
Kirby Cove Hike Near the Golden Gate Bridge
There are countless ways vantage points could view the Golden Gate Bridge from. You could see it from the plazas on either…
Disclosure: This post contains affiliate links. If you make a purchase through these links, I may earn a small commission at no additional cost to you. I only recommend products or services that I believe will add value to my readers.

There are countless vantage points one could view the Golden Gate Bridge from. You can see it from the plazas on either side, Battery Spencer, or Fort Point National Historic Site, to name a few. Additionally, you could walk or bike across it.
An estimated ten million people visit the bridge every year. It is one of, if not the most significant and recognizable landmarks in not just California, but the entire world. I could write an entire article on the countless view points. There’s one, however, I feel deserves its own praise.
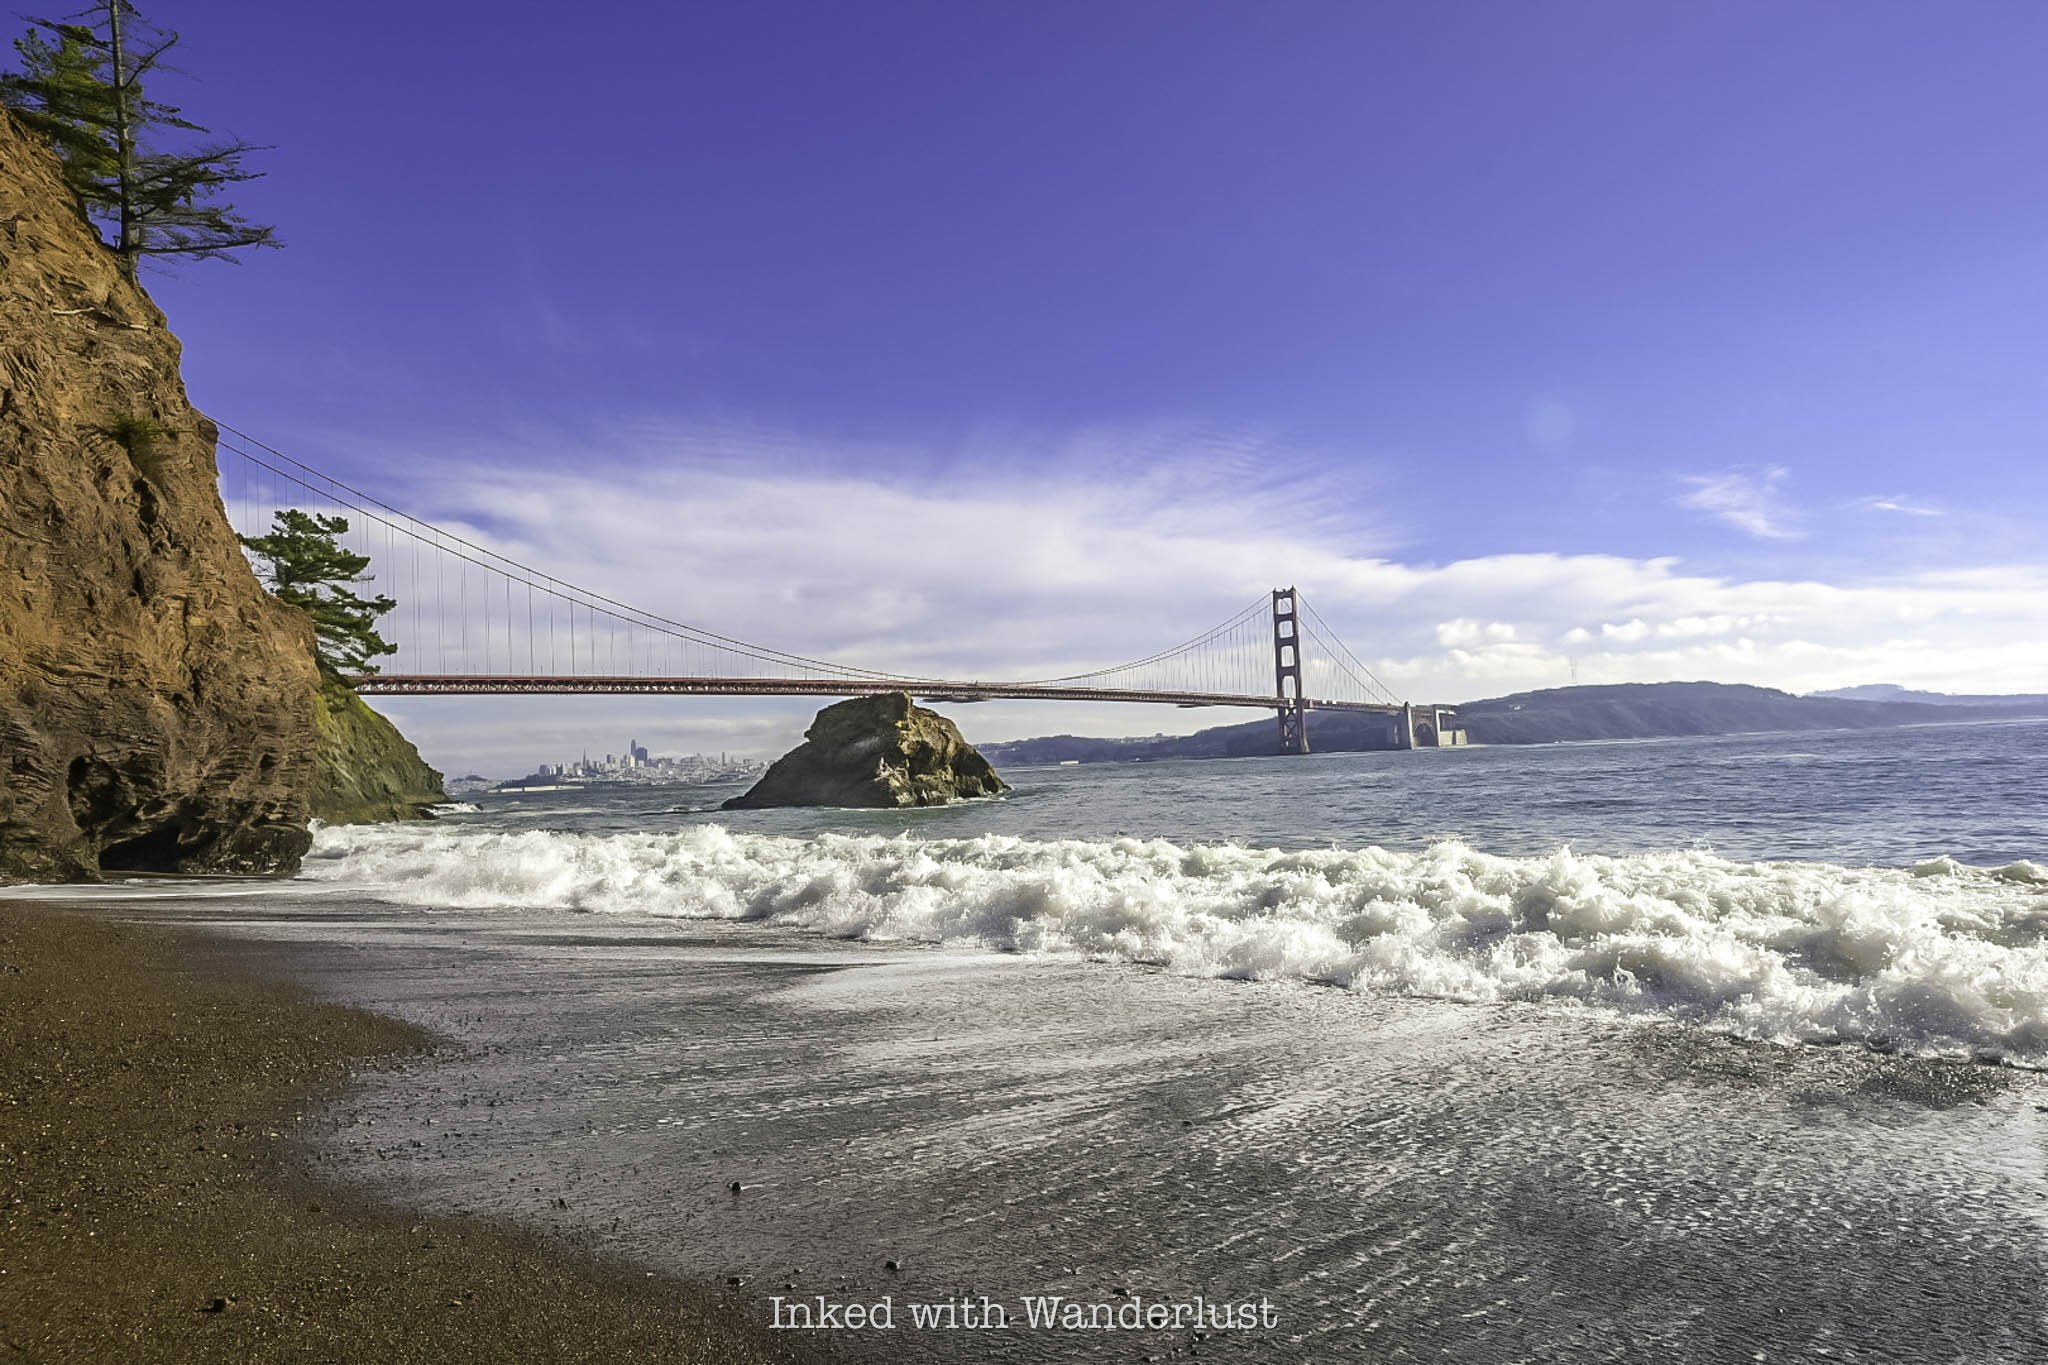
I’m referring to the Kirby Cove hike, a small enclave on the Marin Headlands side of the bridge. It’s accessible via a three mile, round trip trail. At the end of the trail on Kirby Beach, you’ll be treated to an incredible view of the bridge, with waves crashing against the rocky shoreline in the foreground.
So how do you get there? Where can you park? Can you drive down to Kirby Cove? All of these questions (and more) will be addressed. If you weren’t planning on making a trip out to San Francisco this year, you very well may change your mind after reading this post. Let’s get into it.
Trail Stats
Location: Marin Headlands (across from San Francisco)
Fee: None
Open: All year
Family Friendly: Yes
Cell Service: Spotty, but available
Restroom: Multiple vault-style toilets in the campground
Parking: Limited parking along the road and in a few small lots
EV Stations: None
Difficulty: Easy going in / easy to moderate on the way out
Popularity: Medium to high
Mileage: 3 miles, round trip
Elevation Gain: 610 feet
Condition: Easy to follow
Features: Views of the Pacific Ocean and the Golden Gate Bridge, and remains of a couple military batteries
Pets: Not allowed
Drones: Not allowed
Hazards: Steep drop-offs, sun exposed trail, and high tide dangers
My Visit(s): 2016 and 2020
Kirby Cove Hike Information
How to Get There
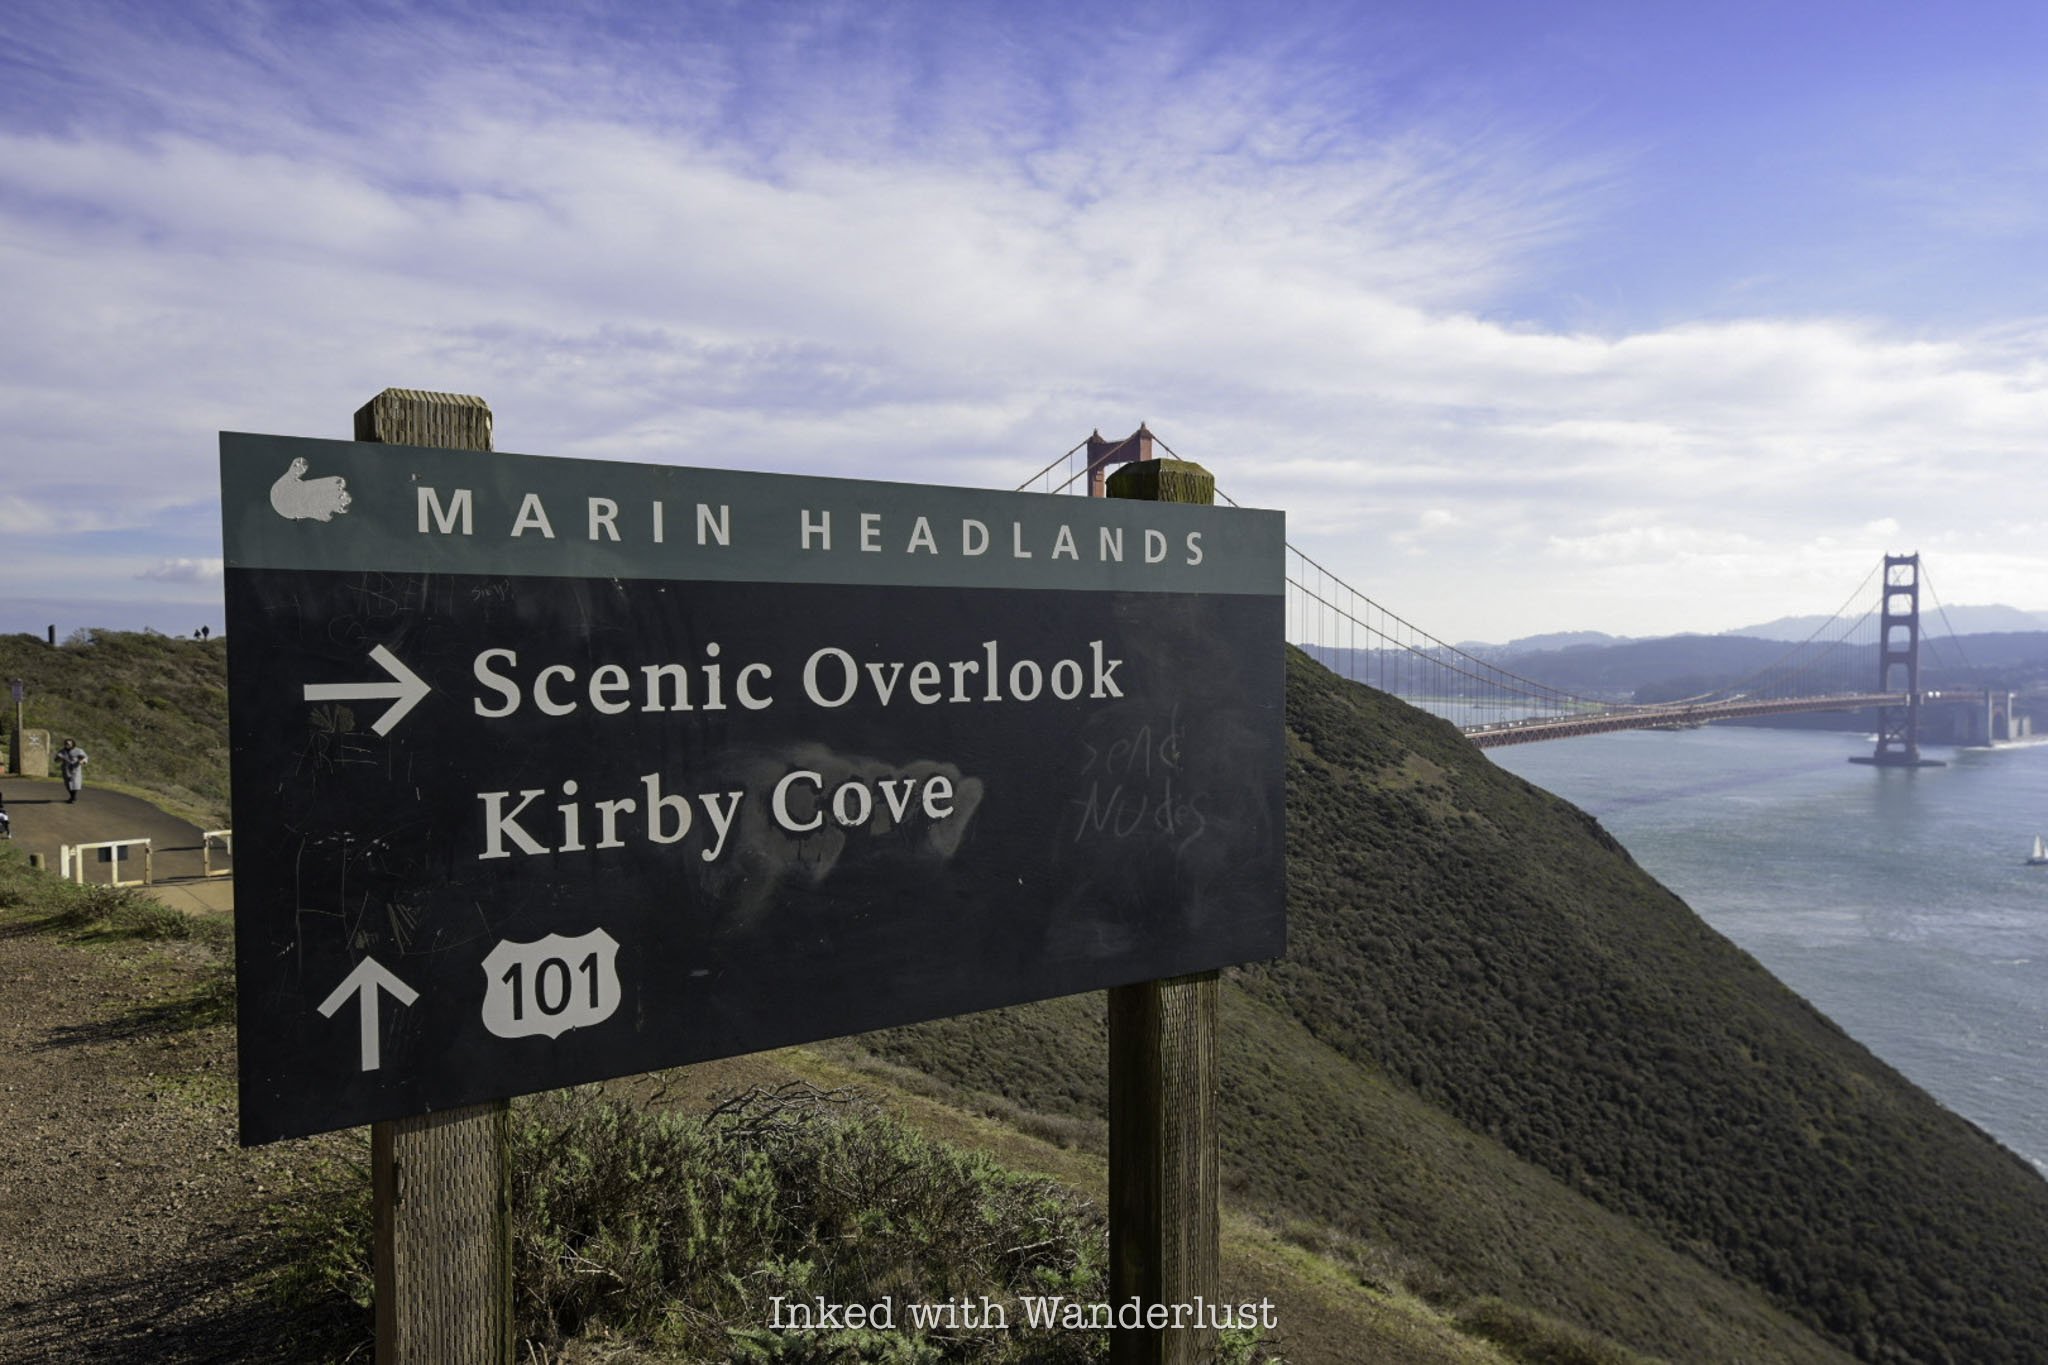
As stated above, Kirby Cove is located on the Marin side of the bridge (opposite of SF). So if you’re already in the city, you’ll need to cross the bridge. If you’re coming into the city from the other side, the exit you’ll take is just before the bridge. To get to Kirby Cove…
Take exit 442 to Alexander Ave. (I’m not kidding when I say it sneaks up on you. Pay close attention or you’ll end up on the bridge)
Take a right on Alexander and shortly after, take a left on Bunker Road
You’ll come to the single lane, “Bunker-Berry Tunnel”. Since it’s one lane, traffic is regulated via signal lights. You will likely have to wait a bit here
You’ll drive Bunker Road for a few miles before coming to McCullough Road. Turn left here
When you come to the round-a-bout near Hawk Hill, you will take the Conzelman Road exit and continue straight until you reach the signed trailhead
Kirby Cove Parking
During our first visit in 2016, you essentially had to get lucky finding a spot at one of the two or three small pullouts along the road. Battery Spencer would’ve been your best bet as it’s the largest. Now, though, the traffic and parking situation has improved greatly.
By converting the main road that runs adjacent to Kirby Cove to a one-way, they’ve increased the available parking tenfold by setting up parking spots along the side of the road, in addition to adding several pull-outs. Regardless of this, parking still fills fast.
My advice is to just grab the first spot you come across. Whether it’s the side of the road or in a pull-out, just take it. If you roll the dice on finding a spot further down the road, you risk finding nothing and will be forced to circle around again.
Kirby Cove Trail

The trail begins just up the way from the Battery Spencer parking lot. If you’ve managed to snag a parking spot here, congratulations! If you had to park further up, no worries. Simply walk down the road (on the dirt side) until you’ve reached the signed trailhead. The trail is right behind it.
Many people ask if they can drive to Kirby Cove. The short answer is yes and no. The only way to drive down is if you have a campground or event reservation (more on that below). Otherwise, you’re going to have to hike down.
The trail is relatively smooth (if you're used to mountain trails this one will feel like a breeze). It’s a steep-ish, 1.5-mile hike to the bottom and is mostly sun exposed until you reach Kirby Cove Campground. Save some water for the hike back out. It’s an uphill slog.
Kirby Cove Campground
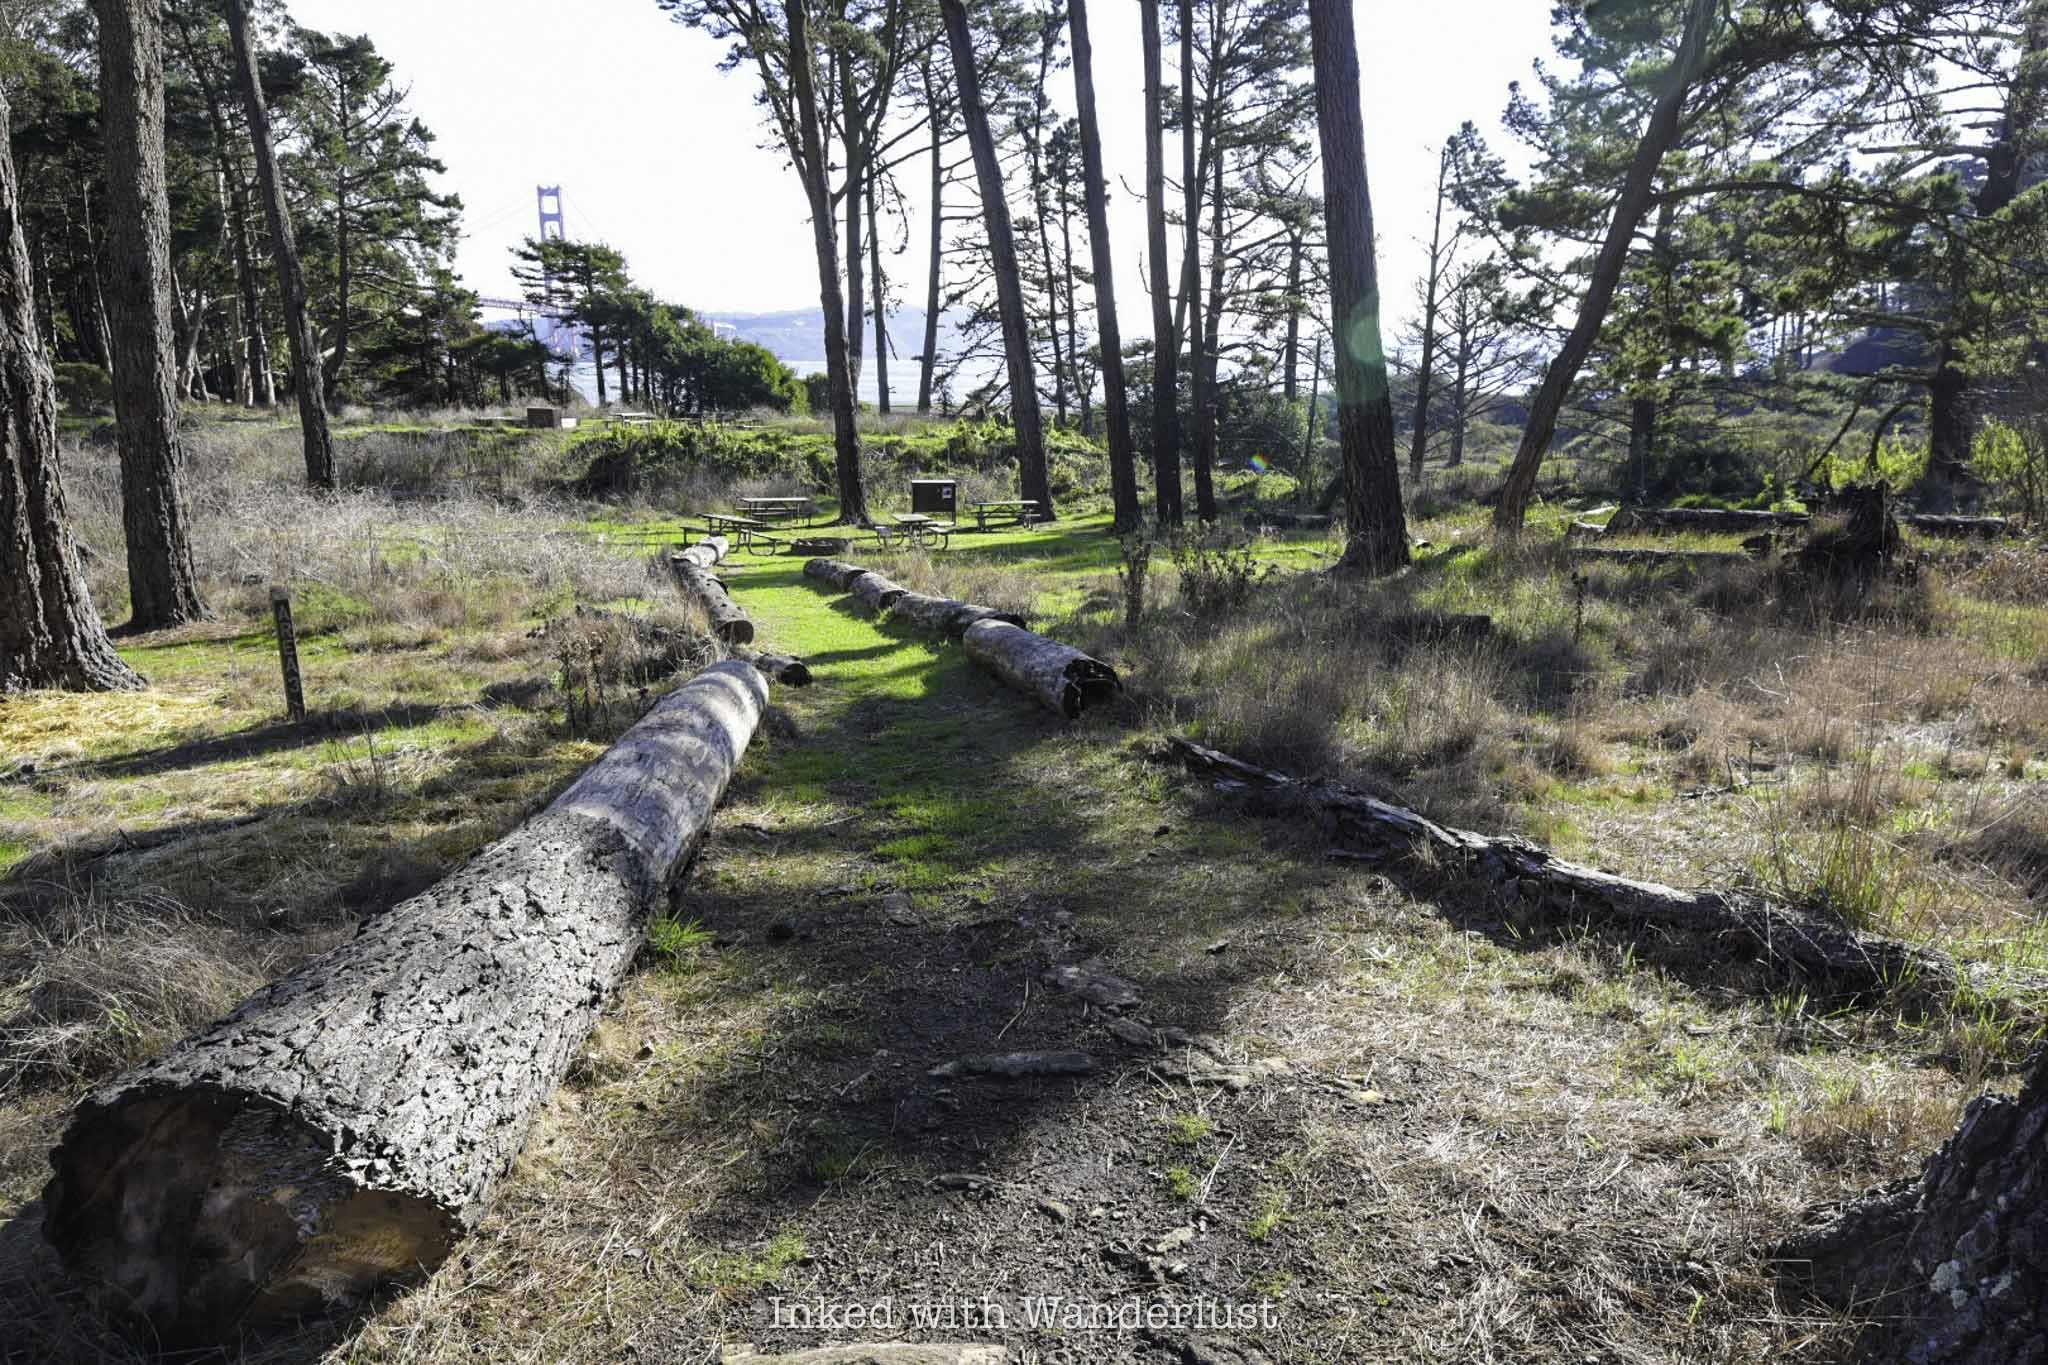
When the trail starts to even out and you’re under tree cover, you’ll hook a left into Kirby Cove Campground. There are several vault-style toilets here, if needed. If you feel like you’ve lost the trail, just look for the logs positioned on the ground just as you enter the campground (pictured above).
If you’re interested in camping here, the Kirby Cove Campground is open between spring and the fall. It has five campsites, each capable of accommodating ten people, and features barbecue pits, picnic tables, and fire rings. Unfortunately, there’s no potable water.

Reserving a camp site or the day-use area is the only way to drive down to his point. When you receive your confirmation, you’ll be given an access code to open the gate at the top of the hill. These sites are tent-only, though. So you’ll need to park and walk your equipment to your site. For reservations, go here.
The campground is lush with cypress, eucalyptus, and pine trees providing plenty of shade. In the center of camp you’ll find a cluster of picnic tables and grills. This is the day-use are you can reserve for special events. Shortly past this area is where you’ll see the bridge pictured above. Cross it to continue the Kirby Cove hike.
Battery Kirby

After crossing the bridge, you’ll come across an old military artillery battery named, “Kirby Battery”. After construction in 1898, it was originally named, “Gravelly Beach Battery”, before being re-named to honor Lieutenant Edmund Kirby who died in 1853 during the Civil War.
This battery was built with concrete and had two M1895 mounted guns for defense. It was built in such a way where soldiers would have a commanding view of the bay while at the same time, being nearly impossible for enemy ships to see them. If you'd like more information on the batteries around San Francisco Bay, go here.

You’re free to explore the battery’s remains all you like. There are several old structures around the battery and an old storm drain tunnel underneath it. I would avoid entering the tunnel as, unfortunately, it’s been wrought with garbage and god knows what else. Last time I visited it was sealed off.
There are several remains of historic military batteries all over both sides of the bay. Another spot on the Marin side is the Muir Beach Overlook, with numerous “dugouts” that were used during World War Two.
Two additional locations with batteries that are across the bridge in San Francisco include the Lands End Trail and Fort Point National Historic Site. The latter is a hiking trail along San Francisco’s coastal shores and the former is a preserved Civil War-era Army Fort situated underneath the Golden Gate Bridge.
Kirby Cove Beach

Just beyond Battery Kirby is the overlook that provides some of the best views you’ll ever see. To your right, waves crash against a rocky shoreline with endless ocean views. To your left is where you’ll get more rocky shorelines, in addition to the Golden Gate Bridge providing an amazing backdrop.
You’ll find stairwells on either side that’ll lead you to the beach. When my wife and I were last here, there were quite a few fishermen so if that’s your thing, bring your gear along. Most of the fishing was taking place on the right side, but we did see one of the other end as well.
The Sea Cave

On the left side of the beach (facing the bridge) you’ll find a small sea cave cut into the rock wall. Access to it will depend on the tide. On our first visit, it wasn’t accessible so for our second trip, we timed the tide just right. You can check tide times at this website.
It wasn’t nearly as impressive as the sea caves we explored on Hug Point Beach on the Oregon Coast (there’s also a waterfall there), but still cool, regardless. Don’t try it if the waves are sketchy. This isn’t a spot you’ll want to be trapped in.
Kirby Cove Swing Update 2024

Believe it or not, the expansive view of the ocean and bridge wasn’t always what the Kirby Cove hike was known for. Around 2015 or so, images of people on a swing with the Golden Gate Bridge in the background began to spread rapidly on Instagram. Due to this, Kirby Cove became an overnight sensation.
When we came here in 2016, the swing was there. At that time, I was just getting into photography and all I had was a cell phone (and not a good one), but my wife did manage to get a decent picture of me on it, that you can see above.
Sometime between then and December 2020, the swing was taken down. NPS officials have taken it down a few times, but a new one always managed to take its place. But officials have eliminated any further chance of its return by cutting the entire tree down.
I don’t know the exact reason why they were so against it, but I have my suspicions. Simply, either someone was injured to the point that a lawsuit was filed or the NPS just wanted to avoid it all together. It’s understandable, but unfortunate because that swing was pretty cool.


Hike The Virginia Lakes Trail In Mono County
There are a number of hikes in Mono County that, in my eyes, stand out from the crowd. Robinson Creek (Barney Lake), Lundy Canyon, Twenty Lakes Basin…
4 minute read | contains affiliate links
There are numerous trails in Mono County that stand out from the crowd. Robinson Creek, Lundy Canyon, Twenty Lakes Basin, Crown Point Loop, and Virginia Lakes round out our personal top five in Mono County.
The Virginia Lakes trail is a great option for everyone from total beginners to seasoned backpackers as you can customize it to your comfort level.
You can keep it semi-shot only only hiking from the trailhead up to Frog Lakes. Then turn around. This will be about 6-miles, out-and-back.
If you want to push further, head past Frog Lakes up Burro Pass to higher elevation lakes like Summit Lake and Hoover Lakes.
So how do you go about hiking this beautiful trail? How do you get to the trailhead? What can you expect? We answer these questions and more below.

Quick Stats
Location: Mono County, CA (between Lee Vining and Bridgeport)
Fee: None
Permit: None
Open: Usually opens late spring and closes around November
For: Hikers
Restroom: At the trailhead
Parking: Large parking lot at the trailhead
EV Stations: None
Difficulty: Moderate
Popularity: Moderate to high
Mileage: 6-8 miles, out-and-back
Elevation Gain: 571 to 2,329 feet (depending how far you go)
Condition: Rocky, but maintained
Features: Numerous lakes and old mining cabin structures
Pets: Allowed on leash
Drones: Not allowed in Hoover Wilderness
Hazards: Nothing aside from usual wilderness hazards
Our Visit(s): 2018 & 2022

Getting to the Trailhead
Getting to the trailhead is pretty simple. If you’re coming from:
Bridgeport: You’ll travel on Highway 395 south for about 13 miles and turn right on Virginia Lakes road. From there, travel 5.5 miles until you reach the parking lot at the end of the road.
Lee Vining: Travel on Highway 395 north and turn left on Twin Lakes road (this will happen shortly after passing the Mono Lake Viewpoint) and follow the same directions above.
Virginia Lakes road is mostly paved and well maintained until around the last quarter mile or so. After passing Virginia Lakes Resort the road turns to gravel (don’t worry, compact cars will have no issues here).

Shortly after the start of the gravel section, you’ll reach the road’s terminus at the parking lot for Big Virginia Lake.
Parking is plentiful on both the upper and lower sections. The lower portion has picnic tables and the upper portion has the restrooms.

Speaking of the restrooms, look for the Hoover Wilderness information post behind them. This post is directly adjacent to the trailhead.
Before you head off, be sure to spend some time checking out Big Virginia Lake. This lake is VERY popular with fisherman.
There’s a short trail to Red Lake heading south away from Big Virginia you could use as a warm-up if you’d like to check it out.
The Trail
You’ll begin at 9,800 feet at the trailhead and trek an uphill slog right from the start. You can skip this by turning right on the trail along the lake (by the restroom) but if you do, you’ll miss out on an amazing view of Big Virginia (pictured above).

The trail will drop you back down a bit before flattening out. Around a quarter of a mile in, you’ll come to a sign announcing your official crossing into Hoover Wilderness and offers you two directions to go in.

Going in either direction will keep you on the trail but the one to the left hugs the lake while the one to the right takes you a bit up and around it. You can’t go wrong with either as both will eventually intersect again at Blue Lake.
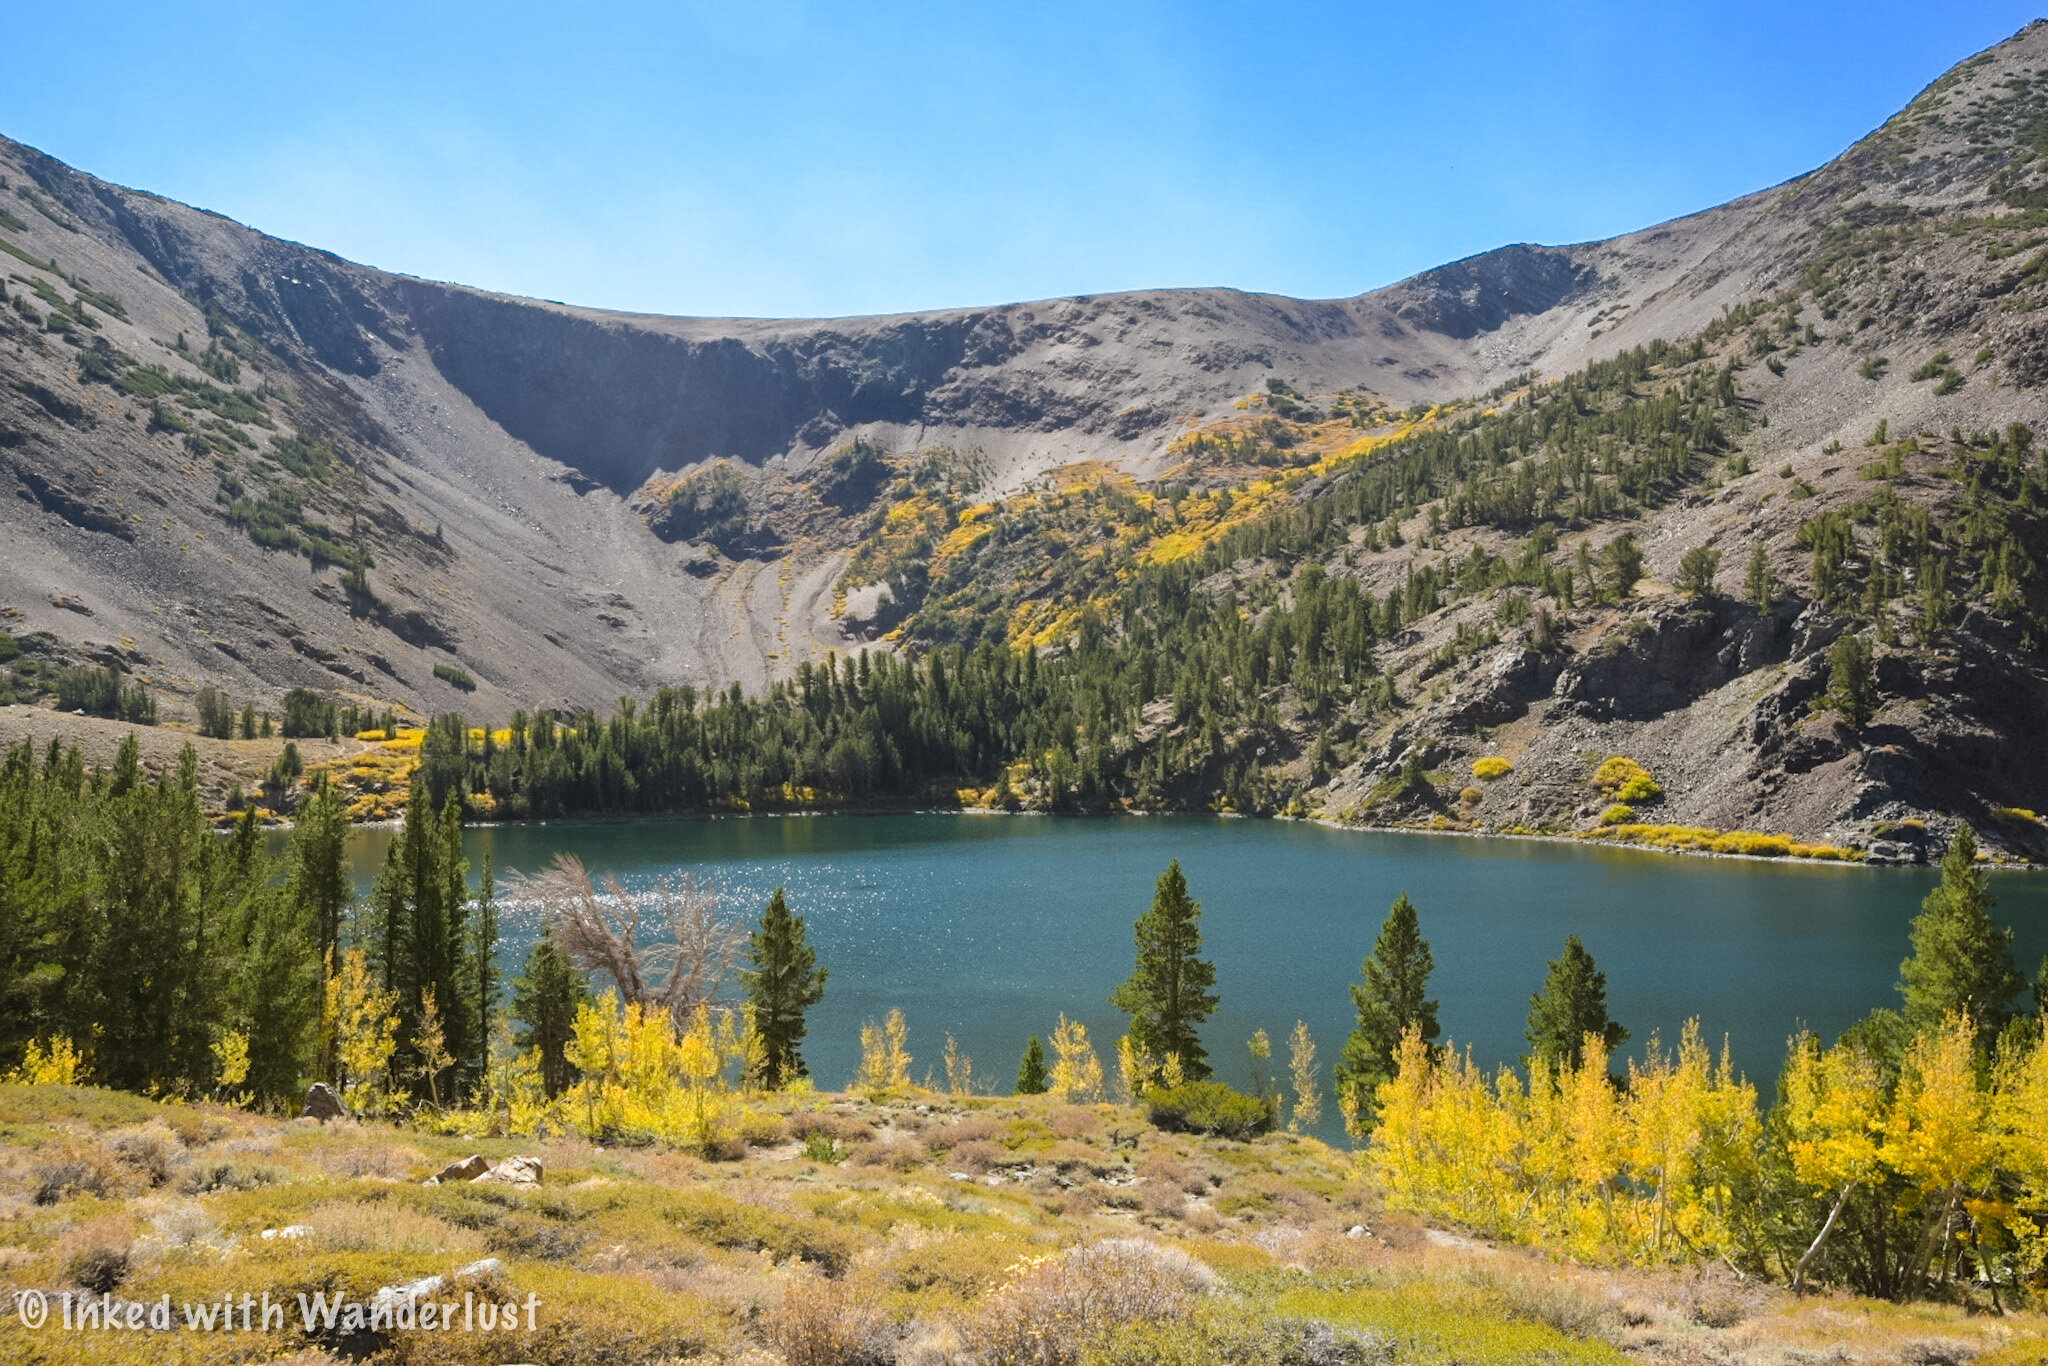
Blue Lake

Shortly after crossing into Hoover Wilderness you’ll get your first glimpse of Blue Lake on your left.
This would make for an excellent place to stop for a quick break to take pictures. There’s a few spur trails leading to the lake’s rocky shore.

You’ll begin your ascent through a large scree field (don’t worry, the trail is obvious). Using trekking poles might be beneficial.
The trail flattens out at the top for a brief reprieve. While there, go off trail a bit to the rocky shelf to get an unparalleled view of the lake.
Miners Cabin & Cooney Lake

After some more climbing the trail will smooth out once again (this is common on this trail) and you’ll soon come across an old miner’s cabin.
Gold & silver mining was huge in this area in the late 1800’s. There are more cabins on other trails such as Lundy Canyon, Gaylor Lakes, and Mono Pass.
Support beams on the left side of the cabin keep it from falling over and rocks help keep the roof intact. It’s an interesting, unexpected find.

After the cabin you’ll begin to hear running water as you inch your way closer to the second lake; Cooney Lake (10,244 feet). Cooney was our favorite of the three.
Just before you arrive, depending on the time of year, you may find a small waterfall near the lake’s outlet. In spring and early summer it’s quite the sight. In fall, however, it’s a trickle.
Frog Lakes

Just a short distance from Cooney Lake is Frog Lakes. If you could view them from above you’ll see that they’re three lakes shaped in a triangular pattern.
We’re almost certain that they begin the season as one giant lake (right as the snow pact begins to melt).

To the north, picturesque granite crags make up the backdrop for these beautiful lakes. To the northeast, Dunderberg Peak (12,374 feet) fills in the skyline.
At this point, you’ve hiked about two miles and are at an elevation of 10,371 feet which gives you 571 feet of elevation gain from the trailhead.
Where to go From Here

This is usually the point where people decide what they want to do. Some choose to call it a day (which is what we did) and some decide to head up to Burro Pass (11,120 feet).
This would add another 1.2 miles up a rocky, barren series of switchbacks. From what i’ve been told by others who have do it, it’s challenging.
From there, you can hike to Summit Lake (10,183) and make it a four and half mile hike. You could also go right and hike to Hoover Lakes.
Your Thoughts…
Does the Virginia Lakes trail sound like one you and your family would enjoy? Let us know in the comments below! We love hearing from our readers.


Please support our website by sharing it with your family and friends.
Thank you for reading.
Editor’s note: This post was originally published in October 2020 and has been recently updated for comprehensiveness and accuracy.

Visit Devil's Postpile National Momument in California
Formed roughly 80,000 years ago, the up to 60 foot basalt columns of Devil’s Postpile National Monument are a sight to behold. The saying, “you won’t believe it until you see it”, holds
Formed roughly 80,000 years ago, the up to 60 foot basalt columns of Devil’s Postpile National Monument are a sight to behold. The saying, “you won’t believe it until you see it”, holds true in this case. Pictures do no justice to this natural masterpiece.
Read along to find out how you can see it for yourself and witness one of the best examples of how much of a role Volcanos played in shaping the Sierras as we know it today.
Mammoth Mountain

Mammoth Mountain Adventure Center.
Your journey to Devil’s Postpile begins at the base of Mammoth Mountain in Mammoth Lakes, CA. With few exceptions, most visitors will be required to utilize the Monument’s shuttle that takes you down the access road to the valley.
The Shuttle
While the Monument itself is free, there is a fee to use this mandatory shuttle. Tickets can be purchased at the Adventure Center day of and as of 2019 it is $8.00 per person 15 and older, $4.00 per person between 3-15 years old, and free for those aged 2 and under (The shuttle rule was suspended in 2020 due to COVID-19).
As stated above, there are a few exceptions to this rule. They are:
Arrive before 7am or after 7pm
Have a handicap placard or plate
Are staying at either the valley campground or Red Meadow’s Resort.
You’re arriving after shuttle operating hours or season
You’re a hunter transporting game or weapons
You’re towing livestock and are using the livestock on valley trails
You have a cartop boat and are using it in valley lakes
READ ALSO: 7 Things You Will Love About Lee Vining

Shuttle line at Mammoth Mountain.
The shuttle runs on average every 45 minutes and usually takes 30 minutes or so to reach the valley. The line moves quickly due to plenty of seating on each shuttle along with some standing room (pro tip: If you’re standing, avoid locking your knees. Someone on the bus with me ate floor because of this).
Much like Yosemite’s east side, the Monument is seasonal and typically opens in mid June and closes in mid to late October. Be sure to keep this in mind when planning your trip.
Devil’s Postpile

Devils Postpile Monument.
The shuttle will make multiple stops along the access road. While you can reach the columns from Red’s Meadow, you’re going to want to get off at the Valley stop as this is the most direct and shortest route.
The valley is where you’ll find the campground, ranger station, bathrooms, and Soda Springs Meadow (which is where the trail to the columns begin). You can find the trailhead to the columns just beyond the Ranger Station.

Devils Postpile Monument.
It is just shy of .05 mile from the start of the trailhead to Devil’s Postpile. The trail is well maintained through Soda Springs Meadow but beyond this, you’ll start noticing thick tree roots and rocks getting in the way.
From here, it won’t be long before you get your first glimpse of Devil’s Postpile and when you do, you’ll be blown away. The columns formed around 80,000 years ago (give or take) after flowing lava cooled and cracked into what we see today.

Top of the Devils Postpile Monument.

Section of the San Joaquin River.
Just as you come upon it keep an eye out for a side trail to your left. This trail will take you to the top of the columns and allow you to touch their smooth, hexagon shaped surface. The trail is a bit steep but freight not, it’s short.
Take all the time you want to admire and photograph this amazing sight. The sun rises above the columns so the morning light tends to be harsh. I found the light much better on my way back out when the sun had time to move on. So if you want to get some good pictures, keep this mind.
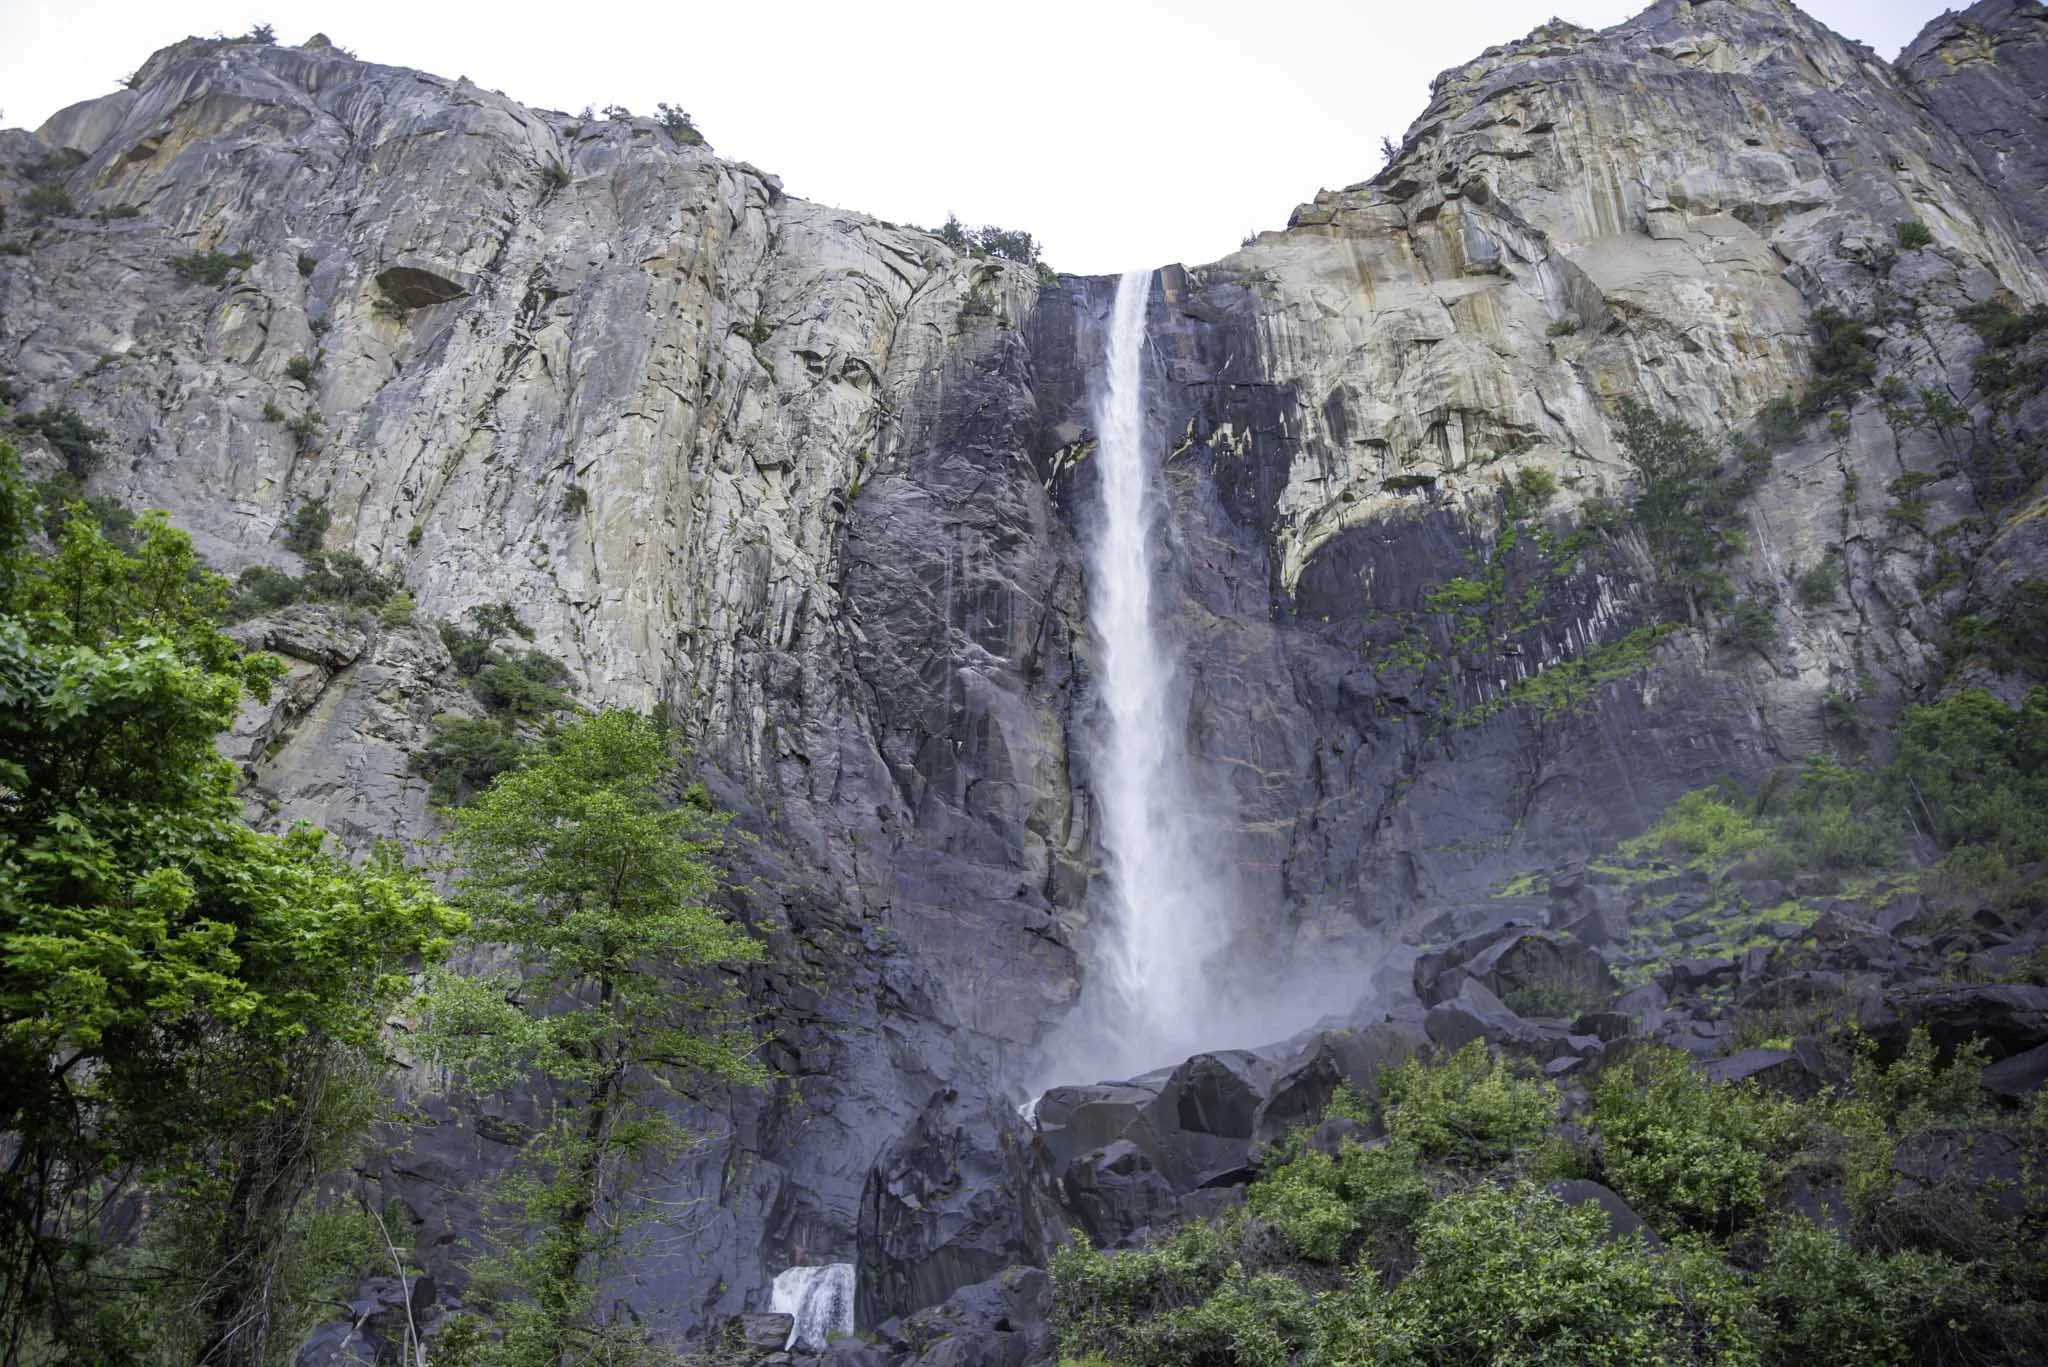
Rainbow Falls

Rainbow Falls. Mammoth Lakes.
You now have two choices. You can either stop here and head back to the shuttle once you’ve spent enough time admiring the Postpile or you can press on and head out to the other natural feature of the Monument; Rainbow Falls.
From here, it is another two miles to the falls. While that isn’t a lot and the trail is mostly flat with the occasional dip, there isn’t much in the way of shade. You’ll have a few opportunities here and there but for the most part, it’s exposed. So if you’re going to continue on, be sure that you brought plenty of water with you.
Between the postpile and the falls you’ll have amazing views of the San Joaquin River as you follow along side of it. Eventually, you’ll come out into a vast clearing (where a massive fire tore through) and be able to see the beautiful Minerats out in the distance to your right.

Me at Rainbow Falls.
Soon enough, you’ll start to hear the roaring of the beautiful Rainbow Falls. Your first glimpse will come as you approach the main (and largest) concrete viewpoint.
If you’re looking for a better viewpoint with a more straight on angle of the falls, keep going down the path and you’ll eventually see it off to your right. When I was here, this one had far less people than the first one.
There are also stairs that lead down the base of this 101-foot beauty where you can get some amazing photos but unfortunately, these stairs were closed to the public for maintenance when I was there. More of a reason to go back, right?
Lower Falls

Lower Falls. California.
Located about a mile further down the trail from Rainbow Falls and outside the boundary of the Monument is Lower Falls. Lower Falls drops just 15 feet over smooth granite rocks and into the perfect swimming hole for overheated hikers.
My friend and I debated over whether or not to include this on our visit. Ultimately, we decided to do it and I was sure glad we did. Lower Falls is comparatively unknown to most visitors so we only had to share it with a few others (we were here in August). I highly recommend going for it.

Devils Postpile Monument.
Things to Know
Mileage will vary. If you only hike to the columns, you’re looking at just under a mile from the valley to the columns and back. If you go to Rainbow Falls, that’ll make it 5 miles round trip and if you include Lower Falls, it’s about 7 miles round trip.
The Monument is free, but the shuttle isn’t. If you manage to arrive outside the operating hours of the shuttle, you’re free to drive down to the valley. Otherwise, you must pay for and use the shuttle.
The Monument is seasonal. Due to heavy snowfall, the Monument is only accessible from mid June to around mid to late October. So plan your visit accordingly.
Crowds get heavy. Devil’s Postpile is one of the most popular attractions in the Sierras. As such, crowds tend to be heavy. Your best bet for light crowds is in the morning because later in the day, lines for the shuttle will rival those of Space Mountain.
Your annual parks pass won’t waive the shuttle fee. Keep this in mind if you’re a pass holder. Everyone pays for the shuttle.
The trail to Devil’s Postpile is (kind of) wheelchair and stroller friendly. I know of people who have pushed strollers along this trail and others who have used a wheelchair, but they did struggle. As you approach the columns, there’s a ramp to help circumvent the rocky stairwell but you will encounter thick tree roots and rocks along the trail. Beyond the columns to the falls, wheelchairs and strollers won’t be possible.
Bring plenty of water. Seriously. I underestimated this trail due to it being short but didn’t realize how exposed the trail to Rainbow Falls is and was nearing dehydration. Learn from my screw up.
Conclusion
Whether you decide to just see the columns or include Rainbow and Lower Falls in your visit, you’re sure to enjoy the time you spend at Devil’s Postpile National Monument.
We hope this article has inspired you to want to visit this beautiful place. If so, please support us by sharing it with your family and friends on your favorite social media site.
Thanks for reading and safe travels!

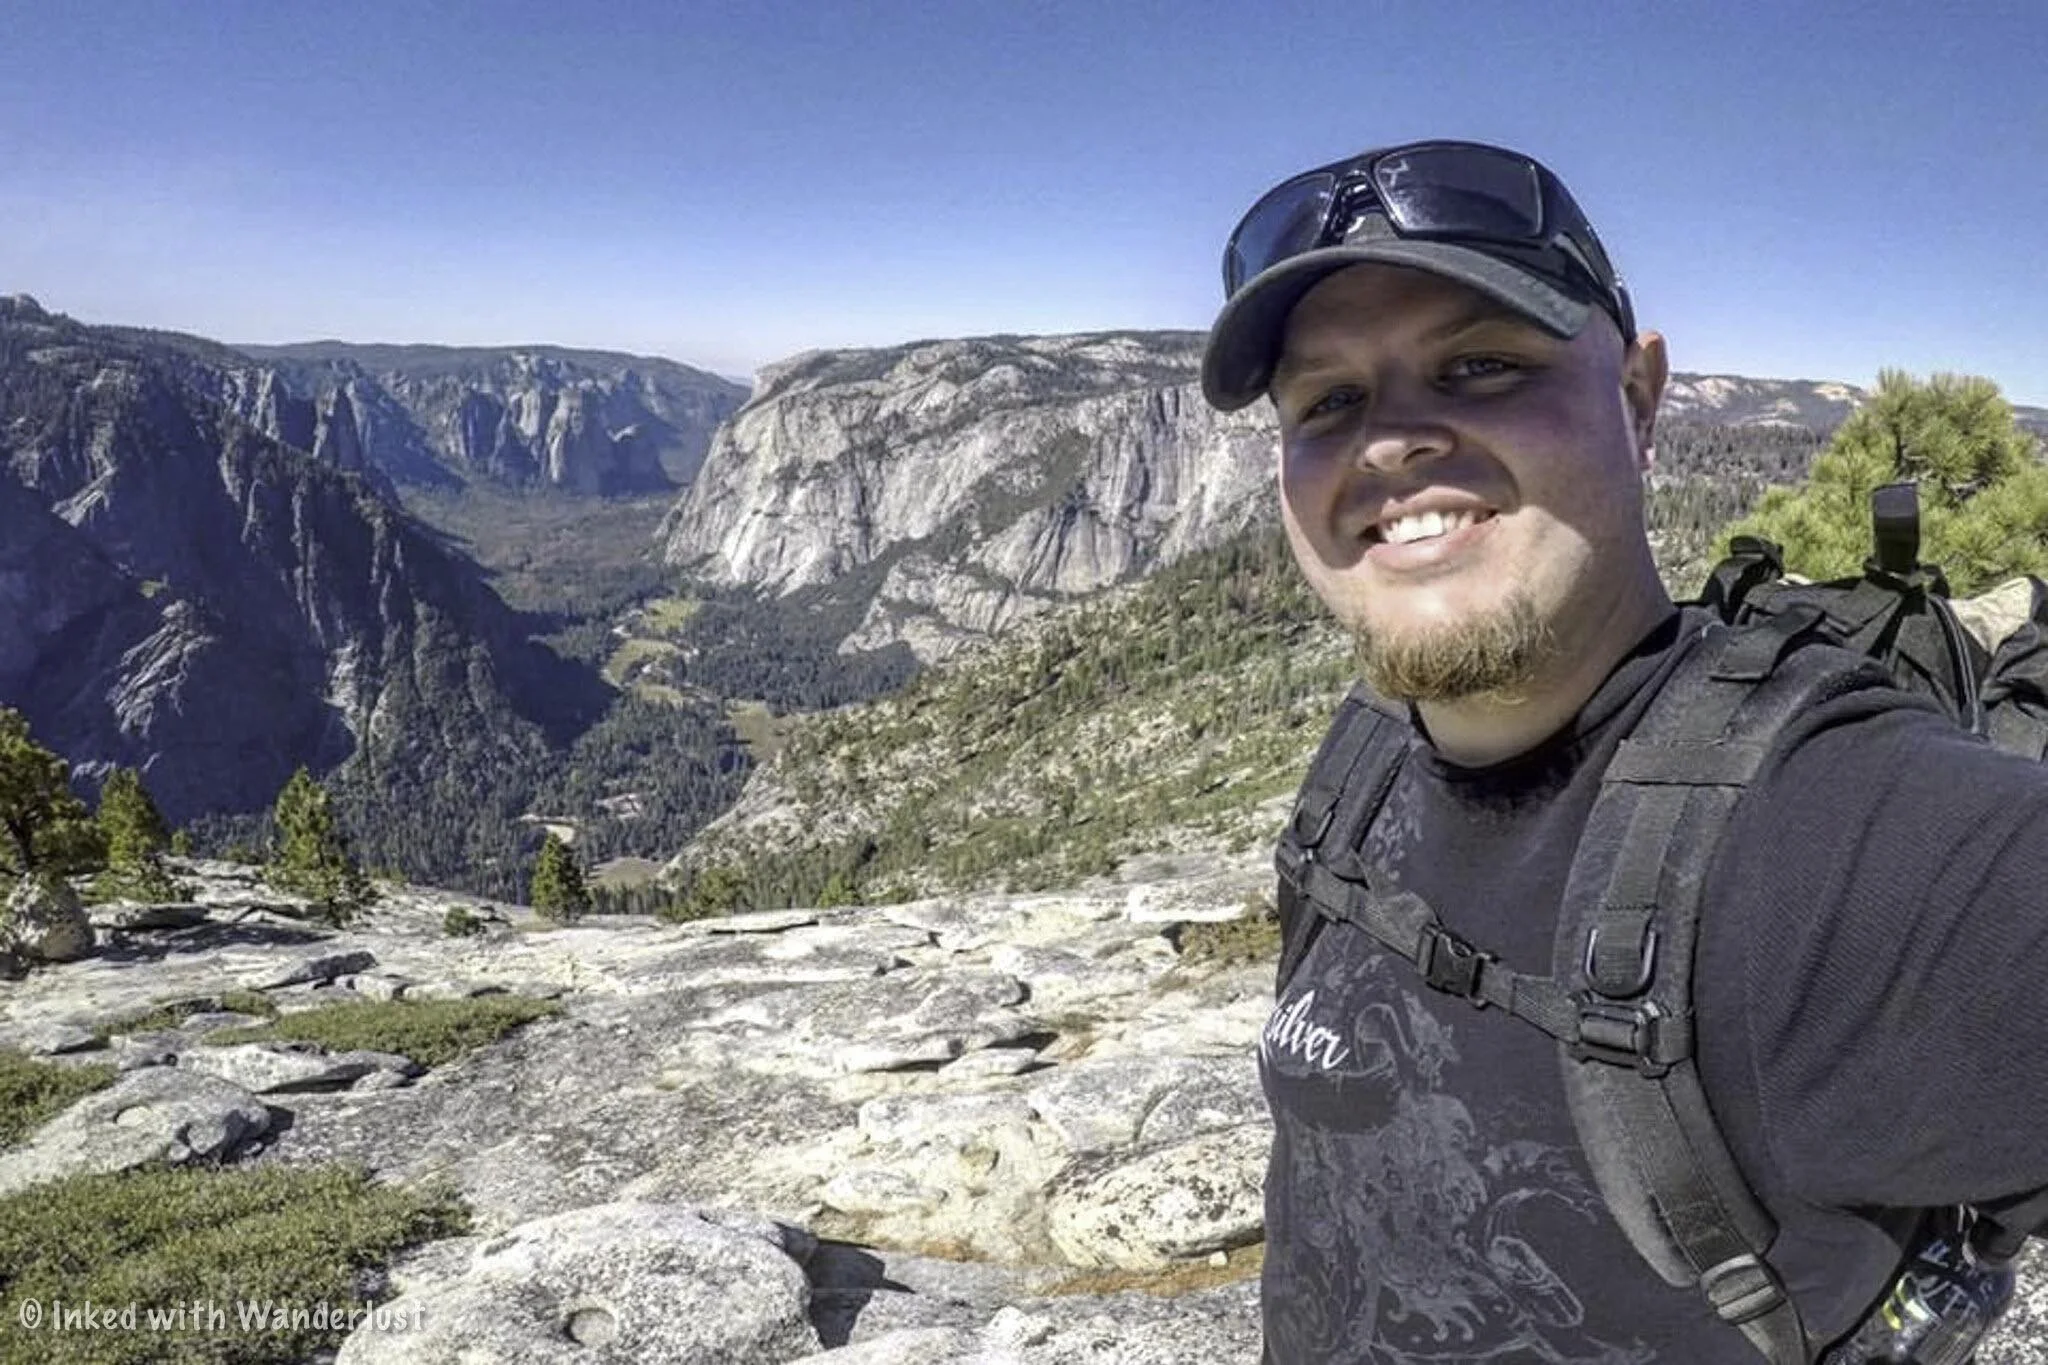
Hike to North Dome and Indian Rock Arch in Yosemite National Park
While hiking Half Dome requires a permit and a great deal of planning, hiking neighboring North Dome requires nothing more than a drive up to the trailhead…
Disclosure: This post contains affiliate links. If you make a purchase through these links, I may earn a small commission at no additional cost to you. I only recommend products or services that I believe will add value to my readers.

While hiking Half Dome requires obtaining a permit and a great deal of planning and preparation, hiking neighboring North Dome requires nothing more than a drive up to the trailhead and strong legs.
Due to this, many see North Dome as an excellent alternative to Half Dome if you were unsuccessful in the permit lottery or if Half Dome is too daunting. There are no cables or climbing involved and best of all, you’ll be in a position to get one of the best views of Half Dome in the entire park.
So where is the trailhead for North Dome? What’s the parking situation like? Like to know what to expect on this trail? What’s Indian Rock Arch? I answer all of these questions and more in the post below. Let’s get into it.
North Dome Trailhead and Parking
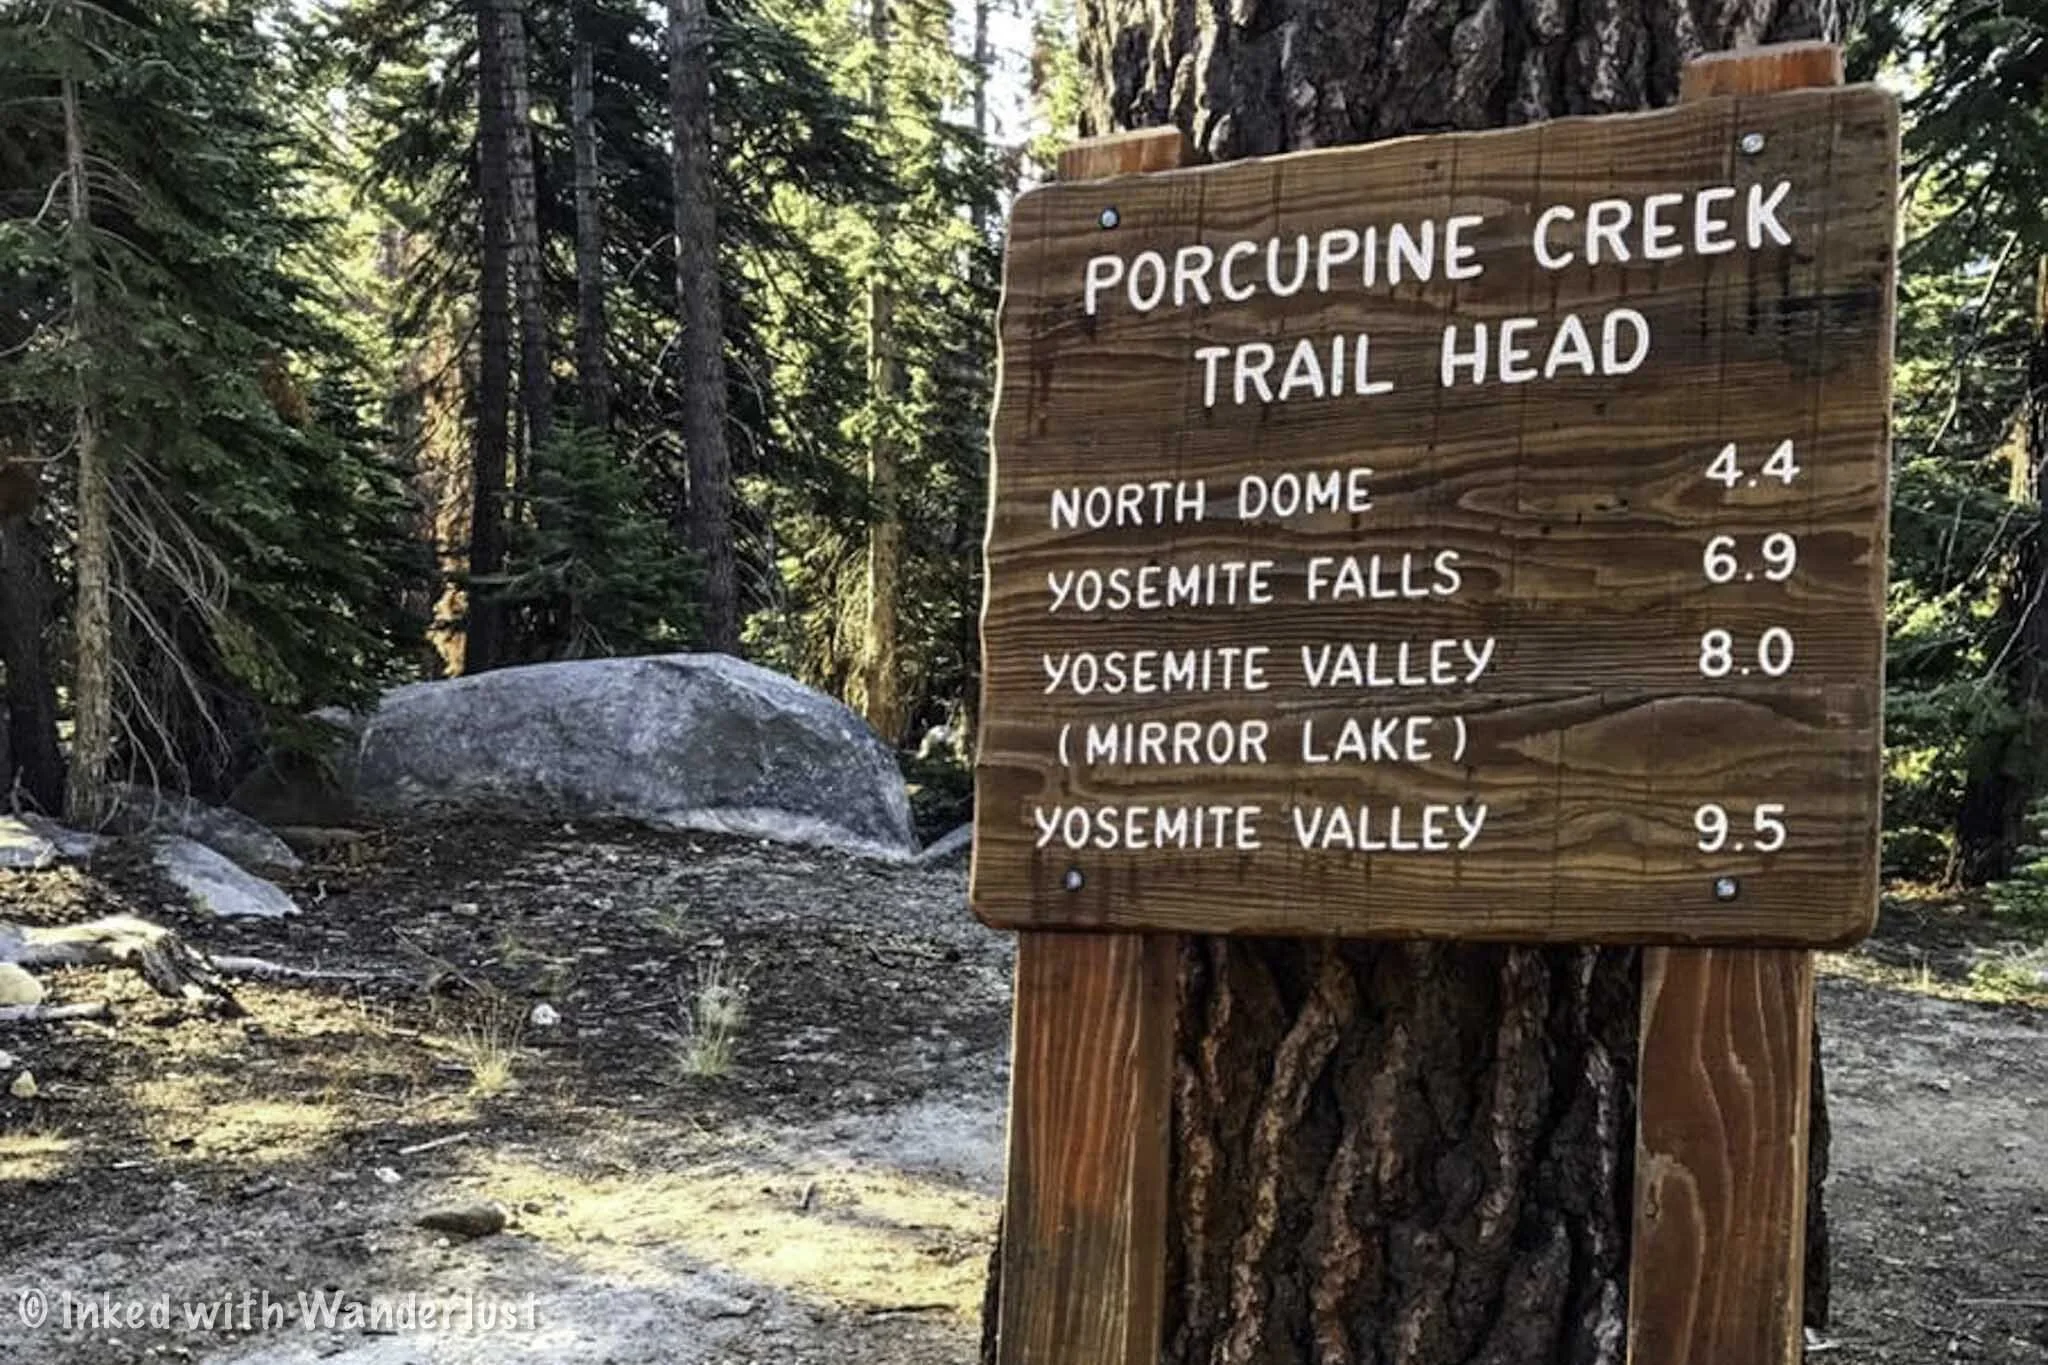
Although you’re technically able to reach North Dome from the valley, the official trailhead is just off Tioga Road on Yosemite’s east side and can be found in the Porcupine Creek parking lot (do not confuse this with Porcupine Flat).
From Yosemite Valley, follow the signs to Highway 120. Ten miles after leaving the valley you’ll come upon Crane Flat. Turn right there and after twenty-five miles or so, you’ll arrive to the parking lot on your right.
From Yosemite’s east entrance, simply drive for about twenty miles after driving through the gate and you’ll reach Porcupine Creek on your left. If needed, there are pit toilets located in the parking lot.
As is the case with most Yosemite trailheads, the earlier you arrive, the better off you’ll be. I arrived to the trailhead at around 7am and there was only one other car. When I got back to my car after the hike, around 2pm, every spot was occupied.
The North Dome Trail

Much of the route to North Dome is your standard, albeit beautiful, walk in the woods. The scenery is stunning as you’re surrounded by hundreds of moss-covered trees and granite boulders.
You’re starting at 8,100 feet at the parking lot and you’ll work your way down to 7,540 feet at North Dome. While there will be some slight incline on the trail, you are ultimately going downward the whole time.
This is great on the way in and will feel like a breeze, but you’ll definitely feel it on your way back to the car (especially in the final mile or so). Total mileage, without taking the detour to Indian Rock Arch is 8.8 miles, round-trip. With the detour (highly recommended), you’ll add another mile or so.
Indian Rock Arch Detour

About 2/3rds of the way to North Dome, you’ll come across the half mile (one way) detour to Indian Rock Arch on your left. It is the ONLY natural granite arch located within Yosemite. The arch is about 15 feet tall and sits atop a hill with commanding views at the top.
My recommendation would be to take the detour on the way in, rather than on the way back. This way, you can save your energy and endurance for the elevation gain you’ll still need to navigate.
North Dome

After checking out Indian Rock Arch, continue your way to North Dome. After another mile or so, you’ll come into a clearing and get your first glimpse of both North Dome and Half Dome in the distance. Don’t stop here, the views are just getting started.
Eventually, you’ll reach a point where it feels like you’ve lost the trail. You haven’t. Just keep Half Dome in your sights and stay to the left (down) and you’ll pick it back up again. If needed, there are typically cairns all over the place to help guide you.

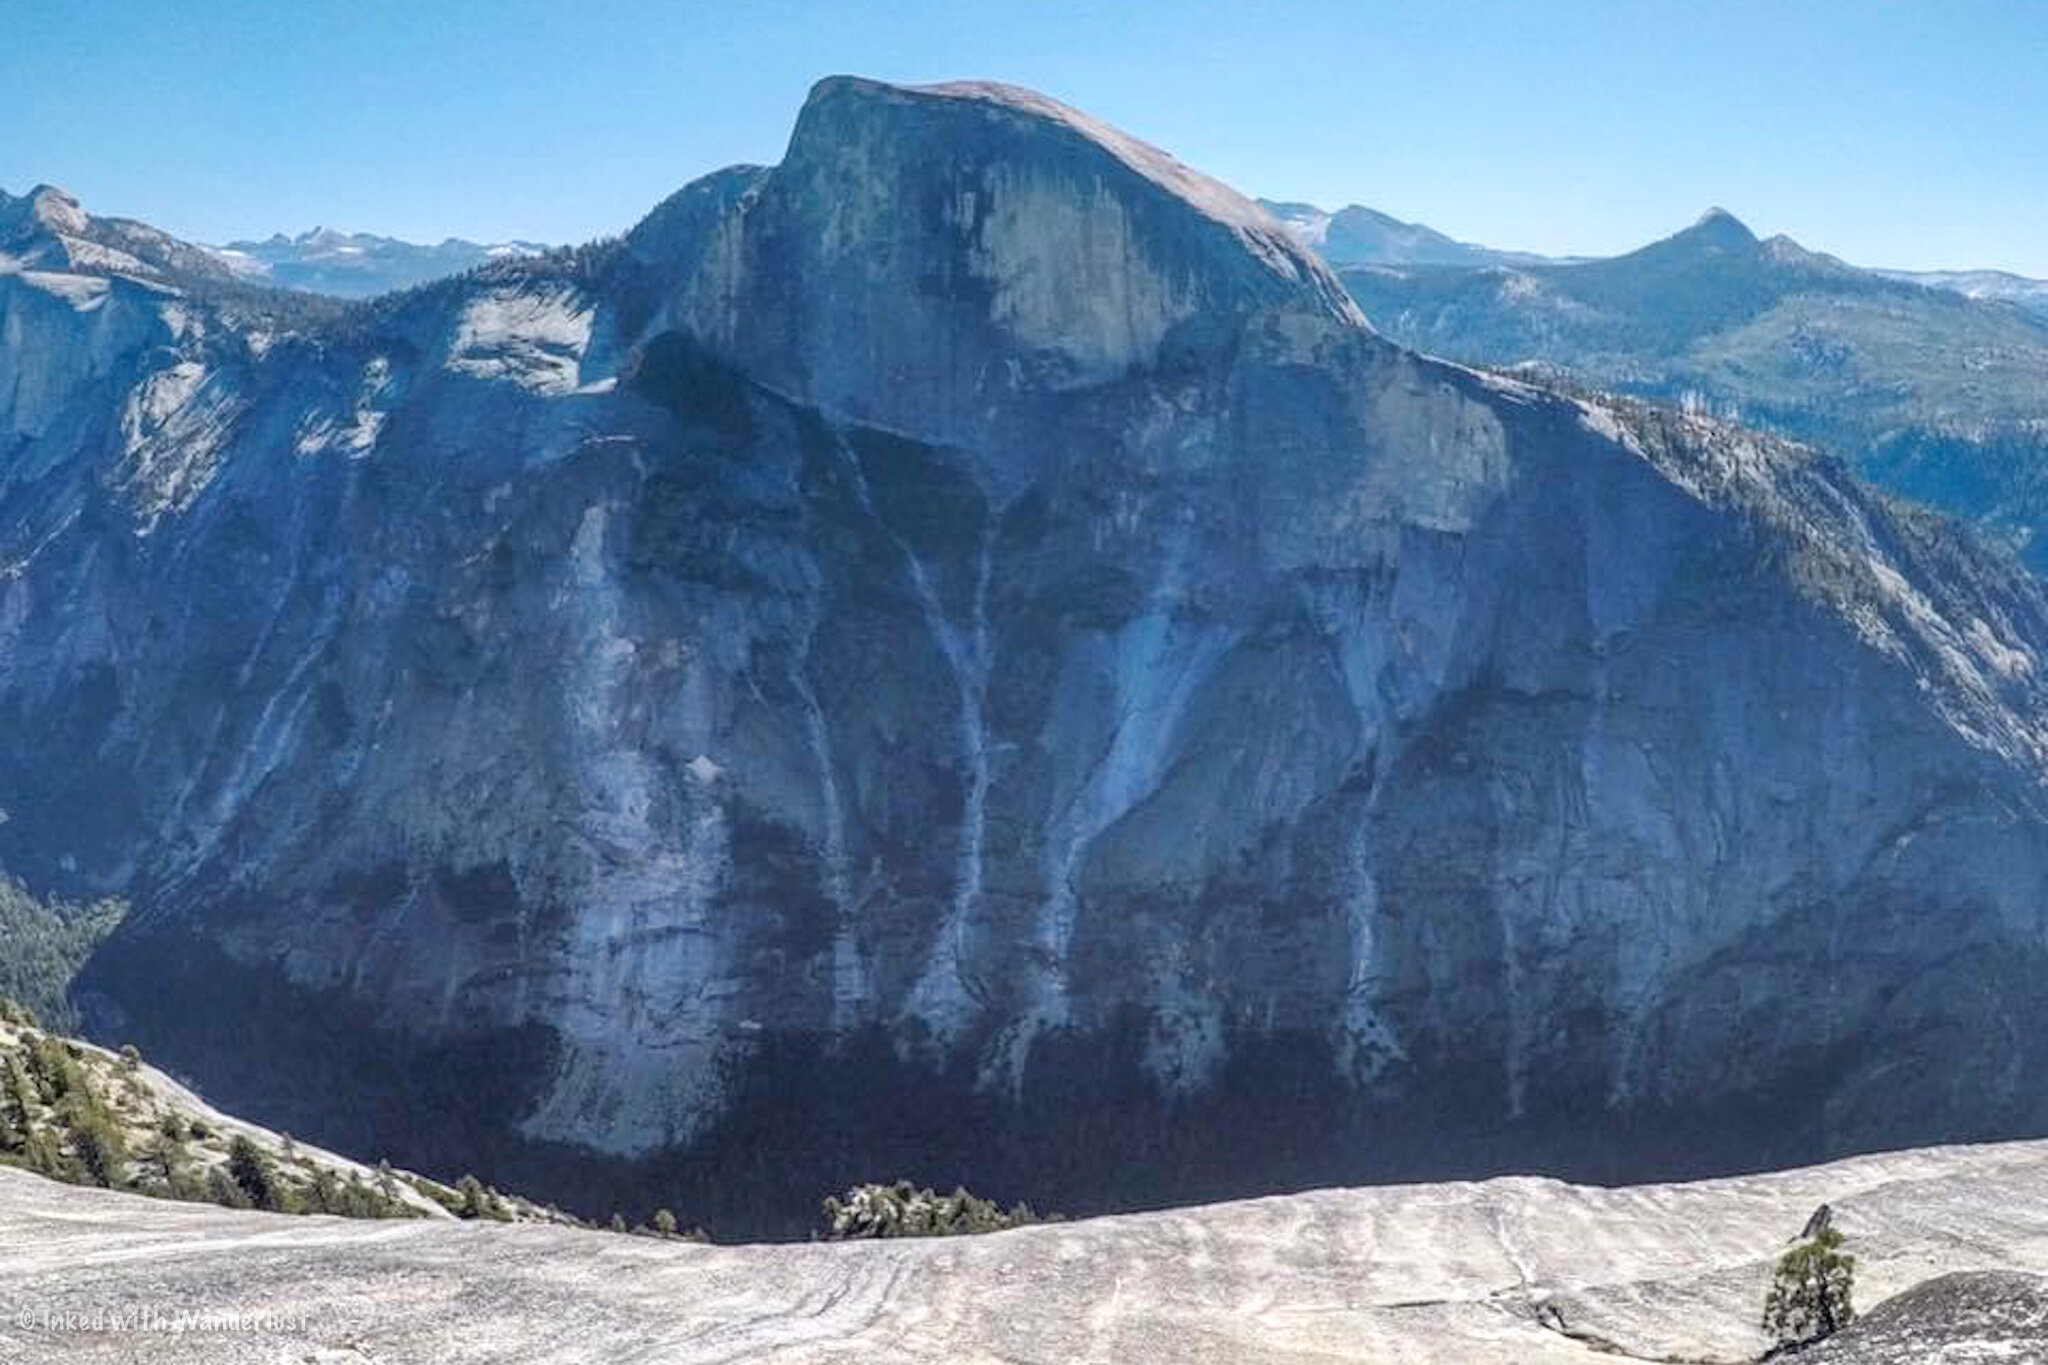
After dropping down from the granite you were just on, you’ll once again find yourself surrounded by trees and will have lost sight of Half Dome. Keep with the trail and after a short while you’ll come to another clearing. Here, you’ve officially made it to North Dome.
Half Dome will have a commanding presence as you continue to work yourself down to North Dome’s precipice and on arrival, you’ll have an amazing view of not only Half Dome, but Tenaya Canyon and the many highlights of Yosemite Valley as well.
Things to Know About the North Dome Hike in Yosemite
The trail is inaccessible in winter. The North Dome trail is on Yosemite’s east side on Tioga Road and due to heavy snowpack, this area of the park is closed in winter. Typically, it’ll open for the season at the end of May or beginning of June and closes with the first major snowfall of the year (typically late October/November).
North Dome isn’t easy, but it isn’t difficult either. You’ll be starting out at a higher elevation and work your way down, which is the easy part. Where it could get moderately challenging for some is on the way back out. As long as you’re prepared for this, you’ll do just fine.
North Dome itself is generally safe, but use common sense. North Dome doesn’t see the amount of hikers Half Dome does, so it isn’t overly slick. However, getting too close to the edge could result in a deadly slide into Tenaya Canyon or Yosemite Valley. Using footwear with good grip is advisable and of course, watch your footing.
It doesn’t get too crowded. It’s nowhere near as bad as the trails in the valley, such as the Mist Trail, or some of the neighboring trails on Tioga road (Cathedral Lakes, Tuolumne Meadows, etc). If you get an early start, you’ll likely have it mostly (or all) to yourself. Starting later will likely mean more people on the trail, though.
North Dome is NOT the same as Half Dome. There are no cables or climbing involved and it’s roughly half of the total milage as Half Dome. North Dome is a great alternative to those seeking similar views as Half Dome provides (albeit from a lower vantage point), but don’t want to bother with the red tape or the challenge of Half Dome.


Glen Aulin: A Glorious Hiking Trail in Yosemite
I’m often asked by Yosemite first timers (friends and friends of friends) about which hiking trails in Yosemite should they hike during their visit…
Disclosure: This post contains affiliate links. If you make a purchase through these links, I may earn a small commission at no additional cost to you. I only recommend products or services that I believe will add value to my readers.

I’m often asked by Yosemite first timers (friends and friends of friends) about which hiking trails in Yosemite should they hike during their visit. There are many beautiful hikes in Yosemite, but one of the few I recommend most often is the Glen Aulin trail, located in the Tuolumne Meadows area of the park.
Its not the easiest hike in Yosemite, nor is it the shortest, but it’s far from difficult and I’d say that as long as you and your family have hiked, a minimum, a few times, then you shouldn’t have any issue with Glen Aulin. It’s a straight shot and mostly level throughout, making it an ideal hike for families.
Before we get into it, you need to know that this trail is located in the high elevation area of Yosemite’s east side. This area of the park receives tons of snow in the winter, making it inaccessible during that time. If you want to hike the Glen Aulin trail, you’ll need to plan a summer or fall visit as the east gate typically opens in late May or early June.
However, even at those times, there could still be heavy snow pack along the trail. If you want to avoid snow and/or muddy conditions, I recommend visiting in late summer or in the fall when the weather is pleasant.
Now that that’s out of the way, let’s get into it!
Glen Aulin Trailhead Parking
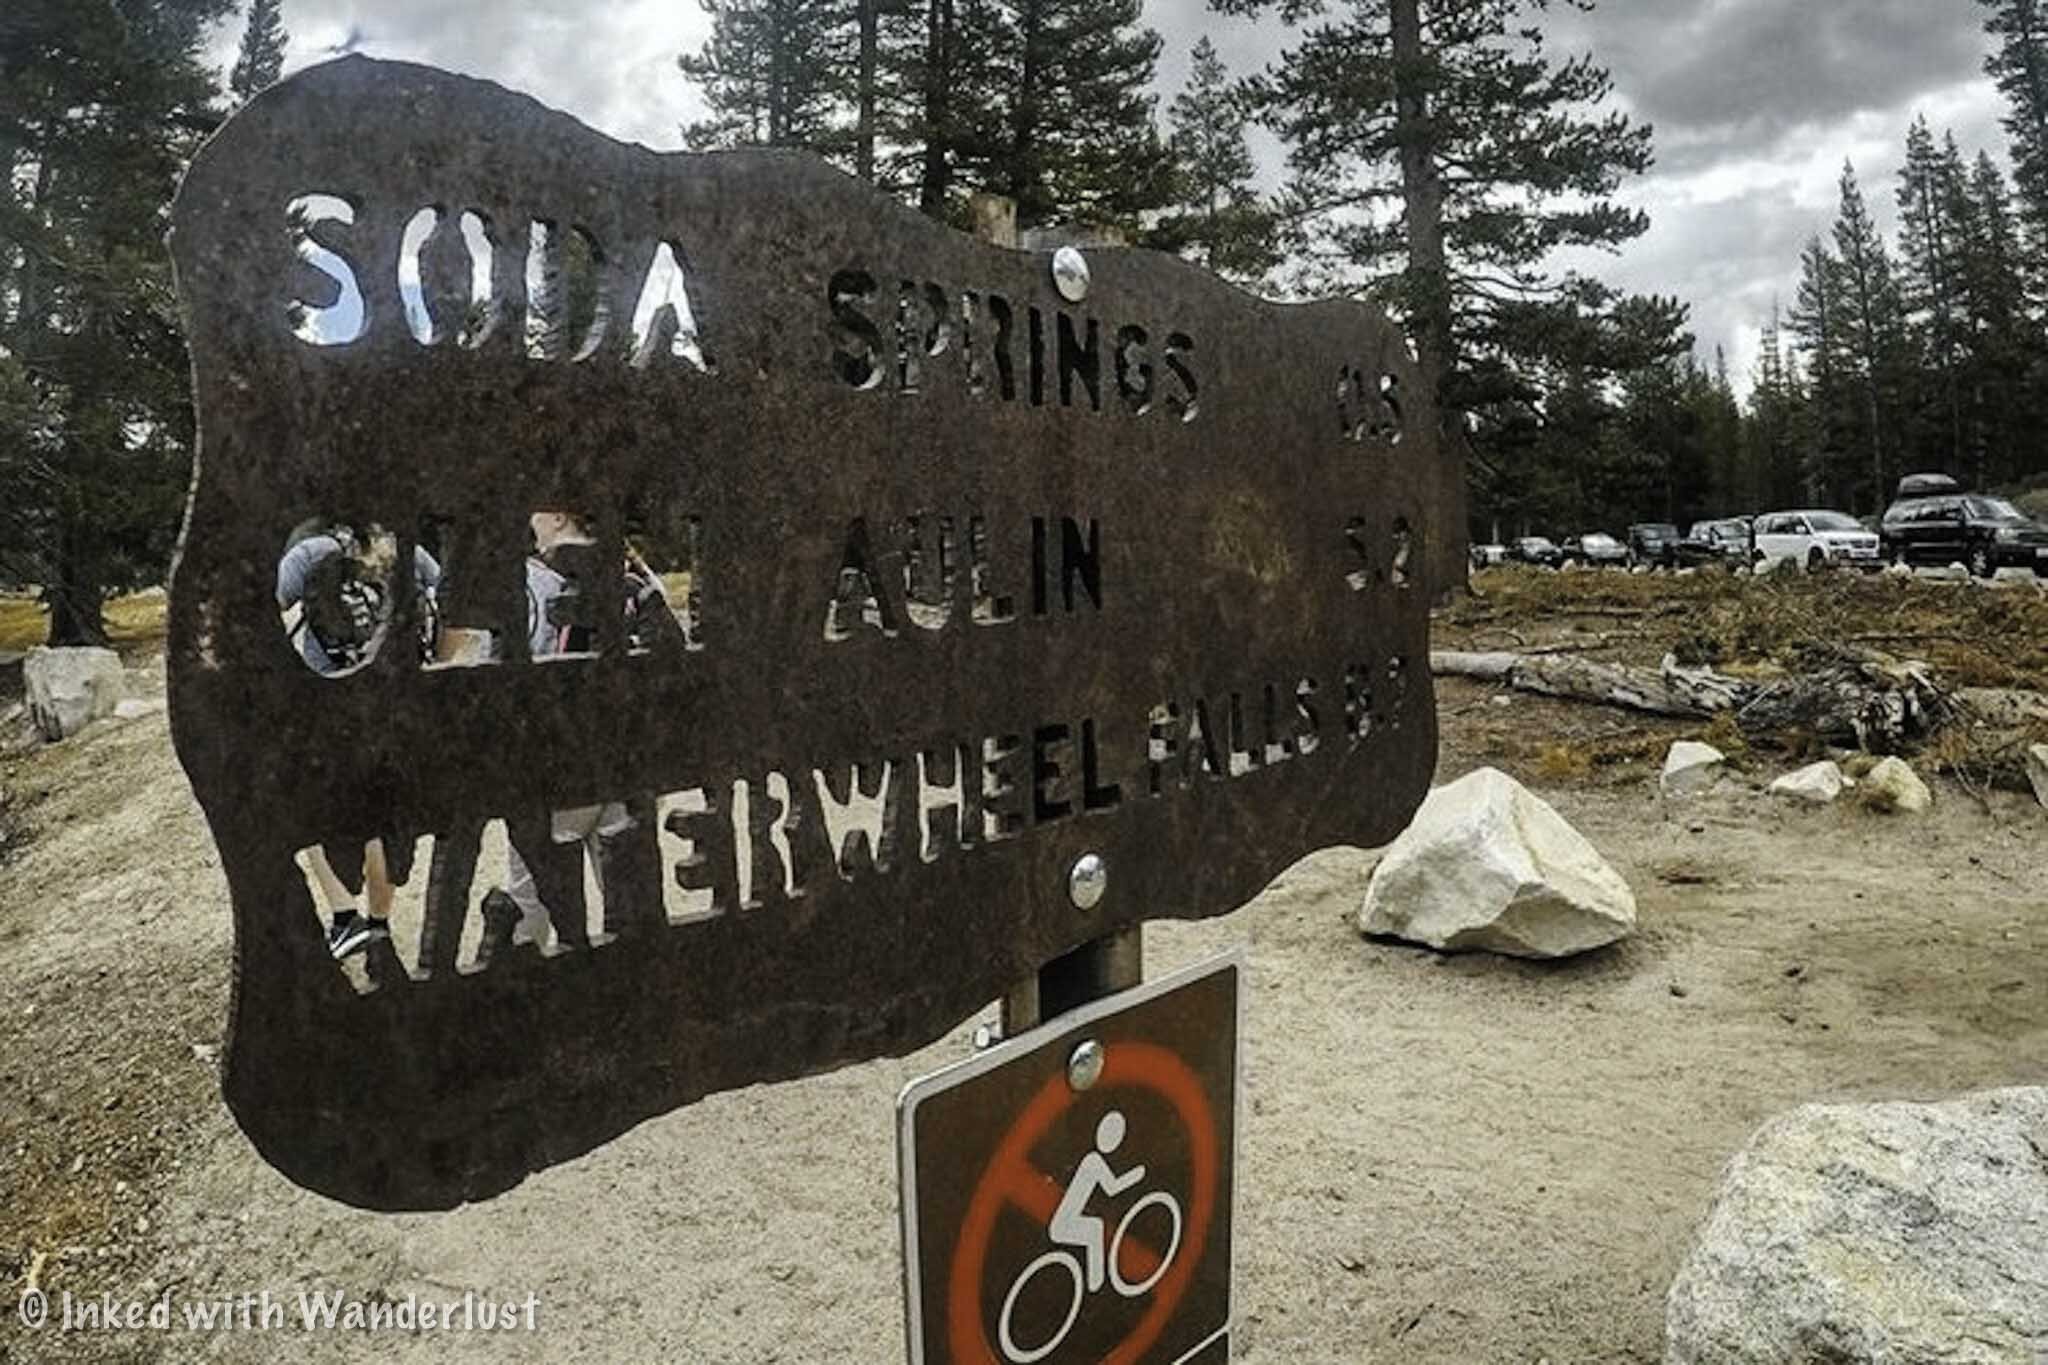
The official trailhead for Glen Aulin begins just to the right of Parson’s Lodge and Soda Springs in the back-end Tuolumne Meadows. However, you must begin on the opposition side of the meadow, which adds some milage to your hike, but not a lot.
Unless you’re starting from the Lembert Dome area, there is no official parking lot for this hike. Some attempt to park on the side of the road, but you’re risking being cited and towed. I would play it safe and park in the visitor center parking lot across the street.
Glen Aulin Hiking Trail

Once you’ve secured a spot, make sure there isn’t anything with a smell in your car or trunk, as this area sees a lot of bear activity. This includes food, drink, deodorant, etc. There are bear lockers everywhere in the area free to use.
To start your hike, cross the street and look out for the trailhead sign that lists Soda Springs, Glen Aulin and Waterwheel Falls (pictured above). You’ll want to follow the dirt path to the opposite end of Tuolumne Meadows.
The first notable feature you’ll encounter is the picturesque bridge spanning over the Tuolumne River. If you arrive early, do yourself a favor and get your pictures in now because on your way out it’ll likely be littered with tourists.

After the bridge you’ll come across Parsons Lodge (slight left) and Soda Springs (slight right). Parson’s Lodge was built by the Sierra Club in 1915 as a memorial to Edward Taylor Parsons (club member and Yosemite advocate). Soda Springs is a mineral spring with a half cabin built around it.
Don’t spend too much time here, because you haven’t officially started the actual trail yet and still have a ways to go. Keep going past Soda Springs and the lodge and you’ll see signs pointing you toward Glen Aulin trail, proper.
Glen Aulin shares its trail with both the PCT and the JMT. So if you see signs for either or both, you’re going in the right direction.

The first half-ish is fairly flat and straightforward. It’s clearly marked and well-maintained so there’s no real risk of going off-track. At around the three mile mark, you’ll come out into a beautiful meadow and lake that rivals Tuolumne Meadows (in my opinion).
Shortly after this point is where the trial starts to get a bit rocky and less maintained. However, the views continue to get better and better. For the next couple miles, you’re zig-zagging along beautiful cascades and have jaw dropping views of the granite mountains out in the distance.
The closer you get to Glen Aulin, the more spectacular the cascades get. I hiked this late in the season and the river was going strong. I could only imagine how it looks earlier in the season.
Tuolumne Falls
Before reaching Glen Aulin, you’ll first find yourself at the beautiful Tuolumne Falls. This waterfall is simply breathtaking and worth spending some time at. Although no one was down there on my hike, I have heard of overheated hikers using the pool around the falls as a swimming hole. I would exercise caution if you decide to do so.
After soaking in the views and getting your pictures, continue down the trail. From here, you’re still another mile or so from your destination. This is where the drop in elevation will become more noticeable and trail becomes rockier than it was before. Watch your step and pace yourself, if needed.
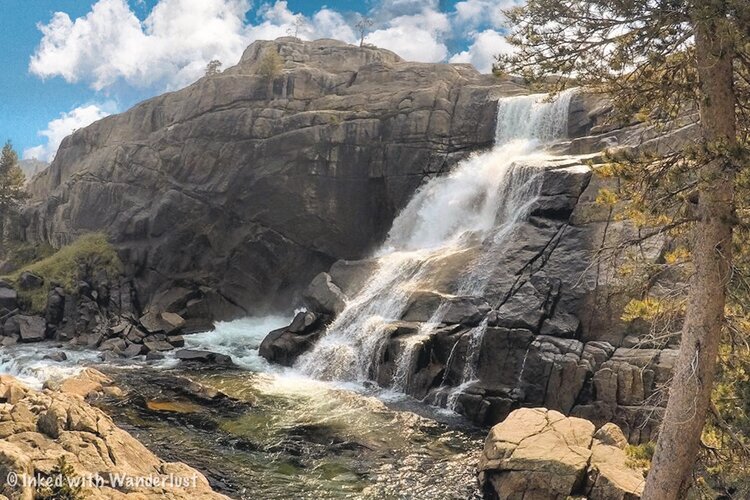
White Cascades and Glen Aulin

This is one of those destinations that just sneak up on you. You’re wondering how much further you have to go and bam, you come off a slight descent and there it is, the beautiful Glen Aulin and White Cascade. The views in this area are simply stunning.
While there’s nothing wrong with enjoying the view from the initial side, you’ll want to keep going as the view is much better across the swimming hole. Head forward towards the bridge and cross it to get there.
Glen Aulin High Sierra Camp

As you’re coming off the bridge, take a right and head over to the Glen Aulin High Sierra Camp. Everyone and anyone is free to hang out around the camp and the swimming hole, but access to the tents and restrooms are only for registered guests.
The Glen Aulin High Sierra Camp is one of five camps scattered throughout some of Yosemite’s most popular locations. You can attain one by entering the annual lottery and crossing your fingers that you win one. Rates for the Glen Aulin Camp in 2024 are as follows:
$175 per night (Adults)
$90 per night (Children)
Rates include a stay in one of the tents, along with dinner and breakfast, with lunch available as an option for an additional charge. Bookings are available for stays from July 4 - September 7, 2024. You can get more information here. Keep in mind that each tent can fit four people and they will fill it. Depending on your party size, you may be sharing it with others.
The best part of the Glen Aulin High Sierra Camp is you’re camping directly next to the gorgeous White Cascades and swimming hole. Imagine waking up to that sight every morning and enjoying a prepared breakfast next to a fire. That beats any hotel I can think of.
Glen Aulin Hiking Tips

This trail gets crowded. For starters, the trailhead begins in Tuolumne Meadows, one of the most tourist-heavy areas of Yosemite. Additionally, it shares its trail with the PCT and JMT. The earlier you can get started, the better.
It’s a moderate level of difficulty. It’s not a difficult hike by any means, but it is on the longer side and rocky in the latter half. That said, it’s mostly level, straight forward, clearly marked and well-maintained. Just be prepared for the length of it and you’ll be fine.
This trail is seasonal. The Glen Aulin trail is located in Yosemite’s high elevation area and thus, receives a heavy amount of snow in the winter, making it inaccessible. The entire east side closes during this time. So plan a summer or fall visit if you want to hike Glen Aulin.
Bears do frequent this area. Bears are all over Yosemite. However, they tend to hang around Tuolumne Meadows and this trail quit a bit. I didn’t see any during my hike, but you might. If you do encounter a bear, make lots of noise to alert it of your presence, give the bear plenty of space and you’ll be fine.
Watch out for the pack horses! Supplies get down to Glen Aulin High Sierra Camp via pack horses. I encountered them 3 times on my hike. Keep an eye out for them and give them the right of way. You also may want to watch your footing after they pass, for obvious reasons.
Planning a trip to Yosemite? If it’s your first visit, be sure to read 10 Awesome Things to Do in Yosemite Valley on Your First Visit. Additionally, read Tunnel View: How to See the Most Iconic View in Yosemite for an epic view you won’t want to miss. Finally, if you’re thinking of hiking Half Dome, read How to Hike Half Dome: The Complete First Timers Guide.
IF YOU WANT TO SEE ALL OF YOSEMITE’S HIGHLIGHTS IN A DONE-FOR-YOU, HASSLE-FREE TOUR WITH KNOWLEDGEABLE GUIDES, GO HERE.

4 Reasons Why You Should NOT Hike Half Dome
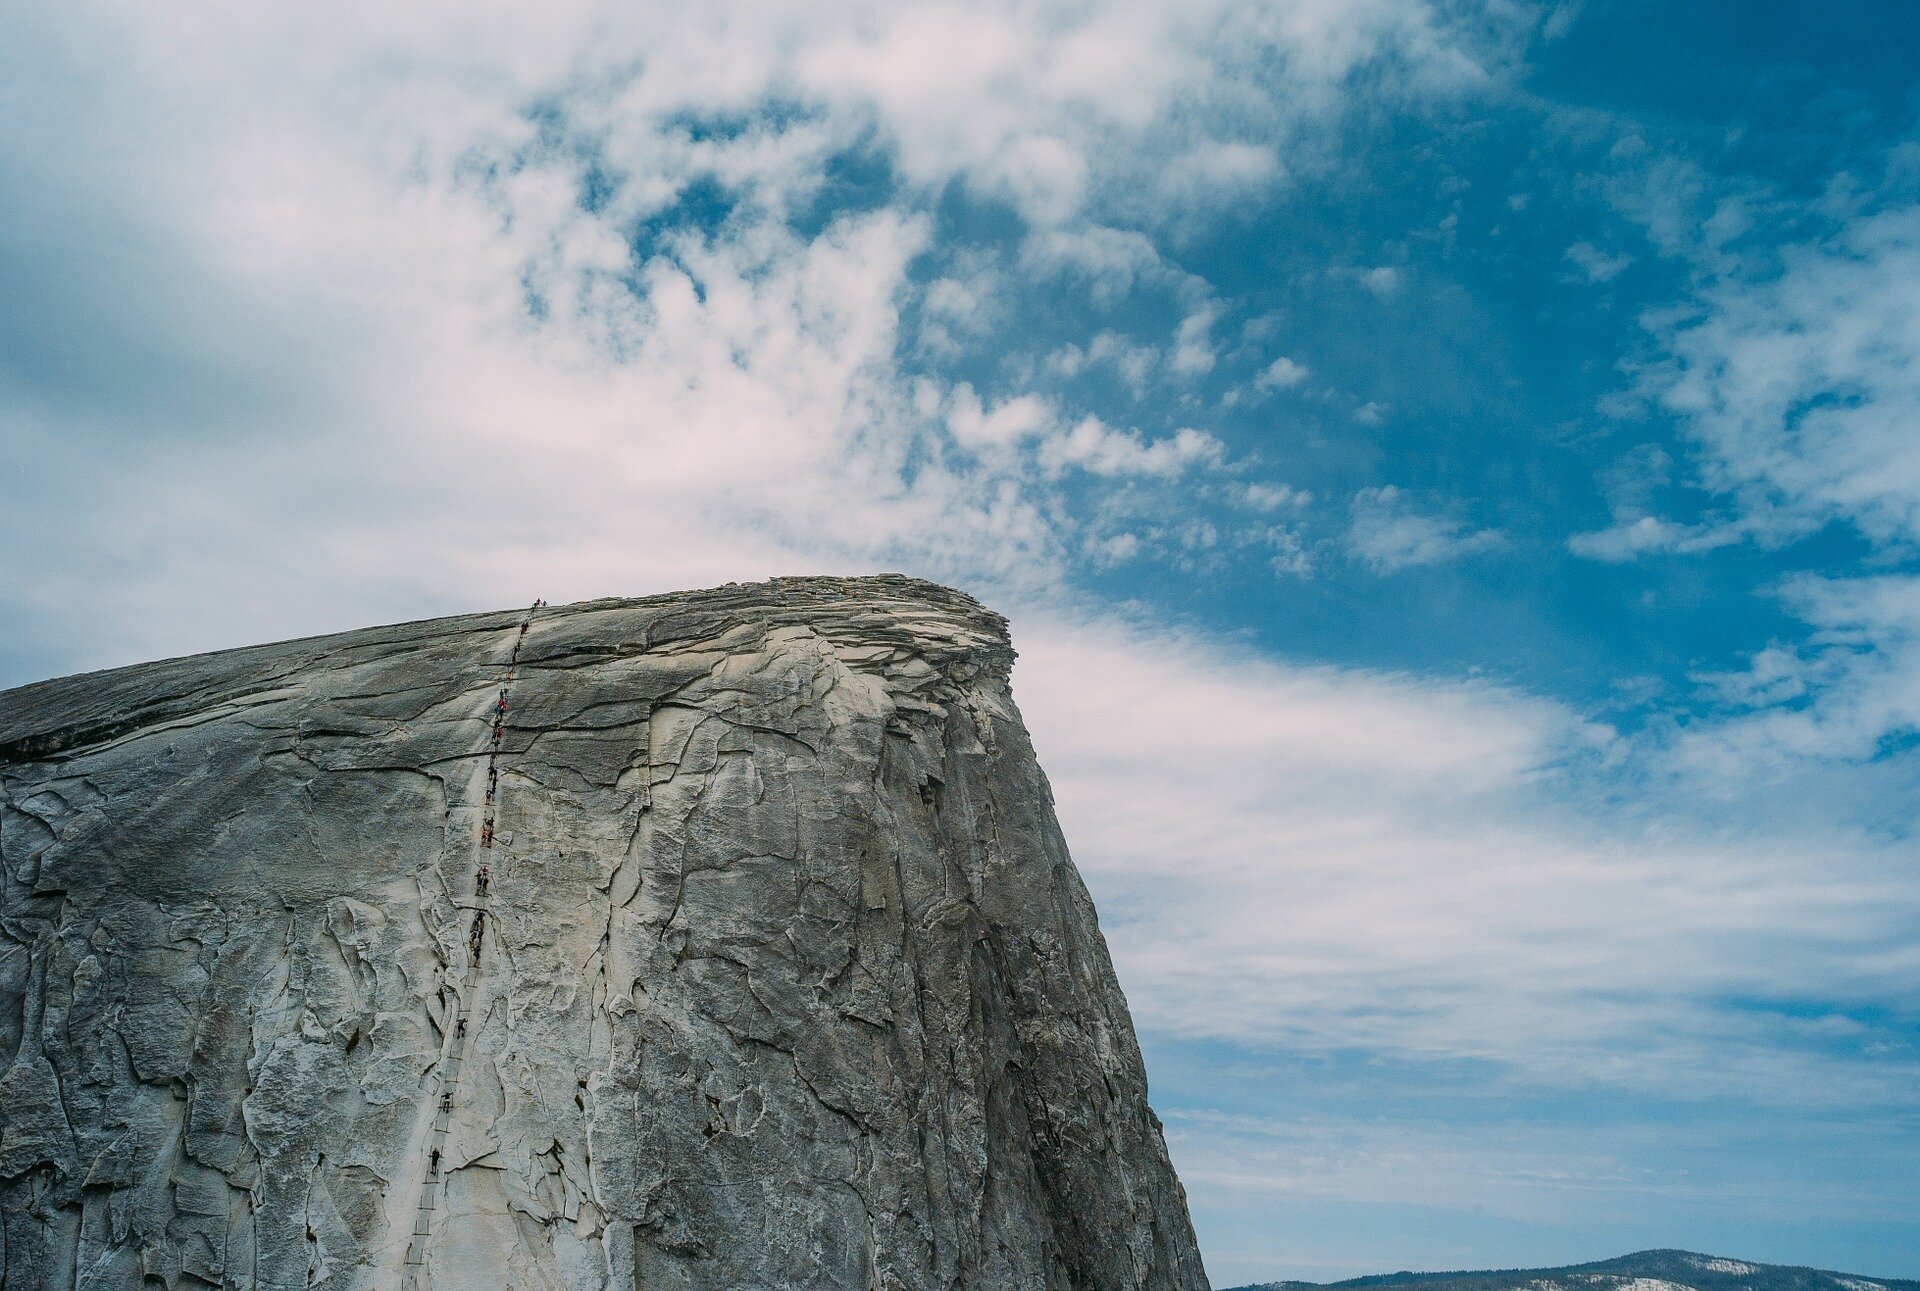
I hiked Half Dome with my brother back in 2017 and it was the most thrilling experience of my life at the time. Hiking 8 miles (mostly uphill), a 400-foot climb up the cables
I hiked Half Dome with my brother in 2017 and it was the most thrilling experience of my life at the time. Hiking 8 miles (mostly uphill), a 400-foot climb up the cables, standing at the top, and being able to look down on Yosemite Valley is an experience that’s hard to describe.
As incredible as it was, it came at a price. As my brother and I were making our way up Sub Dome, I realized how truly unprepared we were. Don’t get me wrong, I THOUGHT we were prepared but truth be told, we probably had no business being up there. That’s a tough pill to swallow, but it’s the truth.
All went well, though. We made it to the top without any major problems and managed to make it back to the car despite being low on energy and close to dehydration. I knew the experience of hiking Half Dome would make for an awesome addition to this blog (you can read that article here) but I started thinking, “what about the other part of it that no one talks about”?
The “part” I’m referring to is instead of encouraging everyone and anyone to hike Half Dome, what if I gave people reasons why they SHOULDN’T hike it? That’s the purpose of this article. We all know the reasons why you should, but there are plenty of reasons why you shouldn’t. So read on to find out the four reasons why you should NOT hike Half Dome.
1) It can be dangerous

Half Dome. Yosemite National Park.
I’m not going to sugarcoat it, there is potential, life-threatening danger on this hike. Truth be told, you’ll find danger in anything you do. Just driving to the trailhead is more dangerous (statistically speaking). That’s why I’m saying it CAN be dangerous. I believe most of the danger can be mitigated as long as you’re prepared for it.
That said, people have died on this hike. They’ve died both on the trail and on the cables. As of 2019 (2020 numbers have not be listed yet) there have been:
At least 13 deaths
291 accidents
& 140 search & rescue missions
This is just since 2005. Thankfully, there were no confirmed deaths on Half Dome in 2020. The most recent was in 2019 when a young women from Arizona slipped on the steepest part of the climb and slid 500 feet to her death.
Weather also plays a role in the level of danger. The granite is smooth and slick from all the hiking boots that’s traversed over it over the years and when it rains, it becomes incredibly dangerous to attempt an ascent or descent. You do NOT want to be up top (or even on the base) when lightning strikes.
2) You have a medical condition

Half Dome. Yosemite.
If you have vertigo, are prone to seizures, have heart or lung problems, bad knees, etc, you shouldn’t hike Half Dome. Vertigo, especially, can cause a fatal accident to occur. Most of the hike takes place on your standard hiking trail but towards the end, you’ll need to navigate your way up Sub Dome and a 400-foot climb up the cables.
Hiking Half Dome with heart issues also wouldn’t be wise. In 1995, a man from Huntington Beach collapsed from heart failure as he was making his way up the cables and fell. There have been others who have had heart attacks while hiking but thankfully survived their ordeal.
Half Dome isn’t worth your life or making your condition worse. There are many trails in Yosemite that are just as spectacular that wouldn’t put you in unnecessary risk. North Dome, for example, is an excellent alternative that ends with any epic view of Half Dome. You can read that article here.
3) You have a low level of fitness
Half Dome cables. Yosemite.
While being a top level athlete isn’t required, being in at least decent shape is. One way you can find out how in “hiking” shape you are would be to go for a hike on an easier trail and pay attention to your breathing. If you’re huffing and puffing, then Half Dome is too dangerous.
Thankfully, this is something that can be overcome. If you’re serious about hiking Half Dome start training MONTHS before, even a year! The sooner the better. Join a gym and utilize a stair master and squat press. Go hiking regularly and keep upping the difficulty. The higher elevation you train at, the better prepared you’ll be.
4) You’re inexperienced

Half Dome. Yosemite National Park.
This one is pretty self explanatory and like the reason above, can also be overcome. If you’re new to hiking, starting with Half Dome wouldn’t be ideal. Your best bet would be to start out small. Like your local park, for example. If you’re coming to Yosemite, some good beginner trails would be:
The Mist Trail (Challenging, but still beginner friendly)
Cook’s Meadow
Elizabeth Lake
Lembert Dome
Cathedral Lakes
Once you’ve put a few of these (or others) under your belt, you can start hiking the more difficult ones that’ll challenge you to up your game and test your resolve. Some of those Yosemite trails include:
Upper Yosemite Falls
Four Mile Trail
Cloud’s Rest
If you can tackle one of these without feeling like you’re going to fall over at any moment, chances are good that you’re ready for Half Dome. If not, then I would definitely stick with the easier ones mentioned above (there’s no shame in it).
Remember, it isn’t just your safety at risk, but you could be putting the safety of other hikers and Park Rangers (if they have to come help you) at risk as well.
= Conclusion =
I hope you’ve found this article helpful in deciding whether Half Dome is a good fit for you. If none of these apply to you then great, get at it. If one does, then remember that NO hike is worth your life and there’s absolutely no shame in admitting when something’s out of your comfort zone. In fact, it’s a respectable trait.
Safe travels.
Please support this website by sharing this article with your friends & family on Pinterest, Facebook, or your favorite social media app.
You can also show your support by reading one or more of the related posts below. Thank you.