
The Complete Guide to Muir Woods: Trails, Reservations, and More
Muir Woods National Monument is one of the most popular attractions in the Bay Area, bringing in hundreds of thousands of visitors annually…
Muir Woods National Monument is one of the most popular attractions in the Bay Area, bringing in hundreds of thousands of visitors annually. A trip to the area just wouldn’t be complete without a visit.
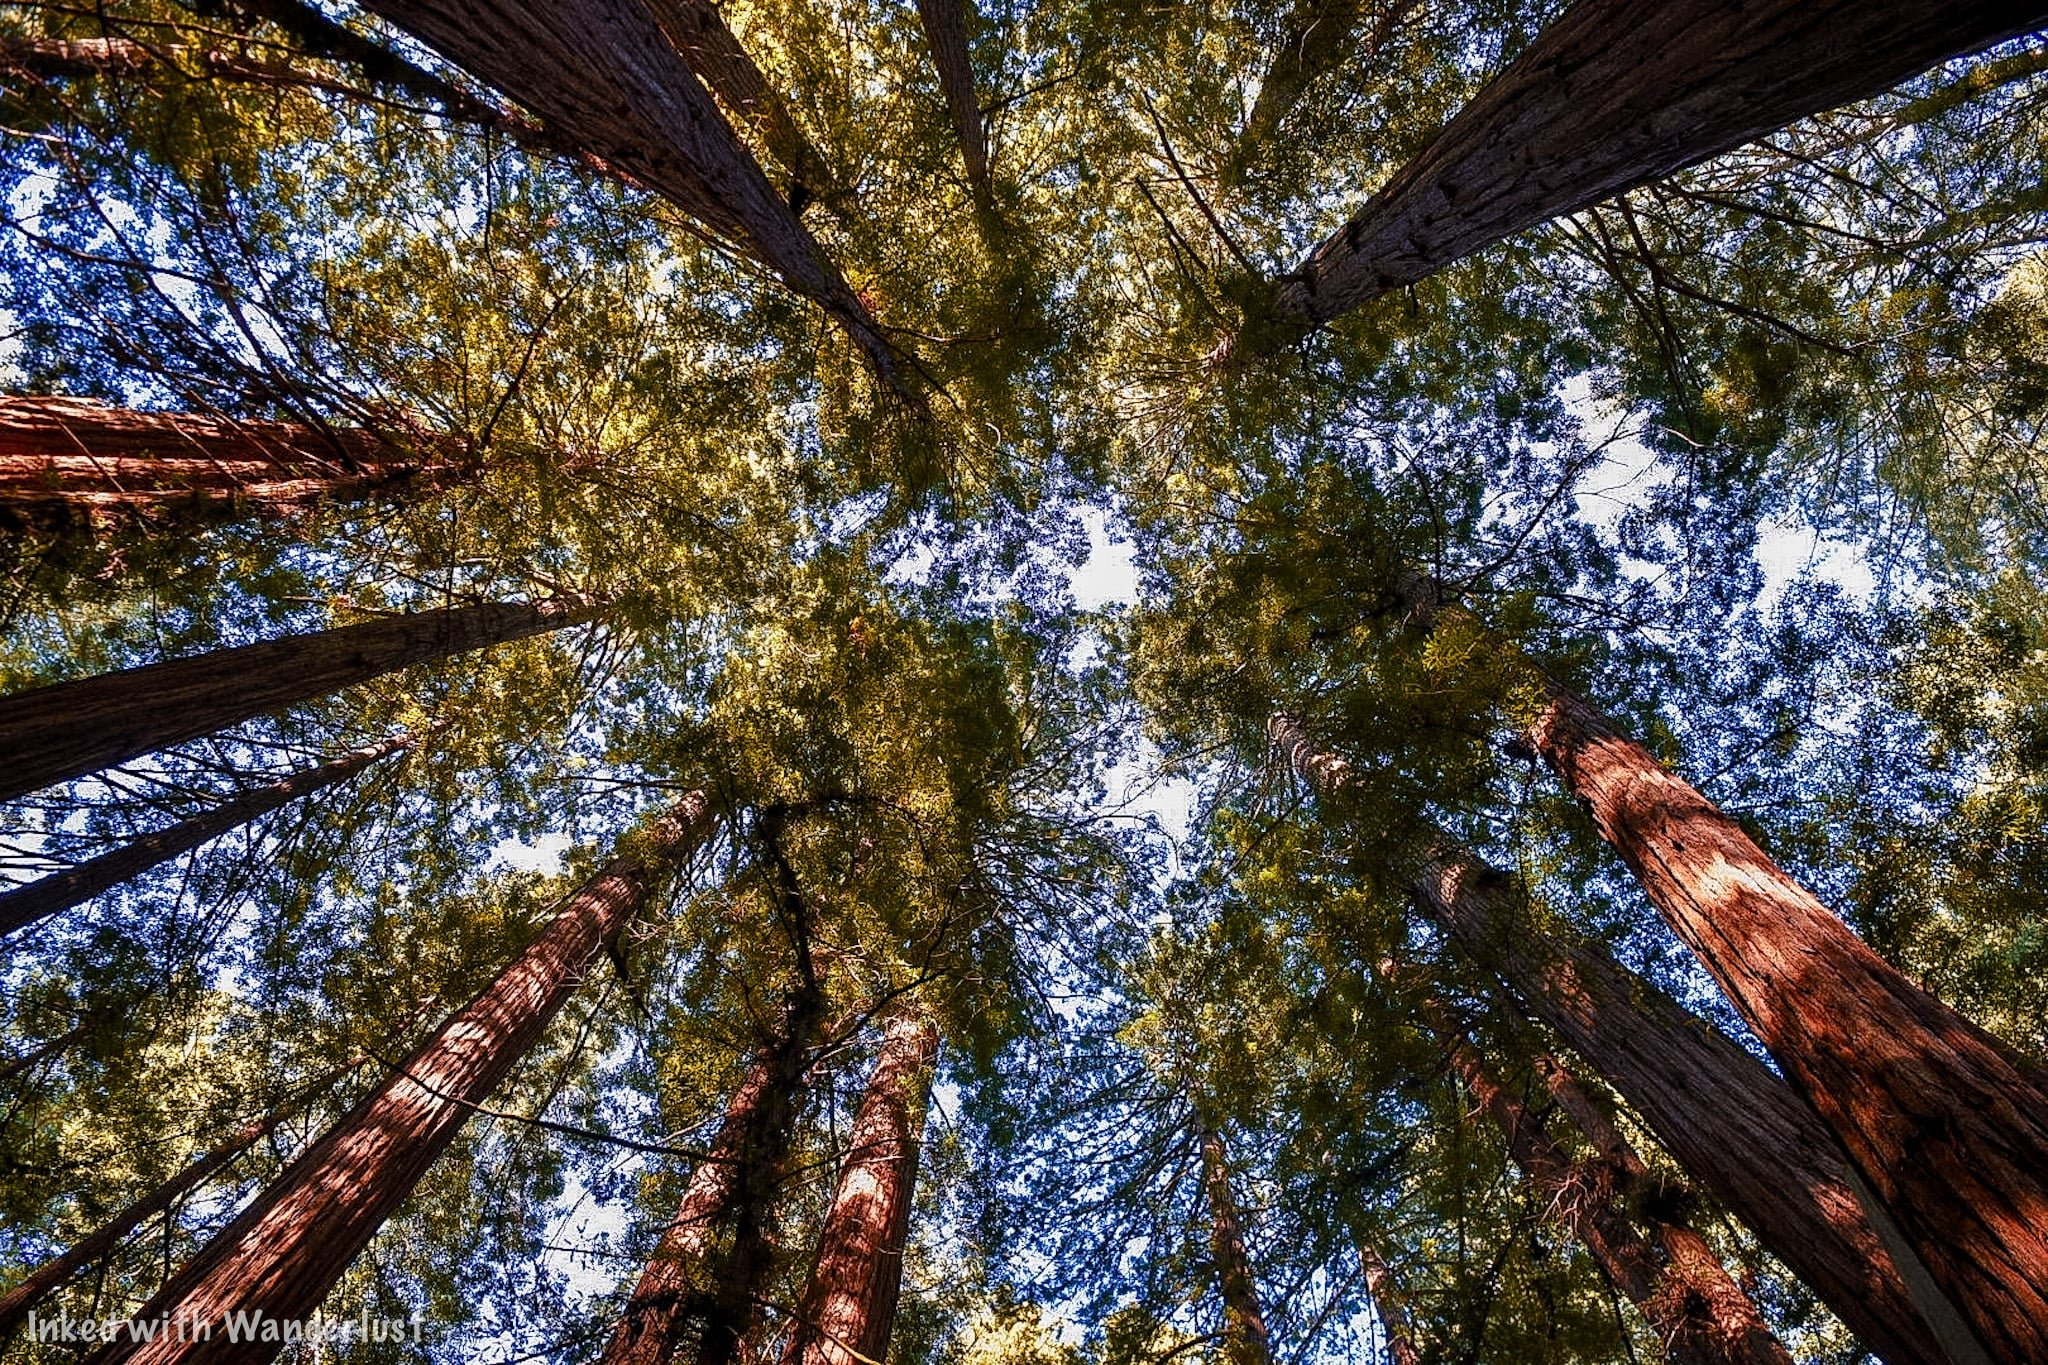
Enacted as a National Monument by Theodore Rosevelt in 1908, Muir Woods is 554 acres of tranquility. These giant coastal redwoods have an average age of 600-800 years old. The oldest clocking in at a whopping 1200 years!
Your first time walking amongst these ancient giants is a magical experience. Many of the trees in the monument are north of 200-feet tall and will undoubtedly leave you in awe as you gaze upon them.
While we encourage anyone and everyone to visit this amazing place, there are certain things you need to know and do before going to ensure a successful visit. Let’s get into it!
Visitor Information
Parking Reservations
If you want to visit Muir Woods, before you do anything else, you need to check the park calendar and ensure there is an available parking reservation for the day(s) you want to go.
Reservations are required no matter the day or time of year. Parking lots at the monument are not large and parking isn’t allowed on the sides of the road. So this is needed in order to mitigate over-crowding.
How To Make a Reservation
To make a parking reservation, follow the steps below:
Go to this website
Click/Tap the reservation button and select the day you want.
You’ll then select your vehicle type.
Select your arrival time window (Arrival times are in 30-minute intervals).
You’ll then be given the option to pay for your park admission fees ahead of time (This fee is in addition to your reservation fee).
Now you’ll enter your information and payment method.
You’ll be emailed a QR code that will contain your reservation and admission fees (if you opted to pre-pay). Be sure to screen shot this and save it. When you arrive, pull it up on your phone and the parking attendant will scan it.
You should also print it out a hard copy in case your phone dies.
Parking Reservation Fees
The following is a list of parking fees for your type of vehicle. These fees are mandatory and are paid at the time you make your reservation:
Standard Vehicle - $9.00
Handicap Accessible - $9.00
Electric Vehicle - $13.00*
Vehicle 17-22 feet - $30
Vehicle 23-35 feet - $45
*The reason EV’s are more is because it includes charging. If you think you’ll be fine without it, just opt for the standard vehicle price. If you’re driving a Tesla, remember to bring your J1772 adaptor.

Shuttle
If you’re visiting on a weekend or holiday, the shuttle is another option. You’ll park at an offsite location at Pohono Park & Ride and take the 30-minute ride in.
If you go with this option, you will NOT need to make a parking reservation. Though you WILL need to select a 30-minute window of arrival at the Pohono lot.
The address for Pohono Park & Ride is as follows:
100 Shoreline Highway, Mill Valley, CA 94941
Fees for the shuttle are:
$3.50 (per person 16 years and up)
Free (persons under 15 years)
The shuttles are ADA accessible with each one able to accommodate two wheelchairs. When making your reservation, be sure to select this option to ensure a spot.

Is Ride-Sharing an Option?
The short answer? Yes and no. You could get an Uber to take you into the monument but once there, you won’t have cell reception. So getting one to pick you up wouldn’t be possible.
Taking a Taxi would be your best bet if you don’t have your own vehicle or you’re visiting on a weekday. We would advise you to arrange a pick-up time with the driver or you can call them on the payphone behind the restrooms near the entrance.
Speaking of restrooms, there are two at the park:
As mentioned above, there’s one just before the entrance near the parking lot.
The other is located near the gift shop and cafe.
Beyond the gift shop, there are no other bathrooms in the monument.
Park Entrance Fees
In addition to paying for either the shuttle or a parking reservation, you will need to pay park entrance fees as well (unless you’re a holder of one of the various annual passes).
Muir Woods entrance fees are as follows:
$15.00 (per person ages 16 and up)
Free for persons 15 years and younger.
*Pro Tip: If you’re a family of 3- 4 and everyone is 16 years or older, consider purchasing the Muir Woods Annual Pass. It costs $45 (the total cost of three adults), is good for 12-months, and covers up to four people per visit! Just keep in mind that it will NOT cover parking or shuttle fees.
The easiest and most convenient way to pay for your entrance fee is online while making your shuttle or parking reservation. When you arrive, the attendant will scan your QR code and you’re done.
If you prefer to pay on arrival, you can. Current accepted forms of payment are cash, credit/debit card, or Apple Pay. Just keep in mind that shuttle or parking fees MUST be paid online, in advance.
Directions to Muir Woods

From San Francisco
Most don’t realize just how close Muir Woods is to San Francisco. How close? Only a mere 11-miles from the Golden Gate Bridge! To get there:
Go north on Highway 101 and cross the Golden Gate Bridge
Take the Highway 1 exit to Stinson Beach
Turn left to stay on Highway 1
Turn right on Panoramic Highway
Turn left on Muir Woods road and continue until you reach the parking lot

From the East Bay
Make your way to and get on Highway 101 South
Take the Highway 1 exit to Stinson Beach
Follow steps 3, 4, and 5 above
For GPS purposes, here is the official address for the monument:
1 Muir Woods Road, Mill Valley, CA 94941
Park Hours
Normally (as in, when we don’t have pandemics going on), Muir Woods is open all year long, including on major holidays. However, it is NOT open 24/7. The monument is open to the public:
8:00am to 5:00pm, daily.
The park facility hours vary slightly from normal park hours. They are:
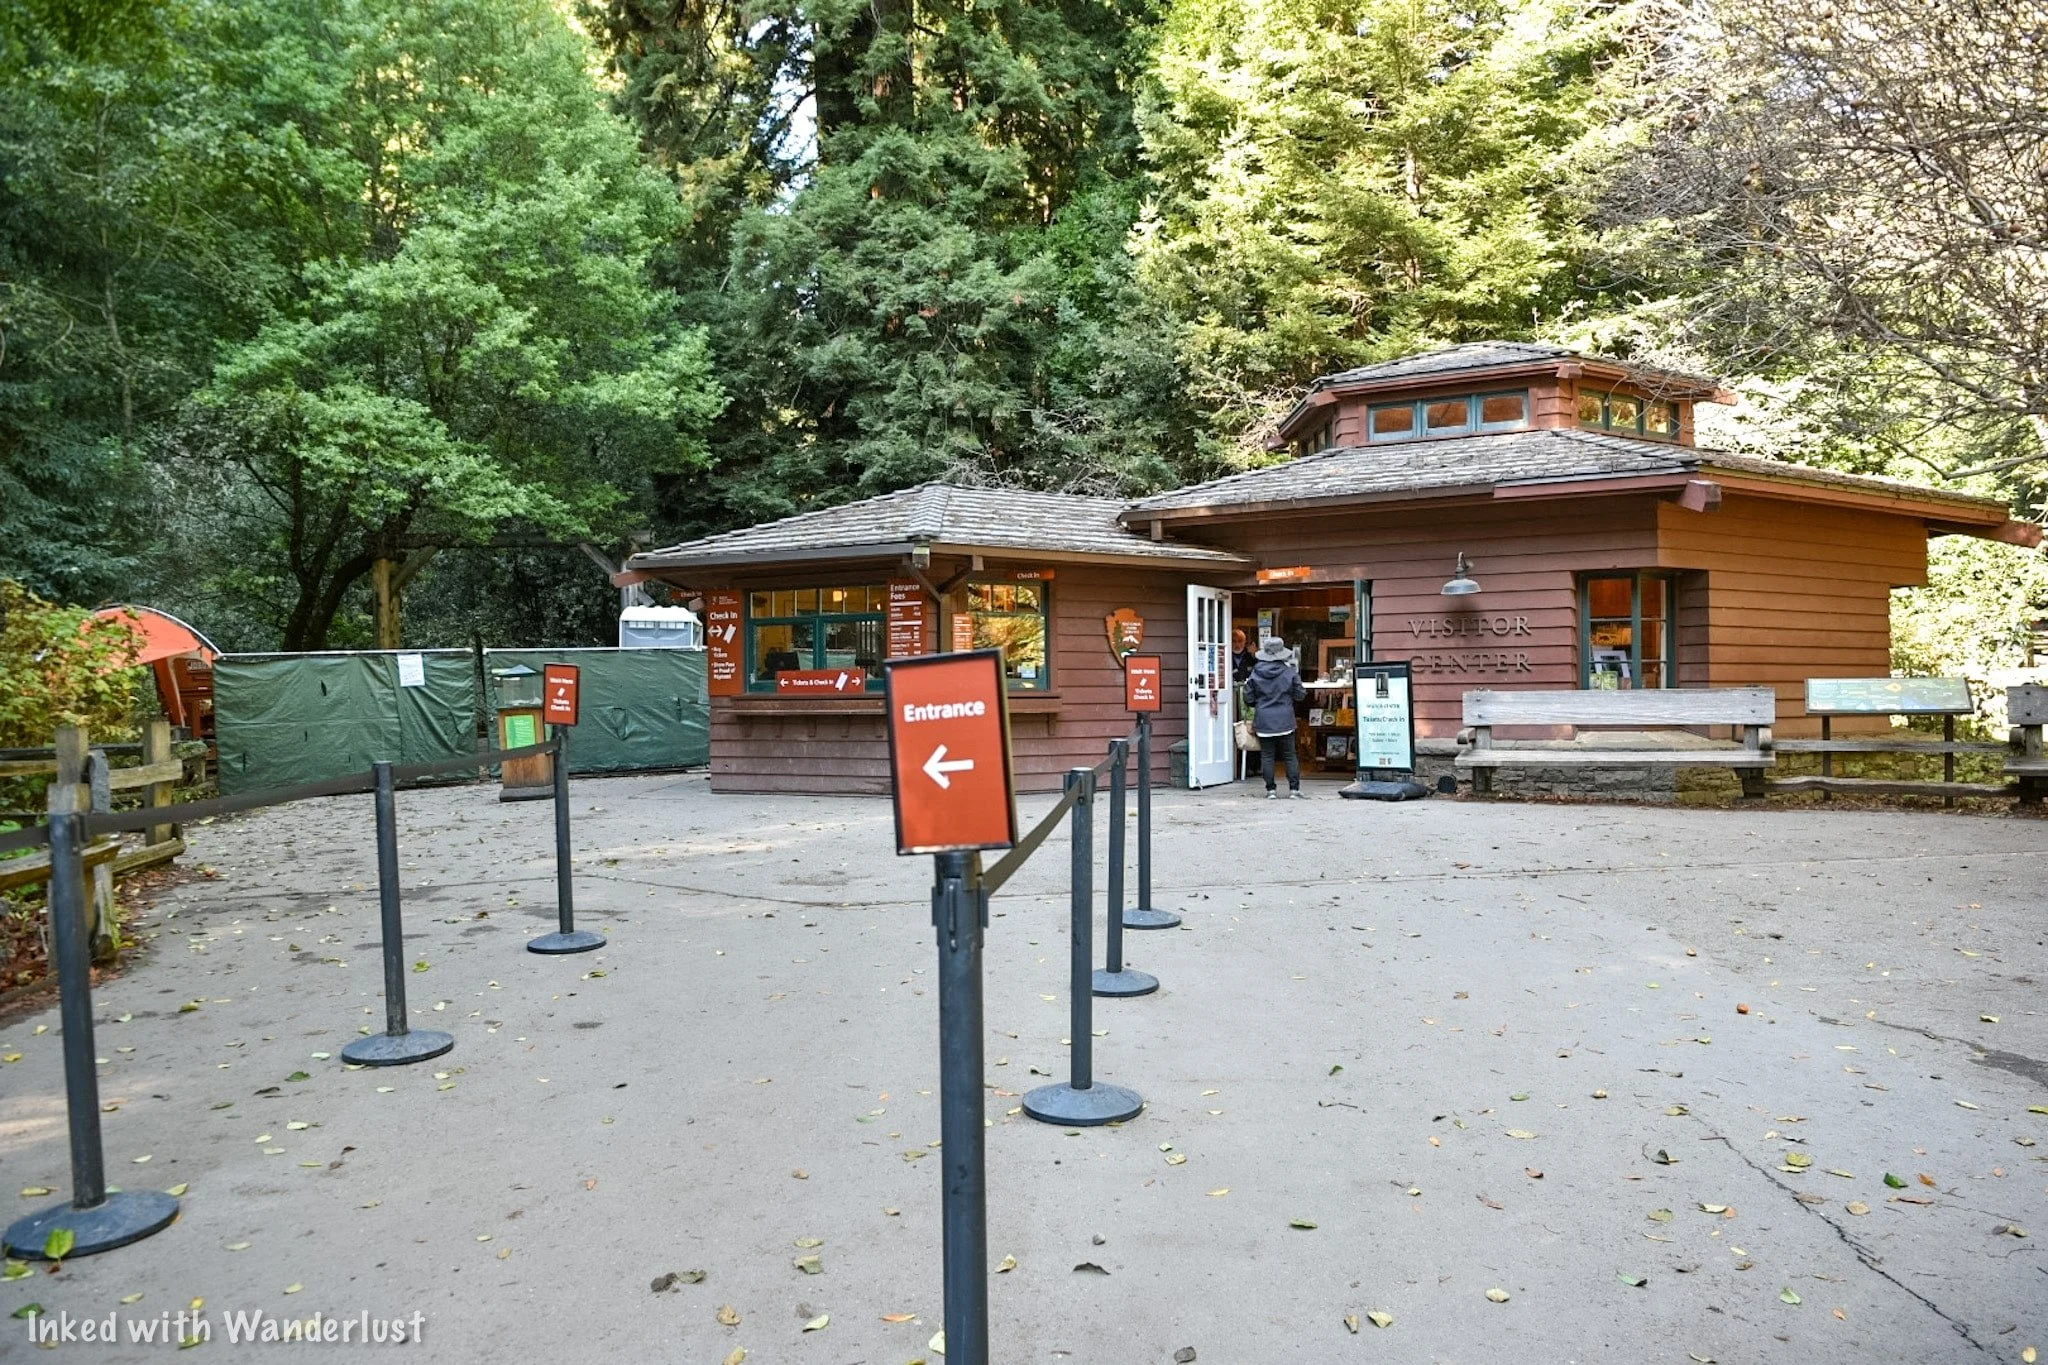
Visitor Center: 8:00am to 4:30pm. This is the building at the entrance to the monument.
Gift Shop: 9:00am - 5:00pm. This building is roughly 50-60 yards or so behind the visitor center.
Cafe: 10:00am - 4:00pm. The cafe is adjacent to the gift shop.
Best Time to Go

Busiest Time
Peak travel months for Muir Woods is May - October. Due to its proximity to San Francisco, it sees heavy visitation during these months. So much so, it can downright miserable.
If you must come during these months, we highly recommend a weekday and arrive as close to opening as possible. It’ll still be crowded, but it’ll at least be slightly easier than the weekend.
Off Season
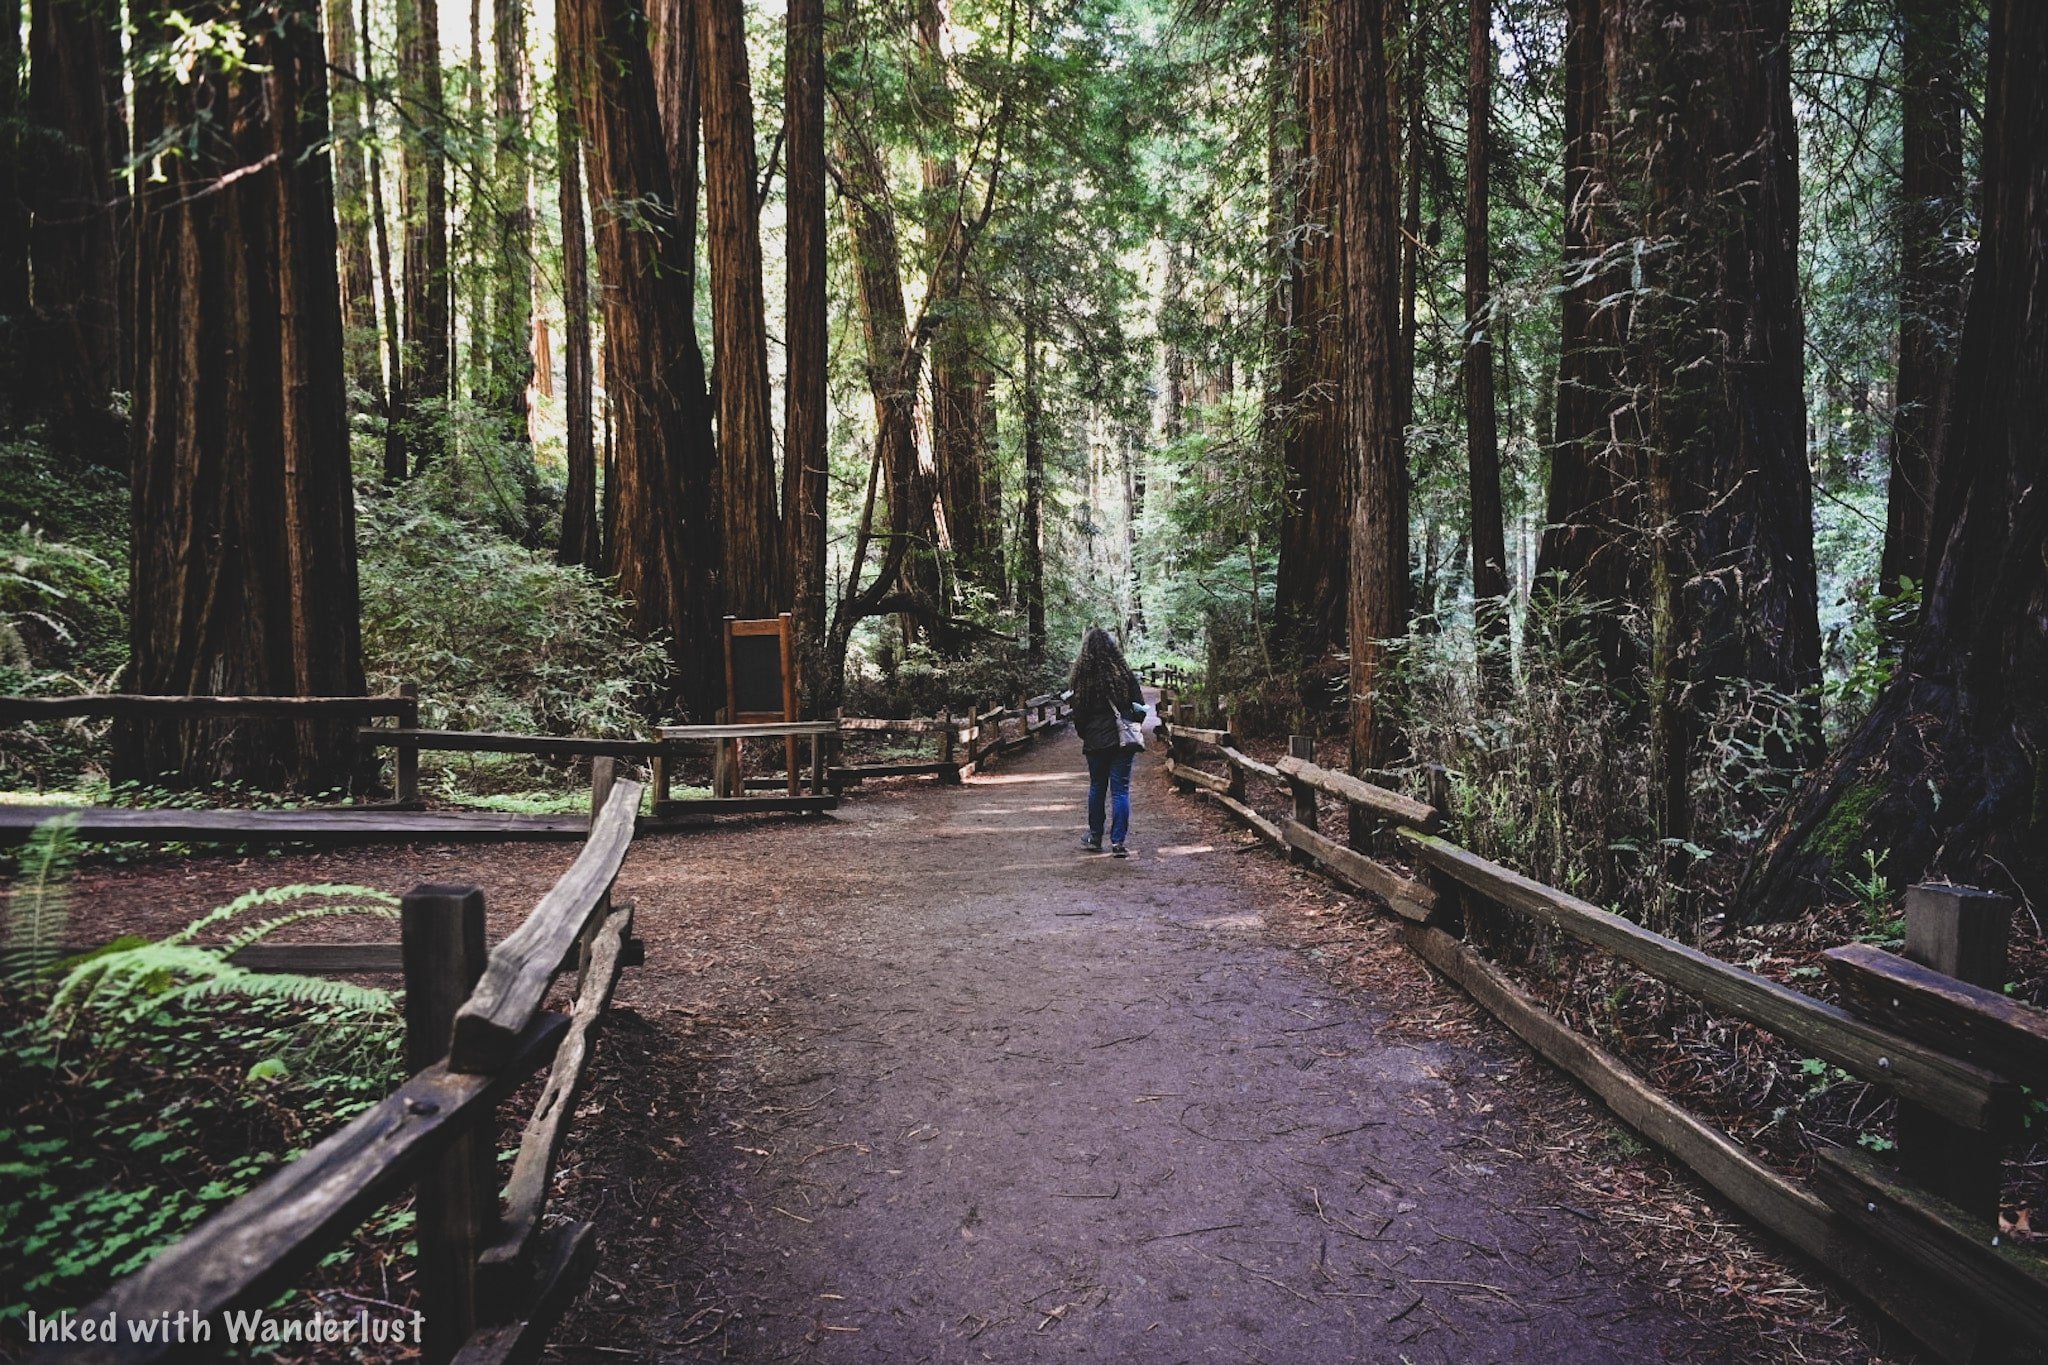
In our opinion, the best time to visit is between the months of November and April. Yes, it does get cold and yes, it can be rainy, but the park also sees a major reduction in crowds.
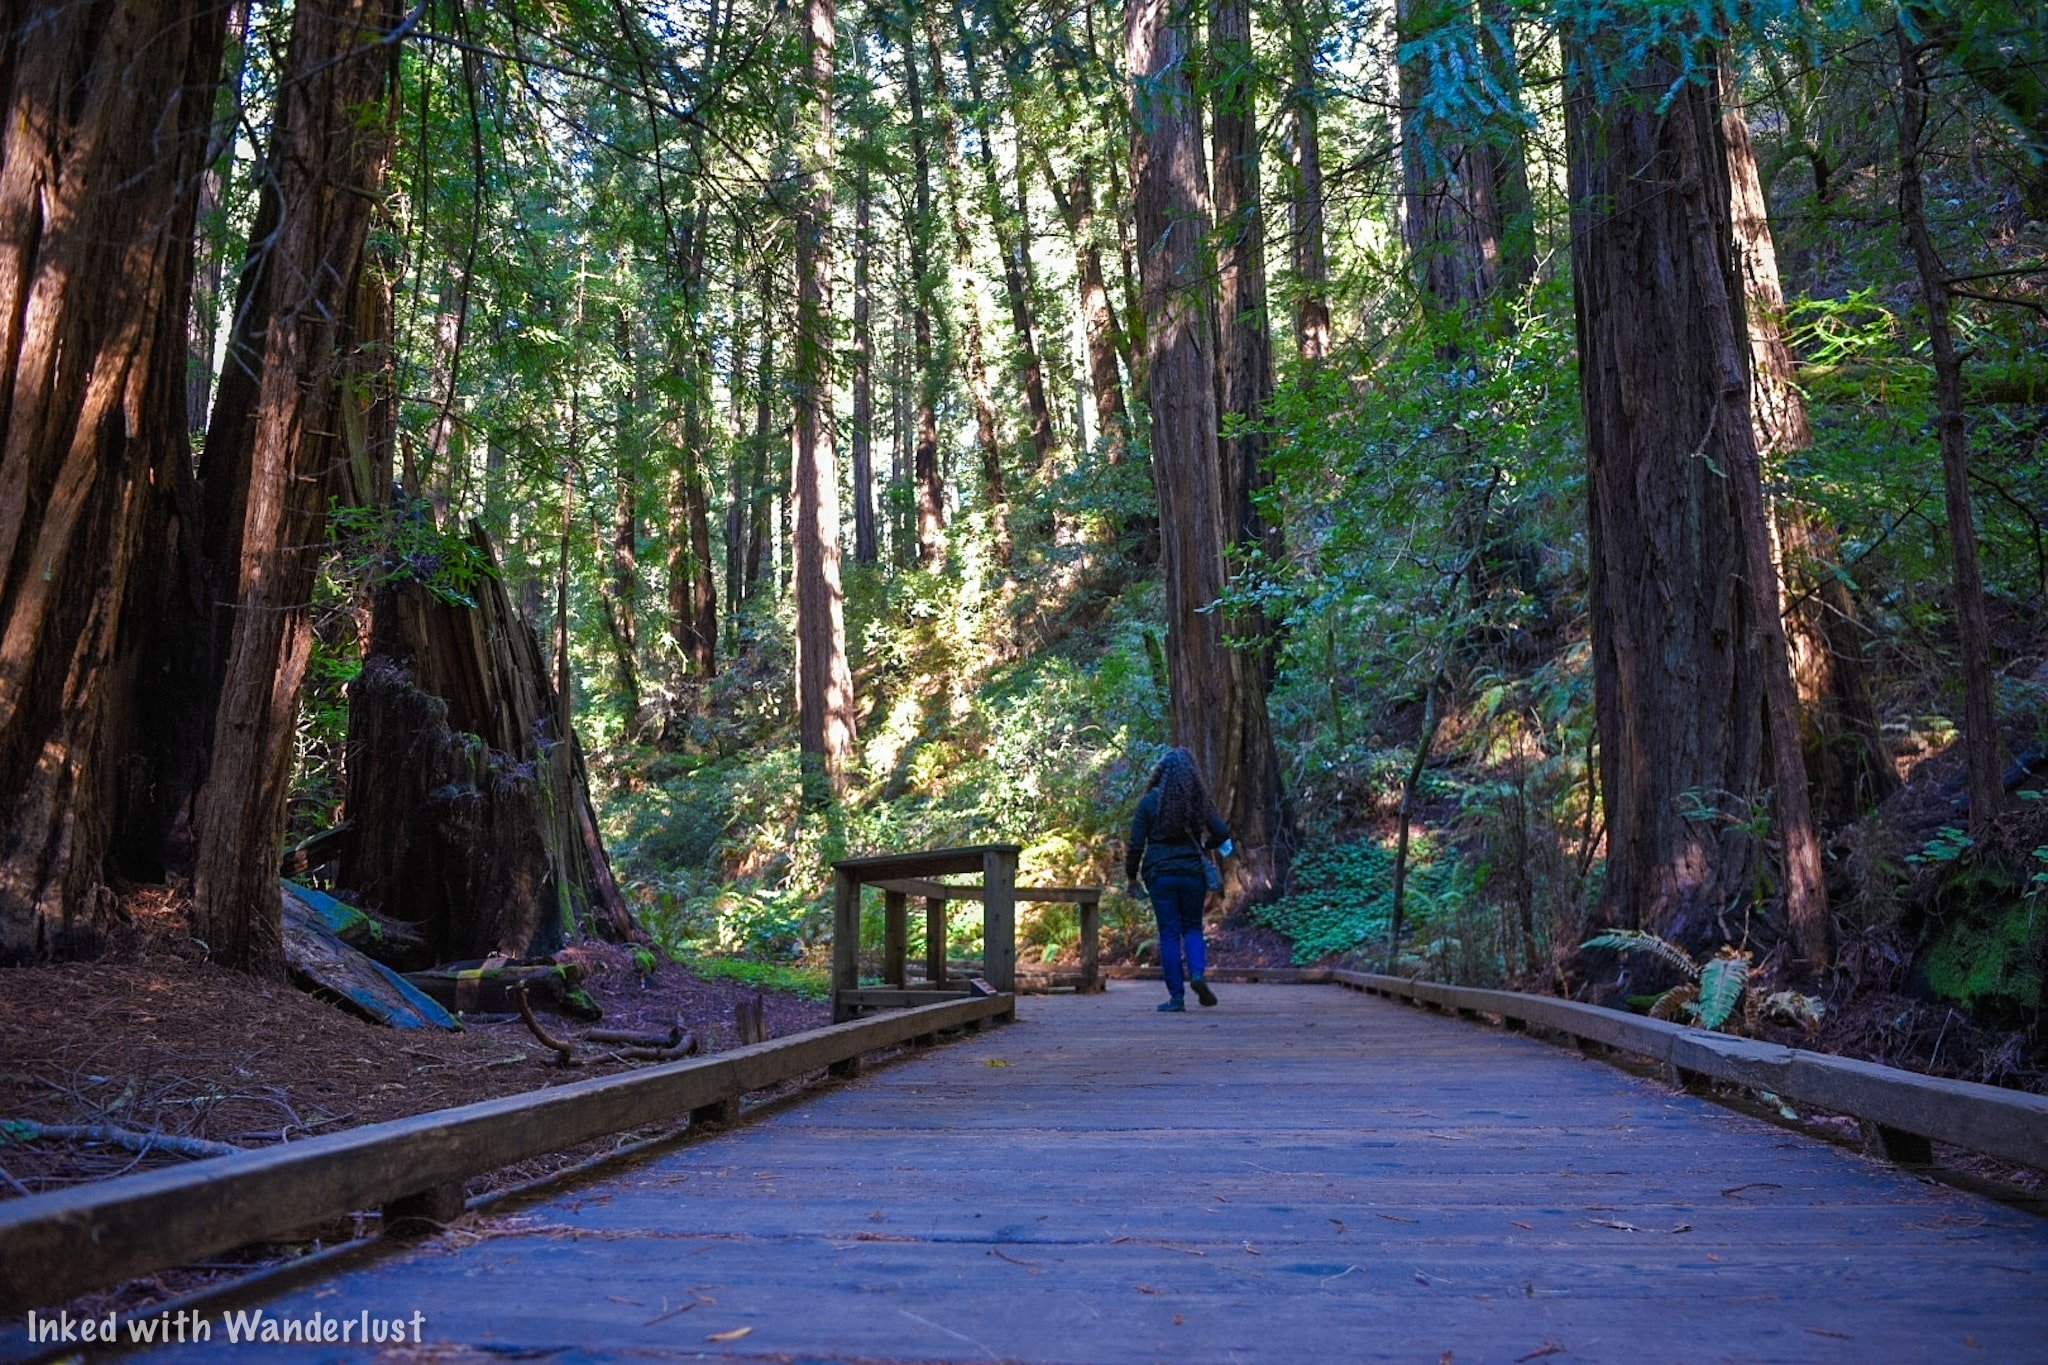
The photos in this post were from our trip in November 2021 and as you can see, the crowds were minimal. If you can help it, we highly advise that you plan your trip for the off season.

Hiking Trails
Within the monument itself, there are 6-miles of trails. There are others that begin in Muir Woods but spur off to other locations such as Muir Beach, Stinson Beach, and neighboring Mount Tamalpias State Park.
All of the park trails begin and end at the visitor center at the entrance of the park. These include:
Bridge 2 and back ( .5 miles): This is a short, peaceful walk along Redwood Creek. The boardwalk following this trail is both wheelchair and stroller friendly.
Bridge 3 and back ( 1 mile): This also follows Redwood Creek (on both sides) but extends your excursion into old growth Redwoods.
Bridge 4 and back (1.5 miles): We highly recommend doing this. This trail takes you all the way to the end of the park (any further and you’ll enter Mount Tamalpias State Park). From here, you can turn around and head back or…..
Hillside Trail (2.0 miles): The first two miles includes the initial 1.5 miles to bridge 4. Instead of heading back the way you came, cross the bridge and head up the hill. This will loop you back and spit you back out at bridge 2. Going this way gives you a different perspective of the forest.

As mentioned above, there are other trails that spur off to other places outside park boundaries. A couple of these include:
Muir Woods to Muir Beach (6 miles): This trail takes you to Muir Beach and back. It isn’t a long or difficult trail but depending on your level of fitness, we would definitely recommend allocating at least a few hours.
Dipsea Trail (up to 10 miles): Dipsea is one of the most popular trails in the area. It begins at Muir Woods and ends at Stinson Beach. You can do the whole thing (about 10-miles, one-way) or you can shorten it to your desired milage.
To see more more trail options, go here.
Whether you intend to stay within the park or hike beyond it, we recommend picking up a park map at the visitor center. You’ll likely be handed one when you get there but if not, definitely ask.

What to Bring
Muir Woods is located almost directly off the coast of the Pacific Ocean. In the morning, that misty fog San Francisco is known for appears quite often. Temperatures rarely exceed 70 degrees and due to the height of the trees, there’s plenty of shade.
Due to this, there are certain things you’ll want to bring with you. Particularly if you’re visiting during the off season months. Here are a few of our suggestions:
Backpack: For us, this is essential. I never go anywhere without my backpack. I use it for camera gear, carrying water, snacks, spare clothing, and other personal items.
Camera: Nearly everyone has a camera on them these days. From DSLR’s to iPhones. Whichever you use, be sure to bring it to capture the memories you’re sure to make. Just don’t try to use a Drone here. They’re not allowed.
Water: Beyond the gift shop, there are no water fountains. Make you to bring plenty of water with you.
Dress in Layers: For the off season months, bring a waterproof jacket. As the day progresses, it’ll start warming up. So keep a long sleeve and short sleeve shirt with you.
Proper Footwear: While the main trail along Redwood Creek is well maintained, you’re still in a wild place. There’s tree stumps, rocks, dirt, etc. Hiking boots or sturdy shoes with good grip would suffice.
Snacks: You can pick some up at the Cafe or save some money/time by bringing them with you. Just be sure to pack out any empty wrappers, bags, etc.

Keep to the Trail
We don’t mean to be preachy, but it needs to be said. It’s important to remain on the trail and boardwalk in Muir Woods. As tempting as it may be to get closer, please don't.
Redwoods have shallow roots and stepping on the little ones can stunt growth. Trampling through the soil could also have devastating consequences for the insects and other wildlife that depend on it as their habitat.
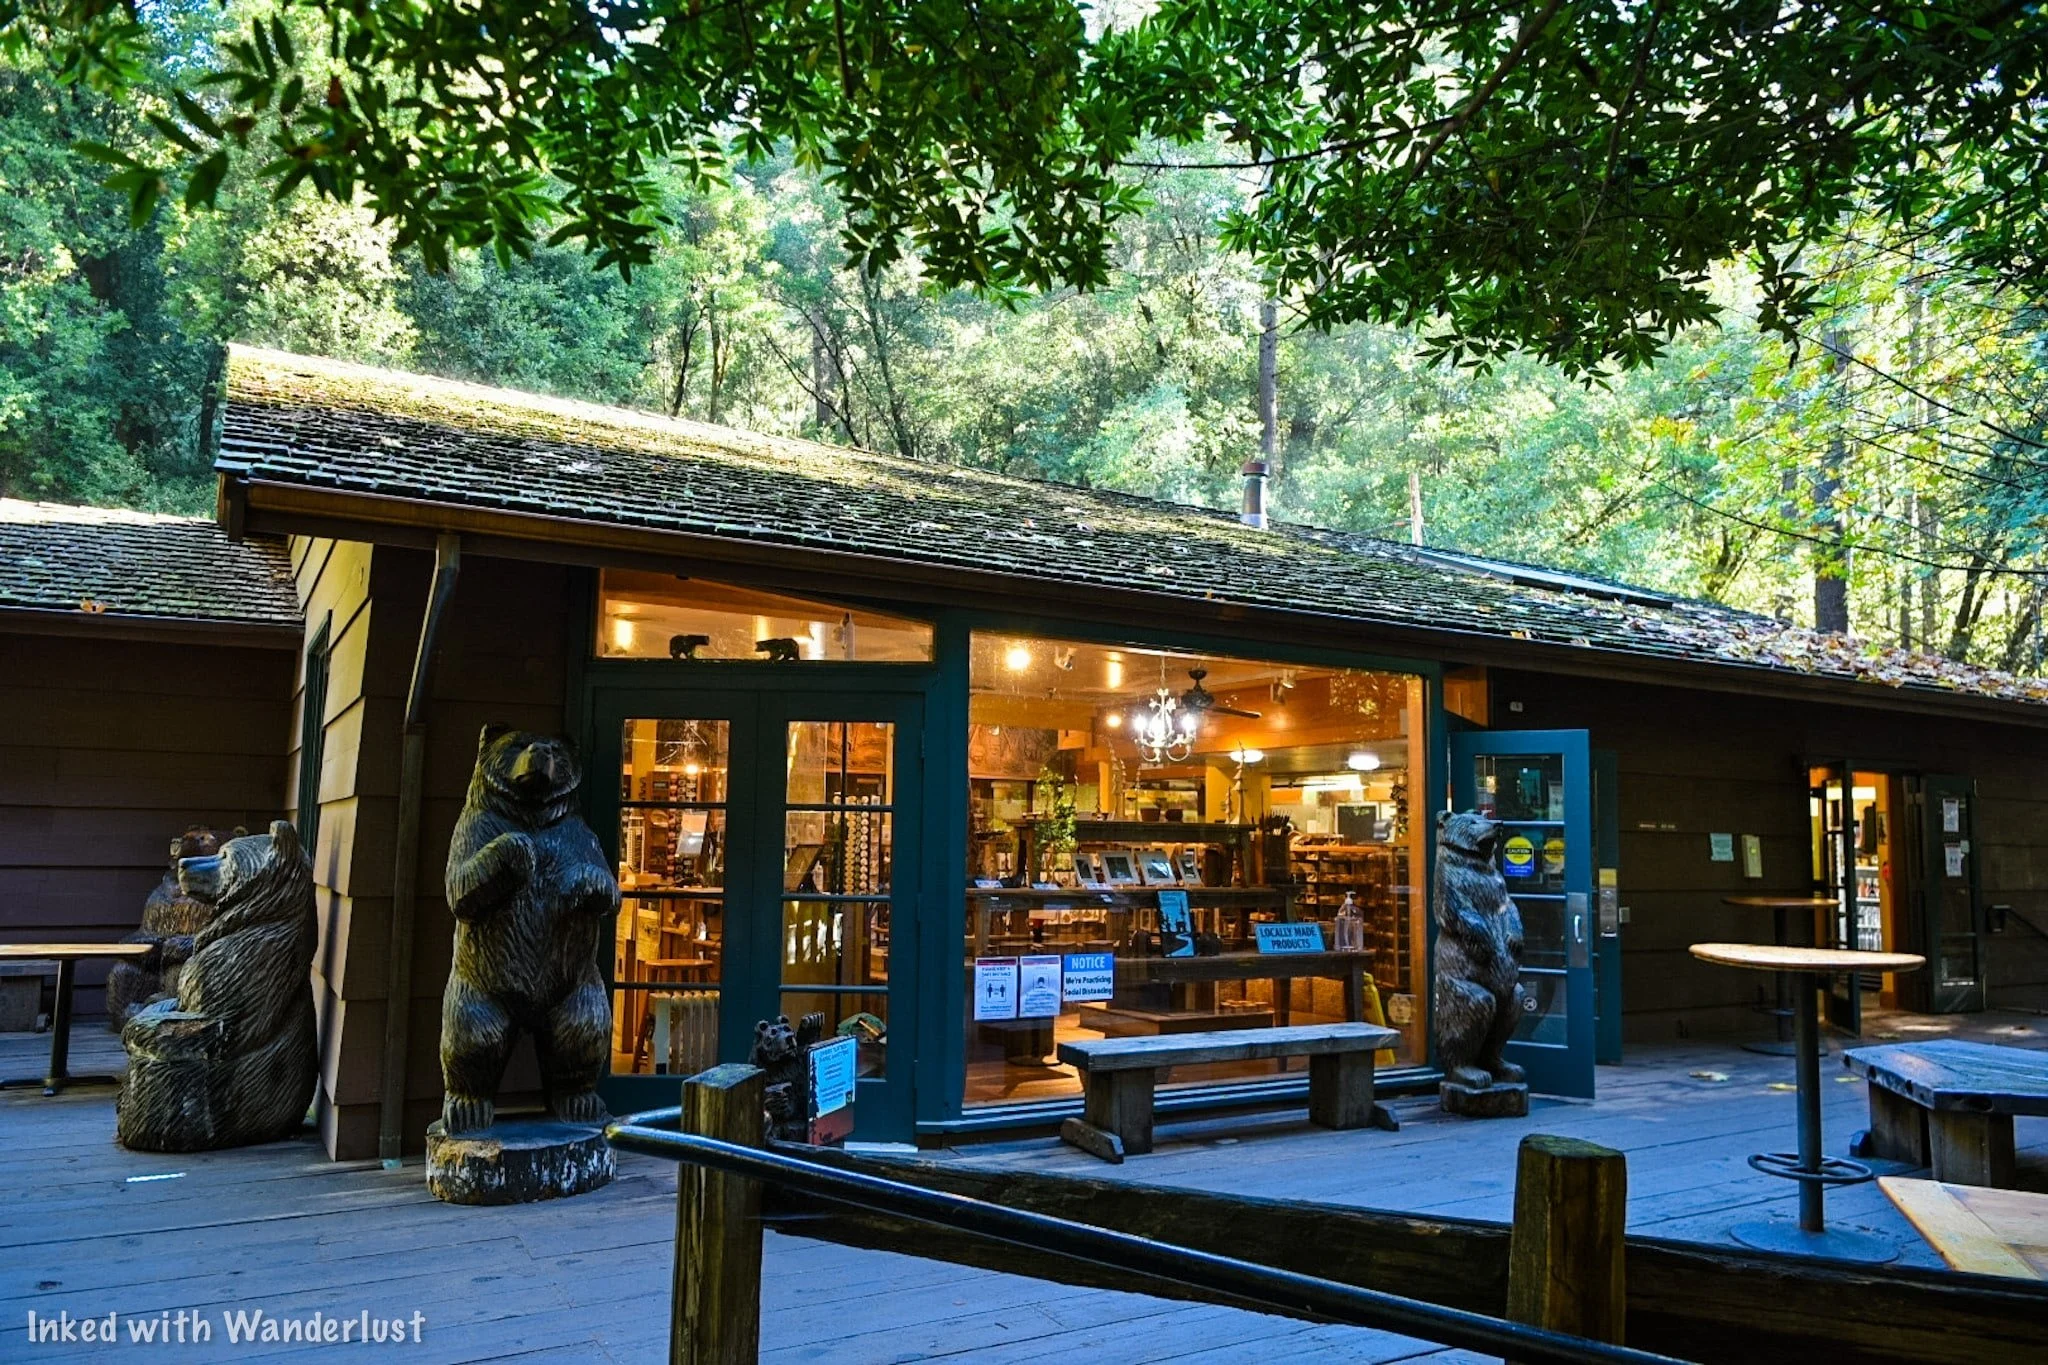
Muir Woods Gift Shop & Cafe
About 20 yards behind the visitor center, you’ll find the gift shop and cafe. Both are housed in one building. The gift shop has all the usuals; shirts, framed pictures, pins, patches, coffee mugs, etc.
The cafe mostly serves a variety of hot and cold sandwiches and some grab & go options. I’ve had the gilled cheese with tomato soup and found it to be fine. Nothing out-of-this-world, but it did the job. You can see their full menu here.
Things to Do Nearby
While you could easily spend an entire day at Muir Woods, if you’re up to it, there are a few places nearby that are worth a visit in their own right.
Muir Beach Overlook: This stunning overlook is located about 10-minutes from Muir Woods. From it, you have endless views of the Pacific Ocean, stunning views of the beach and coastline, and you’ll also learn some awesome military history on top of that. You can read all about it on our post here.
Stinson Beach: About 20-minutes is all it takes to drive to Stinson Beach from Muir Woods.
Kirby Cove Hiking Trail: About 13-miles from Muir Woods and on the Marin Headlands side of the Golden Gate Bridge, this short hiking trail takes you to a stunning cove with jaw an amazing view of the bridge and city. Read our guide on it here.
Mount Tamalpais State Park: What the locals refer to as, “Mount Tam”, this stunning State Park has a huge network of hiking trails through amazing forests, waterfalls, the mountain’s summit, and more!


Conclusion
We thoroughly enjoyed our visit to Muir Woods and we have no doubt you will too. We’re so excited to finally add it to our website and help you put together a trip for yourself. Let us know in the comments if you have any further questions!
We hope you enjoyed this article and it was helpful to you. If so, please support our website by sharing it with your friends and family on Facebook, Pinterest, or your favorite social media site. You can further show support by staying on and reading one or more of the related articles above.
Thanks for reading and safe travels!

The Ultimate Guide To Visiting and Touring Alcatraz Island
Welcoming more than 1.4-million people annually since opening its doors to tourists in 1973, Alcatraz is one of the undisputed top rated attractions…
Welcoming more than 1.4-million people annually since opening its doors to tourists in 1973, Alcatraz is one of the undisputed top rated attractions in San Francisco.
Its rich, yet complicated history makes it appealing to anyone with even a remote interest in the subject. While its gone through multiple stages of claims and ownership, what it’s most famous for is its service as a Federal Penitentiary.
From 1933 to its closing in 1963, Alcatraz, or simply, “The Rock”, housed some of the most notorious inmates in the United States, including; Al Capone, George “Machine-Gun” Kelly, Bob Stroud, and Roy G. Gardner.

Though many have tried, Alcatraz was considered inescapable. Most escape attempts ended in surrender or death of the escapee. Five inmates, however, were never found. Assumed to have drowned in the frigid waters of the bay.
These days, visitors are welcomed and tours of the cell house and island are offered daily. With the click of a mouse, you can visit this historic place for yourself.
This guide will cover everything you’ll need to know, including; making reservations, prices, tour types, and history. You’ll also get sneak peaks of what you’ll see during the tour of the cell house tour.
NOTE: This post is long. At the top of the page, you’ll find jump links to the four major sections of the post. While we encourage you to read the whole thing, if you’d rather skip to what you’re most interested in, just click or tap to go to that specific section.
History of Alcatraz

Military Period (1850 - 1933)
Alcatraz’s notoriety started back in 1850 when, at the behest of a joint Navy and Army commission of implementing a “triangle of defense” to guard San Francisco Bay, President Fillmore signed an executive order to secure land around the bay for such use. This included Alcatraz.
Construction on the lighthouse was completed in 1854, beginning its service as the first lighthouse on the Pacific Coast. By 1859, 87 men of Company H, Third US Artillery took post on the island and by 1863 would take their first prisoners by seizing a confederate ship and imprisoning its crew.
The prison was heavily used during the Spanish-American War and by its conclusion in 1898, Alcatraz would be severely overcrowded. This resulted in the building of the upper prison on the parade ground at the turn of the century.
In 1912, the new cell house (the one you see today) was built. It was constructed using convict labor and finished in the same year. This would be the final cell house built under Military supervision.
By 1930, the Federal Government was in need of a tough prison that could house a criminal population that was either too dangerous, too difficult, or had a high potential for escape. So in 1933, Alcatraz was transferred to the Feds and began its service as a Federal Penitentiary.

Federal Penitentiary Period (1934 - 1963)
The whole goal of the Federal Government was to have a prison that criminals feared. ‘The Rock’, fit the bill and quickly earned a reputation of being tough, miserable, and impossible to escape from. The cells were small (even by prison standards) and frills were minimal.
A man by the name of James A. Johnston would be appointed as its first Warden and would go on to serve for 14-years, nearly half of its operating years. Warden Johnston implemented many rules and other security features such as fortified bars, strategically-placed guard towers, and a dozen inmate counts per day.

Though it had a reputation of being “escape-proof”, some inmates challenged this as several attempts were made, most of which resulted in surrender or death of those involved. There are two notable attempts we will briefly cover.
Battle of Alcatraz
In 1946, several inmates planned and executed an escape attempt that quickly went awry and resulted in the deaths of all inmates directly involved and two guards. Not to mention over a dozen additional guards getting severely injured.
The three main inmates never made it out of the cell house and, after refusing to surrender, died in a hail of gunfire in a small utility corridor by Guards and U.S Marines. If you would like to read about it from the point of view of an inmate who was there, read:
Inside Alcatraz: My Time on the Rock: by Jim Quillen (highly recommended)

Frank Morris & The Anglin Brothers
Probably the most famous escape attempt, due to a Clint Eastwood film being made about it, is the one by Frank Morris and brothers John & Clarence Anglin. The men spent several months chipping away at the deteriorating walls around the vent at the rear of their cells.
They also made dummy models of their heads out of paper, plaster, and real hair, placing them in their beds to fool guards into thinking they were asleep. Sometime after final count on June 11th, 1962, the three men made their move by squeezing through the vent and to the roof through the utility corridor.

They successfully made it to the island’s north shore without being detected, hastily constructed a raft made from 50 raincoats, and headed out into the frigid waters, never to be seen again.
The official conclusion from the Warden was the men drowned. In reality, no one knows for sure. The water temperatures in the Bay are notorious for being very cold with strong currents. Their fate remains a mystery to this day.
Book - Escaping Alcatraz: The Untold Story of the Greatest Prison Break in American History
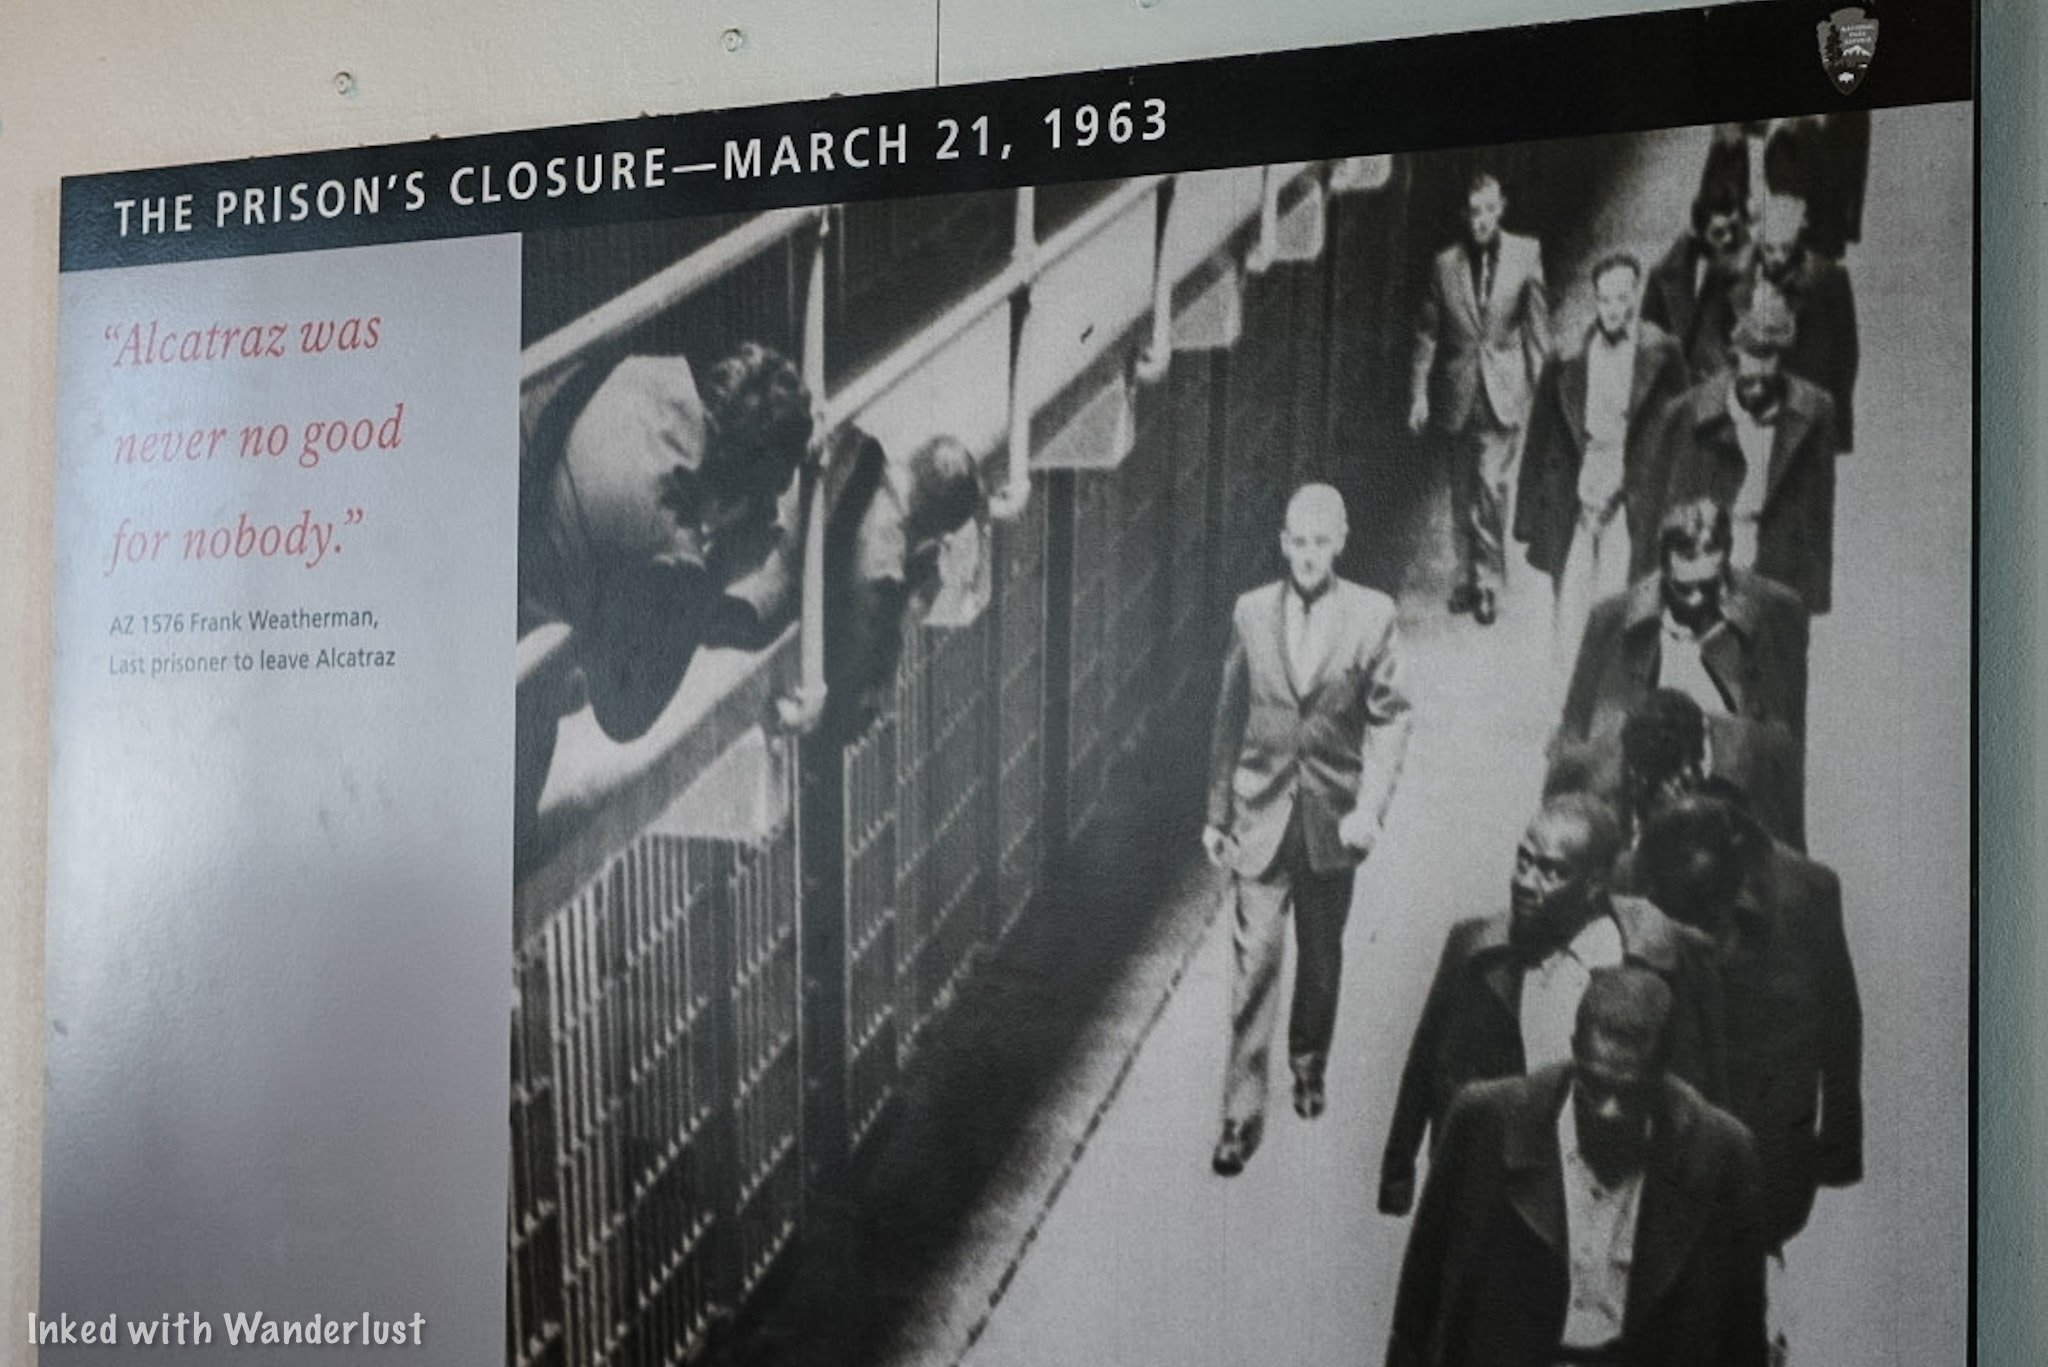
While successful in building an image feared by criminals, Alcatraz would prove itself to be too costly. The salty ocean air was slowly deteriorating the prison. Rising maintenance costs and other ongoing expenses proved to be too much. By order of Attorney General Robert F. Kennedy, Alcatraz was closed in 1963.
Tribal Occupation Period (1969 - 1971)
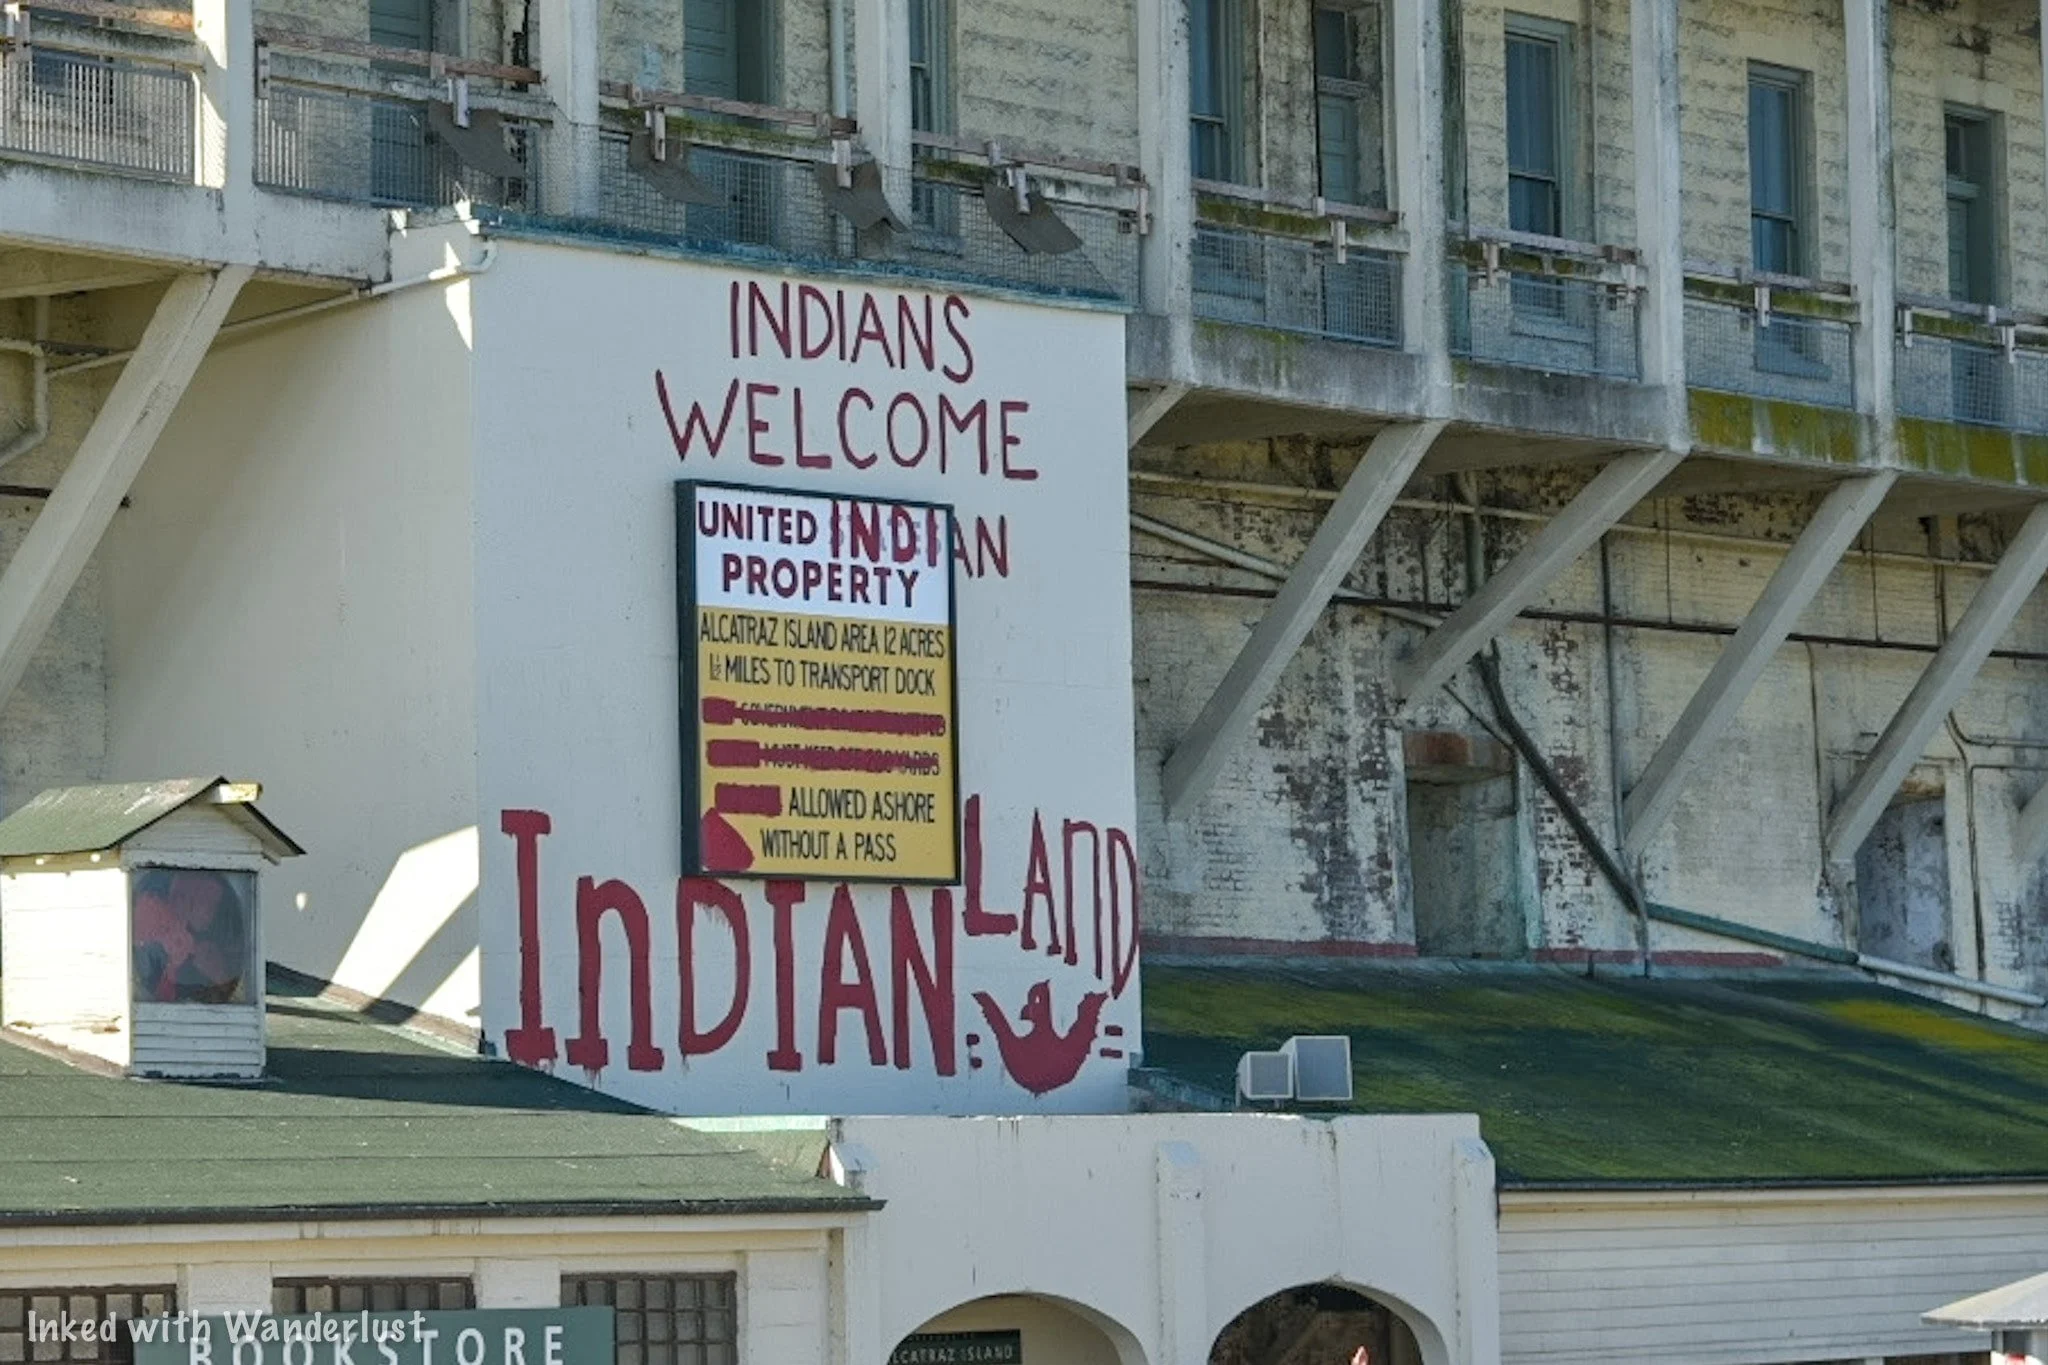
In 1969, an activist group called, “Indians of All Tribes”, landed on Alcatraz with the intent of reclaiming it as Native-American land. They did so in the name of an 1868 treaty that allowed for Indians to reclaim unused federal land. They wanted to redevelop the island into an Indian cultural center and school.
As is often the case, the federal government didn’t agree with their interpretation of the treaty and swiftly began negotiating with the group. It soon became clear that the group would settle for nothing less than complete ownership of the island. Soon, the group of activists on the island would swell to over 300 people.
When negotiations went nowhere, the Feds cut power to the island and used other tactics in an effort to remove the activists. In 1970, after the death of his young Daughter on the island, the leader of the group, Richard Oakes, left the island.
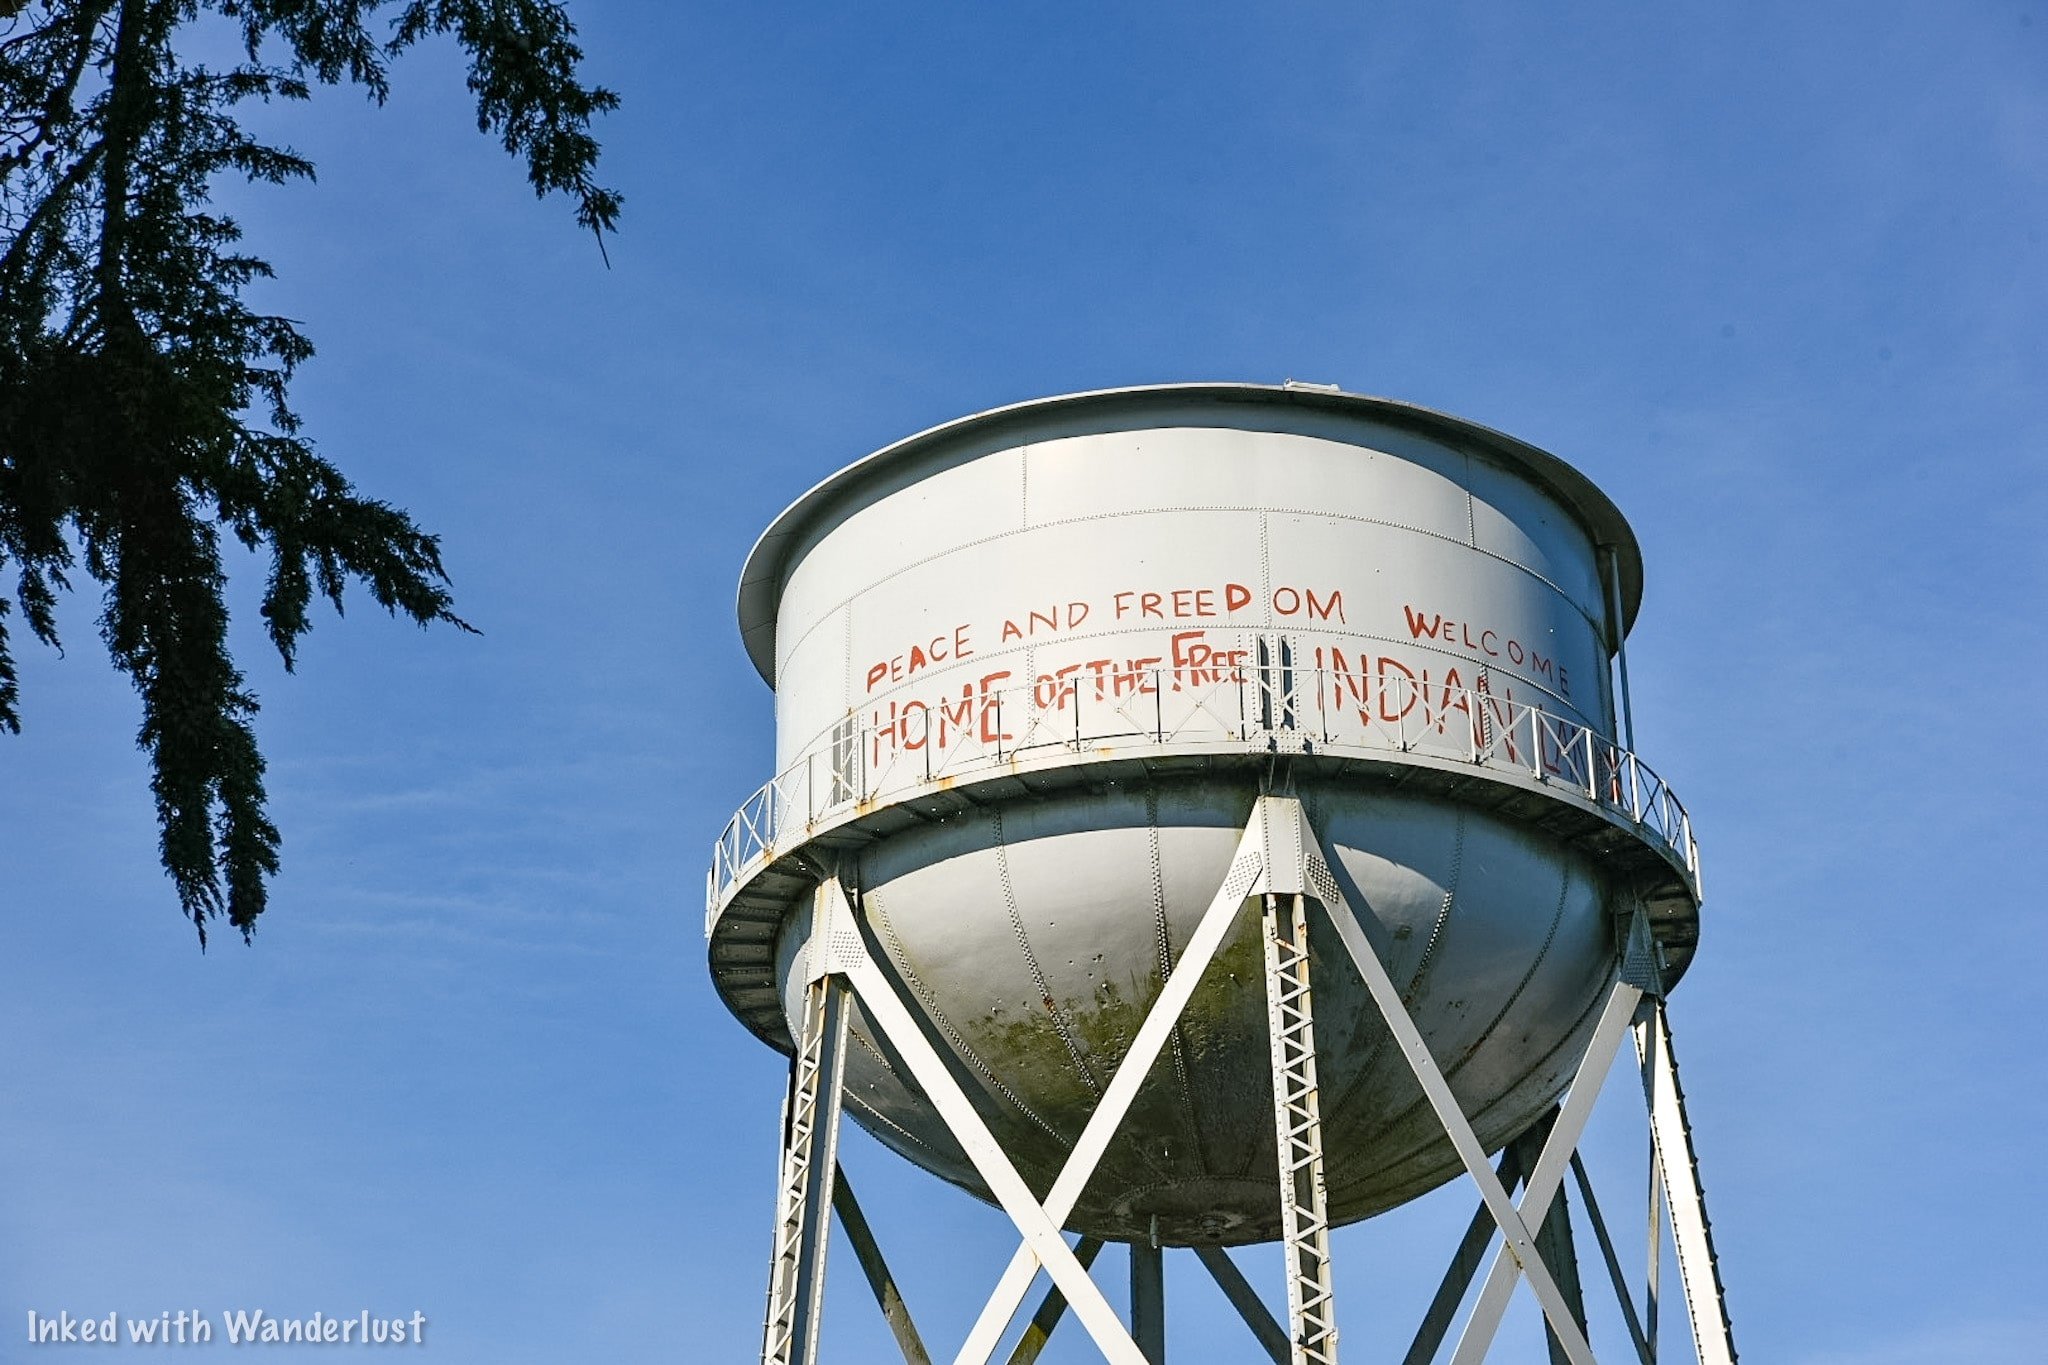
Eventually, more activists would leave and by 1971, just a handful of men, women, and children remained. At this point, the Feds moved onto the island and removed them. While technically defeated, the actions here inspired many Indian related protests at locations across the country, including Mount Rushmore and Plymouth Rock.
If you want to read about the Indian occupation in greater detail (and we suggest you do), read this article. They give a great account of what happened, why it happened, and the end result.
National Park Period (1973 - Present)

During Alcatraz’s operational years, there were only a few ways you could go to the island; you were either working there, incarcerated there, or visiting an inmate. That changed in 1973 when Alcatraz was transferred to the National Park Service and began offering public tours.
The NPS has done a wonderful job maintaining the island and keeping the facilities as authentic as possible while allowing the public to get up close and personal to what was once described as, “hell on earth”.
You, too, can visit and tour Alcatraz for yourself. However, there is a lot to know and you’ll need to be prepared. Now that we’ve gone over the general history of the island, lets get to the information you’ll need to know in order to go.
(Click to go back to top)
Visitor Information

Buying Tickets
Much like anything else, there is a fee to tour the island. The fee you’ll pay includes your entrance to Alcatraz, the cell house tour, and the round-trip ferry ride. Prices for the day tour are as follows (subject to change):
$41.00 - Adult (12 years old and up)
$38.65 - Senior (62 years old and up)
$25.00 - Child (5 - 11 years old)
$119.60 - Family Pack (Two adult & two child tickets)
As far as purchasing tickets go, you have two options:
Online: This is the preferable and easiest way. Often times, it’s the ONLY way. Tickets are known to sell out months in advance. So purchasing your tickets right when you decide on a date is the only sure-fire way. Alcatraz City Cruises is the official concessioner for Alcatraz tickets. You’ll see many others but they’re middle-men and you’ll end up paying more.

Purchase Day-Of: As stated above, tickets have been known to sell out far in advance. We’re not saying it’s impossible to get day-of tickets, but it’s not worth risking the disappointment. If you decide to go this route, head to Pier 33, scan the QR code at the entrance with your phone, see if there’s availability and if there is, make your purchase.
After you make your purchase, you’ll be emailed a receipt with a QR code (your tickets are contained within it). Simply screenshot it with your phone and present it to the ticket booth upon arrival. They’ll scan it and send you on your way. As always, be sure to print a copy just in case your phone dies.
Types of Tours
While the day tour is the most popular, there are two other types of tour you should be aware of:
Night Tour: Limited to just a few hundred visitors per night, the night tour gives you the opportunity to see a sure-to-be spectacular sunset over the Golden Gate Bridge and experience the island in the dark. Prices are similar to that of the day tour but cost just a bit more.
Behind the Scenes Tour: Ever walk by a spot on the tour with the dreaded, “closed to the public”, sign? Here’s your chance to go to THOSE areas. While pricey, you and a group of no more than twenty are taken to areas of Alcatraz seldom seen by the public. Areas such as special gardens, the underground jail, and the tunnel that stretches from one end of the island to the other.

Best Time to Go
There’s really no bad time to visit San Francisco but in our opinions, September - November is best. Temperatures are warm but not unbearable and crowds are minimal.
Winter is when you’ll get the best deal on hotels but you’ll also be contending with regularly occurring rain showers. Spring is good due to mild temps and rain is nearly non-existent.
Summer, as you guessed, would be our least desirable time of year to go. It’s hot, crowded, and everything is pricier than usual. If you can help it, try either spring or fall.
Pier 33 - Alcatraz Landing
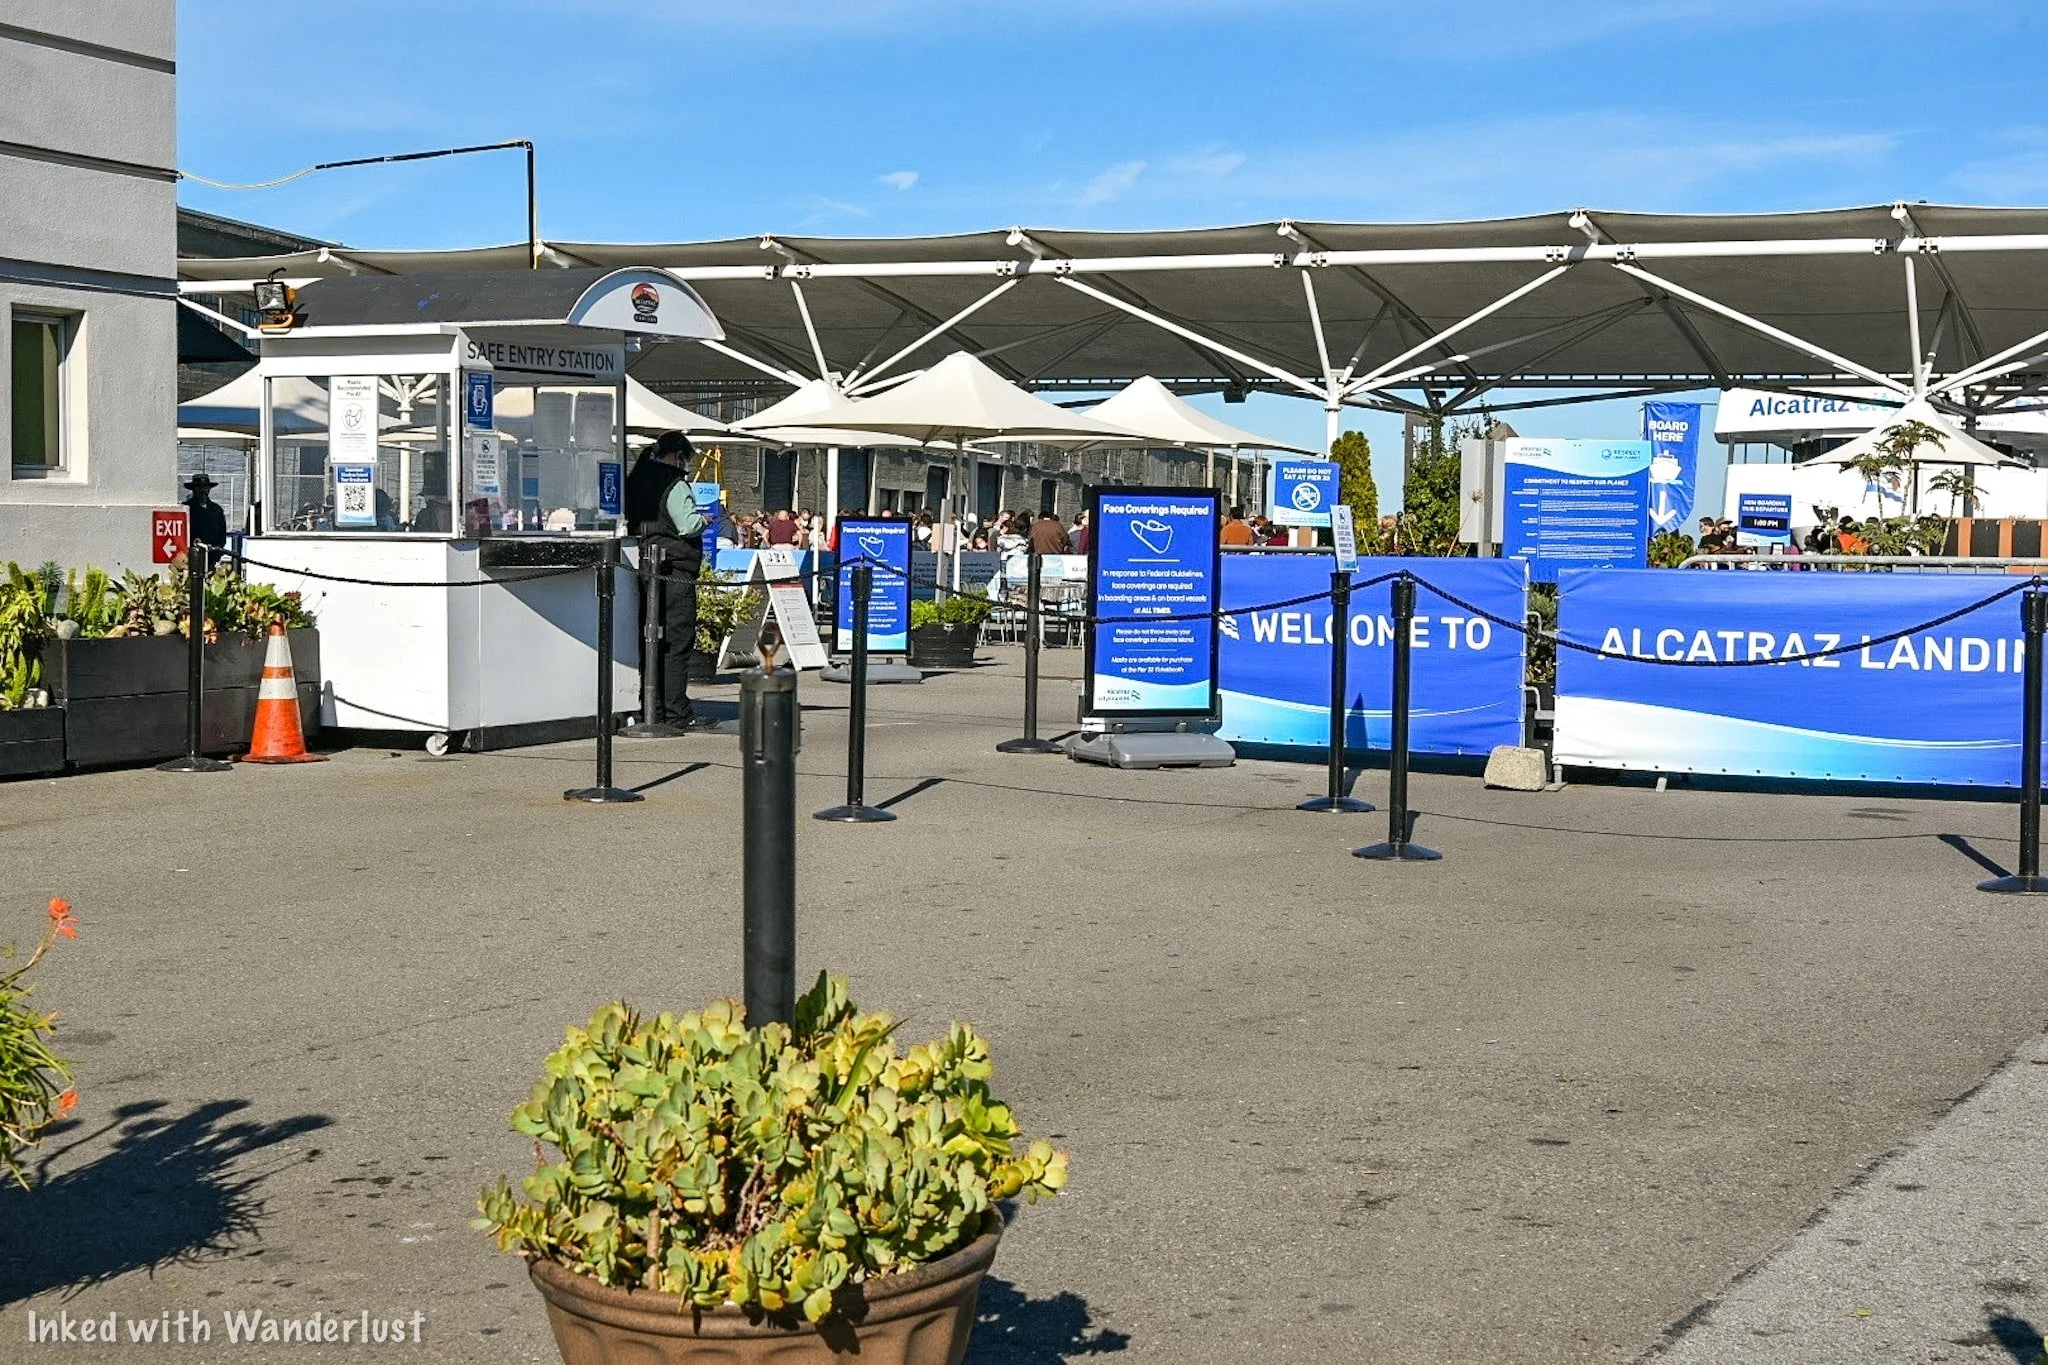
Location
Your journey to Alcatraz begins and ends at Pier 33 on the Embarcadero. The simplest and best ways to get there is by either walking, taking public transit, or a ride sharing option.
If you need to drive, parking can be found at Pier 29.5 (adjacent to Pier 33), across the street from the Exploratorium, a parking garage across from Pier 39, behind the ferry building, and other locations nearby. They all charge their own fees.
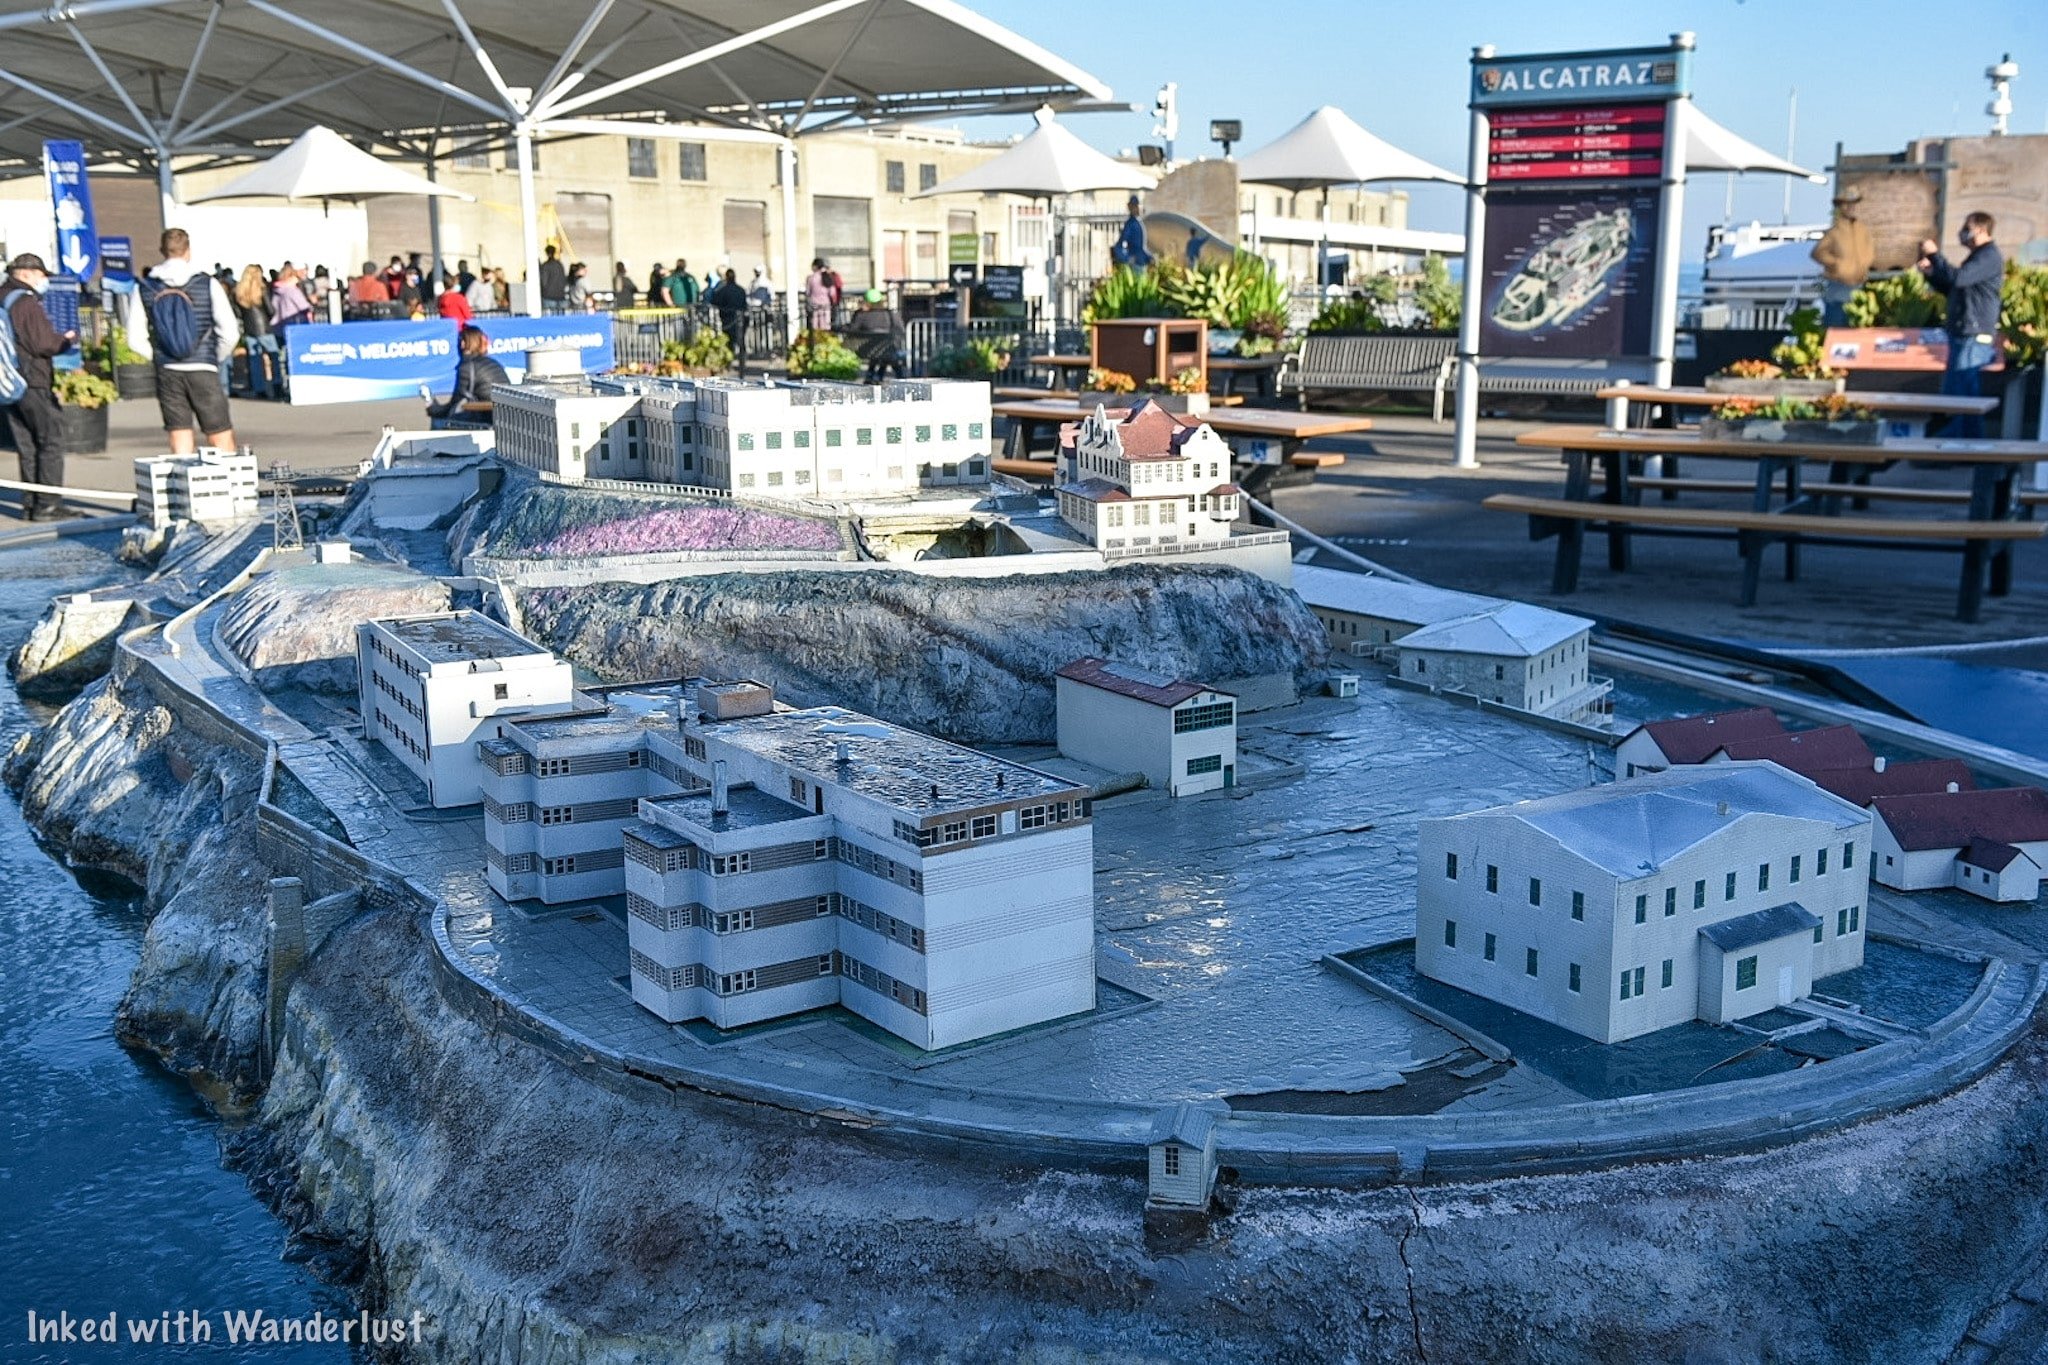
The boarding area contains multiple informative displays and a scaled model of what the island looked like when the prison was operational. There’s plenty of seating scattered about and portable restrooms.
You’ll see the boarding queue up front and at the entrance will be a sign indicating which group is boarding (your group is the time you selected during your ticket purchase).

You can arrive as early or as close to your departure time as you like. However, it is recommended to arrive one hour prior as the vessel is loaded on a first come-first serve basis. You could end up having to wait for the next one if it’s full.
*Side Note: It is here where you can request a Braille and American Sign Language transcript of the cell house tour.
Arriving at Alcatraz
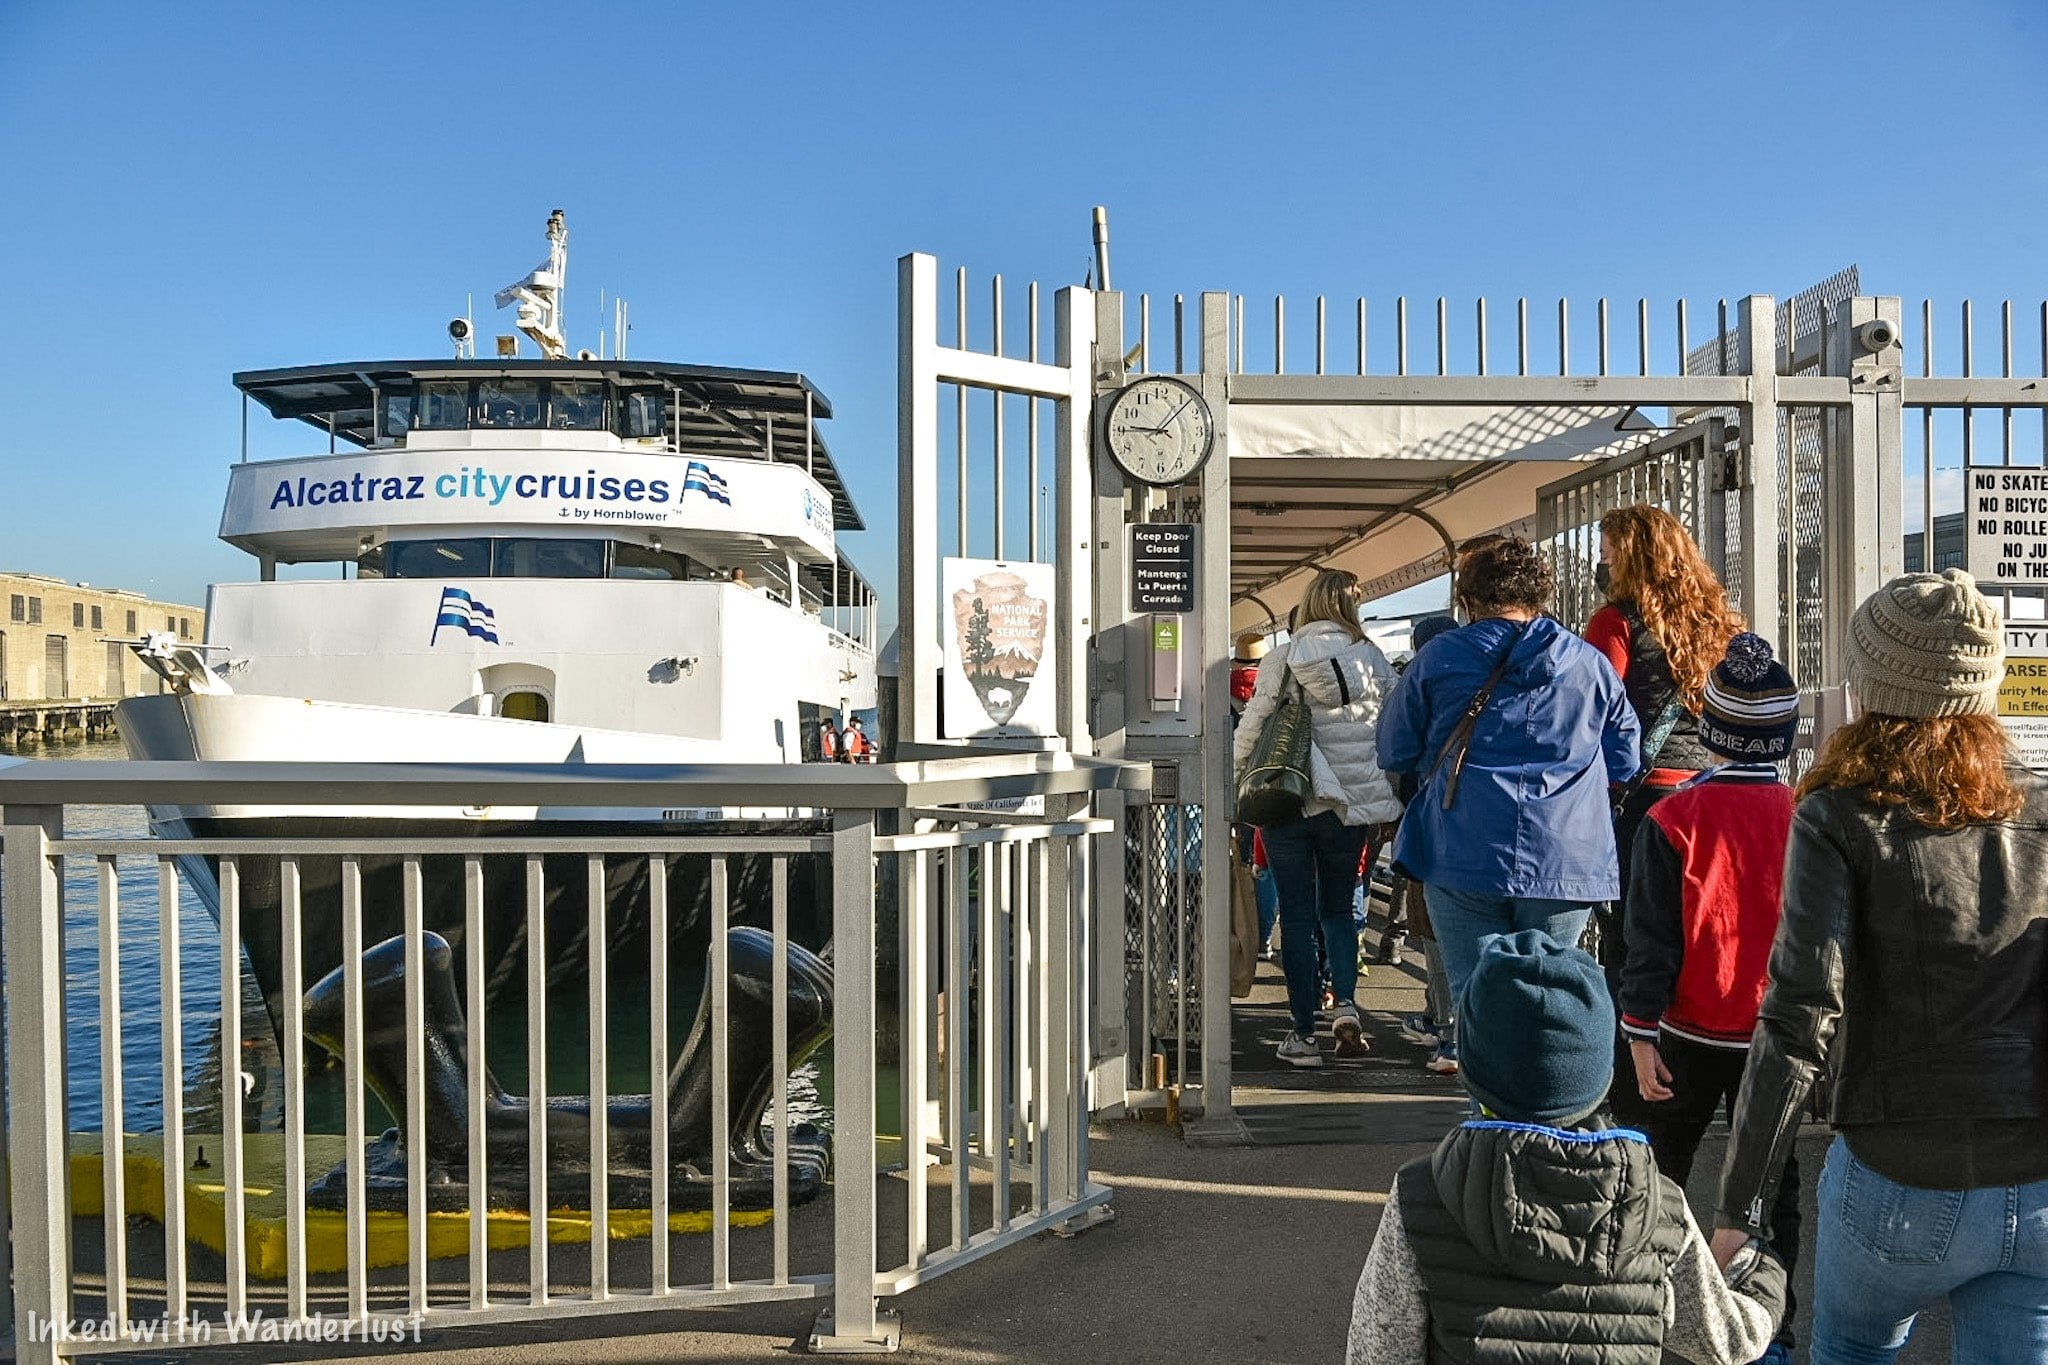
The Ferry Ride
The ride to Alcatraz is scenic and short, maybe 12-15 minutes. In fact, you’ll spend more time embarking and disembarking. If you’re going on a particularly busy day, be prepared for a cramped ride.
*Side Note: As of December 2021, masks are required in all boarding areas, on the vessel (ferry), and in all interior areas on the island. Vaccination status is NOT being checked.
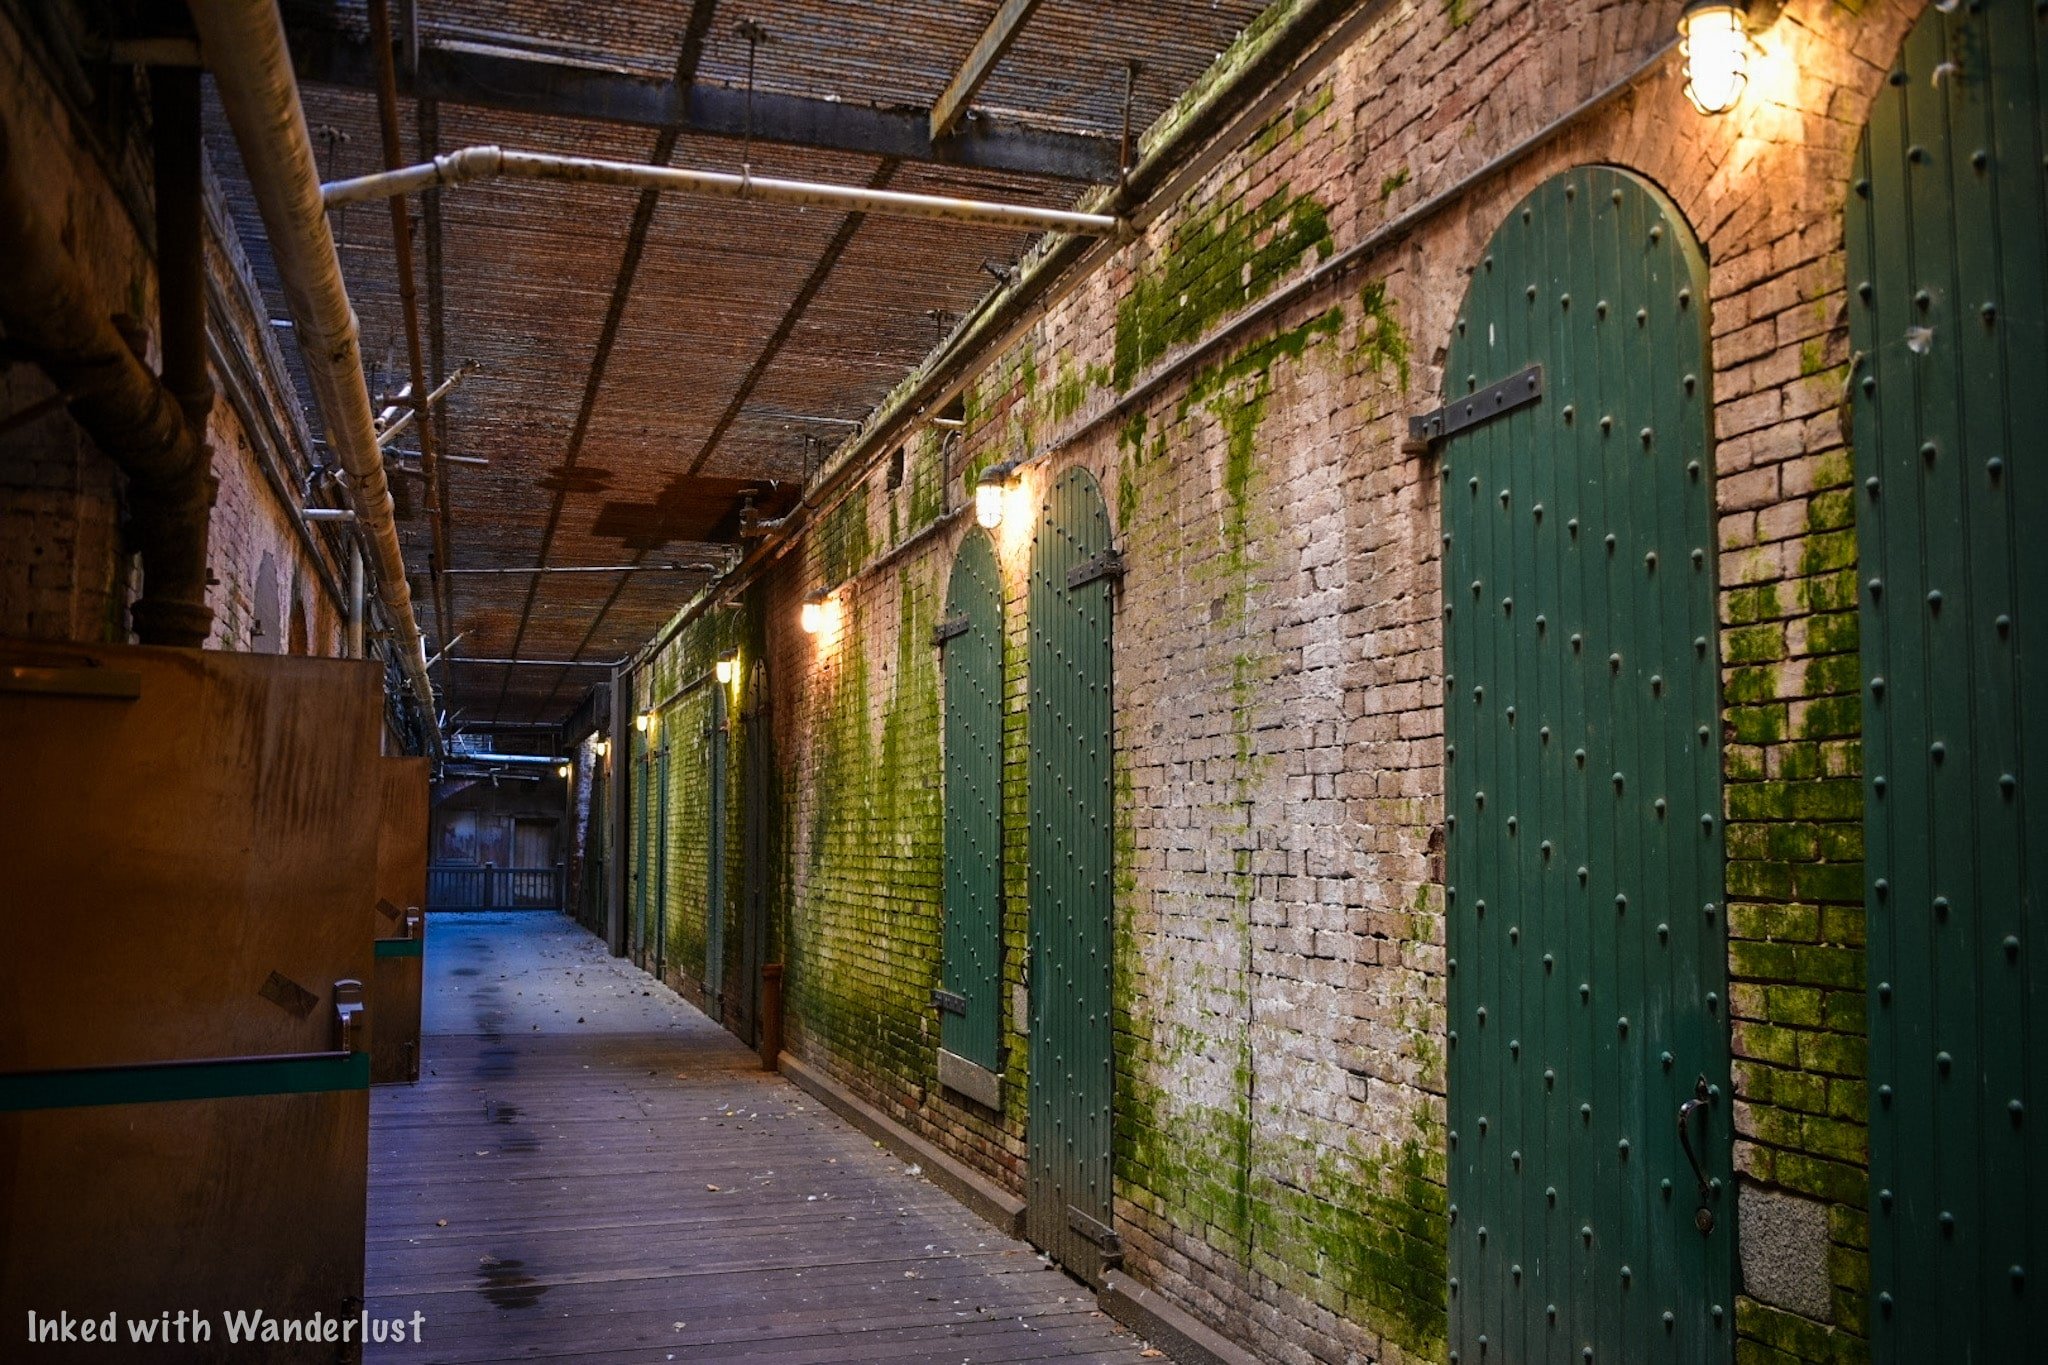
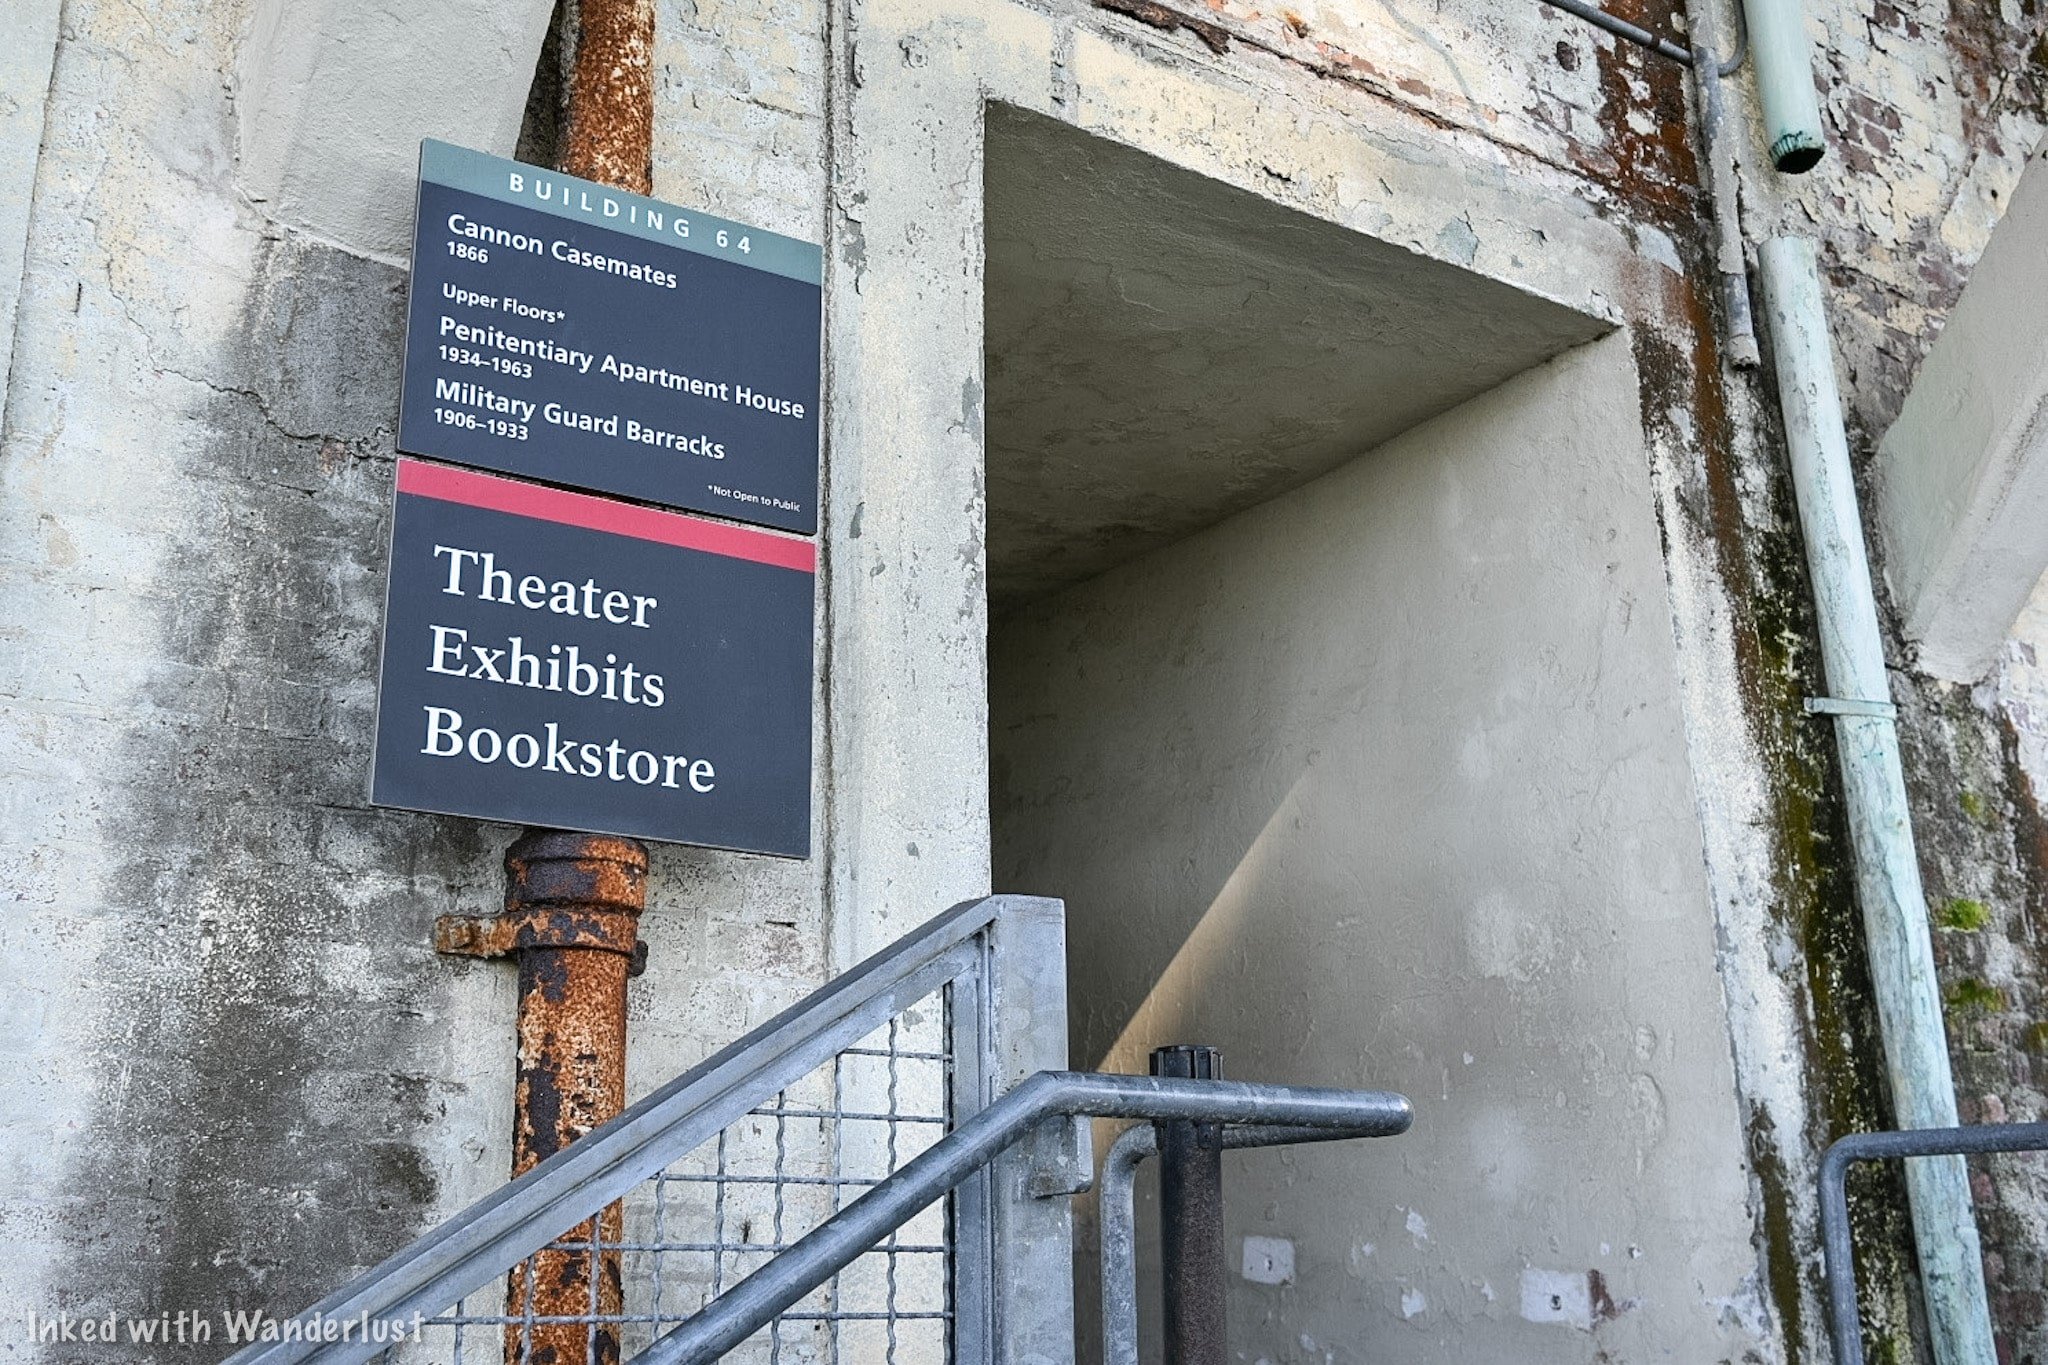
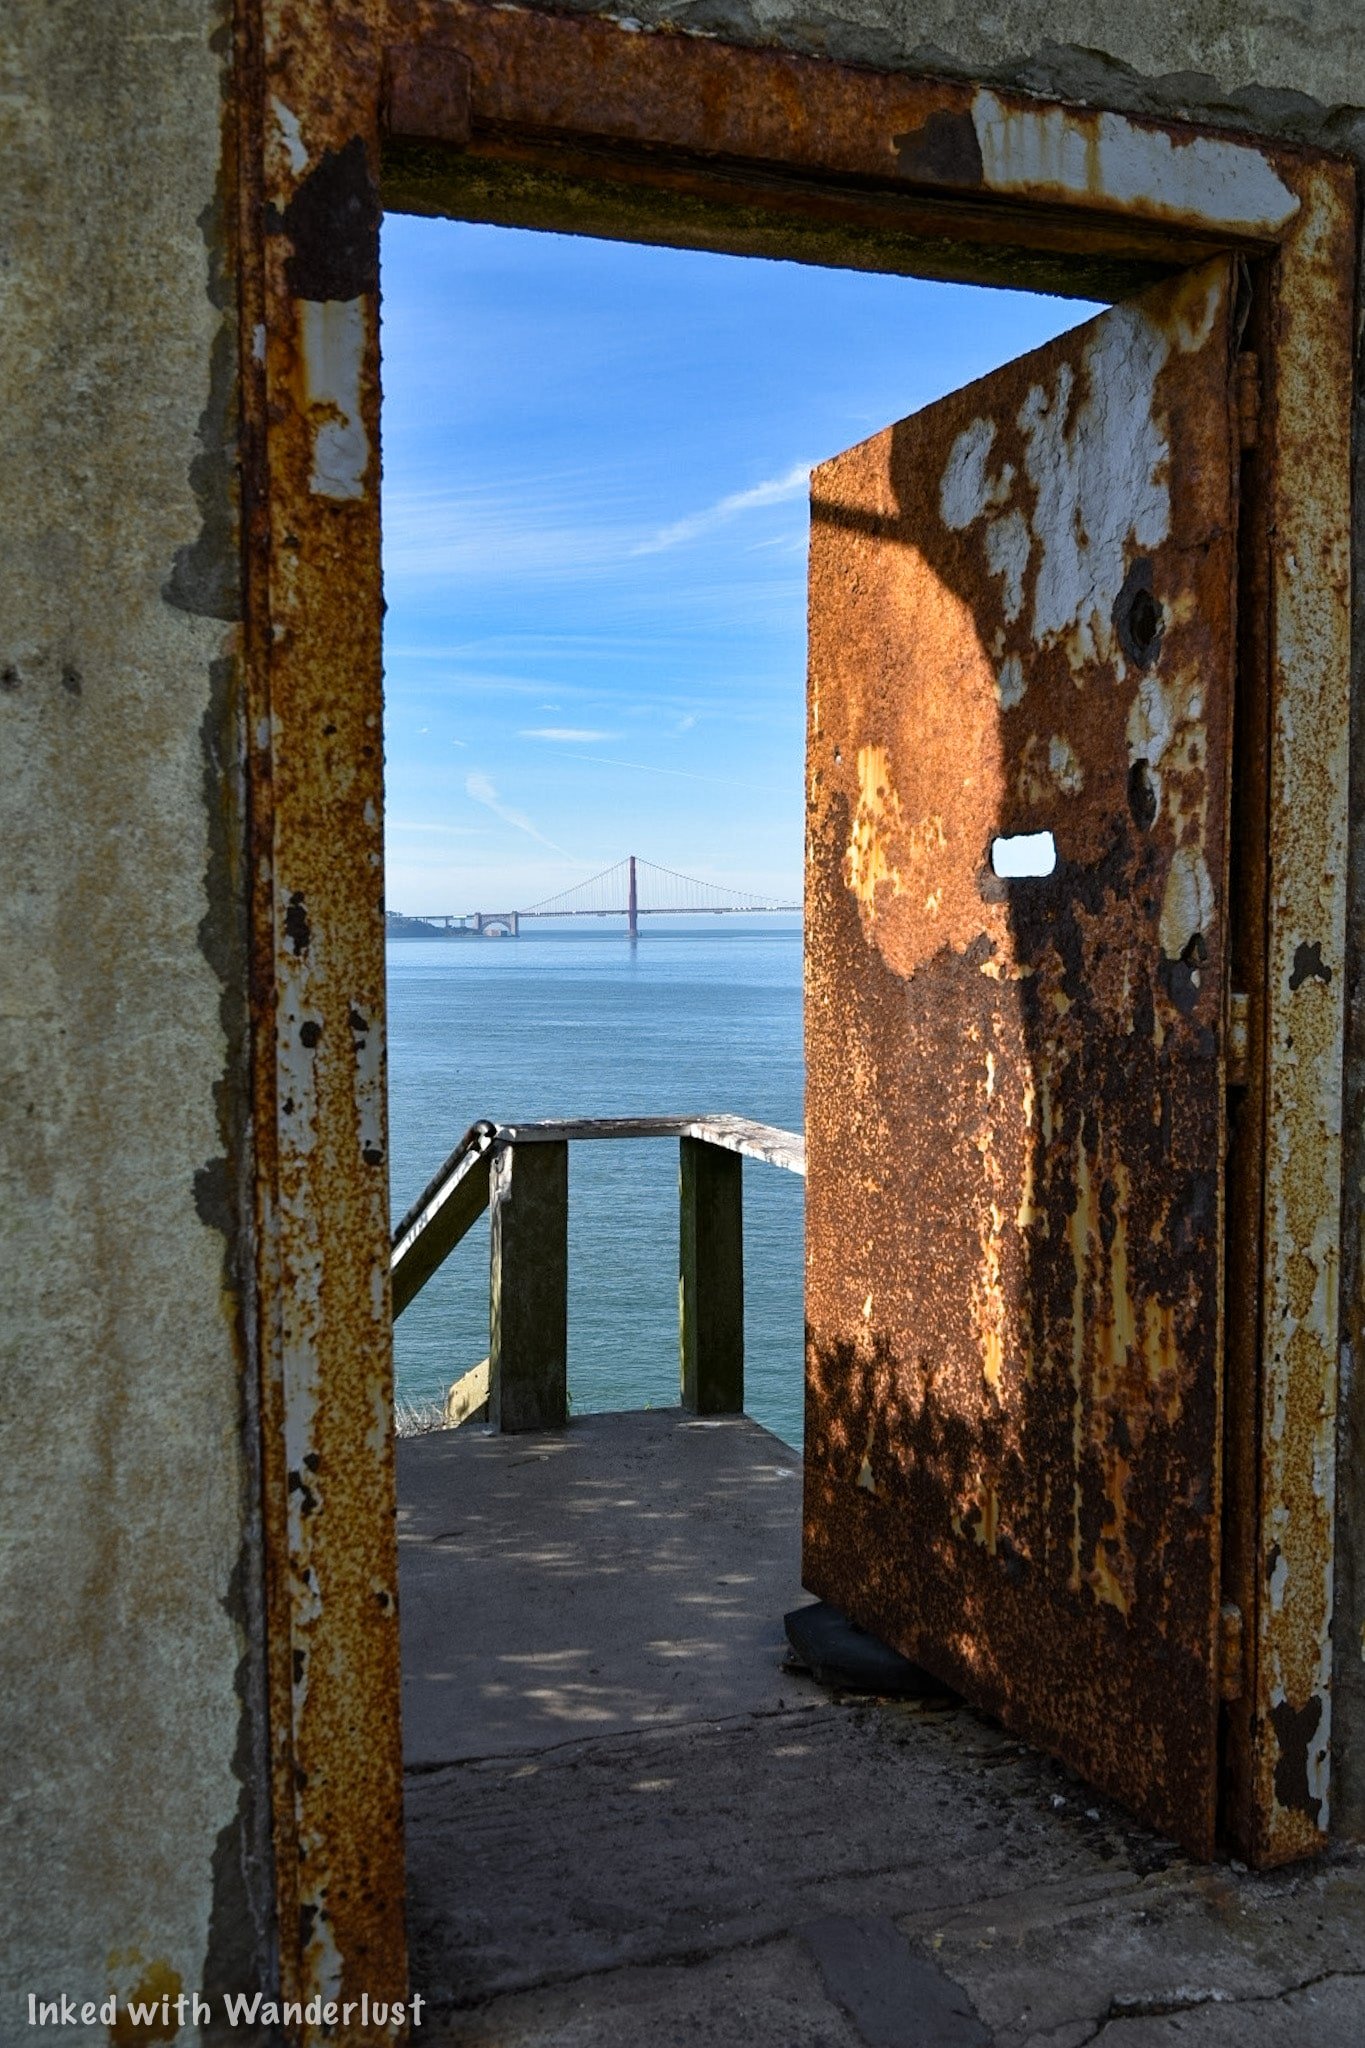
Building 64 will likely be the first thing you’ll notice as you pull into the dock. The upper section was where the military barracks were. Soldiers protecting the bay and guarding the prisoners slept here.
The lower section was part of the fortification protecting the bay. Looking closely, you’ll notice large square holes around the lower section. Those were canon ports.
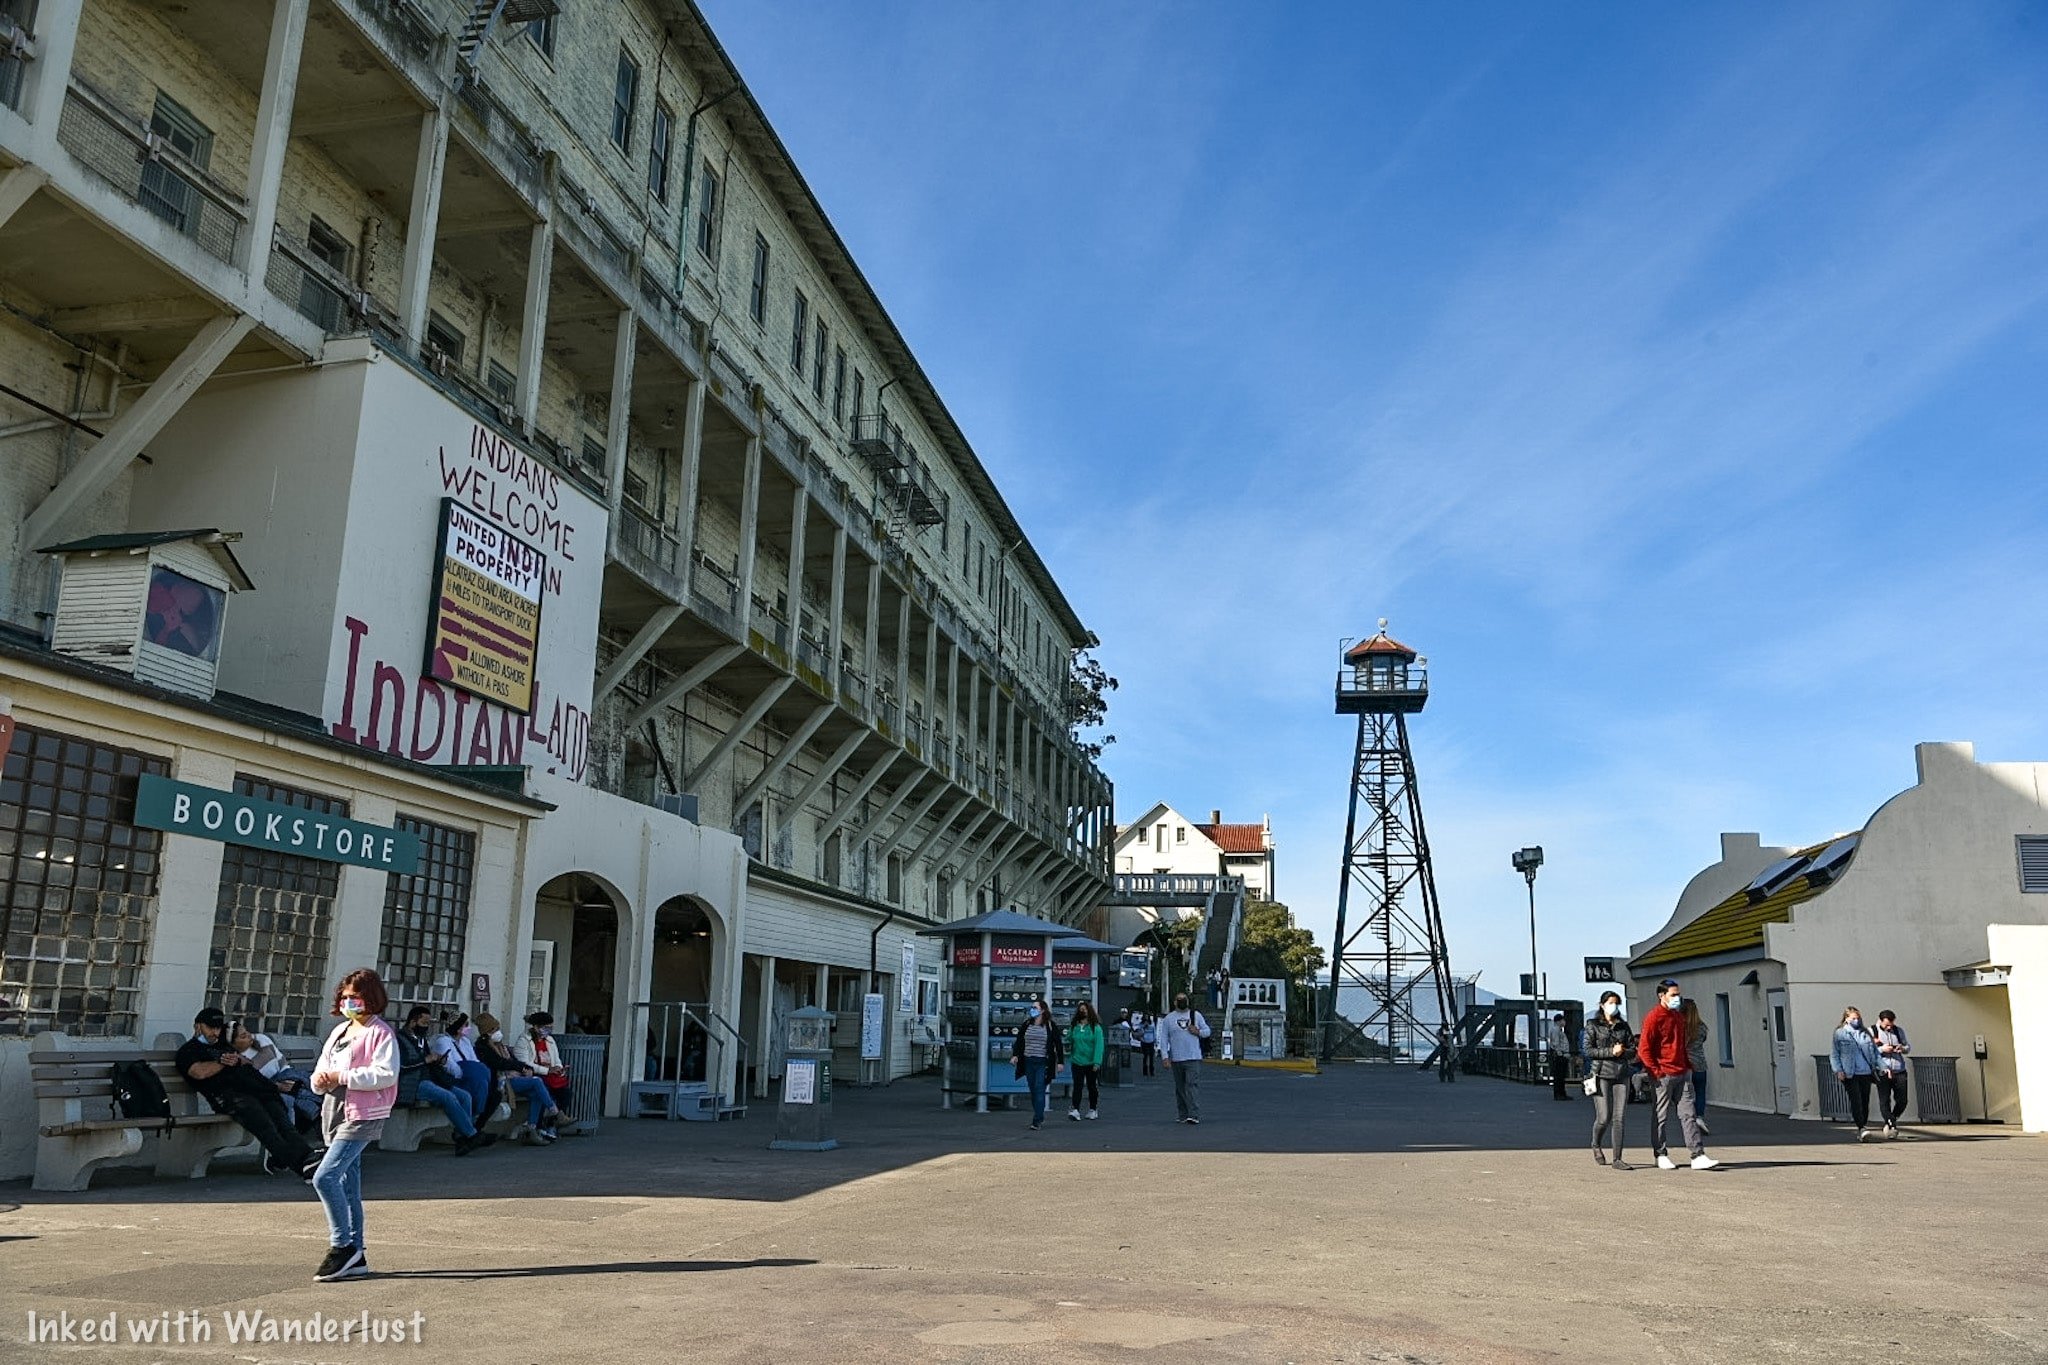
Before taking off, stop and listen to the Ranger presentation held in front of the bookstore. In it, the Ranger discusses the Indian occupation that took place on the island. You’re asked to take part in this but it isn’t required.
The small building across from the bookstore is the first of three restrooms on the island. There’s another adjacent to the entrance of the cell house and one more across from the administration building.
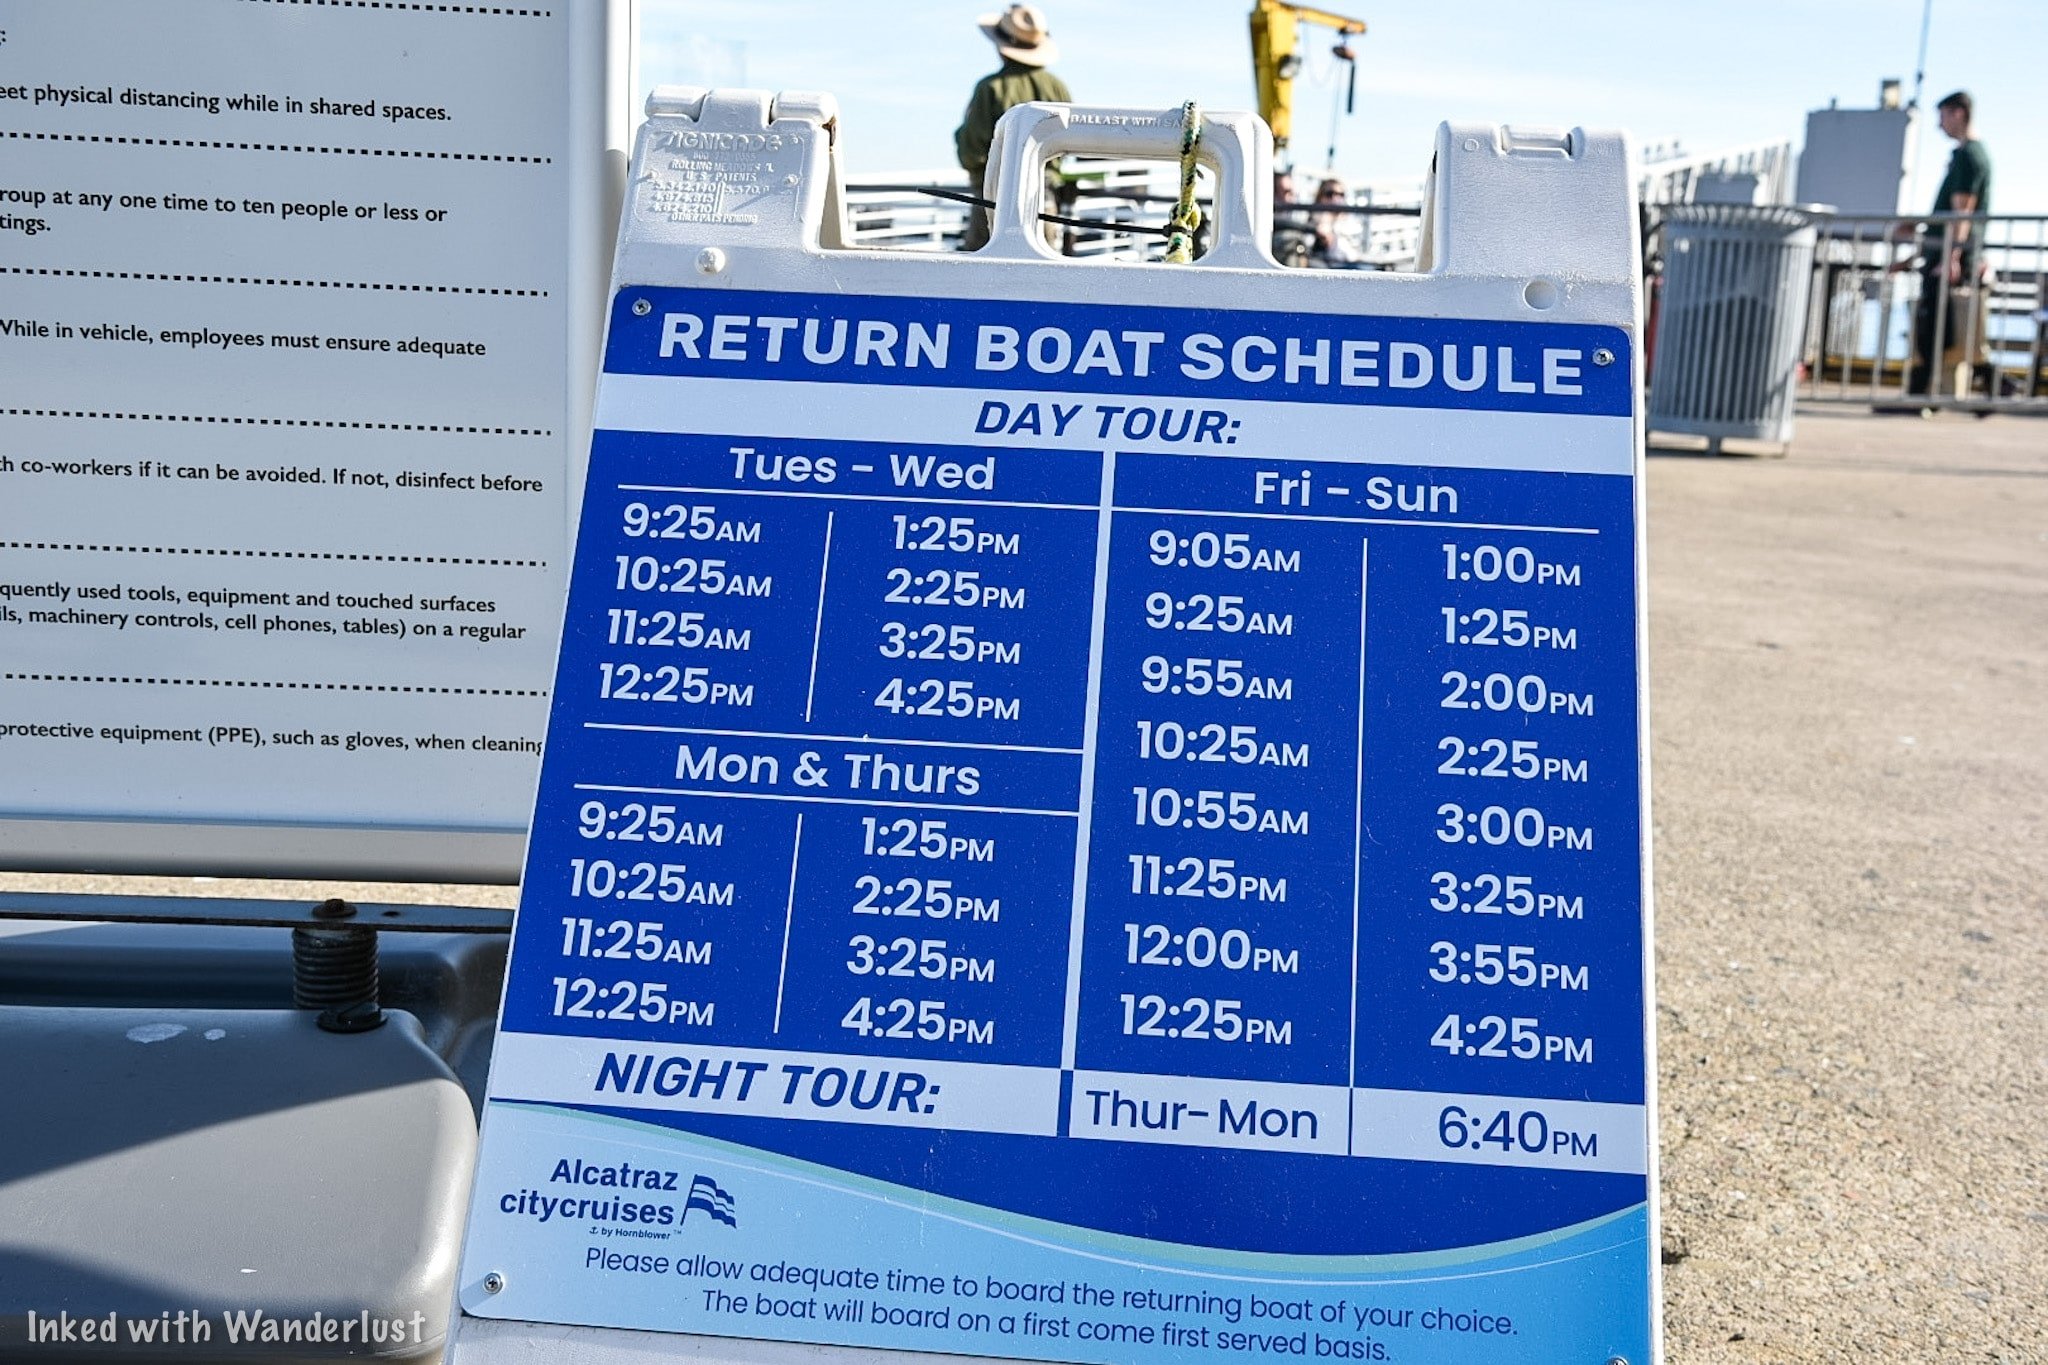
*Side Note: Take note of the sign displaying ferry return times. They vary according to day and the type of tour you’re on. Unless you grabbed a brochure, it would be a good idea to take a picture of this so you’ll know the next available ferry.
(Click to go back to top)
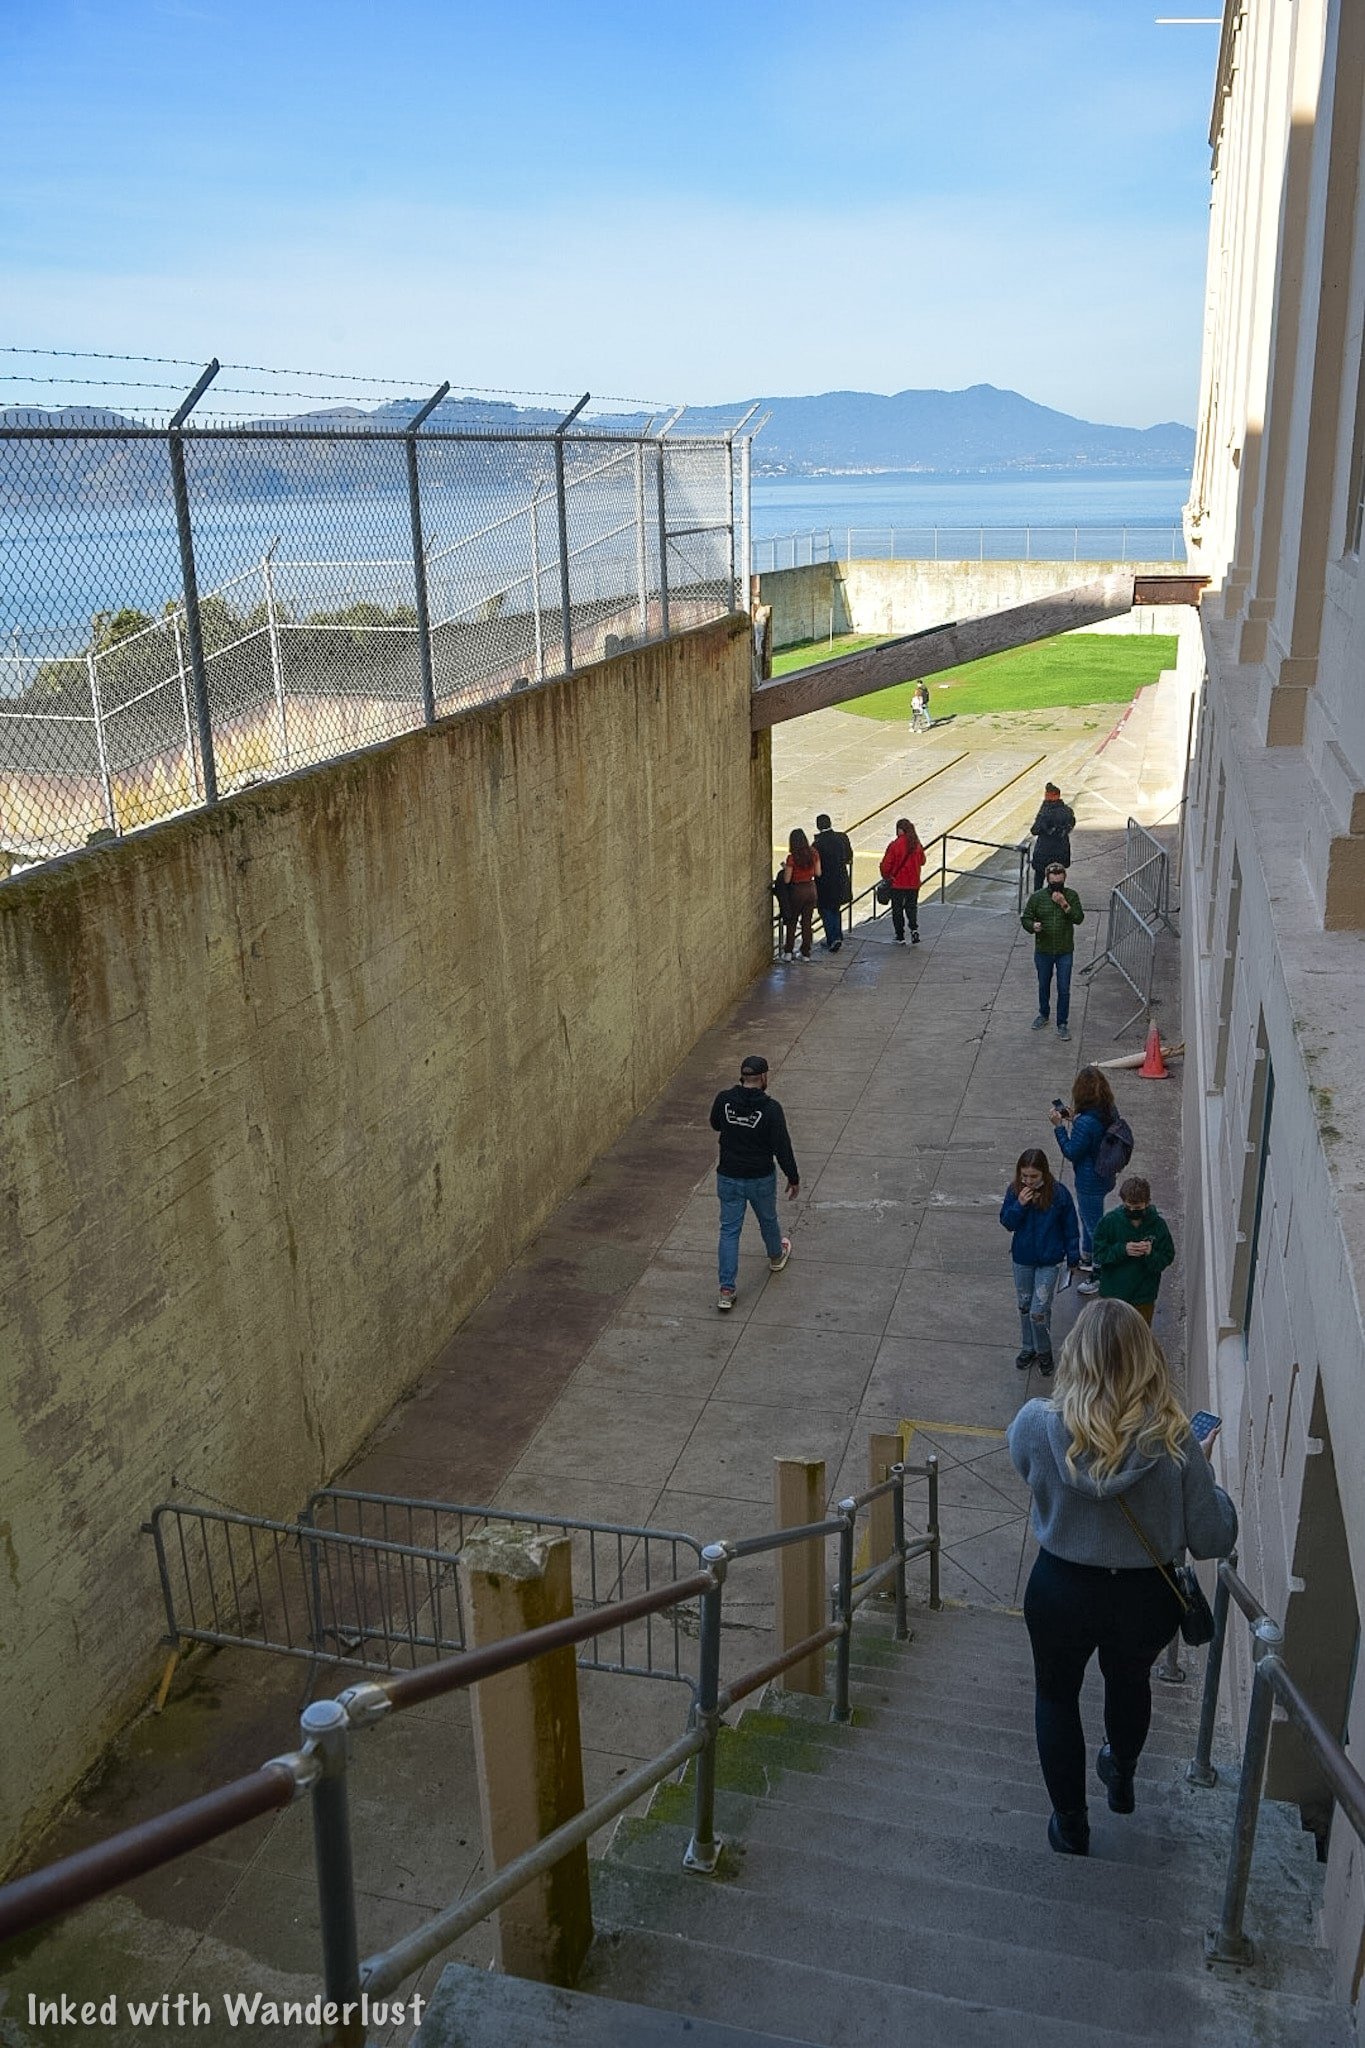
Cell House Tour
Getting There
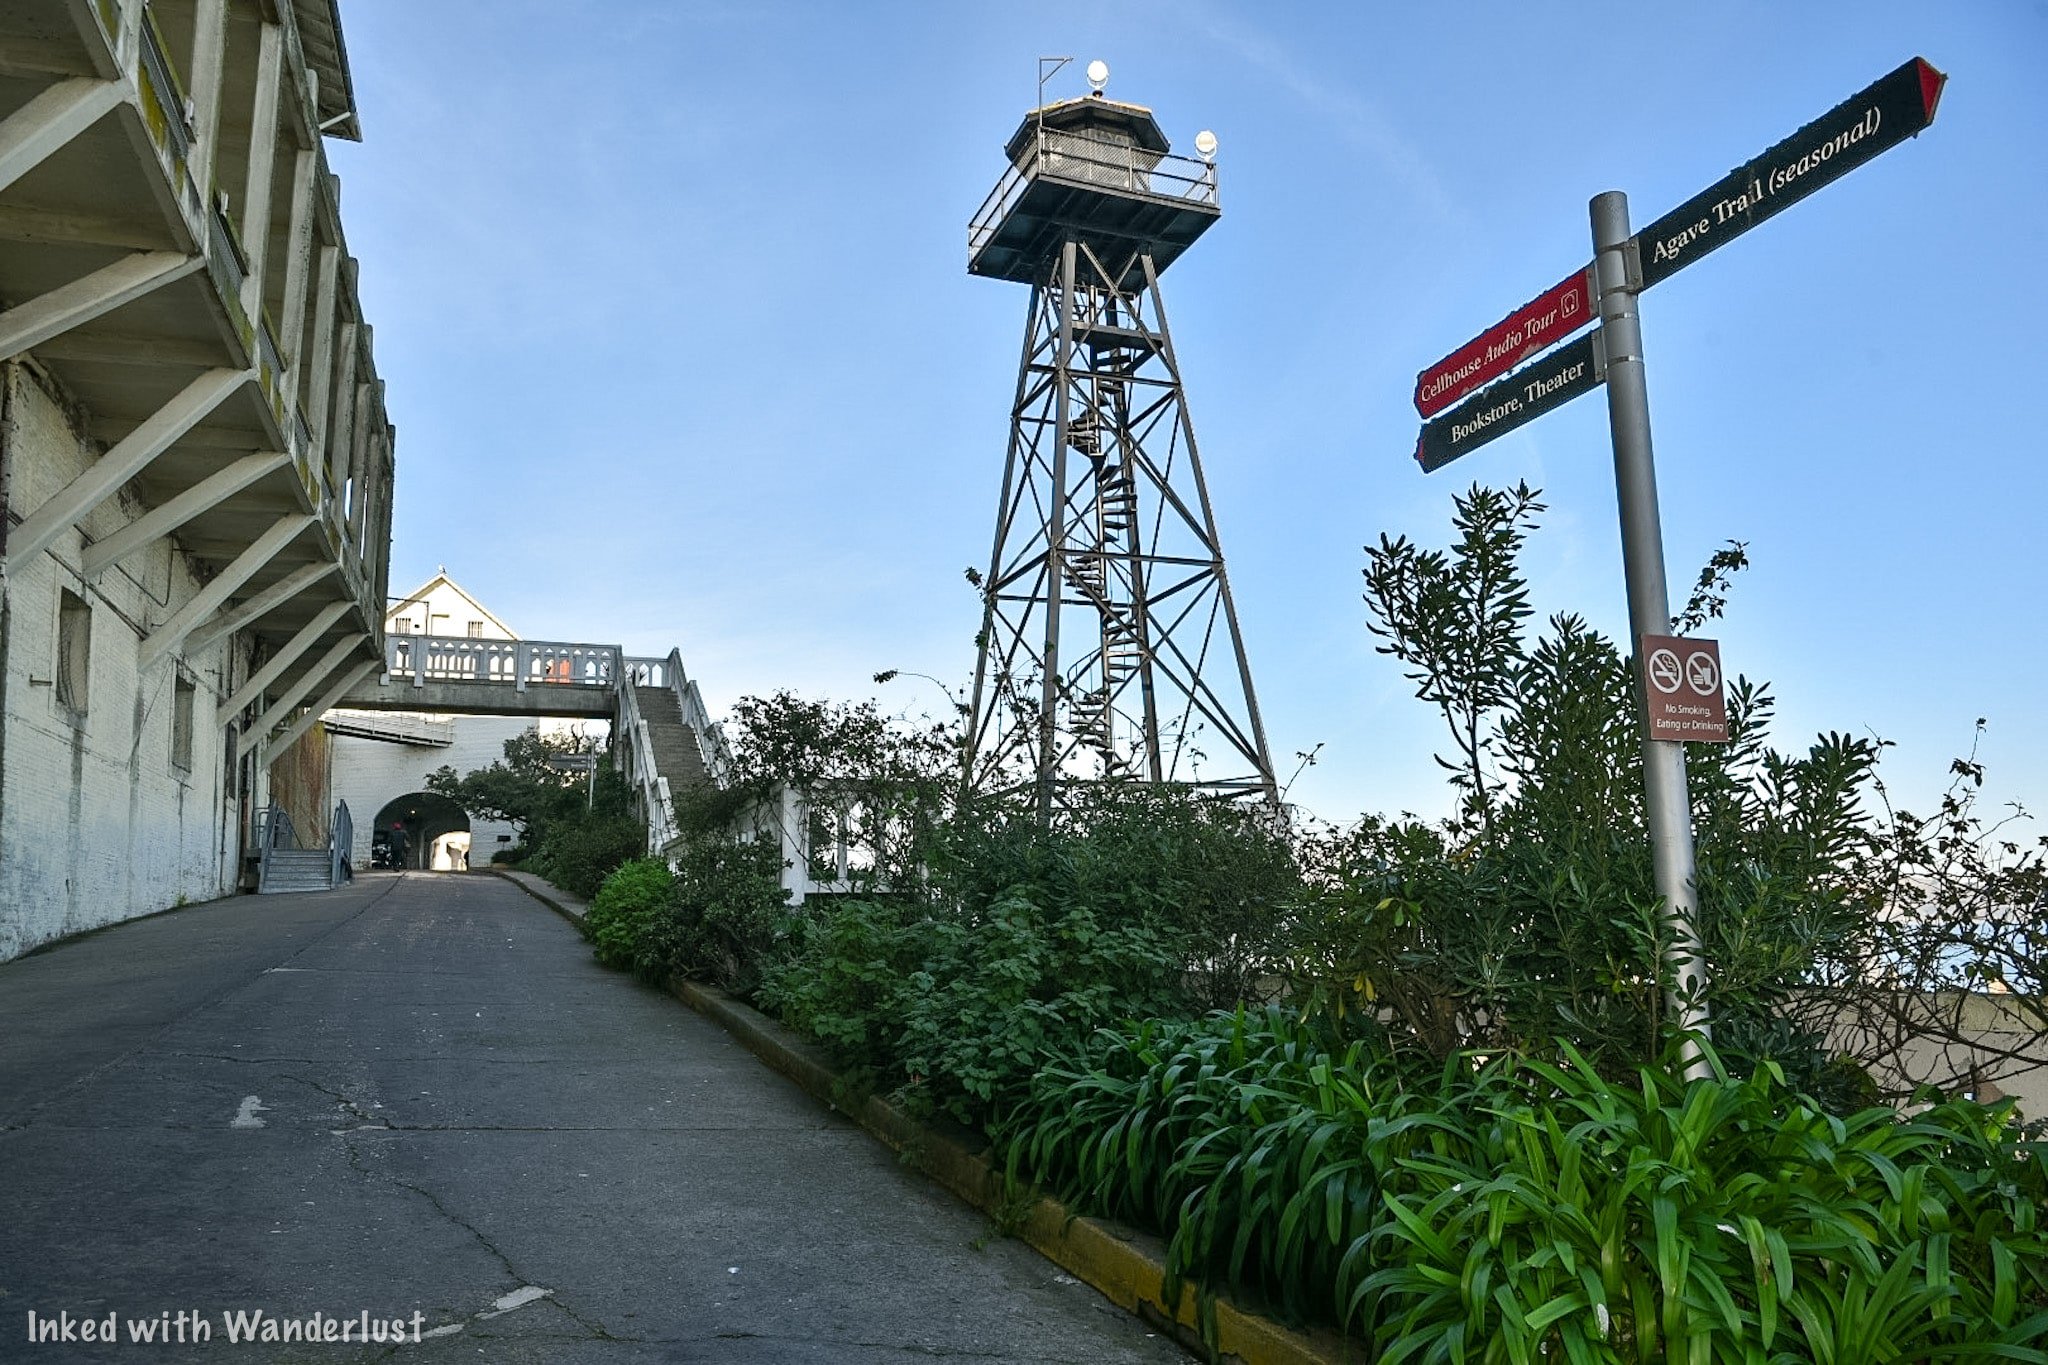
To start the tour, walk parallel to Building 64 on East Road towards the guard tower. Before the tunnel (Sally Port), you’ll see a door on your left. This is the theater exhibit room. It wasn’t in operation when we were here, but we’ve seen it before and it’s worth checking out.
Here’s a few important details about the pathway to the cell house:
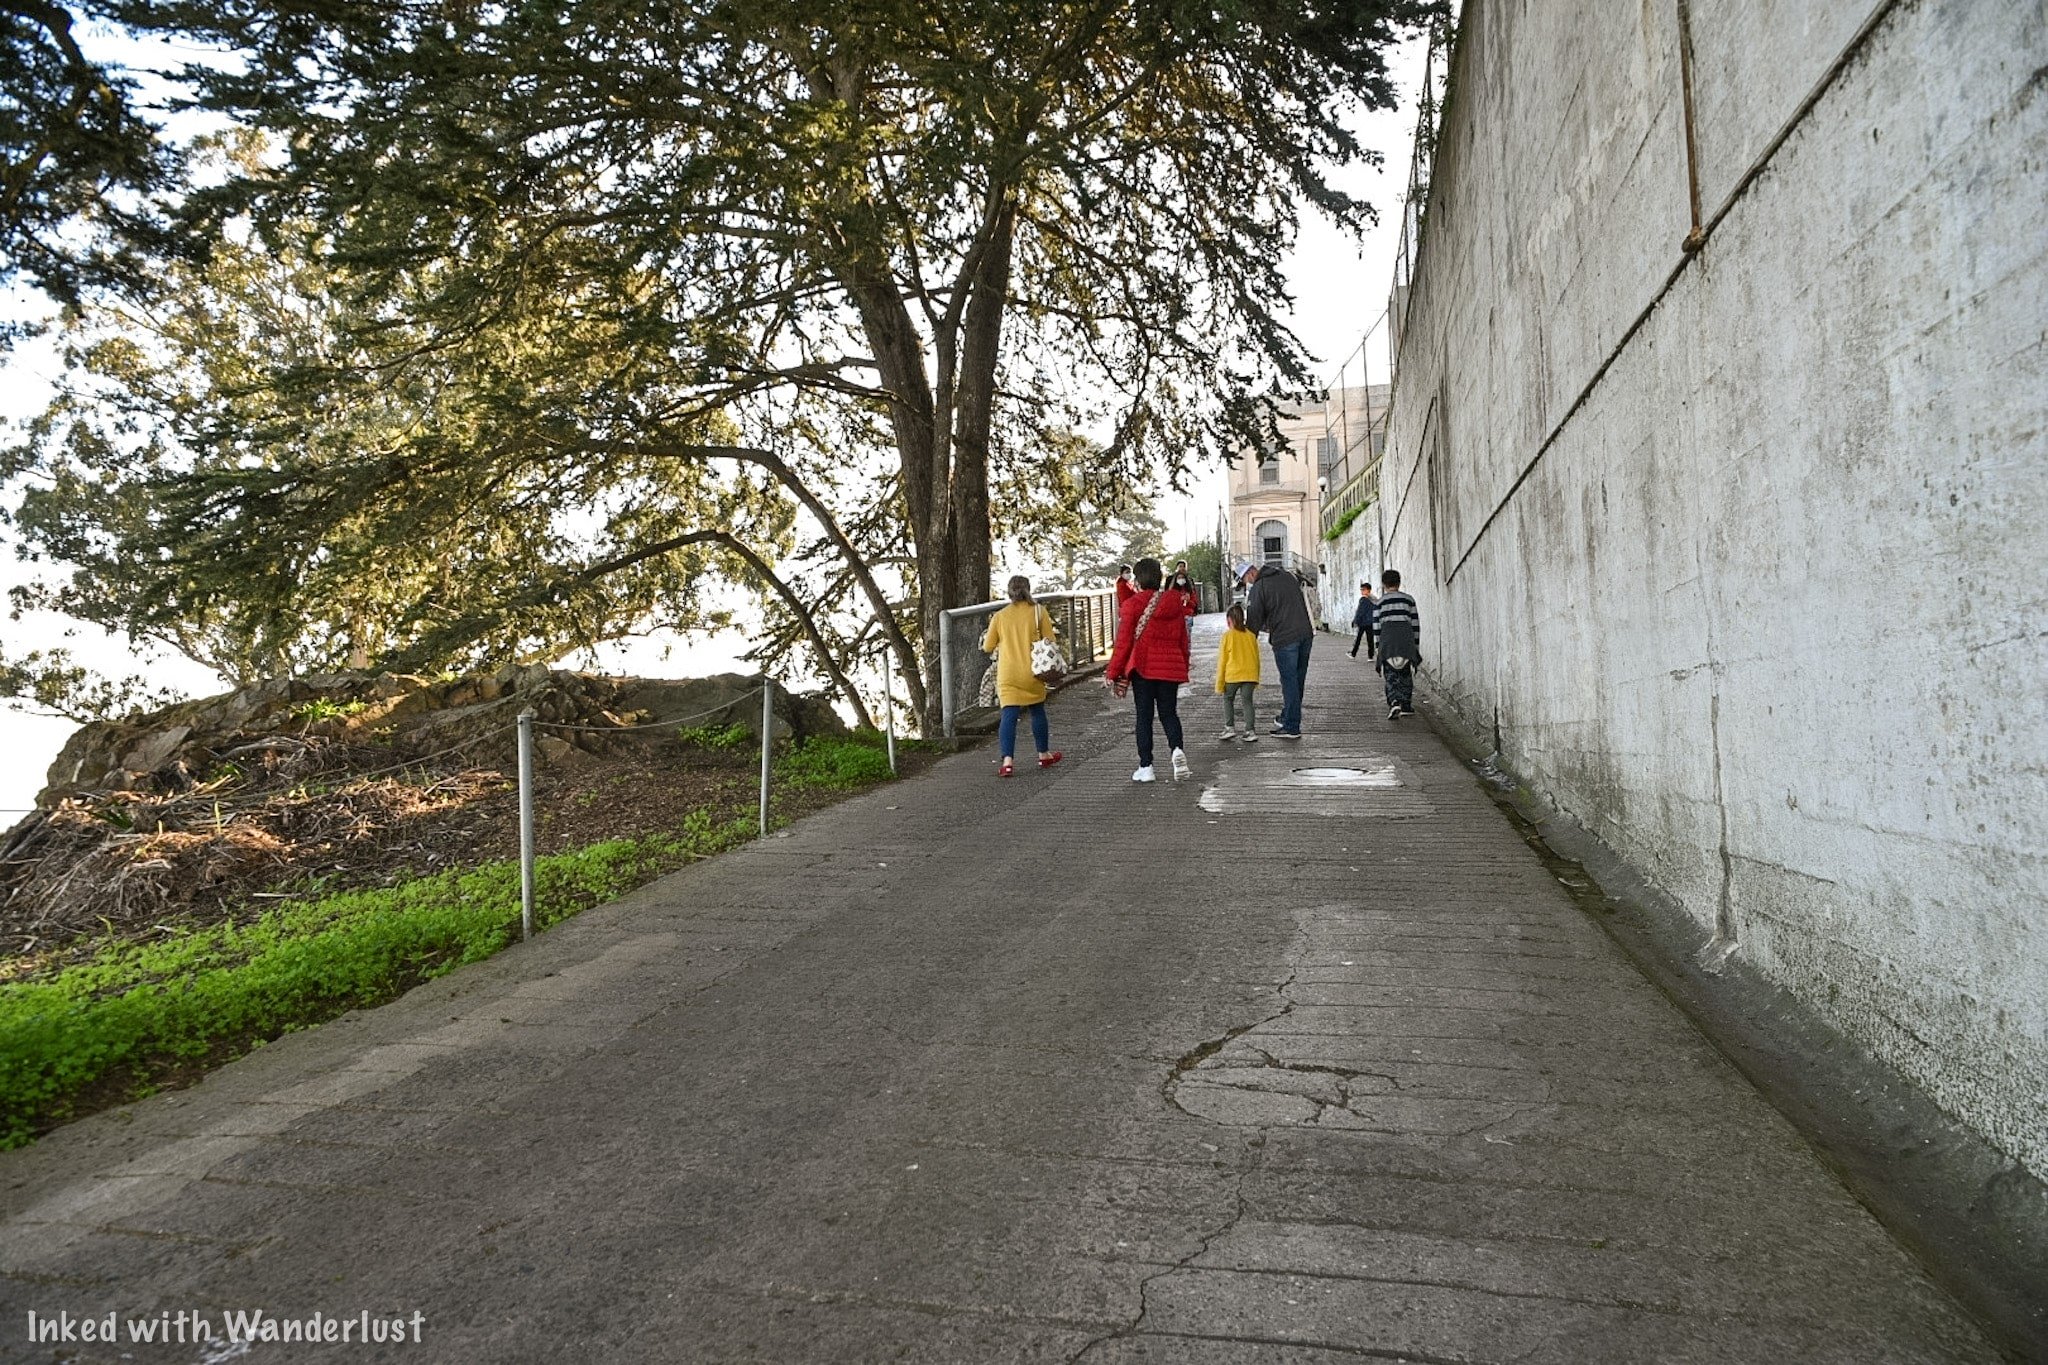
The walk from the dock to the cell house is a quarter-mile.
During this, you’ll have 130-feet of elevation gain.
This is the equivalent to climbing a 13-story building (spread out over a quarter-mile).

It does get a bit steep in some places but honestly, it isn’t difficult to get up there. I only mention this because most people don’t realize how the walk to the cell house is.
On the way up, the pathway spurs off in different directions. At these crossroads, you’ll see signage indicating the correct way to the audio tour. Just follow those.

If you have mobility issues of any kind, you can utilize the shuttle. It picks up at the dock and drops you off right at the cell house entrance (and vice versa). Oh, and it’s free.
Cell House Entrance

Audio Choices
When you see rotted bars with a sign stating, “Main Prison”, you’ve reached the beginning of the tour. Before heading in, you’ll need to make a decision on how you’ll plan to take the tour. You have two options:
Utilize their audio device.
Download the app and use your phone.
Each comes with they’re own negatives and positives. The audio device is small, but it’s in a thick plastic sleeve and due to covid, they no longer include headphones. So you’ll continuously need to hold it against your ear.
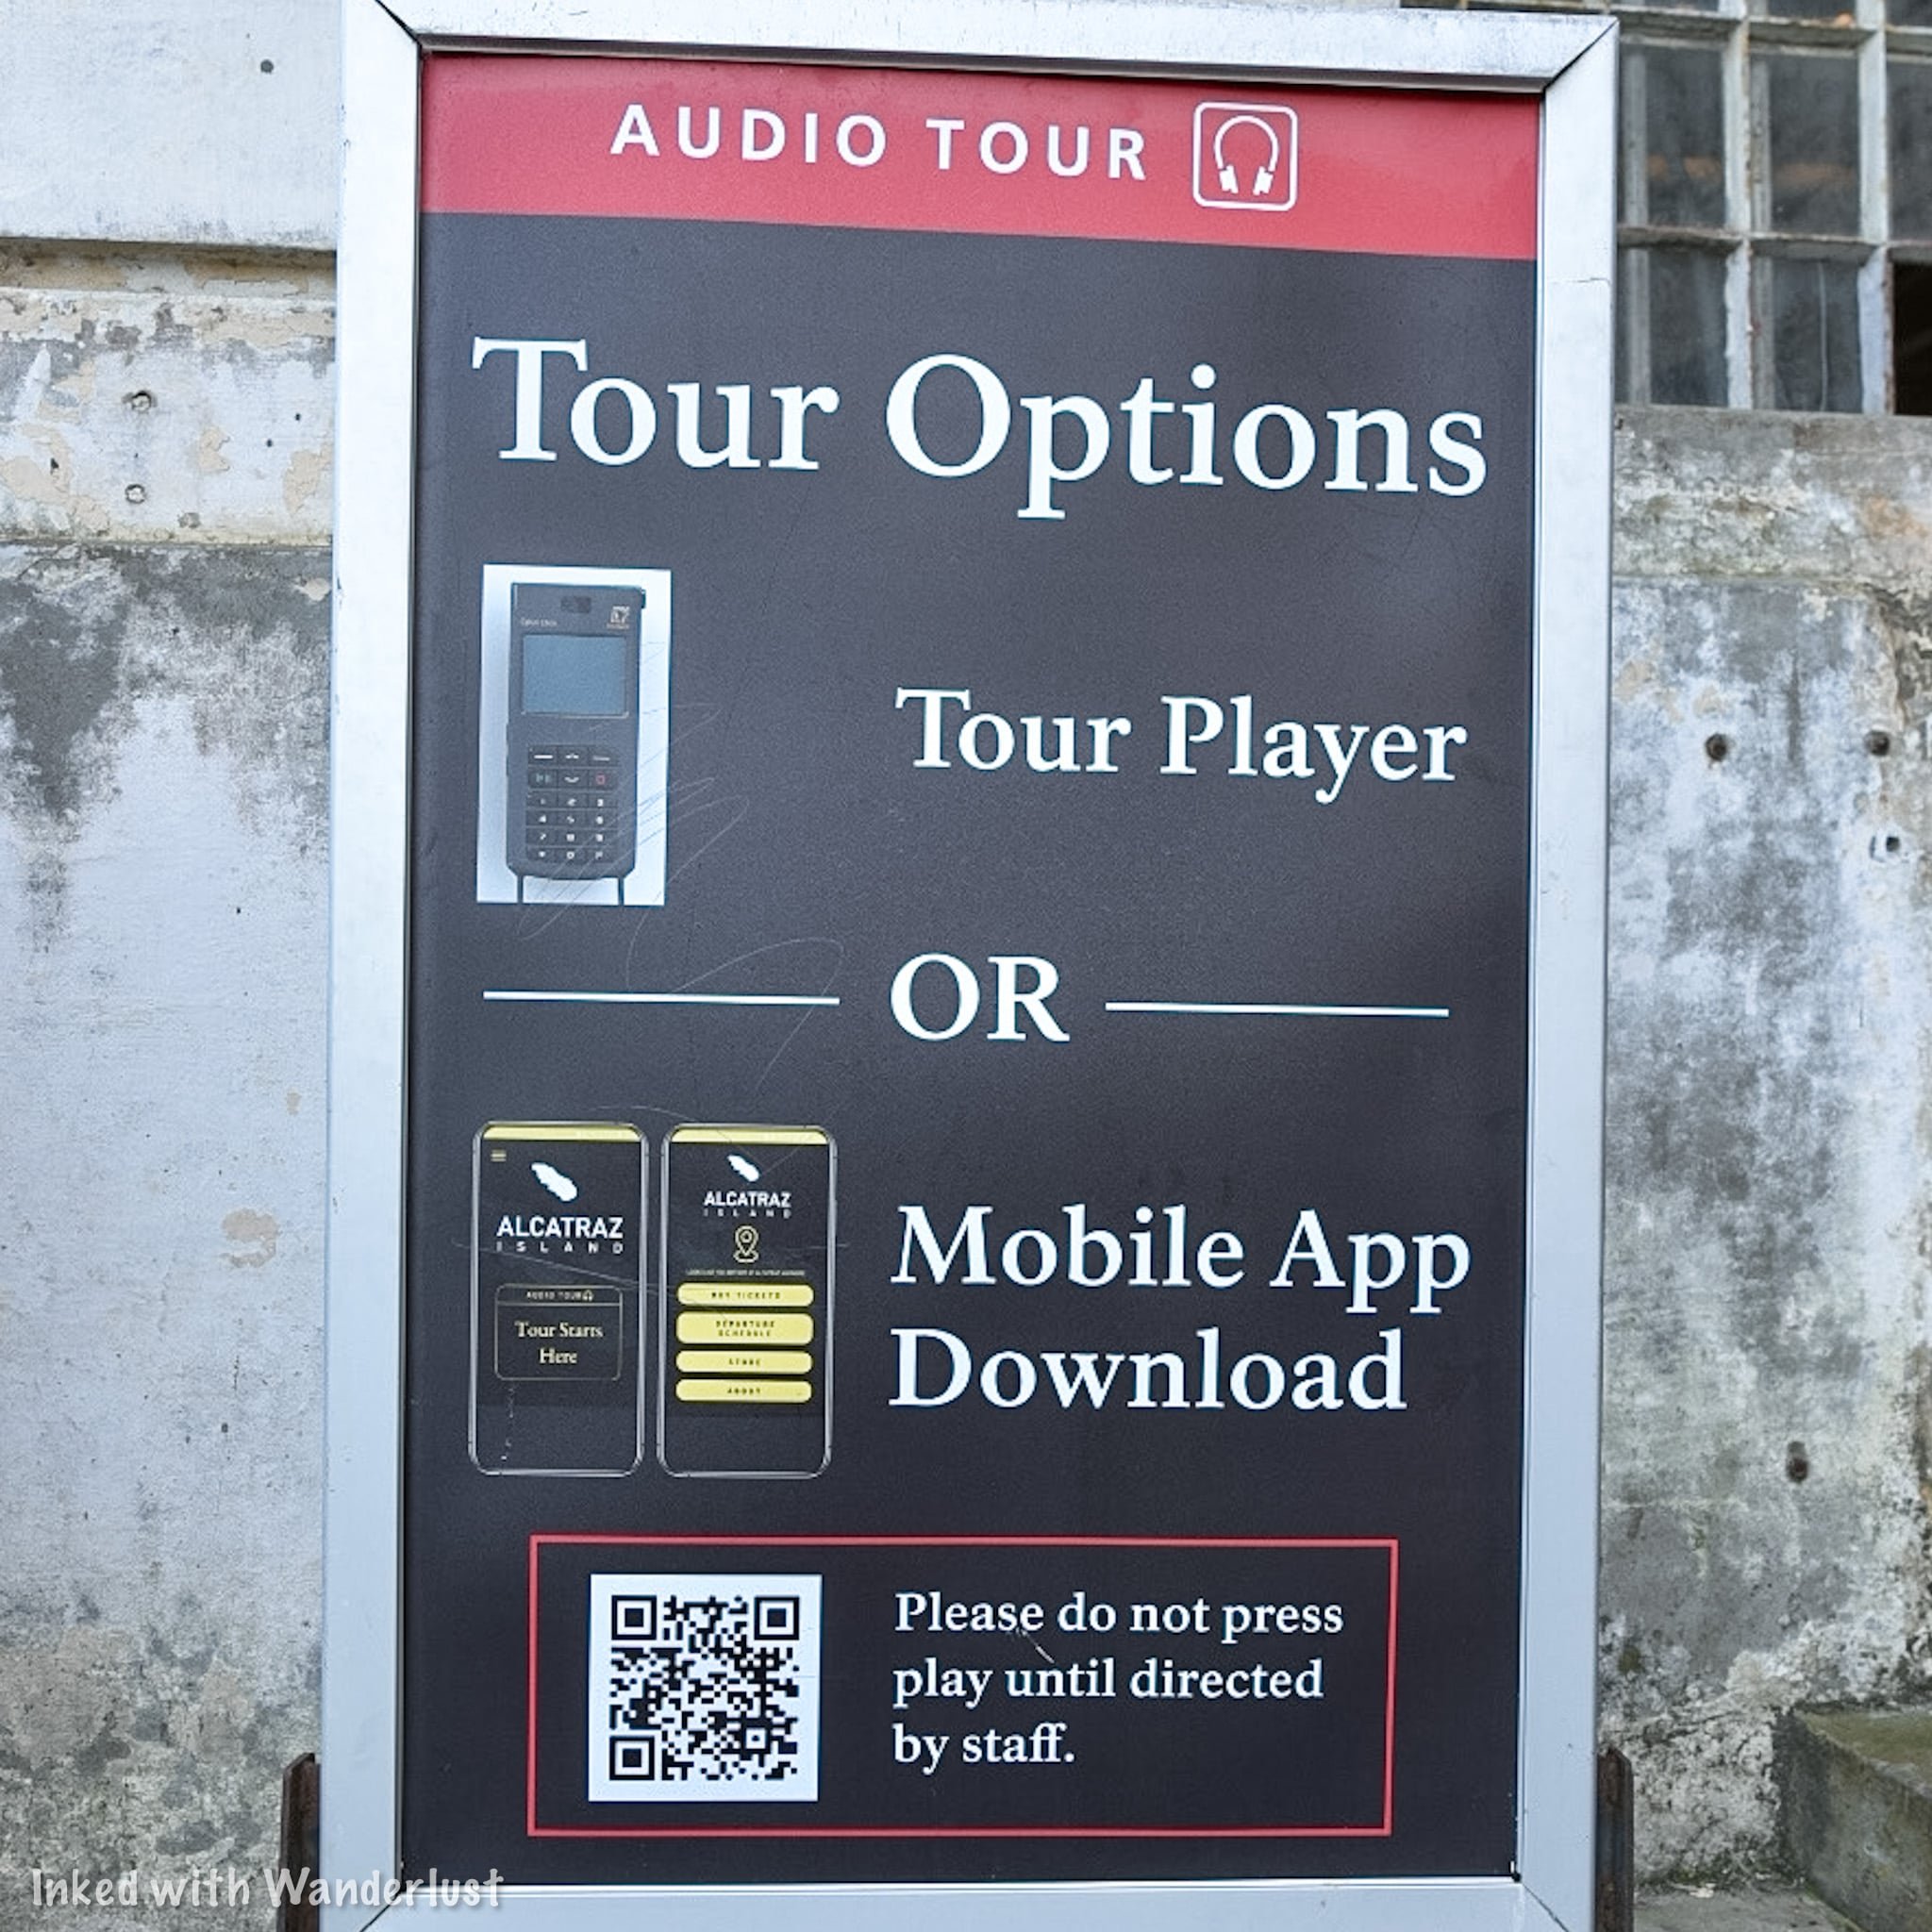
Downloading the app means you won’t have to worry about hearing the narrator through a sleeve as you'll able to use your headphones. The downsides are that it’s known to be buggy and the connection gets lost in some spots.
Neither is perfect but in order to hear the tour, you’ll need to do one or the other. We opted to use the audio device as we didn’t know about the app ahead of time and already drained the batteries on our AirPods.
Alcatraz Showers

After walking through the entrance, you will enter the shower room. The queue wraps around the showers to the other side, where you will pick up your audio device. Each person in your group will be given one.
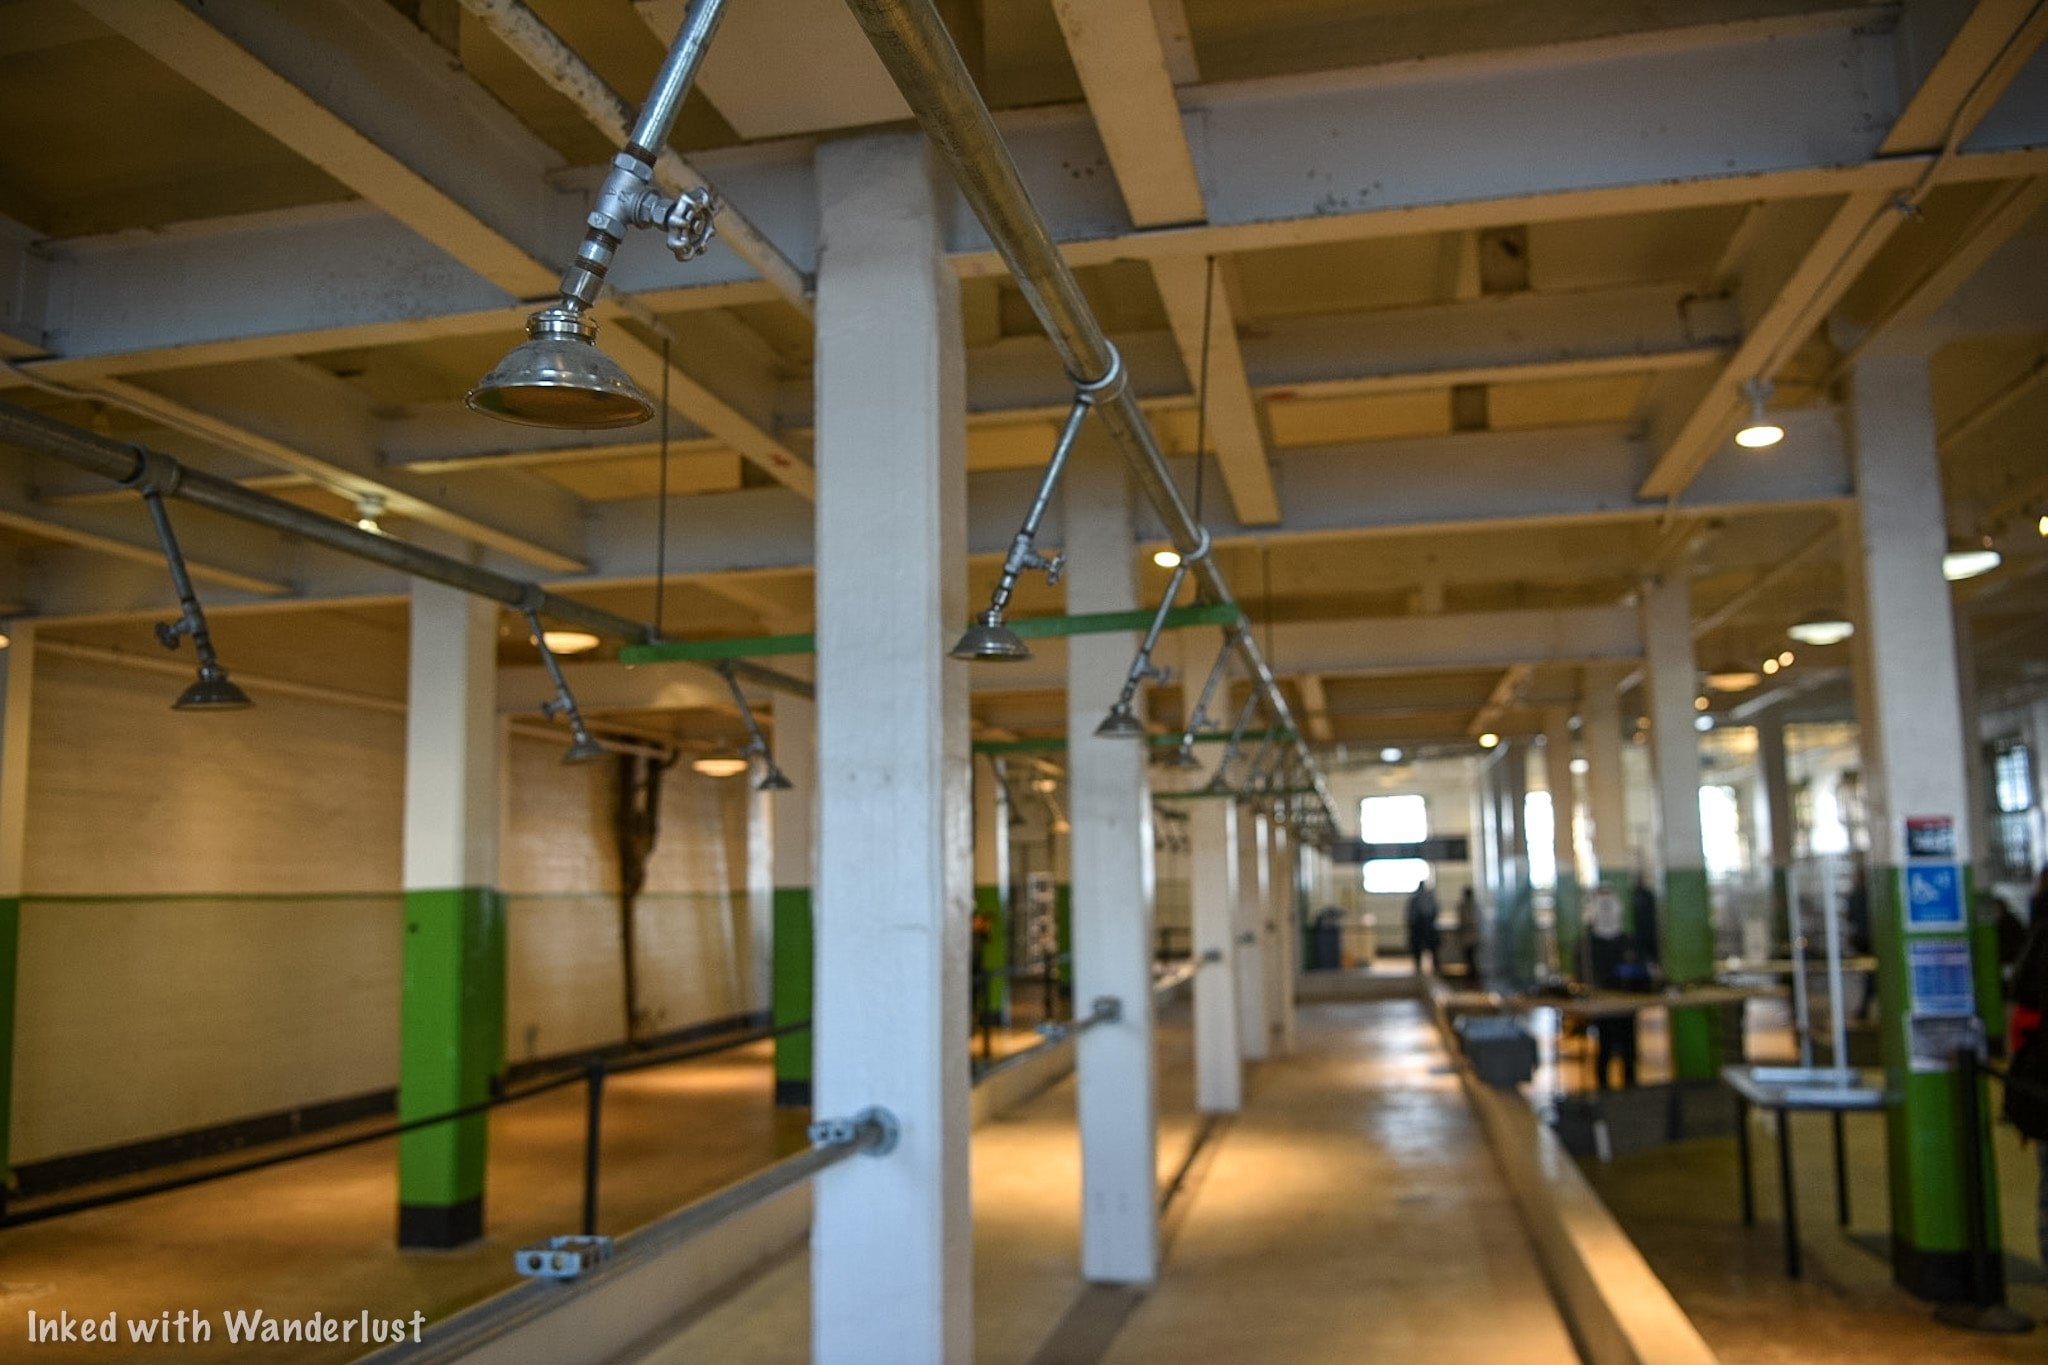
When you reach the front of the queue, inform the attendant if you’ll be using the app or the device. If you choose the app, you’ll go right through.
If you want the device, inform the attendant of your language preference. You can choose between:
English
Spanish
Mandarin
Japanese
Italian
German
French
Dutch
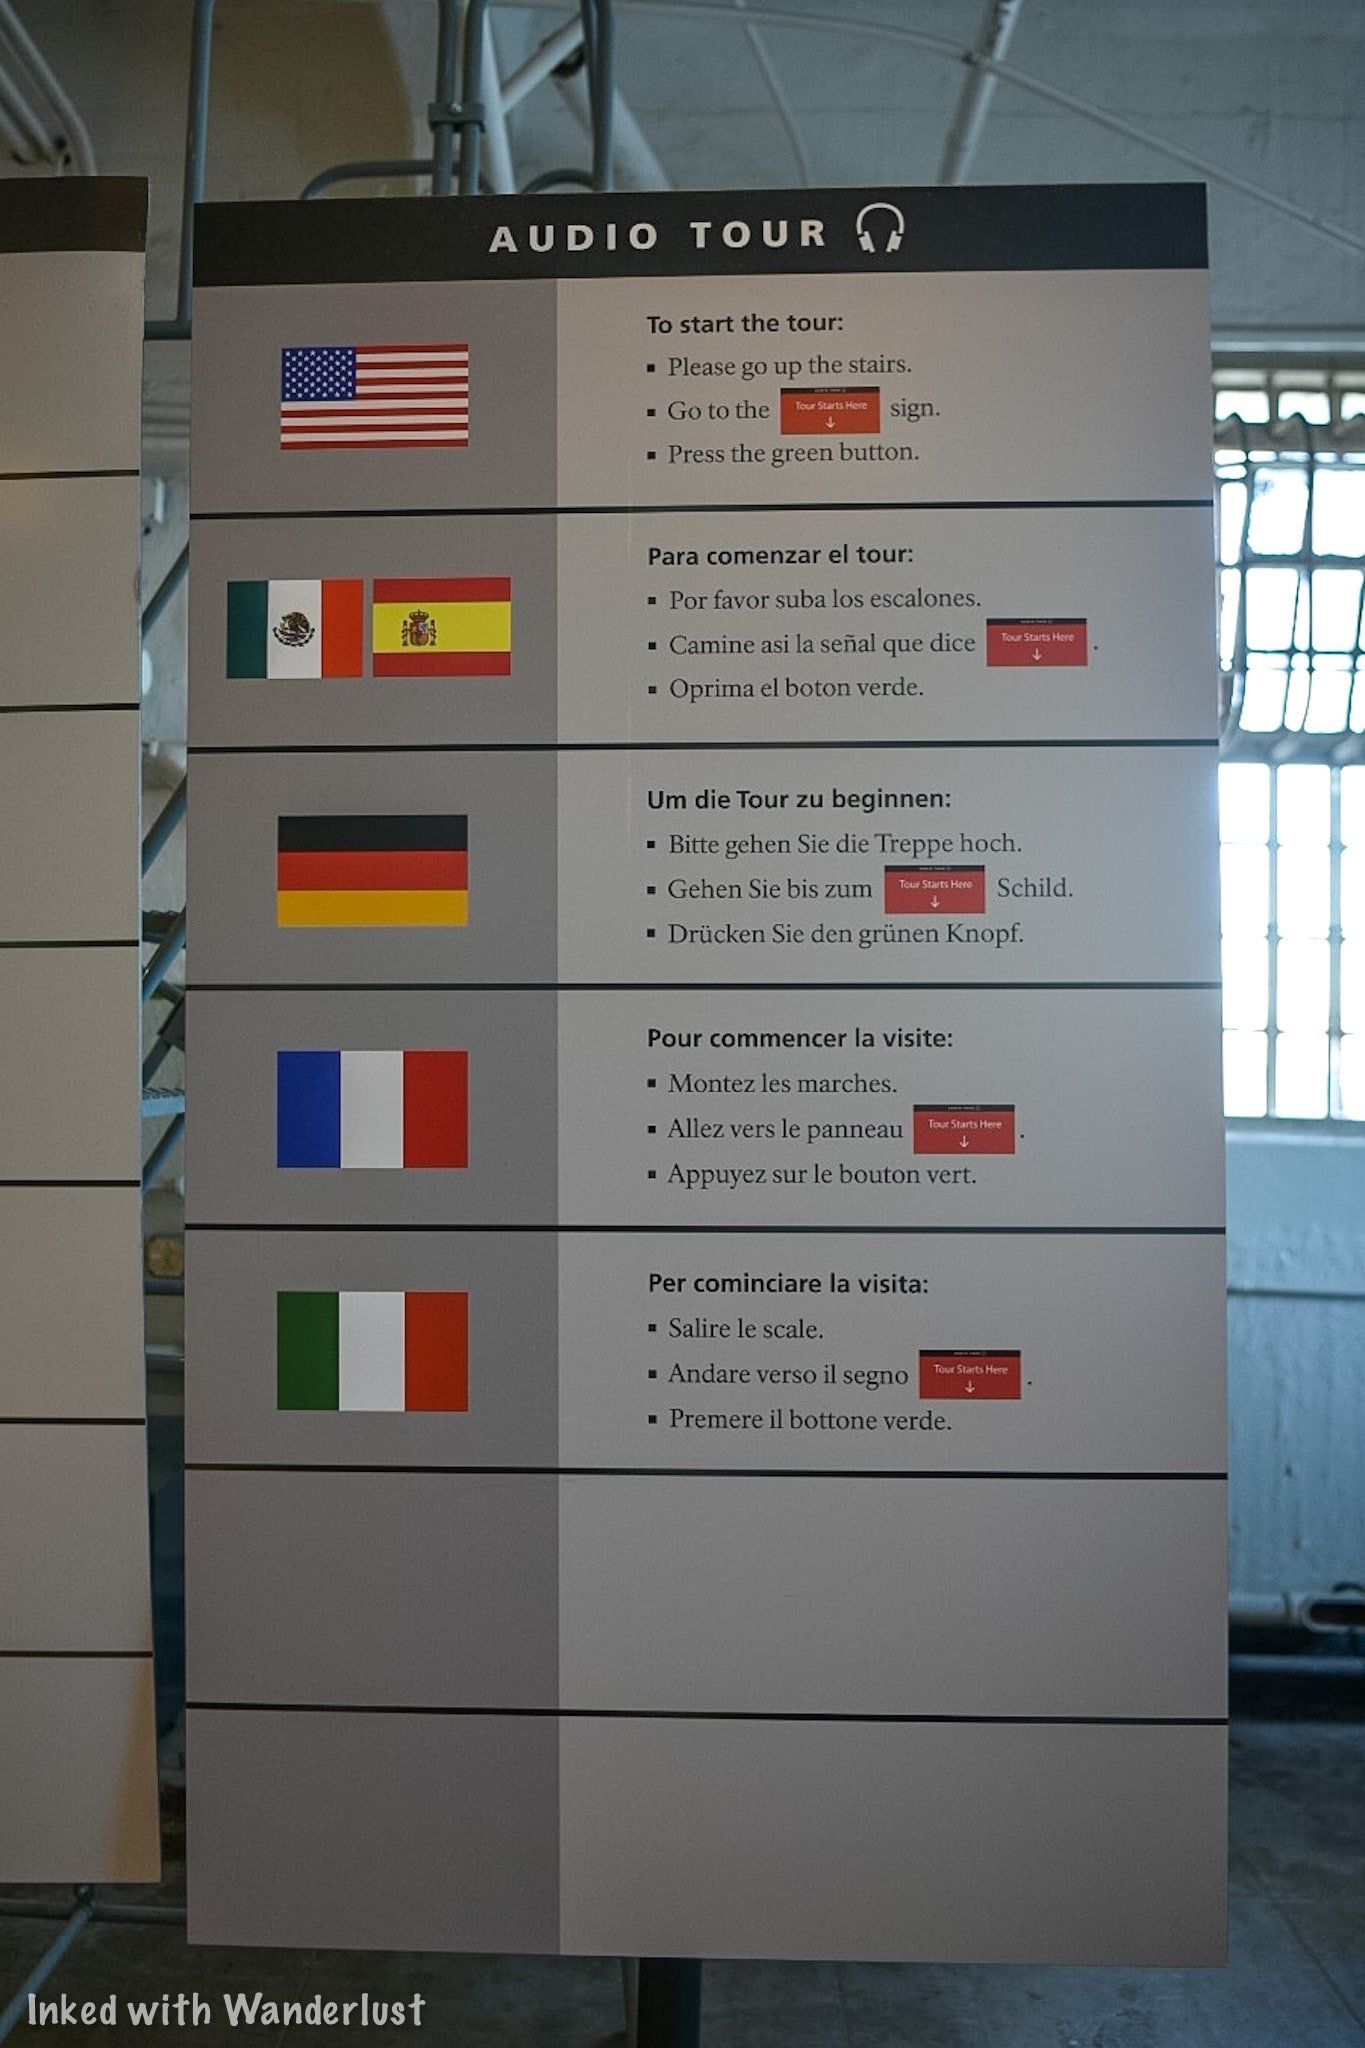
Once you’re set, head up the stairs to the cell house (there’s an elevator for those with mobility issues). At the top of the stairwell, go left and look for a red sign (pictured below). Do not start the device/app until you reach this point.


Michigan Ave
When you reach this point, the tour officially begins. After you hit the green button, you’ll be introduced to the narrators, four former inmates of Alcatraz. They are:
Leon “Whitey” Thompson (Weapons charge, 1960 - 1962)
John Banner (Bank Robbery, 1954 - 1958)
James Quillen (Kidnapping, 1942 - 1952)
Darwin Coon (Bank Robbery, 1959 - 1963)
You’ll also hear from a couple former guards as well (unfortunately, we didn’t catch their names). Also, park officials swap narrators from time to time. So they may be different when you go.
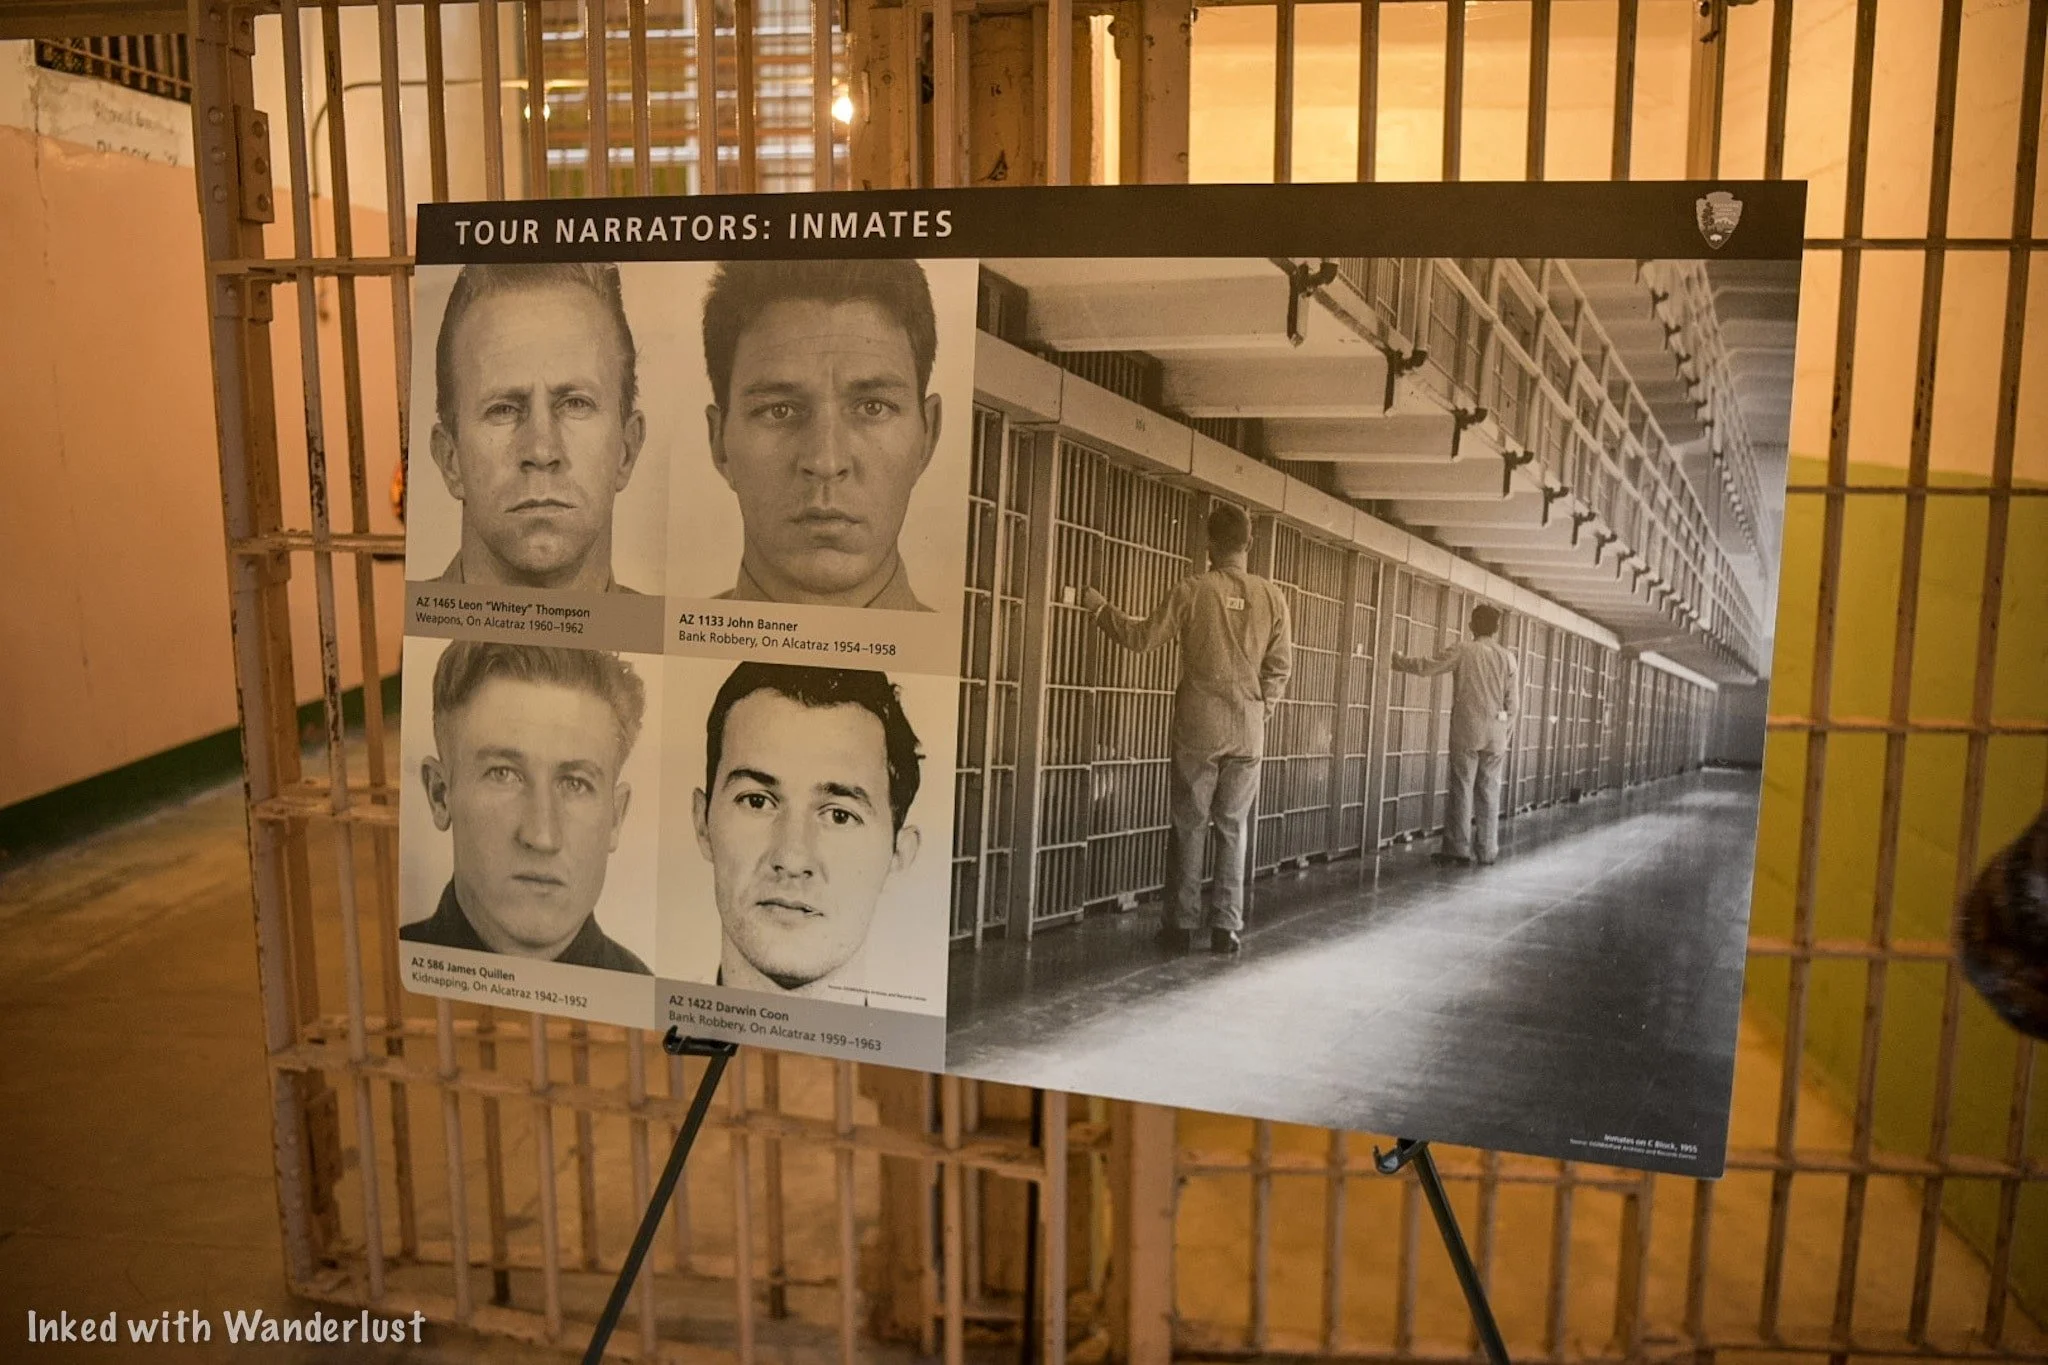
The cell block you’ll see in front of you is B Block. Behind you is A Block, which was seldom used during the island’s run as a federal prison. Unfortunately, it is not part of the regular tour. To see A Block, you’ll need to book the “Behind the Scenes” tour.

The tour narrators will tell you when to stop, what to look at it, describe what you’re looking at, and which direction to go in next. This is why it’s imperative to pay close attention.
You will have the ability to pause the tour and rewind in case you get turned around, missed something, or want to linger in one spot for a while longer.
To the left of the sign with the narrators on it is the, “cut-off”, a passageway through the middle of B Block. You’ll go through here and turn right coming out.
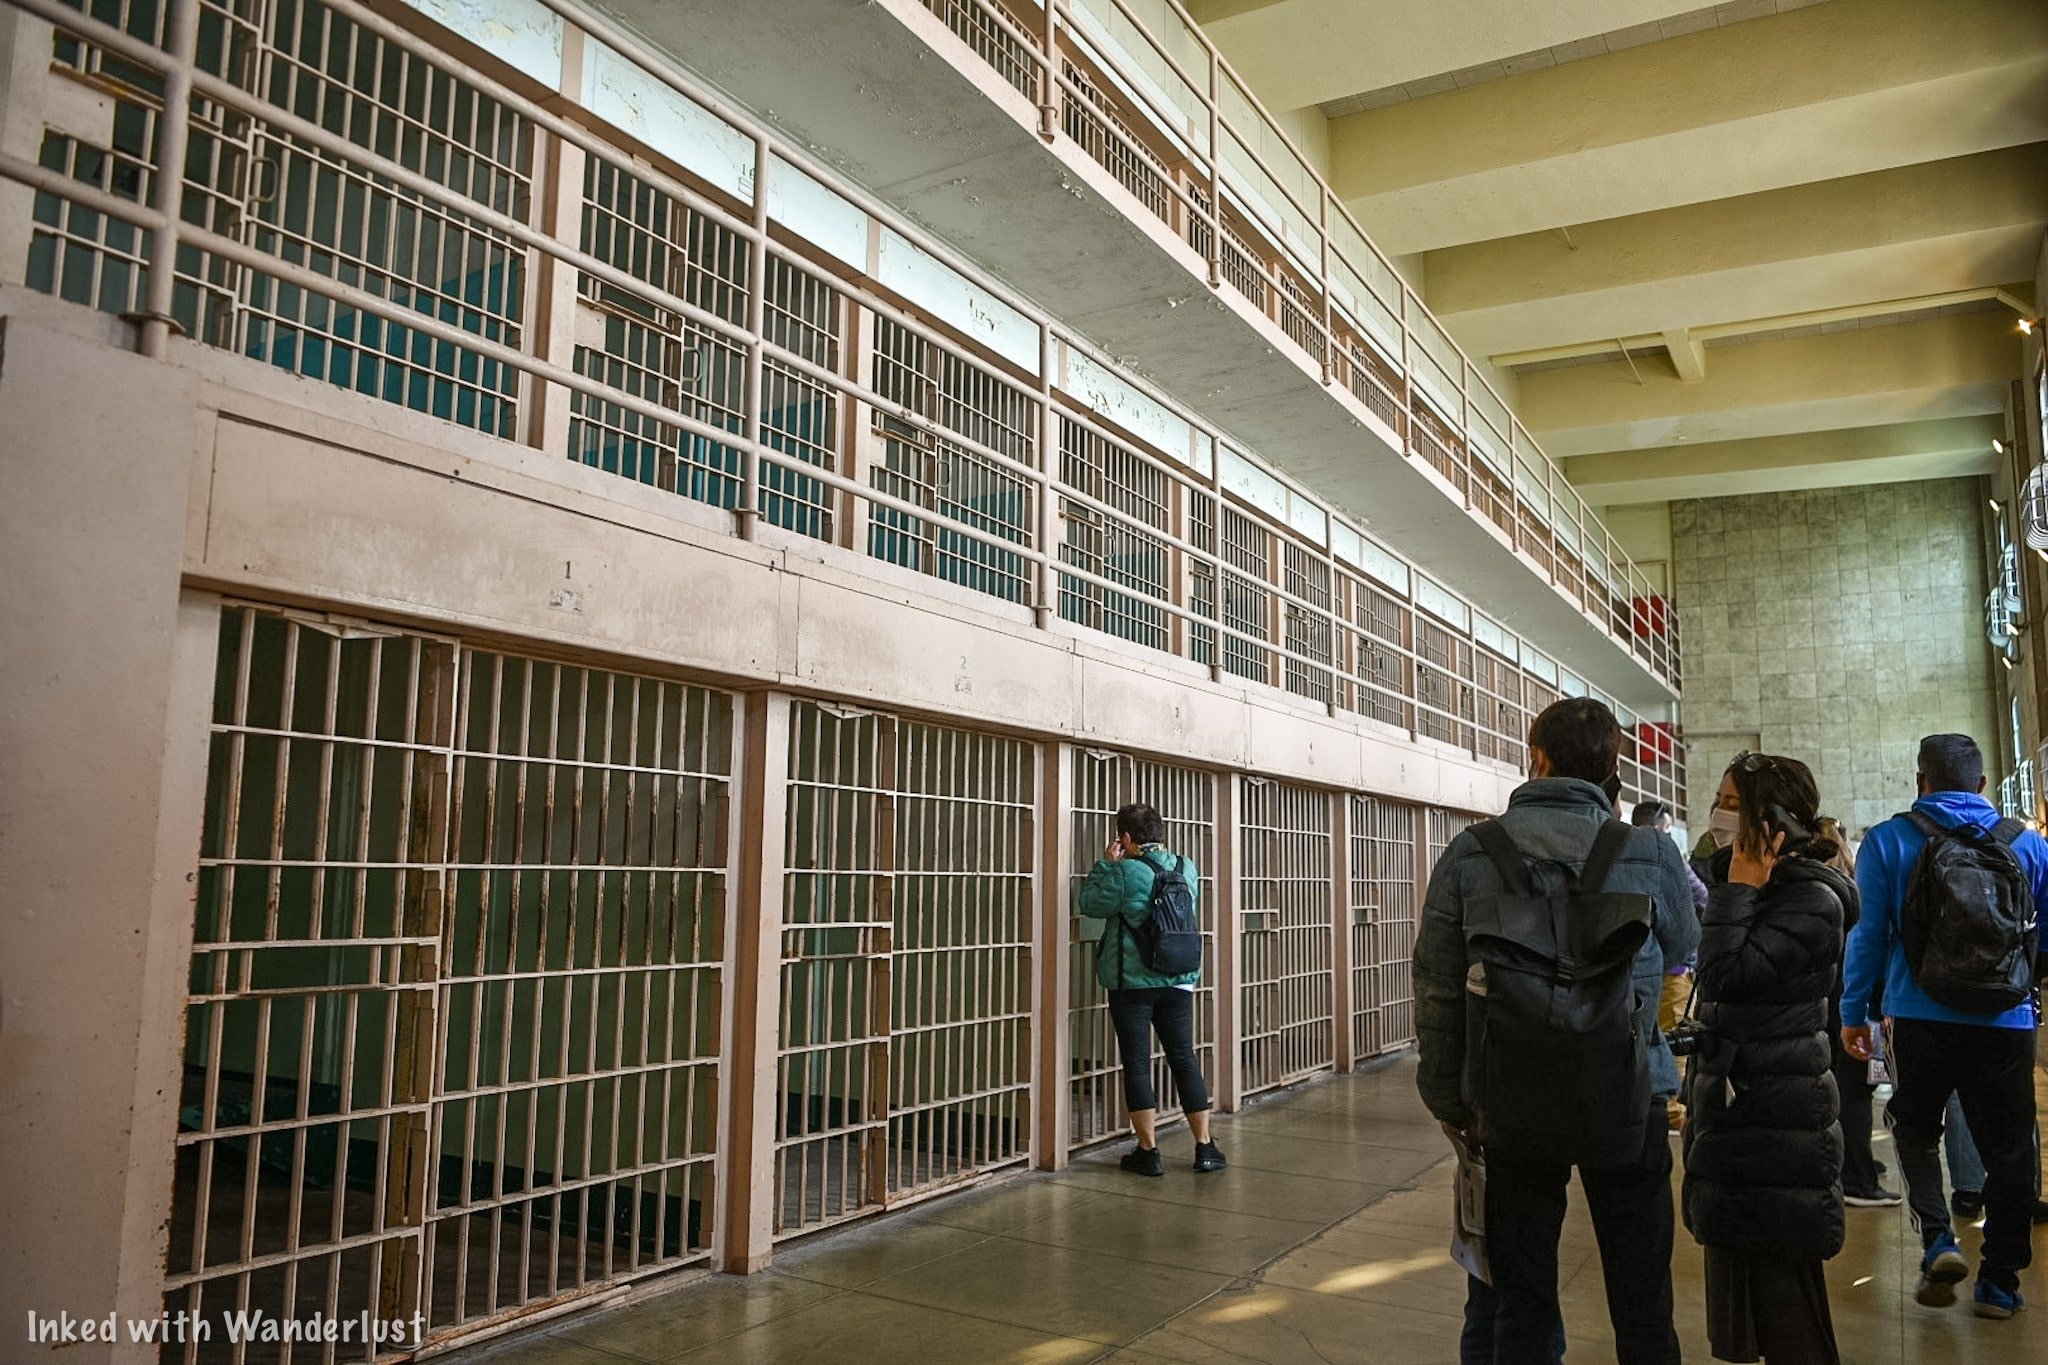
Broadway

After going through the cut-off, you’ll turn onto, “Broadway”. This is the aisle between B and C Blocks. Your narrator will guide you to a few different cells with notable occupants.
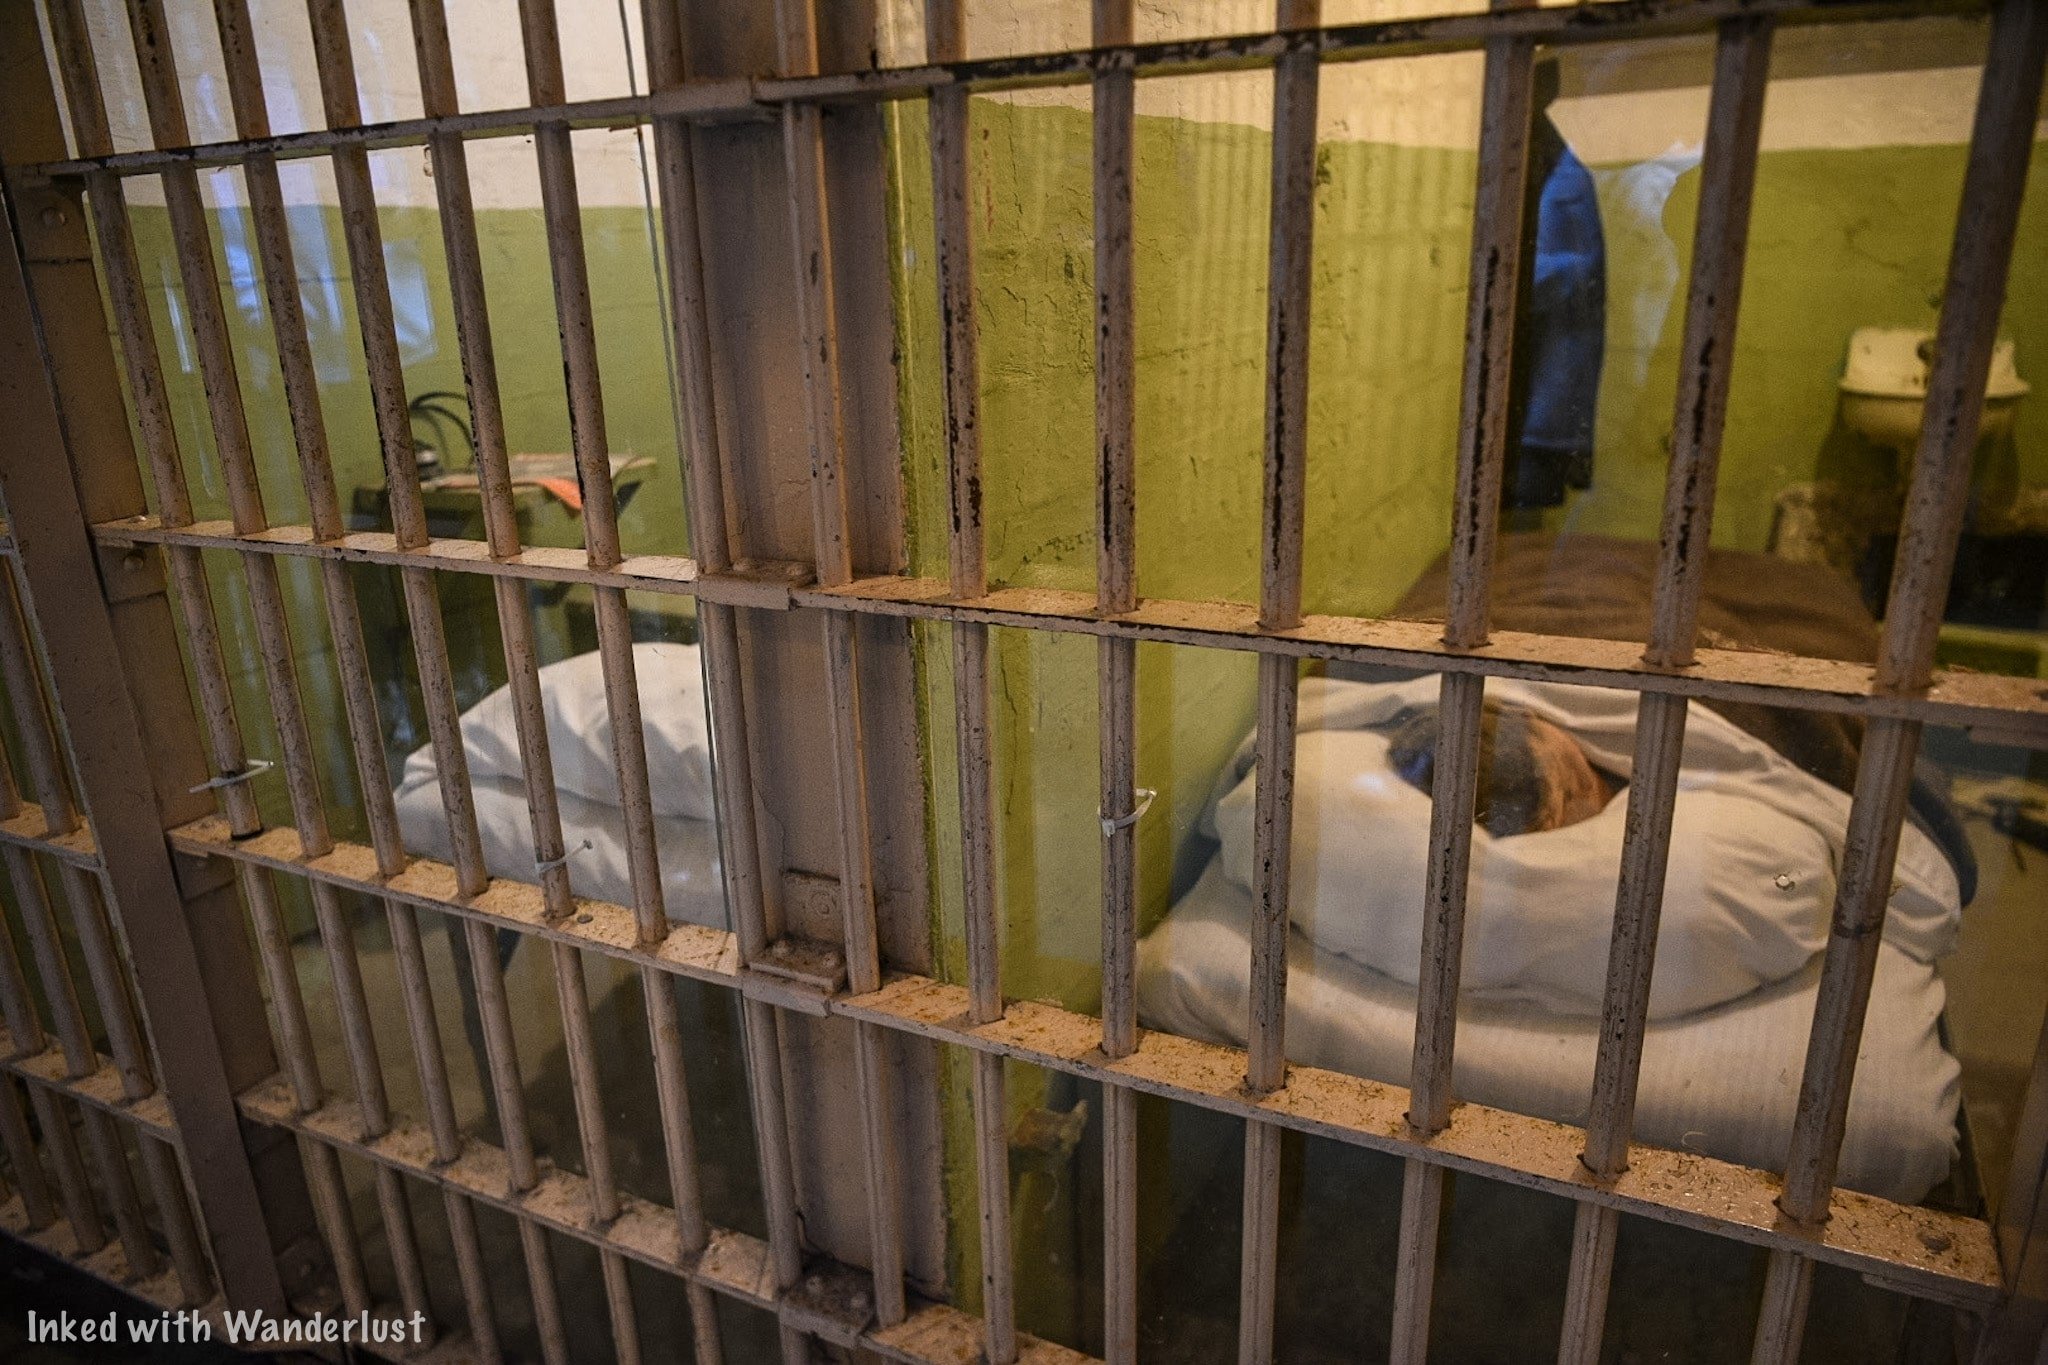
Each cell on B and C Blocks are some of the smallest you’ll ever see. Grown men lived in cells that were 5 feet by 9 feet and 7 feet high. Most inmates could stretch their arms and easily touch each side of their cells.

You’ll work your way up Broadway towards what is known as, “Times Square”. When you reach this point, you’ll turn left and head towards the doorway leading to the Recreation Yard.
Recreation Yard
The Recreation Yard (or simply, “Rec Yard”), is where most inmates would spend a portion of their days. Some would play cards while others played handball. Some, simply, would sit and stare at the impressive views of the city and Golden Gate Bridge.


You will want to pause the tour and spend some time looking around the yard. If you look towards the back wall, you’ll notice an open, rusted door leading to a steep stairwell.
This is the door where inmates would march through to go to whichever job they held. They would have to go up and down these stairs on a near daily basis.


Feel free to spend all the time you want exploring the yard. Once you’re ready to resume the tour, simply head back the same way you came in. When you reach the doorway, hit start on your device and head straight to D Block.
D Block & Prison Library
Inmates who proved to be problematic for guards, i.e, got into fights, assaulted guards, or just didn't follow a specific rule, were sent to D Block. It was quickly given the nickname of, “Punishment Block”.
These cells were much bigger than the ones in the other blocks, but inmates were confined to them 24 hours a day (with the exception of their twice weekly showers).

Since they were completely confined to their cells, everything was brought to them by other inmates or guards. On top of that, the only two activities allowed here were reading and quietly talking to the inmate next to you.
The other feature of D Block, specifically on the upper tiers, was the view of the city. Inmates, however, said this was the worst part because when the wind blew towards Alcatraz, it carried sounds of people talking and laughing from the city, reminding them of how isolated they were.

Further down D Block is where you’ll find the infamous solitary confinement cells, also known as the, “prison within a prison”.
These cells were solid concrete with nothing but a toilet, sink, and a bed inside. No light source was provided so when the solid door was closed, inmates were in total darkness and could hear nothing.

If you want a small taste of what it was like, go to the cell at the very end. Both doors are left open and you are allowed to step inside. Although you cannot shut the door behind you, it will give you a sense of what the inmates experienced.

After D Block, your next step will be the prison library. It’s another example of a, ‘prison within the prison”, as you feel like you’re walking into a cage.
On arrival at Alcatraz, inmates were given a library card and were allowed three books at a time. This was in addition to a bible, text books, and approved magazine subscriptions (newspapers were prohibited).


Inmates weren’t allowed to come and go as they pleased, though. If they wanted to check out a book, they would fill out a slip and turn it in. The Librarian would find the book(s) and deliver them to that inmate’s cell.
There are benches in the library that you’re free to use if you need to sit-down for a bit. When you’re ready to move on, exit the Library and go right on “Park Ave.”

Park Ave., Good-Time Cells, & Visitation
Coming out of the library, the narrator will have you view a few of the cells on C Block on what is known as, “Park Ave.” These cells are referred to as, “Good-Time Cells”, as inmates in these cells were allowed paint supplies and other privileges.
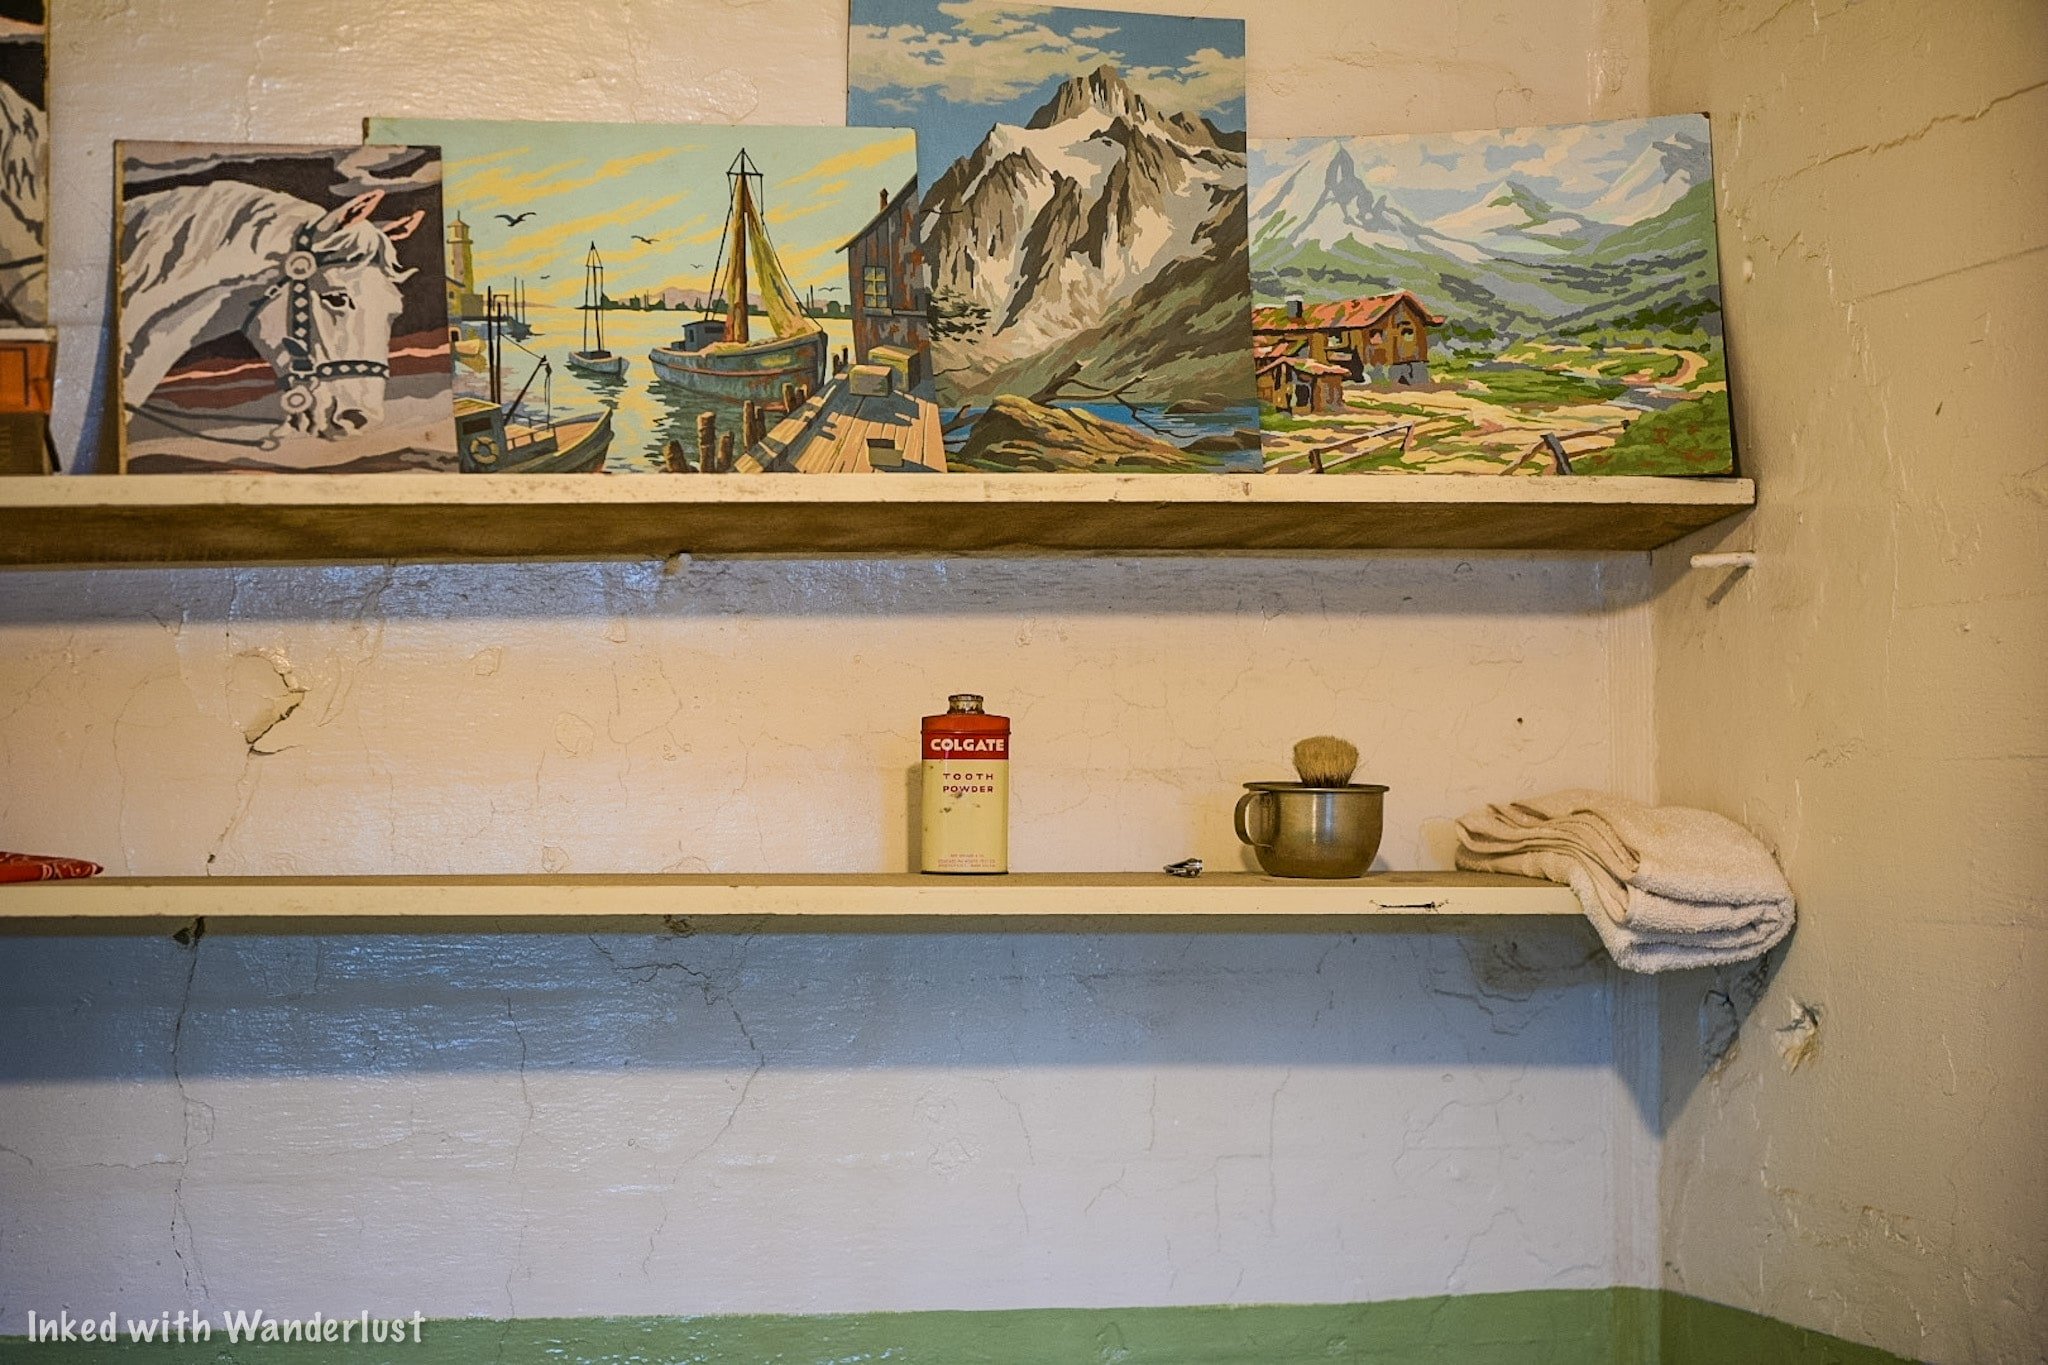
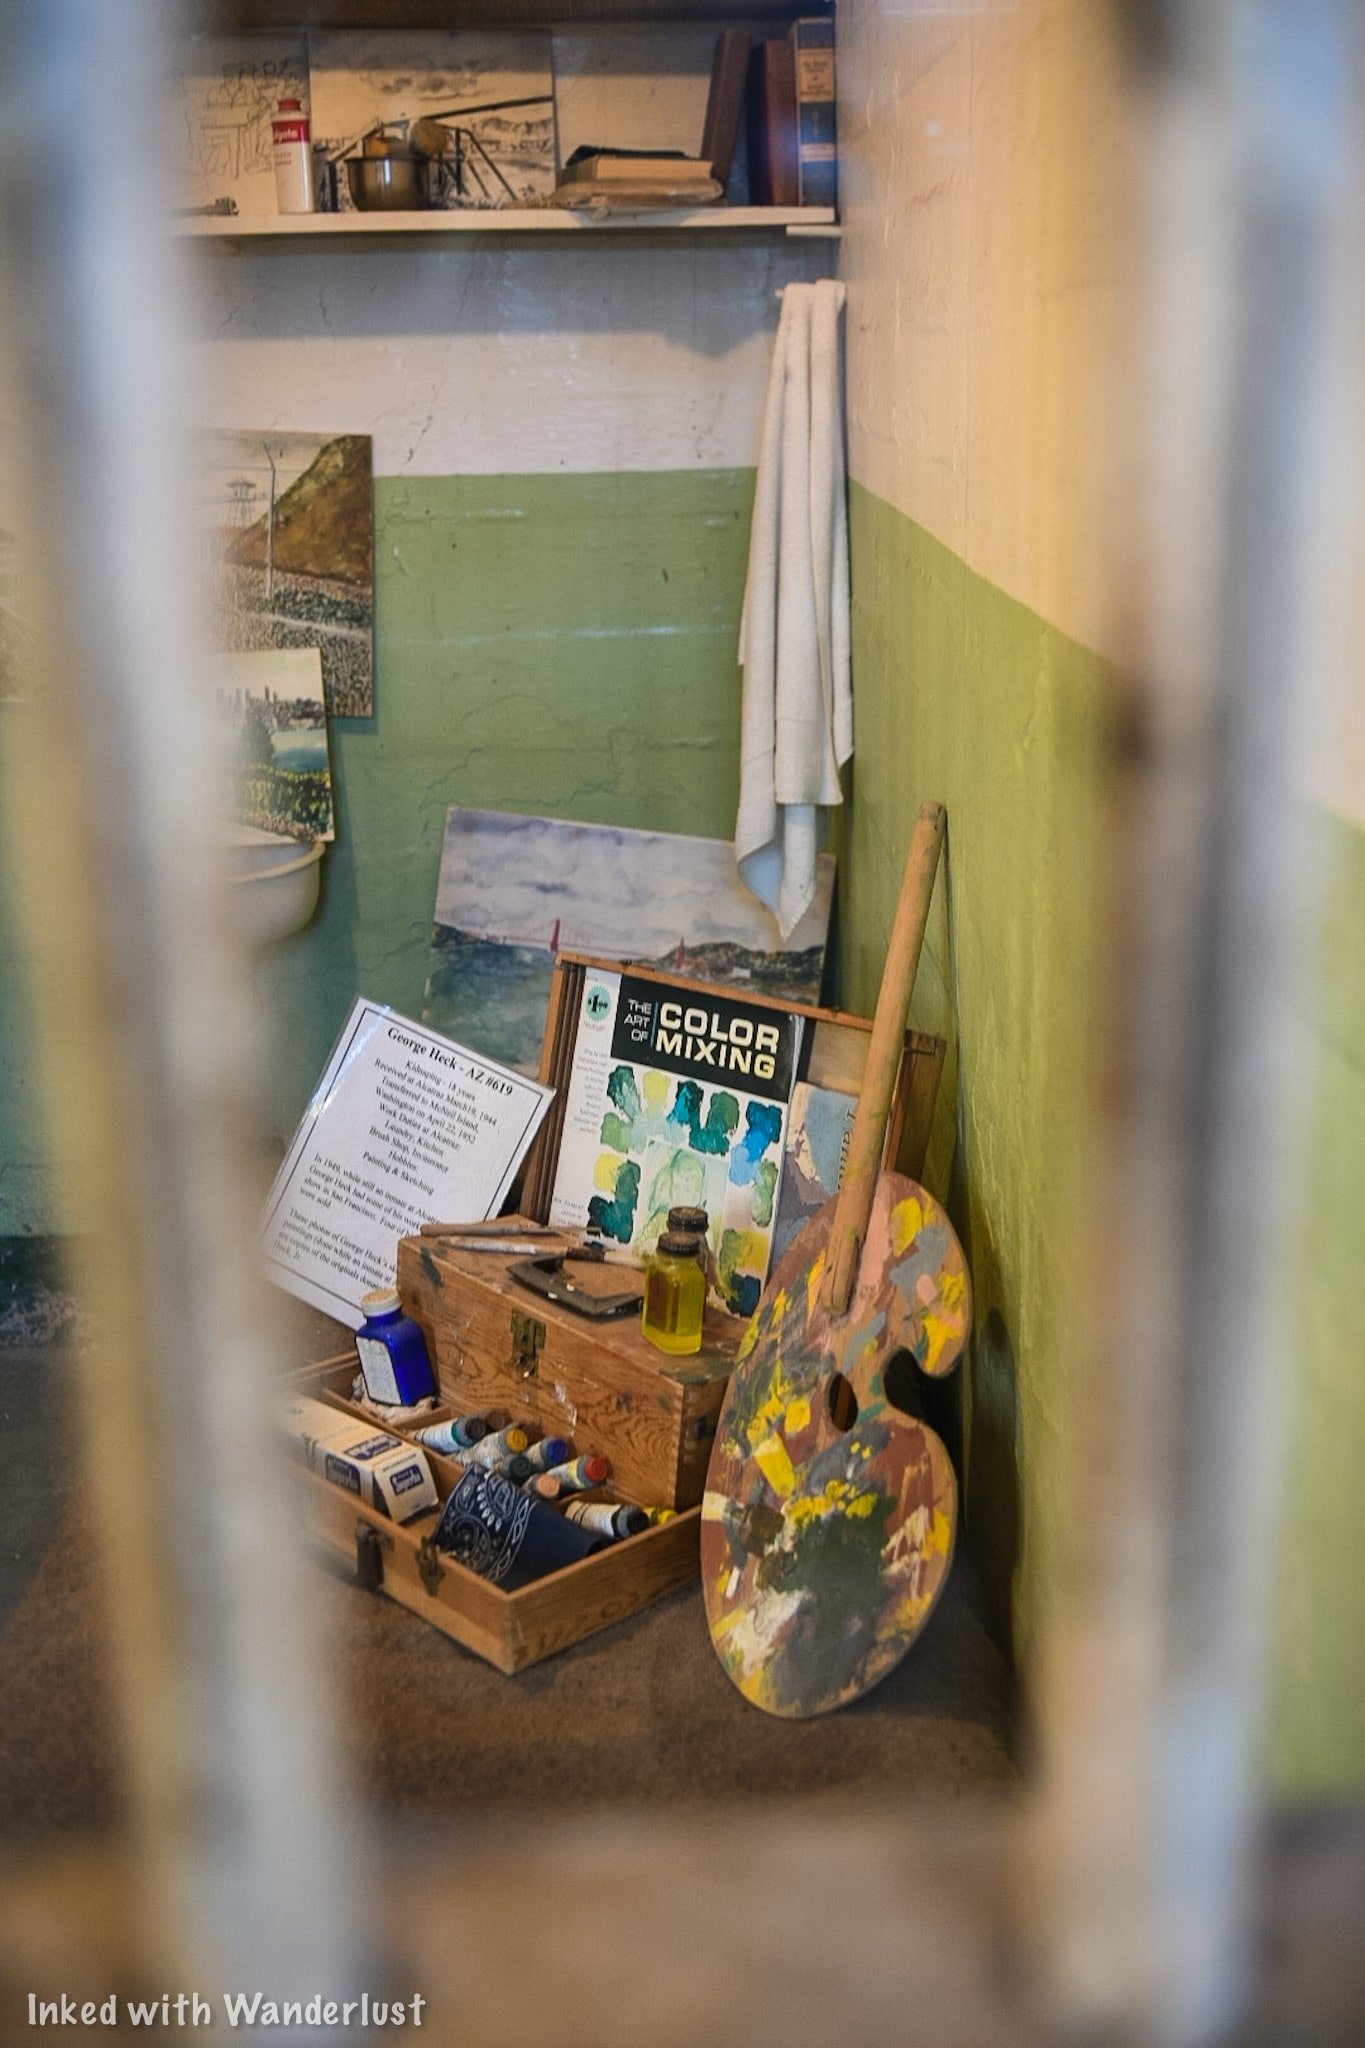
From here, you’ll round the corner to view the visitation area, also known as, “Peek’n Place”. Here, inmates would visit their loved ones by talking to them through a phone and thick, glass barriers. Under most circumstances, inmates were allowed only one visit per month.

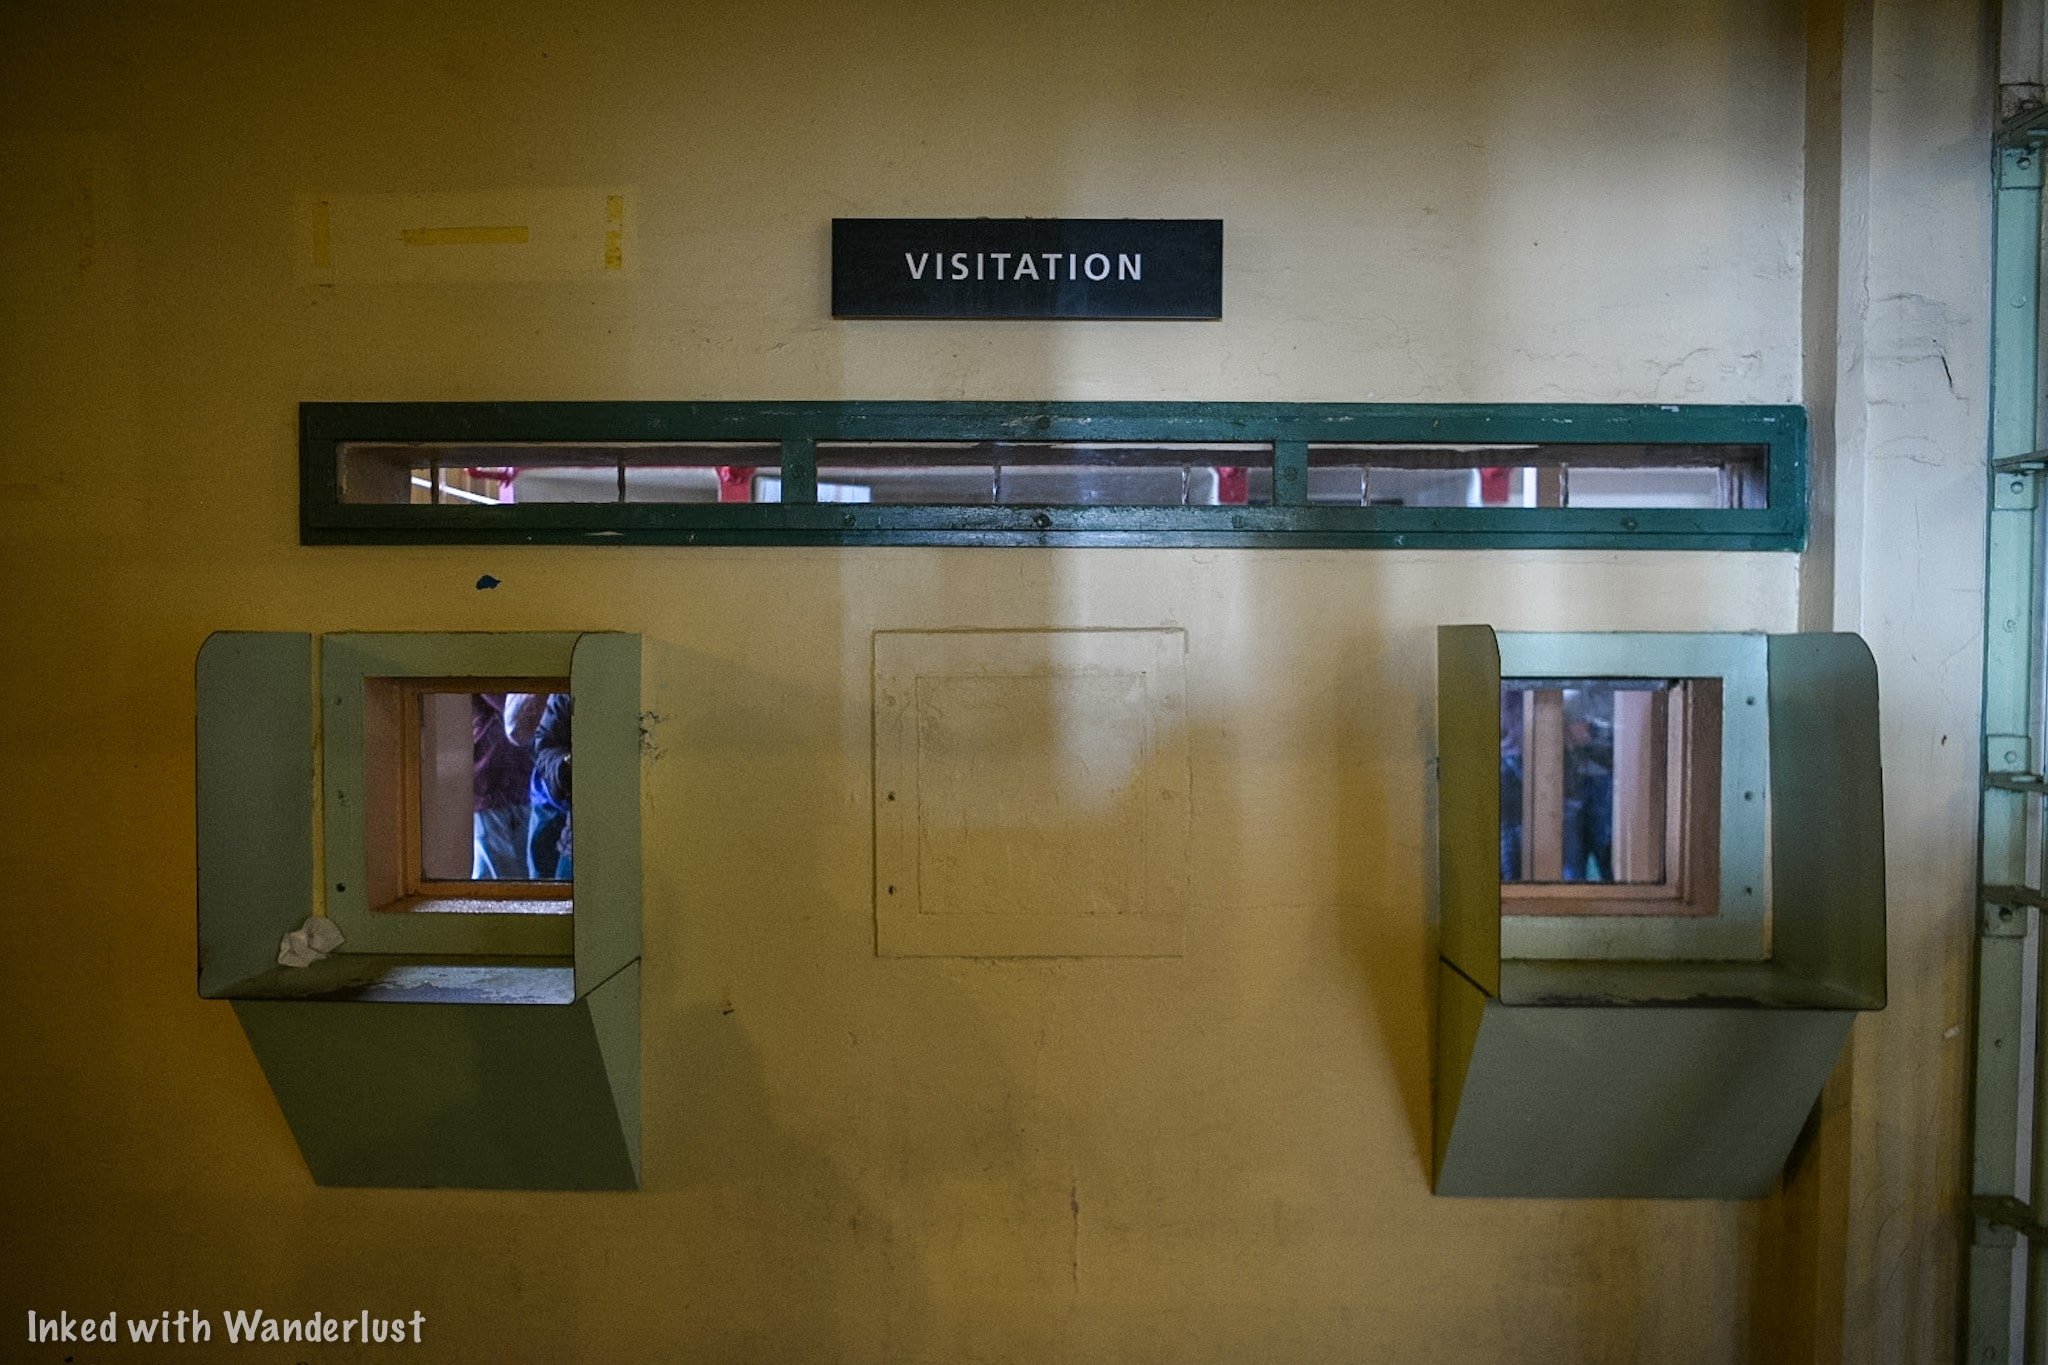
Head to the opposite side of the wall to see it from the visitor’s perspective. There would be a guard stationed here listening to all conversations. Among other topics, discussing current events was prohibited and could’ve resulted in privileges.

The area behind the visitation is where the administrative offices are. You can come back here after the conclusion of the tour. For now, head back down broadway.
Broadway & Dining Hall
Before arriving at the Dining Hall (the final room of the tour), you’ll take one last stroll down Broadway. On the way, you’ll stop to see the cells of Frank Morris and the Anglin Brothers. They took part in the greatest escape attempt in the history of Alcatraz.

You’ll see the vent in the back of their cells where they squeezed through to gain access to the corridor. They took advantage of Alcatraz’s deteriorating state by chipping away at the wall around the vent.
You’ll also see the plaster molds of their heads they constructed. They placed them in their beds at night to fool the guards into thinking they were asleep. In reality, they were in the corridor behind the cells working on the next phase of the escape.

The final section of the cell house tour is the Dining Hall. Here, hundreds of men would gather together for breakfast, lunch, and dinner, everyday. The guards would tell you that this was always the most tense part of the day as fights or riots could break out at any time.


To deter this, tear gas canisters were positioned in the rafters throughout the room that could be set off remotely. There was also an abundant of armed guards present. Despite these security features, a few riots have broken out here.
Inmates were given 20-minutes to eat and were not limited in how much food they could consume. The only caveat to this was no matter how much they took they had to eat it all, leaving no waste. If they made a habit out of doing that, it could result in the removal of privileges.

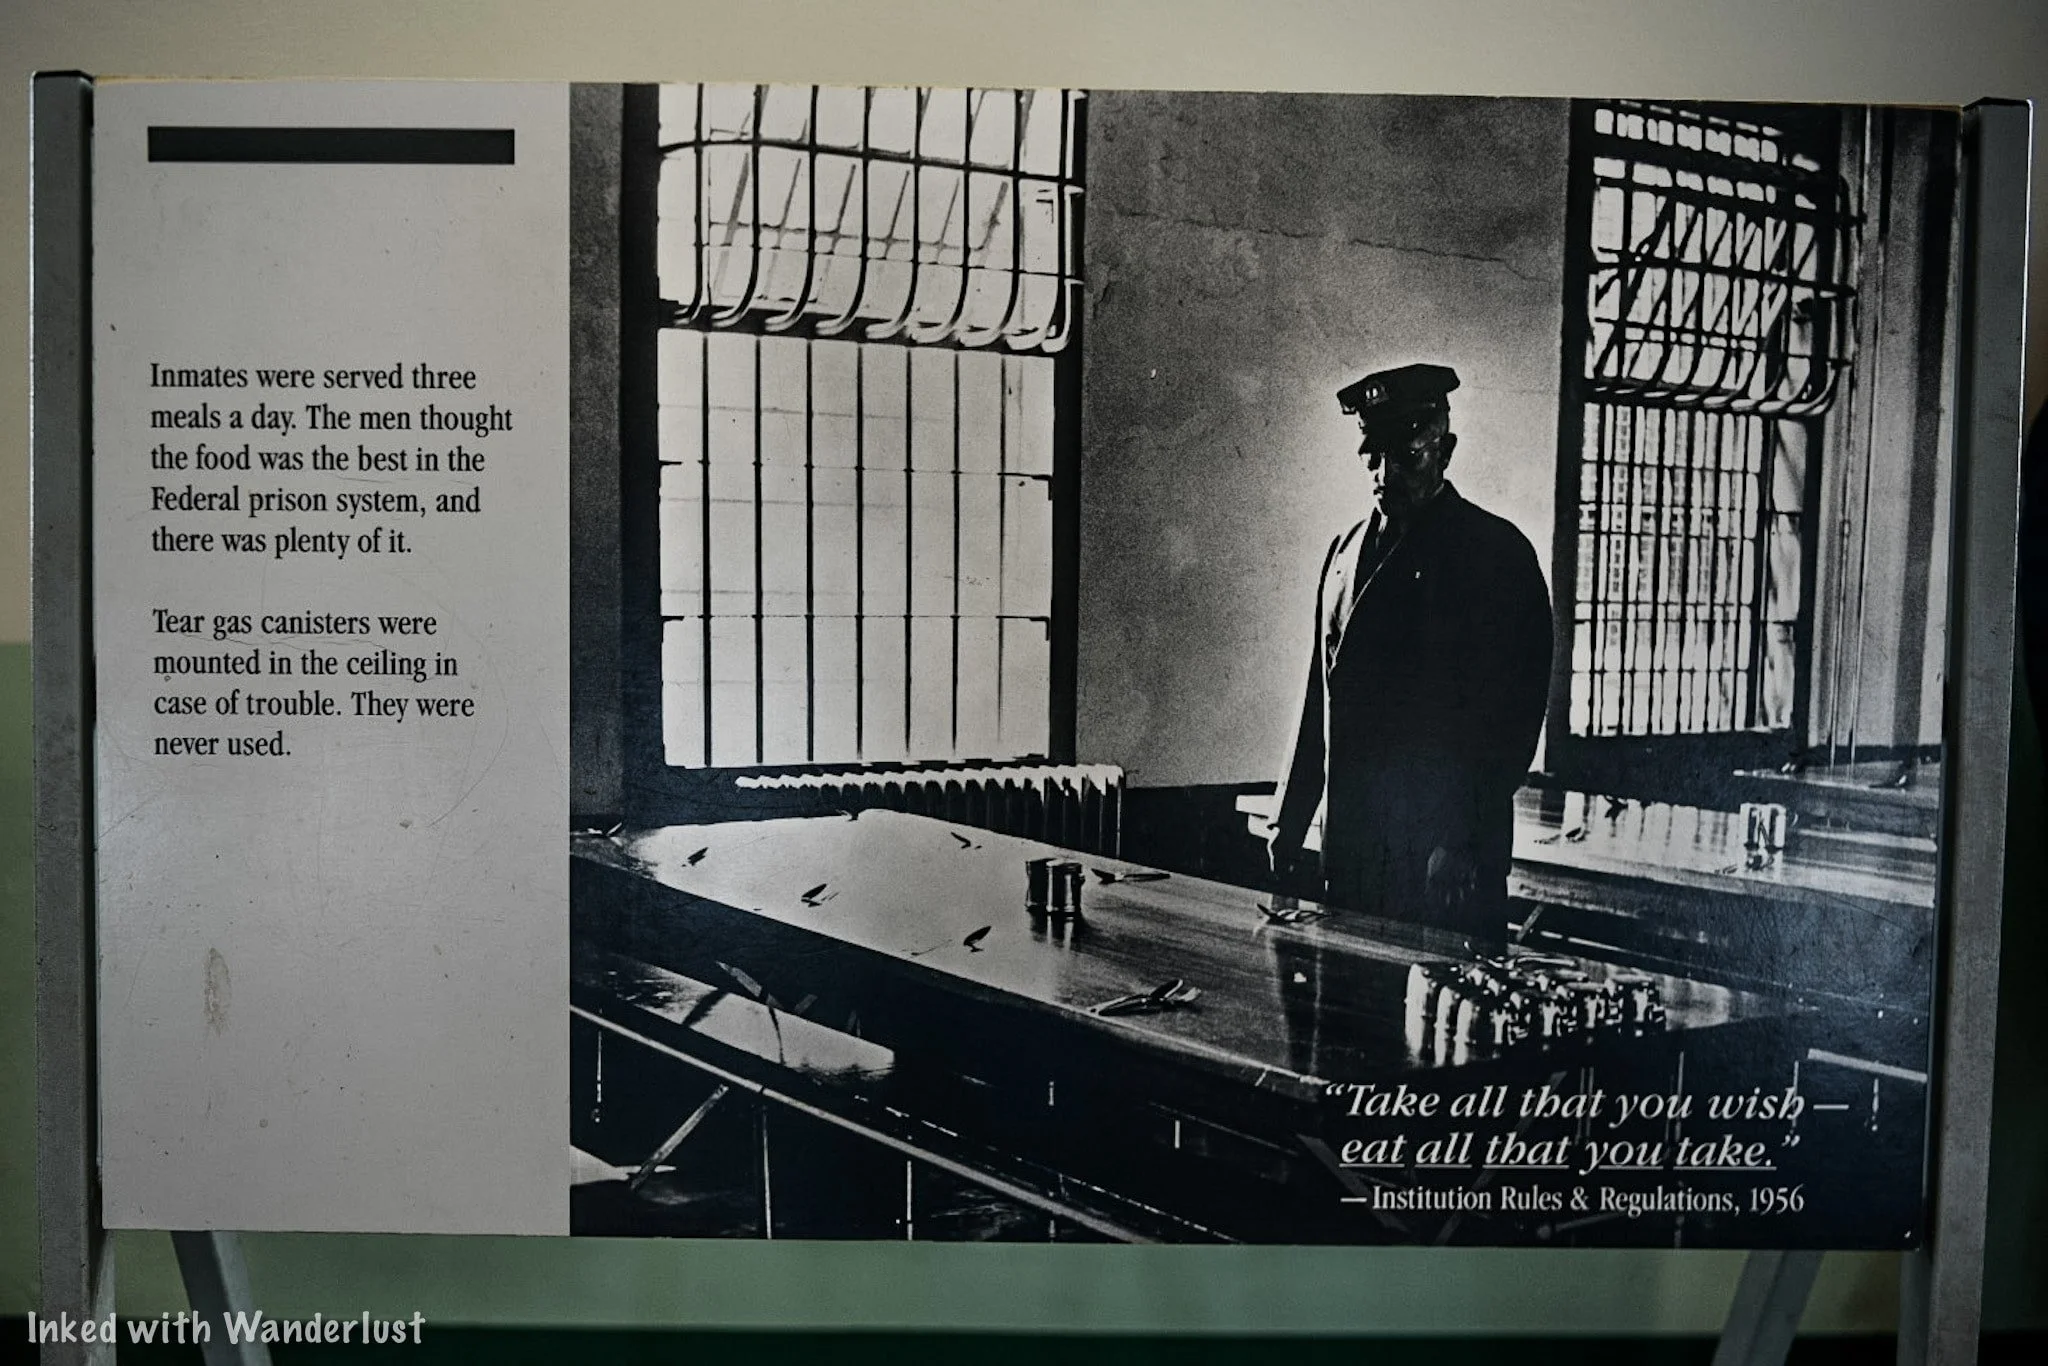
Hanging above the entrance to the kitchen is the menu of the final breakfast served at Alcatraz. Inmates reported the food here to be the best of any Federal Penitentiary they’ve been to.
By now, the narrator has concluded the tour and from this point forward, you’re free to explore the island at your leisure. Turn in your device to the booth in the middle of the room and head back down the stairs.


From there, you’ll come down the stairs and back into the showers. You’ll be directed to exit through the gift shop and when you do that, you’ll be right back where it all began at the cell house entrance.
(Click to go back to top)
Exploring the Island
Your visit to Alcatraz doesn’t end with the cell house tour. You’re free to spend as little or as much time here as you please as long as you’re off the island by the final ferry departure time.
At the conclusion of the tour, simply head back down the path and go from there. Having a map of the island would come in handy here but if you don’t have one, just follow the signage.
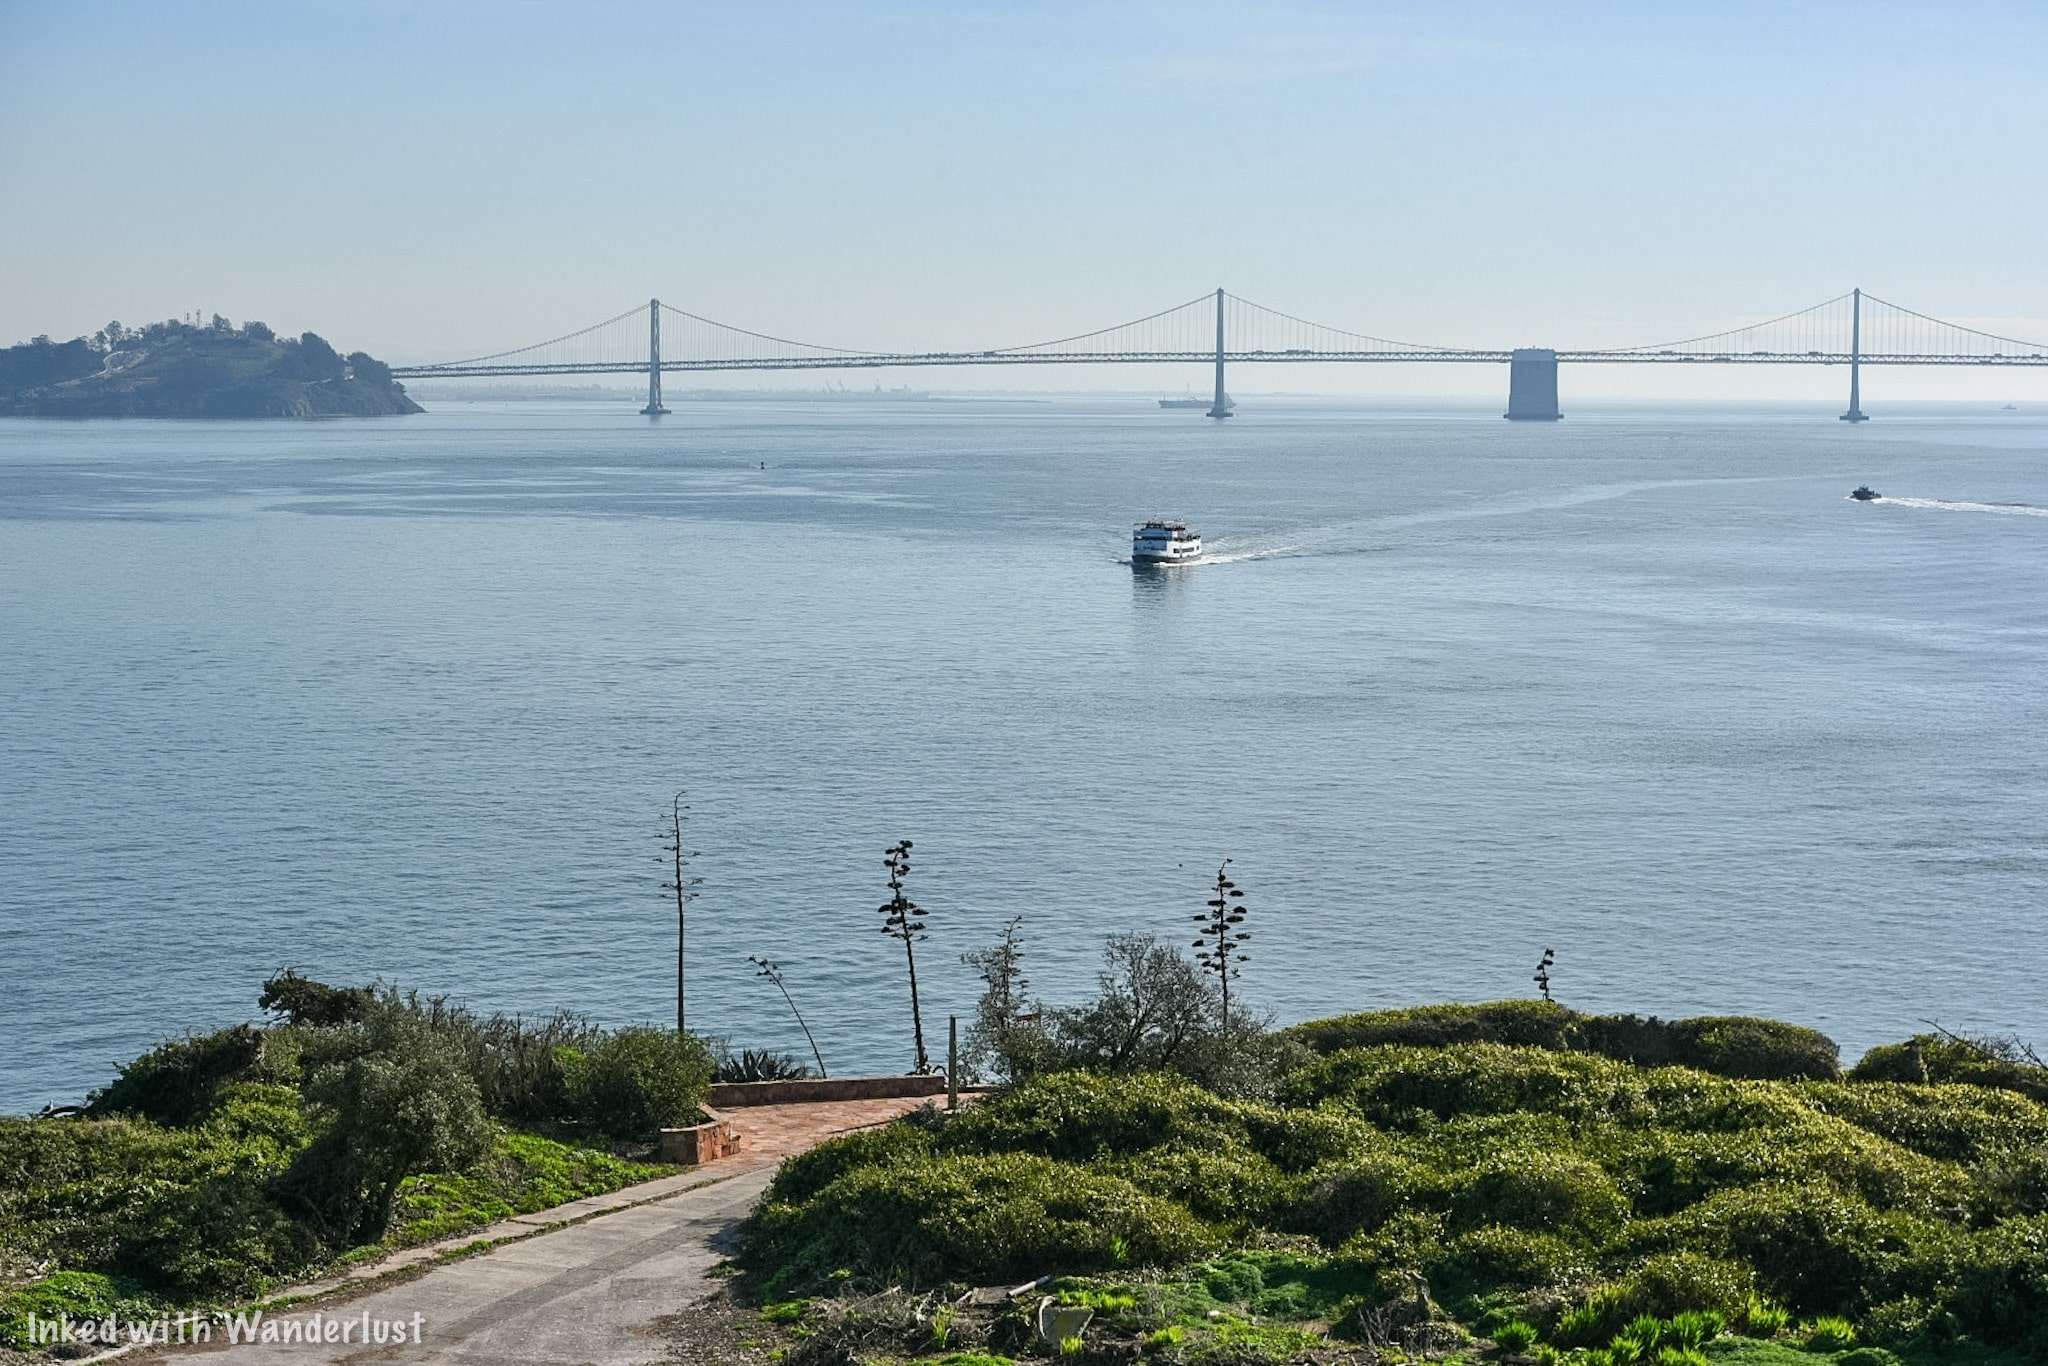
Southwest & Northwest Side
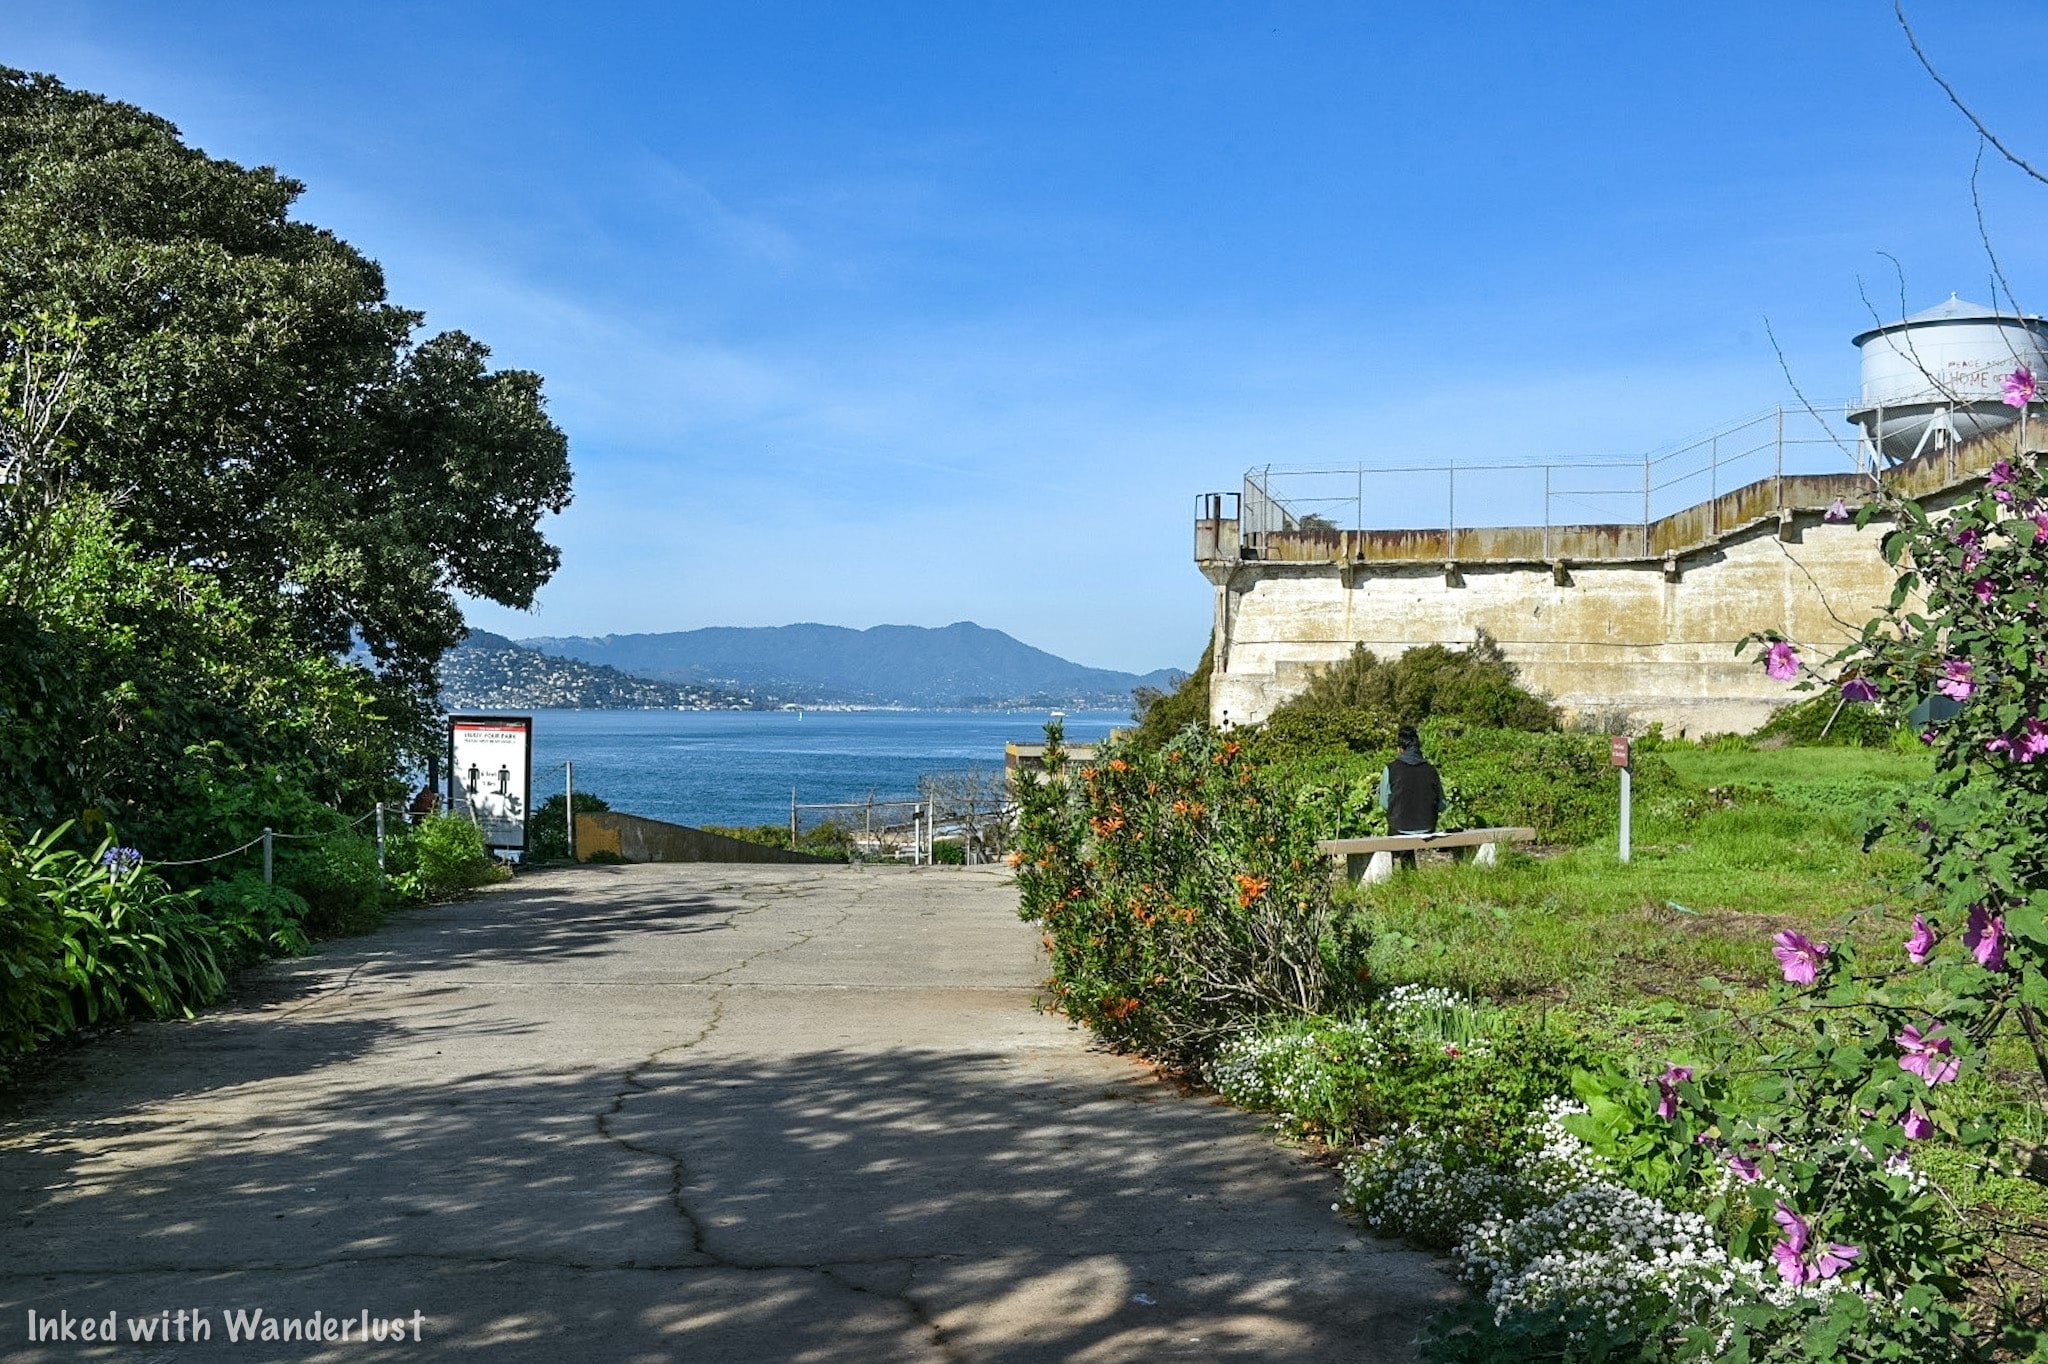
On the southwest side of the island (facing the Bay Bridge) is the administration building, the remains of the Warden’s house, the historic Lighthouse, and the ruins of, ‘Officer’s Row’ (where housing for the guards and their families used to be).


In the admin building, you’ll see the Warden’s office, control room, and other offices. You can also access the cell house from here if you want to see it again.
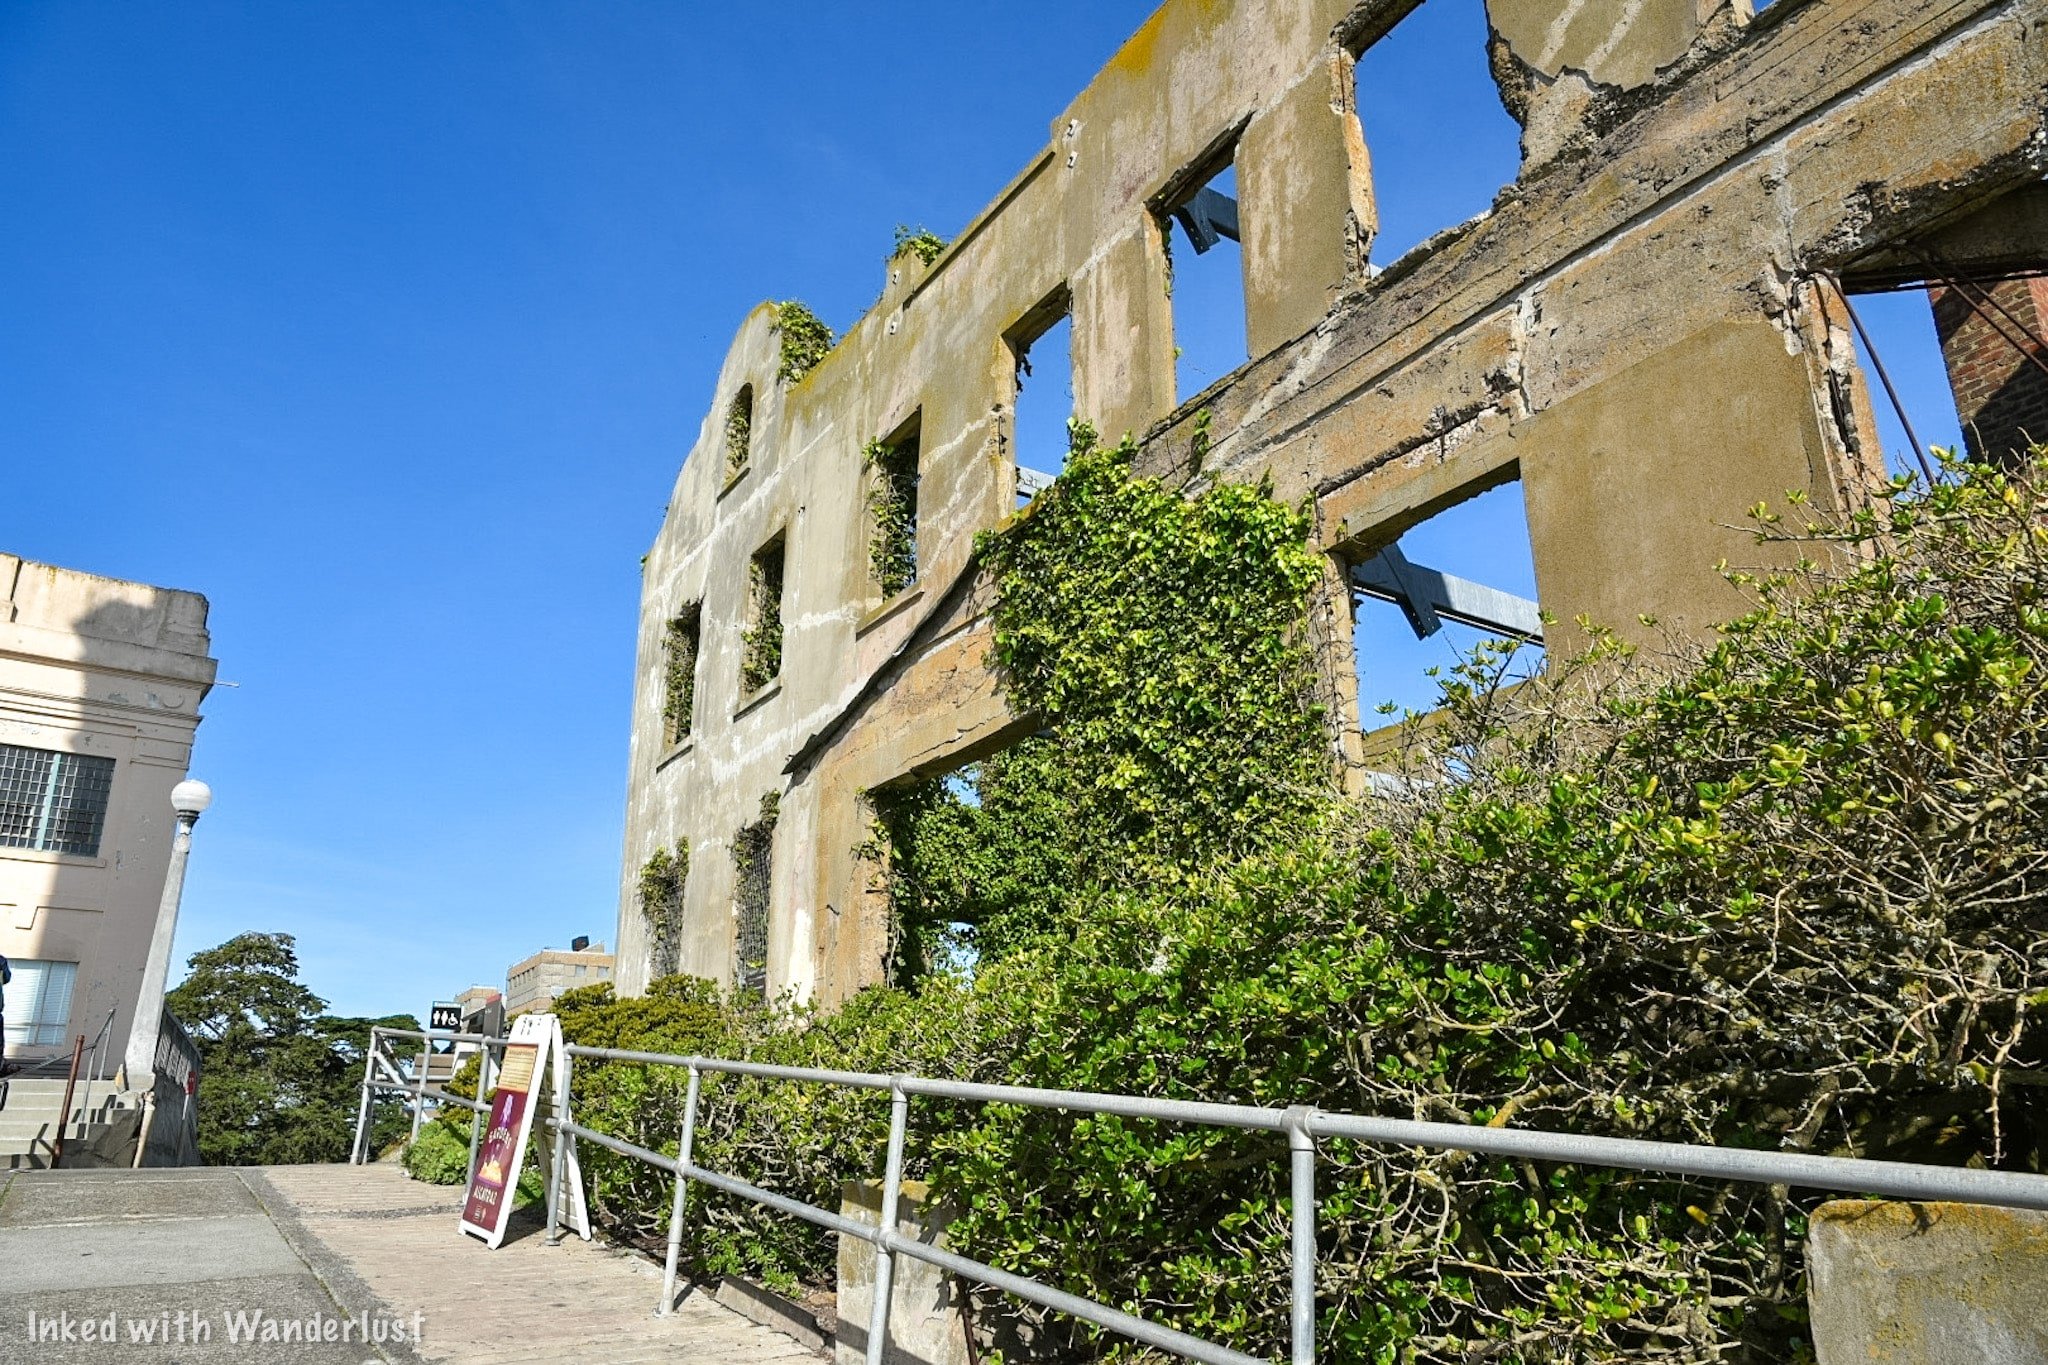
Outside the admin building is the former home of the Warden. As you can see in the image above, the elements and nature have taken over. As you’ll see when you’re here, though, the Warden once had an amazing view of the bridge and city.
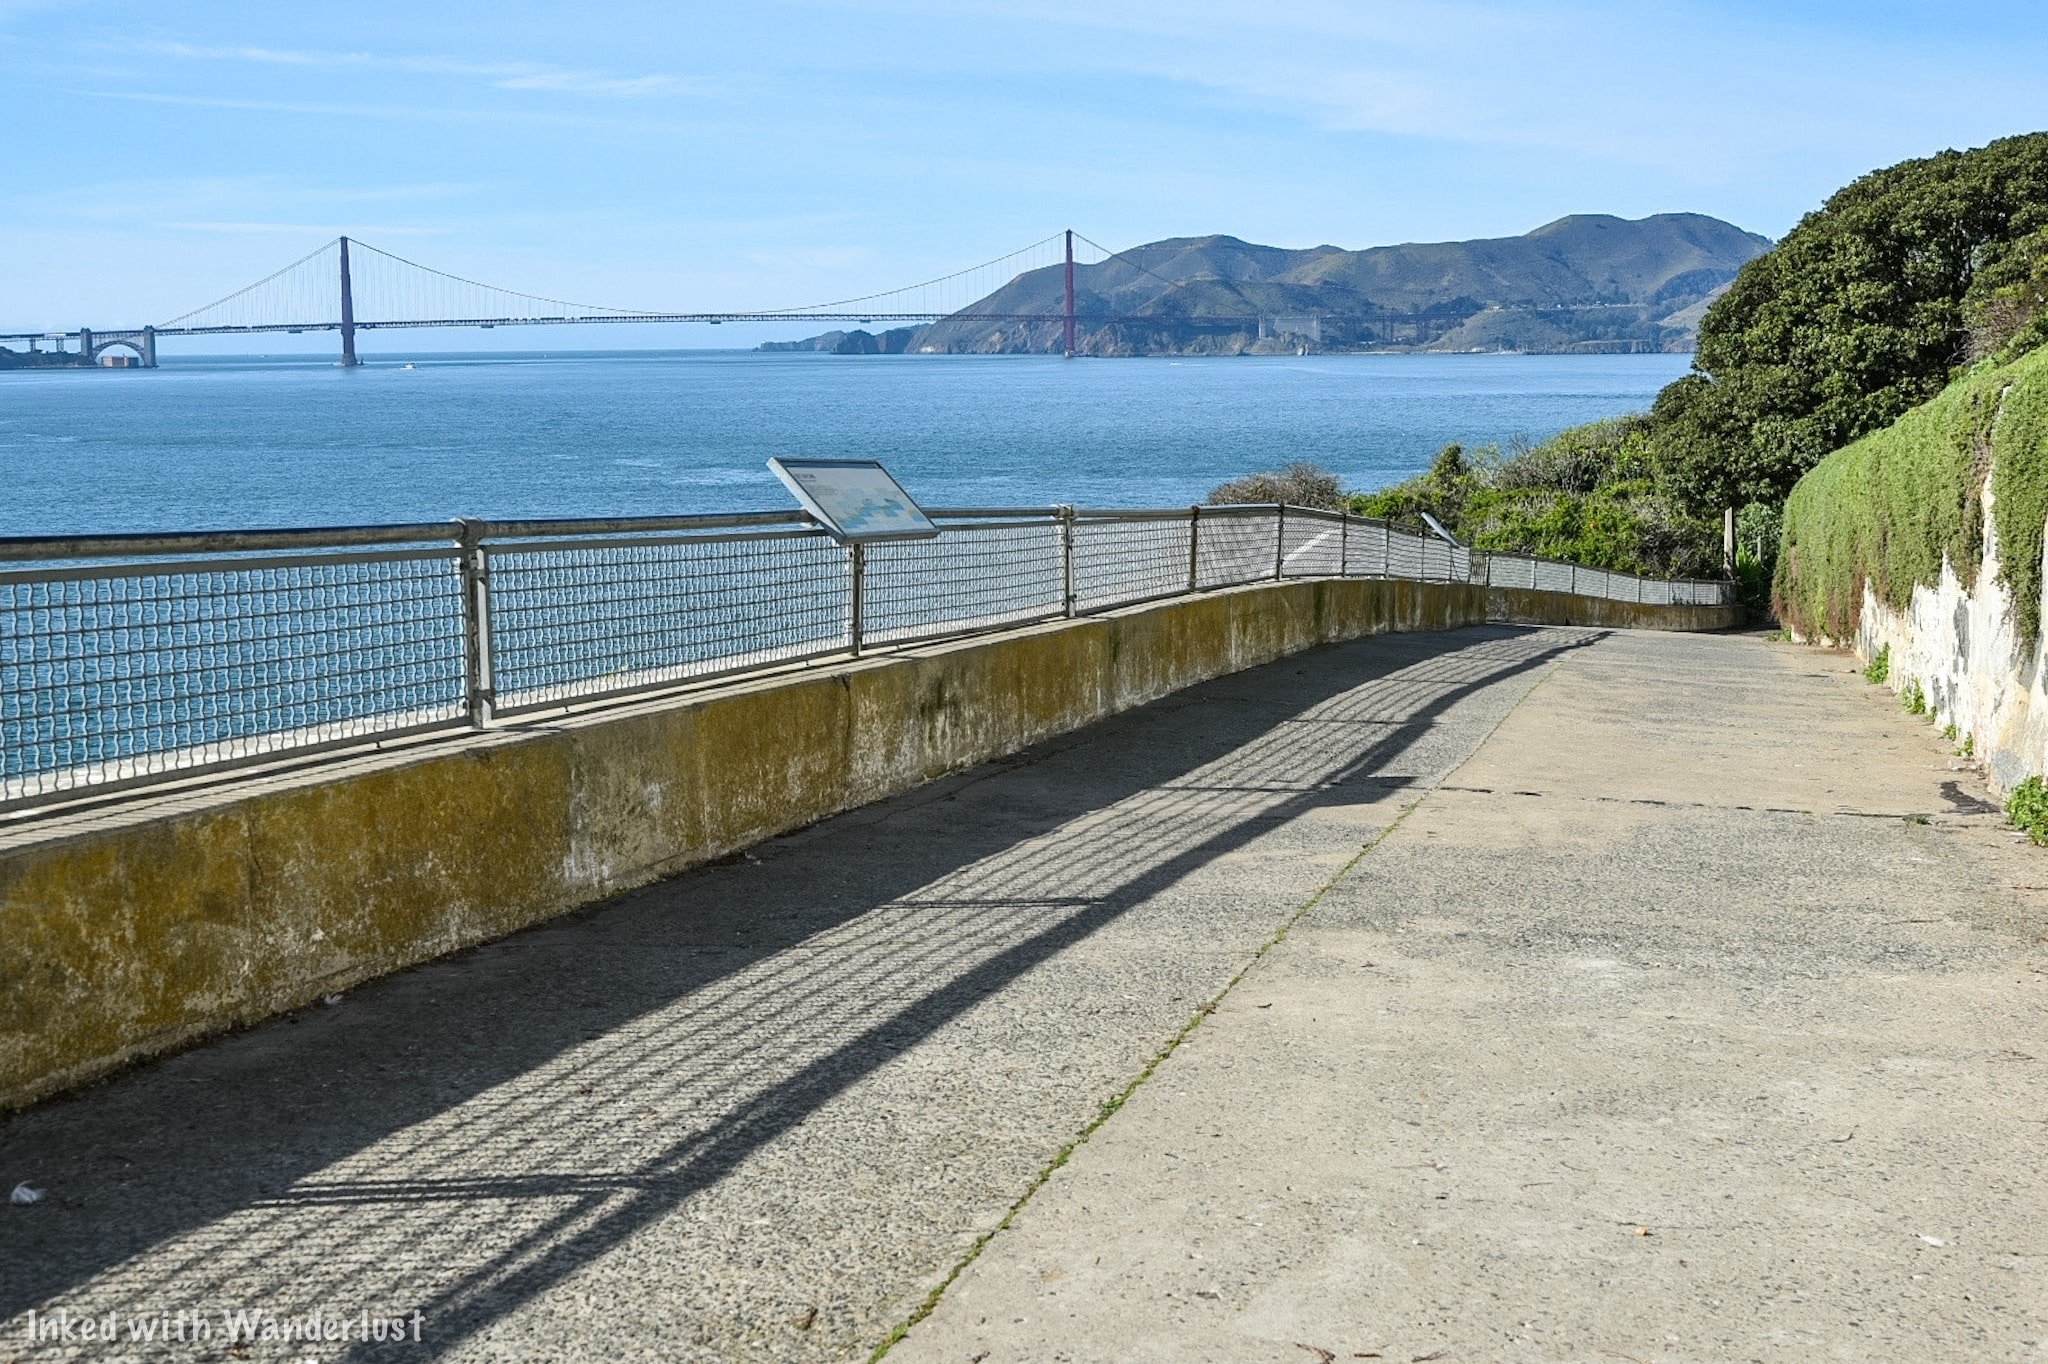
Take the west road (pictured above) to see the Northwest side of the island. Here you’ll find a beautiful garden that was once maintained by the inmates.

The west road eventually terminates near the stairwell that leads back to the Recreation Yard. If you like, you’re welcomed to go back up there. If not, you’ll need to turn back and go the way you came in.
Southeast and Northeast Side
These are on the opposite side of the island. To get there, you have two options:
Go up the stairs through the recreation yard and cut through the cell house to the other side. You’ll go back down the stairs in the Dining Hall and out through the gift shop. Or….
Take the west road back to the Warden’s house and loop back to the other side on east road.

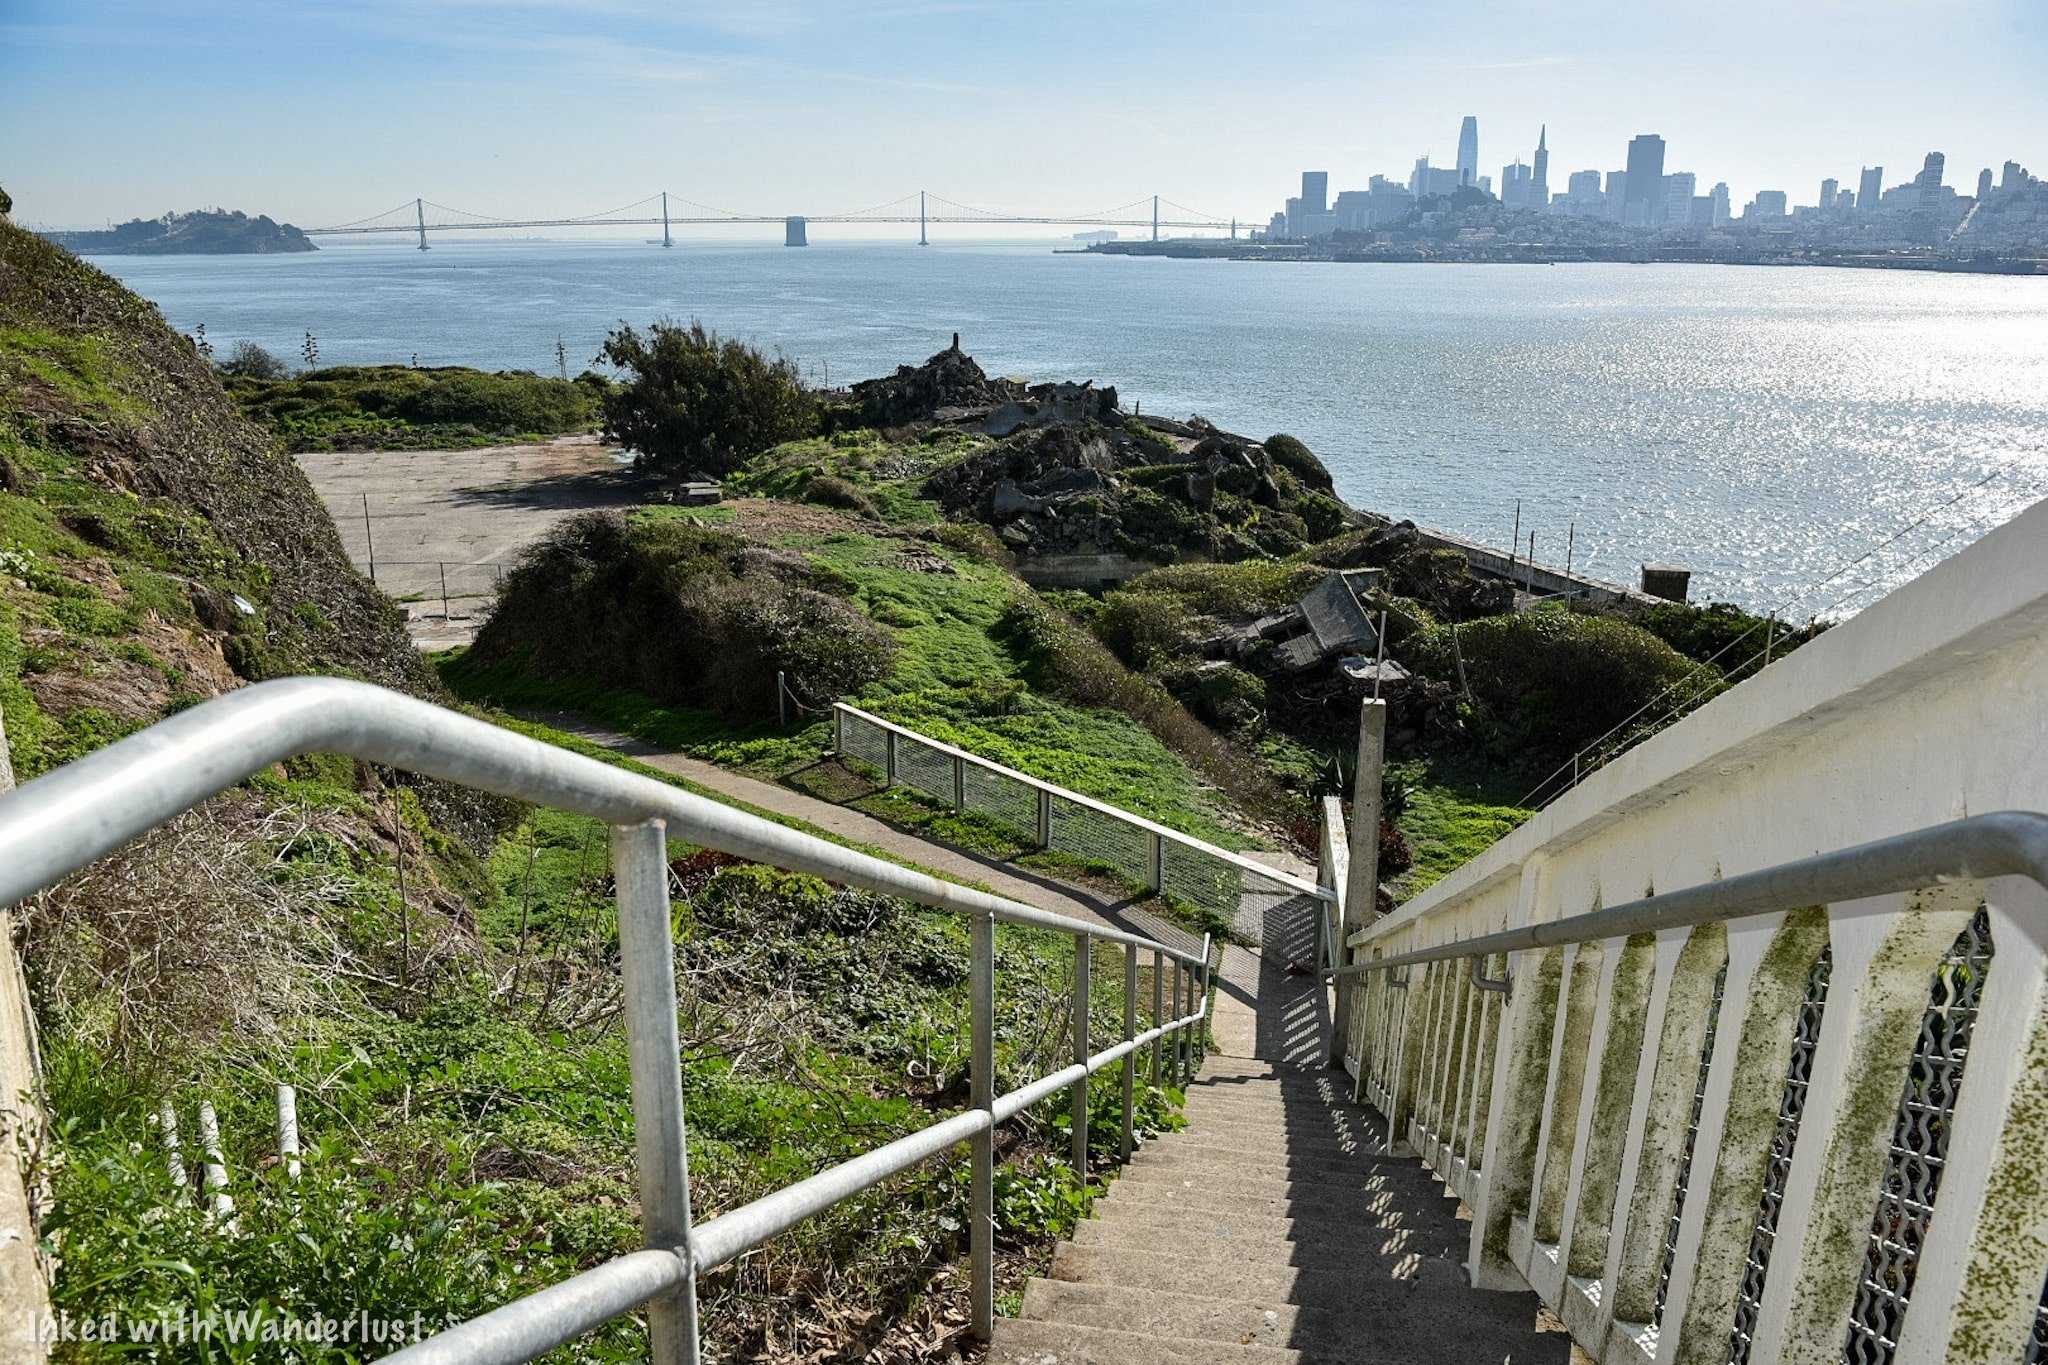
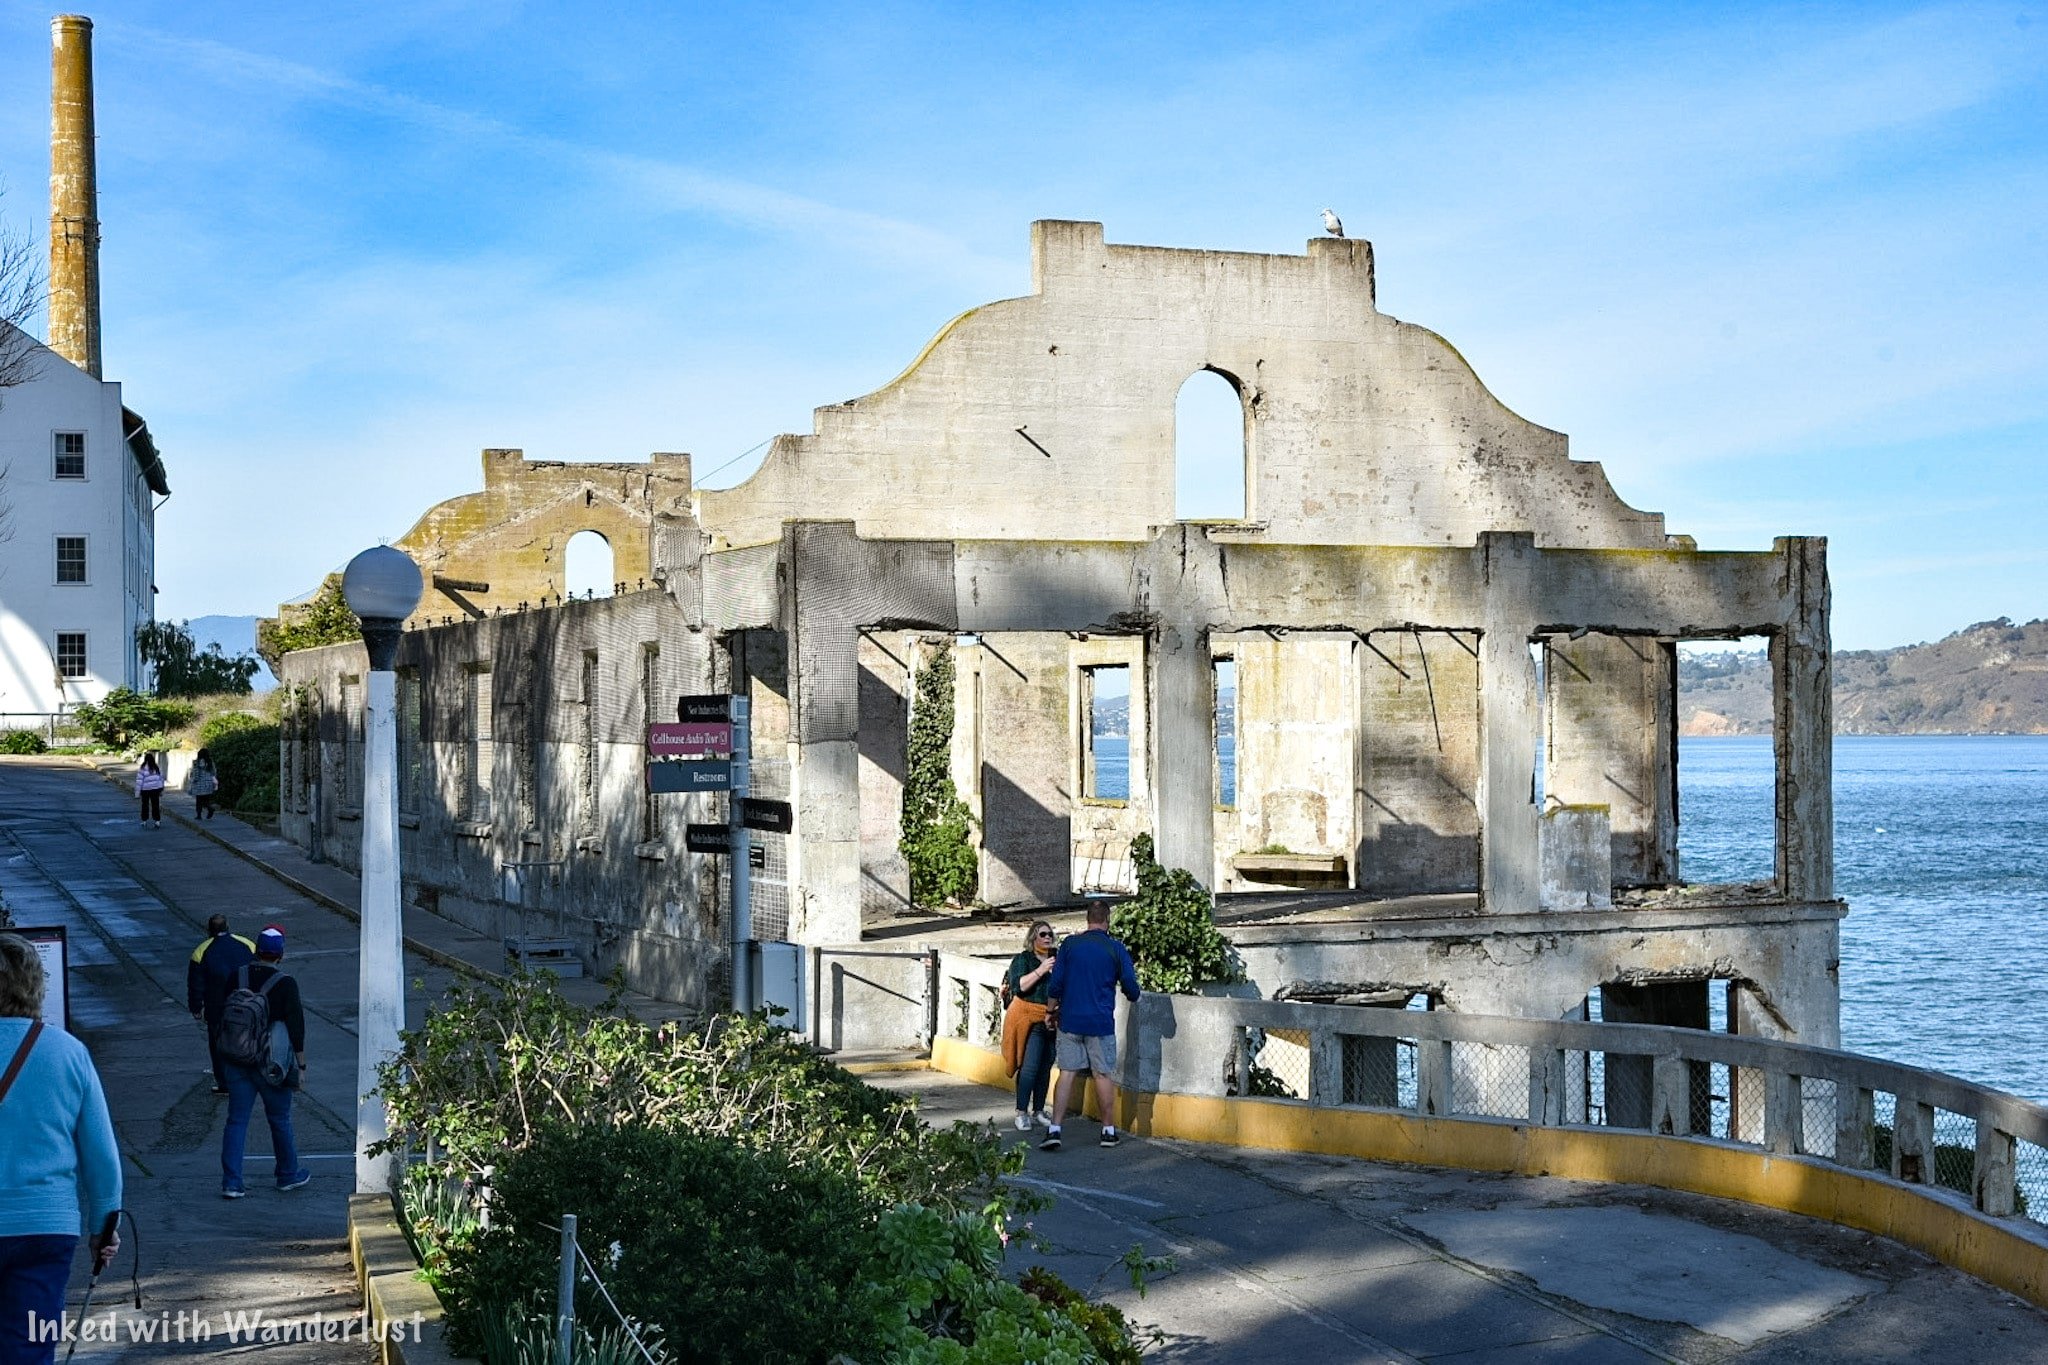
There are multiple historic buildings on this side of the island. Building 64, the Sally Port, the old Boat Dock, and (pictured above) the remains of the Officer’s Club.
Continuing straight away from the Officer’s Club is where you’ll find the Powerhouse, Model Industries Building, and Water Tower. A bit further up the road (going towards the cell house) you’ll find the Morgue.


The Model Industries Building is fenced off so you’re not able to go in and see it. We did see a lot of construction material nearby so that may possibly change in the future.

At this point, you have no other recourse but to turn around. From here, it’s completely up to you where to go.
As stated above, you can remain on Alcatraz for as long as you wish. You can explore the island some more, do the cell house tour again, you can hike the Agave Trail (starts near the ferry dock), or head back to the city.

*We’re often asked about the kind of camera equipment we use to capture the photos used on our website. Below are Amazon links to what we use. If you decide to purchase, Amazon pays us a small commission and it doesn’t cost you anything extra.
(Click to go back to top)
Conclusion
Phew! That was a long one. If you read that entire thing, you rock! If you skimmed through it, you still rock! We’ve been wanting to add Alcatraz to our website for a long time and we’re excited for you to read it. Be sure to let us know in the comment section if you’ve been to Alcatraz or are now wanting to go.
We hope you’ve found this post helpful in planning your next adventure. If so, please support our site by sharing it with your family and friends on Pinterest or Facebook. You can further show support by staying on and reading one or more of the related articles above.
Thanks for reading and safe travels!

Manzanar National Historic Site: Directions, Things to See, and More (2022)
My first visit to Manzanar came in 2017 while on my way home from Southern California. I did some research about attractions along 395 and was surprised to find Manzanar…
Our first visit to Manzanar came in 2017 while on our way home from Southern California. We researched attractions along 395 and we were surprised to find Manzanar as neither of us have ever heard of it.
We only had a few hours to spend but that was all it took for Manzanar to take hold of us. When I was younger, I visited the Museum of Tolerance in L.A and it had a huge impact on me. Manzanar had the same affect.
If you’ve been wanting to visit Manzanar or have never heard of it, keep reading to find out how you can visit this highly historical and important place. Let’s get into it!
Visitor Information

Getting to Manzanar
Manzanar is located in the small California town of Independence nestled between the equally small towns of Lone Pine and Big Pine. The mighty Sierra Nevada mountains provide a beautiful backdrop to what was once an active relocation camp.
Northbound
For simplicity sake, we’ll use Los Angeles as the example.
From Los Angeles, you are roughly 220-miles, or 3.5-hours, away from Manzanar.
Work your way from L.A to Highway 395 North.
You’ll know you’re close once you reach the town of Lone Pine.
From Lone Pine, you’re about 10-minutes away from the turn-out.
Southbound
For southbound, we’ll use Reno.
From there, you’re about 252-miles, or 4.5-hours, from Manzanar.
Find your way from Reno to Highway 395 South and keep to it.
When you reach the town of Big Pine, you’re around 30-minutes away from the turn-out.
Things to See at Manzanar

Manzanar Visitor Center
The first thing you’ll see upon driving in is the same as the thousands of Japanese Americans that were once held here; the Sentry Post. Here, Military Police once stood guard checking vehicles coming in and out.
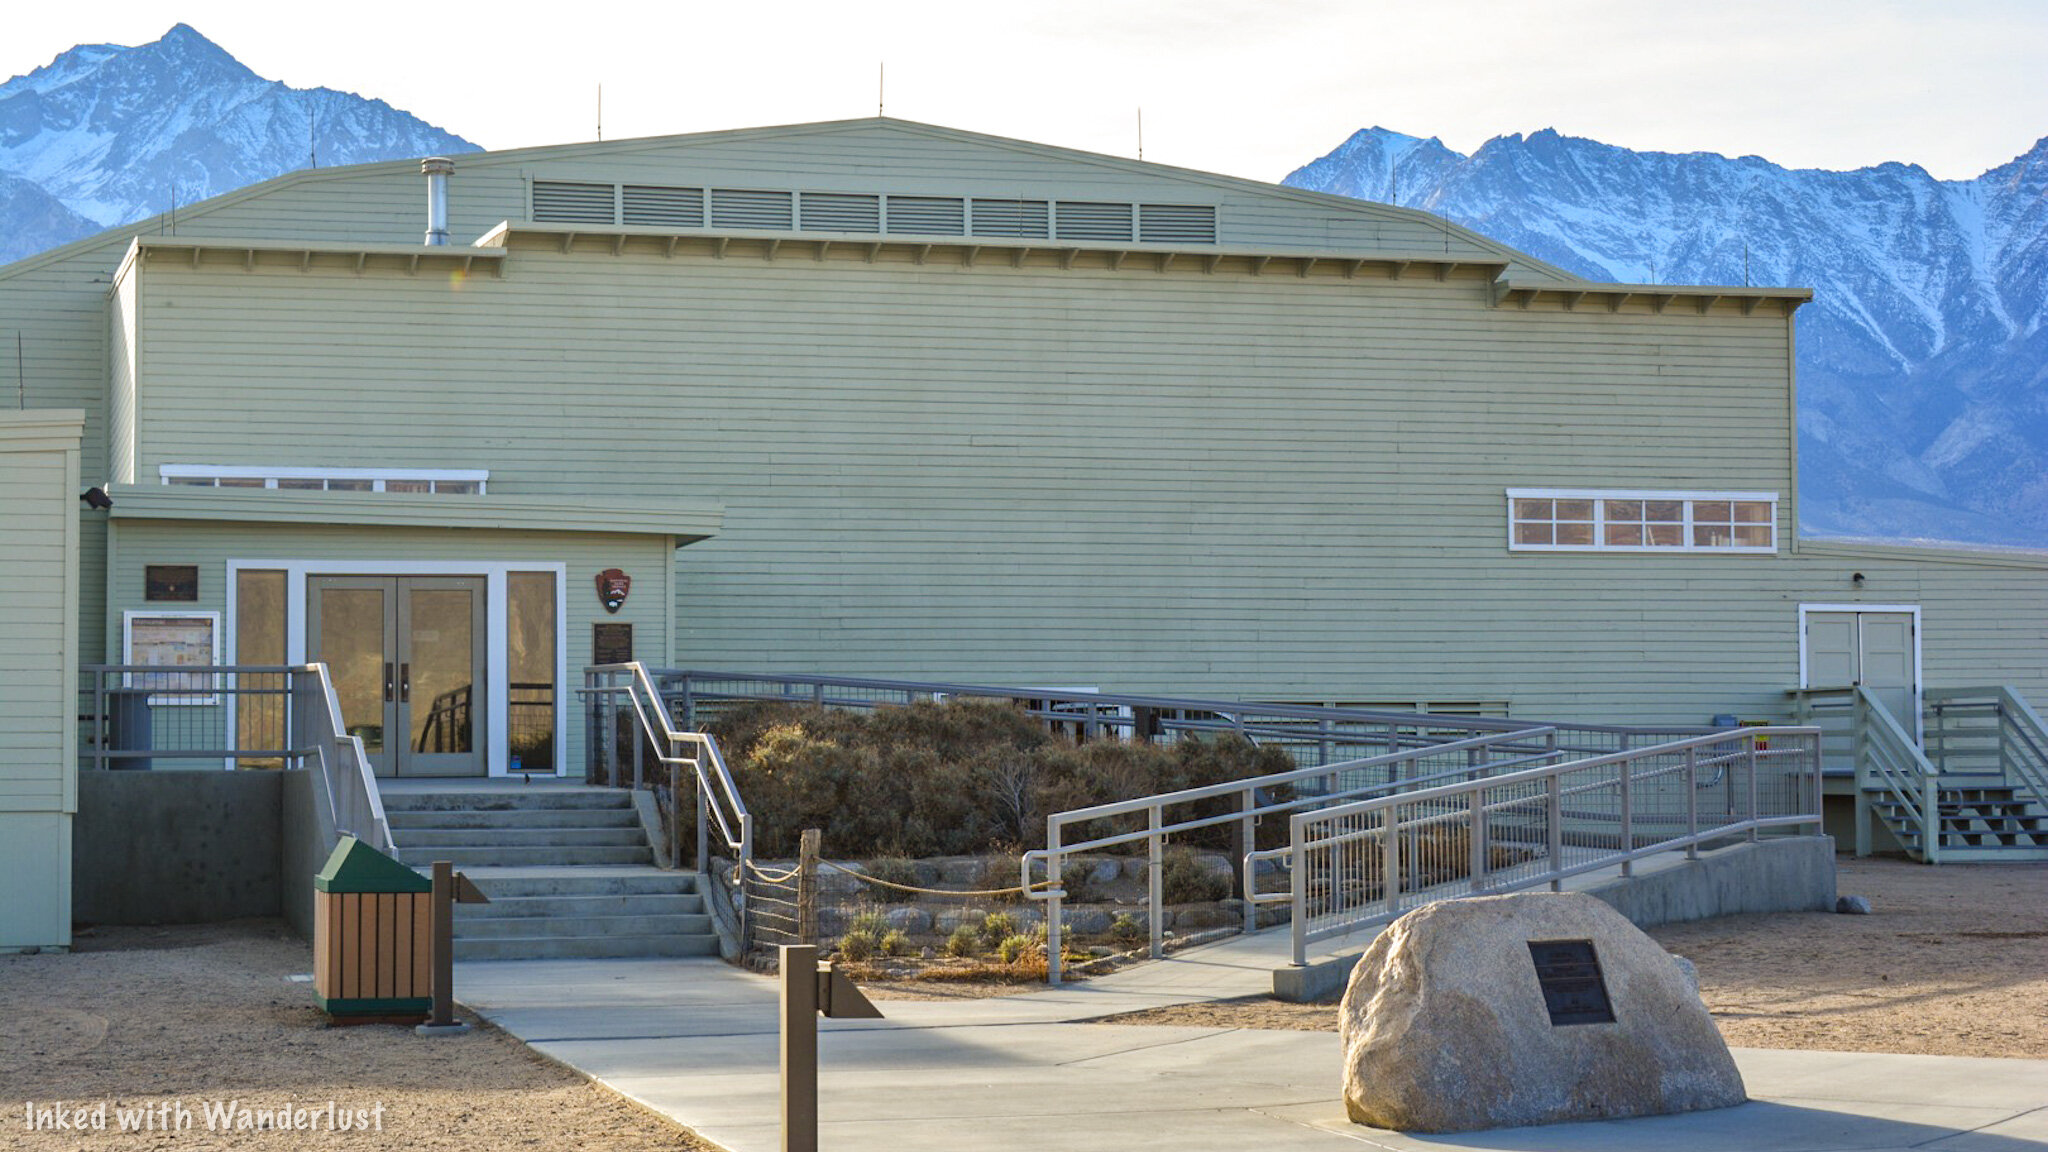
After securing your parking spot, your first stop should be the Visitor Center. We reccomend this because it’s packed with informative exhibits, a 22-minute park film, information desk, and a bookstore.
Hours for the visitor center are as follows:
Monday: 11am - 4pm
Tuesday: Closed
Wednesday: Closed
Thursday: Closed
Friday: 11am - 4pm
Saturday: 11am - 4pm
Sunday: 11am - 4pm
If you arrive on a day or time that the Visitor Center is closed, you can still access the remainder of the park.

Fair warning, you may find some of the exhibits offensive. The one below in particular. However, it does give you a sense of how badly Japanese Americans were treated after the bombing of Pearl Harbor and during the war.

Honestly, we were ignorant to it. We didn’t understand the extent of it all and until we discovered Manzanar, we had no idea our country utilized camps like this. It was difficult for us to grasp.


Manzanar was the first of 10 of these camps and at its peak held more than 10,000 Japanese Americans, mostly from the Los Angeles area. The photo above gives you an idea of its original size.
The entire property was 6200 acres with the developed portion covering 540 acres. The residential area alone was around one square mile and was made up of 36 blocks of 20-foot by 100-foot apartment style barracks, housing up to 8 people each.


The barracks had partitions with no ceiling, providing little privacy. To make matters worse, both the latrines and showers were communal, providing no partitions or stalls. Many who were interned here have said the lack of privacy was one of the worst parts about it.
Block 14 & Barracks
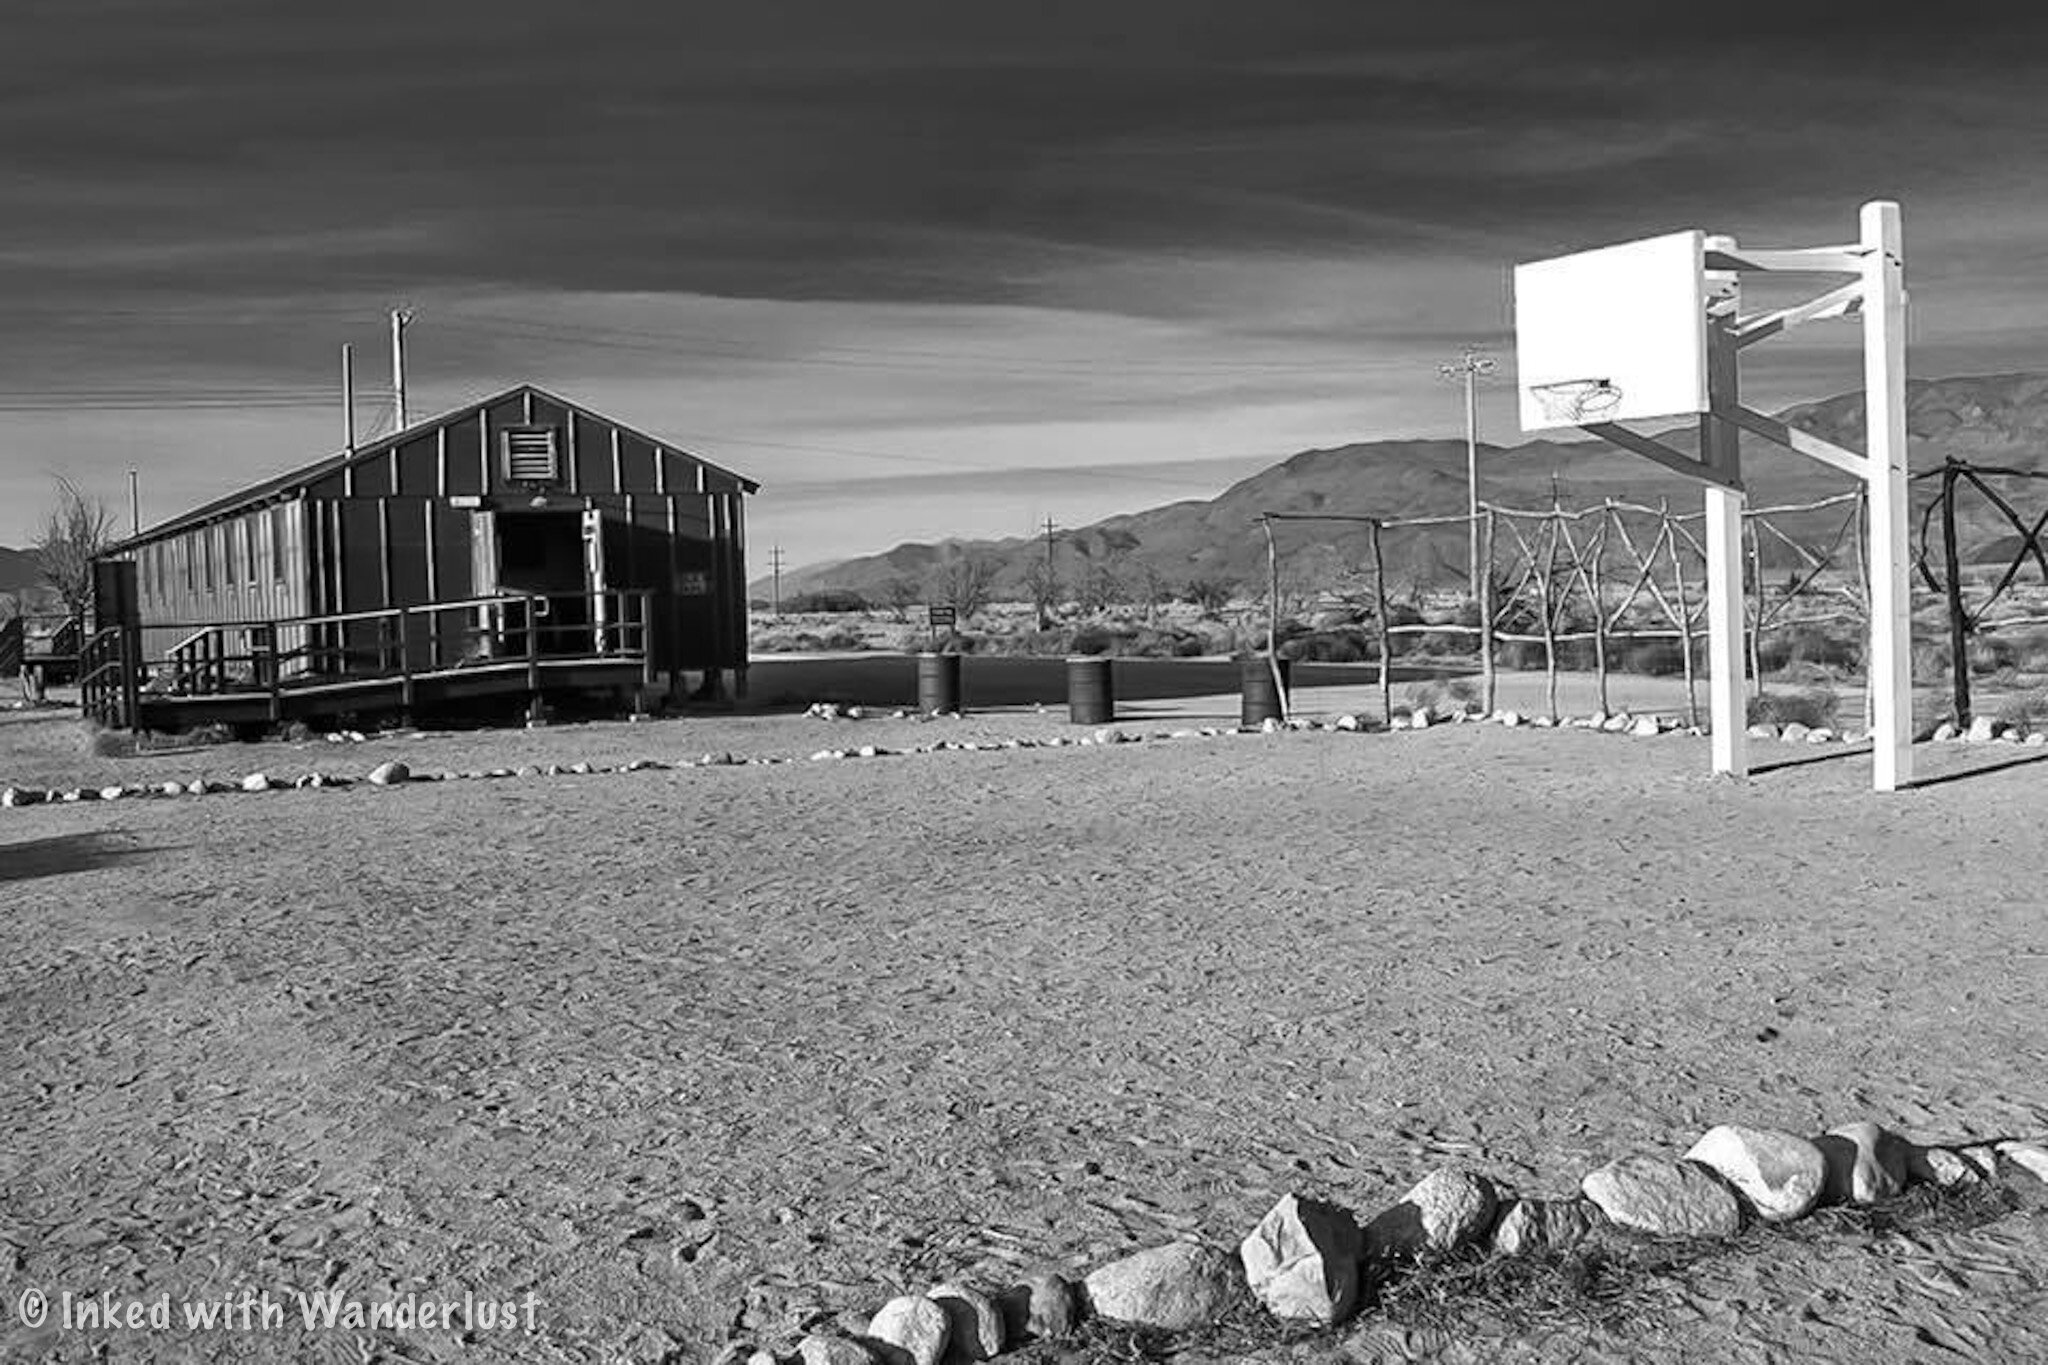
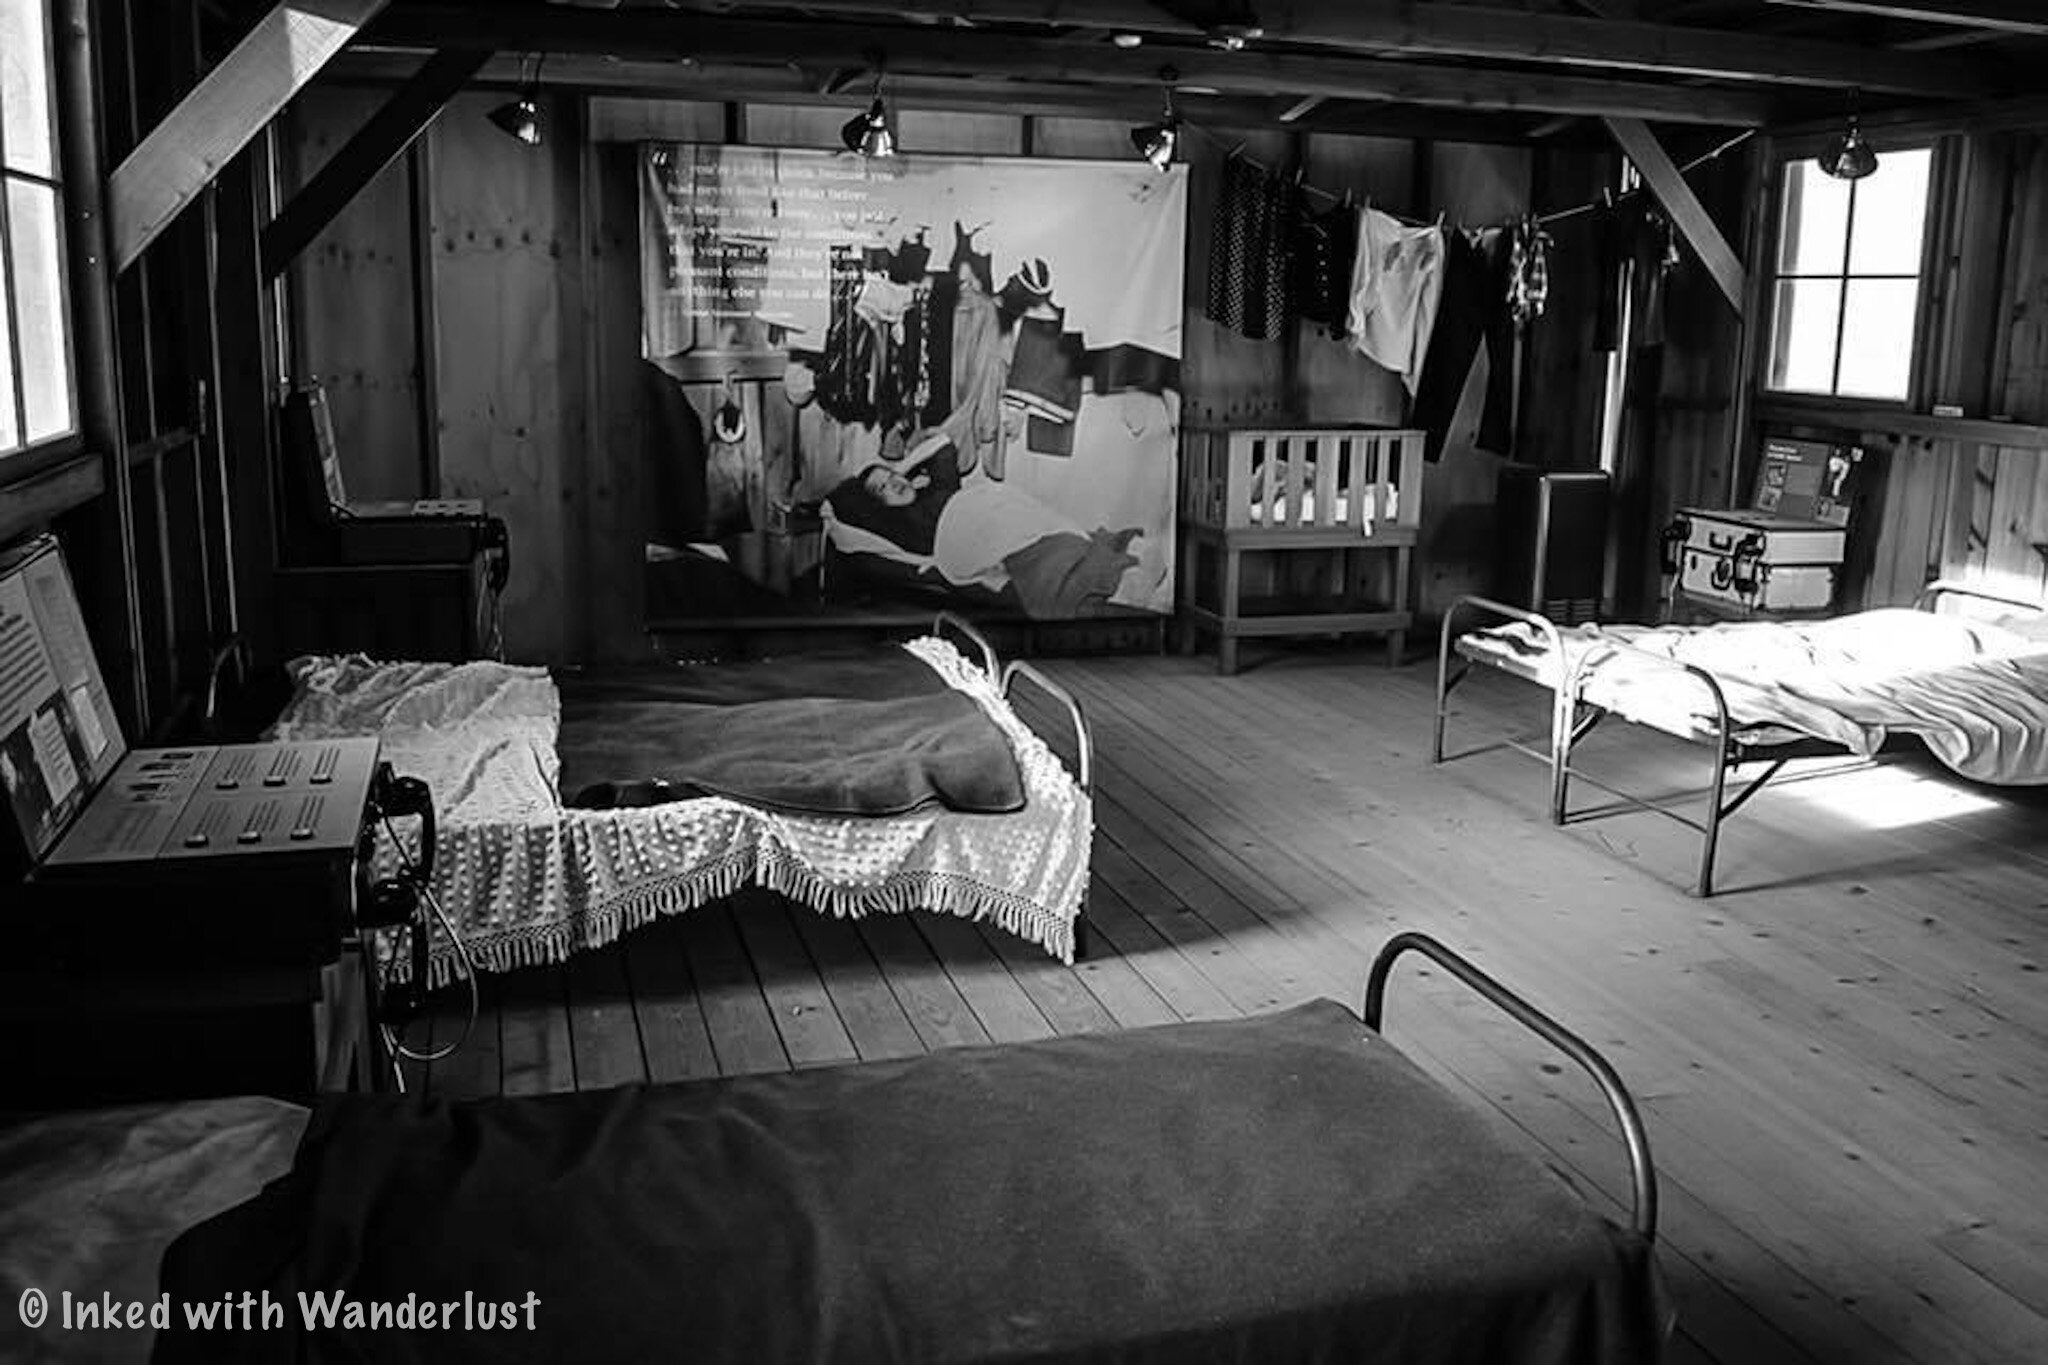
In the back of the exhibit hall you’ll find a giant mural with the names of each person interned. Behind that, there’s an exit leading you to the next feature of the site; Block 14.
Block 14 consists of a mess hall, latrine, four barrack buildings (reconstructed in 2015), and a recreation area. The barrack exhibits describe the arrival process, loyalty questionnaire, the Block Manager’s Office, and the School.

The latrine is where you can see the rows of toilets and communal showers, giving you a sense of the camp’s harsh realities.
The mess hall was originally built in 1942 and was moved to Manzanar from Bishop Air Base in 2002. It’s nearly identical to the 36 mess halls that, between 1942 and 1945, served over 28 million meals.
The exhibits in Block 14 are open daily from 7:30am - 3pm (closed Thanksgiving and Christmas). The remainder of the site is open from dusk until dawn.
Cemetery Monument

After exploring the visitor center and block 14, we were running low on time. Neither of us expected to have this much to do. However, there was one more thing we wanted to check out before we left; the Cemetery Monument.
The monument was erected in 1943 by the people of Manzanar to honor the dead. The cemetery and monument were built just outside of the camp’s boundary and the three letters on the front of the monument translate to, “soul consoling tower”.
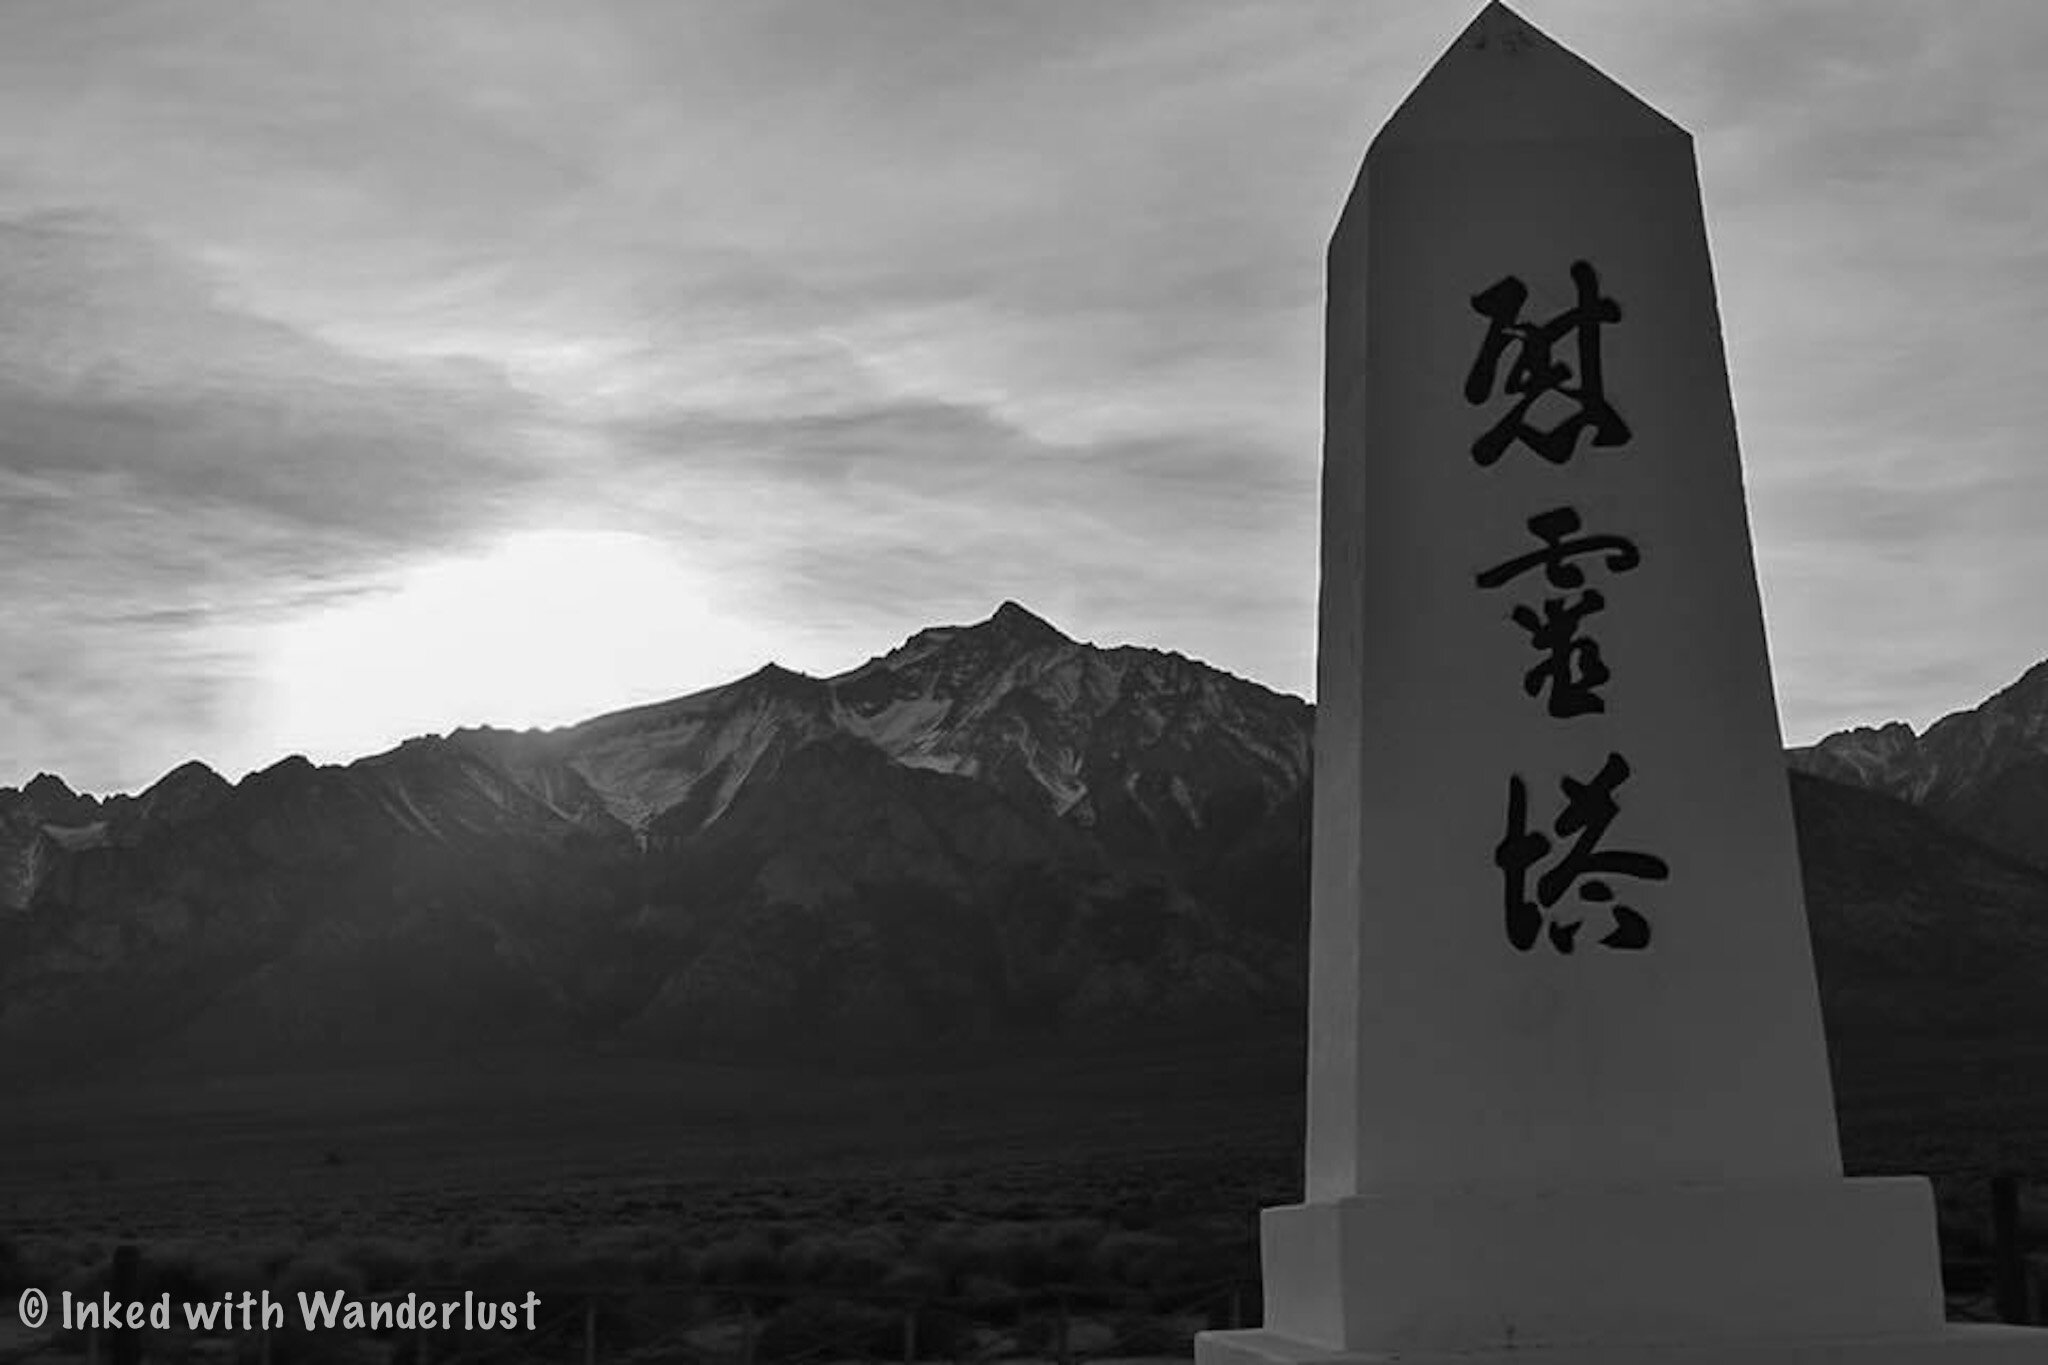
You’re more than welcome to enter the cemetery and photograph the monument, but keep in mind that this is an active cemetery with burials on site.
More than 145 Japanese Americans died while incarcerated here. Many were cremated and sent home for burial elsewhere, but 15 were ultimately buried here.
After the camp’s closure in 1945, some families would have the bodies removed and brought home. In 1999 National Park Service Archeologists confirmed the remains of five people still entombed here.
Manzanar Annual Pilgrimage

Every year on the last Saturday of April, an event called, “The Manzanar Pilgrimage”, is held. It began in 1969 when a small group of people wanted to bring awareness to the injustices that took place here and has now morphed into an event that welcomes people by the thousands.

It is held at the cemetery and features speeches by local tribe members, the NPS, politicians, and community activists. Dance and music performances are also featured throughout the event. Buddhist Priests and Christian Ministers attend to honor the bodies that remain.

We had the honor of attending the 49th annual event in 2018 and were moved by it. Being able to hear from the Daughter of someone incarcerated here gave me chills as she described her Mother’s struggle and plight. If you ever get a chance, we highly recommend attending.


Additional Information
Manzanar is FREE to visit! Again, free. No entry fee, parking fee, etc. As always, you could stop by the bookstore to make a purchase, donation, or both!
Be mindful of visitor center hours. The site itself is open from sunrise to sunset but the visitor center is only open from 11am-4pm and closed completely on Tuesdays, Wednesdays, Thursdays, and most holidays.
Limited resources available. There are bathrooms in the visitor center but other things such as food and gas are limited to the surrounding towns of Lone Pine and Independence. Be sure to fill your tank before visiting.
Be respectful of the site. This site is highly historical and as such, is fully protected. Please don’t destroy or remove anything from the site. Also, you may come across families visiting their deceased loved ones at the cemetery. Be sure to give them space.
No EV charging stations. There are no charging stations at the site itself. However, there is a Tesla Supercharger 10-minutes away in Lone Pine.
No Drone use. As is the case with most NPS properties, Drone use is strictly prohibited.


Conclusion
Our visits to Manzanar were fantastic and we have no doubt you would love it as well, especially if you’re into history. Be sure to drop us a comment and let us know if you plan to visit Manzanar for yourself!
We hope you found this article to be helpful in planning your next trip. If so, please support our site by sharing it with your friends and family on Facebook or Pinterest. You can further show support by staying on and reading one or more of the related articles above.
Thank you for reading and safe travels!
Editor’s Note: This post was originally published in October 2020 has recently been updated for comprehensiveness and accuracy.

4 Reasons Why You Should NOT Hike Half Dome
I hiked Half Dome with my brother back in 2017 and it was the most thrilling experience of my life at the time. Hiking 8 miles (mostly uphill), a 400-foot climb up the cables
I hiked Half Dome with my brother in 2017 and it was the most thrilling experience of my life at the time. Hiking 8 miles (mostly uphill), a 400-foot climb up the cables, standing at the top, and being able to look down on Yosemite Valley is an experience that’s hard to describe.
As incredible as it was, it came at a price. As my brother and I were making our way up Sub Dome, I realized how truly unprepared we were. Don’t get me wrong, I THOUGHT we were prepared but truth be told, we probably had no business being up there. That’s a tough pill to swallow, but it’s the truth.
All went well, though. We made it to the top without any major problems and managed to make it back to the car despite being low on energy and close to dehydration. I knew the experience of hiking Half Dome would make for an awesome addition to this blog (you can read that article here) but I started thinking, “what about the other part of it that no one talks about”?
The “part” I’m referring to is instead of encouraging everyone and anyone to hike Half Dome, what if I gave people reasons why they SHOULDN’T hike it? That’s the purpose of this article. We all know the reasons why you should, but there are plenty of reasons why you shouldn’t. So read on to find out the four reasons why you should NOT hike Half Dome.
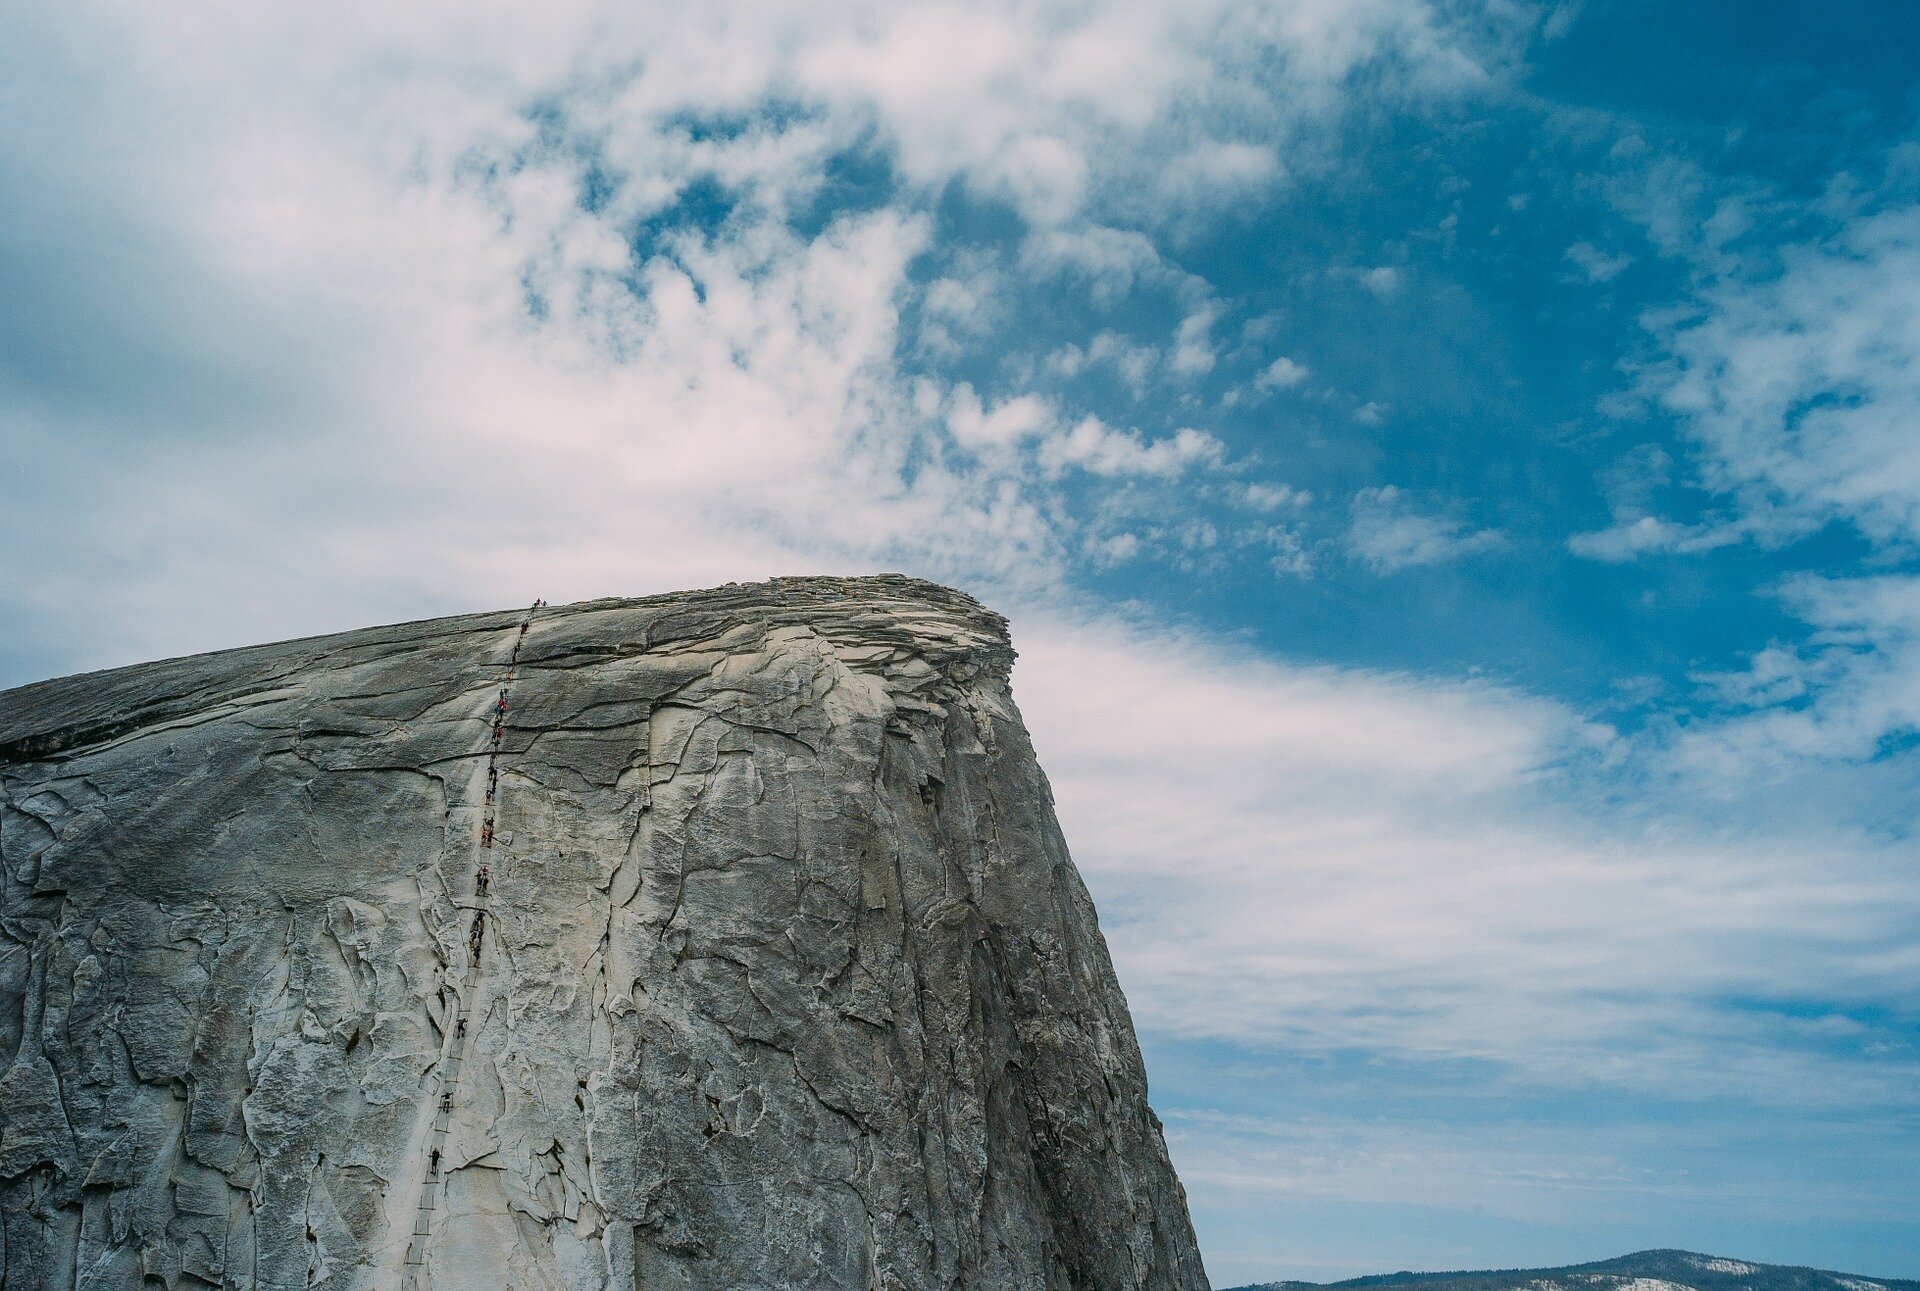
1) It can be dangerous

Half Dome. Yosemite National Park.
I’m not going to sugarcoat it, there is potential, life-threatening danger on this hike. Truth be told, you’ll find danger in anything you do. Just driving to the trailhead is more dangerous (statistically speaking). That’s why I’m saying it CAN be dangerous. I believe most of the danger can be mitigated as long as you’re prepared for it.
That said, people have died on this hike. They’ve died both on the trail and on the cables. As of 2019 (2020 numbers have not be listed yet) there have been:
At least 13 deaths
291 accidents
& 140 search & rescue missions
This is just since 2005. Thankfully, there were no confirmed deaths on Half Dome in 2020. The most recent was in 2019 when a young women from Arizona slipped on the steepest part of the climb and slid 500 feet to her death.
Weather also plays a role in the level of danger. The granite is smooth and slick from all the hiking boots that’s traversed over it over the years and when it rains, it becomes incredibly dangerous to attempt an ascent or descent. You do NOT want to be up top (or even on the base) when lightning strikes.
2) You have a medical condition

Half Dome. Yosemite.
If you have vertigo, are prone to seizures, have heart or lung problems, bad knees, etc, you shouldn’t hike Half Dome. Vertigo, especially, can cause a fatal accident to occur. Most of the hike takes place on your standard hiking trail but towards the end, you’ll need to navigate your way up Sub Dome and a 400-foot climb up the cables.
Hiking Half Dome with heart issues also wouldn’t be wise. In 1995, a man from Huntington Beach collapsed from heart failure as he was making his way up the cables and fell. There have been others who have had heart attacks while hiking but thankfully survived their ordeal.
Half Dome isn’t worth your life or making your condition worse. There are many trails in Yosemite that are just as spectacular that wouldn’t put you in unnecessary risk. North Dome, for example, is an excellent alternative that ends with any epic view of Half Dome. You can read that article here.
3) You have a low level of fitness
Half Dome cables. Yosemite.
While being a top level athlete isn’t required, being in at least decent shape is. One way you can find out how in “hiking” shape you are would be to go for a hike on an easier trail and pay attention to your breathing. If you’re huffing and puffing, then Half Dome is too dangerous.
Thankfully, this is something that can be overcome. If you’re serious about hiking Half Dome start training MONTHS before, even a year! The sooner the better. Join a gym and utilize a stair master and squat press. Go hiking regularly and keep upping the difficulty. The higher elevation you train at, the better prepared you’ll be.
4) You’re inexperienced

Half Dome. Yosemite National Park.
This one is pretty self explanatory and like the reason above, can also be overcome. If you’re new to hiking, starting with Half Dome wouldn’t be ideal. Your best bet would be to start out small. Like your local park, for example. If you’re coming to Yosemite, some good beginner trails would be:
The Mist Trail (Challenging, but still beginner friendly)
Cook’s Meadow
Elizabeth Lake
Lembert Dome
Cathedral Lakes
Once you’ve put a few of these (or others) under your belt, you can start hiking the more difficult ones that’ll challenge you to up your game and test your resolve. Some of those Yosemite trails include:
Upper Yosemite Falls
Four Mile Trail
Cloud’s Rest
If you can tackle one of these without feeling like you’re going to fall over at any moment, chances are good that you’re ready for Half Dome. If not, then I would definitely stick with the easier ones mentioned above (there’s no shame in it).
Remember, it isn’t just your safety at risk, but you could be putting the safety of other hikers and Park Rangers (if they have to come help you) at risk as well.


= Conclusion =
I hope you’ve found this article helpful in deciding whether Half Dome is a good fit for you. If none of these apply to you then great, get at it. If one does, then remember that NO hike is worth your life and there’s absolutely no shame in admitting when something’s out of your comfort zone. In fact, it’s a respectable trait.
Safe travels.
Please support this website by sharing this article with your friends & family on Pinterest, Facebook, or your favorite social media app.
You can also show your support by reading one or more of the related posts below. Thank you.