
A One Day Yosemite Travel Itinerary
For some, Yosemite is a once-in-a-lifetime experience. Often regarded as one of California’s crown jewels, Yosemite reigns…
Disclosure: This post contains affiliate links. If you make a purchase through these links, I may earn a small commission at no additional cost to you. I only recommend products or services that I believe will add value to my readers.
For some, Yosemite is a once-in-a-lifetime experience. Often regarded as one of California’s crown jewels, Yosemite reigns as one of the most visited destinations in the state and in the national park system as a whole.
Despite that, a good chunk of the millions who visit Yosemite annually do so for the first time. Additionally, with work and school commitments ever present, many are short on time or want to include multiple destinations in one trip.
If that’s your situation, then this one day Yosemite itinerary is for you. In it, I’m going to provide a doable schedule to follow to see most of the top sights and trails Yosemite has to offer.
Note that this itinerary isn’t exactly small-kid friendly. If your kids are older (or have experience with long, active days), then they should be able to handle it. For a solo traveler or pair of adult travelers with hiking experience, it definitely shouldn’t be an issue.
Buy me a coffee?
If you found this blog helpful, consider leaving a tip through the Buy Me A Coffee button below! Whether it’s $1 or $5, every bit helps offset small travel costs like coffee, water, lunch, parking, or park entry fees. Your support means the world—thank you!
Best Time to Visit Yosemite
The answer to that all depends on your travel preferences and goals but if you’re asking me, spring and fall are my favorite times of year to go to Yosemite. Summer comes in third, with winter coming in dead last because many hiking trails are largely inaccessible due to snow.
I prefer spring and fall mainly due to the pleasant weather and cooler temperatures. Spring is best for waterfall viewing (specifically Yosemite Falls) as some deplete as summer progresses. Conversely, fall offers golden foliage colors that pop against the massive granite walls.
For the purpose of this itinerary, we’ll focus on visiting during spring or early summer. Note that you’re traveling to the mountains, which tend to create their own weather. Just because it’s normally pleasant, that doesn’t mean it won’t change on any given day.
Yosemite Reservations
One aspect to visiting in spring or summer is having to contend with Yosemite’s reservation system. There are exceptions but most people, visiting during these times will require one. One exception to take advantage of, however, is what I’ll recommend - arriving before 6am.
On select dates in spring and all days in summer, you’ll need a reservation if you arrive between 6am and 2pm. Outside of those hours, you’re good to go. I highly suggest getting there prior to 6am to avoid crowds, but to also see as much as you can on your one day visit to Yosemite.
Where to Stay and Eat
Believe it or not, there are no shortages of places to eat in Yosemite Valley. Quick service and mid-range options include Base Camp Eatery, Mountain Room Lounge and Curry Village Pizza Patio. For a more upscale experience, The Ahwahnee has you covered.
Keep in mind that while food may not be scarce, the restaurants are exceptionally overpriced for what you get and while I haven’t eaten everywhere in Yosemite Valley, the ones I have tried weren’t all that great, in my opinion.
This itinerary will include time to enjoy lunch, but I recommend packing a plethora of snacks and even picnic foods to save yourself time (and money, no less). You’ll practically be spending your entire day in the valley with no time to leave the park and return later.
I suggest bringing a Yeti Soft Cooler backpack (or something similar) to keep food cold. Remember to NOT leave any food or scented items in your vehicle (including the trunk) and to utilize bear boxes. Bears WILL ruin your day by ripping your vehicle apart looking for them.
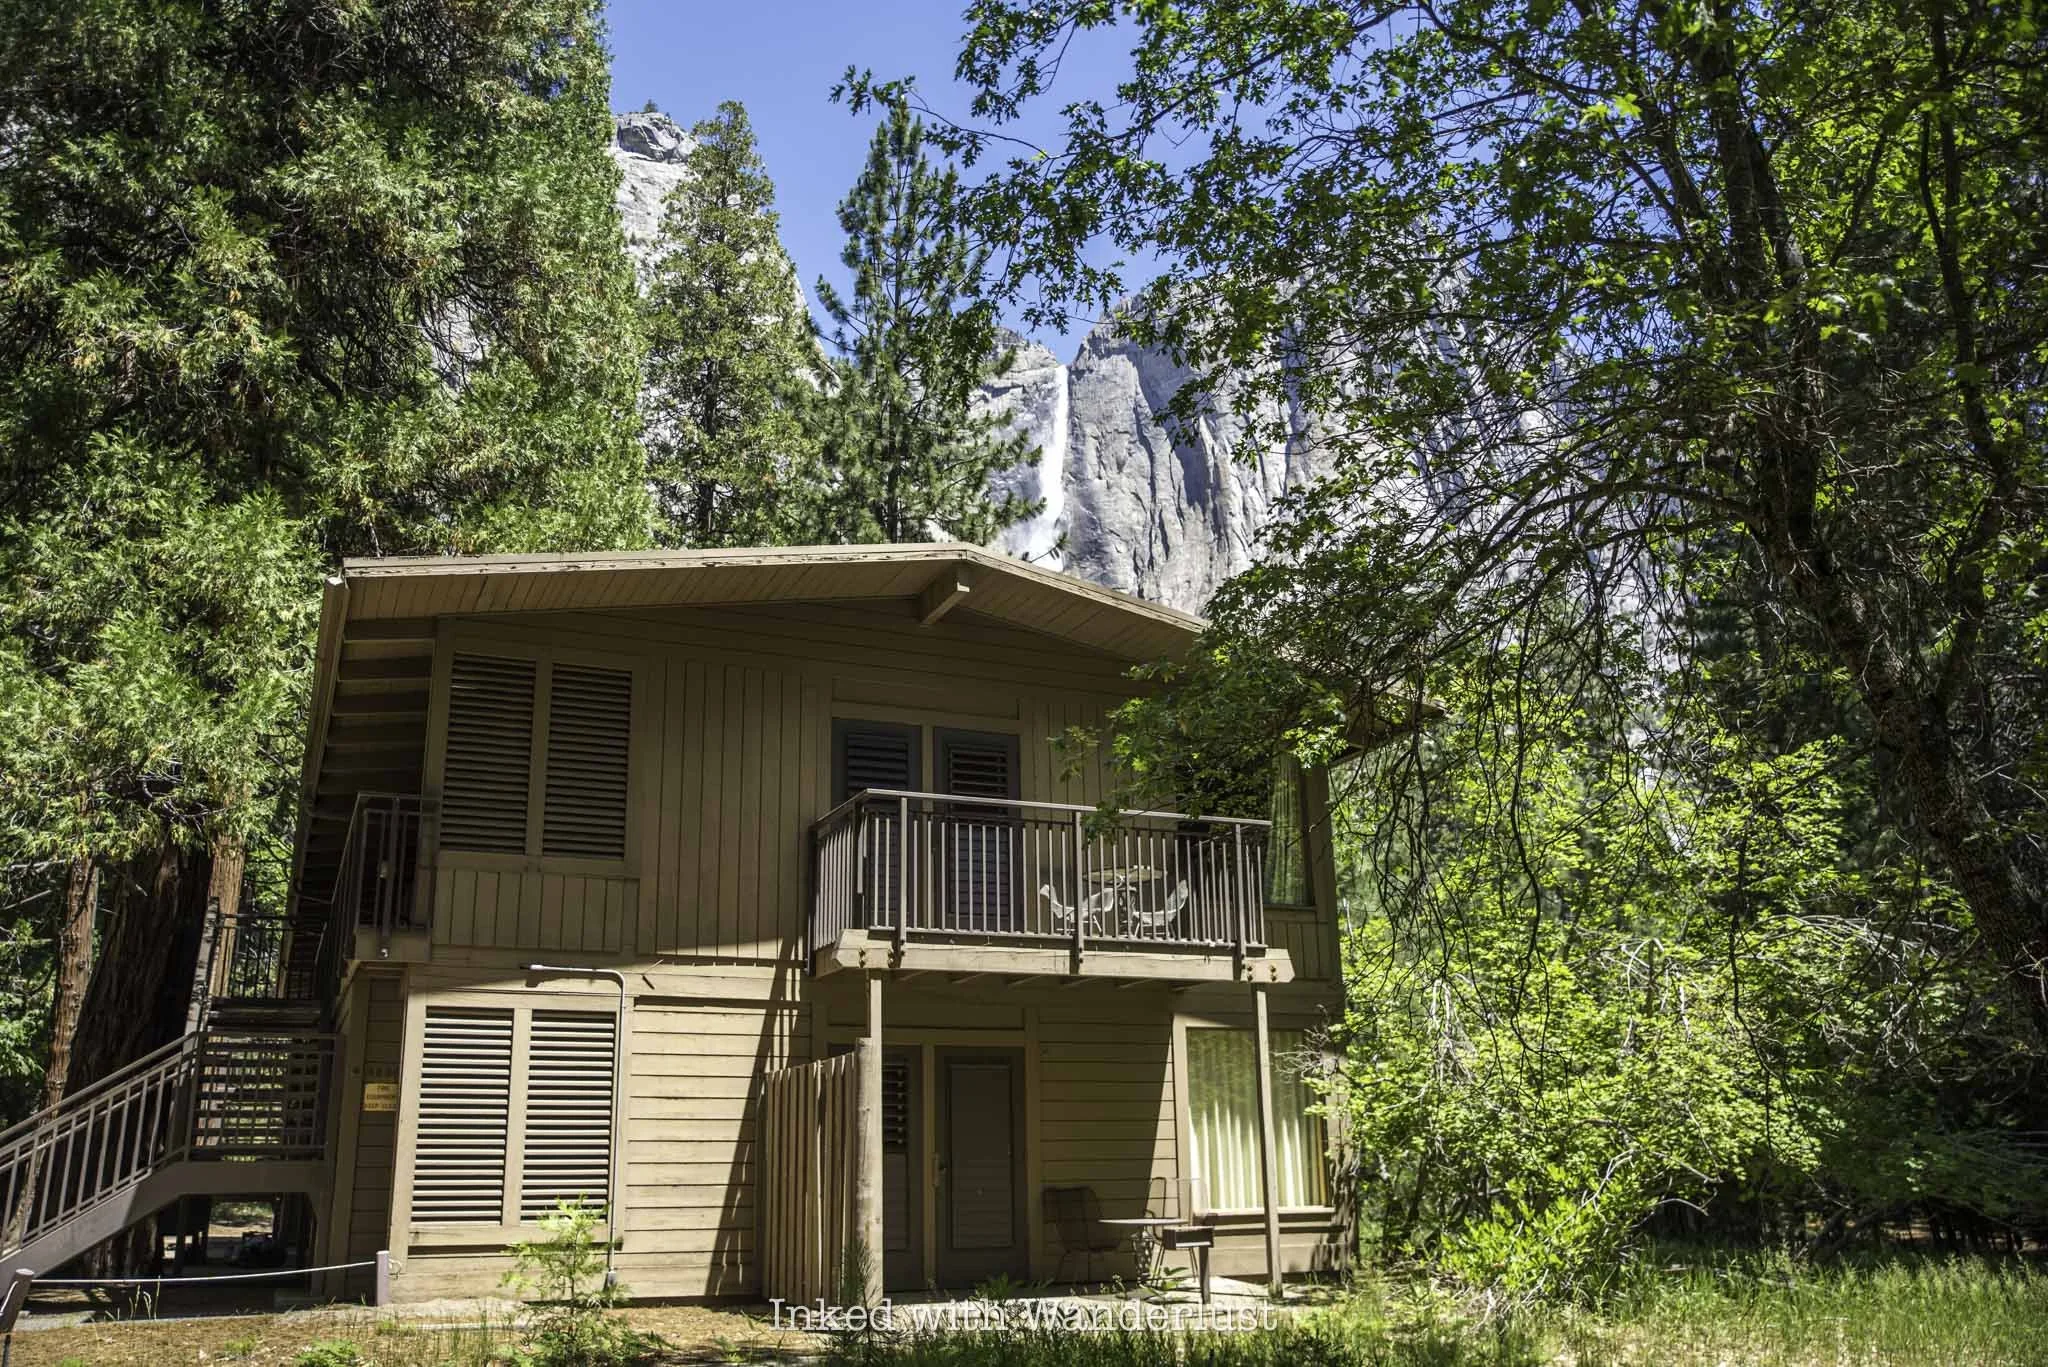
As far as lodging goes, I recommend staying at a hotel or campground in Yosemite, or somewhere close by. This is so you can begin the itinerary right away and maximize your one day at Yosemite. Hotels and campgrounds in Yosemite Valley proper include:
The Ahwahnee
Yosemite Valley Lodge
Curry Village
Camp 4
Upper Pines
Lower Pines
North Pines
Keep in mind that reservations at the in-park hotels and campgrounds are competitive. Often requiring booking months in advance to secure a room during the summer at Ahwahnee. Cancelations happen, though. So just keep trying.
Additionally, there are also hotels and campgrounds in the surrounding gateway towns that are often easier to come by. These include El Portal, Mariposa, Oakhurst, Groveland and Lee Vining (east side).
This itinerary is assuming that you’ll be staying outside of the park. If you’ll be staying inside the park, simply adjust the itinerary below (arrival time, where you’ll initially board the shuttle, etc) accordingly.
One Day Yosemite Travel Itinerary

Since you’ll only have one day at Yosemite, your time on this itinerary will heavily focus on the highlights of Yosemite Valley, as well as a visit to Glacier Point. Remember, if you weren’t able to secure a reservation, be sure to arrive before 6am.
If you’re like most, you’ll be driving in through the Arch Rock entrance. Either present or purchase your America the Beautiful pass ($80) or pay the regular fee ($35) to enter. Remember, cash is not accepted. Only credit/debit cards.
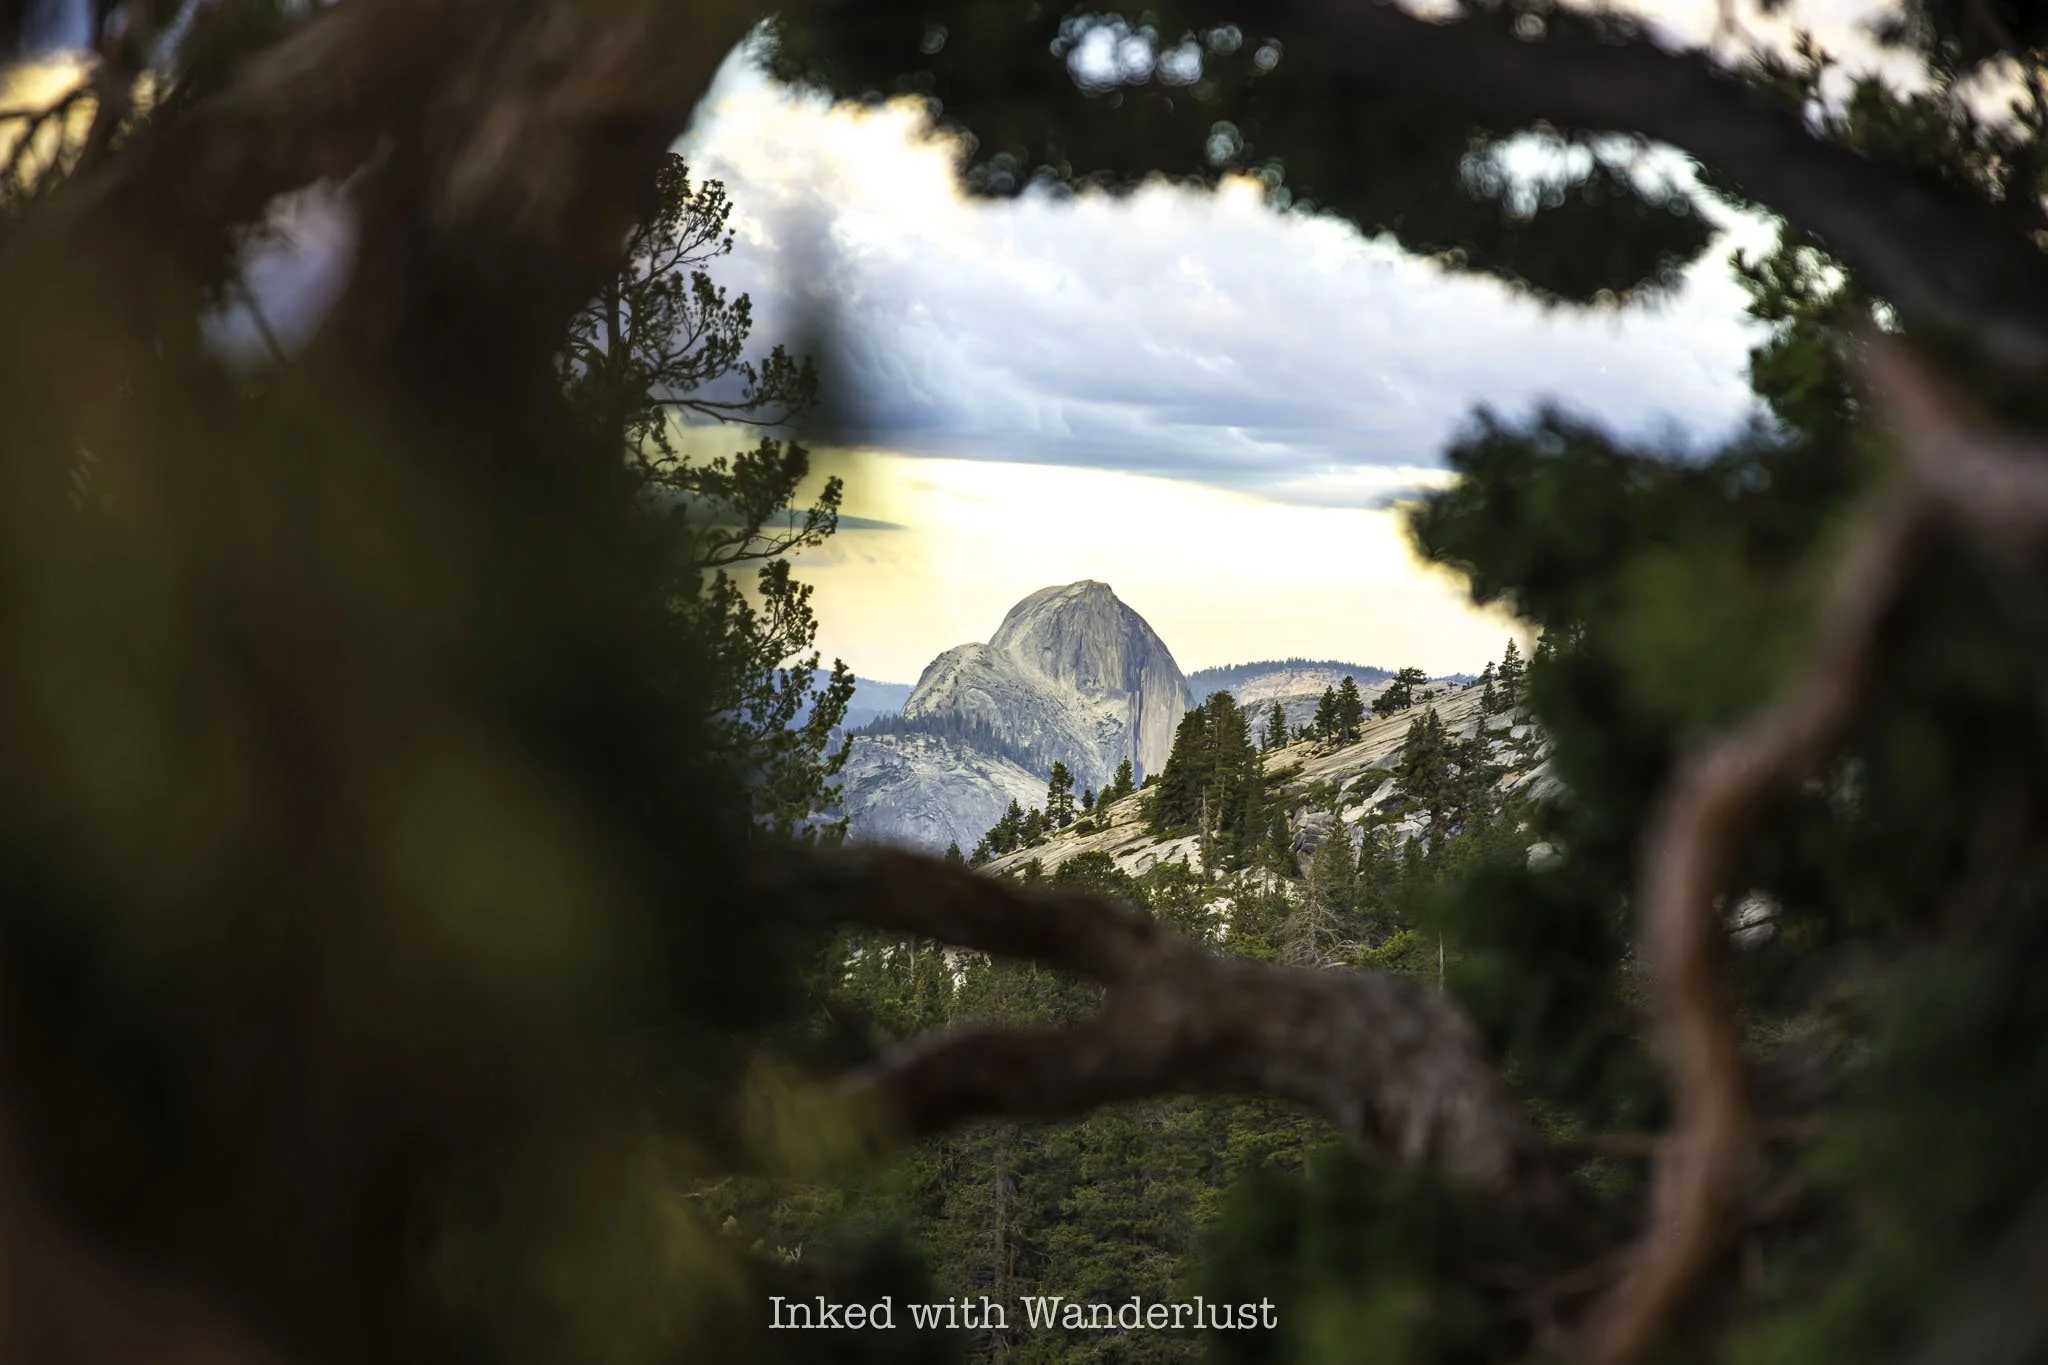
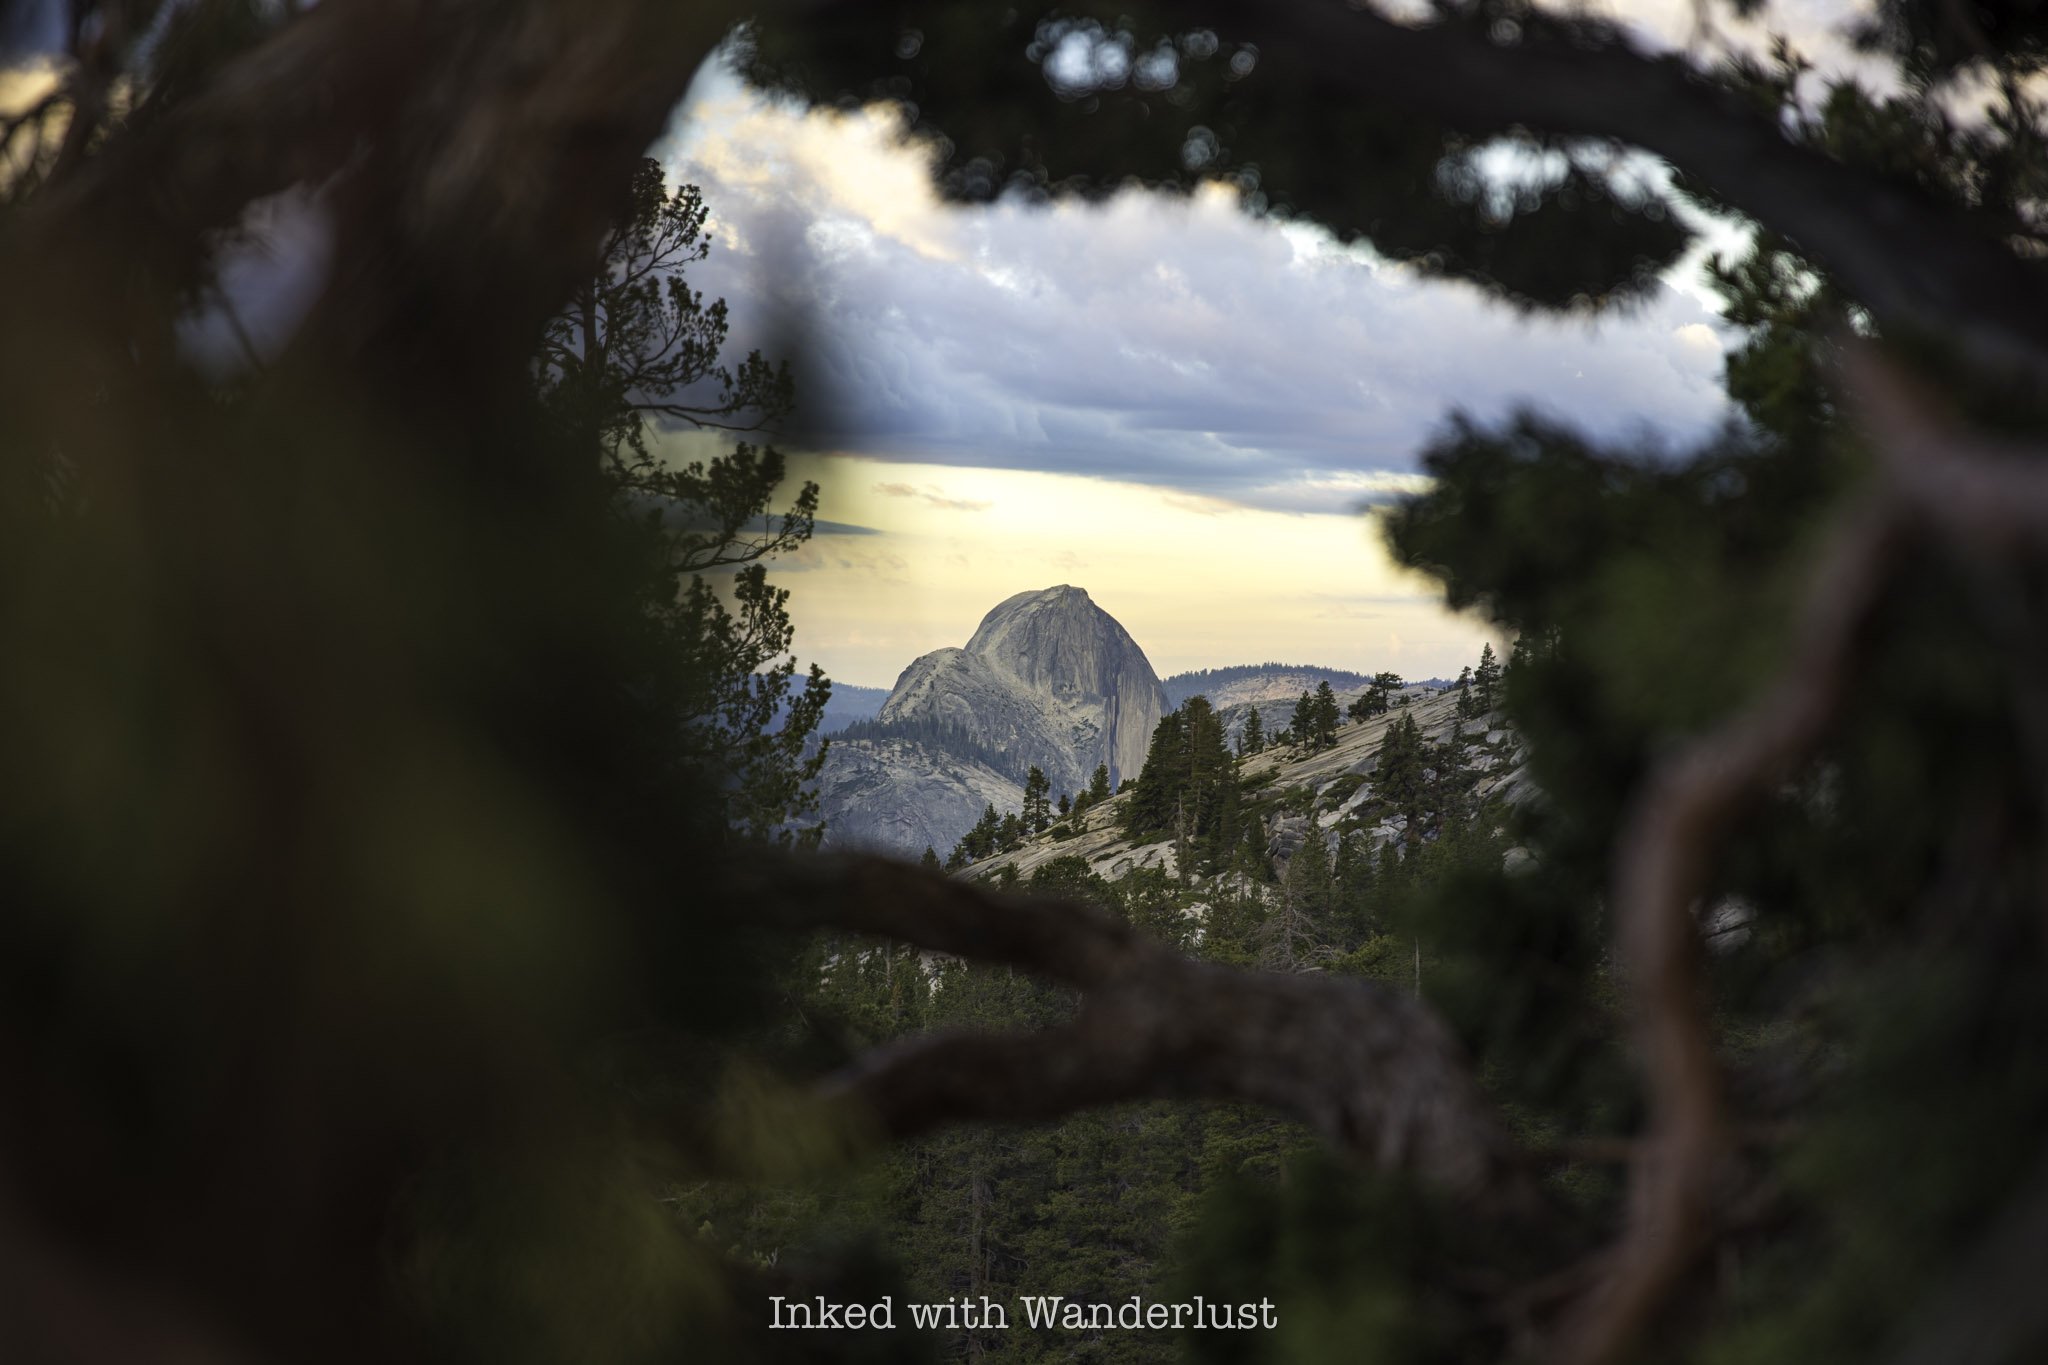
1) Tunnel View (30 minutes or less)
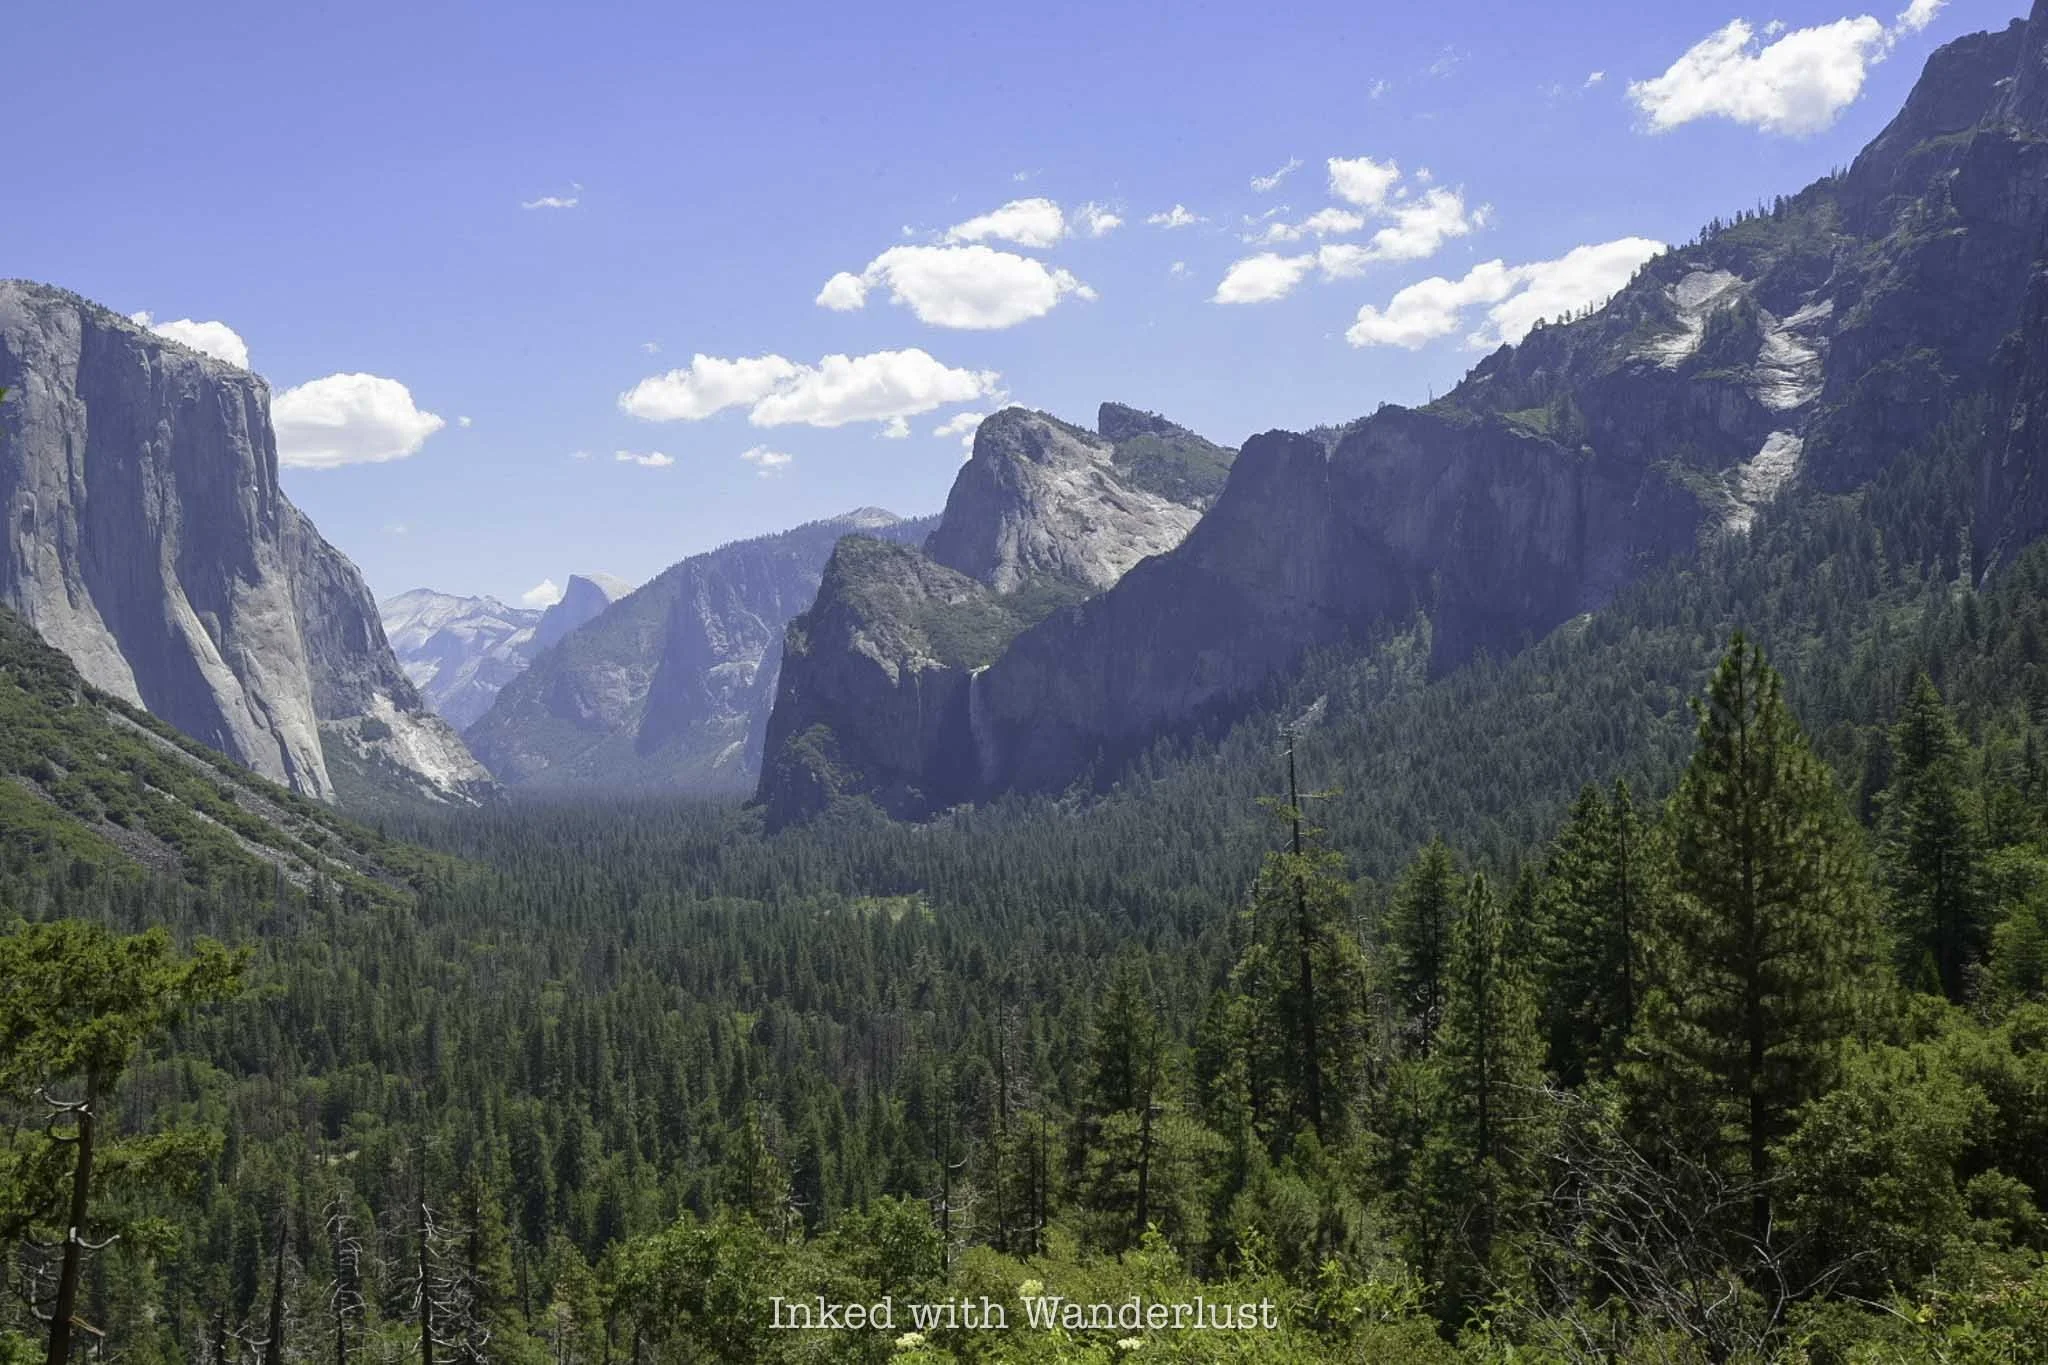
Tunnel View is one of the quintessential Yosemite experiences that anyone, especially first-timers, should check out. You’ve likely seen it on the various social media sites and probably on merchandise as it’s the infamous postcard view of the park.
Despite seeing it in photos, you simply must see it for yourself as photos and video do it no justice. From Tunnel View, you can see many of the park’s most infamous landmarks including Half Dome, El Capitan, Cathedral Rocks and Bridalveil Falls.
READ: “Tunnel View: How to See the Most Iconic View in Yosemite”
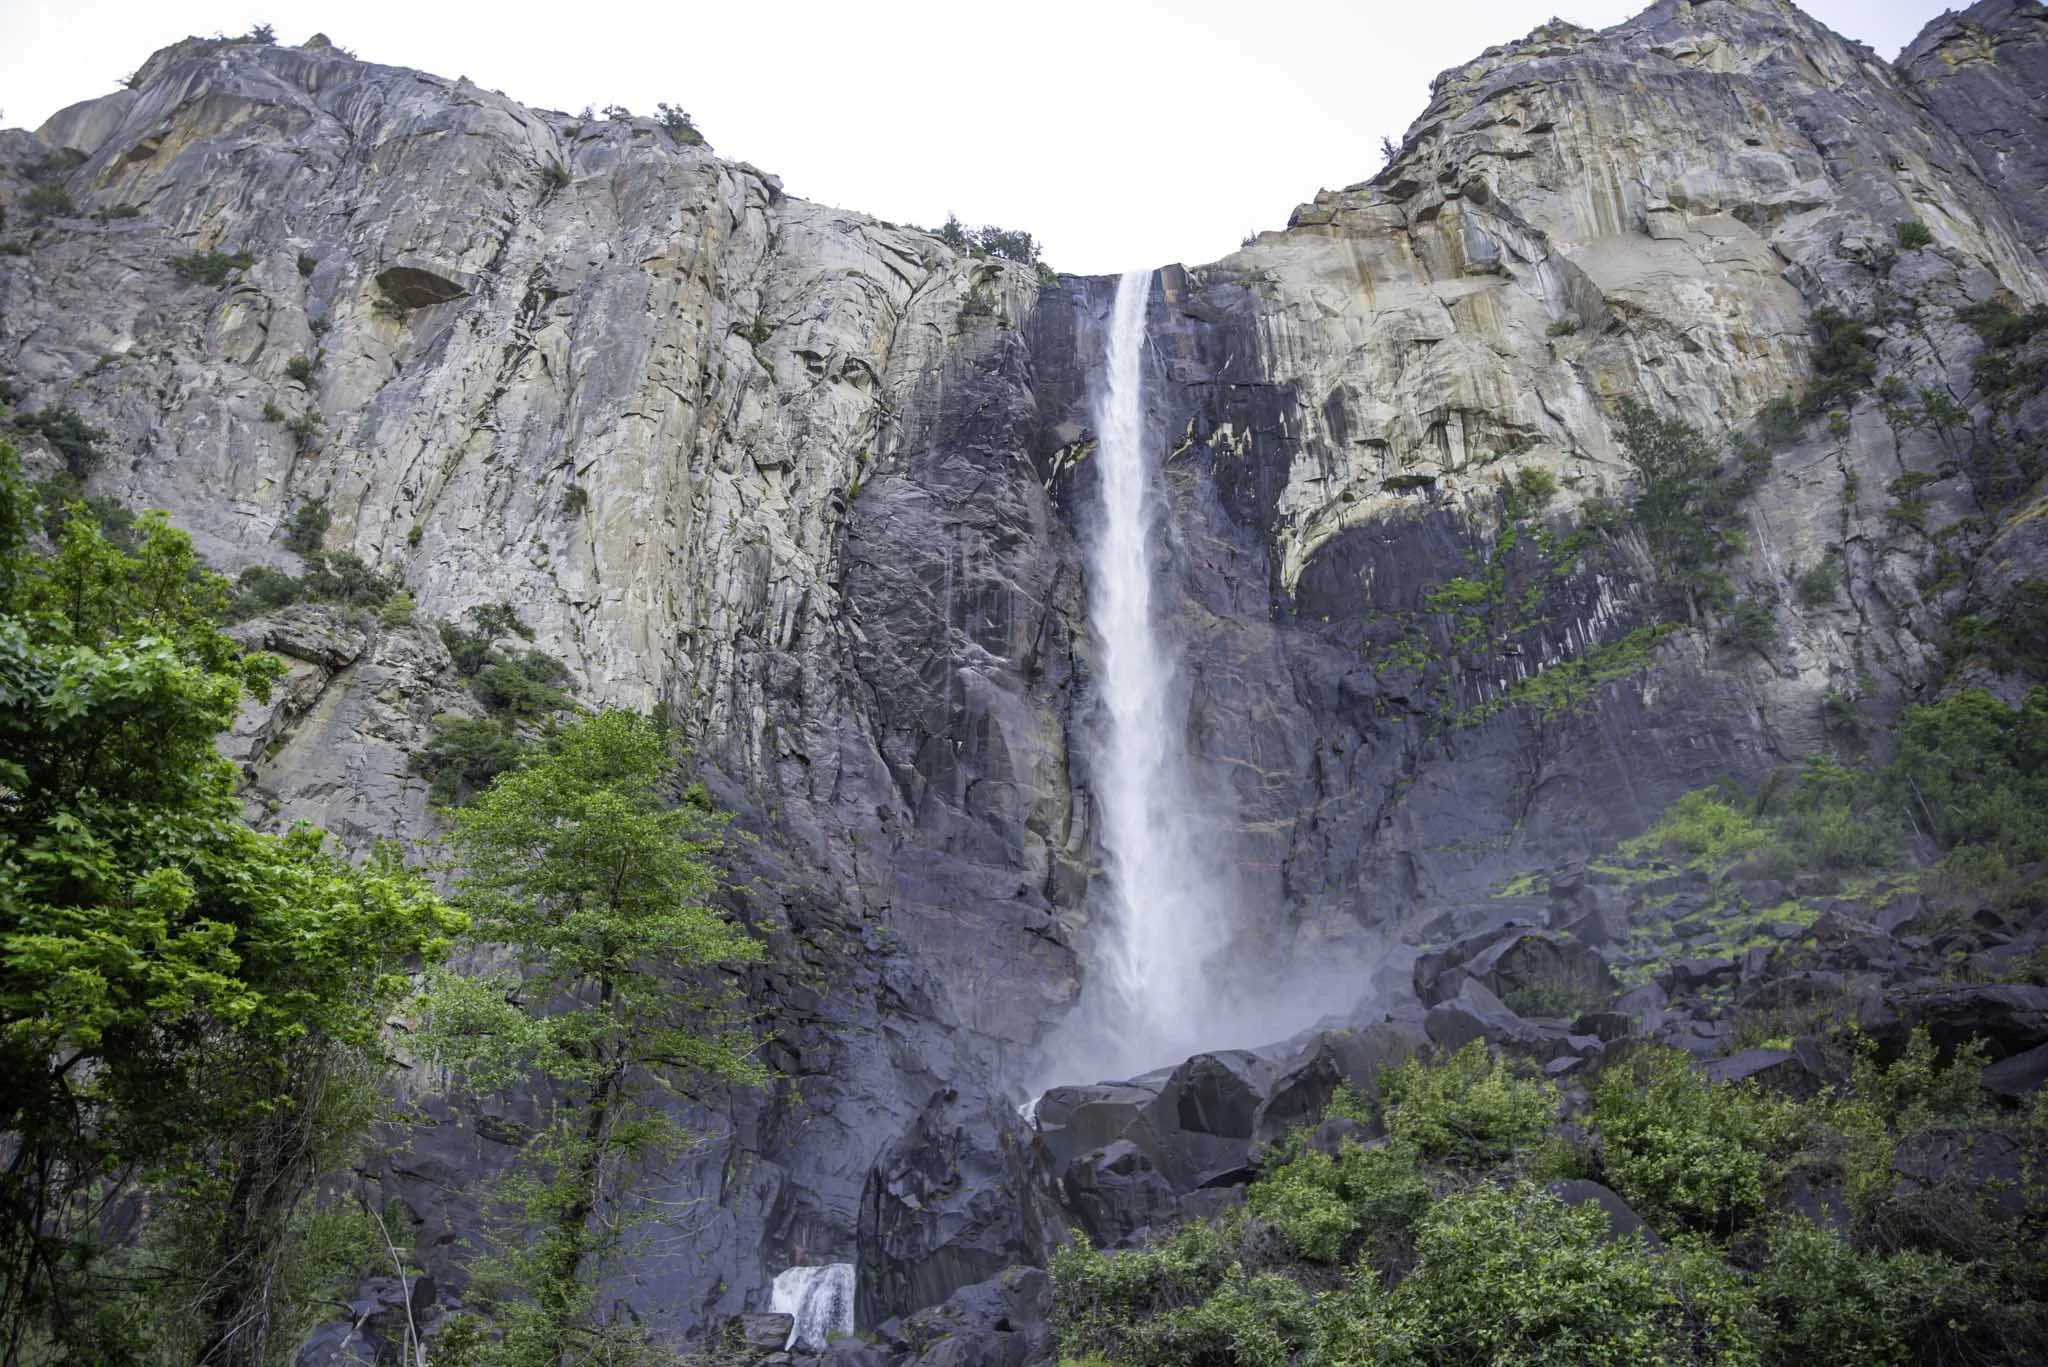
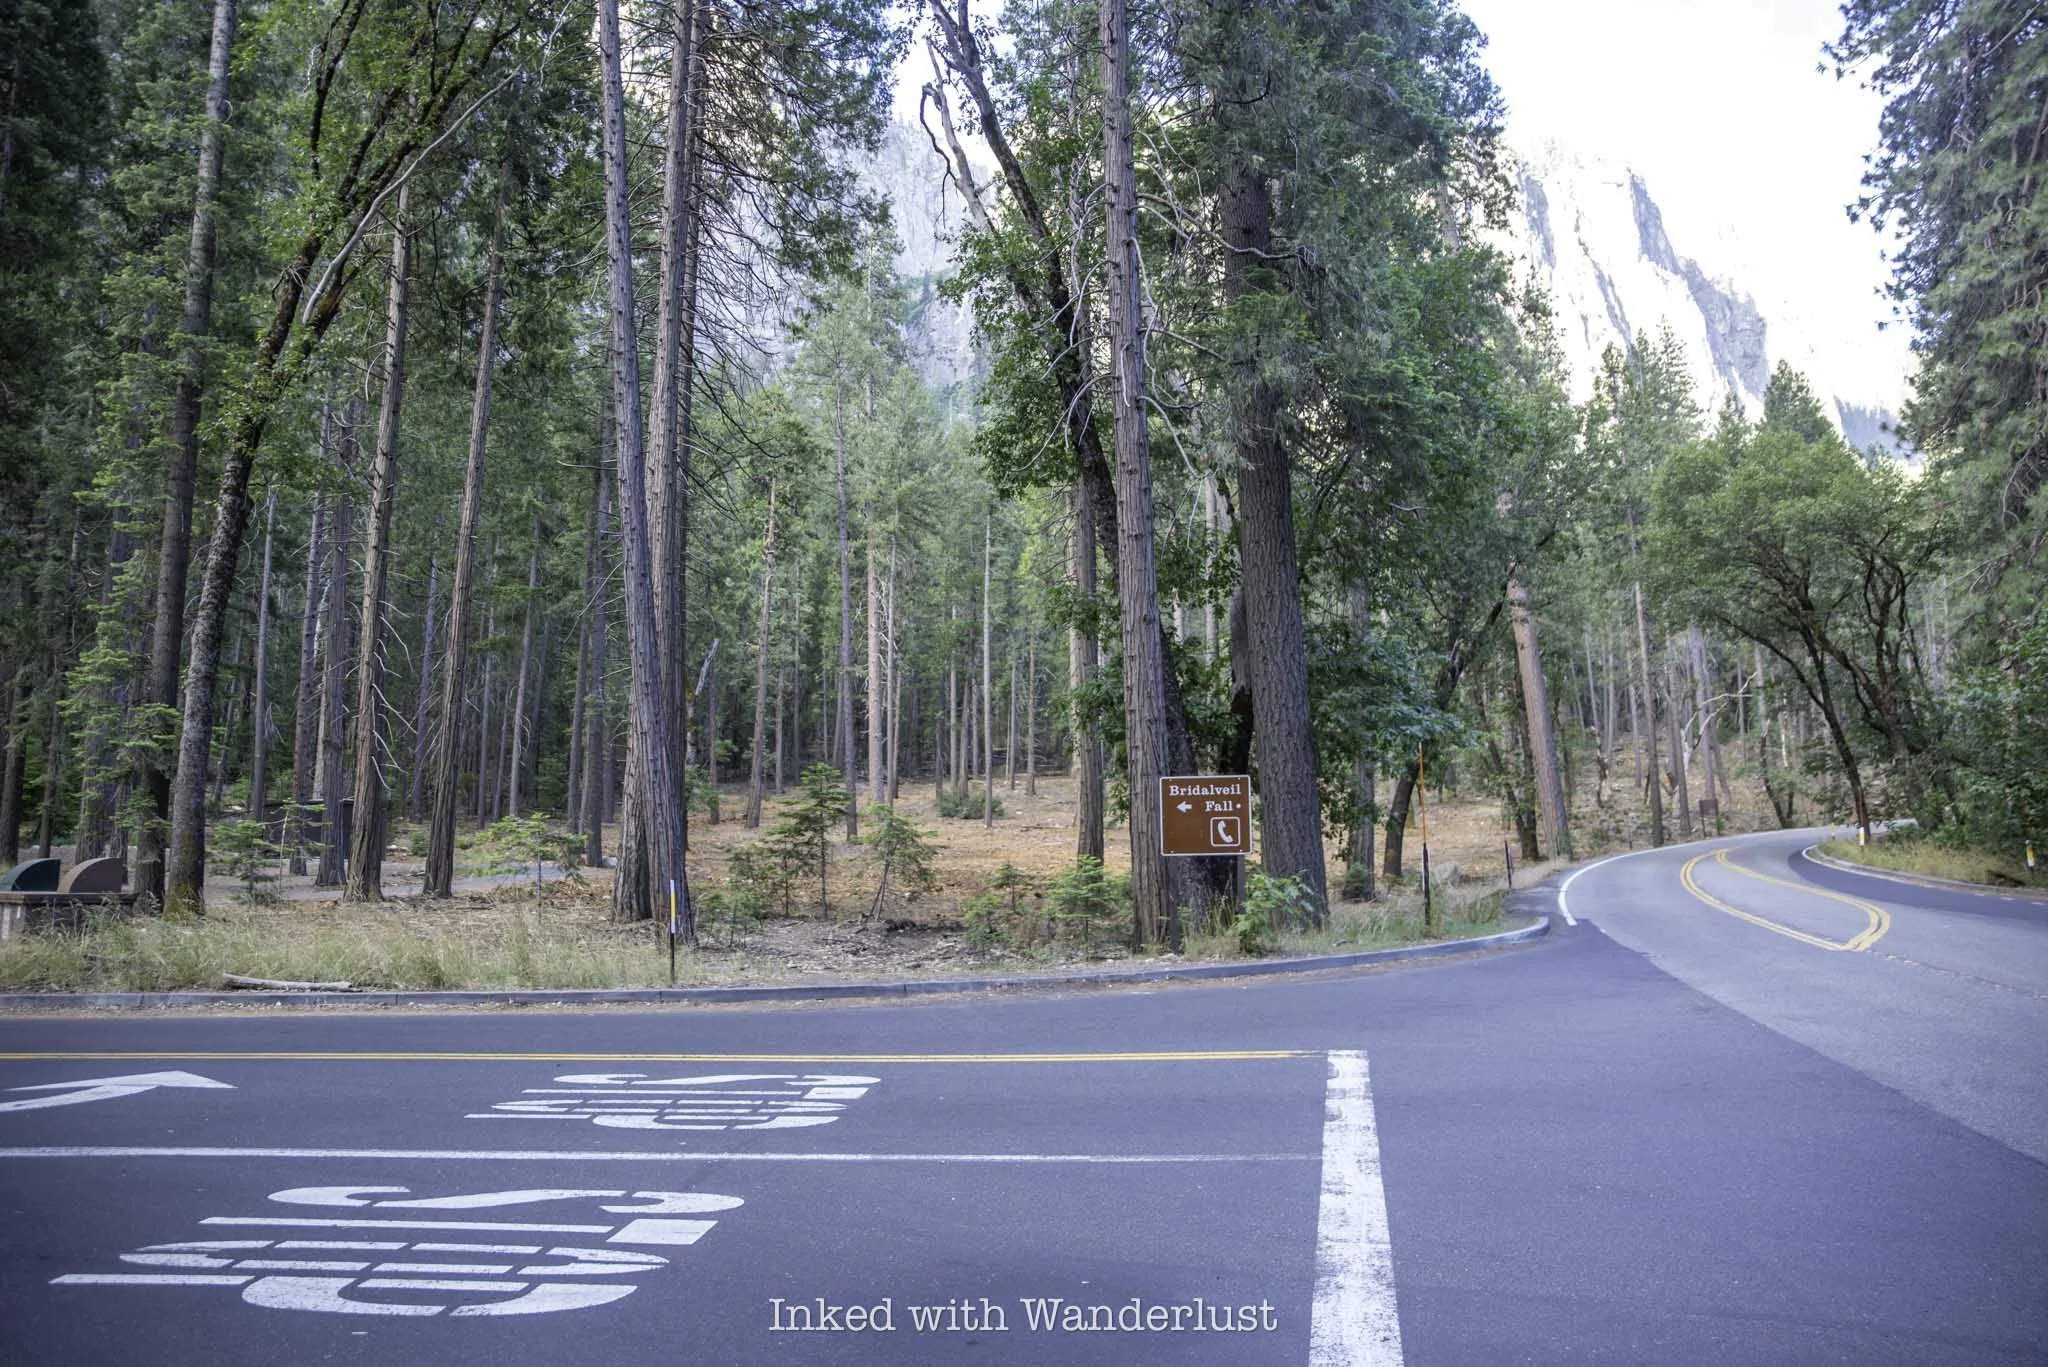
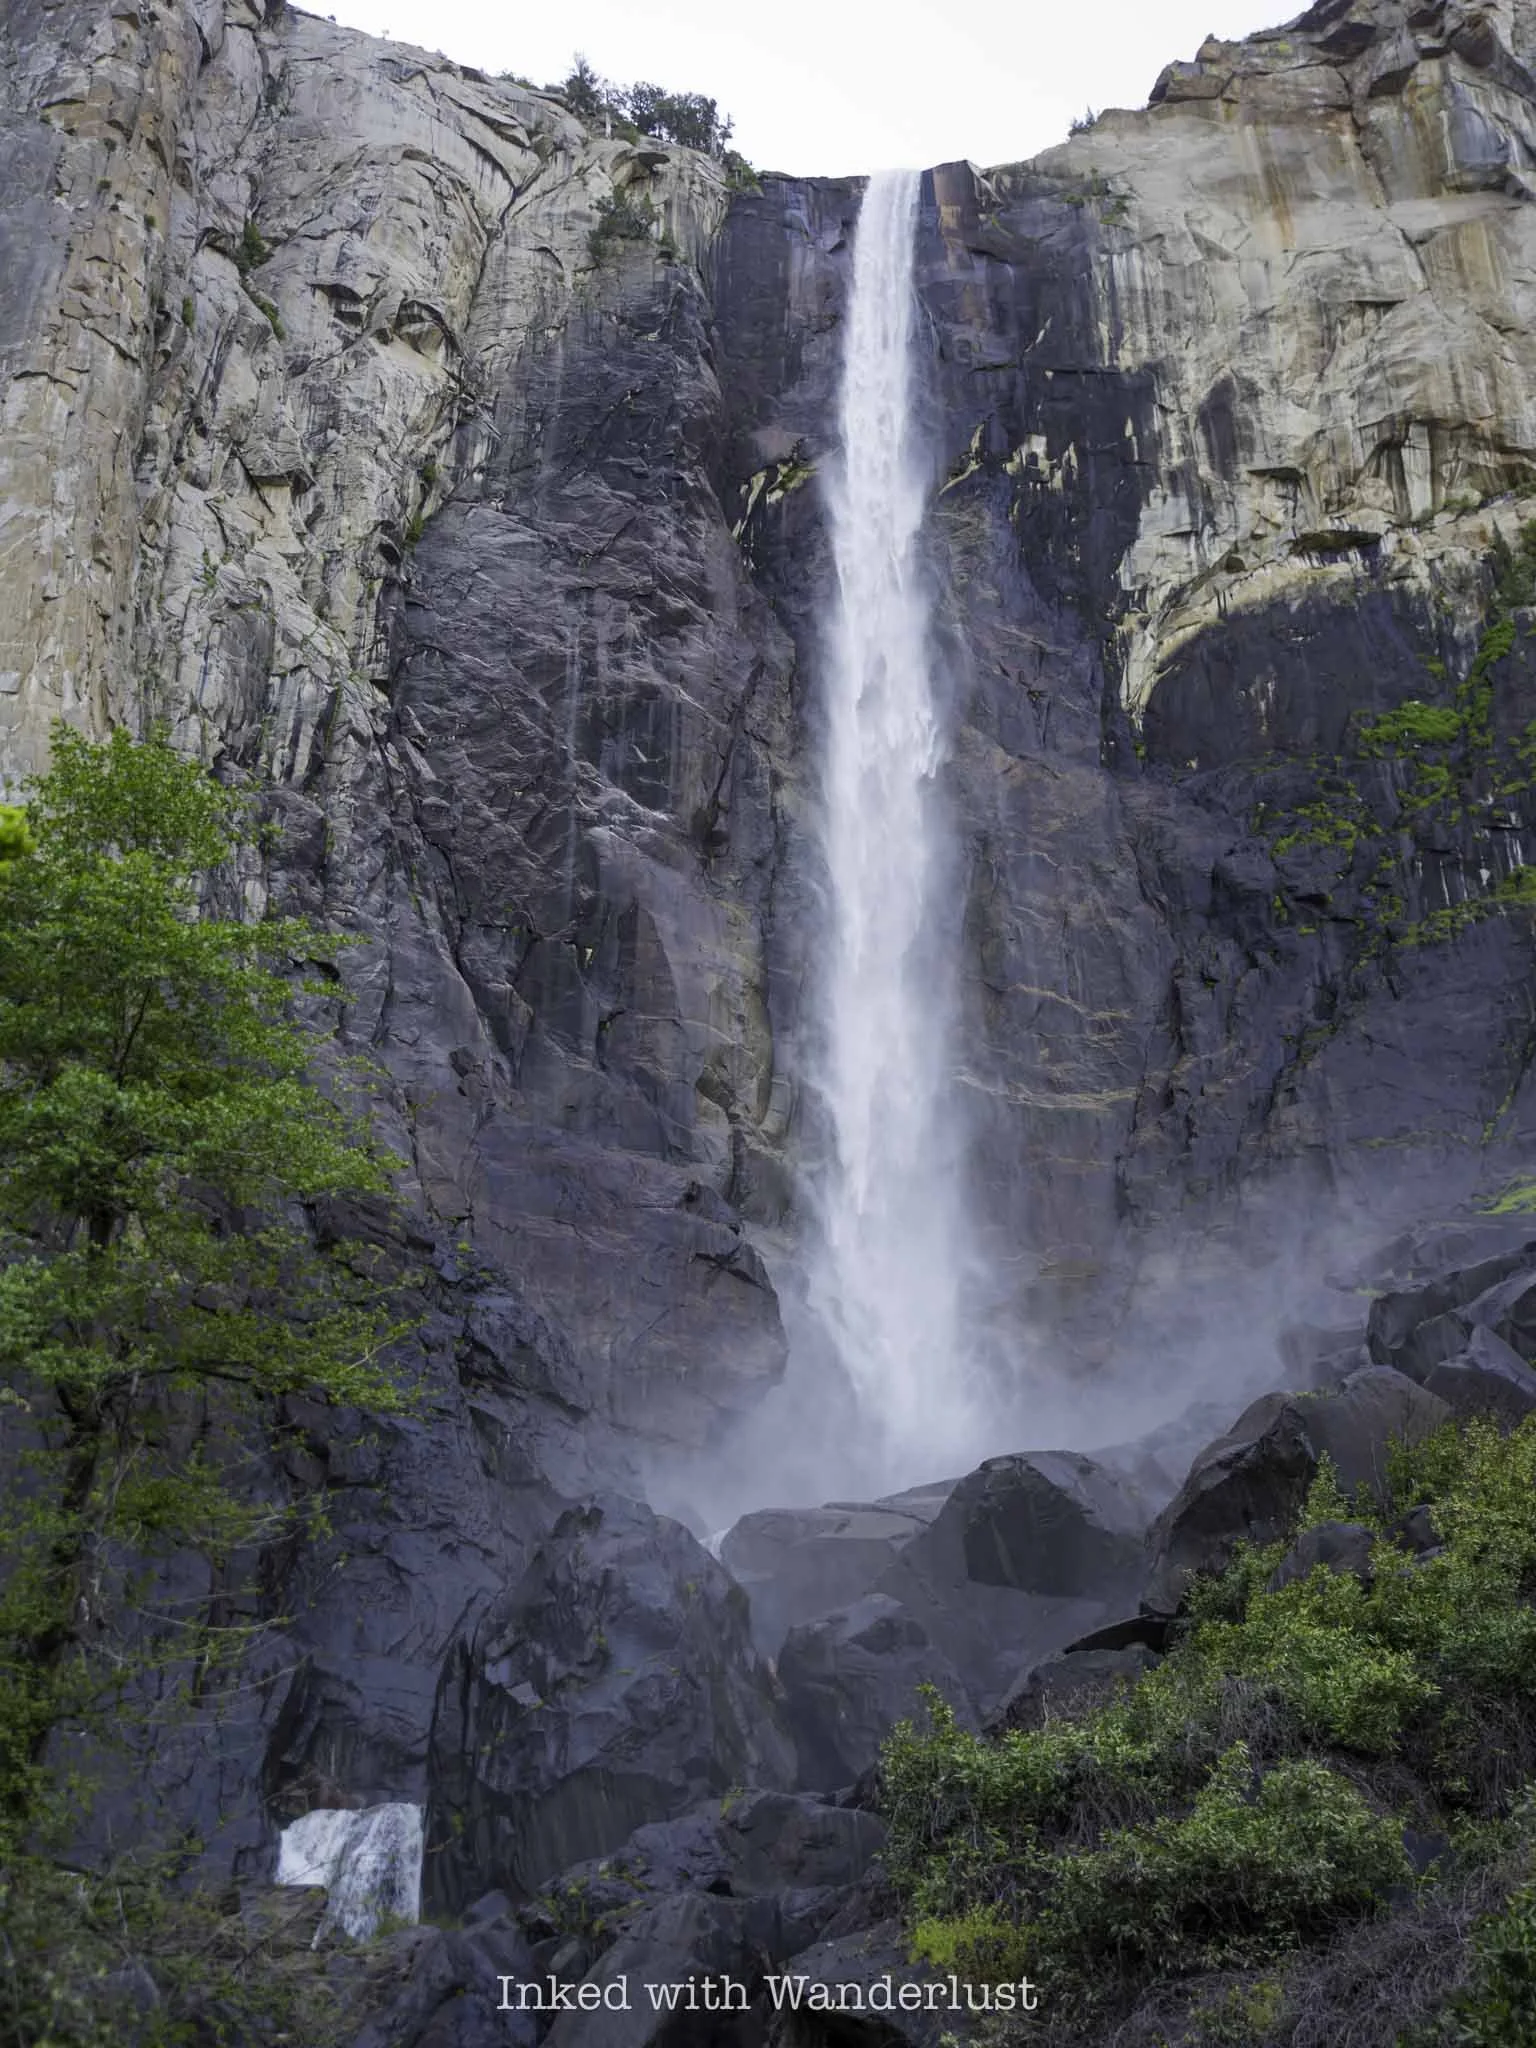
2) Bridalveil Falls (one hour or less)

From Tunnel View, you’ll work your way down the road and over to the first waterfall of your visit - Bridalveil Fall. Unlike most waterfalls in Yosemite, Bridalveil is spring fed, so it flows year-round (though it’ll be heavier in the spring and early summer).
Parking is plentiful here, especially in the early morning. The reason I’m recommending starting your day at Tunnel View and Bridalveil is because they’re both mega-popular and the park shuttle doesn’t go to either - and that’s your next stop.
READ: “How to See Bridalveil Fall in Yosemite National Park”
3) Board the Yosemite Valley Shuttle at Stop #11 (15-20 minute wait for the shuttle)
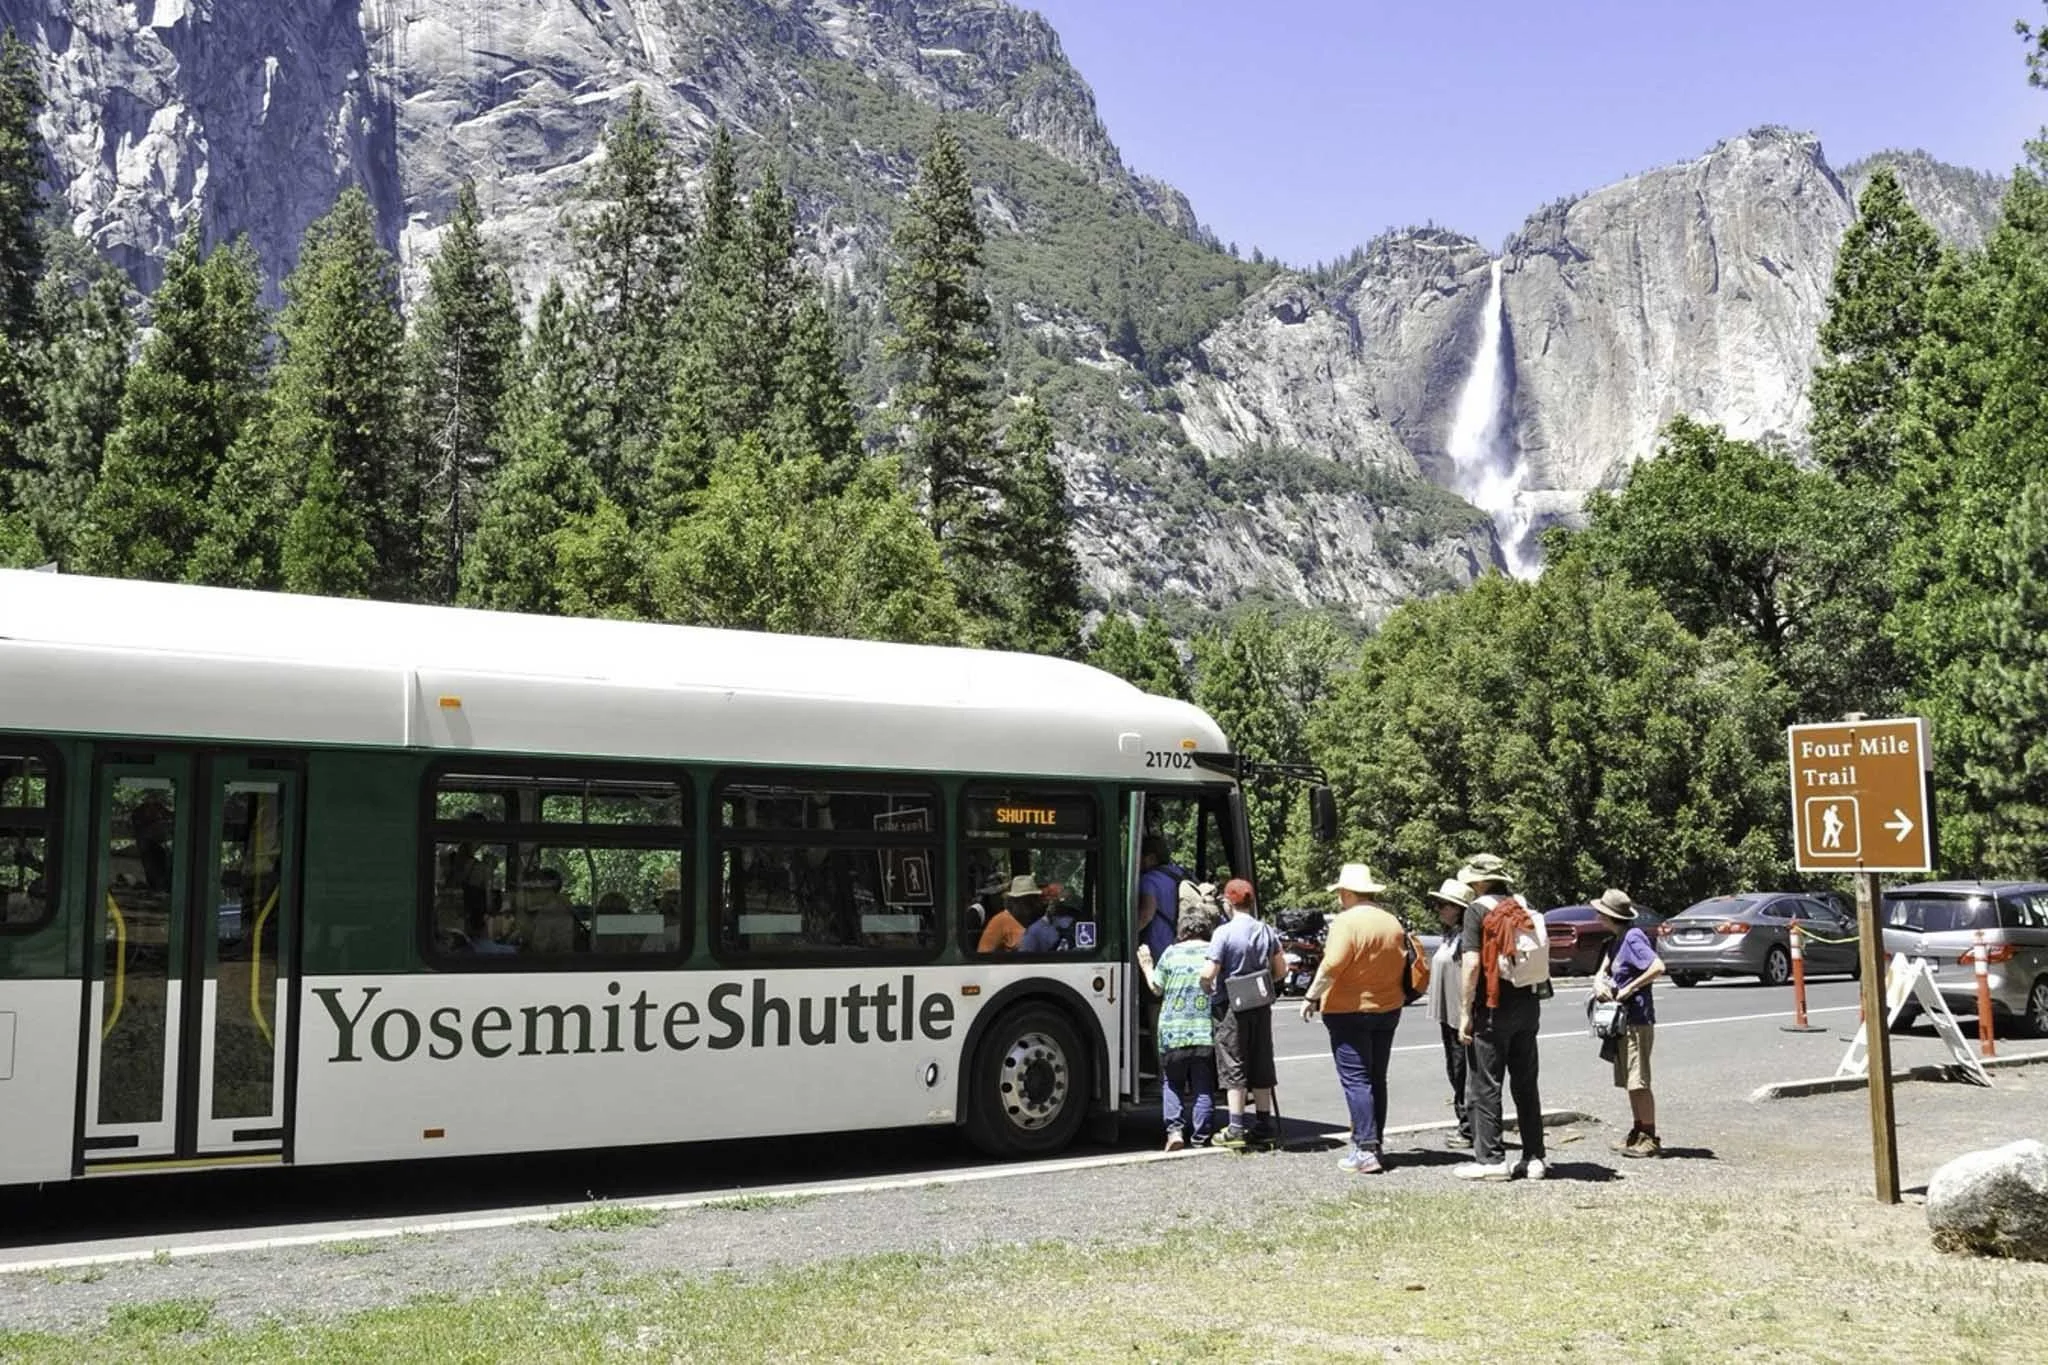
From Bridalveil, you’ll drive for three miles on Southside Drive to the trailhead to the Four Mile Trail. Find a place to park and wait for the Yosemite Valley shuttle (green line) to arrive and board it when it does.
As the day progresses, parking will become increasingly difficult. By utilizing the free valley shuttle, you’ll save yourself from the hassle of finding a place to park, a ton of time and it’ll help to cut down on the effect of emissions on the park.
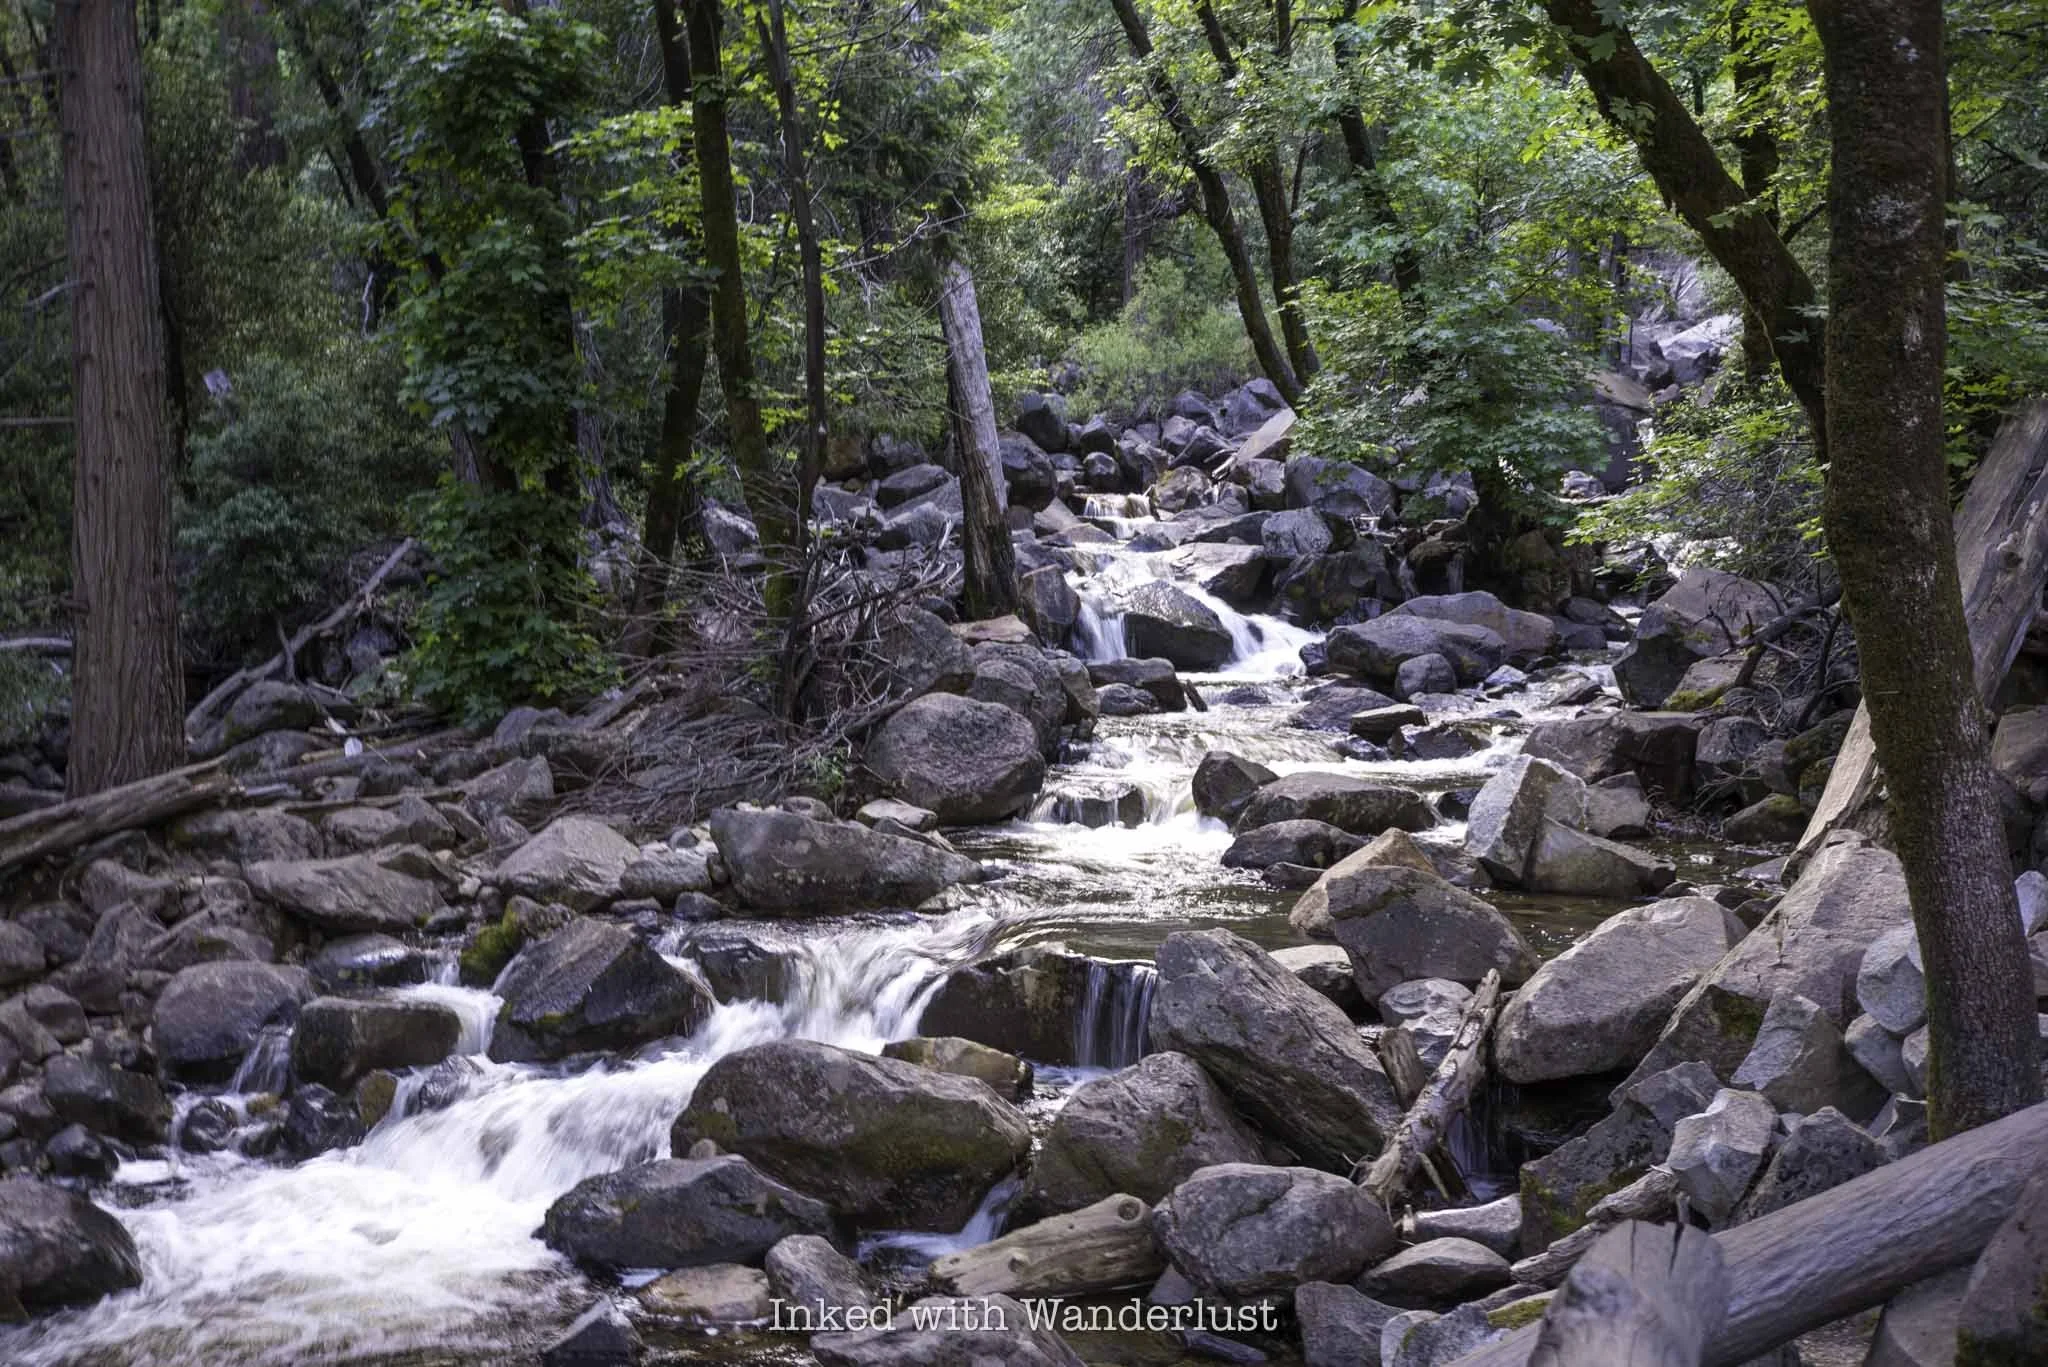
4) Hike The Mist Trail (4 hours or less)

To hike the Mist Trail, you’ll get off of the valley shuttle at Happy Isles, which is stop sixteen. From the shuttle stop, you’ll walk a short distance down the road to the official trailhead (which goes upwards through a gate).
The Mist Trail is one of the premiere hiking trails in all of Yosemite. It’s mega popular, attracting hikers and tourists alike by the millions, annually. It’s no walk in the park (pun intended), but it’s totally doable if you take your time.
According to AllTrails, it takes an average of four hours, round-trip, to hike to the top of Nevada Fall (the second waterfall on this hike) and back. To save time, many hike to Vernal Fall and stop there. However, I highly recommend completing the entire trail if you can.
READ: “The Mist Trail: Hike One of Yosemite’s Most Beautiful Trail”
5) Enjoy Lunch At and Explore Yosemite Village (one hour)

After completing the Mist Trail, it should be somewhere around noon or 1pm. Get back on the valley shuttle (you can board the green or purple lines here) and take the short ride to stop one (Yosemite Village) or stop two (Welcome Center).
There, you and your group can take a break, enjoy lunch at one of the valley restaurants, enjoy a picnic, scope out historic photographs at the Ansel Adams Gallery, learn about the Ahwahnee people at Indian Village, shop for souvenirs and more.
Once you’re feeling ready to get back at it, hop back onto the valley shuttle (green line only) and take the short trip to stop six - Lower Yosemite Falls.
6) Lower Yosemite Falls (45 minutes to one hour)

Much like Tunnel View and Bridalveil Fall, taking the short hike to the base of Yosemite Falls, the tallest waterfall in North America, is quintessential Yosemite. You can hike the full loop (1.2 miles) or simply to the base and back.
How much of the falls you’ll see depends entirely on when you’re visiting, as Yosemite Falls dries up as summer progresses. If you’re visiting in spring or early summer, you’re good to go. From mid-July and on, though, there isn’t much to see.
If Yosemite Falls is dry, I recommend skipping it and going straight to the next location discussed below and spending that extra time there.
7) Stroll El Cap Meadow (one to two hours)
From Lower Yosemite Falls, take the shuttle to stop nine - El Capitan Meadow. Strolling through this gorgeous meadow is an experience like none other. It’s flanked by towering granite formations, including El Cap itself on one side and Cathedral Rocks on the other.
The jaw-dropping views aren’t the only feature of El Cap Meadow. Other activities include observing rock climbers on El Cap, photography, access to Merced River and enjoying a picnic. If you’re running short on time, then take a short stroll through the meadow and take in the sights.
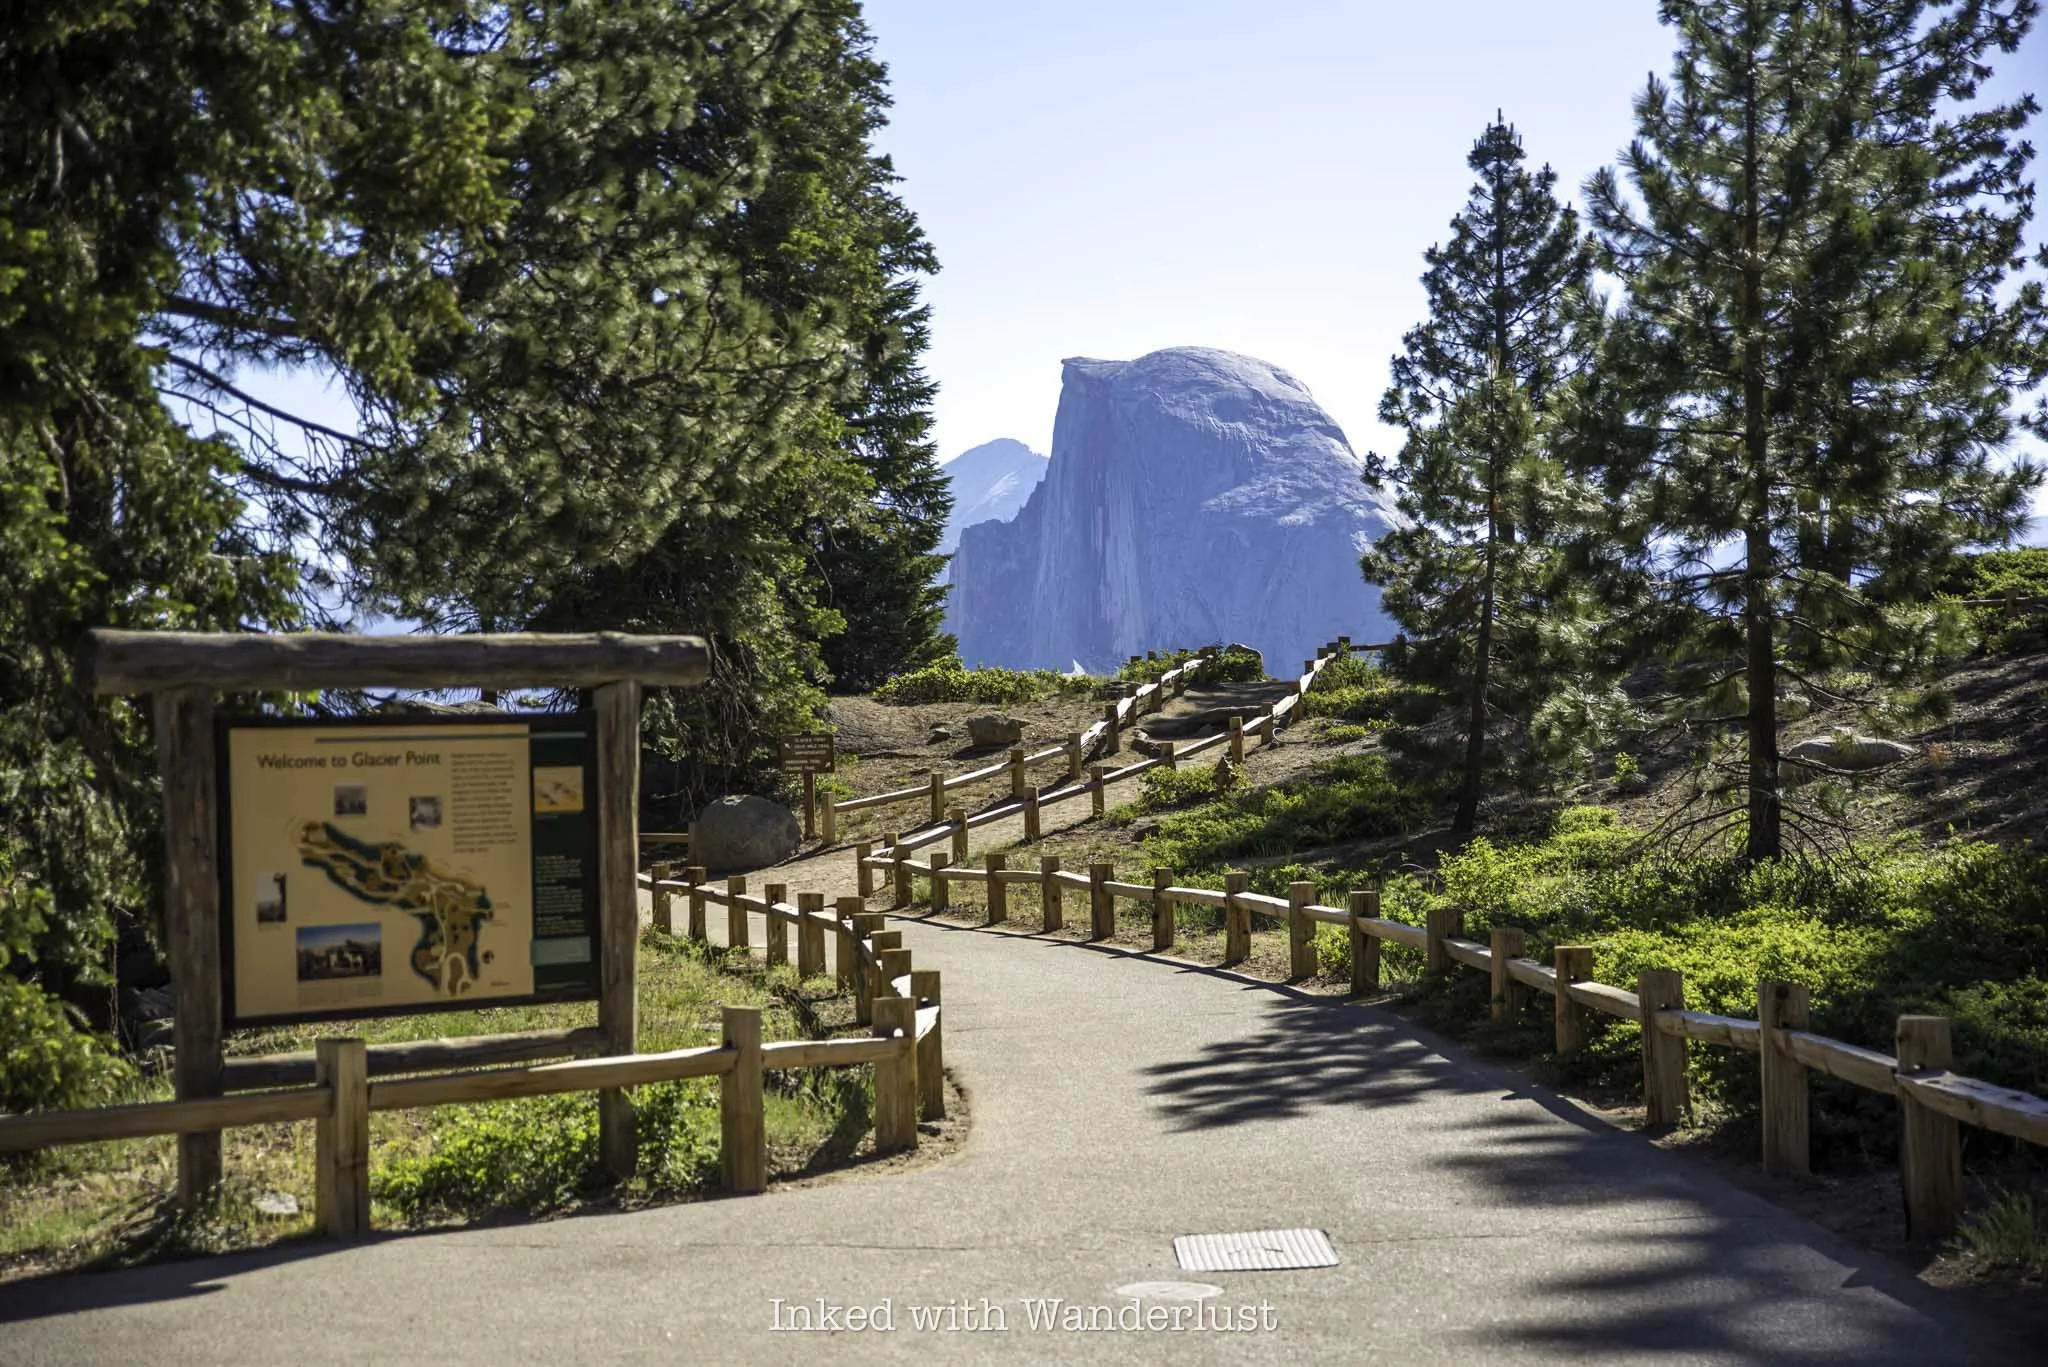
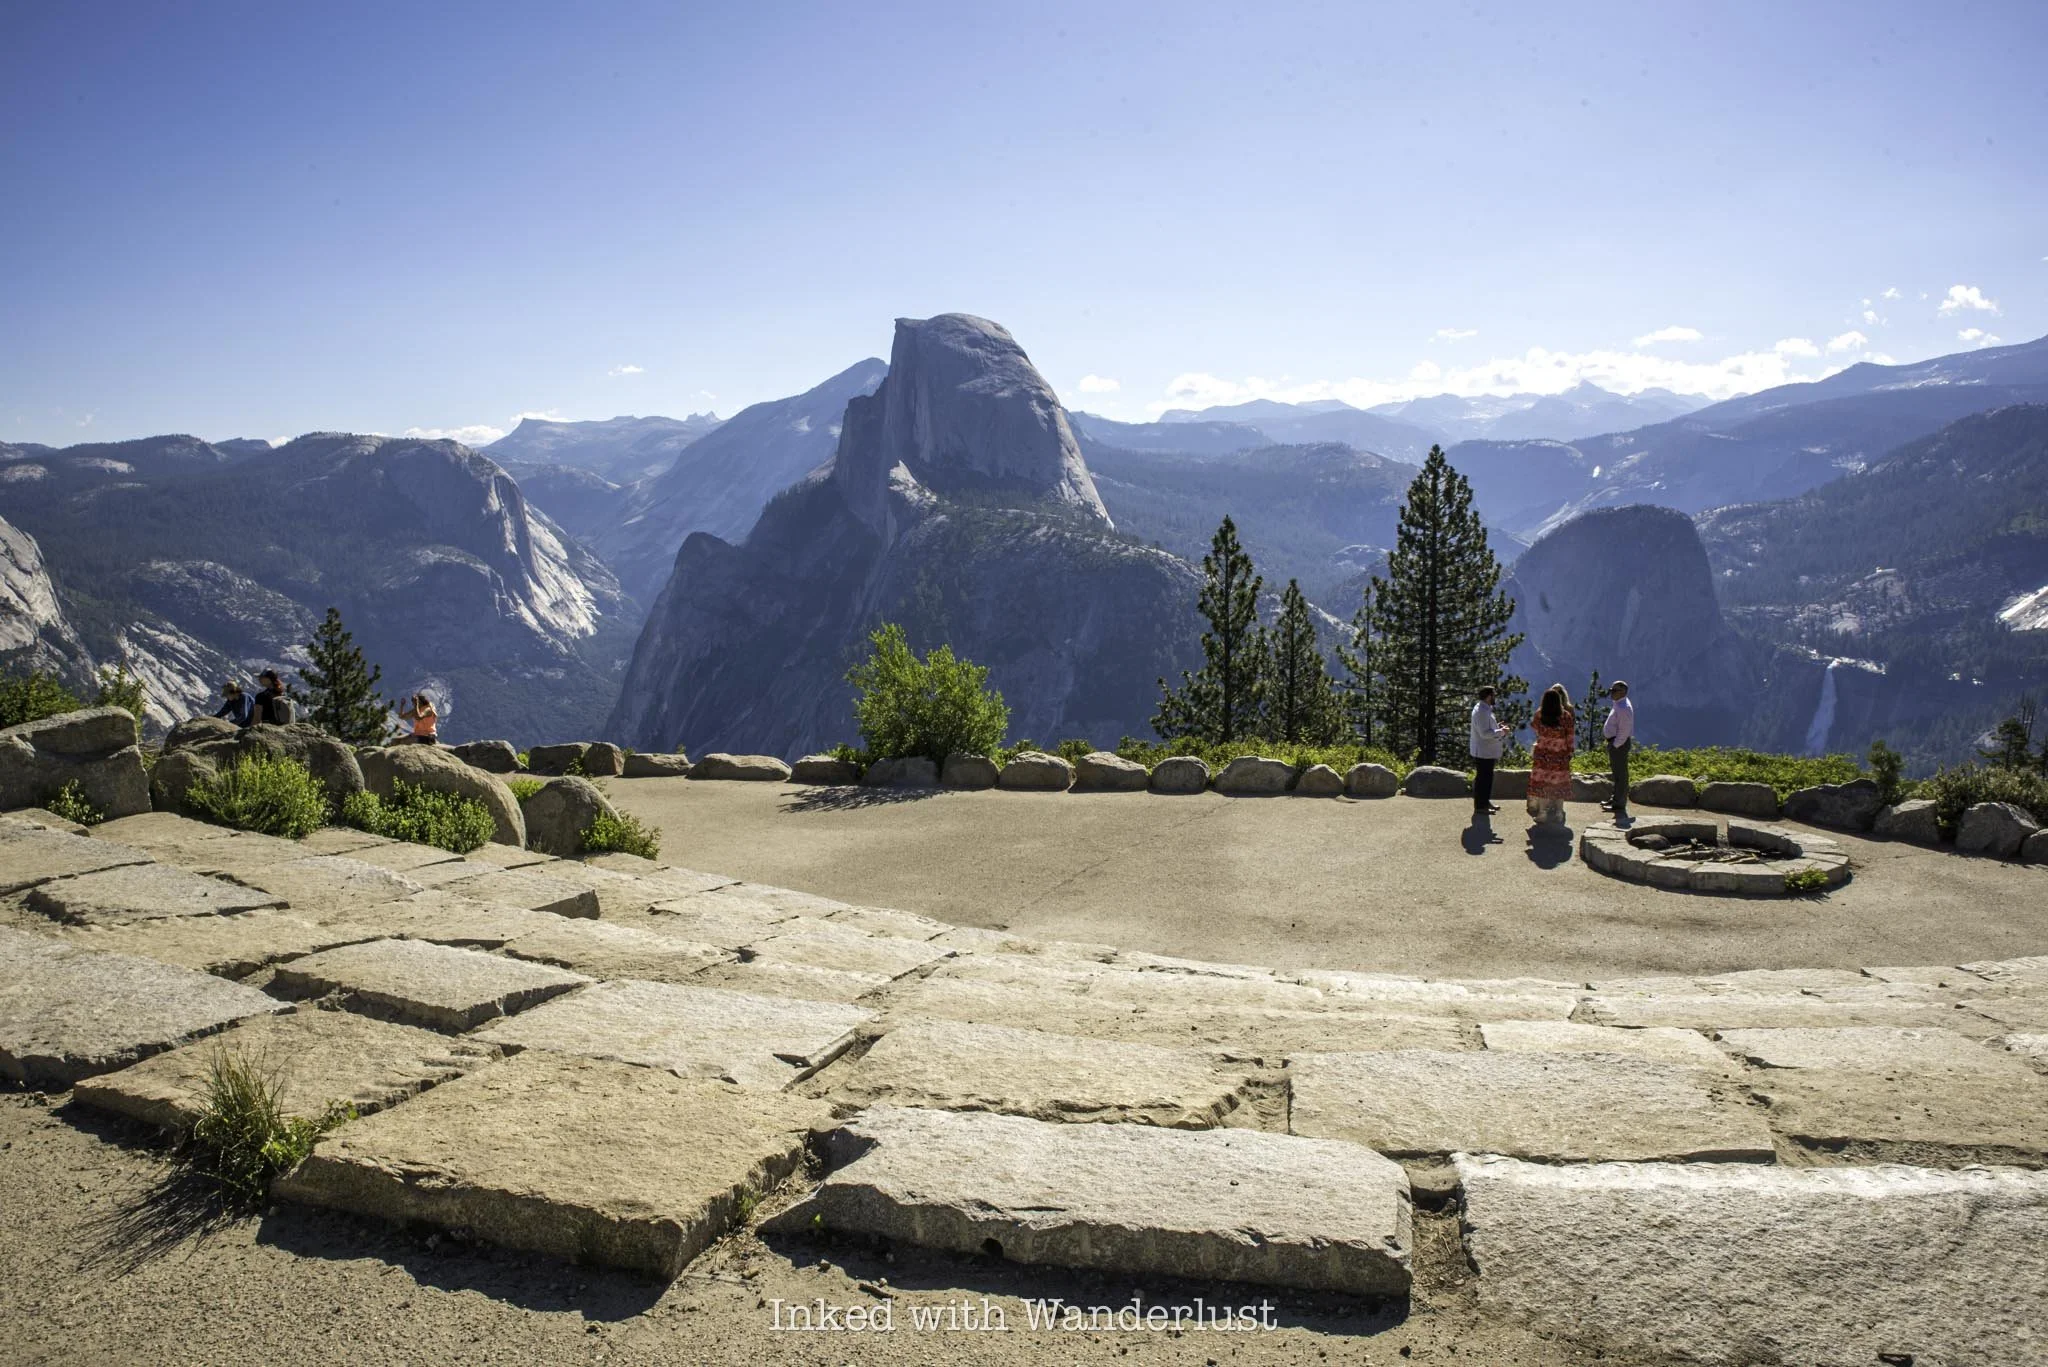
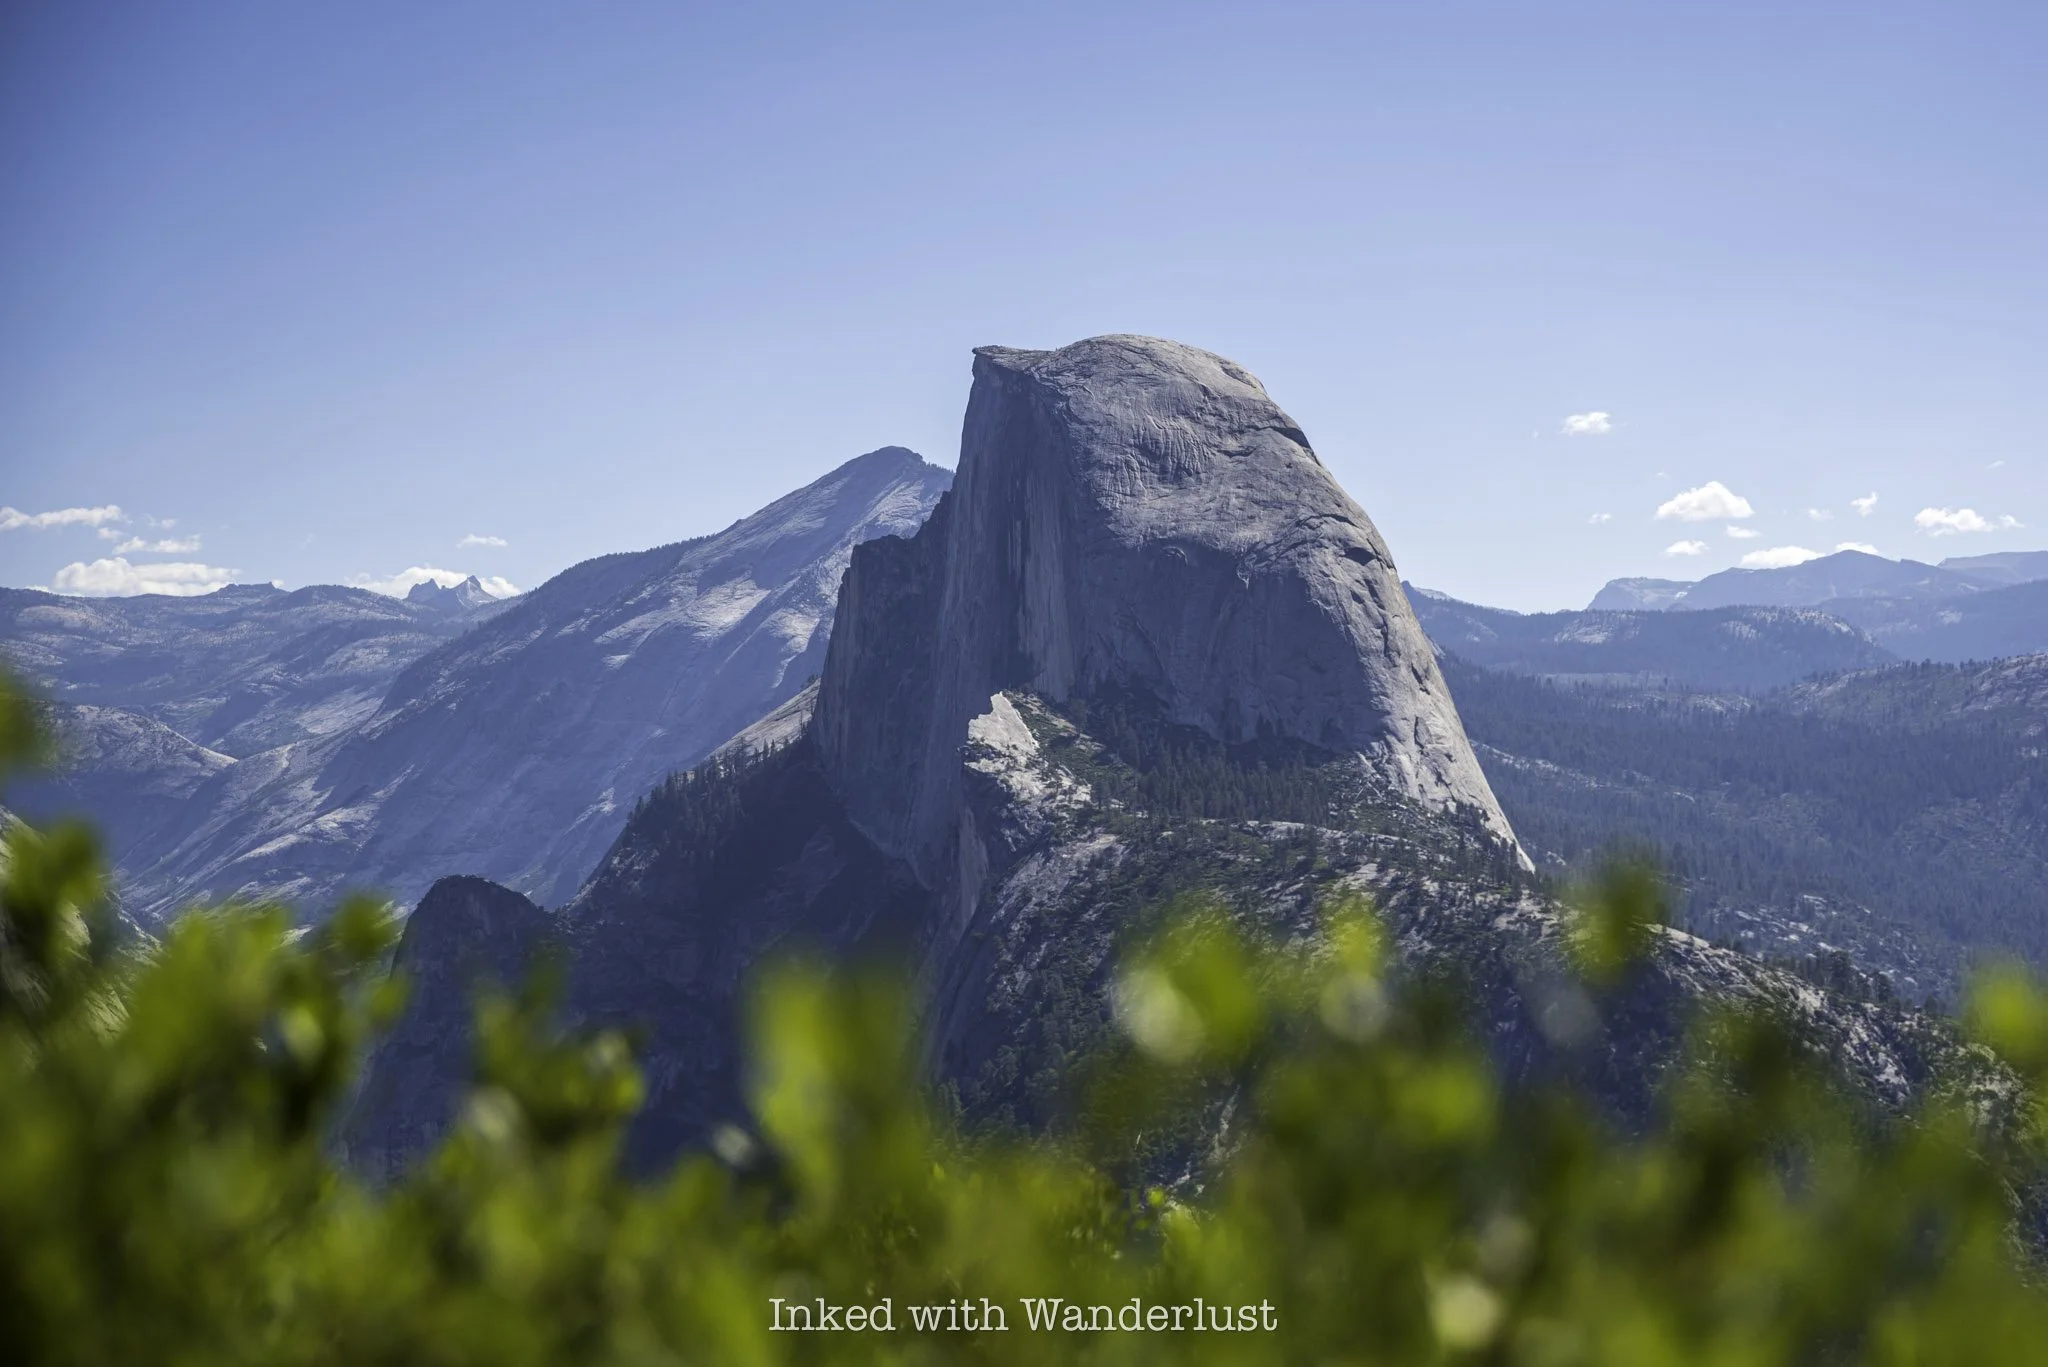
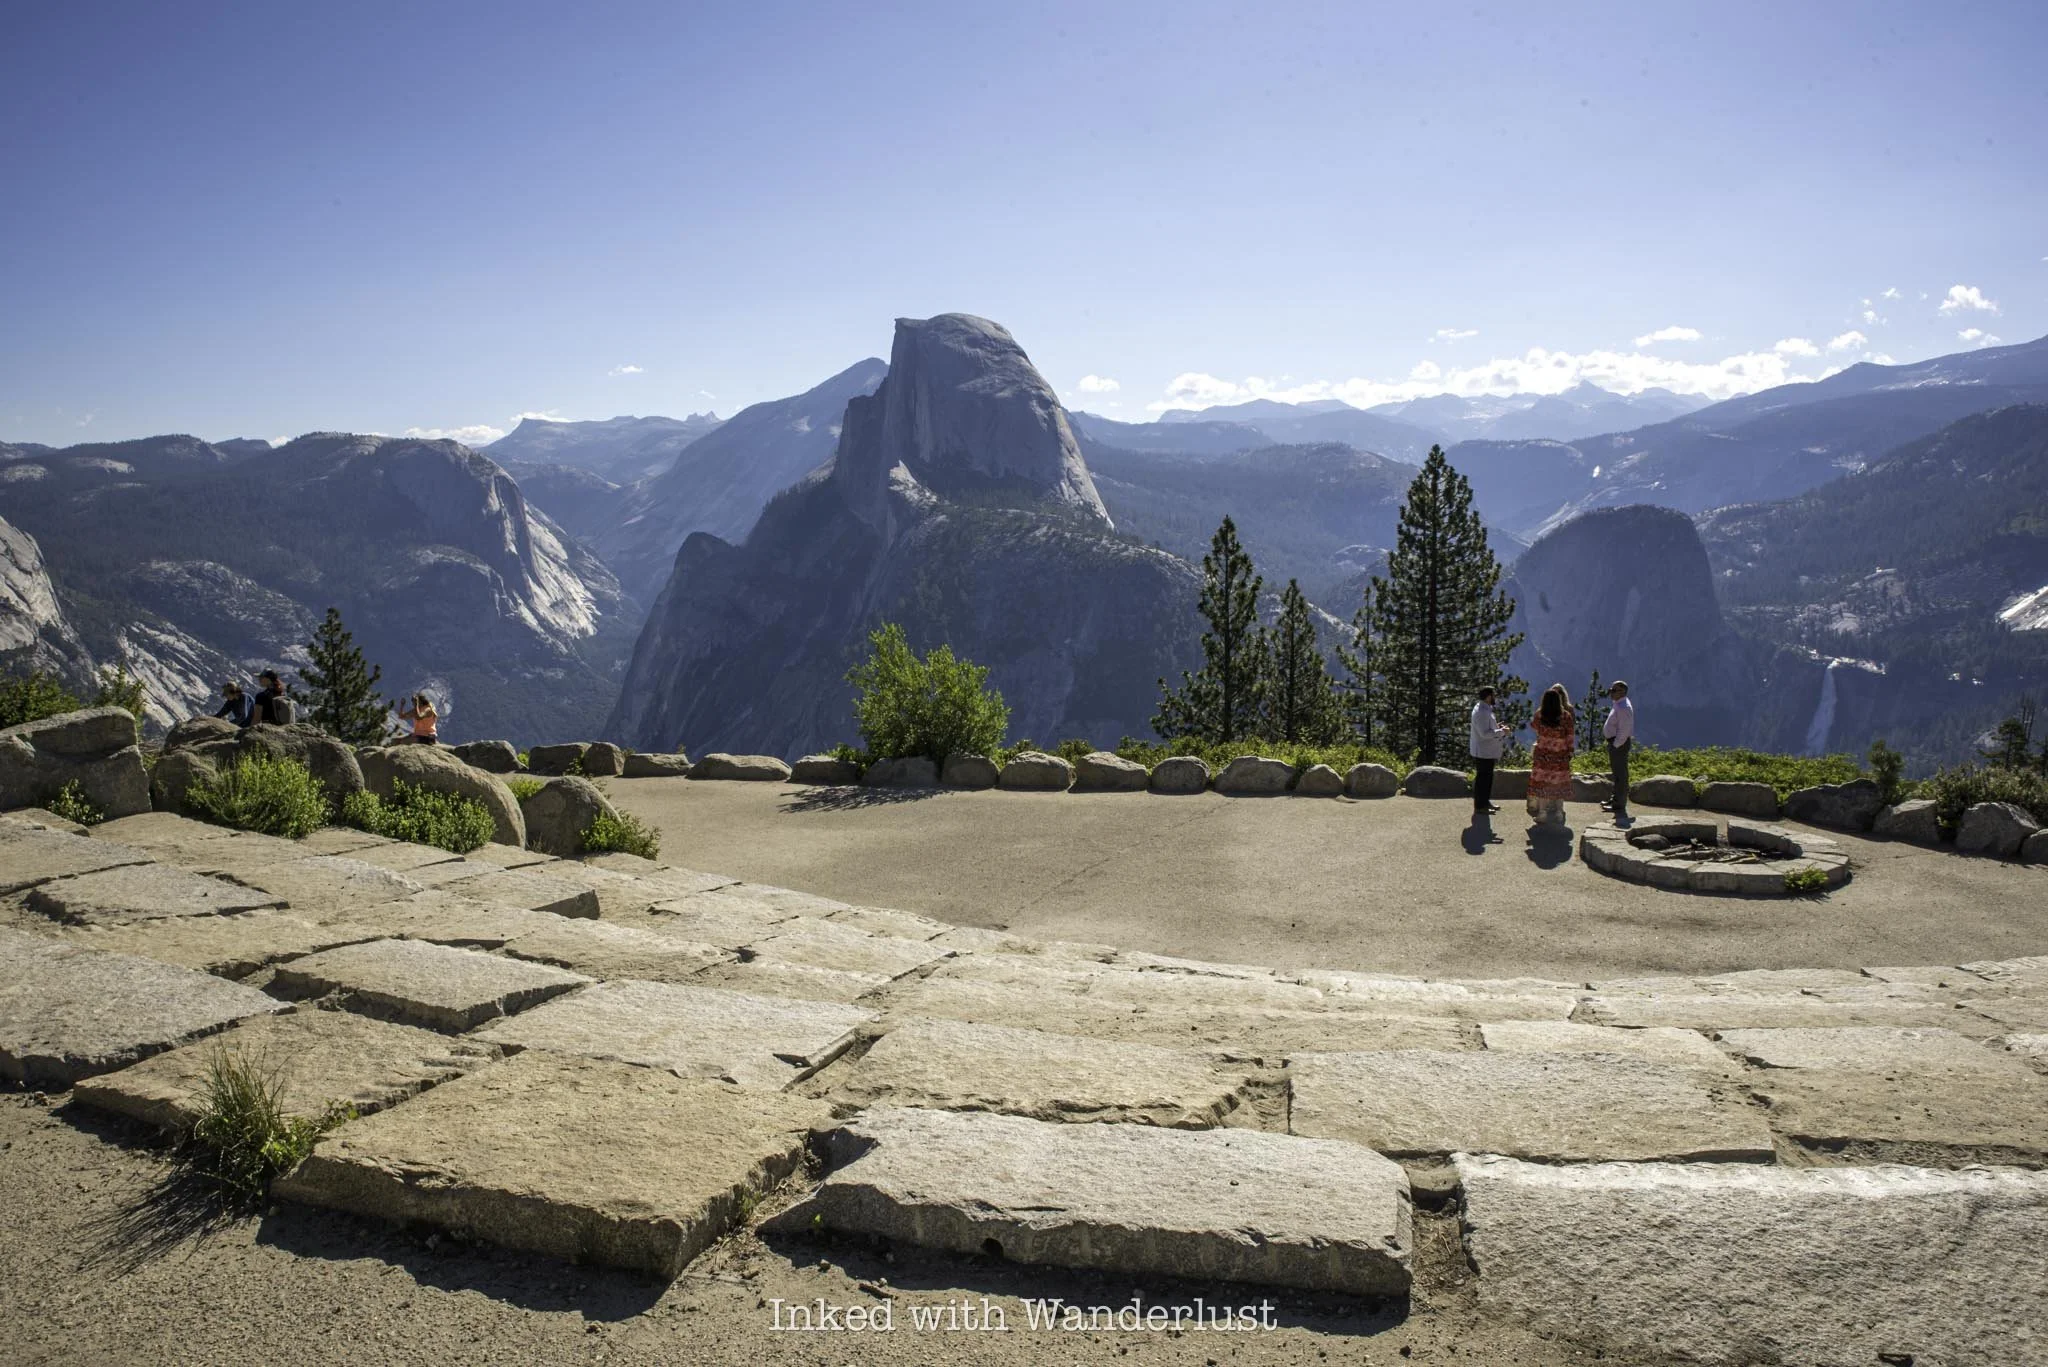
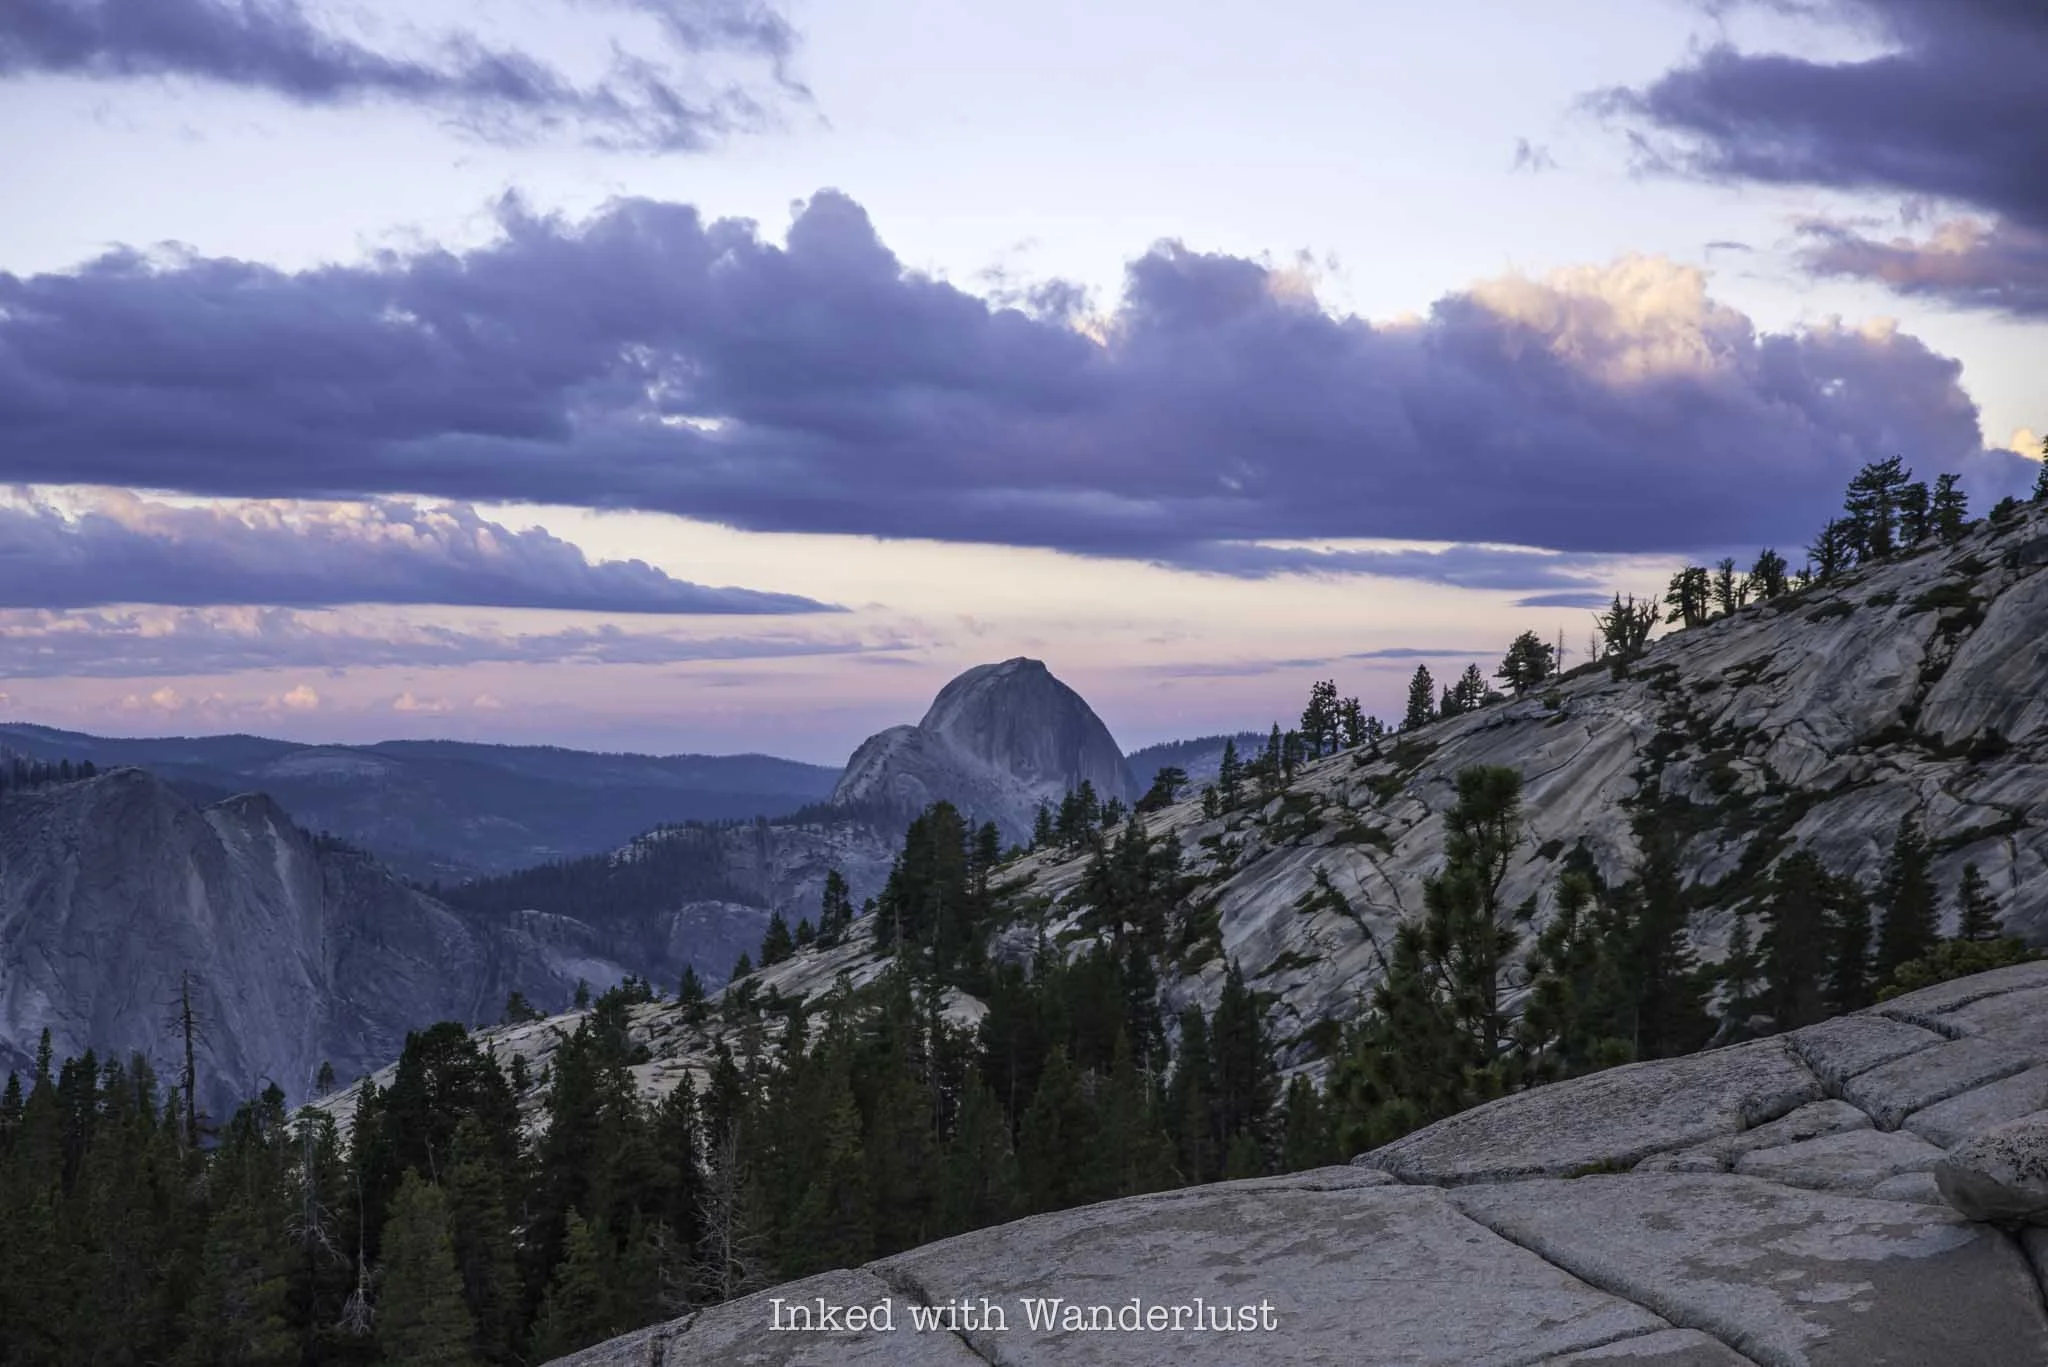
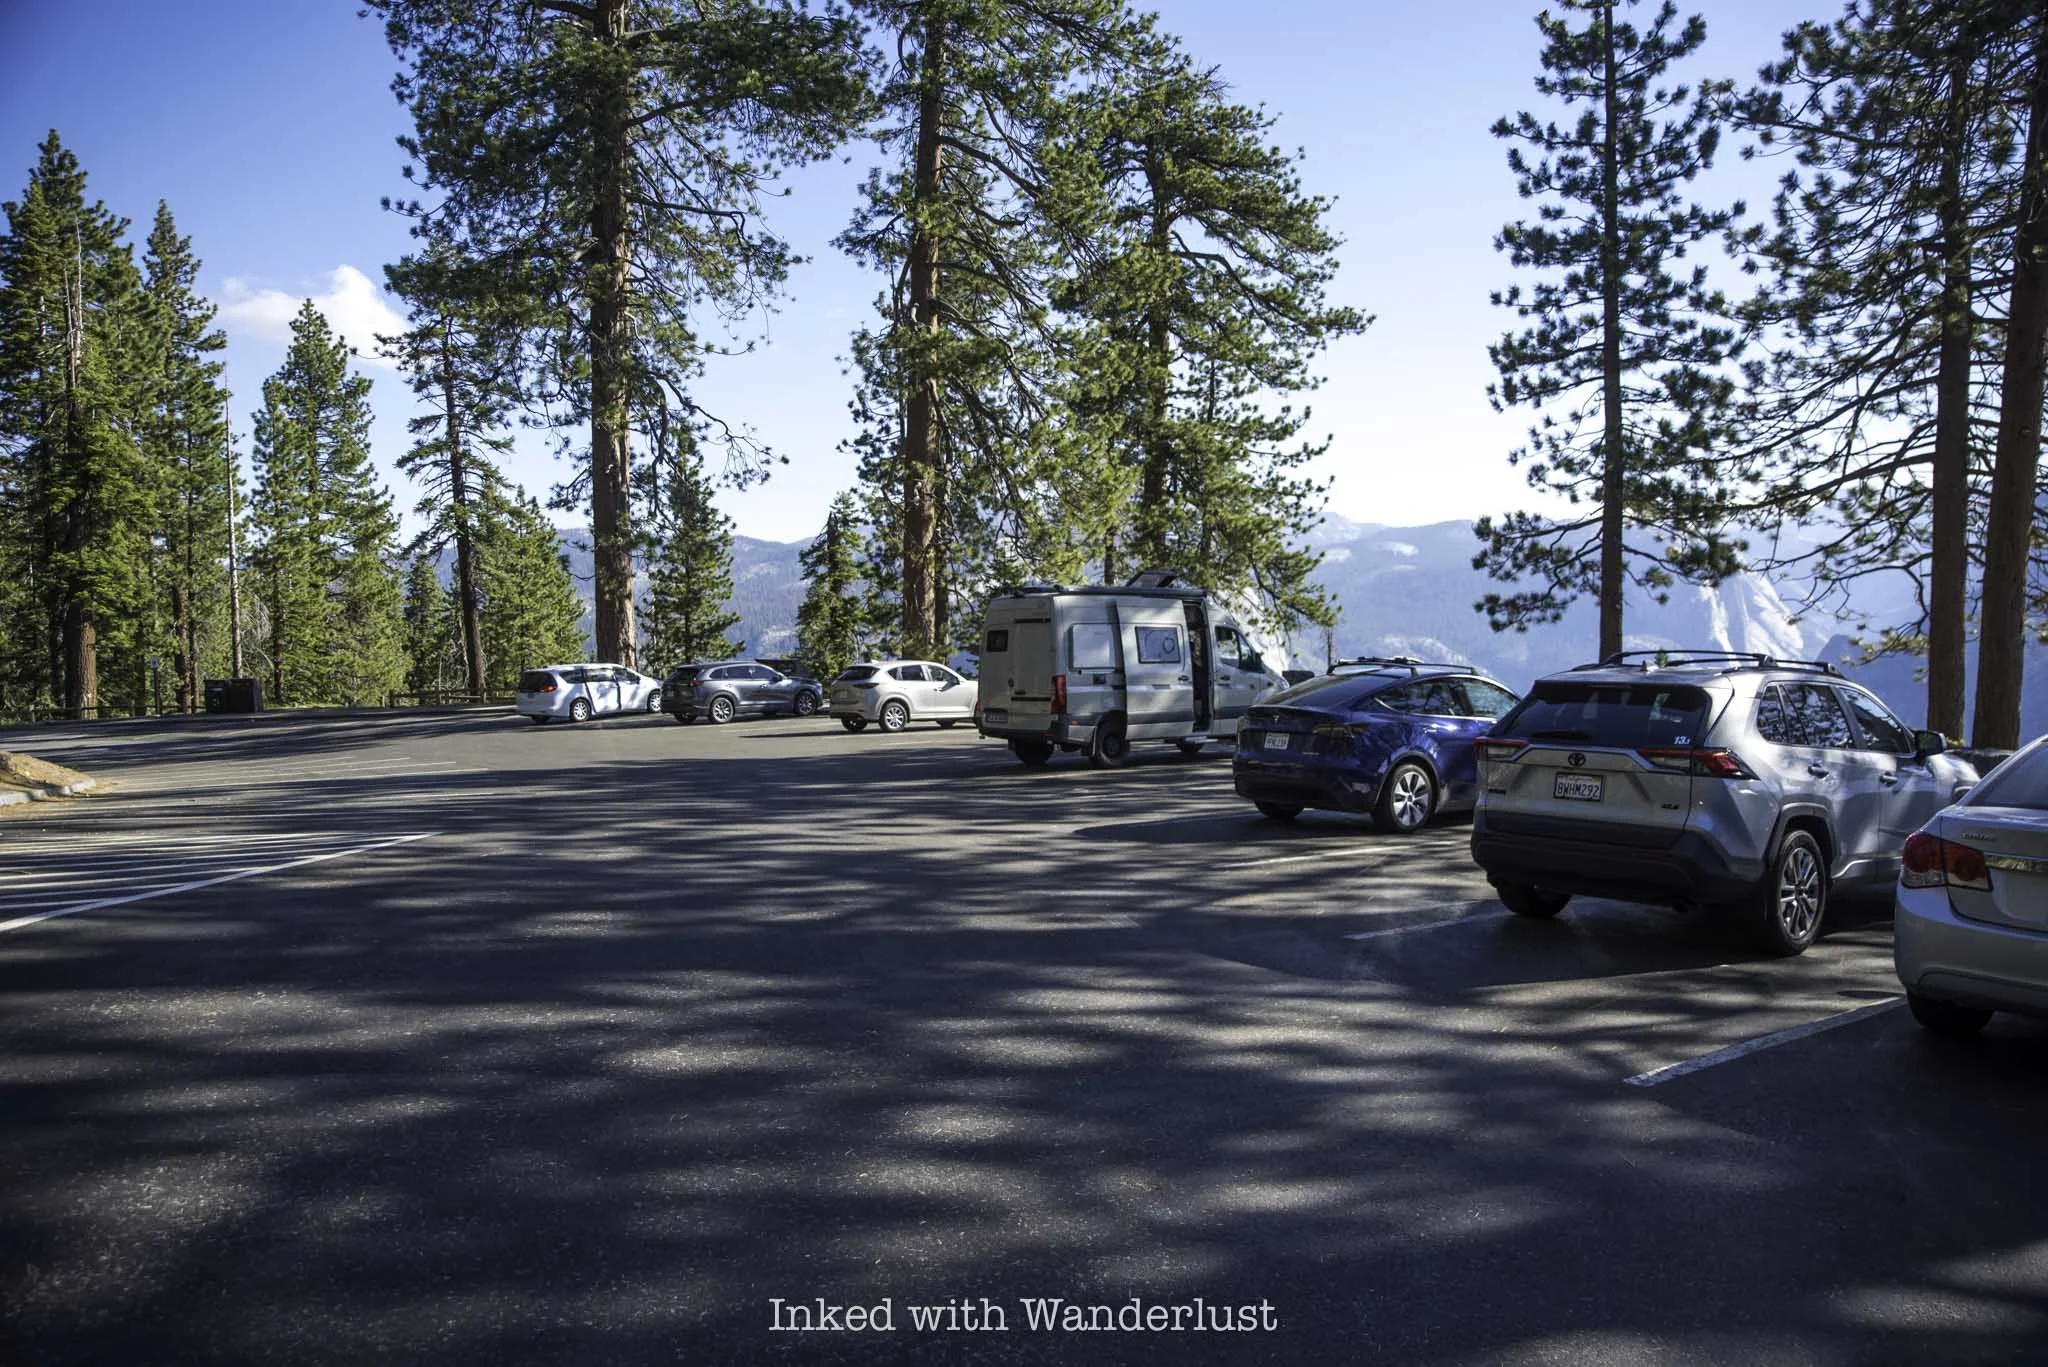
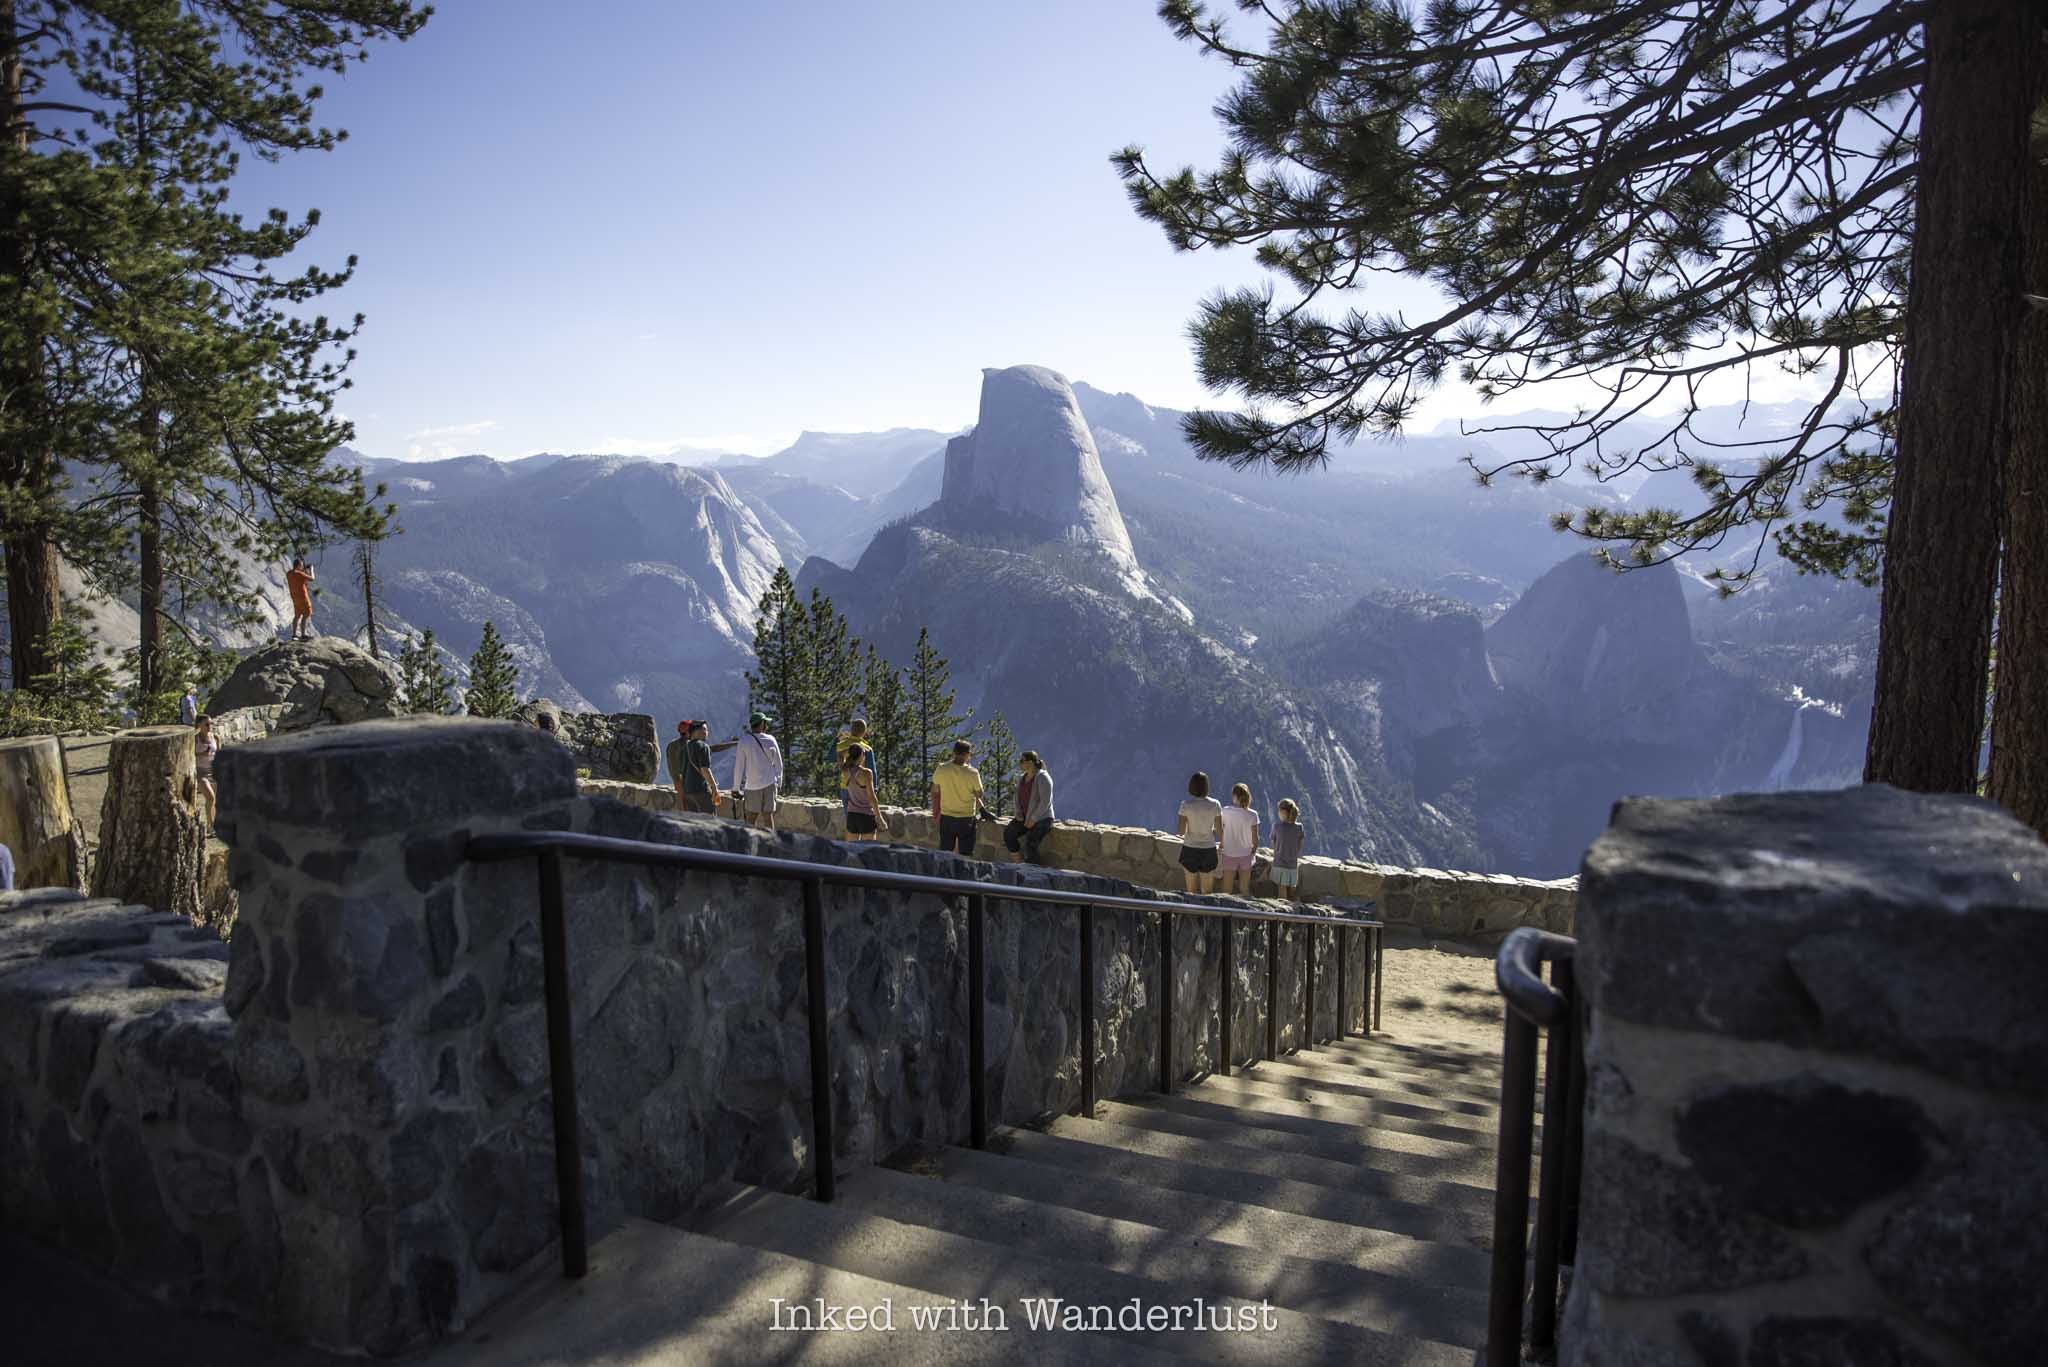
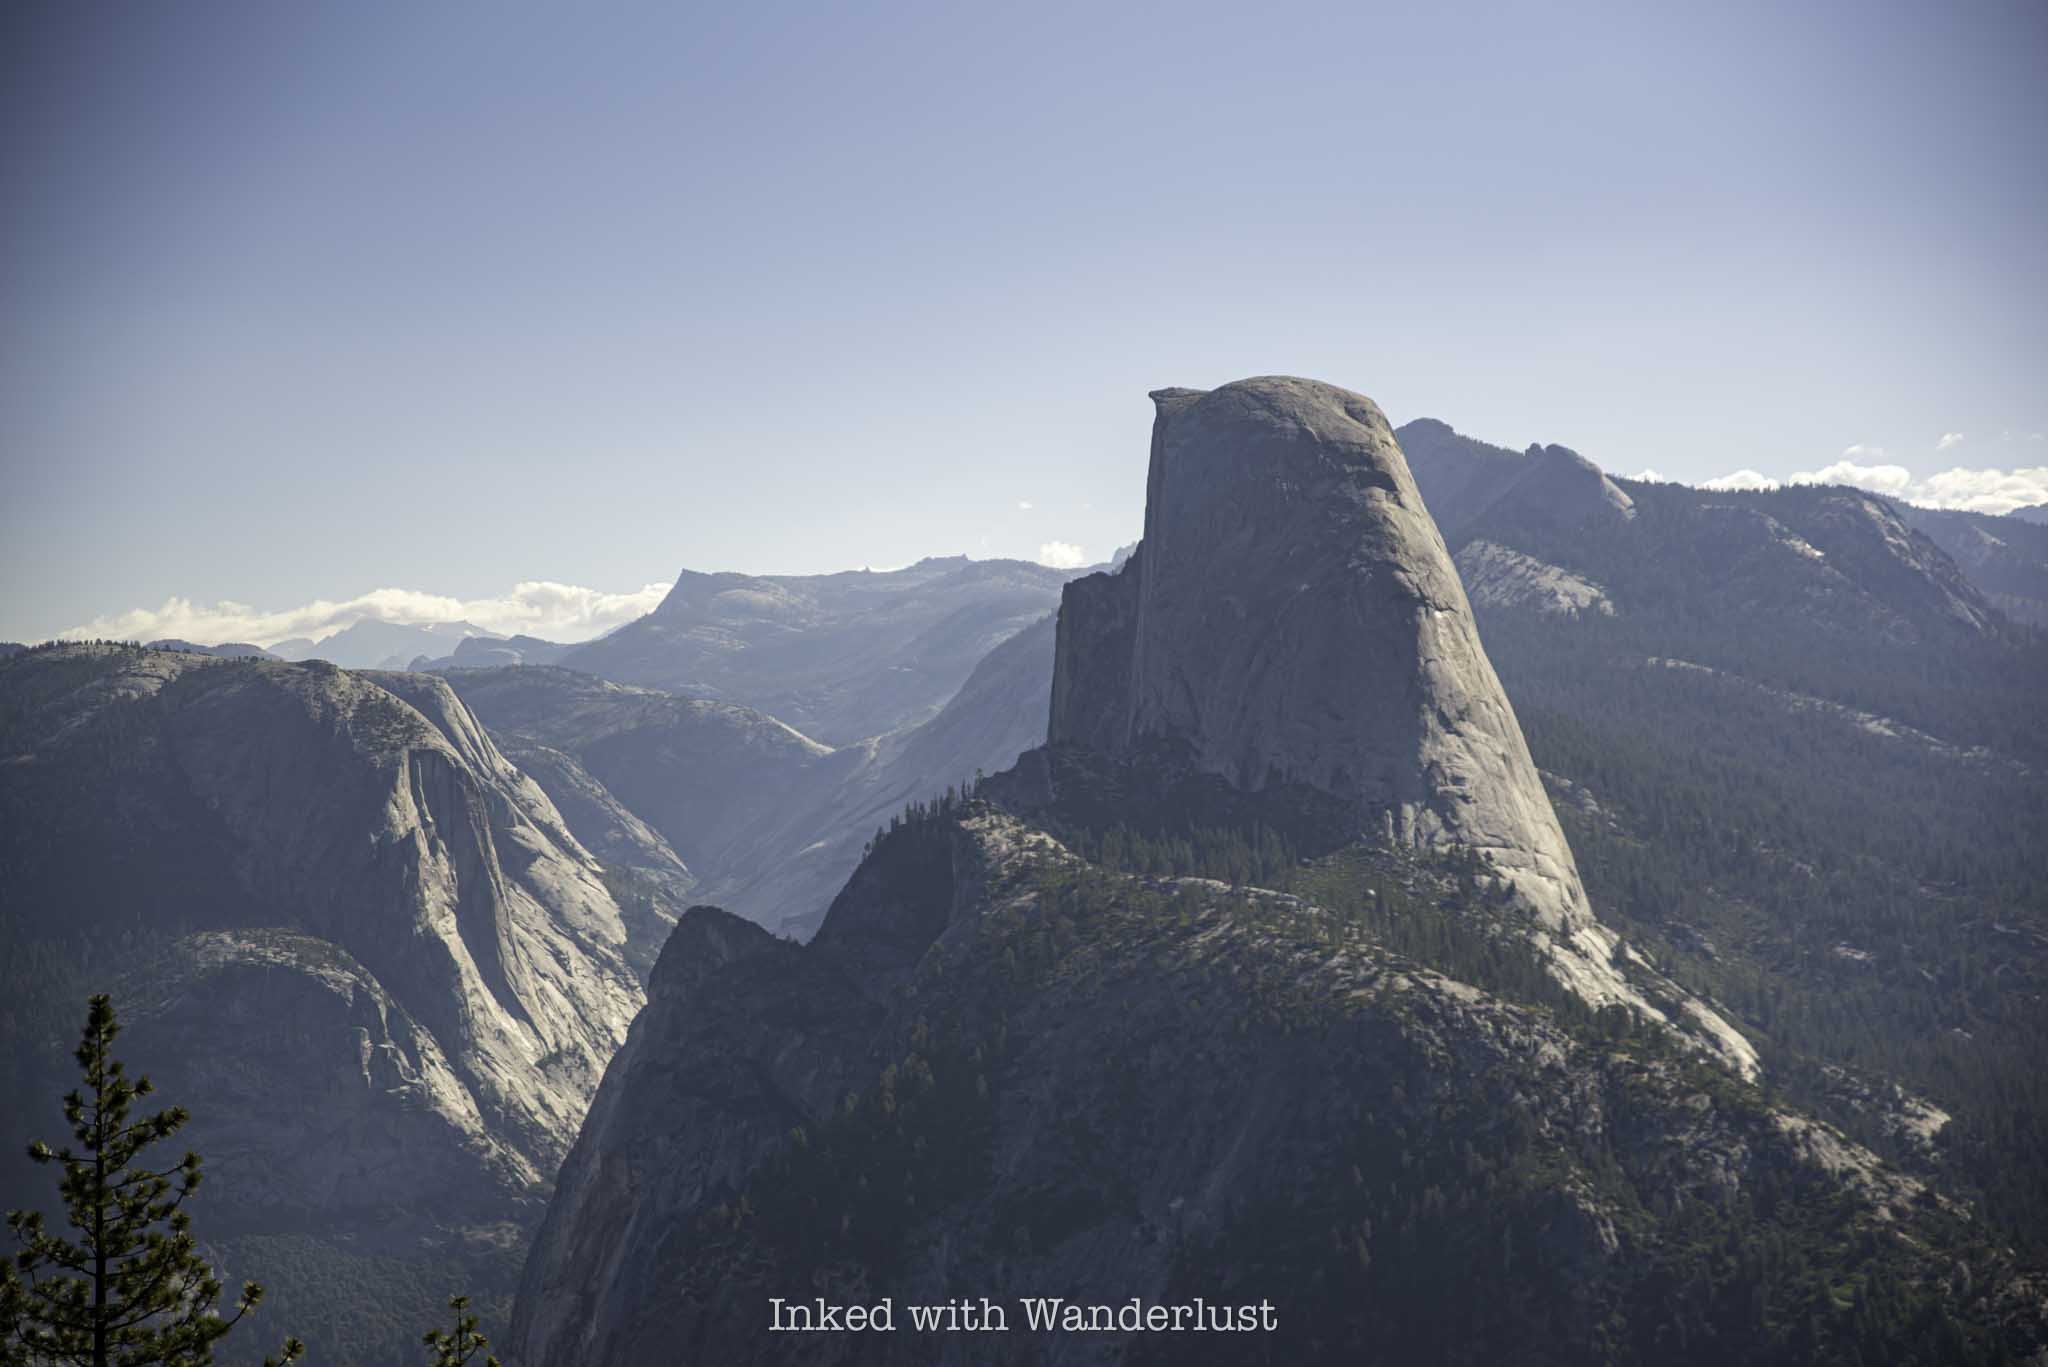
8) Glacier Point (one hour or more)
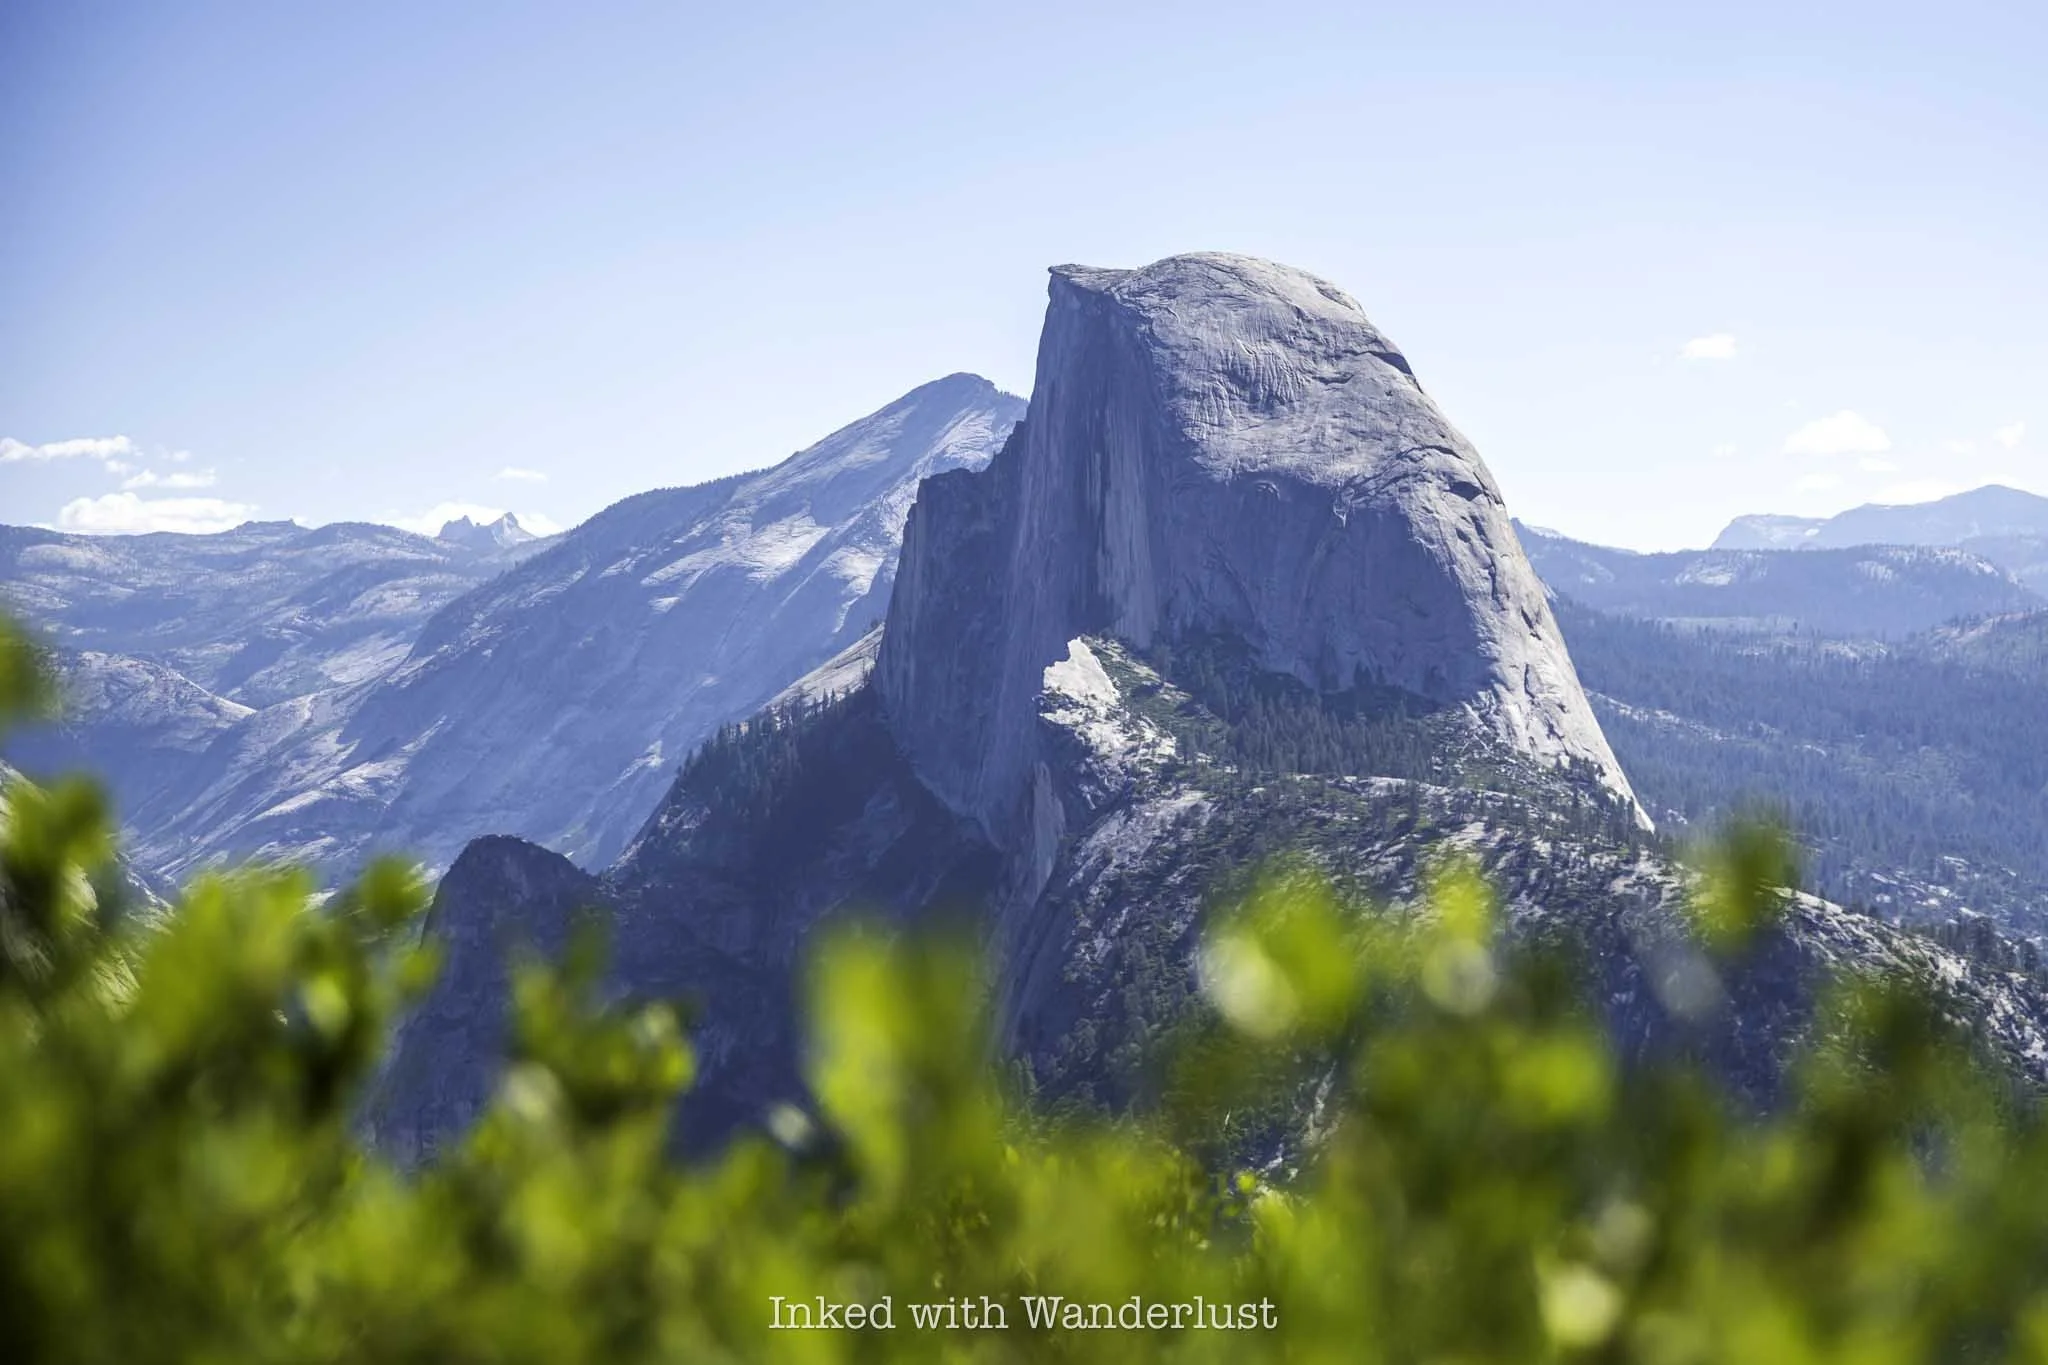
Until this point, you would have spent the majority of your one day in Yosemite in the valley. It’s now time to take a drive to Glacier Point. If you’ve never heard of Glacier Point, it’s one of the most scenic and popular viewpoints in the park.
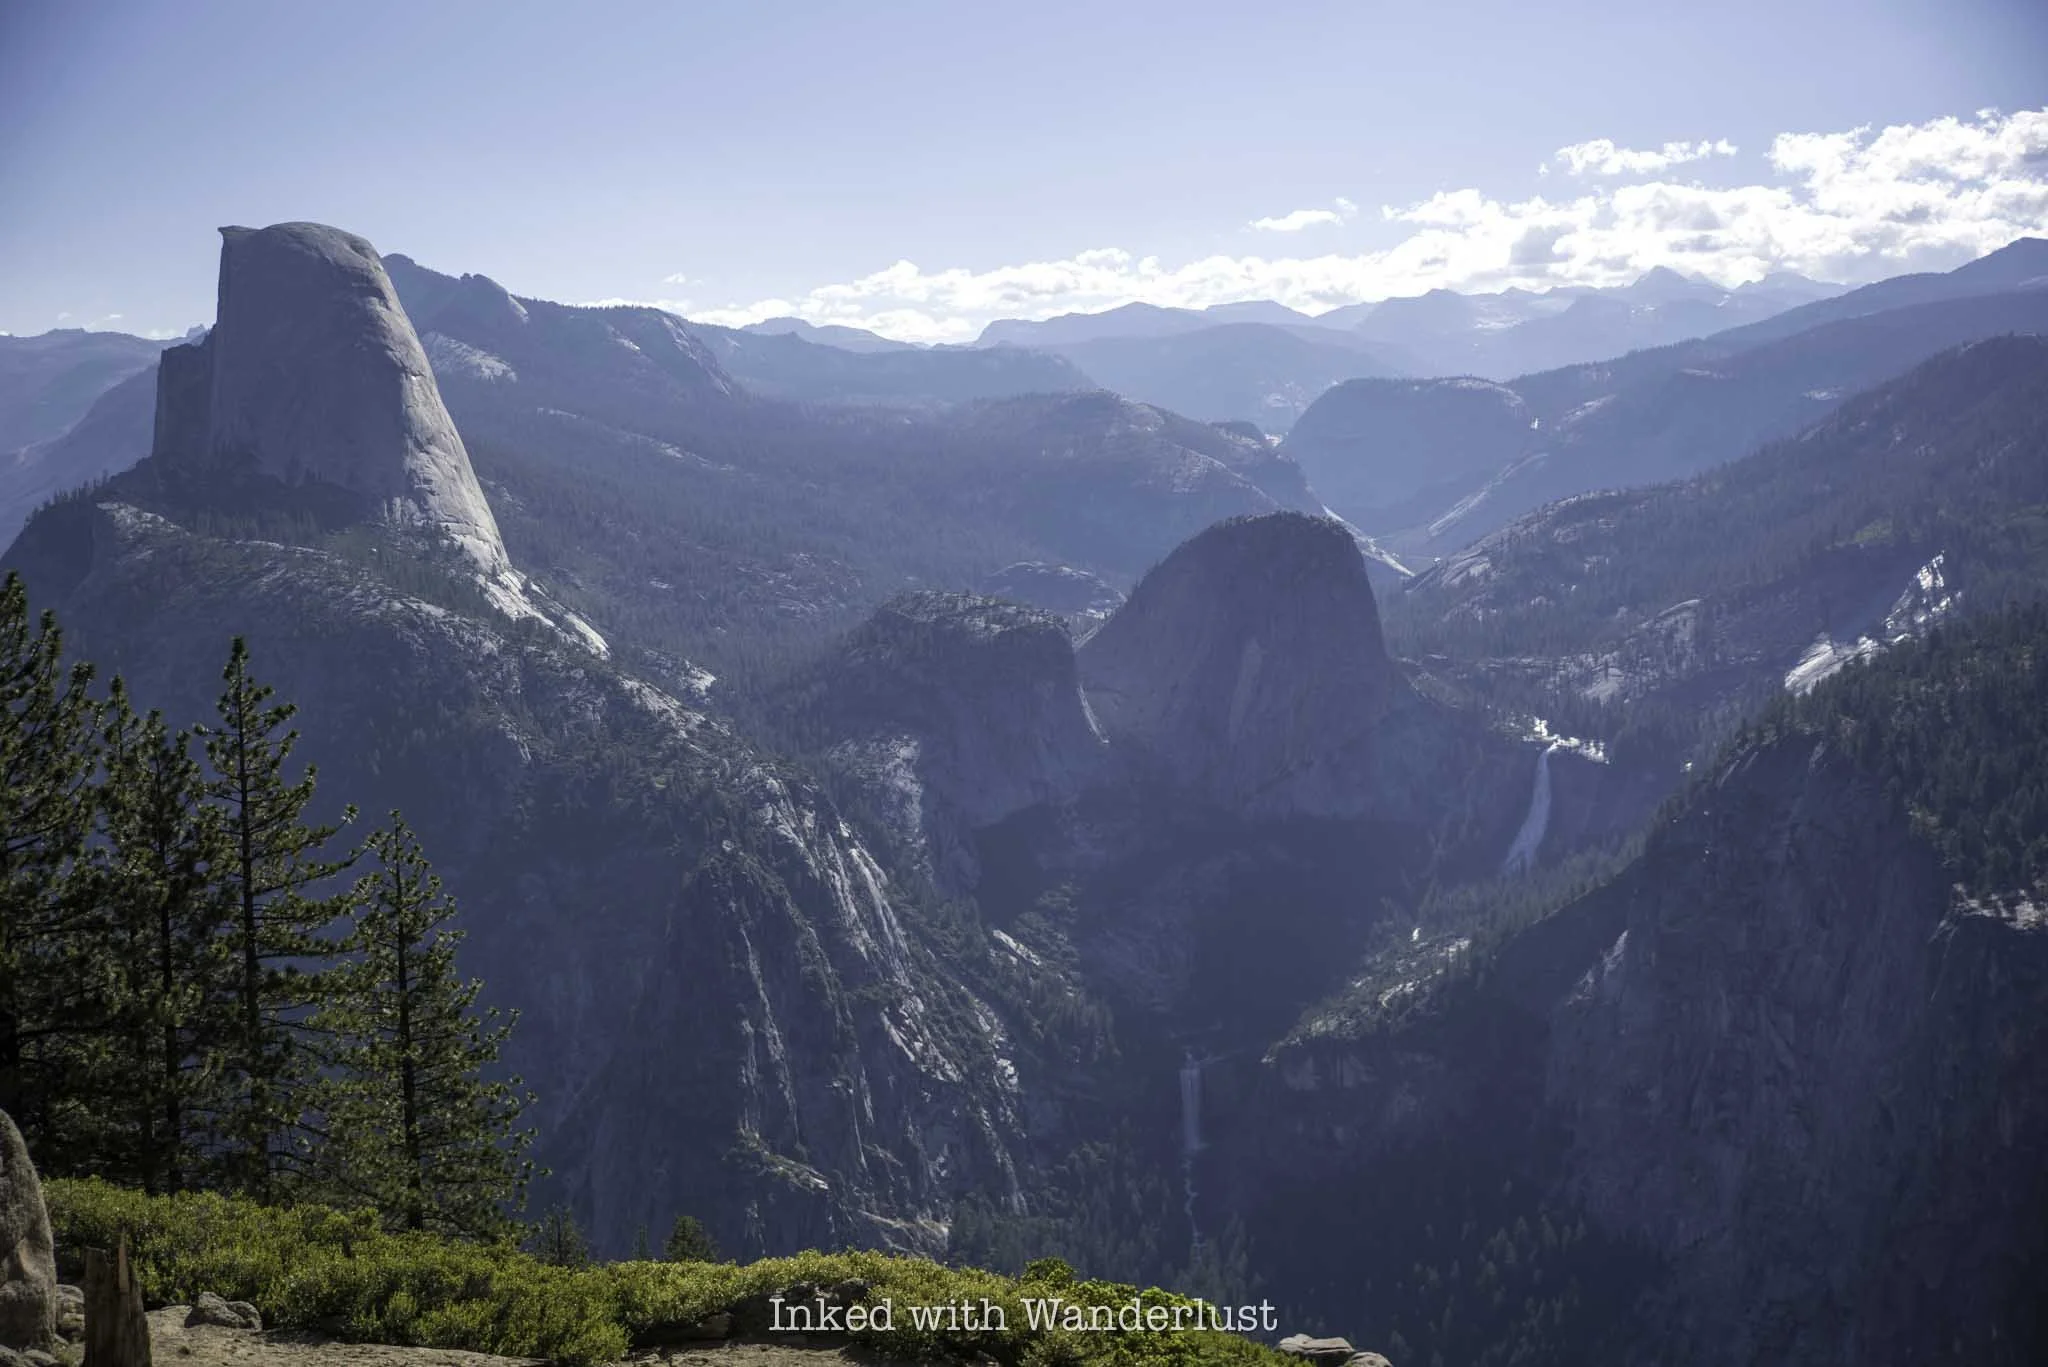
From Glacier Point, you’ll have a wonderful view of the valley from 3,200 feet above. Yosemite Falls, North Dome, Teneya Canyon, Vernal Fall, Nevada Fall, and Clouds Rest are visible from here. Most notably, the commanding view of the infamous Half Dome is second-to-none.
There is no free shuttle to Glacier Point, though you can book the Glacier Point tour. This tour is seasonal and the final bus leaves at 1:30pm. If this is what you’ll want to do, then you’ll need to adjust this itinerary accordingly.
My recommendation is to take your own vehicle. From El Cap Meadow, take the shuttle back to your vehicle at Four Mile Trail. From there, drive down Southside Drive, loop back onto Northside Drive, and then follow the signs to Glacier Road.
Take in the incredible views, check out the historic geologic hut and if you time it right, stick around and witness a jaw-dropping sunset. From here, simply drive back to the valley and on to your hotel or campground.
If you can help it, I implore you to consider spending two days at Yosemite (or even three) as there is so much more to the park than just the valley. Yosemite’s east side is a hikers paradise and Hetch Hetchy, the original valley, is stunning. Thanks for reading!
Did you find this post useful?
If you did, consider leaving a tip through the Buy Me A Coffee button below! Whether it’s $1 or $5, every bit helps offset small travel costs like coffee, water, lunch, parking, or park entry fees. Your support means the world—thank you!

Visiting Glacier Point in Yosemite National Park
If you’ve ever seen a photo of Half Dome online, there’s a good chance it was taken from the subject location of this post…
Disclosure: This post contains affiliate links. If you make a purchase through these links, I may earn a small commission at no additional cost to you. I only recommend products or services that I believe will add value to my readers.
If you’ve ever seen a photo of Half Dome on social media, there’s a good chance it was taken from the subject location of this post, Glacier Point in Yosemite National Park. It’s one of the most iconic viewpoints in Yosemite and is visited by millions of people each year.
However, many don’t realize where in the park Glacier Point is located, and are often surprised to find out when they arrive to Yosemite Valley that it’s actually another hour’s drive away along a windy, mountainous road.
While it isn’t difficult to reach, there are a few things you should know ahead of time to avoid being surprised yourself. Aspects such as drive time, directions, transportation options, seasonality, and more are discussed in the post below. Let’s get into it.

Quick Stats
Location: Yosemite National Park
Fee: Yosemite requires an entry fee of $35
Open: All year, but only accessible via vehicle from April/May to November
Family Friendly: Yes
Cell Service: Yes
Restroom: Multiple
Parking: Large, paved lot
EV Stations: None
Milage: 0.5 mile, out and back
Elevation Gain/Loss: 50 feet
Difficulty: Easy
Popularity: Mega-high
Mileage: Less than a half-mile
Condition: Well maintained and easy to follow
Features: Views of Yosemite Valley and Half Dome
Best Viewed: Any time of year
Pets: Allowed on leash
Drones: Prohibited
Hazards: Usual wildlife hazards
My Visit(s): 2020 and 2024
When is Glacier Point Yosemite Open?

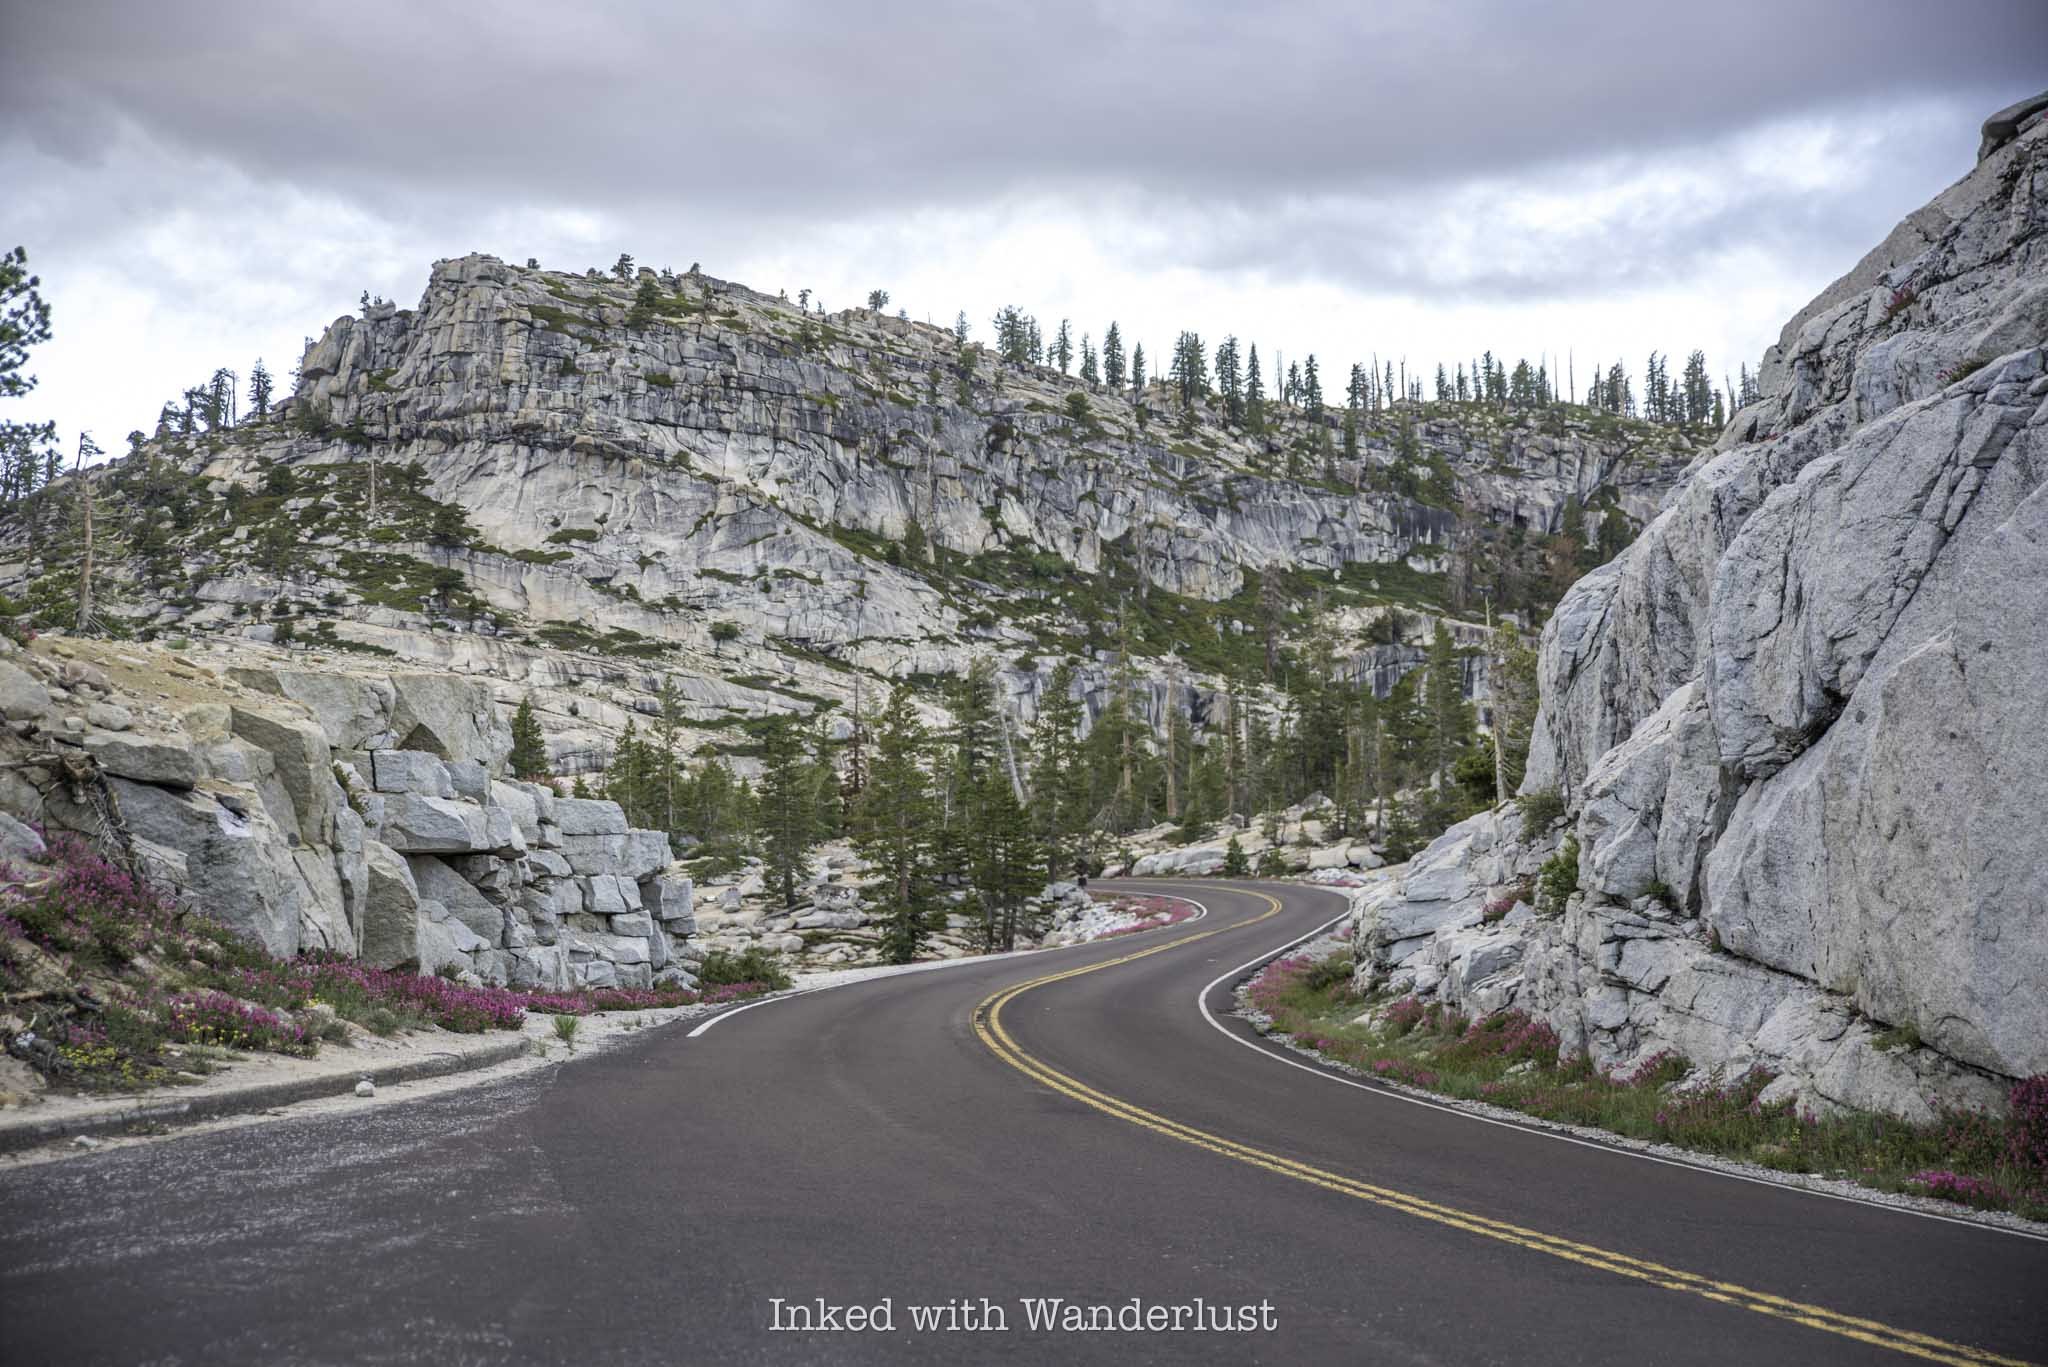
Glacier Point is open all year long, even during the park’s snow-dense winter season. However, most people will not be able to access it during winter because Glacier Point Road, the mountainous road which leads to and terminates at Glacier Point, is closed due to heavy snowpack.
Once it stops snowing, road crews begin plowing the road sometime in April and will typically open it to vehicle traffic in May. Much like Tioga Road on Yosemite’s east side, the road will close with the first heavy snowfall of the season, which usually occurs in November. You can see status updates on the NPS website here.
When the road is closed, you can still access Glacier Point, however, you’ll need to do so via cross-country skiing. If you’re skilled and experienced in this, there’s a good chance you’ll have Glacier Point all to yourself when you get there.
How to Get to Glacier Point Yosemite

The only entrance in Yosemite that’ll take you straight to Glacier Point is the southern entrance via Wawona Road. After driving through the entrance, you’ll continue along Wawona Road for about 17 miles before reaching Glacier Point Road, on which you’ll turn right. From there, it’s 15 miles to the road’s terminus at Glacier Point. Total drive time is about one hour.
From all other entrances, you’ll first need to drive into Yosemite Valley. If you’re driving in from the east entrance or El Portal, you’ll drive along Northside Drive before taking the turn off onto Southside Drive, before quickly turning right onto Wawona Road.
You’ll be passing one of the valley’s most famed waterfalls, Bridalveil Fall, on your left, as well as the most popular of Yosemite viewpoints, Tunnel View, on your right, before driving through the historic Wawona Tunnel.
You’ll drive on Wawona Road for about 18 miles before coming to Glacier Point Road. Turn left here and continue driving for about 15 miles until you’ve reached Glacier Point’s parking lot. Drive time depends on where in the valley you’re coming from but generally speaking, you can expect about one hour.
Shortly before reaching Glacier Point, you’ll pass another Yosemite viewpoint, Washburn Point, which offers a similar view. From Washburn, you’ll have an angled view of Half Dome and a closer view of two of Yosemite Valley’s most popular waterfalls, Vernal Fall and Nevada Fall, which are part of The Mist Trail.
Despite being signed appropriately, many mistake Washburn Point for Glacier Point. While deserving of a stop in its own right, and a great alternative if Glacier Point is too busy, you’ll need to continue another mile or so down the road to reach Glacier Point. Remember, the road terminates at Glacier Point’s parking lot, so there’s no mistaking it.
Parking at Glacier Point
Parking is plentiful at Glacier Point. The lot is paved, large, and contains hundreds of designated parking spaces. However, it is still known to fill quickly, particularly during the busy summer months and on days when there are no day-use reservation requirements.
Comparatively, sunrise and sunset both are mega-popular times at Glacier Point, particularly amongst photographers. I’ve been there in the morning shortly after sunrise and I’ve been there in the middle of the day. In my opinion, morning time is the way to go for guaranteed parking.
Another option is to arrive in the late afternoon, an hour or two prior to sunset. Whatever you do, avoid going in the middle of the day. That’s typically when Glacier Point is at its busiest and it’s also the hottest point in the day, and there’s little to no shade up there.
Does the Yosemite Valley Shuttle Go to Glacier Point?
While there are a varying degree of third party tour groups that’ll take you to Glacier Point, unfortunately, the free Yosemite Valley Shuttle service does not. If you don’t have your own vehicle with you or you’re just not comfortable driving yourself, you can utilize the paid shuttle to Glacier Point.
These shuttles pick up near Yosemite Valley Lodge (shuttle stop #7) and first take visitors on a tour of the valley highlights before continuing onto Glacier Point. The service has concluded for 2024 but in 2025, this tour will run from June 15 and conclude after October 13.
There are only two departure times daily, one at 8:30am and another at 1:30pm. Both roundtrip and one-way fares are available. The one-way fare is a great option for those who want to hike the iconic Four Mile Trail one-way into the valley and just a need a lift to the starting point.
Aside from this shuttle, your only other option is to either drive yourself or with someone else. Additionally, this shuttle does not make any other stops along Glacier Point Road. And no, ride sharing services are not options within the park due to limited cellular signals.
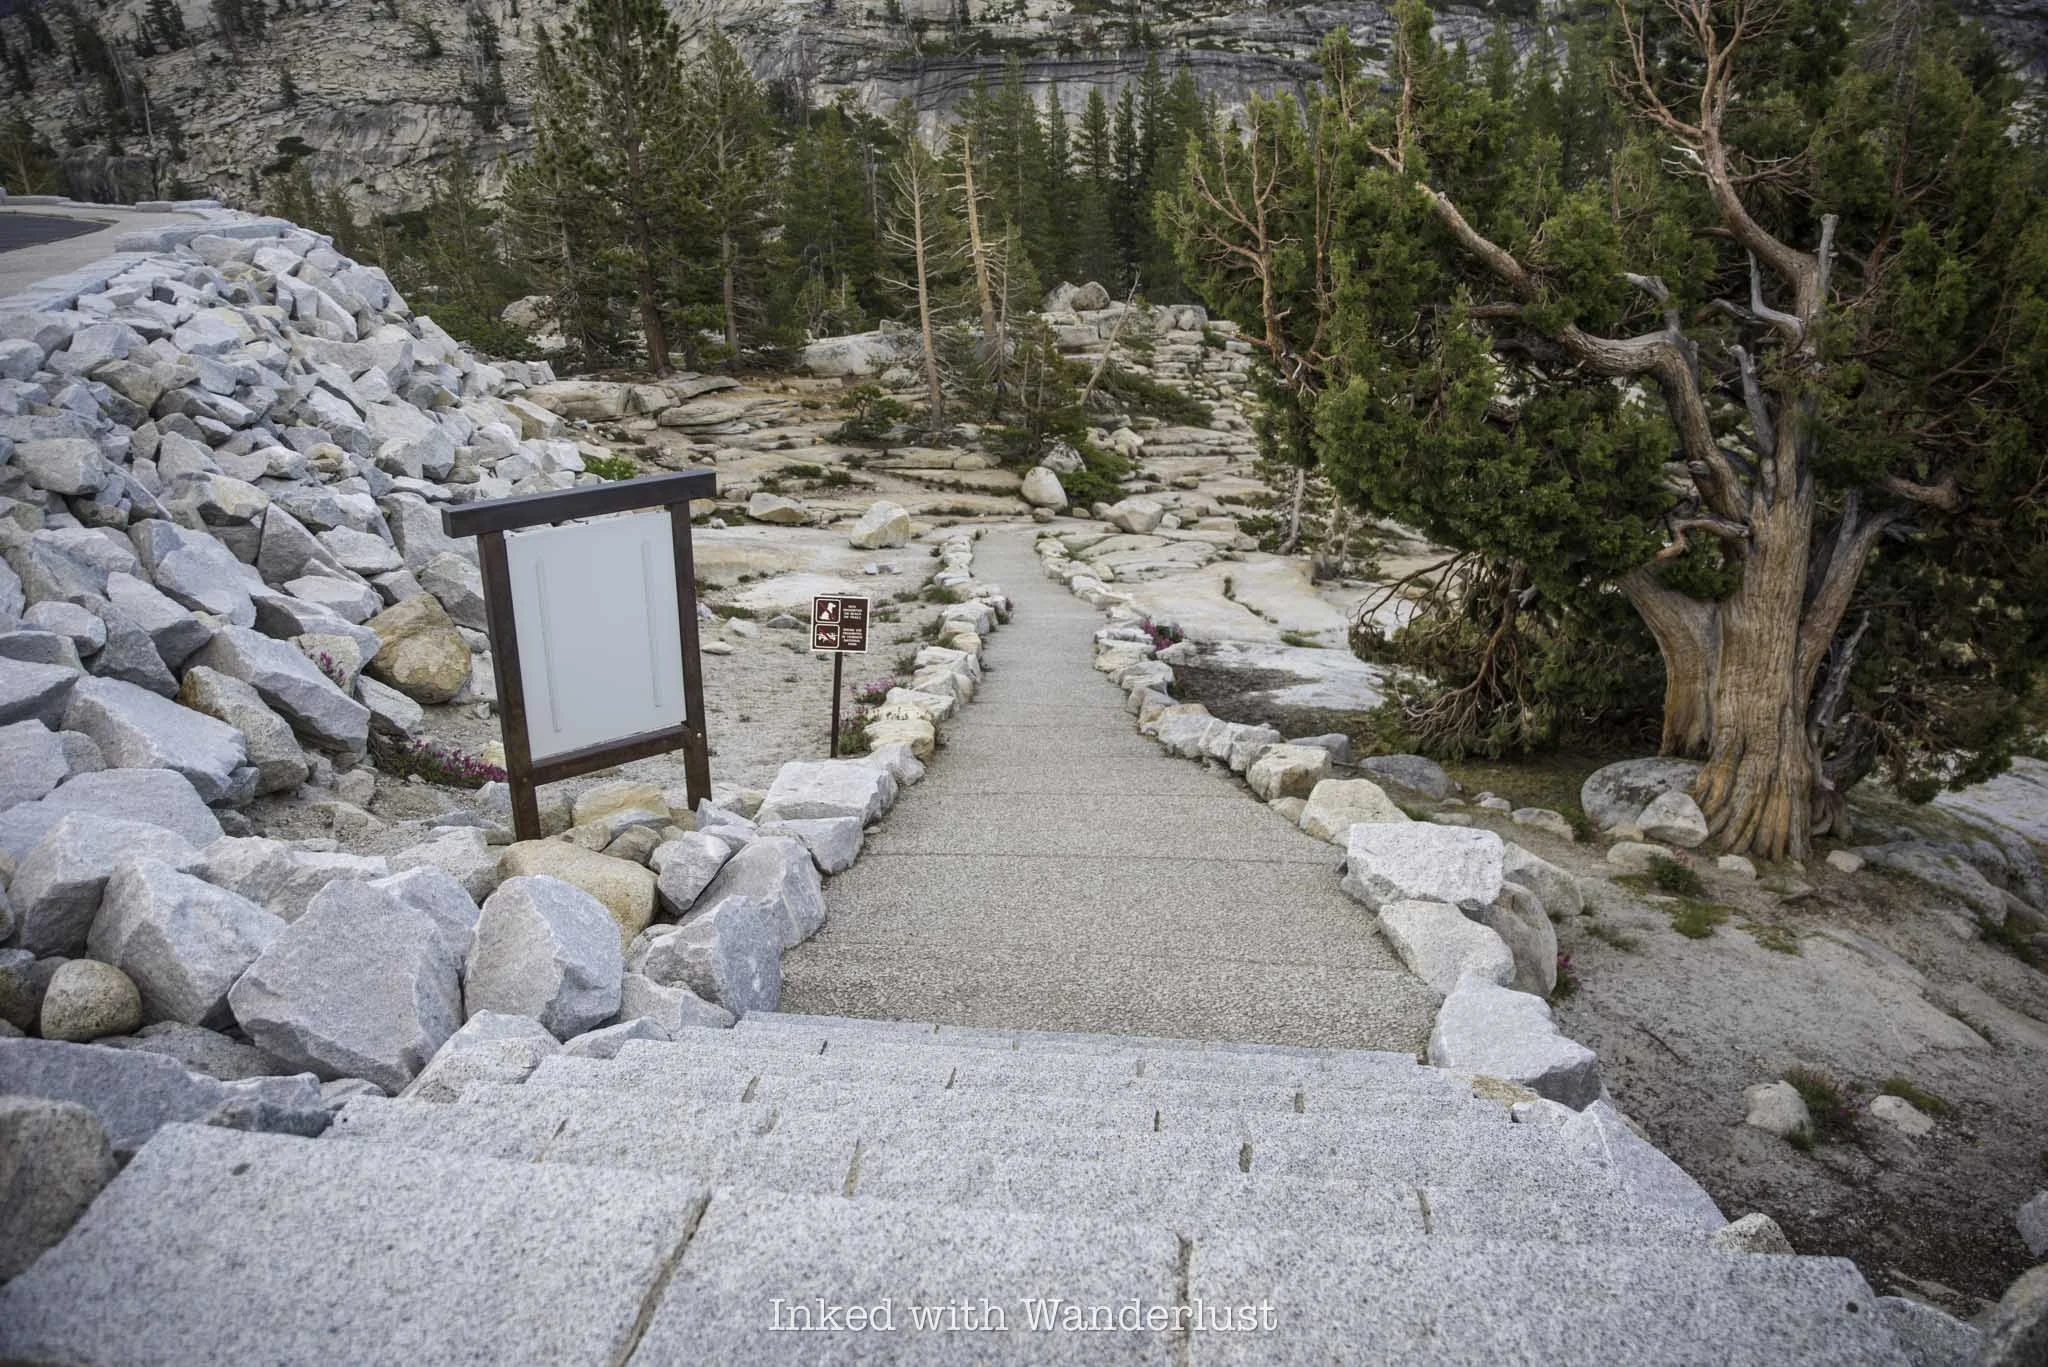
Glacier Point Hiking Trail
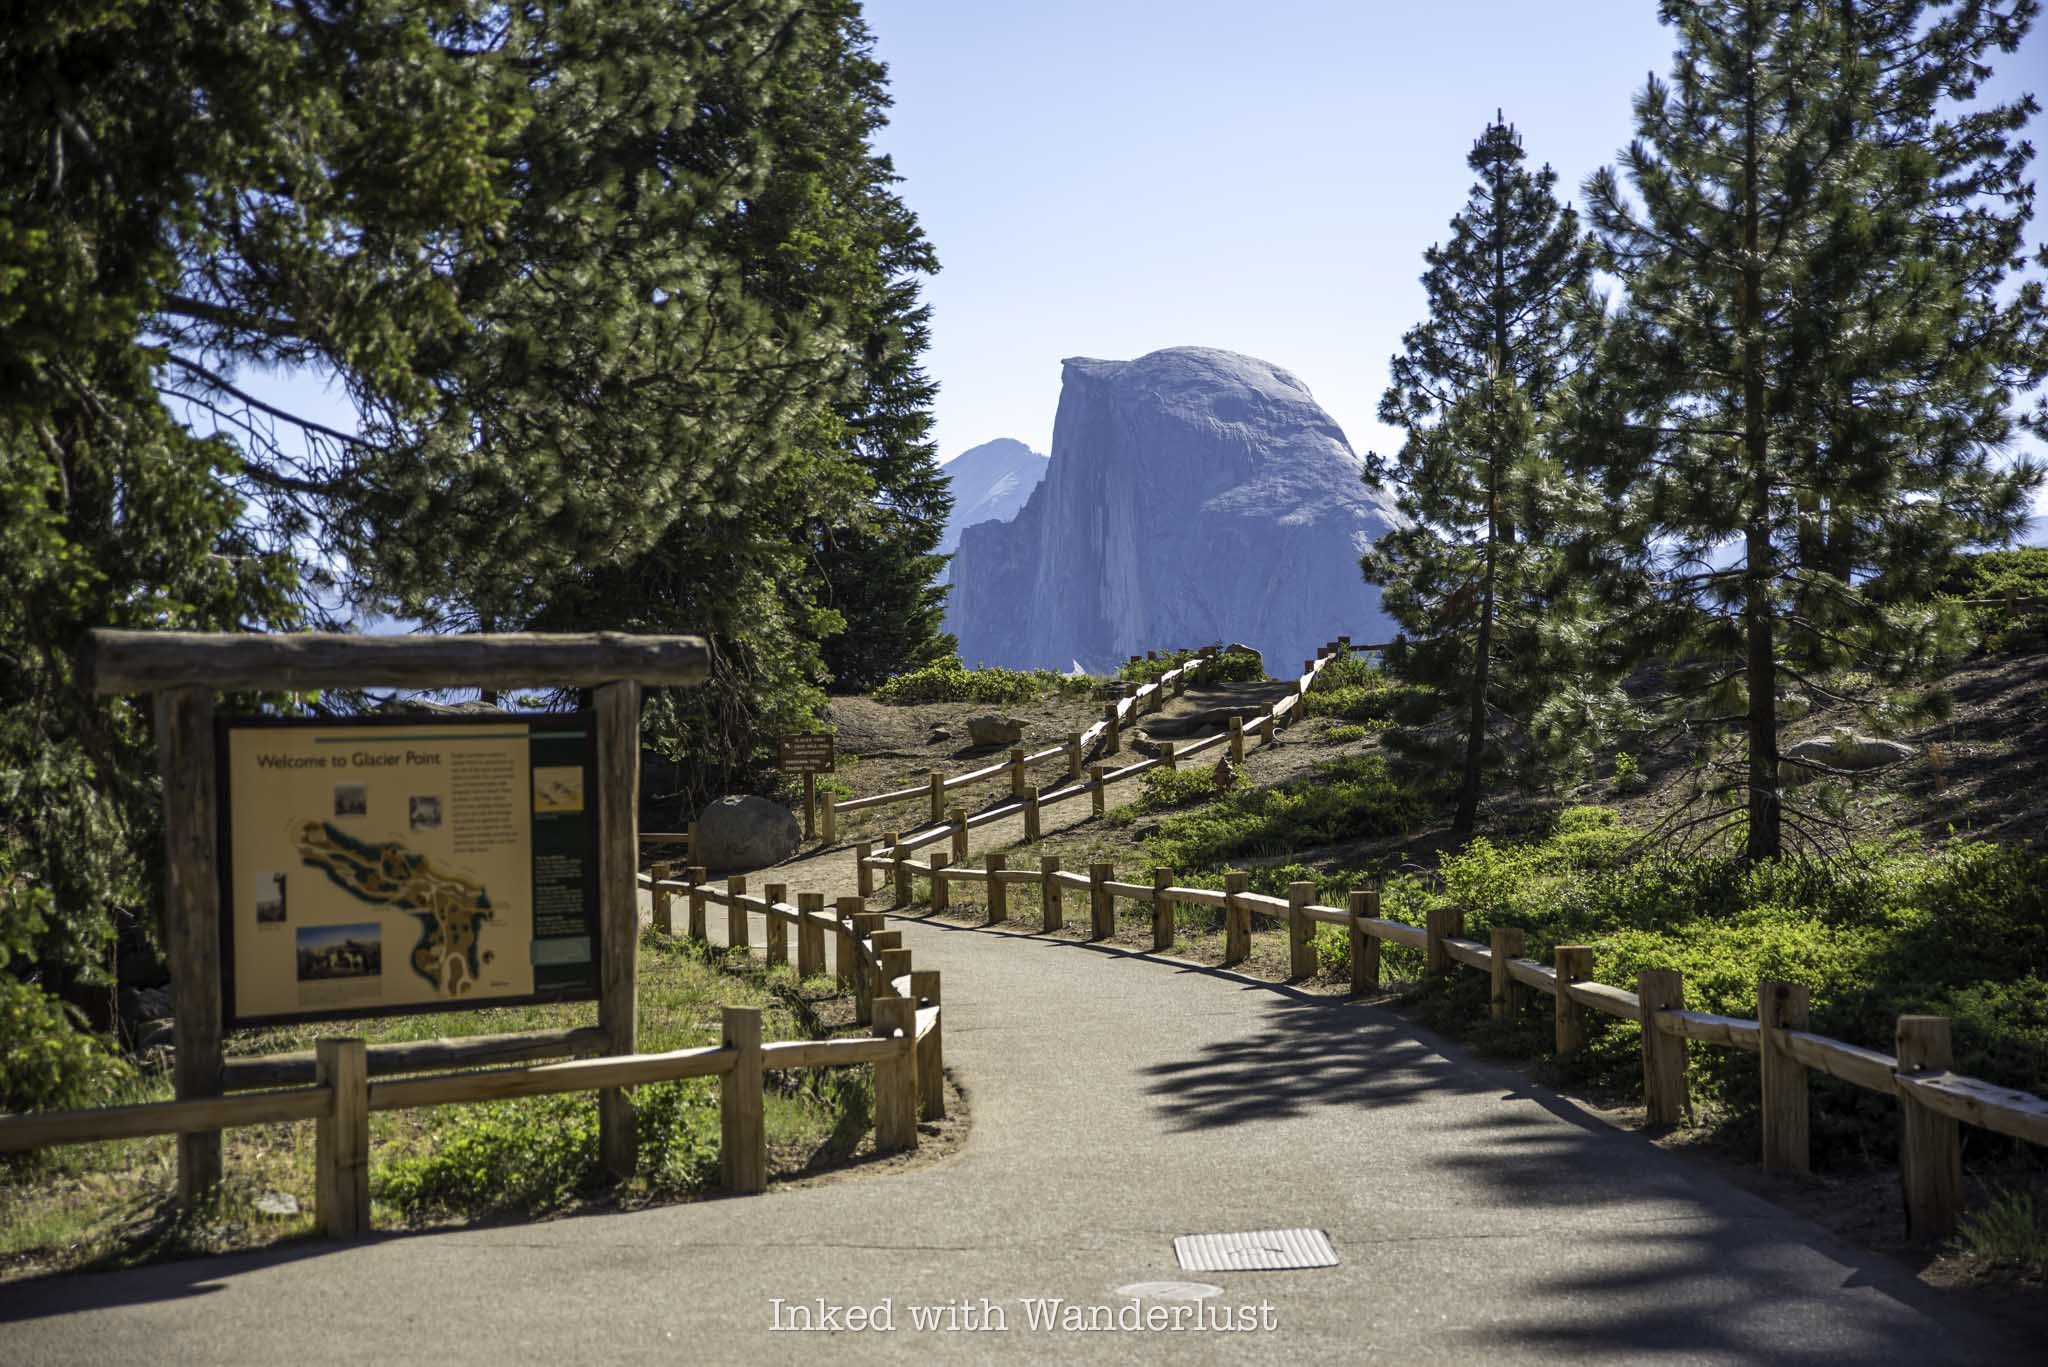
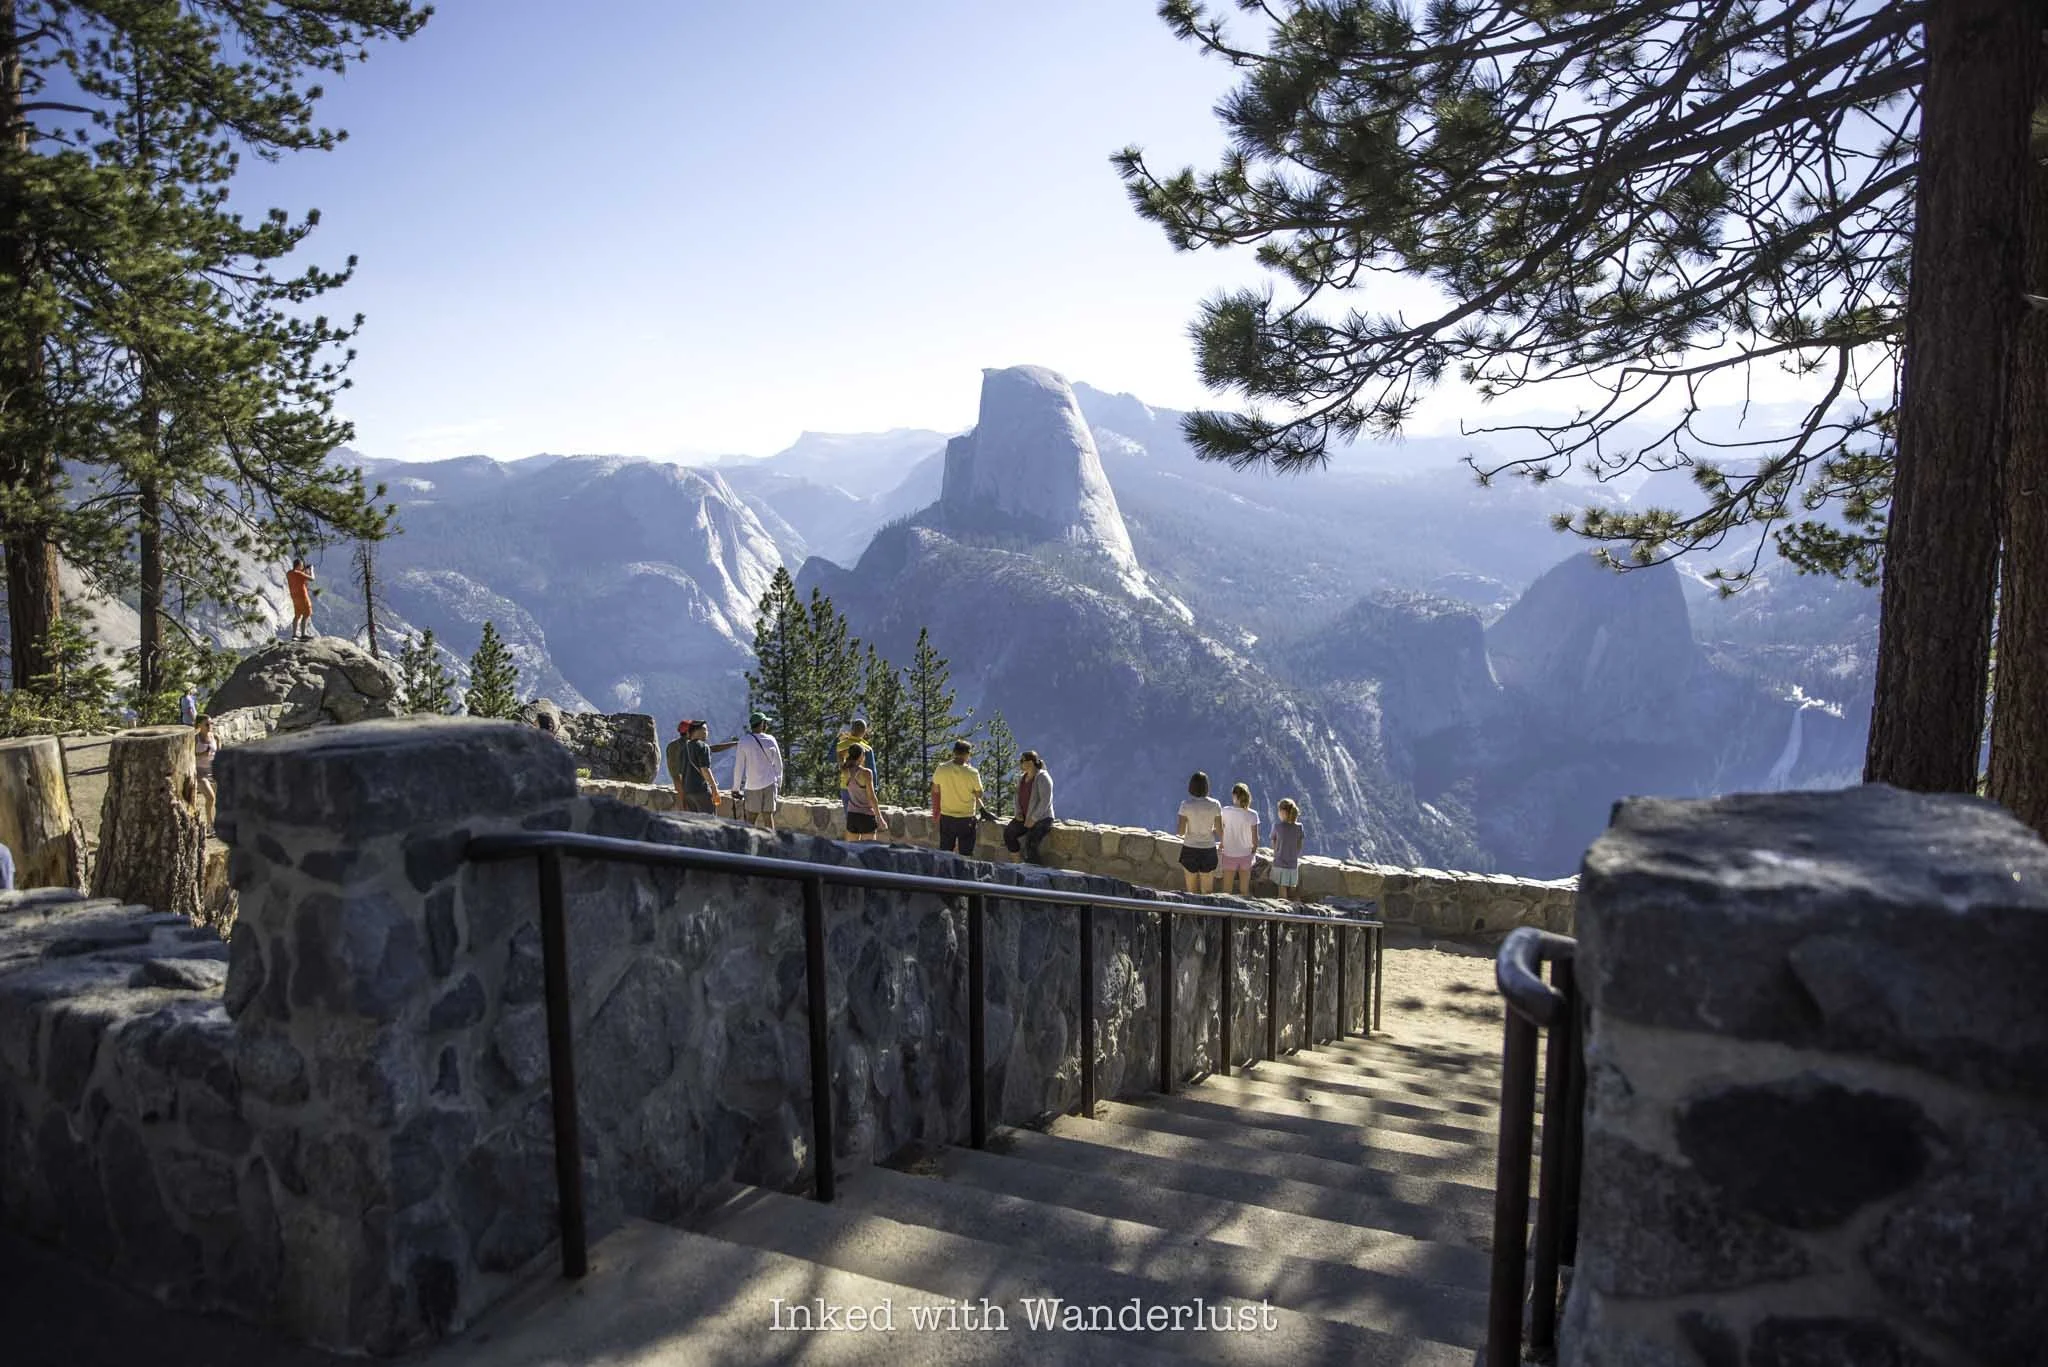
The Glacier Point trail is short and mostly paved. It begins nearly right off of the parking lot and concludes at an overlook offering magnificent views of Yosemite Valley and many of its main attractions. As you’re walking away from the parking lot and you get your first glimpse of Half Dome, keep left on the trail.
When you reach the clearing through the trees, you’ll see a structure on your left. Honestly, I’m not sure if this is supposed to be a visitor center or what, as it was closed on both of my visits. Moving on, to continue on the trail, stay to the left while keeping Half Dome on your right.
You’ll soon come across a sign indicating you’re on the right path. For Glacier Point, you’ll continue straight towards the upcoming geology hut. If you’re here to hike the Four Mile Trail, you’ll veer to the left at the junction.
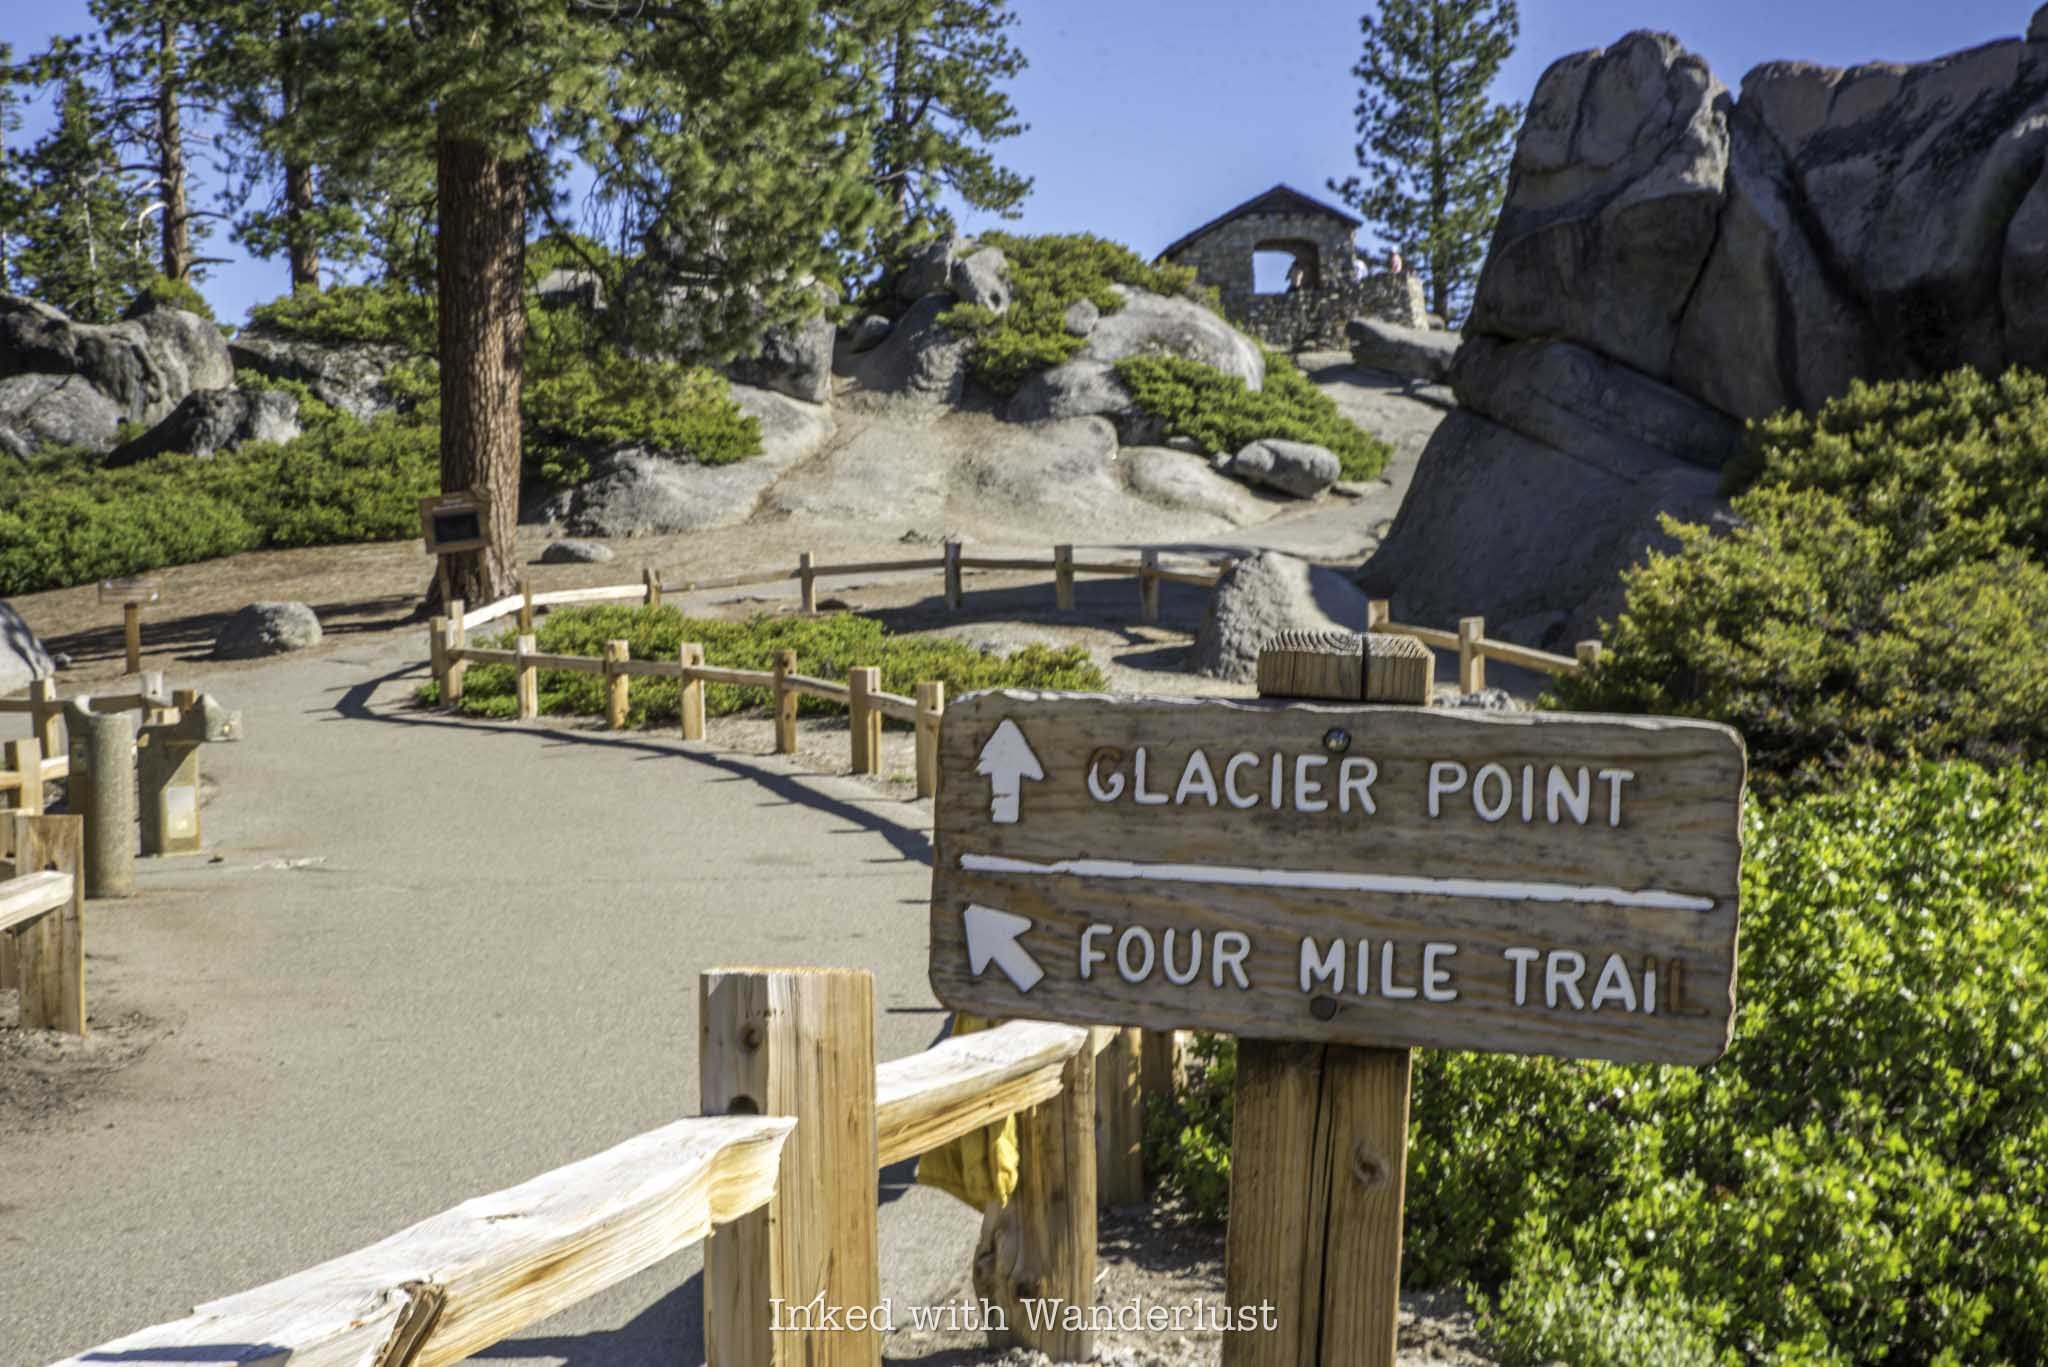

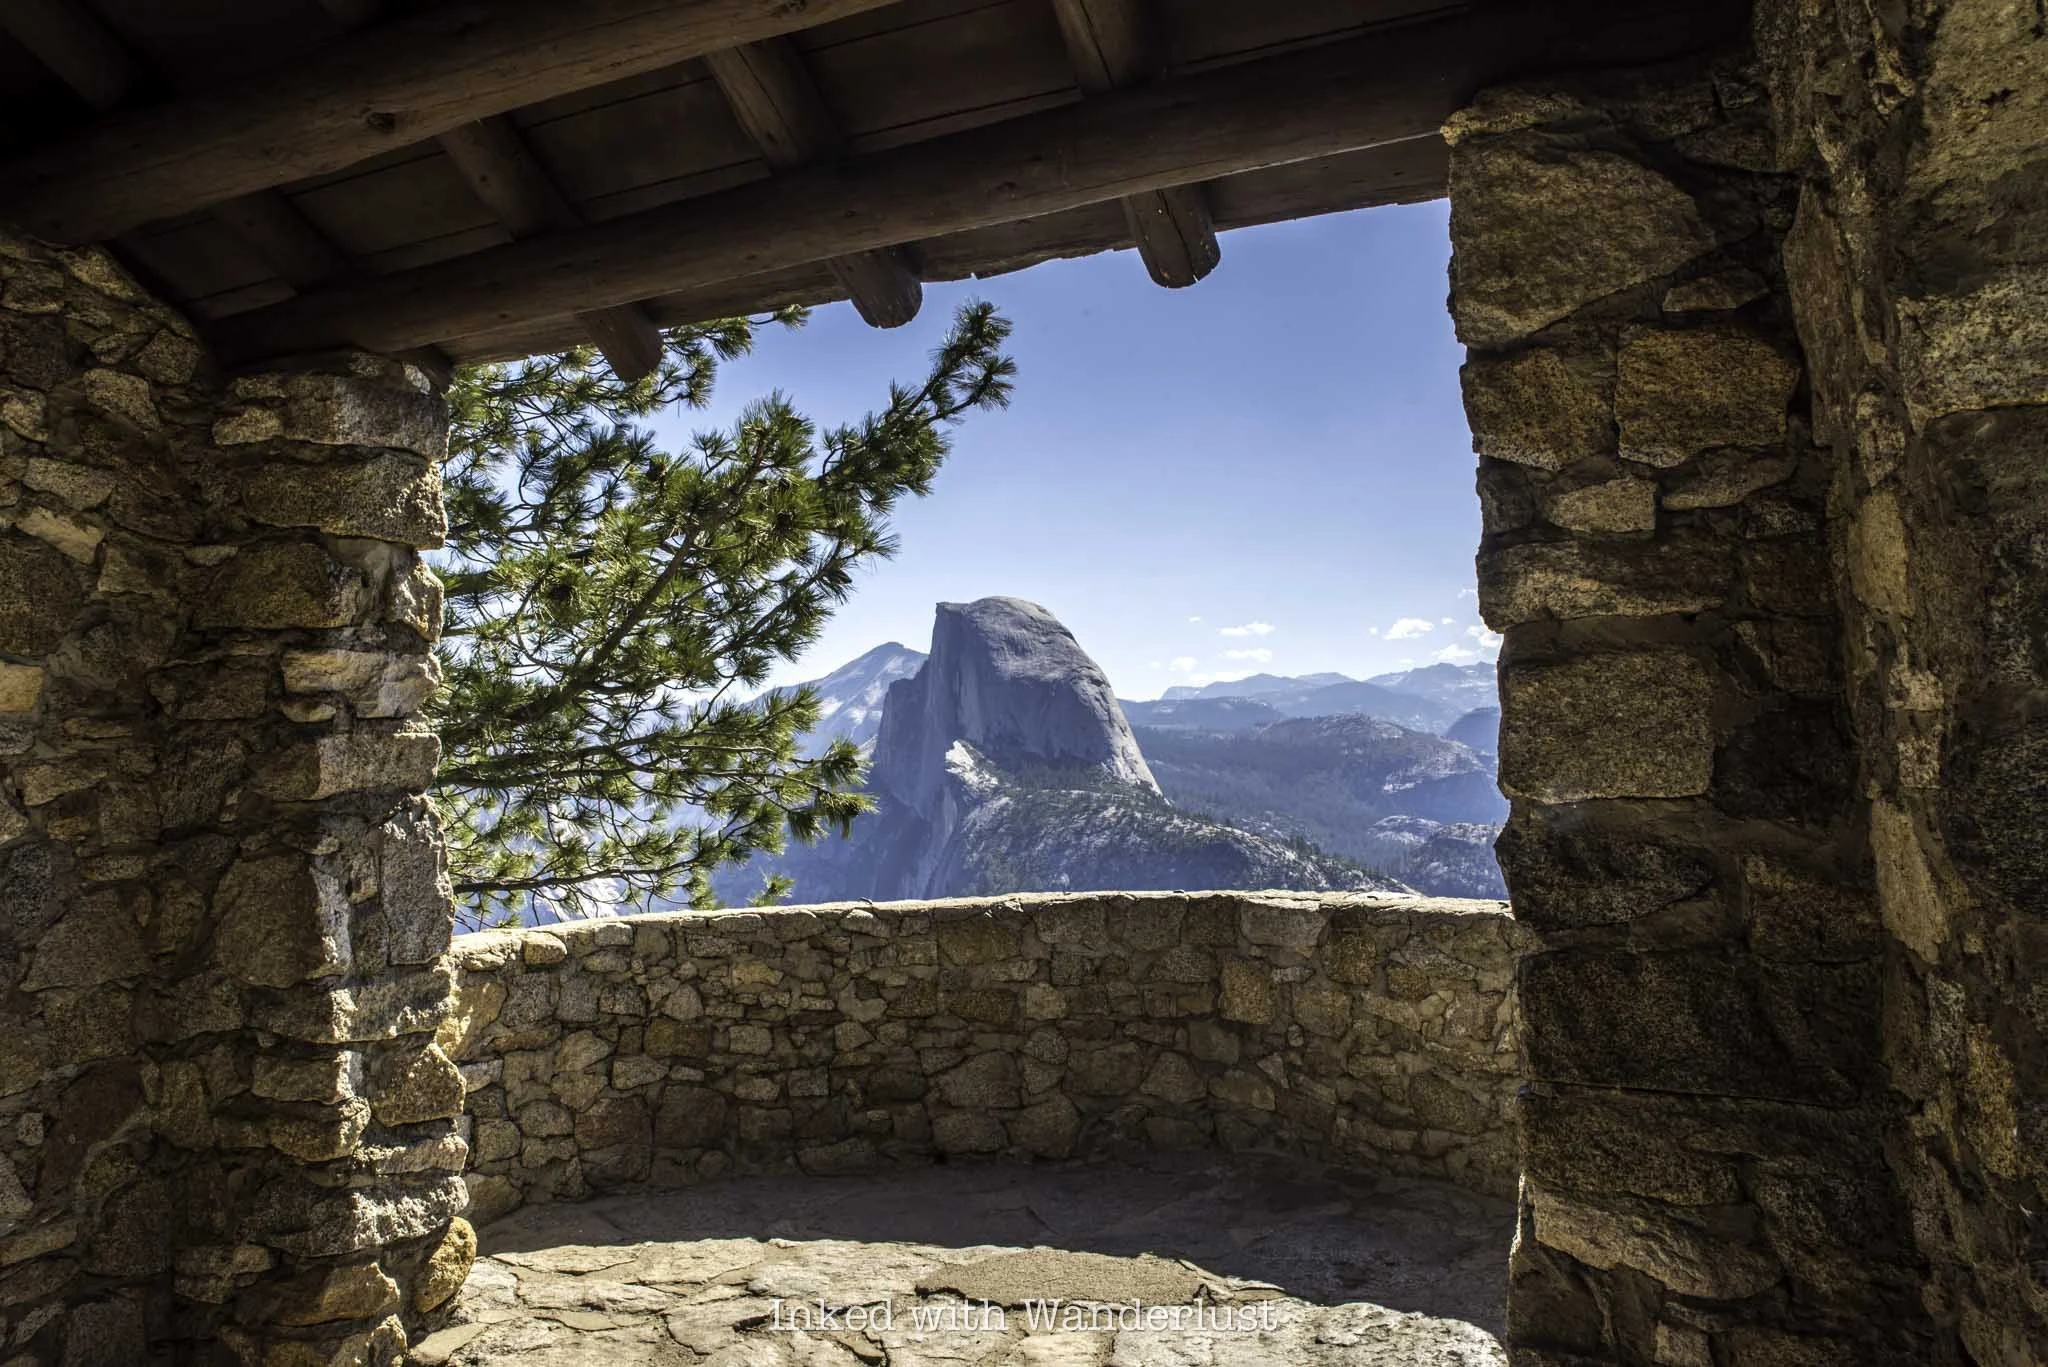
The first feature of the trail you’ll walk up on is the geology hut, a stone-built structure constructed by the Yosemite Natural History Association in 1925. It was built as an observatory to help educate visitors about Yosemite’s geological past and how the valley was formed.
You can either go through or around it, but I do recommend checking it out. There isn’t much room on the inside, but there are numerous informational boards detailing the park’s glacial formation and history.
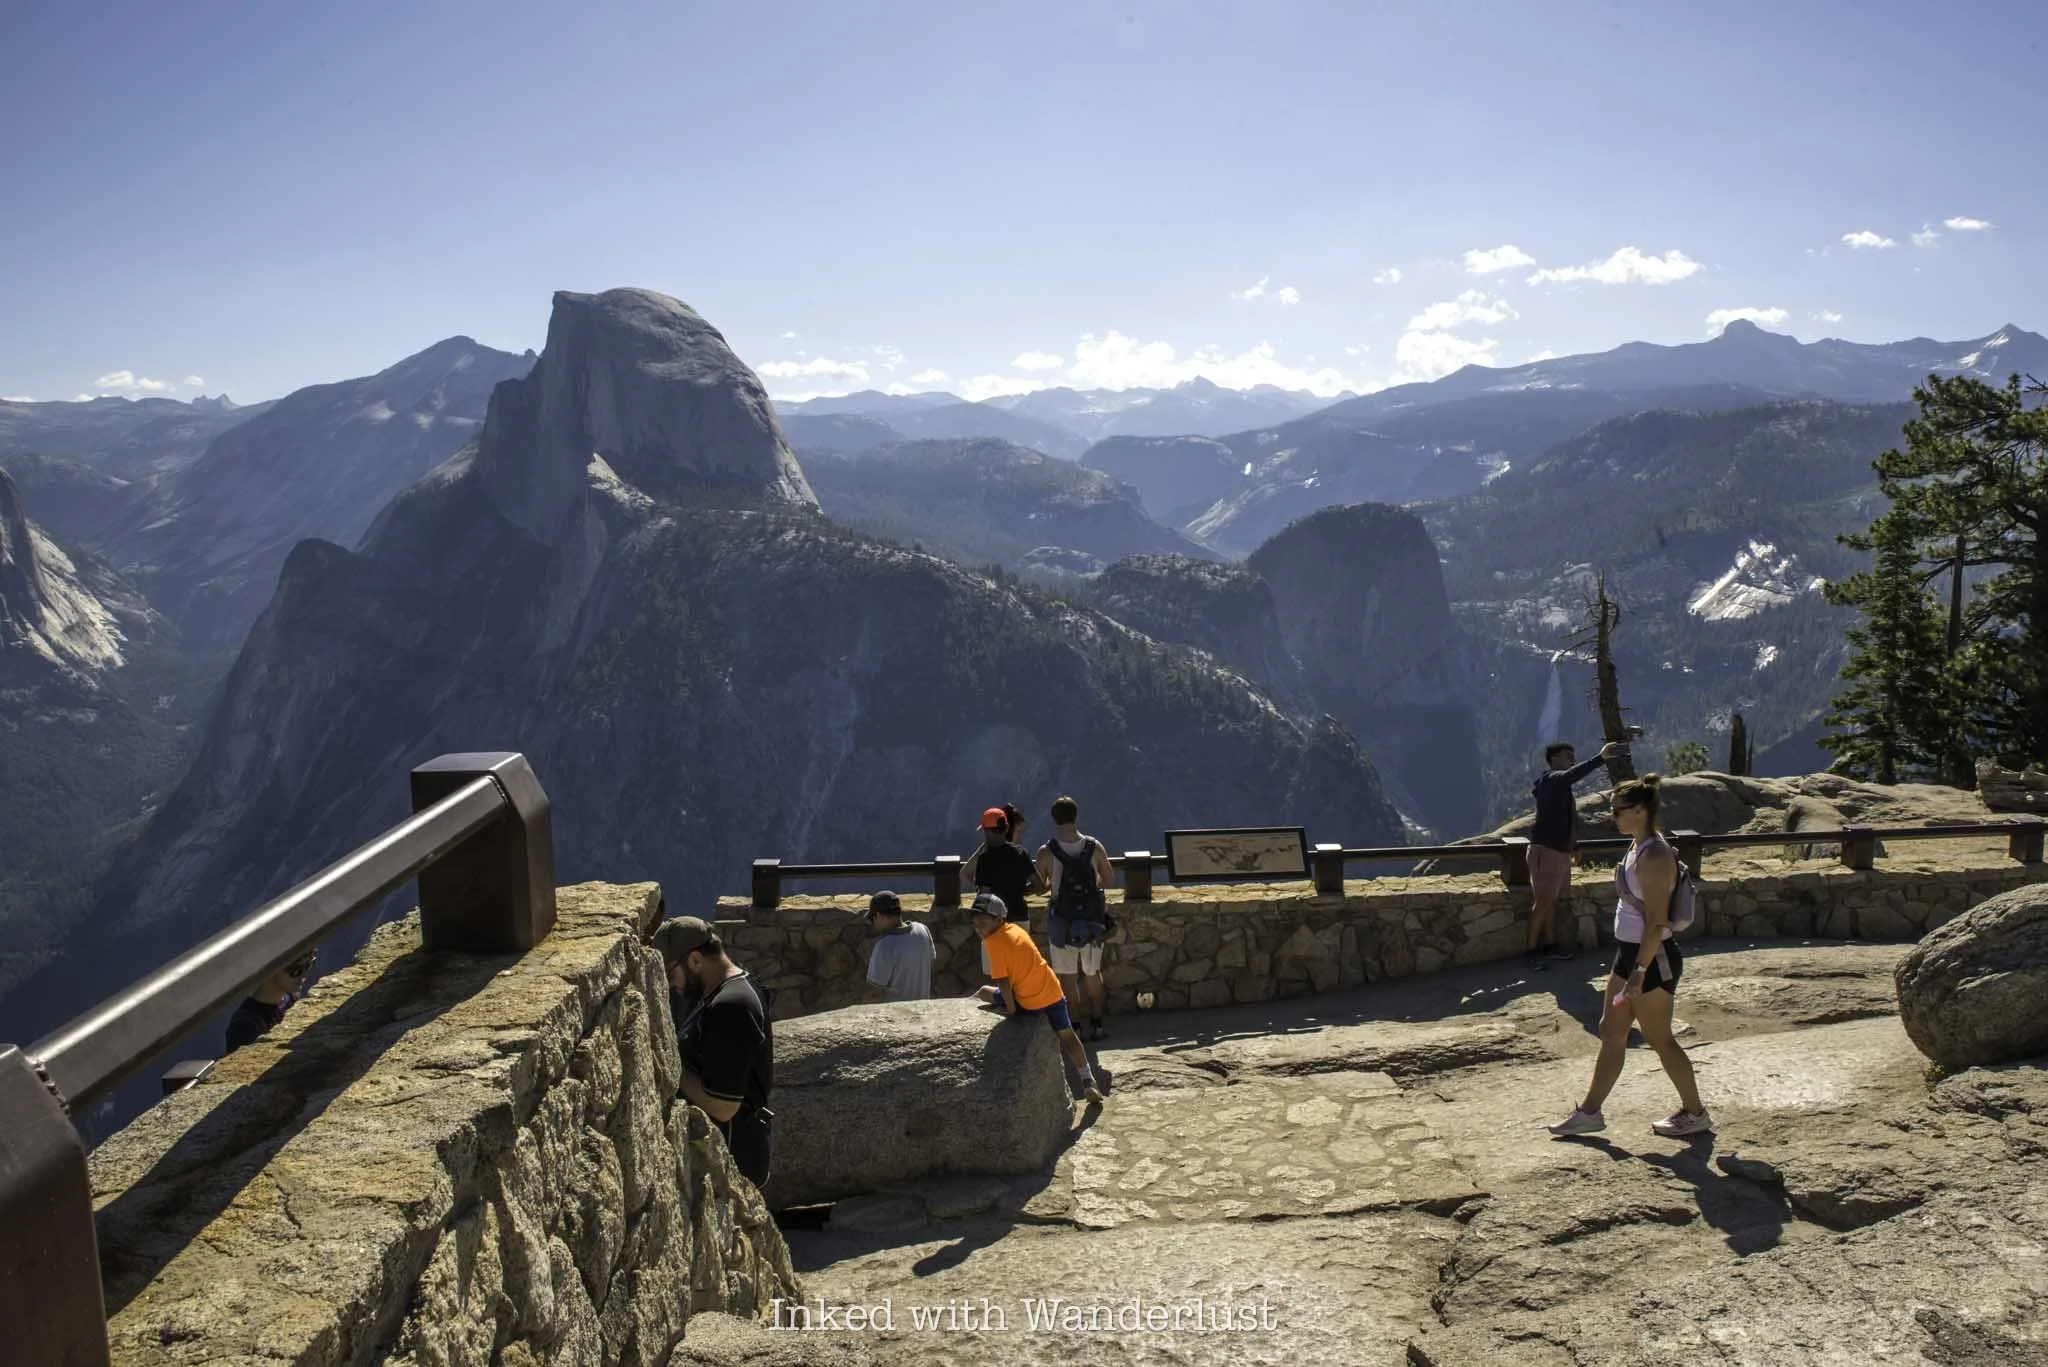
Beyond the geology hut, you’re just a short walk away from the viewing deck. When you arrive, you’ll notice there are two decks, one on the lower end that offers a superb view of Half Dome, Clouds Rest, Tenaya Canyon, Vernal Fall, Nevada Fall, North Dome, and more.
From the slightly elevated deck, you’ll be treated to straight-on views of the Royal Arches, Mount Hoffman, The Ahwahnee Hotel, Yosemite Village, Overhanging Rock, and if you’re here early enough in the season, Yosemite Falls.
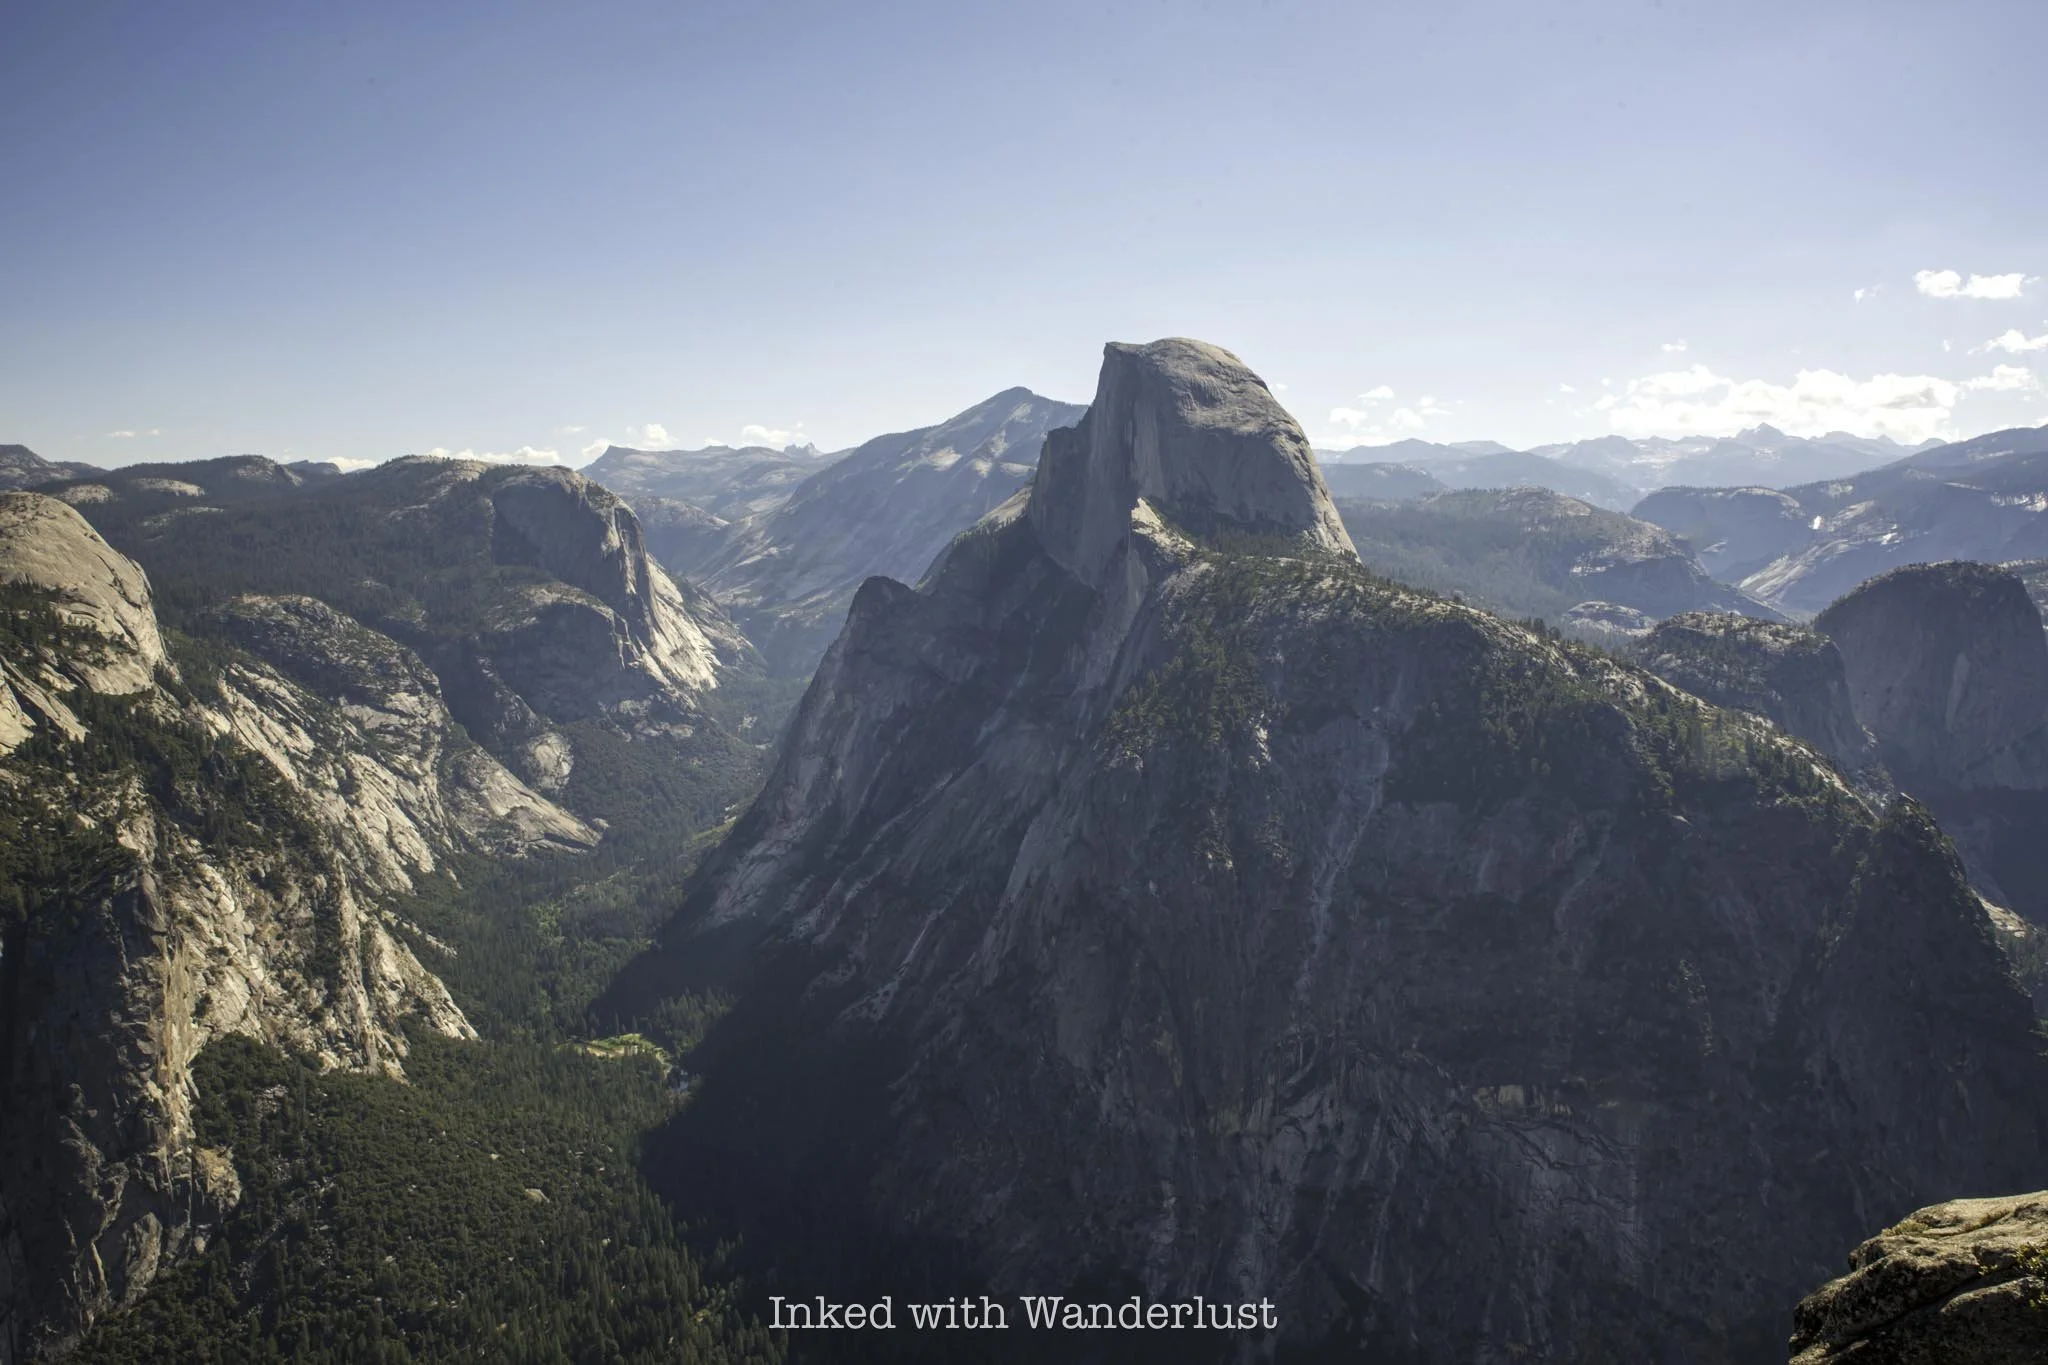

From Glacier Point, you’re able to see about a quarter of the park from one spot. Since you’re 3,200 feet above Yosemite Valley from here, that means you’ll be looking down on many of the valley features that you'd normally look up at, including Yosemite Falls, which is 2,425 feet above the valley floor.
Throughout most of the viewing area, the guardrails are fairly high up, making an accidental fall highly unlikely. That said, at some points they are close to the ground, low enough for kids to climb on. If you’re bringing littles with you, watch them closely in these areas. During my visit, I saw one kid nearly climb completely over the rail before somebody spotted him.

From here, you can continue along the Four Mile Trail, which will offer much of the same views but from a different perspective. Keep in mind that this trail isn’t for the weak and goes all the way down to the valley floor. At the end, you’ll only be half done as you’ll have a physically demanding hike back up.
Other popular hiking trails that leave from Glacier Point include Panorama Trail, Pohono Trail, Illilouette Falls, Half Dome (provided you have a permit) and more. If not, simply head back the same way you came. From Glacier Point, you can check out Washburn Point, Taft Point, and more sights along Glacier Point Road.
PSALM 23:3-4

Lower Yosemite Falls Hiking Trail
When visiting Yosemite Valley, you’ll immediately take notice of its collective grandeur. Everywhere you look, it’s one amazing sight after...
Disclosure: This post contains affiliate links. If you make a purchase through these links, I may earn a small commission at no additional cost to you. I only recommend products or services that I believe will add value to my readers.
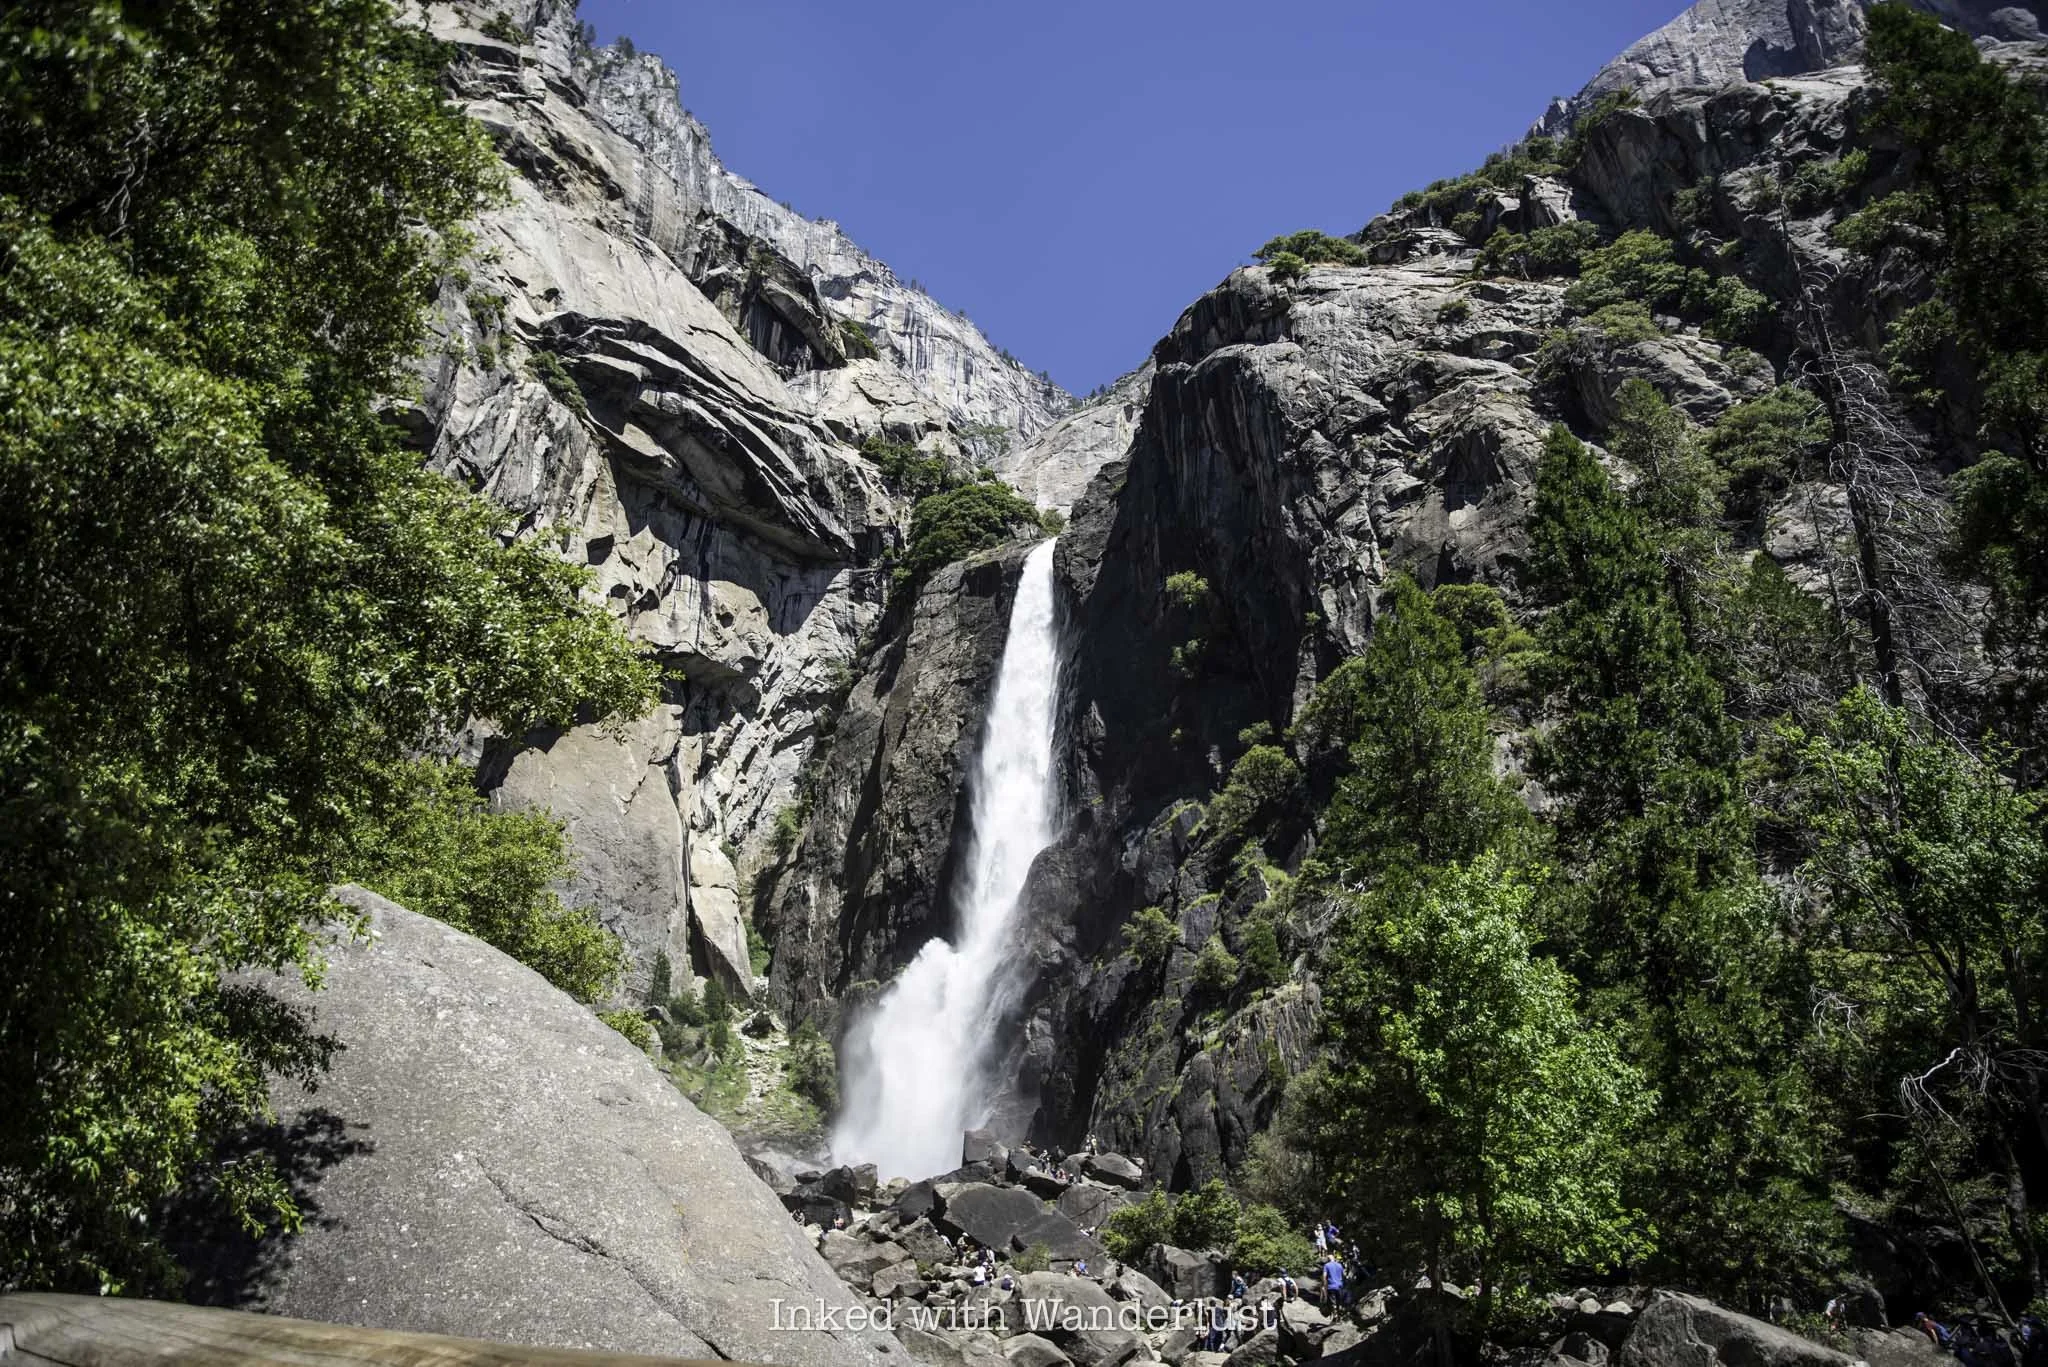
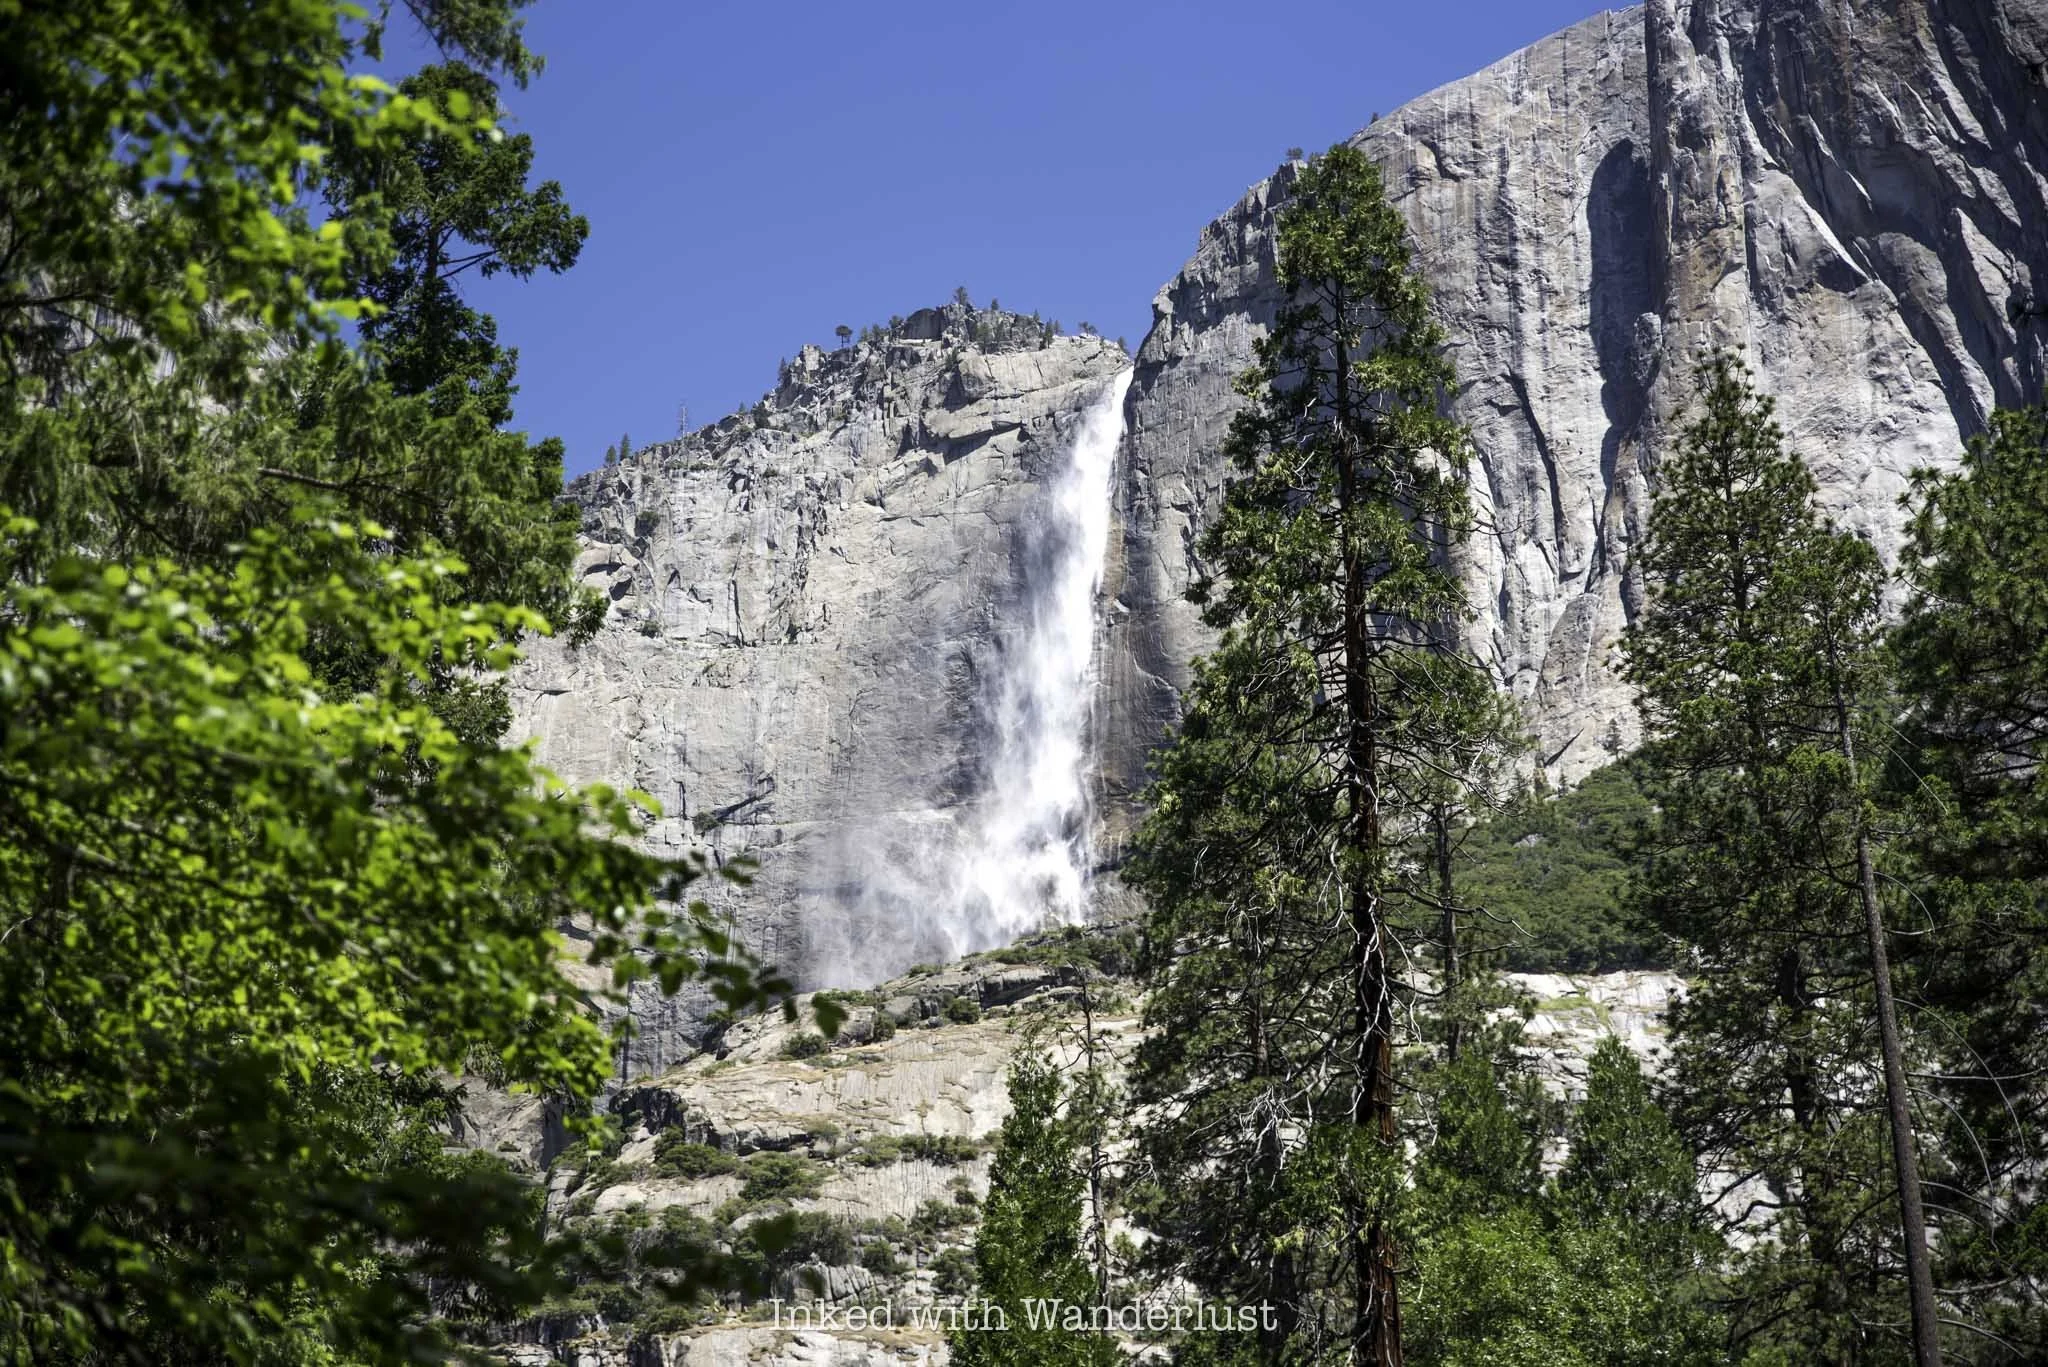
When visiting Yosemite Valley, you’ll immediately take notice of its collective grandeur. Everywhere you look, it’s one amazing sight after another. One of those sights which stand out amongst most is the park’s namesake - Yosemite Falls, the tallest waterfall in North America at 2,425 feet.
When searching for the best things to do in Yosemite Valley, many will point to the Upper Yosemite Falls hike and for good reason. The views from up there are simply incredible. However, it’s a physically demanding, time consuming hike.
For those who don’t have the time (or energy) to tackle the upper falls, and simply want an up-close view of this magnificent waterfall, there’s the Lower Yosemite Falls hiking trail. It’s an excellent option for those just looking to hit up the highlights.
So where do you park to see Yosemite Falls? How long is the trail to the lower portion? Is this trail stroller friendly? I answer all of these questions and more in the post below.
Trail Stats
Location: Yosemite Valley, California
Fee: Standard park entry fee (currently $35)
Open: All year
Cell Service: Decent, but can be spotty
Restroom: Semi-large structure with flush toilets at the trailhead
Parking: Large day-use lot east of Yosemite Valley Lodge
EV Stations: Rivian Waypoint stations in the Yosemite Valley Lodge lot
Difficulty: Easy
Popularity: Mega high
Mileage: One mile for the whole loop
Time: Less than one hour
Elevation Gain: 55 feet
Condition: Well maintained
Features: Lower portion of Yosemite Falls
Best Viewed: November - June (peak flow in May)
Pets: Allowed, but must be leashed
Drones: Prohibited
Hazards: Wildlife encounters are possible, as well as slippery rocks around the waterfall (off trail)
My Visit(s): 2015, 2020, 2021 and 2024
Lower Yosemite Falls Parking

Much like the rest of Yosemite Valley, finding parking for Yosemite Falls can be quite the hassle. It’s for this reason I always encourage people to utilize the free Yosemite Valley Shuttle. It makes multiple stops at most of the valley highlights and is easy to use.
However, if you insist on using your own vehicle to get around, you’ll find parking for Yosemite Falls (either the upper or lower trails) in the lot east of Yosemite Valley Lodge, just a bit further down Northside Drive.
To get to the trailhead from here, you can, in theory, walk along Northside Drive but I don’t recommend it. The best (and safest) ways to reach it are to either cross the street and take the trail that cuts through Camp 4 or take the trail through Yosemite Valley Lodge and then cross the street to the trailhead.
Either way, you’re looking at a (roughly) half a mile walk to the trailhead, one way. I’d be remiss if I didn’t mention the parking lot directly across the street. I’m not encouraging you to park there as that area is typically reserved for hotel guests, but it is there. So do with that what you will.
Again, I’m going to strongly encourage you to utilize the shuttle. Park your vehicle at either Curry Village or Yosemite Village and hop on. Be sure you’re taking the valley-wide shuttle and not the east valley one. Shuttle service begins at 7am and ends at 10pm and again, it is free. The stop you’ll use for Yosemite Falls is #6.
Lower Yosemite Falls Trail

Both the trail to the base of the falls, and the conjoining loop, are paved paths with virtually no elevation gain to speak of. They’re also wheelchair and stroller accessible, making it an ideal outing for the entire family.
To the right of the trailhead is a semi-large structure with flushable toilets, water bootle refill stations and an array of unshaded picnic tables. It’s busy here quite often so if you’re looking to enjoy a quiet picnic, this isn’t it.
The lower section of Yosemite Falls is on full display in front of you at the trailhead so to continue, simply head straight for it and follow the path. If you’re here during the busy summer season, get here early in the morning and you’ll likely have it (mostly) to yourself.
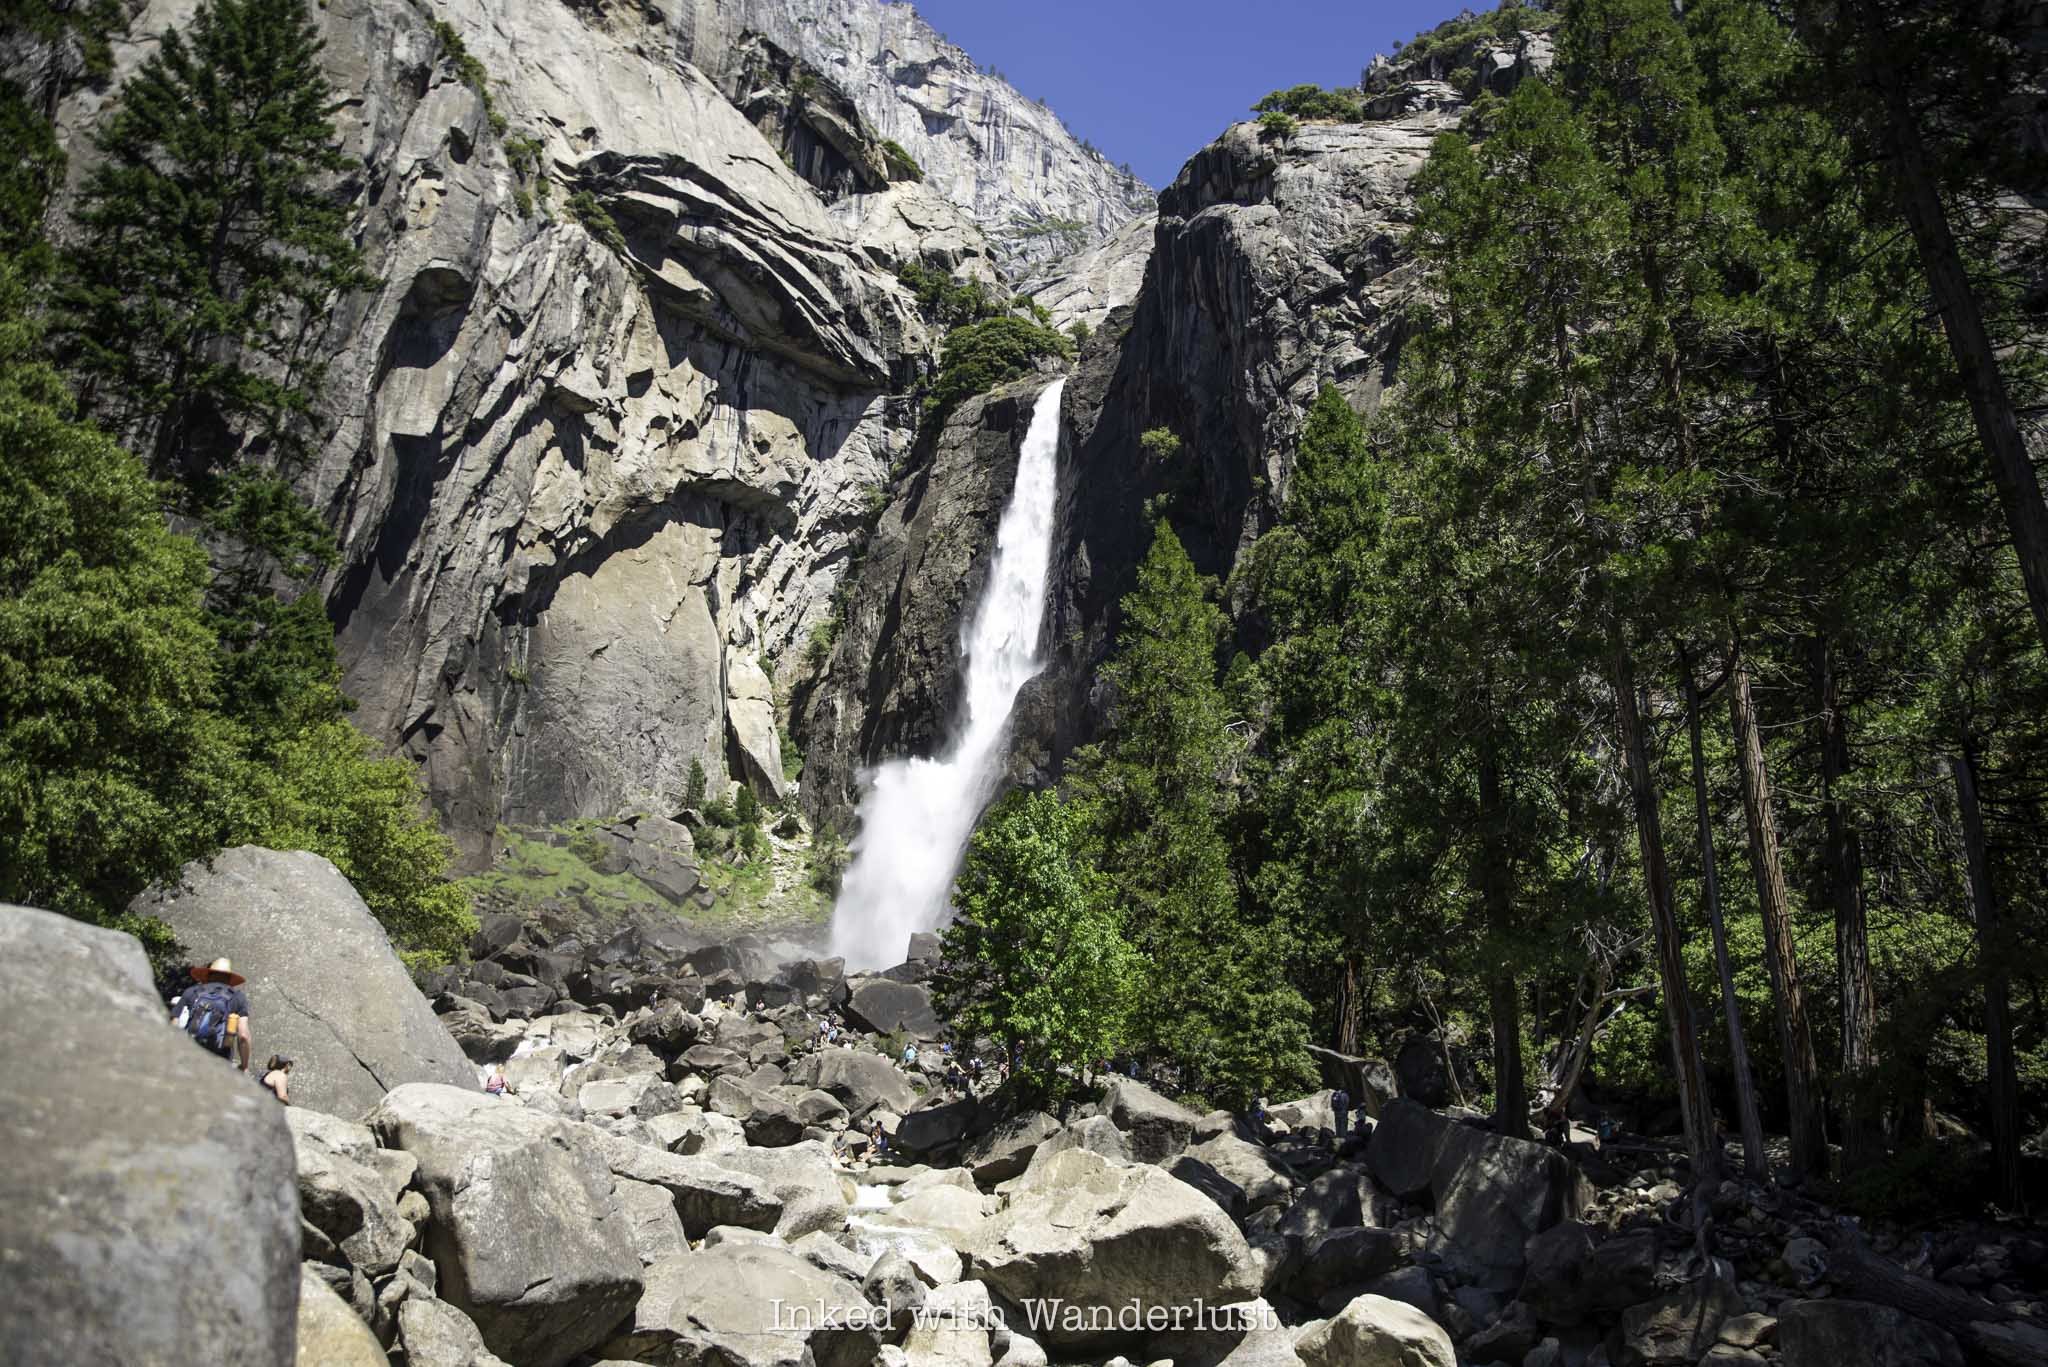
About a quarter mile after starting, the trail will veer to the right and you’ll arrive to the base of the falls. As stated above, if you’re here in the early morning, you’ll likely only encounter a few others. After that, though, the crowds will be sizable. So pack your patience.
With few exceptions, don’t expect to see water flowing past June. Every so often there’s still flow into July, but it’s rare. If you want to see Yosemite Falls at its fullest, I recommend visiting no later than May. Once you get into July and August, the falls are all but dried up for the season.
If you feel inclined, you can boulder-hop your way to a closer view of the falls. I’m assuming Yosemite doesn’t prohibit this, as many were doing it and the ranger that was there didn’t seem to mind. Be careful, though. Those granite rocks are notoriously slick.


Most people stop here and head back the same way they came. For a more tranquil experience, traverse over Yosemite Creek via the wooden bridge and continue on the loop trail. Here, you’ll walk through a cluster of tall redwoods, which provide much needed shade. You’ll also get continued views of Yosemite Falls.
This segment of the trail was a virtual ghost town compared to what I experienced on the other side and at the base. Definitely don’t skip the other half of the loop. If nothing else, it’s a relatively peaceful escape from the crowds.
Shortly after crossing the bridge, you’ll come to a massive granite rock. There’s nothing inherently special about it that I was able to determine, but it’s crazy to think how loud of a noise that thing caused when it slammed into the valley floor all those years ago.

Shortly after the big rock, you’ll reach a segment of the trail that transitions from pavement to a wooden boardwalk. I asked about this and was told it’s because early in the season, there’s often runoff from Yosemite Creek and the boardwalk allows the runoff to flow while enabling visitors to still enjoy the trail.
In between the boardwalks there’s a small detour you can take for a view of the falls. Look for a small sign stating “falls view”. You’ll come to the view shortly after taking the detour. The view from here isn’t all that unique, but it’s still worth checking out since the detour only takes a few minutes.
If you’ve taken the shuttle to Lower Yosemite Falls, you’ll find shuttle stop #6 prior to the end of the loop, along Northside Drive to the left of the trail. Otherwise, continue on the loop to reach the trailhead, and continue to your vehicle.
Lower Yosemite Falls Common Questions

What is the difference between Upper and Lower Yosemite Falls?
Yosemite Falls is comprised of three parts - the lower falls, middle cascade and the upper falls. Together, they create Yosemite Falls. The upper portion is 1,430 feet tall while the lower portion stands at 320 feet. When adding in the middle cascade, the waterfall’s total height is 2,425 feet.
How long does it take to hike Lower Yosemite Falls?
That all depends on your fitness level and walking stride but generally, I would say less than one hour (including time spent at the base).
Is the Yosemite Falls hike hard?
The lower loop trail? No. It’s easy. If you’ve heard someone referring to this hike as hard, they were referring to the Upper Yosemite Falls hike which is a hard, physically demanding hike.
Do you need a reservation for Yosemite Falls?
Not for the falls itself but dependent on when you visit, you may need a day-use reservation to enter Yosemite.
Can you see Yosemite Falls without hiking?
You won’t be able to see the base but yes, there are many points throughout the park where you can see Yosemite Falls without hiking. A few include from the trailhead of this hike, Cook’s Meadow and Glacier Point.
Can you see Yosemite Falls from Tunnel View?
No, you cannot see it from Tunnel View.
When is Yosemite Falls dry?
Yosemite Falls typically begins to dry up around late June or early July. By late July, all you’ll be looking at is a smooth granite surface. If you want to see Yosemite Falls, plan you visit for between November to June. May is the falls’ peak flow time. If Yosemite Falls is dry during your visit, you can still see Bridalveil Falls, which flows all year.
PSALM 121:8

10 Amazing Things To Do On Yosemite’s East Side
It still surprises me how many people are completely unaware that there’s much more to Yosemite beyond the valley. Yes, the valley is littered with amazing sights. Tunnel View, Yosemite Falls, Half Dome, and...
Disclosure: This post contains affiliate links. If you make a purchase through these links, I may earn a small commission at no additional cost to you. I only recommend products or services that I believe will add value to my readers.

It still surprises me how many people are completely unaware that there’s much more to Yosemite than the valley. Don’t get me wrong, the valley is literally dotted with amazing sights like Tunnel View, Yosemite Falls, Half Dome, and the Mist Trail, so there’s no shame in spending your vacation there.
However, I put this list together to persuade you to include a visit to the east side of Yosemite during your visit. Many of the main sights can be seen in a single day, but if you want to include a few of the hiking trails (and you should), you’ll want to set aside at least two days.
This list was made with families and casual hikers in mind, which is why the more strenuous trails, such as Cloud’s Rest, were omitted. With that in mind, let’s get into my pick of 10 amazing things to do on the east entrance of Yosemite.
Buy me a coffee?
If you found this blog helpful, consider leaving a tip through the Buy Me A Coffee button below! Whether it’s $1 or $5, every bit helps offset small travel costs like coffee, water, lunch, parking, or park entry fees. Your support means the world—thank you!
Is the East Entrance to Yosemite open?
Yosemite’s east entrance is seasonal. It is closed during the winter due to heavy snowpack and remains closed through spring while road crews work to clear it. Typically, Yosemite’s east gate opens between late May and mid June, depending how heavy the snowfall was that year. For example, due to the record snowfall of the 2022/2023 winter, the east entrance didn’t open until late July.
In general, park officials will keep the gate open until the first major snowfall of the year, which typically occurs in late October or sometime in November. During this time, the only way to access this side of the park is via backcountry skiing.
1) Drive Tioga Pass

If you’re coming from Lee Vining, this part is built into the trip. Tioga Pass is California’s highest automobile pass in the state and is the access road to Yosemite’s east entrance. Most of it is also closed during winter.
From the valley, follow the signs to Highway 120 and keep driving until you’re outside of the east gate and head down to Lee Vining. While you’re there, be sure to grab some lunch at Whoa Nelly Deli or Bodie Mike’s BBQ.
This drive is simply breathtaking and is a must see. Drive cautiously, though. The is narrow, the drop-offs are steep, and there are no guard rails. Additionally, keep an eye out for falling rocks. Some notable features along the pass include Nunatak Loop, Saddlebag Lake, Lake Ellery, and the Twenty Lakes Loop trail.
2) Gaylor Lakes Trail

Gaylor Lakes is one of the first hiking trails you’ll come across after arriving. In fact, the parking lot is immediately to your right upon driving through the gate. People who are hiking up to the summit of Mount Dana also park here, so it fills rather quickly.
Gaylor Lakes is a moderate-level hike and rather short in length, but the first mile or so is an exhausting uphill slog above 10,000 feet. After the pass, it drops you back down and it is there where you’ll come across the first of a series of lakes. Keep going and you’ll discover historic miners cabins.
Trail Length: About 3 miles, out and back
3) Elizabeth Lake Trail
This is another hike on the easier side. There is some elevation gain along the way, but nothing difficult and for the most part, it’s barely noticeable. It’s mostly flat, short in length and has an epic payoff at the end. Unicorn Peak is the mountain shadowing the lake and is climbable if you have any energy left to burn.
The official trailhead is located at the back end of Tuolumne Meadows campground. To get there, simply drive through the campground and park by the restrooms. If it is closed, you’ll need to park in the lot out front and walk to the trailhead. This will add another couple miles overall.
Trail Length: 5 miles, out and back. 7 miles if hiking through the campground
4) Olmsted Point

Olmsted Point is one of the east side’s most popular attractions due to its easy access and epic view of Half Dome. The lot can comfortably hold around a few dozen vehicles, but tour buses do utilize it and thus, it fills up quickly. Especially on weekends and in the summer months.
Try to get here as early as possible to guarantee a parking spot (being here for sunrise is an experience all its own). It will fill up later in the day but people tend to come and go often. So worst case, you may just have to circle around a couple times.
Pro tip: If you have extra energy to burn, head up the granite slope across the road because from there, the views of Half Dome and Tenaya Lake are epic
5) Lembert Dome & Dog Lake Trail

Looming 800 feet above Tuolumne Meadows is Lembert Dome, one of the most recognizable landmarks on the east side. Hiking to the top of Lembert Dome is possible via a rather short, but steep in some places, trail. Once you’re up there, the views of Tuolumne Meadows are outstanding.
Additionally, you can add some milage to this hike but taking the detour to Dog Lake, which is just behind Lembert Dome. Why did they name it, “Dog”, you ask? I have no idea, but it’s a beautiful lake regardless and worth the short detour.
While this hike starts out on flat terrain, it soon turns into an uphill climb that will make you question your desire to complete the hike. Once you get past that, though, the trail smooths out again (until you reach the dome, that is). Despite the climb, it’s completely doable as a family hike.
Trail Length: 2.8 miles, out and back for both Lembert Dome and Dog Lake
6) Tenaya Lake

Tenaya Lake is the largest and easily accessed of all Yosemite lakes. No hiking required. Simply find a parking spot in the lots at either end of the lake or find a spot along the shoulder.
In the dead of summer, the crowds here can get particularly large but still nowhere near the levels Yosemite Valley receives. To guarantee yourself a good spot on the lake itself, arrive early.
There’s an easy going trail that circles the lake. You won’t have to worry about ups and downs as it’s mostly flat but early on in the season you will encounter high water levels at the lake’s outlet on the west end. Late in the season, however, it’s a non-issue.
Pro Tip: Tenaya Lake is one of the most scenic lakes you could possibly paddle board on. Bring this highly-rated inflatable SUP board along with you
7) Pothole Dome

The easiest of all the domes, Pothole stands on the western end of Tuolumne Meadows and is mild in difficulty. It’s also hard to miss as it’s easily visible from the road.
From the parking lot (10-12 cars max) you’ll find the trail that takes you straight to it. As tempting as it may be to cut straight across, please keep to the trail. This area is part of a years long effort to grow more trees in the meadow.
Once you reach Pothole, simply find a section that looks to be in your comfort zone and go up. There’s no official path from this point. Alternatively, keep on the trail and it’ll eventually take you to beautiful cascades on the Tuolumne River.
Pro tip: Go as high as you can. The views of Tuolumne Meadows and Cathedral Peak are amazing from the top
8) Mono Pass Trail

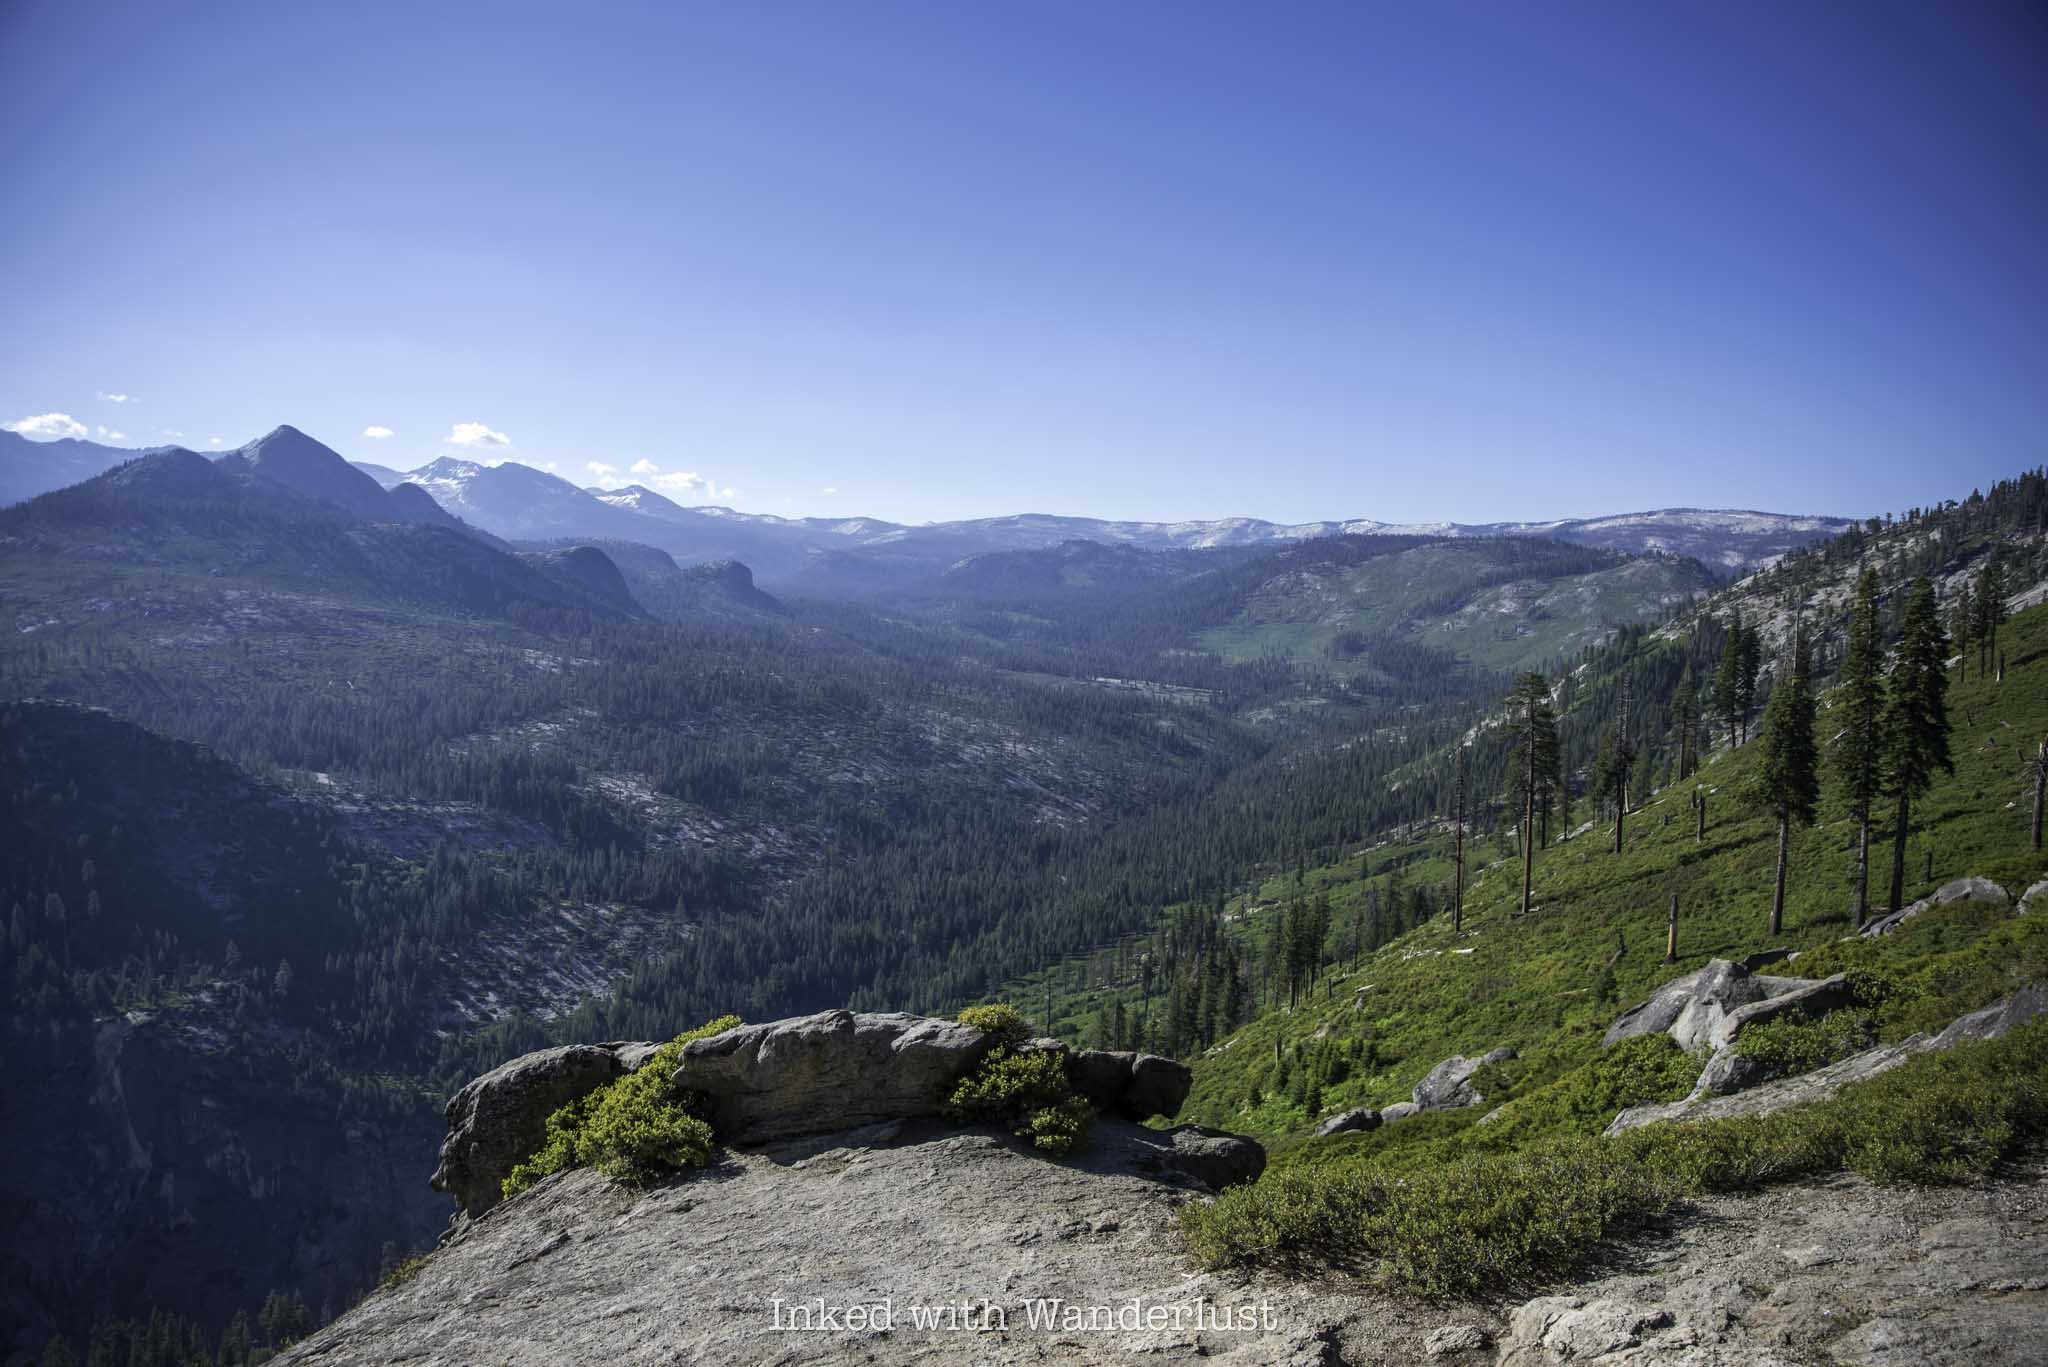
This hike falls under the category of sorta long but still moderate. It’s mostly flat until you reach the fork to Spillway Lake and starts to head up to Mono Pass at 10,599 feet.
Along the trail you’ll pass beautiful river streams, meadows, and shaded pines (until you reach the pass, that is). Once you pass the boundary of Yosemite and reach a rocky shelf, you’ll have an epic view of Sardine Lake and a slither of Mono Lake in the same frame.
Trail Length: 7.8 miles, RT if you go to the Sardine Lake overlook. 7.4 miles if you don’t
Pro Tip: Shortly after arriving at the pass but before the lake you’ll see an unmarked trail spurring off to the right. Take it and in a quarter mile you’ll see a few old 1800’s miner cabins
9) Tuolumne Meadows

Few things beat taking a stroll through the always beautiful, Tuolumne Meadows. It is probably the most tourist heavy attraction on this list but don’t fret, you’ll have plenty of elbow room.
Some notable features of Tuolumne Meadows are frequent deer & bear sightings (mostly in the morning), the Merced River, Pothole Dome, Parsons Memorial Lodge, Soda Springs, and more!
Pro Tip: If you’re here in spring or early summer, bring mosquito repellant and lots of it. If you’re not a fan of DEET, you can try this DEET-free citronella spray. I use when I hike and it does a great job at keeping mosquitos, bees, and other insects off of me (it smells fantastic as well)
10) Cathedral Lakes Trail

Rounding out the list is one of the premier hikes on Yosemite’s east side and easily one of the top hikes in the entire park, Cathedral Lakes. This one is mega popular among the Instagram crowd and is a regular stop along the John Muir Trail (JMT).
The trail is moderate in difficulty but the first couple miles or so will be a steady uphill slog. You’ll see two lakes, both of which are worthy of your efforts. Lower Cathedral is the largest of the pair but the upper lake, in my opinion, wins in the scenery department.
Trail Length: 7 miles, out and back if doing one lake. 8 miles if doing both
After exploring the park’s highly scenic east side, consider spending one day in Yosemite Valley. If you’ve never been there, it’s not to be missed. I’ve curated a highly detailed one day Yosemite travel itinerary if you’re interested.
This post was originally published in 2021 and was recently updated for accuracy.
Buy me a coffee?
If you found this blog helpful, consider leaving a tip through the Buy Me A Coffee button below! Whether it’s $1 or $5, every bit helps offset small travel costs like coffee, water, lunch, parking, or park entry fees. Your support means the world—thank you!

Olmsted Point: An Epic View of Half Dome
Olmsted Point is located on the park’s beautiful east side, just down the road from Tenaya Lake and Tuolumne Meadows. There’s no hiking…
Disclosure: This post contains affiliate links. If you make a purchase through these links, I may earn a small commission at no additional cost to you. I only recommend products or services that I believe will add value to my readers.
Yosemite National Park has many amazing viewpoints throughout the park. Household names such as Glacier Point, Washburn Point and Tunnel View typically get the lion’s share of the attention. There’s another viewpoint that isn’t as well known, but features one of the best views of the park’s iconic Half Dome…Olmsted Point.
Olmsted Point is located on the park’s beautiful east side, just down the road from Tenaya Lake and Tuolumne Meadows. There’s no hiking involved. Simply park your car near the lookout and enjoy yourself. There’s a short interpretive trail you can use, or explore around the granite rock for even closer views of Half Dome.
Keep in mind that since Olmsted Point is in Yosemite’s backcountry, this area of the park closes in the winter due to heavy snowfall. Highway 120, the road which cuts through the east side, is typically accessible between late May or early June and the first major snowfall (which typically happens around mid October to early November).
In this post, I’ll discuss topics such as how to get there, the parking situation, who Olmsted Point is named for, other things to see and do nearby, and more. Let’s get into it.
How to Get to Olmsted Point and Parking
Getting to Olmsted Point
Getting to Olmsted Point is straightforward. As mentioned above, it’s located in Yosemite’s east side, just down the road from famed Tenaya Lake and Tuolumne Meadows. You can get there either from Lee Vining and entering through the east gate, or by traveling up Tioga road from the valley.
From Lee Vining, you’re looking at a roughly 45-minute drive. You’ll travel up the awe-inspiring Tioga Pass before passing through Yosemite’s east entrance. From the entrance, it’s about 17-miles before you’ll arrive at Olmsted on your left, shortly after passing Tenaya Lake.
From the valley, follow signage to Tioga road. Olmsted will be the first major visible attraction you’ll come across and it’ll be on your right side. It’s about 45-miles up a winding mountain road, so expect the drive to take a bit over an hour.

Parking at Olmsted Point
The parking lot for Olmsted Point is fairly large and paved. It’s large enough to hold dozens of vehicles but despite that, it does fill quickly. Especially during the busy summer months. So if you’re visiting during that time, I suggest arriving early. Particularly during sunrise. That’s what I did and as you can see in the photo above, I was the only one there.
If you’re not going to make it for sunrise, I suggest arriving prior to 10am. After that, the lot begins to fill as more people enter the park and additionally, that’s when the tour buses begin to arrive, causing a huge swell of crowds at Olmsted.
Olmsted Point Things to Do

When visiting Olmsted Point, many people just get out of their car, spend a few minutes taking in the view, and leave. While the view of Half Dome is indeed the main attraction, be sure to venture past the paved lookout and spend some time exploring.
At the lookout deck itself are a few informational signs detailing the glacier-carved history of Olmsted Point, facts about the man it was named for, and other tidbits of information. Just to left of those signs is a trailhead leading to the Olmsted Point Nature Trail.
The nature trail is short, clocking in at only a half-mile, out and back. It takes an average of 10-minutes to complete and offers a different perspective of Half Dome, Cloud’s Rest, and Tenaya Canyon. Be careful if you’re here in the morning during spring or early summer. The notorious Yosemite mosquitos will eat you alive.
To the right of the lookout deck are two rather large granite shelves you can walk out on and explore. The view of Half Dome doesn’t change very much, but there are granite boulders and a couple of trees up there you can utilize for creative photos (the first picture in this section, for example).
Additionally, behind the parking lot and across the street is another granite hill you can climb up to get a unique view of Half Dome from. Looking in the opposite direction from that vantage point is a equally fantastic view of Tenaya Lake.
Who is Olmsted Point Named After?
Olmsted Point is named after famous landscape architect Frederick Law Olmsted. Best known for designing the grounds of Central Park in New York City, Olmsted played an instrumental role in the protection of Yosemite in the 1860’s.
While working with Senator John Conness, Olmsted helped to secure public land designation for Yosemite Valley and Mariposa Big Tree Grove, giving these areas protection of the state and ensuring they’ll be around for generations to come.
This historic effort resulted in the first acreage of land set aside for public use that would lay the groundwork for what would eventually become the National Parks system. I would say his contributions to Yosemite are deserving of this namesake dedication.
How to See Bridalveil Fall in Yosemite National Park
Standing at a commanding 617 feet, Bridalveil Falls is often the first waterfall visitors see when driving into Yosemite…

Standing at a commanding 617 feet, Bridalveil Falls is often the first waterfall visitors see when driving into Yosemite Valley. It is visible from portions of both Northside and Southside Drive, several pull outs along Big Oak Flat Road, and is part of the famed postcard view from the Tunnel View vista.
However, why stop at viewing it from afar when you can hike a short, easy-to-follow trail to the base and get up close and personal with it? Recently, Bridalveil Falls reopened to the public after a years-long closure for improvements to the trail, parking lot, and facilities.
The Bridalveil Falls hike is one of the most popular in the valley, often seeing similar crowds to other waterfall trails such as Lower Yosemite Falls and the Mist Trail. So how long is the Bridalveil Falls trail? When is the best time to visit? I discuss all of this and more in the post below.
How to Get to Bridalveil Fall and Parking

As one of the premier attractions in Yosemite Valley, Bridalveil Falls is easy to reach within the park. Its parking lot and facilities have recently gone through a years-long improvement project, adding additional parking spaces, improved trail conditions, and several restoration efforts.
The parking lot for Bridalveil is on the way to famed viewpoint, Tunnel View. From the El Portal entrance, make your way through El Portal road and take the Southside Drive option at the fork. From there, turn right onto Wawona Road. Shortly after that turn, the entrance to the parking lot will be on your left.
From the west entrance, continue down Wawona Road. After driving through Wawona Tunnel and passing Tunnel View on your left, continue a bit further down the road where you’ll find the parking lot on your right.

From the park’s east entrance or Hetch Hetchy, you’ll make your way to or on Big Oak Flat Road before transitioning onto El Portal Road, then onto Southside Drive, and taking the right turn onto Wawano Road. As you can see, no matter which direction you are coming from, Bridalveil Fall is easy to reach.
One important thing to note is the Yosemite Valley or the El Capitan shuttles do not stop here. The closest is stop E5 (Cathedral Beach Picnic Area) via the El Capitan shuttle (summer months only). From there, you can reach Bridalveil Fall via the Valley Loop Trail, which is a roughly 1.5-mile hike.
Bridalveil Fall Yosemite Hiking Trail

How long is the hike to Bridalveil Fall? Not long at all. If you’re not fond of long hikes or you’re just short on time, you’ll be happy to discover that the trail to Bridalveil Fall is less than a mile, round trip, along a smooth dirt path with very little elevation gain.
The trail begins at the far end of the parking lot, just past the restrooms. To the left of the trailhead is informational literature of how Bridalveil formed, current wildlife activity, and more.
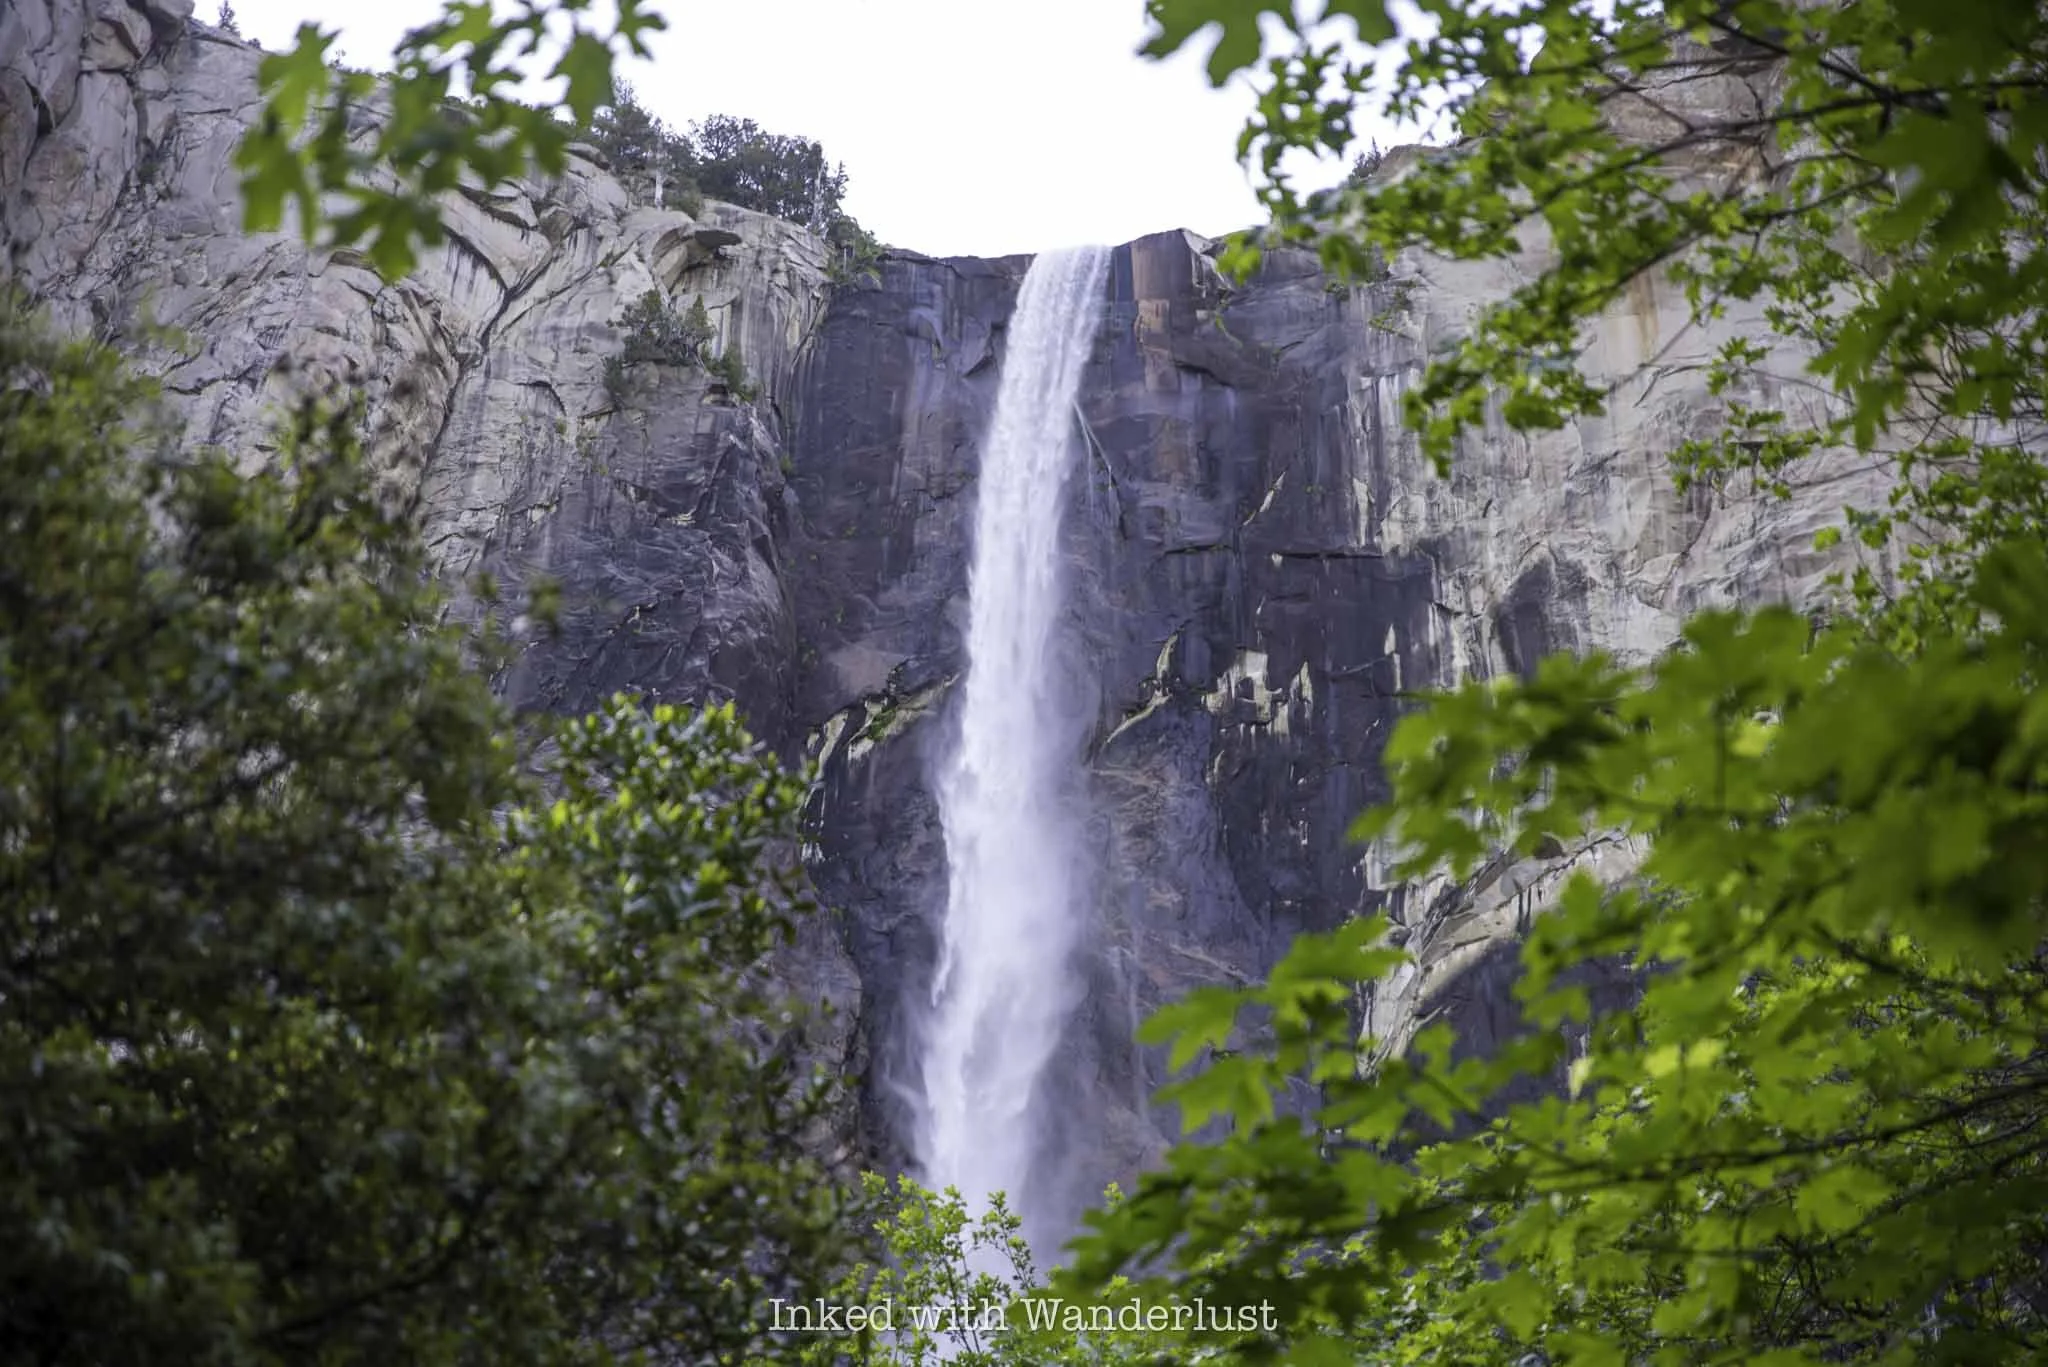
The views of the waterfall are non-stop throughout this short trail. Just past the boardwalk section of the trail you’ll get more glimpses of Bridalveil beautifully framed by trees and other greenery. If you happen to be here during the fall, the fall foliage takes the view up a few notches.
Just prior to reaching the waterfall, you’ll encounter several views of the beautiful Bridalveil Creek. While spring is the best time to see the creek at its fullest, it’s a lovely sight even when it slows down as the water cascades over the boulders, creating dozens of mini waterfalls.
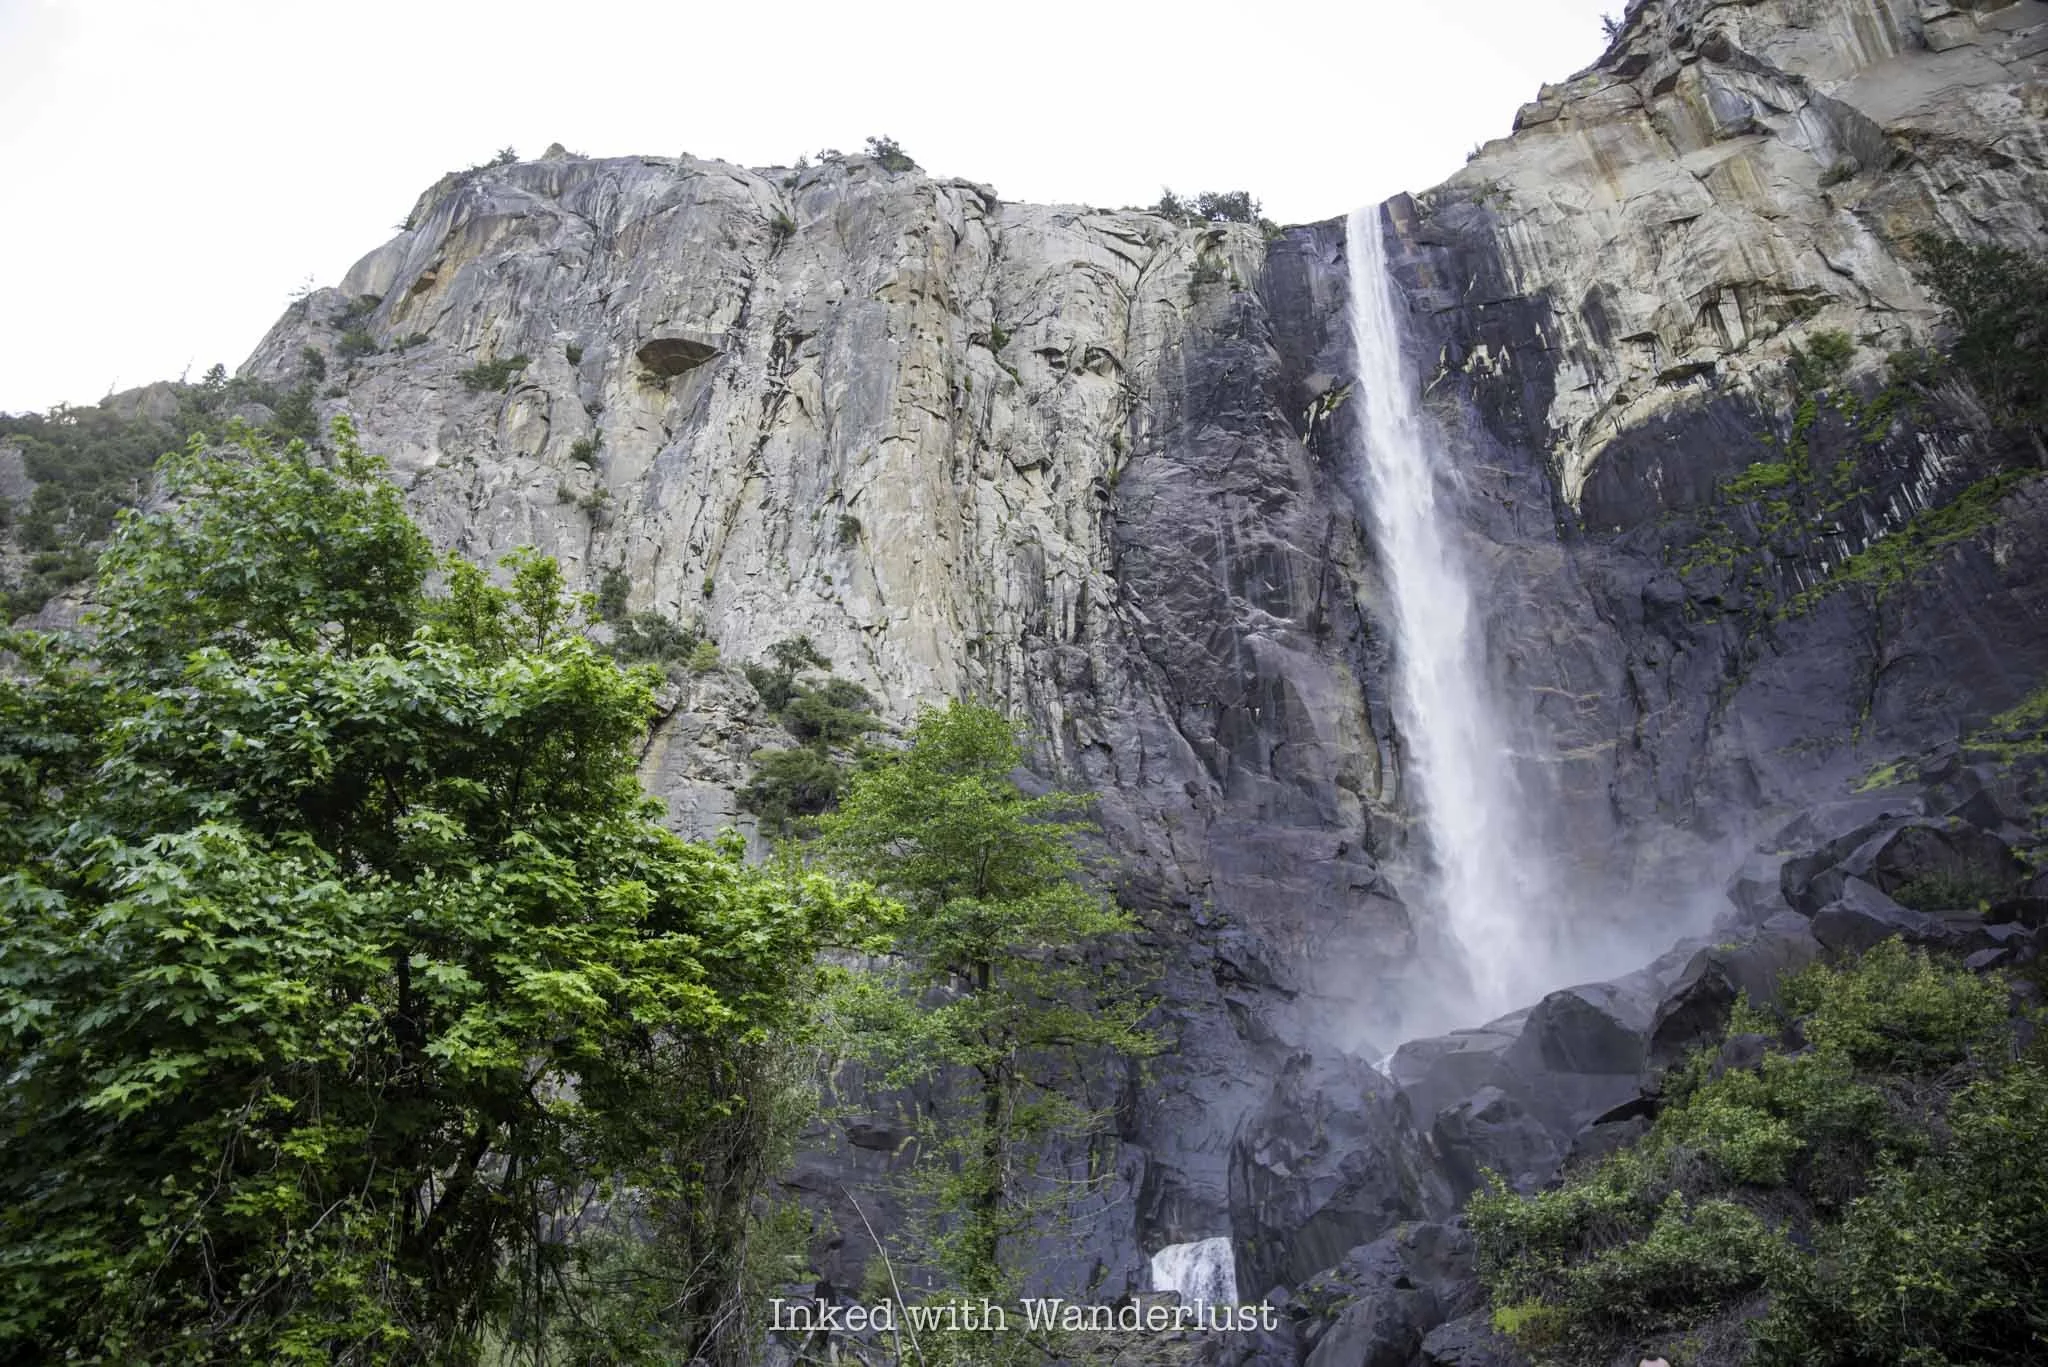
Once you reach the creek, simply follow it upstream. You’ll eventually come to a few steps and after that, Bridalveil Fall comes into view as you step into the viewing area. From here, you get close enough to the waterfall to feel the mist coming off of it (though not nearly as bad as the Mist Trail).
The viewing area is fairly small for such a popular destination. On a busy day, it isn’t unheard of for people to be shoulder-to-shoulder here. That is why I highly recommend getting here early to beat the rush. During my visit, I only had to share it with a few other people.
Common Questions About Bridalveil Fall
Is Bridalveil Fall open?
Yes. Bridalveil Fall reopened in 2023 from its years-long closure for the restoration project.
How long is the hike to Bridalveil Fall in Yosemite?
The trail is 0.8-miles, out and back.
What is the difference between Bridalveil Fall and Yosemite Falls?
While both are amazing in their own right, the differences are stark. Yosemite Falls is comprised of three waterfalls (upper, middle cascade, and lower sections), totaling 2,425 feet. Making it the tallest waterfall in North America. Bridalveil Fall is much smaller at 617 feet and is a singular waterfall. Both, however, are worthy of your time.
When is the best time to visit Bridalveil Fall?
Any time. Bridalveil flows all year, so there’s never a bad time. You’ll see it at its best in the spring. The summer months bring dense crowds and a diminished(ish) flow. Fall is fantastic for the colors and reduced crowds. Winter could be a great time as crowds are minimal, but you could be dealing with icy conditions and possible trail closures.

Is Bridalveil Fall trail ADA friendly?
Yes. The entire trail is paved, with the exception of the wooden boardwalk portion. There are three steps at the end, but to the right of those steps is a ramp you can utilize. Additionally, there is very little, if any, elevation gain on this trail.
Where is Bridalveil Fall located?
There are many waterfalls with this name in the United States. Both “Bridalveil” and “Bridal Vail” are often used. The Bridalveil Fall in this article is located in the valley of Yosemite National Park, California.
When does Bridalveil Fall stop flowing?
Unlike Yosemite Falls, Bridalveil Fall in Yosemite flows all year long.
Planning a trip to Yosemite? If so, be sure to read about the current day-use reservation requirements here. Also, read about Washburn Point, one of Yosemite’s most beautiful viewpoints. Additionally, if it’s your first visit, see my recommendations for the best things to do in Yosemite Valley. Finally, no visit to Yosemite would be complete without seeing its equally amazing east side.

Washburn Point: A Stunning Yosemite Viewpoint
When driving Glacier Road, most people have Glacier Point as their ultimate destination in mind, and for good reason. Glacier Point is one of…

When driving Glacier Road, most people have Glacier Point in mind as their ultimate destination and for good reason. Glacier Point is one of the most stunning viewpoints Yosemite has to offer. However, just a mile shy of Glacier Point is a similar vista in Washburn Point.
Washburn Point was named for the three Washburn brothers, who built the original road connecting Wawona to Yosemite Valley in the late 1800’s. This vista is easy to get to and is an excellent alternative to Glacier Point should you find yourself unable to find a parking lot (or don’t mind a bonus stop).
In this post, we’re going to cover multiple topics such as the parking situation, what you’re able to see from here, what to expect, best time to visit, and more. Let’s get into it.
How to Get to Washburn Point and Parking

Getting to Washburn Point is fairly straightforward. From the valley, the easiest thing to do is to follow the signs to Bridalveil Fall and Tunnel View. If you’re already on Northside Drive, you’ll keep left to loop back to Southside Drive and veer right onto Wawona road. If you’re on Southside Drive, though, you’ll need to loop back onto Northside first, as the main road in Yosemite Valley is one-way.
Once on Wawona road, you’ll pass Bridalveil Fall on your left and Tunnel View on your right before entering Wawona Tunnel. From the tunnel, you’ll travel for about eight miles before coming to Glacier Point Road where you’ll turn left onto. If you’re coming from the southern entrance of Yosemite, continue for about seventeen miles before turning right onto Glacier Point Road.
From this juncture, you’re roughly fifteen or so miles from Washburn Point. Keep in mind that if you’re driving an RV (or towing one) you cannot take it to either Washburn or Glacier Points as those vehicles are prohibited past the Sentinel Dome/Taft Point parking lots due to the (very) narrow road and tight bends.
Washburn Point’s parking lot will be on your right. It’s paved and can comfortably hold around three dozen or so vehicles. During peak times it can be difficult to snag a spot here. If this happens during your visit, your only option will be to circle around and try again as there’s no parking on the road allowed.
There are no bathrooms at Washburn Point. For that, you’ll need to go further down the road to Glacier Point or circle back to the Sentinel Dome/Taft Point parking lots. Additionally, there are no bear lockers for your food. Though they’re not entirely necessary as you’re never out of eyeshot of your vehicle.
Also, there are no free park shuttles to Glacier Road. Additionally, the paid tour shuttle only stops at Glacier Point. It does not make stops at any other trailheads. Your only option for Washburn is to drive your own vehicle, or hike to Glacier Point from the valley and then walk the 3/4 of a mile road to Washburn. Though I’ll caution against this option as the road has no sidewalks and can be dangerous for pedestrians.
Washburn Point in Yosemite
To call Washburn Point a ‘hike” would be quite the stretch as the only thing between you and the incredible scenery is about twenty concrete steps. The viewing deck below is large enough to contain a decent crowd with additional space on either side.
If you or someone you’ll be traveling with have mobility issues or you’ll be pushing a stroller, simply head to the north end of the parking lot and use the ramp to access the viewing deck.
As stated above, the view at Washburn Point is similar to that at Glacier Point, but at more of a side profile. The details of the “Grand Staircase” leading to famed Vernal and Nevada Falls are more clearly visible than they are down the road.
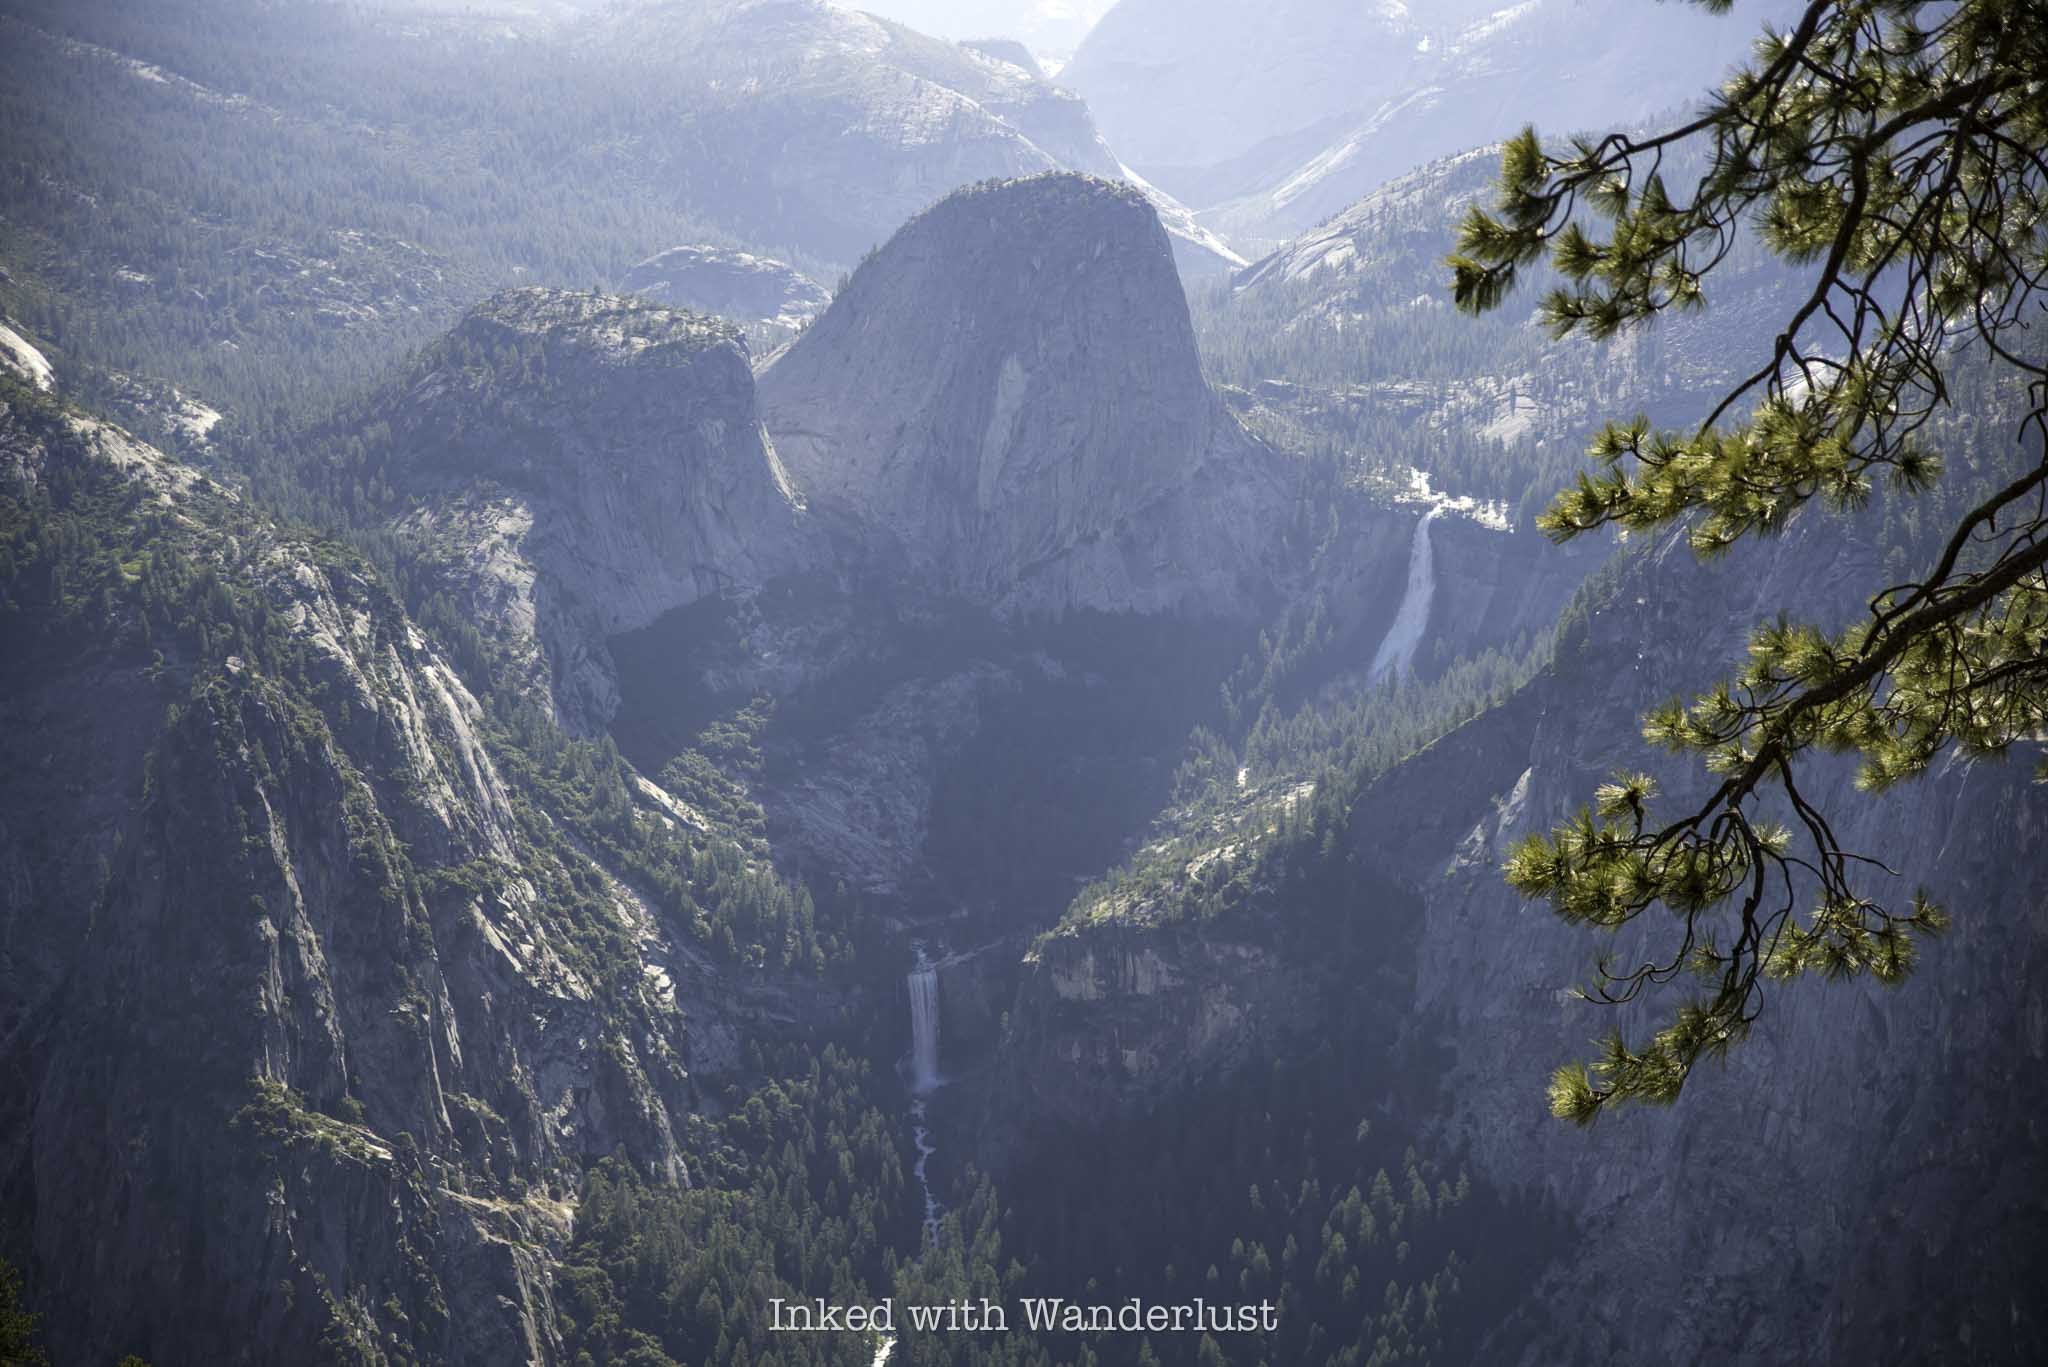
Directly in front of you, you’ll have a commanding view of Half Dome (the back side), Liberty Cap (the granite mountain that looms over Nevada Fall), Vernal Fall, Nevada Fall, Mount Broderick, North Dome and a peak of Cloud’s Rest. To the right, you’ll have a vast view of the Clark Range, with Mount Starr-King and Illilouette Falls in the foreground.
Washburn Point is also one of the best sunrise and sunset spots in Yosemite. Keep in mind that because of that, it usually results in higher crowds and tougher parking conditions. Sunset, in particular, can be a tough time to go, but is well worth the effort.
It’s eons easier at sunrise as most Yosemite visitors have yet to wake up. Once the sun has risen above the mountains, though, Washburn Point can be a tough spot to get good photos as the sun tends to produce harsh light here (as you can see in the photos in this post).
Best Time of Year to Visit Washburn Point
Washburn Point is located along the famed Glacier Road. Due to the heavy snowfall this area of the park sees, the road closes to vehicles in the winter. It’ll typically close in late October or November, and doesn’t reopen until spring (usually in late March or April).
In the winter, it’s possible to use skis to access Glacier Road from the Badger Pass Ski Area. Most people do this to access Glacier Point but since Washburn is on the way it makes for an easy (and excellent) bonus stop.
If you’re like most people, though, you’ll likely visit when the road opens to vehicle traffic for the spring, summer and fall seasons. Spring, in particular, is a great time to visit Washburn Point as you’ll be able to see (and hear) Nevada and Vernal Falls at their fullest flow.
While fall brings about the beautiful golden foliage the Sierras is known for, the flow of the waterfalls will be all but depleted by this point. You’ll still see some flow, but nothing like spring and early summer. Keep this fact in mind when planning your visit.
Planning a trip to Yosemite? If so, be sure to read 10 Awesome Things to Do in Yosemite Valley on Your First Visit. In addition, don’t forget to visit Yosemite’s famed east side. Finally, if you’re planning to hike Half Dome, read my How to Hike Half Dome for First Timers Guide.

Tunnel View: How to See the Most Iconic View in Yosemite
In Yosemite, we are blessed with dozens of these. Iconic, easily recognizable landmarks such as Half Dome, El Capitan, Yosemite Falls, Bridalveil Falls, Glacier Point, Tuolumne Meadows…
One thing you’ll notice about national parks is that the majority of them have that one view, attraction or trail that everyone has seen or at least knows about. They’re so popular that most people could simply look at a photo and will know exactly what and where it is.
In Yosemite, we are blessed with dozens of these. Iconic, easily recognizable landmarks such as Half Dome, El Capitan, Yosemite Falls, Bridalveil Fall, Glacier Point, Tuolumne Meadows, the Mist Trail, The Awahnee Hotel, Hetch Hetchy and more can be found in the valley and throughout the park.
However, amongst all of these is one viewpoint where you can stare in awe at quite a few of the above mentioned landmarks. One viewpoint that is so recognizable and popular that it’s been featured on hundreds of Yosemite publications throughout the years. That viewpoint is Tunnel View.

How to Get to Tunnel View in Yosemite

Thankfully, seeing this beauty for yourself requires little effort as you’ll simply park your car, get out and take in the view. If you’re coming from the valley, follow the signs to Glacier Point (HWY 41). You’ll turn right, bypass the turn out for Bridalveil Fall, and head uphill for about 1.5 miles to the parking lot on your right.
If you’re coming from the southern entrance, follow the posted signs to the valley. Once you reach Wawona Tunnel, you’ll want to start slowing down because the main parking lot will be to your immediate left after exciting the tunnel. Additionally, there’s a smaller parking lot across the road.
Depending on how crowded it is during your visit, both lots may be full (pro tip - they probably will be). Thankfully, people don’t tend to spend a lot of time here as aside from the view, there’s nothing to do, so there’s a lot of come-and-go. If the lots are full, just circle back around.

During my first visit, every spot was taken, causing us to circle around a couple times (it was Father’s Day weekend, to be fair). Making matters worse were the tour busses dropping off hordes of tourists. Prepare yourself for this possibility as Tunnel View is one of the main stops for tour companies.
My most recent visit was much different, though. Covid-19 did a number on tourism and Yosemite was no exception. As you can see in the photo above, there was plenty of available parking in the middle of the day and I was able to walk right up to the wall without having to fight for a spot. It’ll likely never happen again, so don’t depend on this.
What to See at Tunnel View in Yosemite
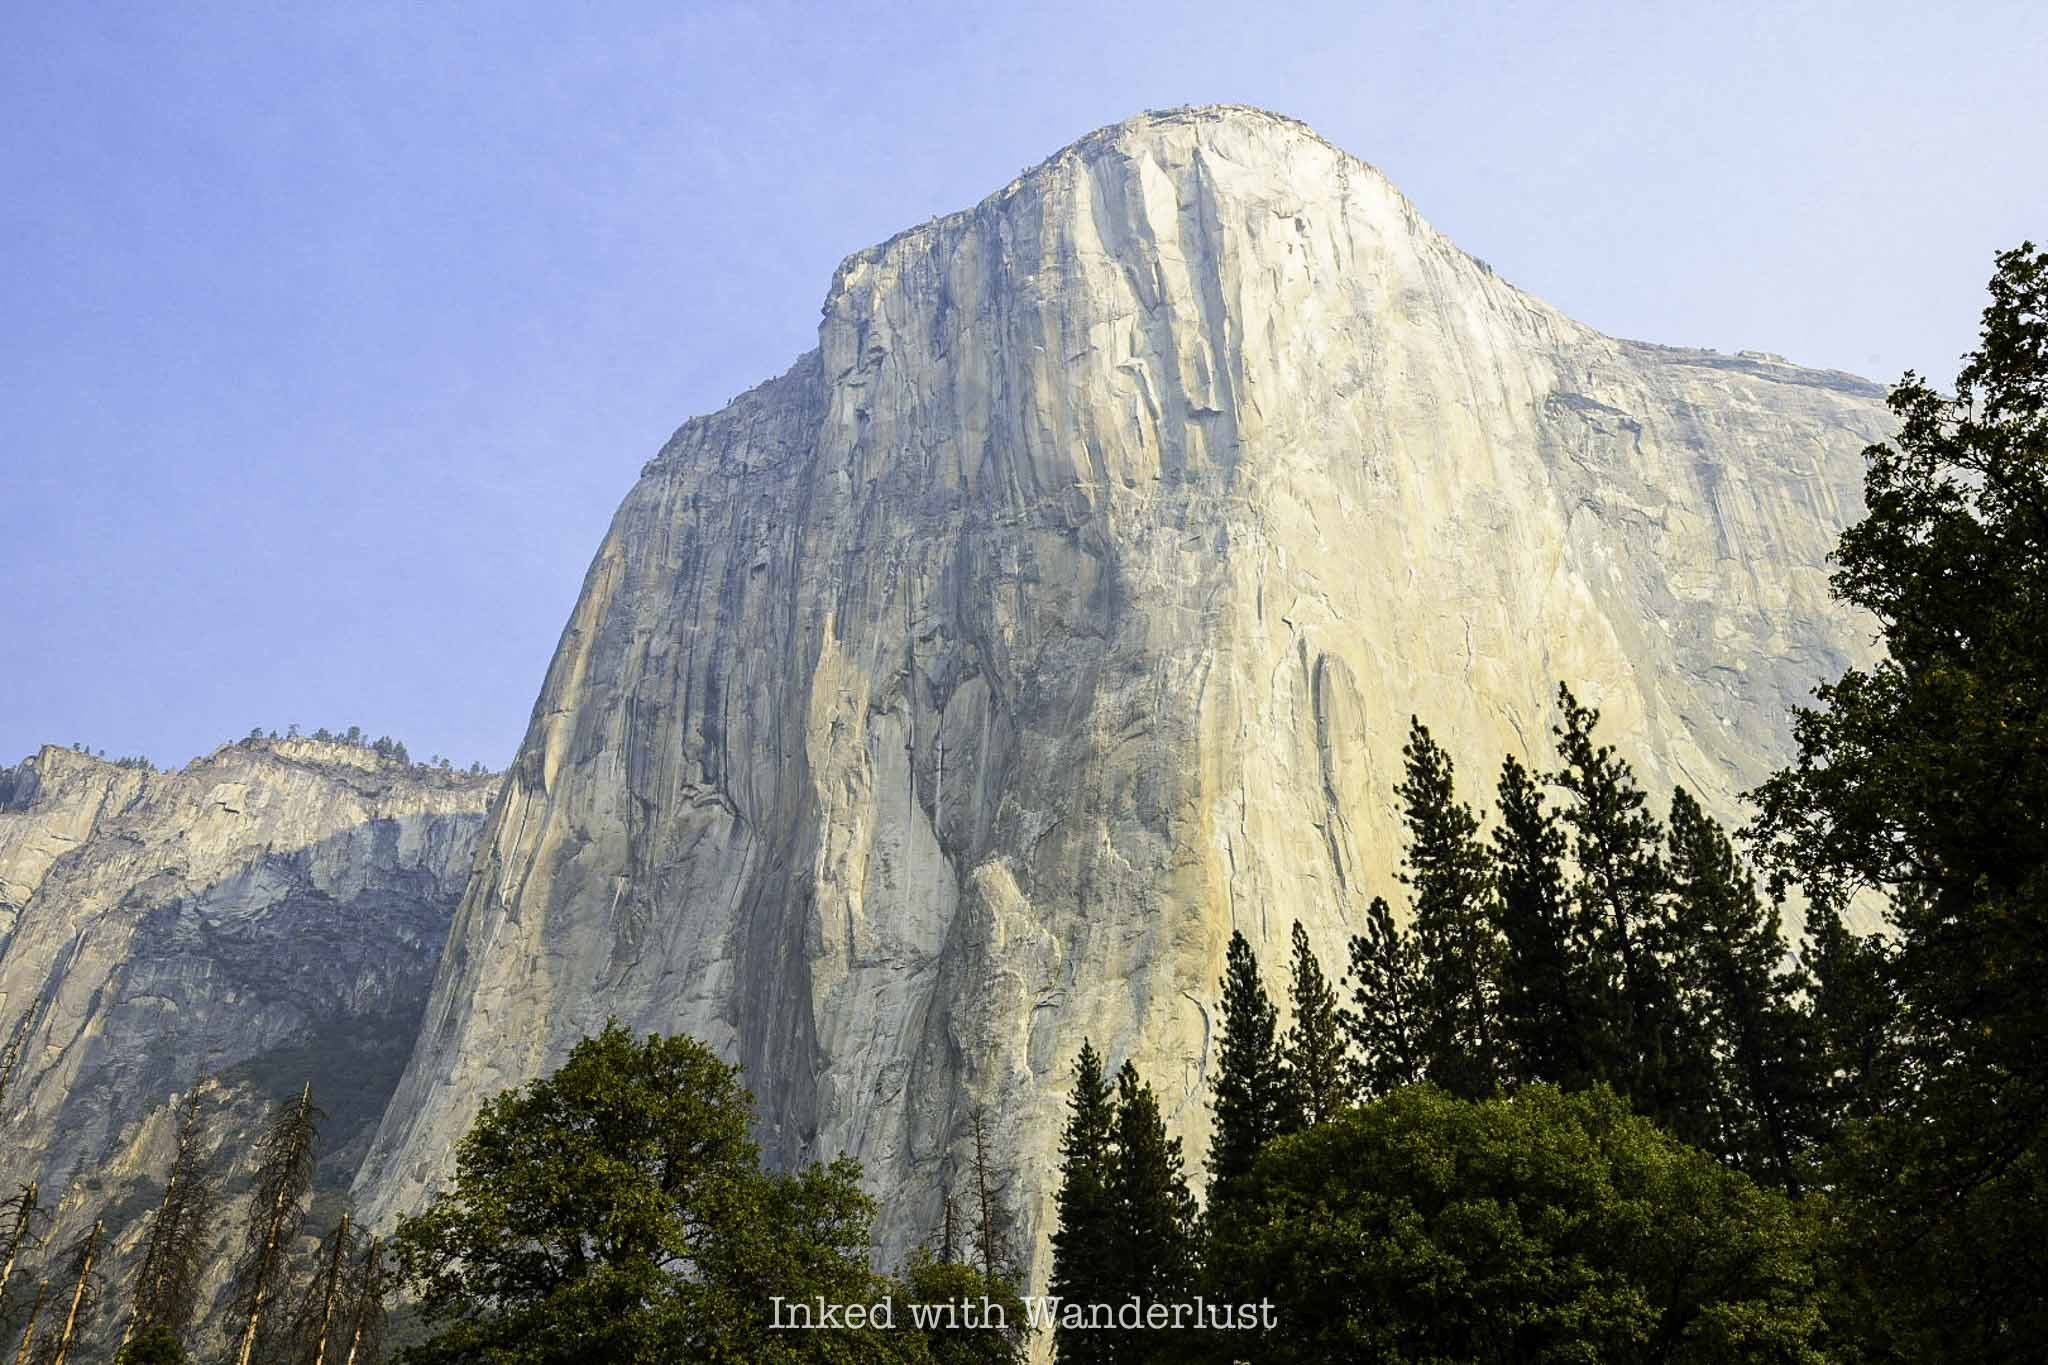
From Tunnel View, you’re able to see and photograph many of Yosemite’s top landmarks all in the same frame. The most notable of which include El Cap, Half Dome, Bridalveil Falls and Sentinel Dome. You’ll also get an up close look at the historic Wawona Tunnel. It’s the longest tunnel in the park and where you’ll go if you want to drive to the attractions along Glacier road.
This is where most people will take in the view. However, if you have extra energy to burn and want to ditch the crowds, there are two other spots that offer similar views but with far less people around. These, however, require a little bit of effort to reach.
The two viewpoints mentioned above Artist Point and Inspiration Point. Both offer similar, yet slightly different views of the same one you get at Tunnel View. The biggest advantage to both is that because of the steep, half mile climb to get to each one it tends to see less people. Some argue that either or both offer a superior view because they’re at a higher angle.

The trailhead for both is located in the smaller of the two Tunnel View lots. As stated above, the first half mile is going to be a steep, uphill slog and for Inspiration Point, you’ll need to fight your way through an unmaintained section of trail towards the end.
Directions wise, both are the same in the beginning (technically, you’re on the Pohono trail), but you’ll eventually come to a split. To get to Artist Point, turn left here and follow it for another half mile. For Inspiration Point, you’ll cross the road and begin your trek through the aforementioned unmaintained section of trail. Inspiration Point is on a granite shelf overlooking the valley.
Best Time to Visit Tunnel View
Honestly, anytime is a good time. The view will be slightly different dependent upon the season. Winter will feature the snow-covered granite slopes of El Cap and Sentinel Dome, while Fall features beautiful yellow and orange hues in the trees below. Even the dead of summer is a great time, but you’ll be there in the height of the tourist season and high temperatures that accompany it.
Time of day is another conversation. If you just want to see it and snap a few photos, getting there first thing in the morning when the crowds are lightest is best. If you really don’t care about photo quality and don’t mind crowds, then just show up whenever.
Planning a trip to Yosemite? If so, be sure to read 10 Things to Do in Yosemite Valley on Your First Visit. Additionally, check out Hiking Half Dome in Yosemite if you’re considering conquering Yosemite’s most epic day hike. Finally, to save money on vacation packages to epic destinations such as Disneyland, Walt Disney World, Universal Studios and several cruise lines, visit my friends at Get Away Today.
This post was originally published in 2020 and was recently updated for accuracy.

Yosemite Valley: 10 Things to Do For First Timers
Of all the many sections of Yosemite National Park, the valley is what gets the bulk of the attention of most visitors and for…
Disclosure: This post contains affiliate links. If you make a purchase through these links, I may earn a small commission at no additional cost to you. I only recommend products or services that I believe will add value to my readers.

Of all the areas of Yosemite National Park, the Valley is where the bulk of park visitors go and for good reason; it boasts some of the parks most famous attractions, such as Half Dome, Yosemite Falls, El Cap, Tunnel View, Happy Isles and much more.
This post doesn’t intend to tell you what the best sights are, as most other websites and blogs do. Being the “best” is up to each person’s interpretation. What I may consider the best, others might disagree. Additionally, there are so many equally beautiful things to see in Yosemite Valley that labeling any of them the “best” would devalue the others, in my humble opinion.
So instead, this post will use the word “awesome” to describe the sights I’m about to recommend. There are many others, but if anyone in my family or friend group were visiting Yosemite for the first time and asked for my recommendations, these are what I would start with in order for them to get a well-rounded first visit of the Valley. Let’s get into it.

Click or tap on ad to view offer
1) Tunnel View

No visit to the Valley would be complete without seeing the classic postcard view of Yosemite, so it’s only fitting we begin here. You can reach Tunnel View by following the signs to Glacier Road (Hwy 41). They’re dotted all along the main road on the valley floor. You’ll turn right at the sign pointing towards Glacier Point and head up 1.5 miles to the viewpoint’s parking lot.
From the viewpoint, you’ll get an unparalleled view of some of Yosemite’s most iconic landmarks; El Cap, Bridalveil Falls, Half Dome, Sentinel Dome, and more. The crowds get thick at Tunnel View, as this is a popular tour bus stop. The earlier you arrive, the better. For additional information on Tunnel View, read my post at the link below.
READ ALSO: How to See the Most Iconic View in Yosemite
2) El Cap Meadow

Seeing El Capitan from Tunnel View is one thing, but seeing it up close and personal from the meadow below is a whole lot better. The best part? Due to its massive size, you can see it from just about anywhere in the meadow surrounding it.
Parking is plentiful on both sides of the road but in the busy summer months, it can be difficult to come by. If you can’t find a spot, just circle around. You’ll likely come across one eventually. The meadow makes for an excellent place to picnic and view El Cap climbers as they make their way up its face.
Pro tip: Be sure to bring binoculars. Seeing climbers with the naked eye is nearly impossible.
3) The Mist Trail

The Mist Trail is one of the premier hiking trails of not just the valley, but the entire park. Two beautiful waterfalls, Vernal & Nevada, are the main features of the trail, along with the infamous (and quad bursting) stone steps. The latter (Vernal) provides the mist that the trail is famous for in the spring and early summer months.
The trail is on the shorter side, coming in at 3 miles round-trip if just going to Vernal Fall. It’ll be 7 miles round-trip if moving on to Nevada Fall as well. Despite its relative shortness, the trail is steep and you will have to navigate hundreds of the slick, stone steps at both waterfalls. If you have the stamina, this hike is a must.
4) Yosemite Falls

Made up of three falls (upper, middle, & lower), Yosemite Falls stands at a commanding 2,435 feet and is one of the parks biggest (literally) attractions. Most people view the falls at the base from the viewpoint located just across the road from Yosemite Valley Lodge.
If you want to get up close and personal with it, though, hiking the Upper Yosemite Falls trail will take you to the top where epic views of the valley await you. The trail is strenuous and is about 7 miles, round-trip.
READ ALSO: Lower Yosemite Falls Hiking Trail
5) Half Dome

Not for the faint of heart, but worth every ounce of effort, Half Dome is the undisputed king of popular hikes in Yosemite. In order to partake in this one, you’ll need to apply for a permit. If you’re one of the lucky ones to get a permit, prepare yourself for a challenging, but rewarding experience.
You’ll make your way up the Mist Trail, get up and over Sub Dome and finally grab hold of the cables to hoist yourself 400 feet to the top. If you’re preparing to hike Half Dome or are considering it, read my post below for guidance.
READ ALSO: Half Dome: The Ultimate Guide To Yosemite’s Best Day Hike
6) Ansel Adams Gallery

Located in Yosemite Village, The Ansel Adams Gallery features many photographs from one of the most famous photographers in the world. If it’s in your budget, you can even purchase some of Ansel’s most iconic works for yourself.
Ansel Adams made a name for himself on his photographic art in not just the Valley, but the park as a whole and beyond. Seeing the park through his lens is something no visit to Yosemite would be complete without.
7) Indian Village

Indian Village is located within Yosemite Village, right behind the visitor center. It features several exhibits of dwellings, a sweat house, pounding rocks, Chief’s house, and a ceremonial roundhouse that were used by the Miwok Tribe. Additionally, there are examples of cabins used by early, non-native settlers.
It is a great place to take a leisurely stroll and at the same time, learn fascinating history about the people who not only originally discovered Yosemite before anyone else, but called it home for many years before it was stolen from them.
8) Glacier Point

Even though it’s outside the bounds of the valley, I’m still going to include it as the views from it are of the Valley. From the valley, follow signs to Highway 41and drive through Wawona Tunnel, following the road for about thirty miles. You’ll reach Glacier Point at the road’s terminus.
You’ll be at an elevation of 7,214 feet above sea level and 3,200 feet above the Valley itself. There’s a short trail that makes its way along the rim, a cool geology hut and a recently renovated visitor center, to name a few things. Many come here for the epic view of Half Dome, but Glacier Point has so much more to offer, so be sure to spend time looking around.
9) Bridalveil Fall

Likely the first waterfall you’ll see after entering Yosemite Valley, Bridalveil Fall plunges 620 feet to the Valley floor and is one of the parks main attractions. You can view the fall from Tunnel View or you can utilize the paved trail that goes from the parking lot to the base.
Bridalveil flows year round but is most impressive in spring and early summer. If you visit during these times and go to the base, you will likely get wet, so be sure to protect those cameras. Bridalveil Fall has recently reopened after a multi-year renovation project of its parking lot, restrooms and trail.
READ ALSO: How to See Bridalveil Fall in Yosemite National Park
10) Cook’s Meadow Loop

Lastly, no visit to Yosemite Valley would be complete without a hike around Cook’s Meadow. It’s a short, one mile loop, but packs a punch when it comes to epic views.
Yosemite Falls, Half Dome, Sentinel Rock, Glacier Point, and the beautiful Merced River are all features found along this easy going trail. It is perfect for families or for those just wanting to take in the sights while taking it easy.

Click or tap ad to view offer

Half Dome Permit: The Ultimate Permit Lottery Guide
I won’t sugar coat it, no one likes having to get a permit to go hiking. However, due to the increasing popularity of…
2026 Information!
While this post was written in 2020, the information below has been updated for 2026
The Half Dome lottery will run from March 1st - March 31st
The National Park Service announced that they anticipate the cables to be up from May 24 - October 15, however, these dates can change at any time
If your desired date falls within that timeframe, you’ll need a permit

Click or tap ad to view offer
Why You Need a Permit for Half Dome

No one likes having to get a permit to go hiking. However, due to the increasing popularity of our National Parks over the years, it has become a necessity.
Prior to the implementation of the permit system in 2010, there were as many as 1200 hikers on Half Dome on any given day. There would be a literal queue to go up the cables. This not only presented safety issues, but it also caused damage to the trail.
So as of 2010, a permit would be needed to hike Half Dome while the cables are up, limiting the amount of hikers on Half Dome to just 300 per day. While bottlenecking still occurs, it’s far more manageable and the impact to the environment has been reduced.
If you’ve never hiked Half Dome (and since you’re reading this article chances are good that you haven't), be sure to read my detailed article that shows you what to expect on this epic hike.
So, how do you get your hands on one of these elusive permits? Read on below to find out!
Half Dome Pre Season Lottery 2026

As stated above, the Half Dome cables will be up between May 25 and October 16 in 2026. If your desired date falls within that timeline, you’ll need to enter the permit lottery via Recreation.gov or by calling 877/444-6777 between the hours of 7am and 9pm (PST).
The Half Dome pre season lottery runs throughout March (the 1st through 31st), every year. There is no advantage to submitting your application early. Those who enter the lottery on the 31st have just as much of a chance as those who have entered on the 1st.
The applicant can list up to six people on a single application. Keep in mind that your name (as either Trip Leader or Alternate) can only appear on ONE application. If your name appears on multiple applications, ALL of them will be canceled.

You can apply for a specific day or a range of dates, but your permit will only be rewarded if there is space available on at least one of the dates listed on your application.
You must select a trip leader (yourself) and can also select an alternate (if applicable). Either the trip leader or alternate MUST be present at Subdome with permit and ID in hand, and your group must be together. Permits are not transferable.
The fee to submit the application is $10. This is per application, NOT per person. This fee is non-refundable regardless of whether you win permit or not.
Judgment Day
If you’re one of the lucky winners, you’ll be notified via email on April 10th. Alternatively, you can call the number listed above for results. Be sure to verify that the email you used to sign up on Recreation.gov is current.
Once notified, you’ll be given two weeks (April 24th) to accept the permit and pay the $10 per person, refundable fee. If you don’t, your application will be canceled. This $10 per person fee is in addition to the fee you paid when you entered the lottery.
If you didn’t win a permit, you’ll still receive an email on the same day. If this happens, don’t get discouraged. There’s still a couple more ways to get one.
Half Dome Daily Lottery

Yosemite sets aside 50 permits for a daily lottery with an application period of two days. The actual amount they give out depends on estimated under-use and cancellations.
*For example: If you wanted to hike Half Dome on Sunday, you would submit the application on Friday and receive your results that same evening.
To get one of the daily permits, simply head to recreation.gov and submit an application two days prior to your desired date. You can only submit one application per desired date, but there is no limit to how many daily lottery permits you can apply for (and win) throughout the season.
Improving your Odds

There’s no magic formula. It works like any other lottery. You just submit your application and hope for the best. However, there are a few things you can do to move the odds to your favor (a little bit, at least).
Apply for a weekday instead of a weekend. Your chances are significantly better if you choose a weekday over a weekend day. It may be difficult for you because of work schedules, but take it from someone who’s been there, using a vacation day (or two) is more than worth it.
September & October. If you can, plan for September or the first couple weeks of October. These months offer a better chance than July or August. The downfall to this is Vernal and Nevada Falls flow will be low. However, your focus here is Half Dome.
The less hikers in your group, the better. I know it would be epic for you and your entire squad to conquer Half Dome together but remember, Yosemite only allows 300 people a day on Half Dome, NOT 300 permits. So the larger your group, the greater the odds.
I hiked it in 2017 and there were 26,943 applications with a total success rate of 19%. The year prior had a success rate of 25% and 2015 saw a 35% success rate.
The 2023 Half Dome permit success rate was at a mere 22%
As you can see, the odds increase annually. The more popular Half Dome gets, the less likely you are to secure a permit. So anything you can do to give yourself even the slightest edge can make all the difference.
Hiking Half Dome During A Backpacking Trip

While the majority of hikers do this as a day hike, many choose to turn their adventure into a 2-3 day trek. This method would allow you more time to take in the views.
To do this, you’ll not only need a permit for Half Dome, but a wilderness permit as well. Having only one or the other will not suffice. The fees for a wilderness permit are $5 plus $5 per person and can be applied for below.
While applying for a wilderness permit, you need to check the box stating that you also want a Half Dome permit. If any are available during the days listed on your application AND Half Dome is reasonably part of your itinerary, you’ll receive one.
Securing a Half Dome permit in this manner will make you eligible to go up the cables on any of the dates listed on your wilderness permit.
However, ff you’re on a backpacking trip that started OUTSIDE of Yosemite and you want to climb Half Dome during your trip, you will need to apply for a permit through either the regular preseason or daily lotteries.
Hiking Half Dome Without A Permit
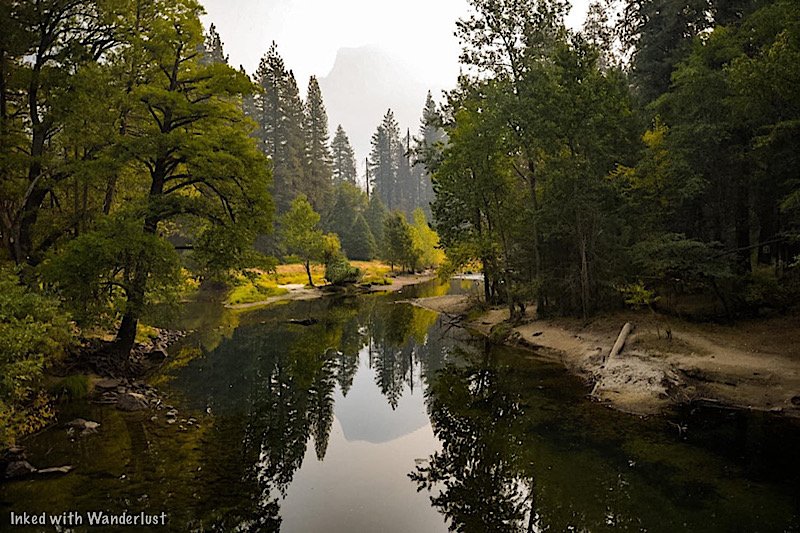
Let’s say you’ve done everything you could to get a permit. You weren’t successful in the pre-season lottery and the daily lotteries haven’t been kind to you either. What do you do?
Currently, the only way to hike Half Dome without a permit is to do it during the off season in winter or early spring. Yosemite officials don’t outright ban it, but they strongly discourage it for one big reason:
*The cables are down and the potential for injury or death rises exponentially.
During the off season, the poles and wooden planks are removed to avoid getting too weathered. The steel cables are left flat on the dome throughout the entirety of the climb. In theory, you could hike to the cables, grab hold of them and hoist yourself up.
The advantages to this are not needing a permit and the near certainty that you’ll be the only one up there. However, in my opinion, the advantages are far outweighed by the hazards.
We’re siding with park officials and advise against this (unless you have climbing experience and have the gear). It’s 100% your decision, though. If you do decide to go for it, please be safe and don’t take unnecessary risks.
READ NEXT: “15 Tips For Your First Time Hiking Half Dome”
This post was originally published in 2020 and was recently updated for accuracy.

How To Hike Half Dome: The Complete First Timers Guide
Towering nearly 5,000 feet above the valley and 8,800 feet above sea level, Half Dome is considered one of the top day hikes…
Disclosure: This post contains affiliate links. If you make a purchase through these links, I may earn a small commission at no additional cost to you. I only recommend products or services that I believe will add value to my readers.

Towering nearly 5,000 feet above the valley, Half Dome is considered one of the top day hikes in the country. In 1865 it was considered, “perfectly inaccessible”.
In 1875 a man by the name of George Anderson proved that theory wrong. Not only did he reach the summit, but he installed the predecessor to what we now know as the cables.
These days, you’ll see hundreds of people summiting Half Dome on a daily basis and it can be viewed prominently at various locations throughout the park. I hiked Half Dome on September 11th, 2017. It’s a day that will live in my memory forever because even to this day, it was my most rewarding experience.
If you’re considering hiking Half Dome, this guide will provide you with everything you’ll need to know.
READ ALSO: “Hiking Half Dome In Yosemite: My Journey In 30 Pictures”
2026 Half Dome Permit
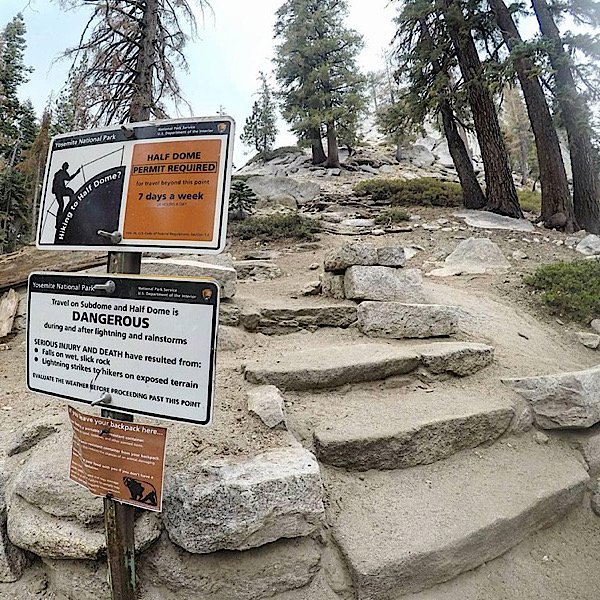
Before hiking Half Dome, you’ll first need to apply for and win a permit. The extreme popularity of this hike has made it a necessary evil. The NPS limits the amount of permits issued for the season to 300 per day, with 225 going to day hikers and the remaining 75 to backpackers.
I can’t speak from experience exactly how your permit is checked as when I hiked it, there was no one checking. What I do know is you can hike without a permit up until (at least) the sign just before the start of Sub Dome (pictured above).
From what I hear, there is usually a ranger either on Sub Dome or just below it checking permits. If you do not have one, you will be turned around.
READ ALSO: “Half Dome Permit: The Ultimate 2026 Permit Lottery Guide”
Begin at Happy Isles Trailhead
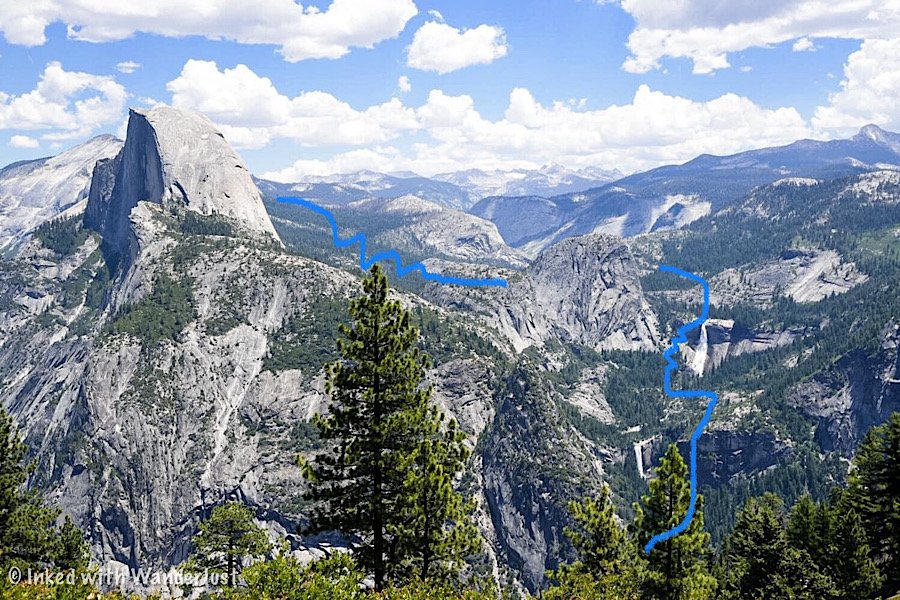
Depending on your starting point, the miles you hike will vary greatly. This guide covers the Happy Isles trailhead as it’s the starting point for most hikers. Starting at Happy Isles, your milage will be 16.2 miles, round trip. Your elevation gain will be 4800 feet and it will be a strenuous, full-day hike. Plan for 8-12 hours.
You can find parking in the Yosemite Valley Trailhead lot just past Curry Village. From there, it’s a quarter mile from the trailhead. You should seriously consider beginning your hike as early. Pre-dawn is ideal. The reason for this is because you will be racing to beat the afternoon storms and crowds.
If your plan is to utilize the shuttle, keep in mind that they do not start running until 7am. Also, the parking lot is known to fill quickly.
The Mist Trail

My brother and I arrived to a fairly empty parking lot at 2:45am, ate a super quick breakfast and were at the trailhead by 3am. You’ll start out on a paved path that works its way to Vernal Falls. From the trailhead, it’s just 1.5 miles to Vernal but don’t underestimate it, because it is steep.
As you arrive to the Vernal Fall footbridge, you’ll see a restroom and water fountain (the one source of filtered water on this trail). Past the footbridge, the trail again climbs steeply and is also where you are introduced to the brutal, stone steps that lead to Vernal and beyond.
Vernal Falls

Here is where you’ll receive the first fruit of your labor. The chance to stare in awe and amazement at Vernal Falls. When I got to Vernal it was still pitch black. Once my eyes adjusted, the view of Vernal with stars sparkling above was breathtaking.
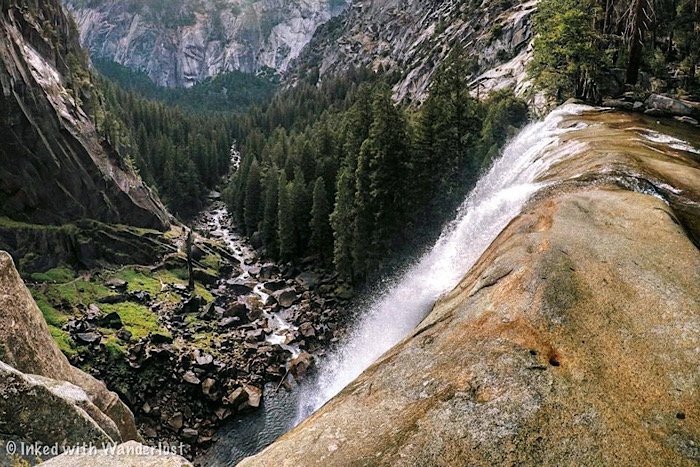
The time of year you do this hike will determine how “misty” it will be. Early in the season, it isn’t unusual to see hikers donning ponchos. Be sure to take pictures but don’t spend too much time as you still have hundreds of steps to climb to get to the top of Vernal. Once there, you’ll get a commanding view.
Nevada Falls
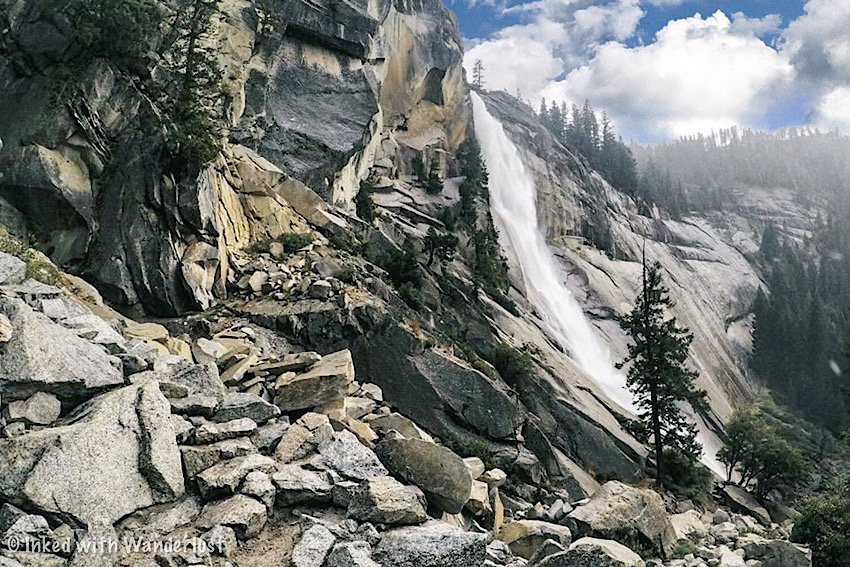
From the top of Vernal, you have another 1.5 miles or so to the top of Nevada Falls and the official end of the Mist Trail. You initially start out on relatively flat terrain through shady pines along the Merced. Soon, it’ll transition into another series of rocky switchbacks.
As you make your approach you’ll come across another footbridge and take notice of, “Liberty Cap”, A large piece of granite that is often mistaken for Half Dome. As you reach the base, you’ll work your way up the switchbacks mentioned above. Once there, you’ve reached the end of the Mist Trail and the first milestone of your hike.
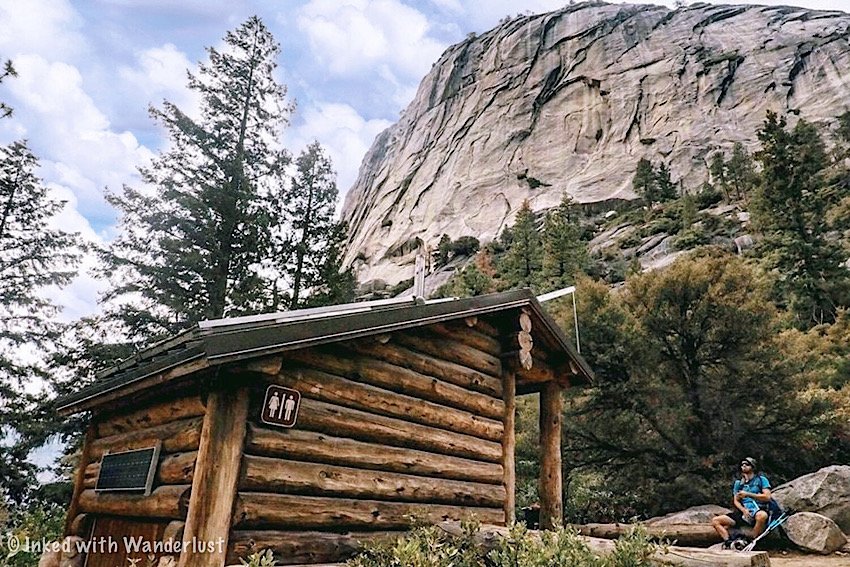
Here, you will find an opportunity to use the provided facilities and take advantage of the many logs/rocks to sit on while enjoying a snack (or two). You could also detour to the right (away from the restrooms) for 0.2 miles to see the top of Nevada Fall from yet another footbridge.
READ ALSO: “The Mist Trail: Hike One Of Yosemite’s Most Beautiful Trails”
Onward to Half Dome
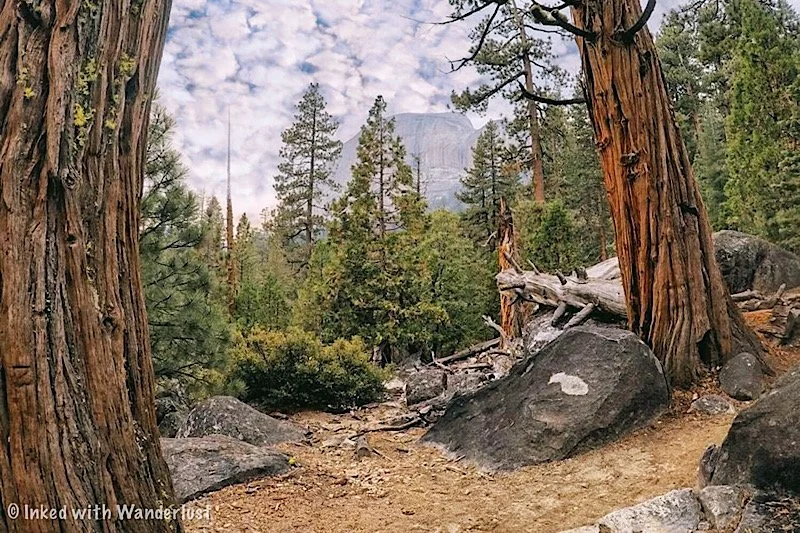
Once you’ve taken in the sights at Nevada Fall and feel rested enough, it’s time to continue your journey. From here, you’ll enjoy a brief flat section of trail. The next point of interest you’ll reach is Little Yosemite Valley (and a backcountry campground of the same name).
Securing a spot here allows you to break your hike up into two or more days. To do this, you’ll need a wilderness permit in addition to your Half Dome permit. I highly recommend going this route to get the most out of your experience.
After passing through Little Yosemite Valley, the trail begins to climb again. Tall sequoias provide shade from the sun as you work your way up the mountain. This climb isn’t overly difficult, but it is constant and steady. Occasionally, you’ll get sneak peaks of Half Dome between the trees.
Sub-Dome
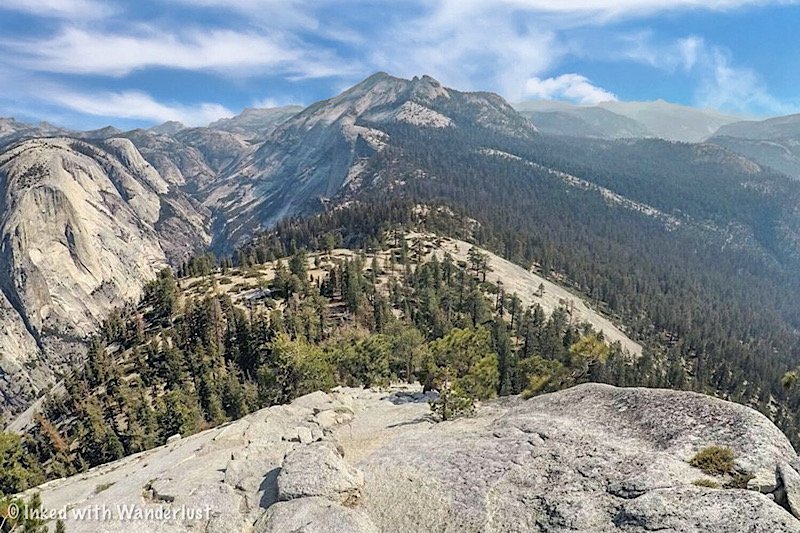
I fully believe that Sub-Dome’s sole purpose is to wreck whatever’s left of your legs. At this point, you’re at 8,000+ feet and just hiked for nearly 8 miles. Half Dome’s base is within reach and Sub-Dome will make you question how badly you actually want to do this.
Take your time and pace yourself here. Not only is Sub-Dome difficult to ascend, but it could also be dangerous as there’s little room for error. You’ll know you’re near the top when you see the lone tree sticking out of the granite, providing the only shade on this section.
Once you get over the hump just beyond this tree, the cables are just a short distance ahead of you.
The Half Dome Cables
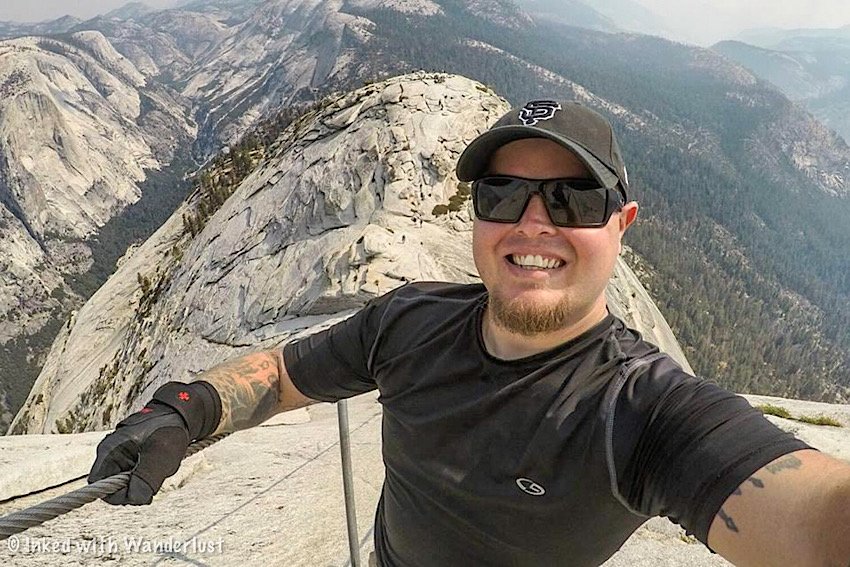
Two steel poles are placed (not exactly secured) into the granite rock, roughly six feet apart (length wise) with a wooden plank between each pair. Running the length of the dome from top to bottom are two steel cables running parallel to one another.
As stated above, the poles are not secured. Hikers have accidentally pulled them out. If that happens, don’t panic, just place it back in. As you work your way up, you’ll notice it get steeper with each step. From my perspective, it wasn’t that bad. In fact, I felt it to be fairly simple and straight forward.
Keep a firm grip on the cables and use the wooden planks as a goal to work towards. Once you get to each plank, use them as a resting point if you need to. While on the planks, keep your fellow hikers in mind and consider their speed. If someone behind you wants to pass, let them.
From the base to the top, you’ll climb a total of 400 feet. It took me around 20 minutes to do it. That’s with stopping to rest and taking a few pictures. The granite is slick from the thousands of hiking boots that have traversed it over the years, so sturdy hiking boots with excellent tread are a must!
The Summit
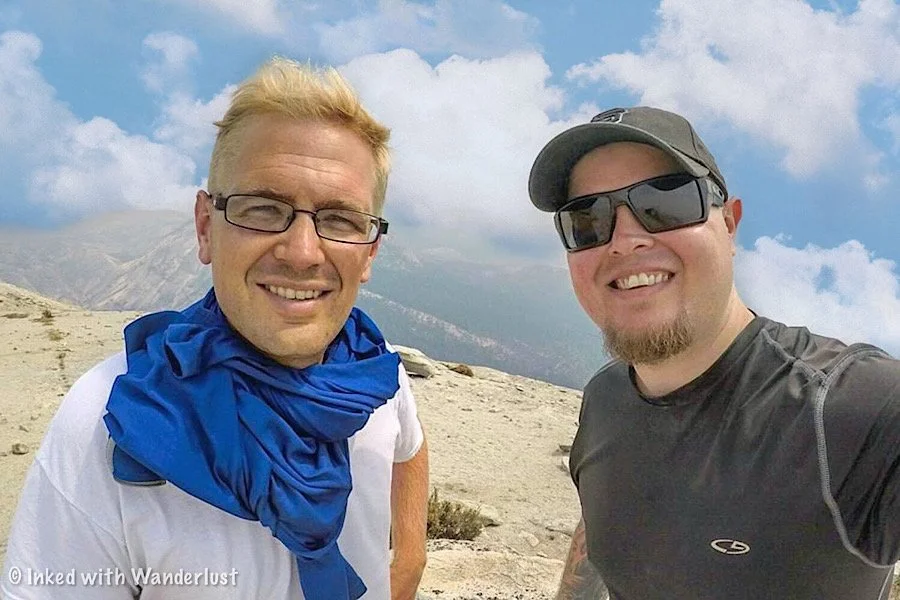
To reach the summit, you would’ve hiked 8+ miles, gone up several hundred stone steps, inclined nearly the entire way, felt the pain of subdome and completed a fear inducing 400 foot climb.
The area of the summit is roughly the same size as seven combined football fields. There’s plenty of room for everyone to explore. The views from Half Dome’s summit are unsurpassed. You can see Yosemite Valley, Tenaya Canyon, North Dome, Cloud’s Rest and more.
It’s important to note that if you see storm clouds in the area, it’s best to head back down asap. Trying to navigate the cables in the rain is dangerous. To me, going down was more difficult for me than going up was. I tried both forward and backwards. In my opinion, descending backwards was easier.
When you’re back the base, collect your packs, take a few more pictures and start your way back.
Decide Which Route To Take Back
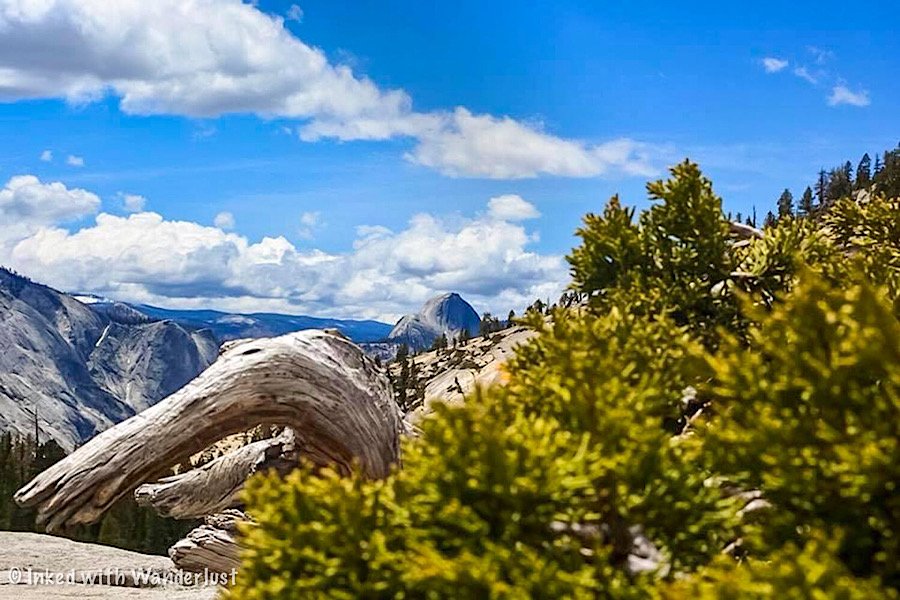
Once you’ve made it back to the top of Nevada Fall, you’ll now have to decide which direction you want to go. Your options are:
Back down the Mist Trail: This option is just you going down the same way you came up. The drawback are the steep, slick steps that make the process of going down a slow one.
Take the John Muir Trail: This option will add a mile and a half to your decent but will allow you to skip the steps on a relatively smooth path.
My brother and I chose the Mist Trail because it was pitch black during our way up and we wanted to see the waterfalls. However, the rain made me regret that decision.
Those steps were now ultra slick and forced us to move painfully slow. Suddenly, dealing with more mileage but smoother terrain felt like the better option. By the time we made it back to the car my legs were jello, my shoulders were screaming and I was dehydrated (I didn’t bring nearly enough water).
Despite all that, it was an epic adventure and I would do all over again in a heartbeat.
Alternate Routes To Consider

Happy Isles is just one of a few starting points for Half Dome. Other trailheads include:
Tenaya Lake: You’re looking at 23 miles round trip. Next time I hike Half Dome, this is where I plan to leave from.
Glacier Point: You’re looking at 20 miles round trip. Essentially, you’ll work your way down the Panorama Trail to Nevada Fall, then from there to Half Dome (on the way out, you could simply exit at Happy Isles instead of going back up to Glacier Point. That’ll save you some milage).
Little Yosemite Valley: This is the backcountry campground I mentioned earlier. You’ll hike 4.3 miles from the Mist Trail to here, then 7 miles round trip from Little Yosemite to Half Dome and back.
Alternate Hikes In Yosemite
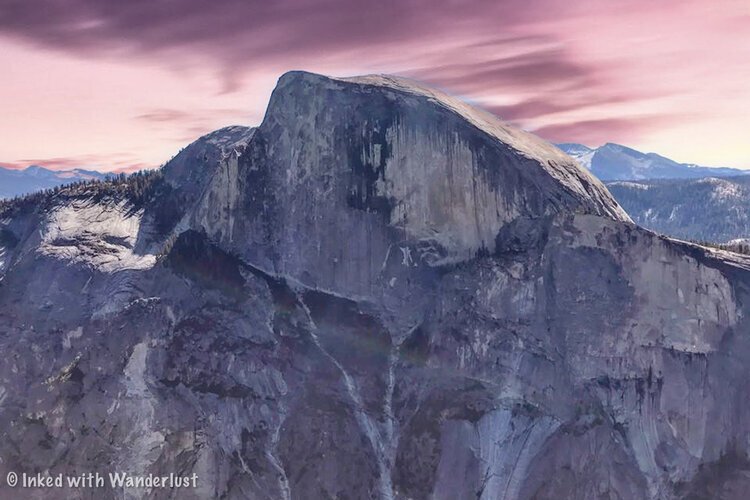
Half Dome isn’t for everyone. Thankfully, Yosemite is jam packed with incredible hikes you can do if you didn’t obtain a permit or if it’s too much for you.
Some of these include:
4-Mile Trail (Yosemite Valley/Glacier Point road)
Upper Yosemite Falls (Yosemite Valley)
The Mist Trail (Yosemite Valley)
Pohono Trail (Yosemite Valley/Glacier Point road)
Cathedral Lakes (Tioga road)
Cloud’s Rest (Tioga road)
Glen Aulin/Grand Canyon of the Tuolumne (Tioga road)
North Dome (Tioga road)
These are just a handful of the amazing hikes Yosemite has to offer. So if you didn’t get a permit, there’s no need to cancel your trip to Yosemite.
READ ALSO: “10 Awesome Things To Do In Yosemite Valley”
Stats And Additional Tips
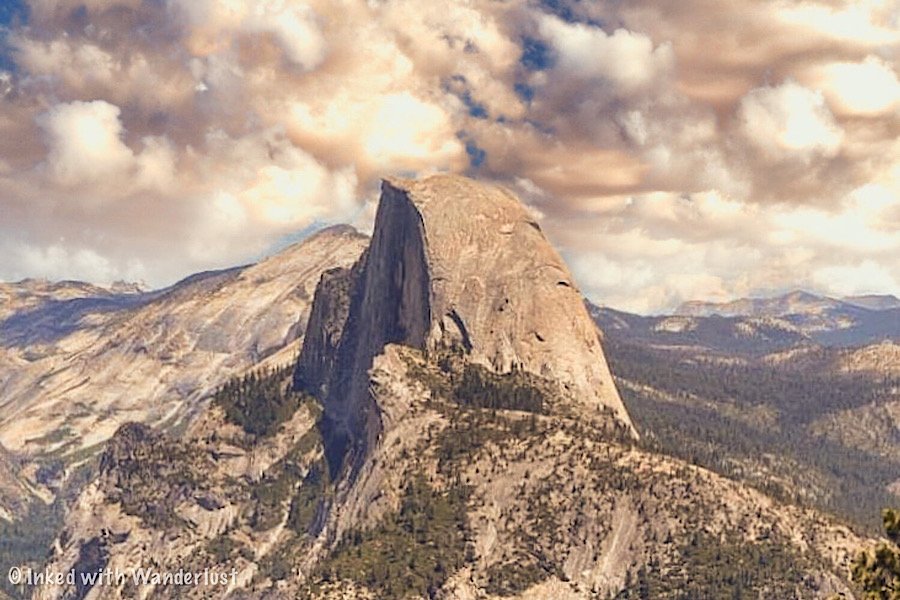
Total mileage: 17 miles round trip if you utilize the Mist Trail (the most commonly used trailhead).
Length of time: This will vary from person to person and highly depends on your level of fitness. Typically, expect an 8-12 hour hike.
Location: Yosemite Valley.
Water intake: Bring more than what you think you’ll need. You’ll have an opportunity for more water at the Vernal Footbridge via the filtered fountain, but that’s it. 4-5 liters or more would be wise.
Permit required: As stated above, a permit is required for this hike. The only time a permit isn’t needed is when the cables are down during winter (not recommended).
Avoid weather: If you see dark clouds or if it’s activity raining or snowing, do not climb up the cables. It is not worth the risk!
READ ALSO: “15 Tips For Your First Time Hiking Half Dome”
Essential Gear To Bring
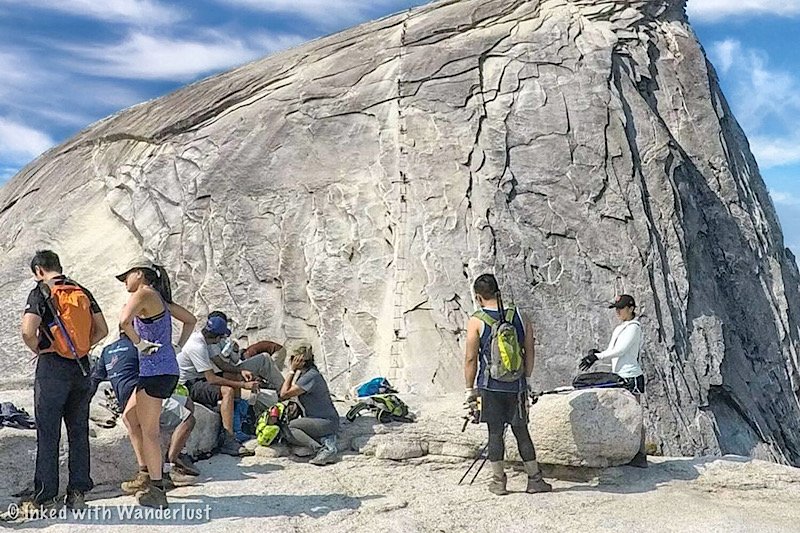
This depends on if you’re doing it as a day hike or over 2-3 days. For simplicity sake, I’m going to assume you’re like most people and doing it as a day hike. Some essential gear includes:
Daypack
Full-fingered gloves (to grip the cables)
Hiking boots/shoes with excellent tread
Hydration bladder insert (preferably 3+ liters)
Moisture wicking socks
Sunglasses and hat
Camera
Trekking poles
Sunscreen
Moleskin (for blisters)
Rain jacket/poncho
This post was originally published in 2020 and has been recently updated for accuracy.

15 Tips For Your First Time Hiking Half Dome
Every year, thousands of hikers summit Half Dome, many of them for the first time. In 2017, I was one of those first timers…
3 minute read | contains affiliate links
Each year, thousands of hikers summit Half Dome, many of them for the first time. In 2017, I was one of those first timers and though I felt like I was fully prepared, truth is, I wasn't.
In fact, I’m confident that if you polled others who’ve hiked Half Dome, I’m willing to bet that many of them would agree.
If you’re hiking Half Dome for the first time this season (or just mildly curious), this post is for you. I’m giving you 15 tips I feel all Half Dome hikers should be aware of going in. Let’s get into it.

Disclosure: This post contains affiliate links. If you click through and make a purchase, I may earn a commission at no additional cost to you. Thank you for supporting us!
1) Get An Early Start
This is especially true if, like most people, you’re doing this as a day hike. You’ll want to arrive to the trailhead as early as possible.
When my brother and I hiked it, we arrived at the Happy Isles trailhead at 3am. We didn’t see any daylight until we got past Nevada Fall.
The reasons you’ll want to start early are:
You’ll beat the crowds to the cables and avoid bottlenecks
You’ll likely avoid the afternoon storms that are notorious in Yosemite
You’ll beat the mid-day heat
If you’re doing this hike as a multi-day and you’re just hiking to your camping spot the first day, you won’t have to worry about it as much.
If you’re doing this as a day hike, however, definitely get started as soon as you can. It doesn’t have to be 3am, but pre-dawn is ideal.

2) Bring Gloves With You
Surprisingly, many people don’t think of this. The Half Dome cables are made of steel and they get hot. They’re also blister inducing.
Using gloves on the cables will help prevent blisters, protect you from burns and most importantly, provide you with good grip.
Sometimes, a pile of discarded gloves forms near the base. You’re welcome to use a pair but you shouldn’t count on the pile being there.
While it’s thoughtful, Rangers will collect and throw the gloves away as it’s technically littering. So bring your own. Full fingered preferably.
SEE MY TOP RECOMMENDATION FOR GLOVES TO USE ON HALF DOME HERE!

3) Bring More Water Than You Think You’ll Need
I cannot stress this enough. It’s always important to bring water with you on a hike but it’s especially true on this one.
I recommend 3-4 liters, per person. I only brought two liters with me and ran out on the way back (with over six miles left to go).
The only filtered water source is the fountain at the Vernal Fall footbridge (just about a mile into the hike). After that, you’re on your own.
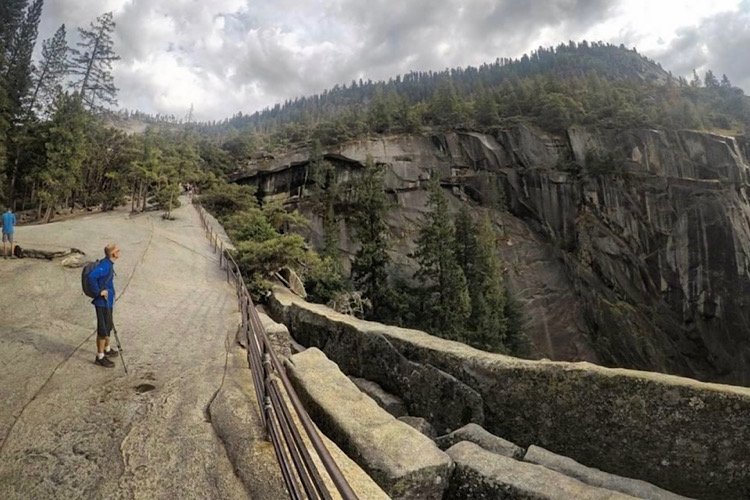
4) Trekking Poles Are A Must!
My knees were killing me on the way back. If it weren’t for my trekking poles helping to off-set the weight, my brother would’ve had to carry me out.
If you’re someone who’s prone to knee pain or you know you usually require trekking poles on normal hikes, you’ll definitely want to bring them along on this one.

5) Wear Shoes/Boots With Excellent Grip
While granite usually has excellent natural grip, years of hikers traversing it has caused that section to become smooth and slick.
Seriously, normal shoes or ones that are worn down will not suffice. You’ll definitely want to break them in prior to your hike, but the tread should be as new as possible.

6) Leave Your Backpack At The Base
It may be tempting to bring your backpack with you as you climb up the cables but take it from me, make it easier on yourself (and others) and ditch it at the base.
The reason I say this is twofold:
There isn’t a lot of space between the cables, so if everyone’s wearing a bulky backpack, that space only becomes more restrictive
For some, it’s already challenging enough to climb the cables. Adding the weight/balance of a backpack only complicates matters
If you must bring a backpack to the top, bring a smaller day bag and leave the bulky one behind. No one’s going to mess with your stuff.
Do be sure to seal your bag before leaving, though. You don’t want Marmots and other critters getting in there.
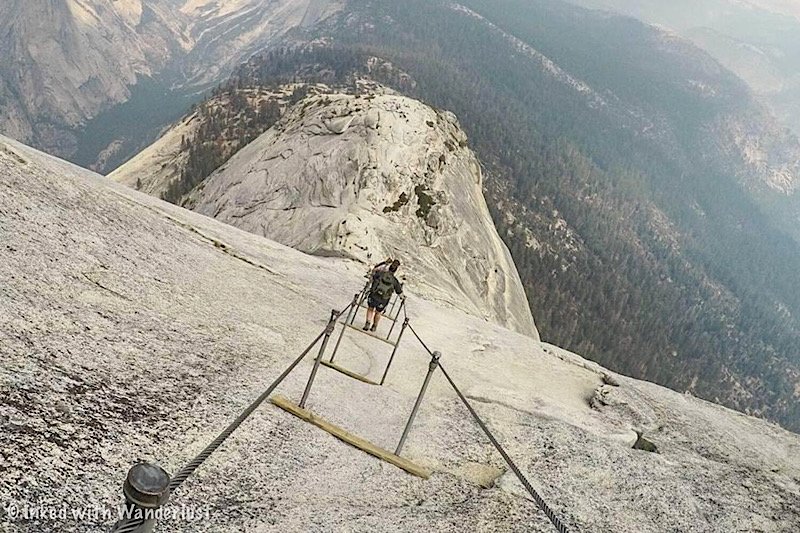
7) Take As Long As You Need On The Cables
There’s no shame in taking it slow. This isn’t a race and there’s no prize at the top for the fastest climber. Go at your own pace.
Every six feet or so (at each set of steel poles) are wooden planks. Use those as a guide and focus on them if the heights start getting to you.
Rest at each one if necessary. No one will make fun of you. Just be mindful of those who may want to go faster and let them pass.

8) If You See Dark Clouds, Don’t Attempt It
Yosemite is infamous for its afternoon storms. It isn’t uncommon to go from clear blue sky to rain and lightning in the blink of an eye.
Bad weather and climbing Half Dome isn’t a good mix. If lightning decides to strike, there’s a good chance Half Dome will be where it hits.
If you get to the base and it starts to rain, don’t risk it. If you’re at the summit and see black clouds rolling in, get back down pronto.
In the 1980’s, numerous people were killed and injured on the summit when a sudden storm came in. It’s always best to er on the side of caution when it comes to storms.

9) You Can Use A Climbing Harness If You Want
Some opt to utilize a harness to secure themselves to the cables, reducing their chance of falling.
It’s a device that you wear around your waist and legs, with the other end connecting to the cables via a carabiner.
Personally, I don’t think it’s necessary. However, if it’ll make you feel better and help you fulfill your dream, go for it.
You will need to unclip and clip back in every six feet or so, so it will slow you down a bit. The peace of mind it provides may be worth it, though.

10) Get Into The Best Shape You Can
There’s no need to be a top-level athlete or master climber, but the better shape you’re in, the easier time you’ll have.
The cables themselves are more upper strength than leg strength and the hike itself will test your cardiovascular endurance.
Hitting a stair master will prepare you for the Mist Trail portion of the hike. Likewise, a strength training routine would be beneficial.
Most importantly, hike as much and as often as you can prior to your trip. The higher the elevation, the better.
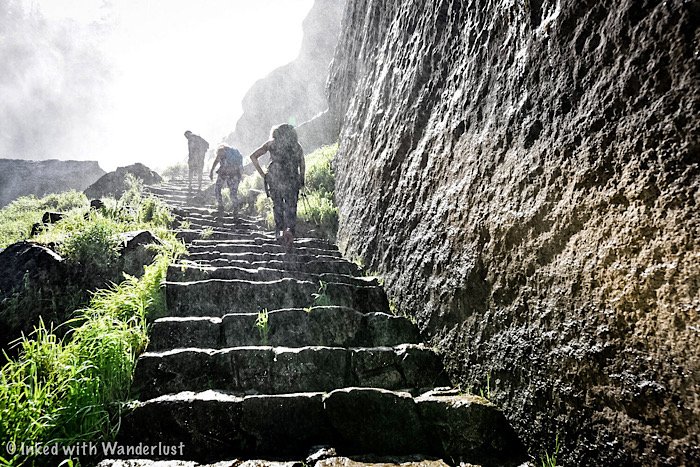
11) Bring Extra Socks
This is one I wish I’d thought about. You should always take care of your feet…always. That means bringing a fresh pair of socks (or two).
If you don’t and get soaked on the Mist Trail, you’ll be forced to hike the rest of the way with soggy socks.
If the Mist Trail doesn’t get you, then your socks will most definitely be soaked in sweat by the time you make it to the summit.
Packing extra socks will allow you to swap out the nasty ones for a fresh pair for the hike back down.

12) Have A Hard Copy Of Your Permit Available
Some hikers spend 8-10 hours or more doing this hike. Consequently, if you’re taking a lot of pictures, your phone battery will almost certainly die.
If that happens and all you have is a digital copy of your permit, you’ll have nothing to show the ranger when asked. Guess what that means? Off you go.
It wouldn’t hurt to have a printed copy in a plastic bag inside your backpack. That way, you won’t risk getting turned around.
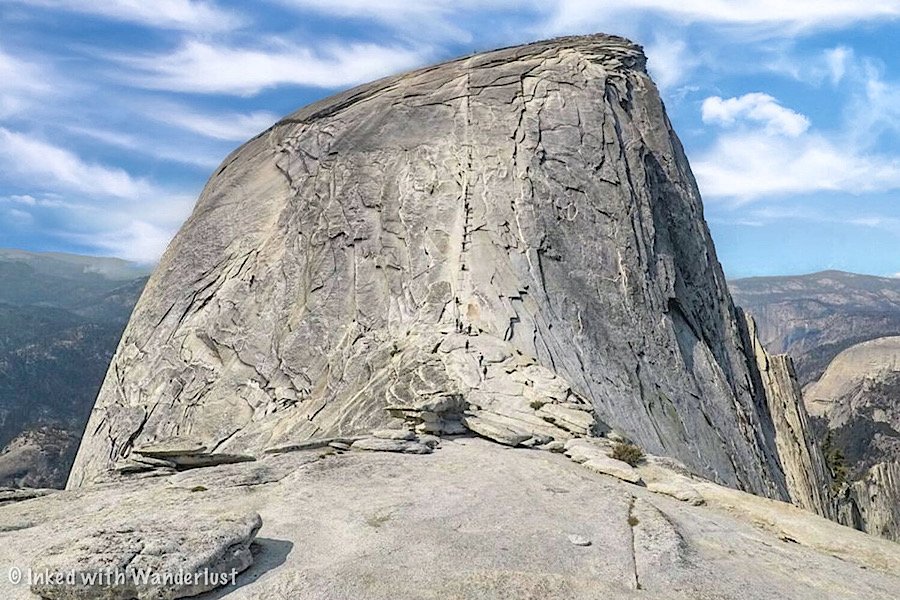
13) Bring Ibuprofen & Moleskin
You can add this one to the, “wish I thought of it”, category. As stated above, my legs and feet were wrecked by the time we got back to the car.
It was only then that I realized my mistake. I had absolutely nothing to help mask the pain and had a long drive home ahead of me.
Bring some Ibuprofen (or an alternate pain killer) with you. Take a couple at the summit, if needed, to reduce the discomfort on the way back down.
Also, moleskin does wonders for covering and preventing blisters. If you don’t know what it is, it’s a dense, woven cotton fabric that acts as a shield between your skin and shoes in areas where blisters are most common. Highly recommended for ANY hike.

14) Eat, Eat And Eat Some More
This is a long, demanding hike and for most people, will take a full day. You will burn a serious amount of calories and energy.
Due to this, you’ll need to replenish your body with as many nutrient dense foods as you can.
Foods with complex carbs, low amounts of sugar, decent level of healthy fats and high amount of protein will do the trick.
Also, salty snacks, such as beef jerky and sunflower seeds, will help you retain water and keep you hydrated for longer.
Stop as often as you need if you’re feeling hungry or low on energy. Trust me, you don’t want to tackle the cables with nothing in the tank.
SEE MY TOP RECOMMENDATION FOR PREPARING FOOD IN THE WILDERNESS!
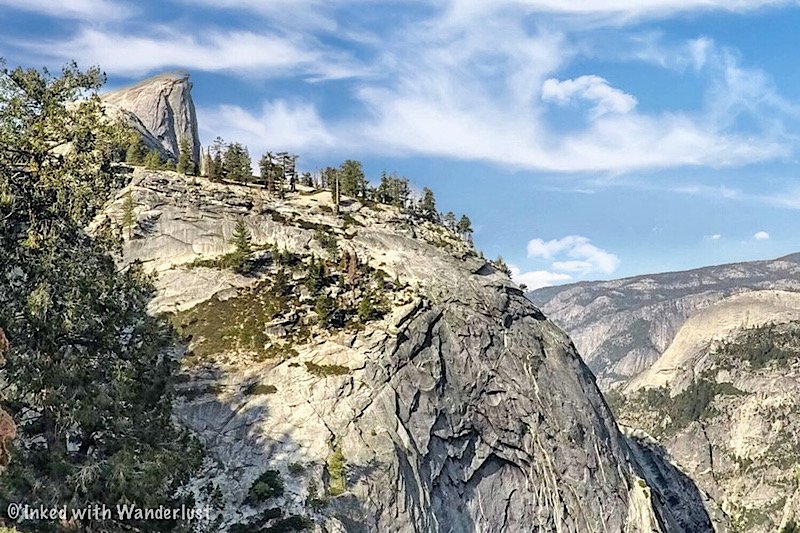
15) There’s No Shame In Turning Around
More hikers do it than you might think. I’d wager a guess that for every ten hikers that make it to the cables, at least one decides against it.
Whether it’s due to bad weather or simply a gut-feeling on your part, there’s no shame in turning around. The cables are intimidating.
So don’t succumb to peer pressure or allow pride to take over. If you get there and it doesn’t feel right, then don’t do it. You still had an amazing adventure!
BONUS: Peak Design Camera Clip

This camera clip by Peak Design is a MUST for anyone using their DSLR or point-and-shoot camera while out on a hike or are just out and about on a shoot.
As shown in the image above, it securely attaches to your backpack strap and firmly holds your camera in place. Allowing you to be hands free while not in use.
When inspiration strikes, a quick button press is all it takes to remove it. When done, simply snap back into place and you’re done.
CHECK OUT THIS SOLID CAMERA CLIP BY PEAK DESIGN ON AMAZON HERE!
If you’re serious about hiking Half Dome, be sure to read my other Half Dome related posts…
Disclosure: This post contains affiliate links. If you click through and make a purchase, I may earn a commission at no additional cost to you. Thank you for supporting us!
Please support this website by subscribing to the newsletter below.
Thanks for reading.

Hiking Half Dome In Yosemite: My Journey In 30 Pictures
Back in 2020 when I launched this website, the very first published post was, “Half Dome: The Complete Guide To Yosemite’s Epic Day Hike”, and it’s…
3 minute read | contains affiliate links
In 2020, when I launched this website, the very first published post was, “Half Dome: The Complete Guide To Yosemite’s Epic Day Hike”, and it’s the one i’m most proud of.
The reason for that is because hiking Half Dome was a goal of mine and accomplishing that goal is what gave me the confidence and drive to launch Inked with Wanderlust.
The original post contains a ton of information and I highly recommend giving it a read if you’re planning to hike Half Dome (especially if it’s your first time).
*PRO TIP: Bookmark both of these posts to your device so you can return to the information later
This post, however, will be the shorter, stripped down version. It’ll focus solely on the trail itself and nothing else. So you’ll quickly get an idea of what this hike is like.
It’ll also focus solely on the trailhead where most Half Dome hikers begin their journey; the Happy Isles trailhead and through the Mist Trail.
If reading this post gives you some inspiration to hike Half Dome yourself, check out our ultimate beginners guide here (opens a new window).
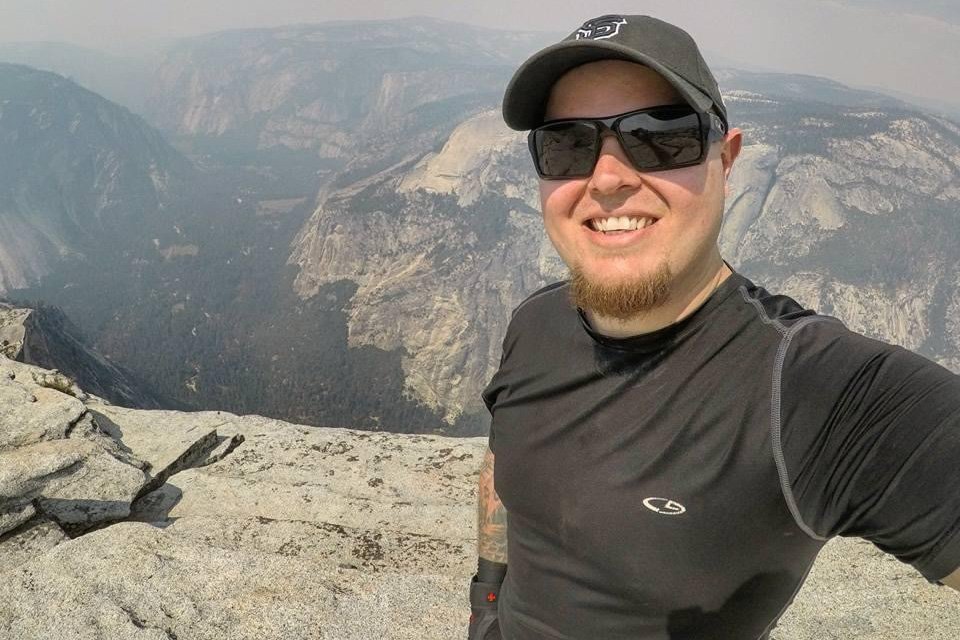
Quick Stats
Location: Yosemite Valley, California
Fee: $35 to enter Yosemite + applicable permit fees
Permit: Required when cables are up (typically between Memorial Day and Columbus Day)
Open: All year (cables are down during winter)
For: Hikers
Restroom: Five: 1) At the trailhead 2) At the Vernal Fall footbridge 3) Near the Emerald Pools at the top of Vernal 4) At the top of Nevada Fall 5) At Little Yosemite Valley campground
Parking: Large dirt lot a quarter-mile from the trailhead
EV Stations: None
Difficulty: Hard
Popularity: Extremely high
Mileage: 14.2 - 16.5 miles, RT (depending on which route you take back)
Time: Full day/Overnight
Elevation Gain: 4,800 feet
Condition: Maintained and easy to follow
Features: Two waterfalls and summiting Half Dome itself
Pets: Not allowed
Drones: Not allowed
Hazards: The slick stone steps of the Mist Trail and the potential for fatal falls
Our Visit(s): 2017
Half Dome Trailhead and Parking
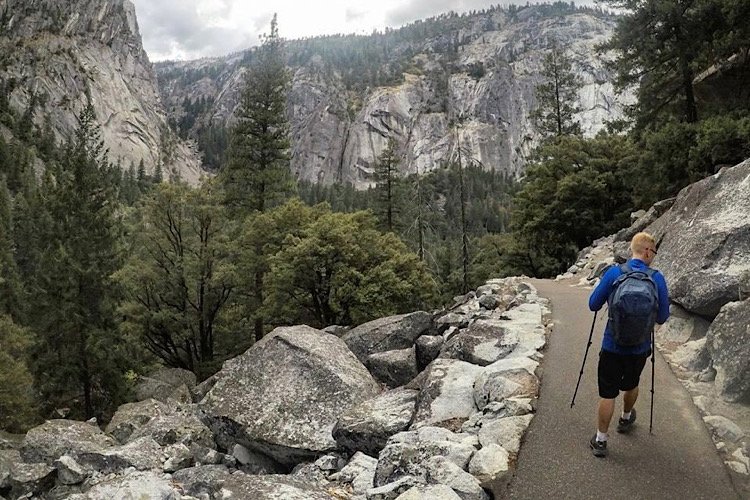
For most hikers, the official starting point for Half Dome is the Happy Isles trailhead. Which is also the trailhead for the Mist Trail and John Muir Trail.
There is no parking lot at Happy Isles itself. The nearest one is a large dirt lot located about a quarter-mile down the road (near Curry Village).
To get to it, look out for Curry Village signage and follow them. As you near Curry Village, you’ll see signage pointing the way to the parking lot.
The lot is known to fill quickly. Especially during the summer and spring season. Plan for an early start, pre-dawn preferably. I began my hike at 3am.
If full, you can always utilize the shuttle. It’ll drop you off near the trailhead. Keep in mind, though, that the shuttle doesn’t begin operations until 7:00am.
The Mist Trail
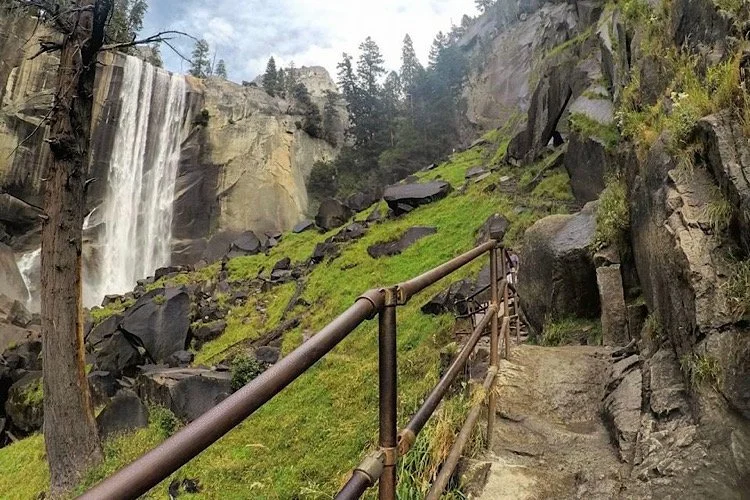
Aside from Half Dome, the Mist Trail is arguably the most popular trail in Yosemite. It features two beautiful waterfalls (Vernal and Nevada Falls) in a relatively short hike.
If you’re here in spring or early summer, prepare to get wet. They don’t call it the Mist Trail for nothing. Later in the season, it isn’t so dramatic as run-off is minimal.
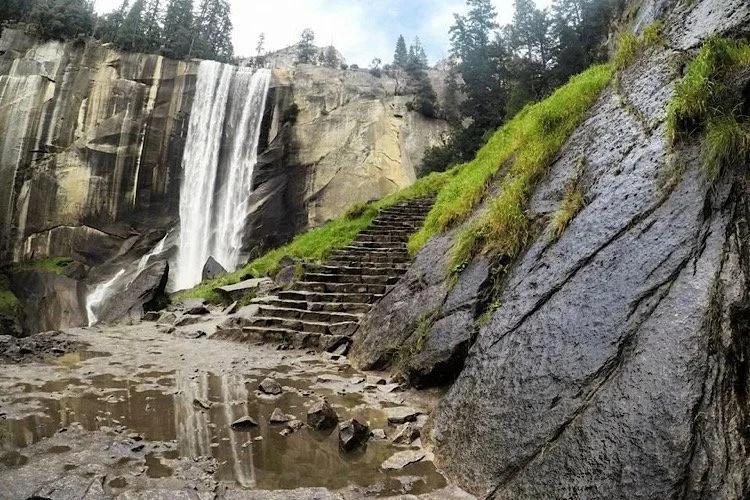
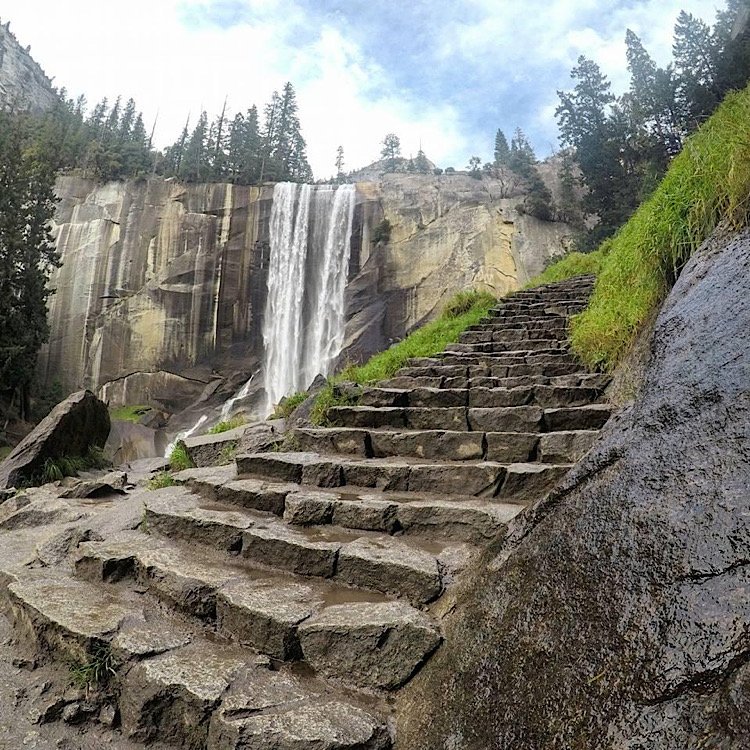

One danger you’ll need to be cognitive of are the stone steps. There are hundreds of them and they get incredibly slick from the constant mist.


From the trailhead, it’s 1.5-miles to Vernal Fall. By the time you’ve reached Nevada Fall, you’re about 3.5-miles in.


Between Vernal Fall and Nevada Fall you’ll get a reprieve from the stone steps as the trail turns to a traditional dirt path.
After crossing the footbridge near Nevada Fall, the stone steps return as you work your way to the top of the beautiful waterfall.


At the top of Nevada Fall is a restroom and a few benches/rocks scattered about to sit on. It makes a great spot to relax and gather yourself.
Little Yosemite Valley & Incline

After Nevada Fall, you’ll start on the one and only flat portion of the trail. Be sure to enjoy the reprieve because it won’t last long.
This stretch will take you through what’s known as Little Yosemite Valley (where a backcountry campground by the same name is located).
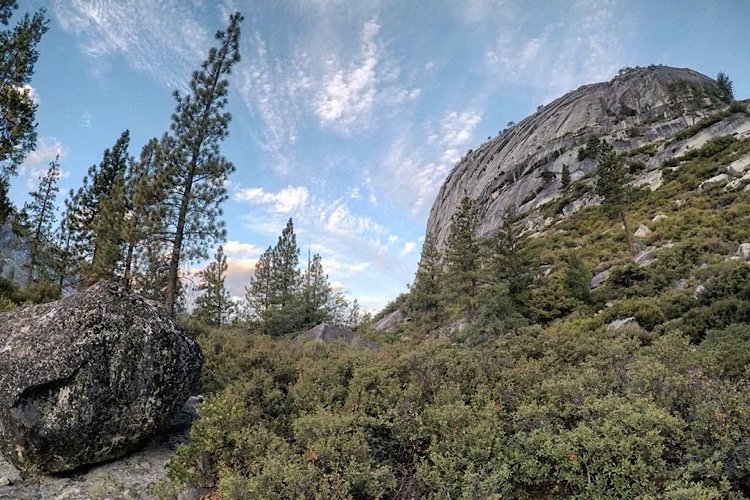


When you reach the campground, you’re right around the halfway mark to Half Dome. There, you’ll find your fifth and final opportunity to use a restroom.

Shortly after the campground is when you’ll again begin another relentless incline as you make your way to Sub-Dome.
You’ll make your way up the mountain via a series of switchbacks. They’re not difficult but if you’re not used to the elevation, you’ll feel it.
Sub-Dome
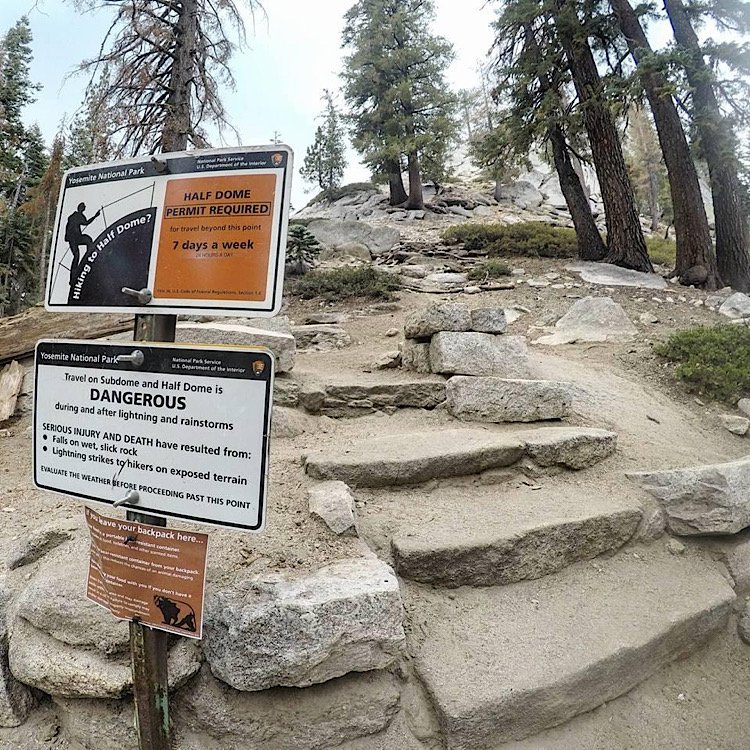
Sub-Dome is your final obstacle before reaching the cables. I believe Mother Nature designed it to do one thing; destroy whatever’s left of your legs.
It’s a mini granite-dome connected to the back half of Half Dome. A series of short switchbacks built into the granite take you to the top.
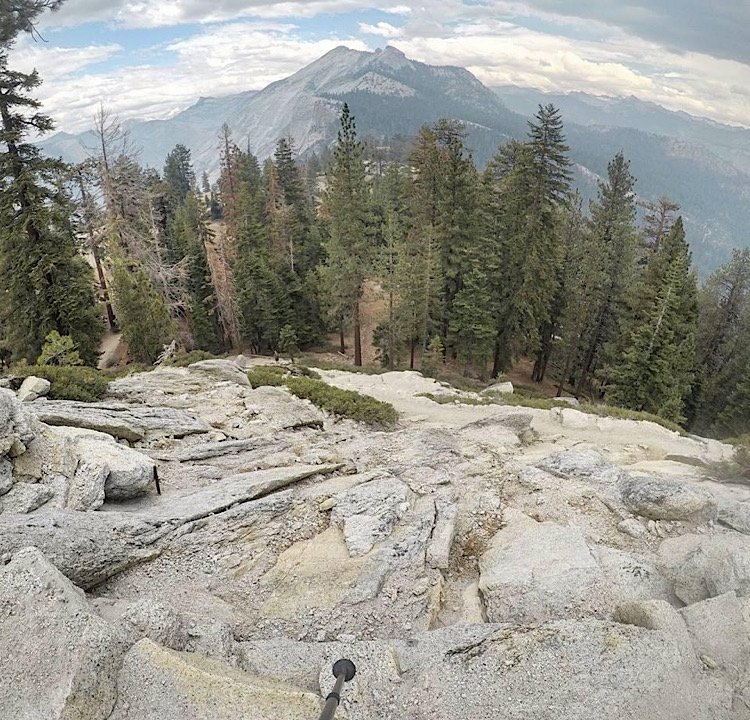
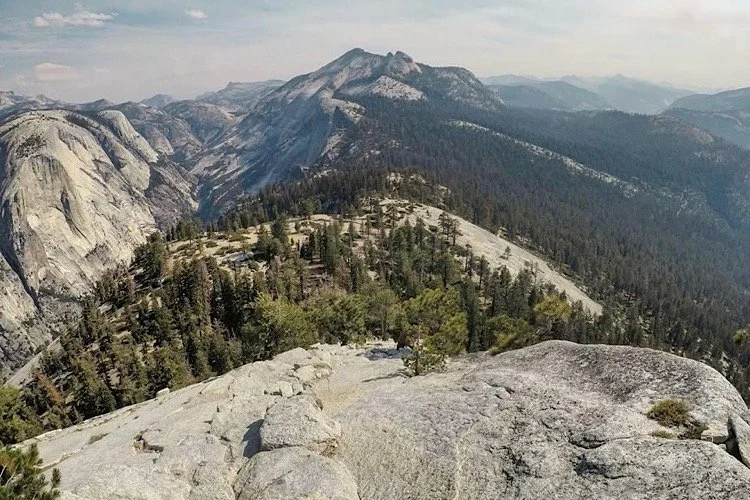
This is also the point in the hike where you’ll likely need to show your permit to a Ranger for inspection (if there’s one stationed there).
Sometimes the Ranger is stationed just before Sub-Dome, sometimes their stationed at the top. Don’t risk going through all that if you don’t have one.
READ ALSO: “Half Dome Permit: The Ultimate Permit Lottery Guide”
Half Dome Cables

From here, the only thing standing between you and the summit are the cables. The cables are there to assist you in reaching the top.
They’re placed in the granite and feature a wooden plank between two steel poles every six feet or so. Along the entire length are two elevated steel cables.
To use them, simply grab hold of the cable and hoist yourself upward to each wooden plank. My brother and I used those planks as resting points.
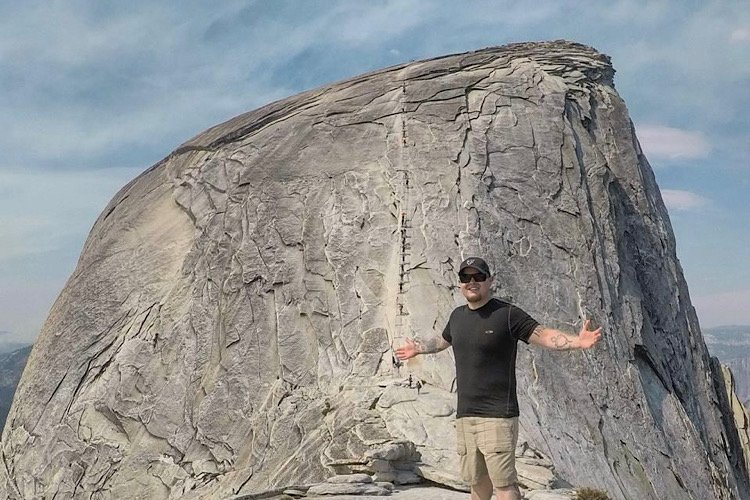
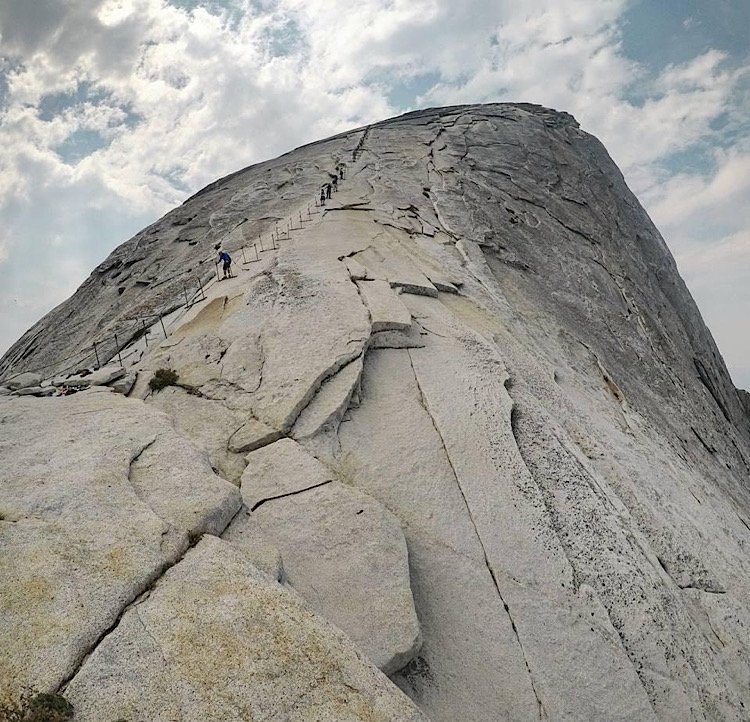
The space between the cables isn’t very wide and those going in both directions share the space. No matter your direction, stay to the right.
If you want to use a harness to secure yourself, you can. You’ll need to unhook/hook-up again at every pole so it will slow you down a bit.


If you feel like you need to take it slow, that’s perfectly fine. Just keep in mind that people behind you may want to go faster. If so, simply let them pass.
When I was on the cables, I was impressed by how cooperative and helpful everyone was to each other. There was no chaos or rudeness.
To me, the ascent wasn’t that bad. It looked much worse in pictures and video. Still, it gets near vertical the higher you go, so take precaution.
Half Dome Summit
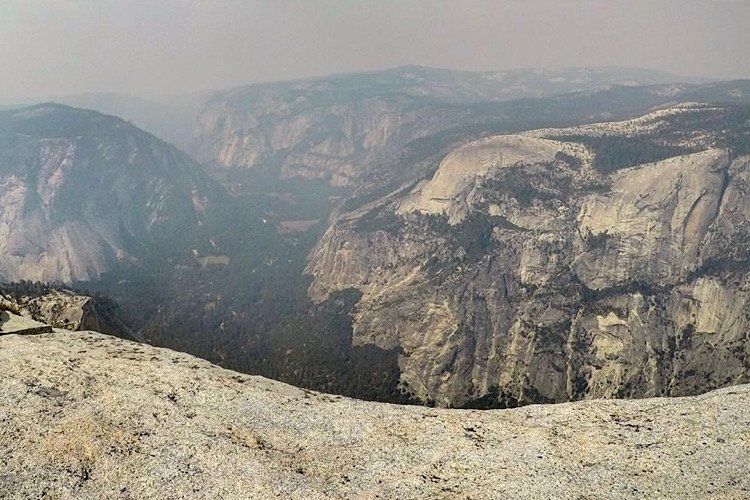
Reaching the summit of Half Dome is quite the accomplishment for all who attempt it. For me, this was an “Everest” moment (cheesy, I know).
The views are astounding no matter which way you look. Walk straight (away from the cables) to the edge to get a commanding view of the valley.
Other points of interest visible from Half Dome are North Dome, Cloud’s Rest, Glacier Point, Tenaya Canyon and more. The views are simply unsurpassed.
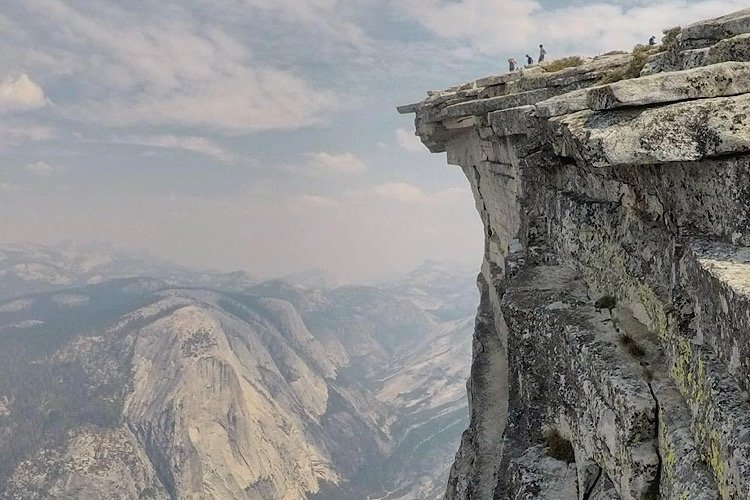
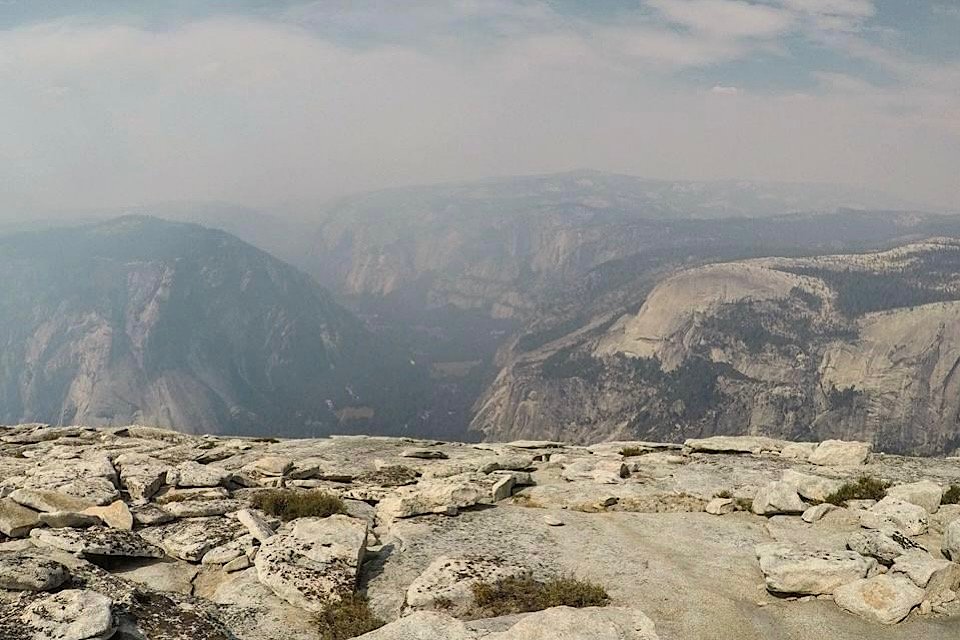
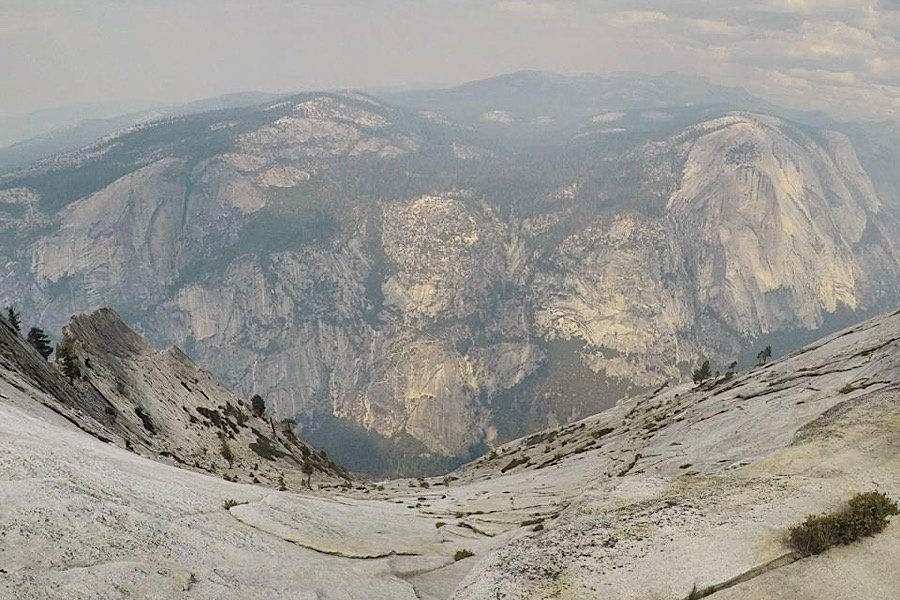
The summit is about the size of seven combined football fields, so there’s plenty room to walk about and explore. So take your time.
One thing I should mention - if you see dark clouds coming, head back down asap. You do not want to be stuck up there during a storm.
Heading Back
When you’re finished, simply head back the same way you came…with one exception. When you reach the top of Nevada Fall again, you’ll have two choices:
Head back down the Mist Trail (remember the slick, stone steps)
Take a detour down the John Muir Trail (JMT)
When I hiked it, we made the decision to hike back down the Mist Trail because on our way up, it was still dark and we didn't see much.
Trust me when I say that if there’s one aspect of our experience I regret, it’s not taking the JMT detour. My legs were jello and navigating those steps was miserable.
Taking the detour will add another mile or so to your hike BUT…you won’t have to contend with the steps. It’s a standard dirt path.
Your Thoughts…
I’d like to know your thoughts on hiking Half Dome and the cables themselves. Is this something you think you’d want to do?
Have you done it? If so, i’d like to hear your perspective. Perhaps it wasn’t that bad to you or maybe it was harder than you anticipated?
Let us know in the comment section below or send us a private message on our Instagram. We love hearing from our readers!
Also, don’t forget to check out our insanely detailed ultimate guide about Half Dome to get suggestions, advice, alternate routes and more!
Please support our website by subscribing to our newsletter below.
Thanks for reading.
CHECK OUT THESE OTHER AMAZING CALIFORNIA DESTINATIONS!
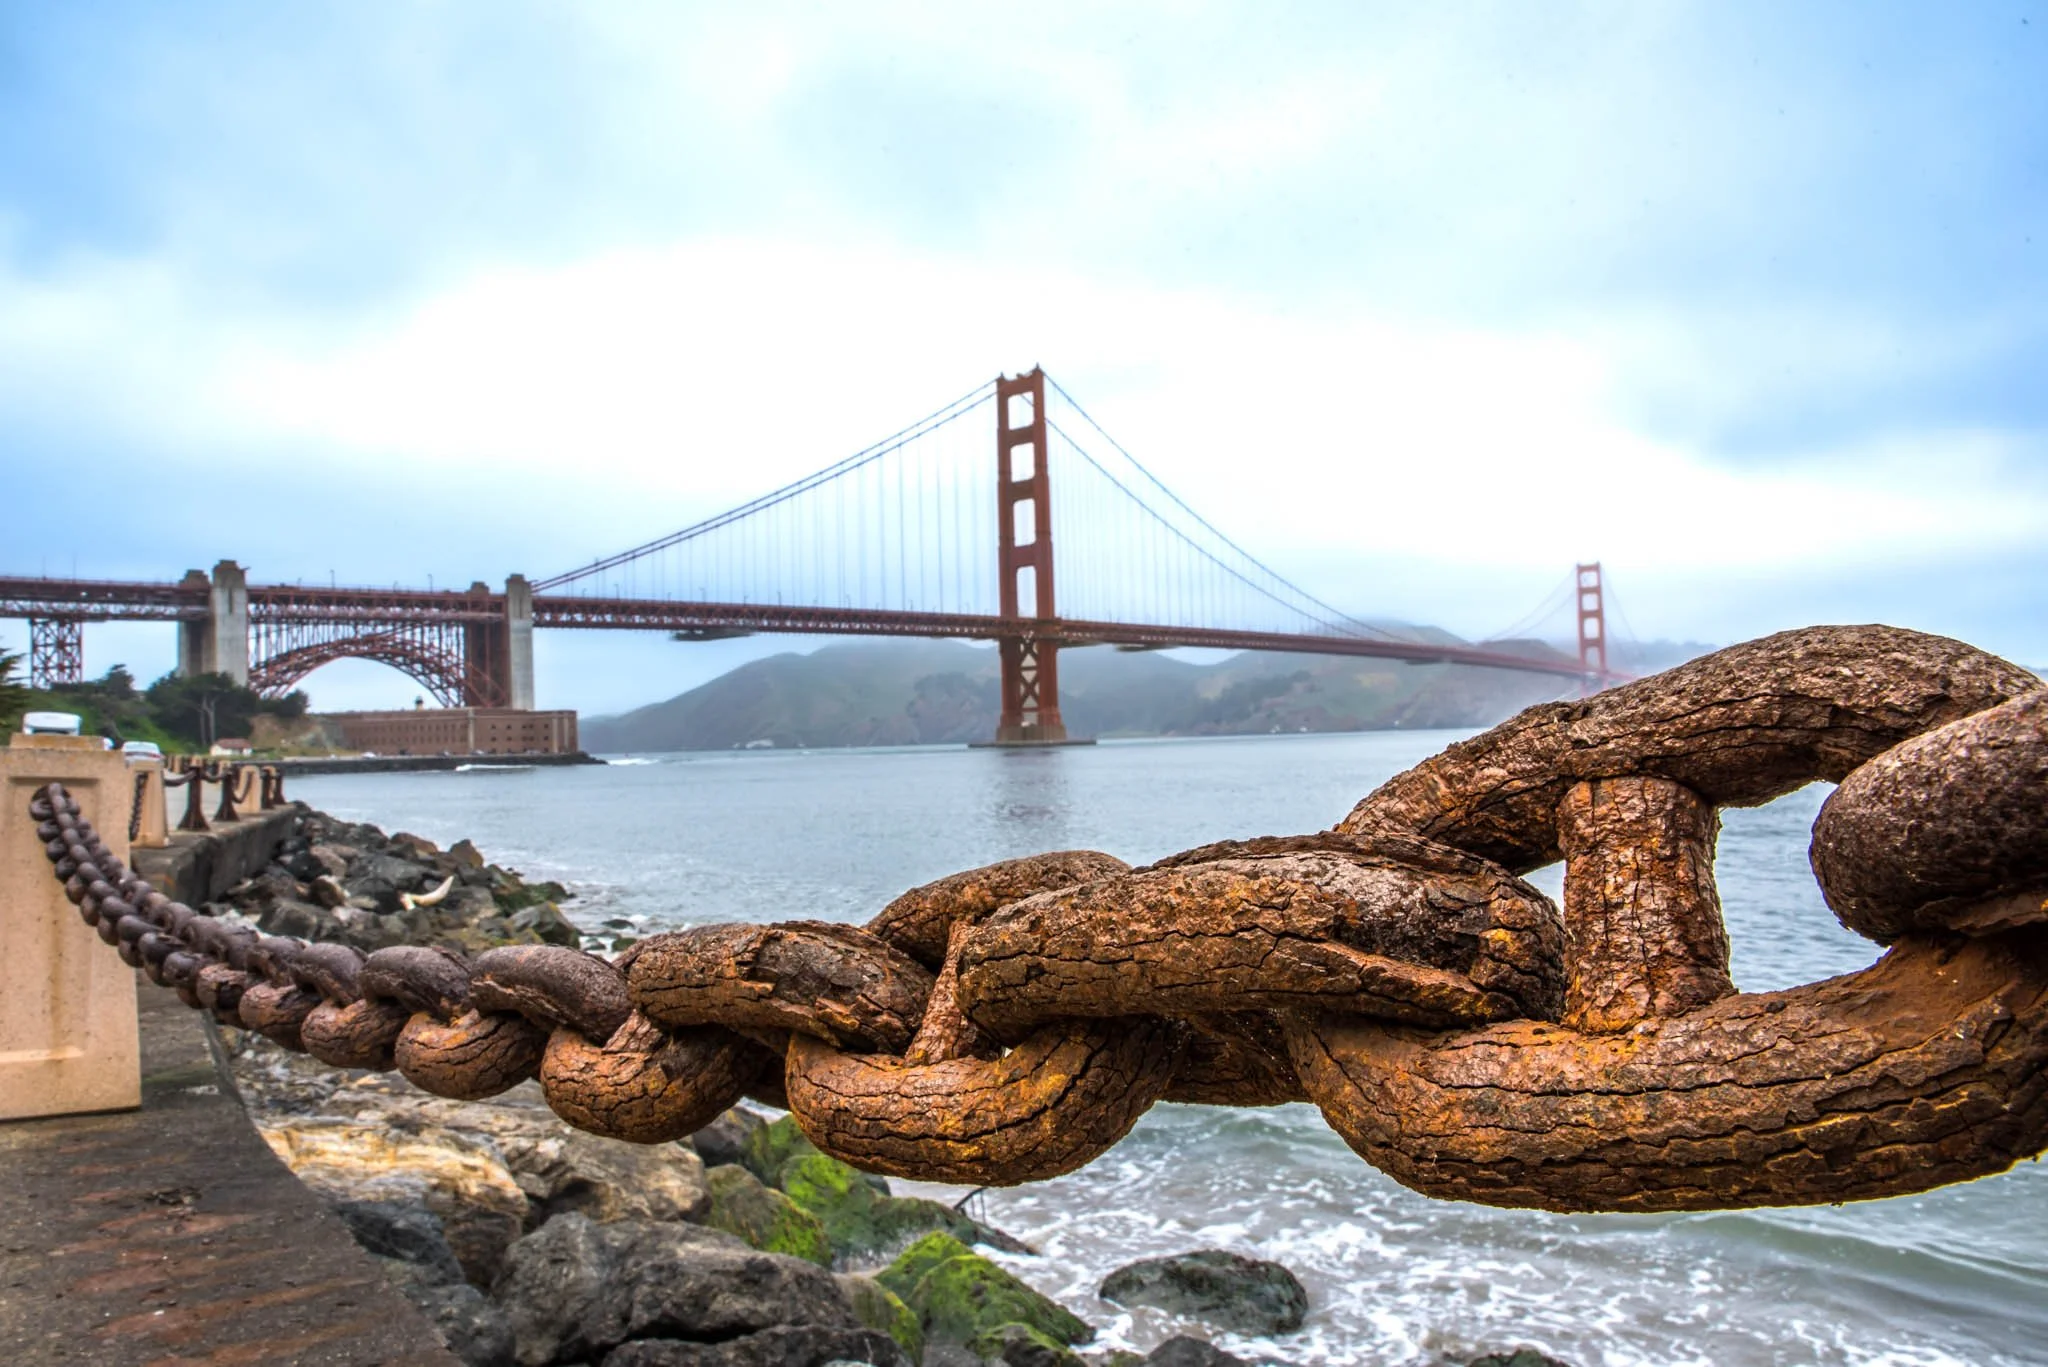


The Mist Trail: Hike One Of Yosemite's Most Beautiful Trails
Yosemite National Park is filled to the brim with many popular and beautiful natural attractions and trails. However, there are a select handful that are…
5 minute read | Contains affiliate links
Yosemite is filled to the brim with many popular and beautiful natural attractions and trails. However, there are a select handful that are insanely popular in the park.
We have been blessed to have hiked many Yosemite trails and while they are all amazing in their own right, there are two that stand out from the pack; Half Dome and The Mist Trail.
We’ve covered Half Dome in a previous article that details my experience and gives you a good idea of what to expect.
While The Mist Trail is partially covered in that one (The Mist Trail is where most hikers begin), we felt it to be deserving of its own detailed, dedicated post.

Quick Stats
Location: Yosemite National Park (Valley)
Red Tape: None for the trail, but you’ll need to pay the park entrance fee
Open: Spring through Fall
For: Hikers only
Parking: Large dirt lot a quarter mile from the trailhead
Restroom: Two. One at the Vernal footbridge and another at the top of Nevada Fall
EV Stations: None
Drone Use: Not allowed
Difficulty: Moderate to hard
Time: Two to four hours
Milage: Three miles (RT) to Vernal Fall / Seven miles (RT) to Nevada Fall
Elevation Gain: 1,925 feet
Trail Condition: Well maintained and marked
Main Feature(s): Vernal Fall & Nevada Fall
Pets: Not allowed
Special Notes/Hazards: The stone steps along the trail are slick, some are steep, and they can be dangerous. Watch your footing
Our Visit(s): September 2017 & June 2020
The Mist Trail

Parking can be somewhat complicated for this trail (Yosemite as a whole, really). This trail is one of, if not the, most popular in the park. So the lot fills quickly.
Those who are hiking Half Dome utilize this trail and parking lot as well and they get an early start. So the lot may be already partially full by the time the sun rises.
Usually, if you get here before 9am, you’ll likely score yourself a spot. If it’s full, signs will be posted alerting you to that.
Your options in this case would be to park at Curry Village (an additional half a mile away) or park elsewhere in the park and take the free shuttle.

Private vehicles are not allowed on the road going to the trailhead. So either way, you’re going to have to walk to get there.
Simply follow the road to the trailhead. It’ll be to your right after the bridge. After a short distance, you’ll see a gate and trail signage on your left. This is the official starting point.
Vernal Falls

The first feature on this trail is the beautiful Vernal Fall. Not counting the distance from the parking lot, it’s 1.5 miles from the trailhead to the top of Vernal.
Don’t let the short distance fool you. This trail is anything but easy. It’s a relentless, uphill slog nearly the entire way. Not to mention the slick, stone steps.
After a mile, you’ll arrive at the Vernal Fall footbridge. Here, you’ll get your first and only opportunity at filtered water via the fountain. You’ll also have access to the first of two restrooms.
Both are located just past the bridge. This is the point where a lot of visitors decide to call it a day and head back (you do get a slight view of the falls from the bridge).

You’ll also have a fork in the trail here. If you don’t want to deal with the slick stone steps, you can take the John Muir Trail.
This trail is on a far more even grade, but it will not take you to the base of Vernal and it will add a bit more time to your hike. To experience the mist, continue left on the trail proper.
The trail begins to climb again as you get closer to Vernal. Soon, you’ll approach the beginning of the stone steps and get your first glimpse of this magnificent waterfall.
I’ve never counted them, but according to my research, there are 500-600 of these steps. Again, these steps are SLICK. Be mindful of your footing.
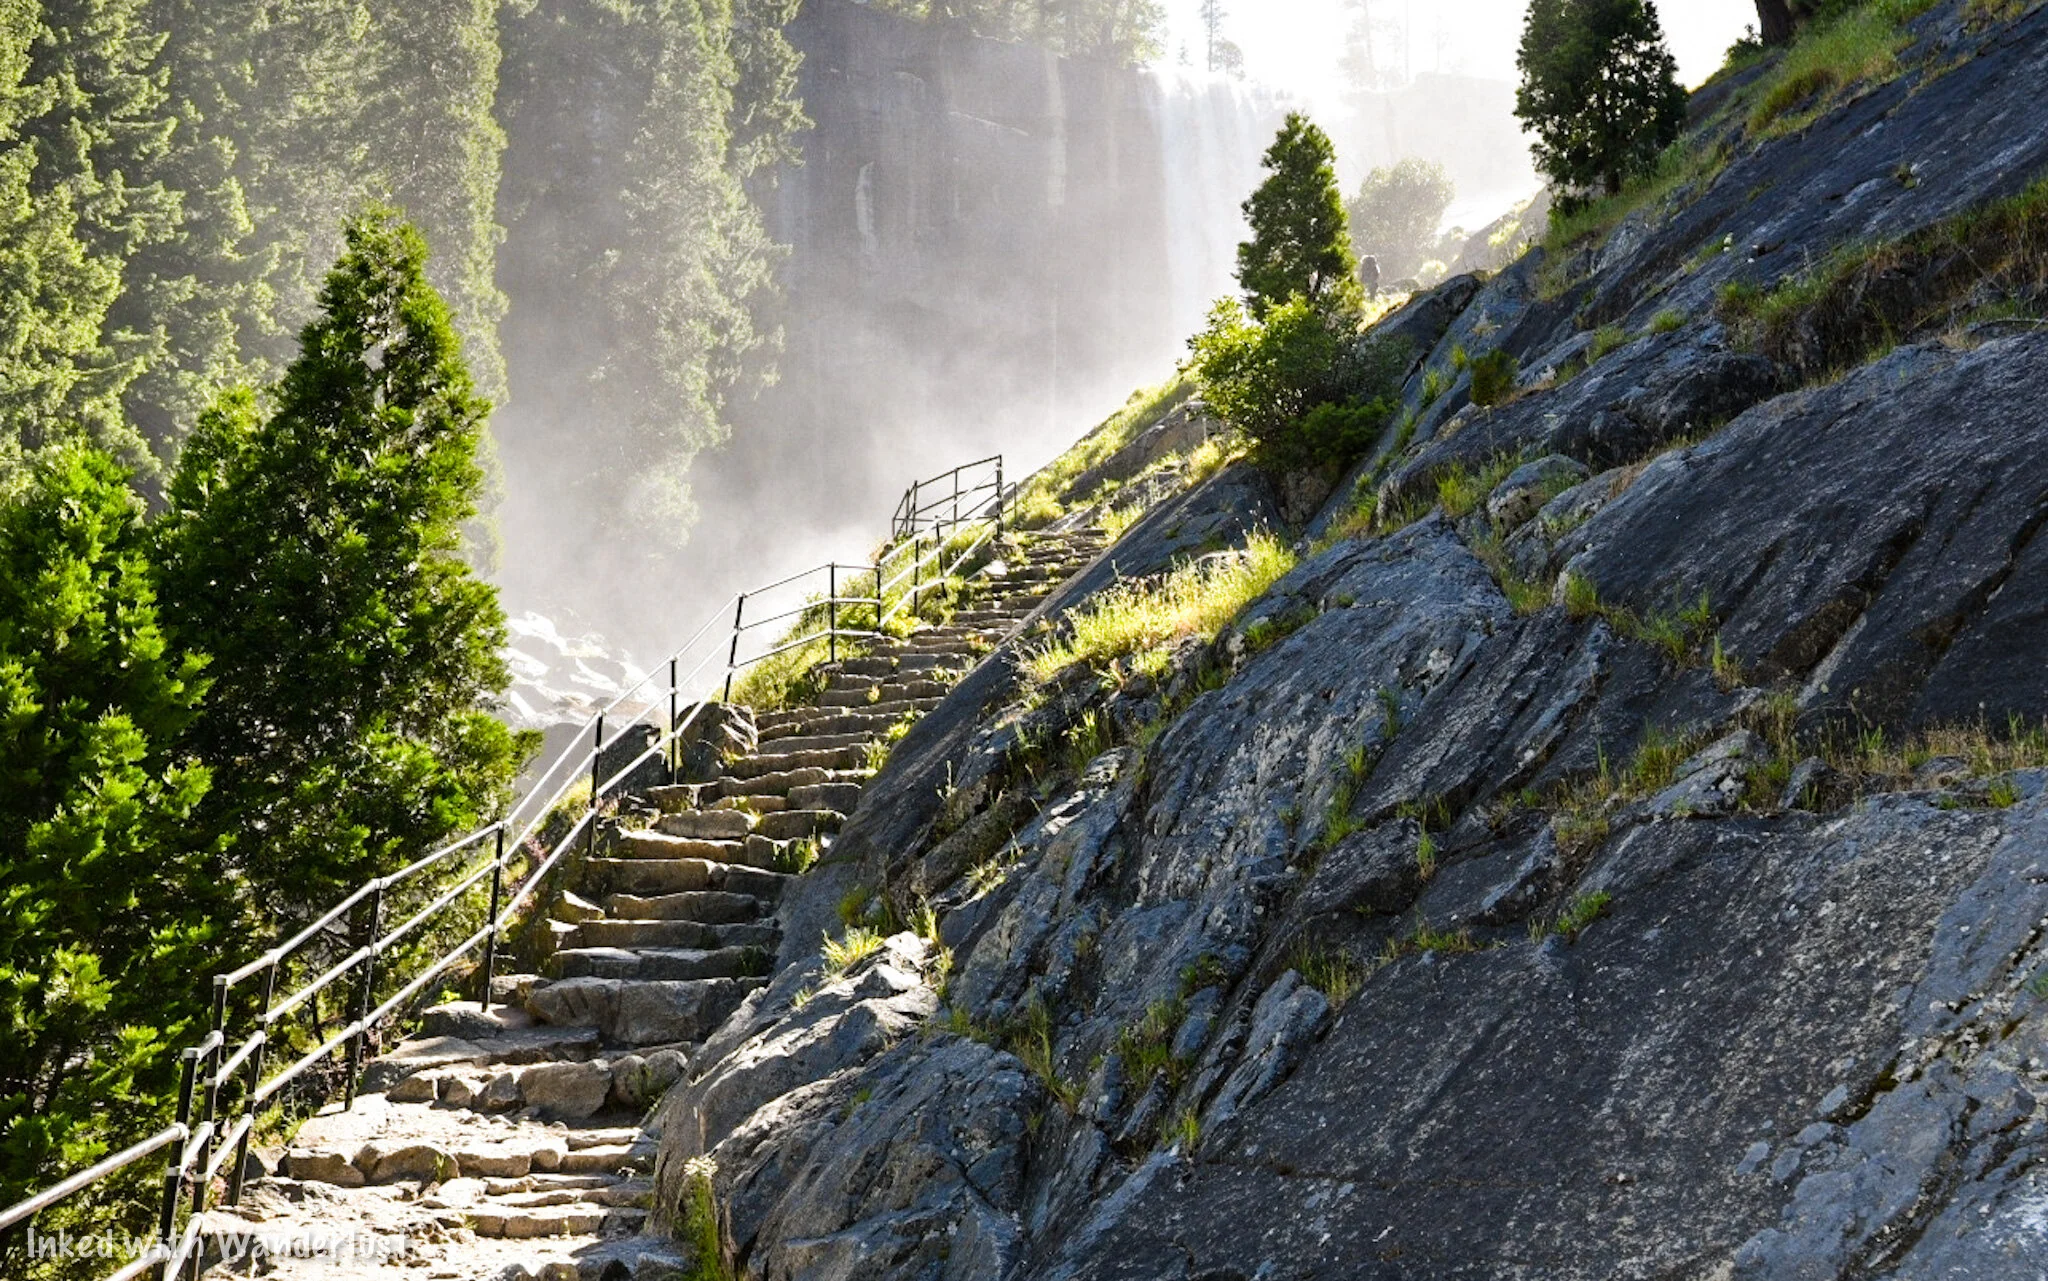
As you make your way up the steps, it’ll soon dawn on you where this trail’s namesake comes from. Though the amount of mist you experience will depend on the time of year.
If you’re here in the fall, you’ll experience little, if any. This is due to the falls not flowing as heavily as they do in the spring.
That said, come during spring or early summer and you’ll definitely find out why it’s called the Mist Trail. You WILL get wet. Soaked, even.
We caution anyone with a camera that isn’t properly weather sealed to stow it away before proceeding. Also, If you’re against getting wet, a poncho would be advisable.

Once you’ve reached the mid-way point between the steps (you’ll know you’re there when you’re on a flat-ish area at eye level with the waterfall), you’ll be mostly out of the reach of the mist.
You’ll also have a decent amount of tree cover to help you escape the sun for a bit with various rocks to site on, if needed.

From here, you’ll have an epic view of the gorge that Vernal dumps into and the river, which has been cutting through here for many years. It’s an amazing, unbeatable sight.
If you’re lucky, the sun will hit the mist just right and present you with a rainbow (or two) to gaze at. At this point, you’re roughly one-mile into the hike.
From here, you’ll have a choice. This is the point where a lot of visitors decide to turn back. However there are more amazing views at the top of Vernal.
To do this, you must hike another half mile up a few hundred more stone steps. These steps are not usually as slick as the ones along the base, though.
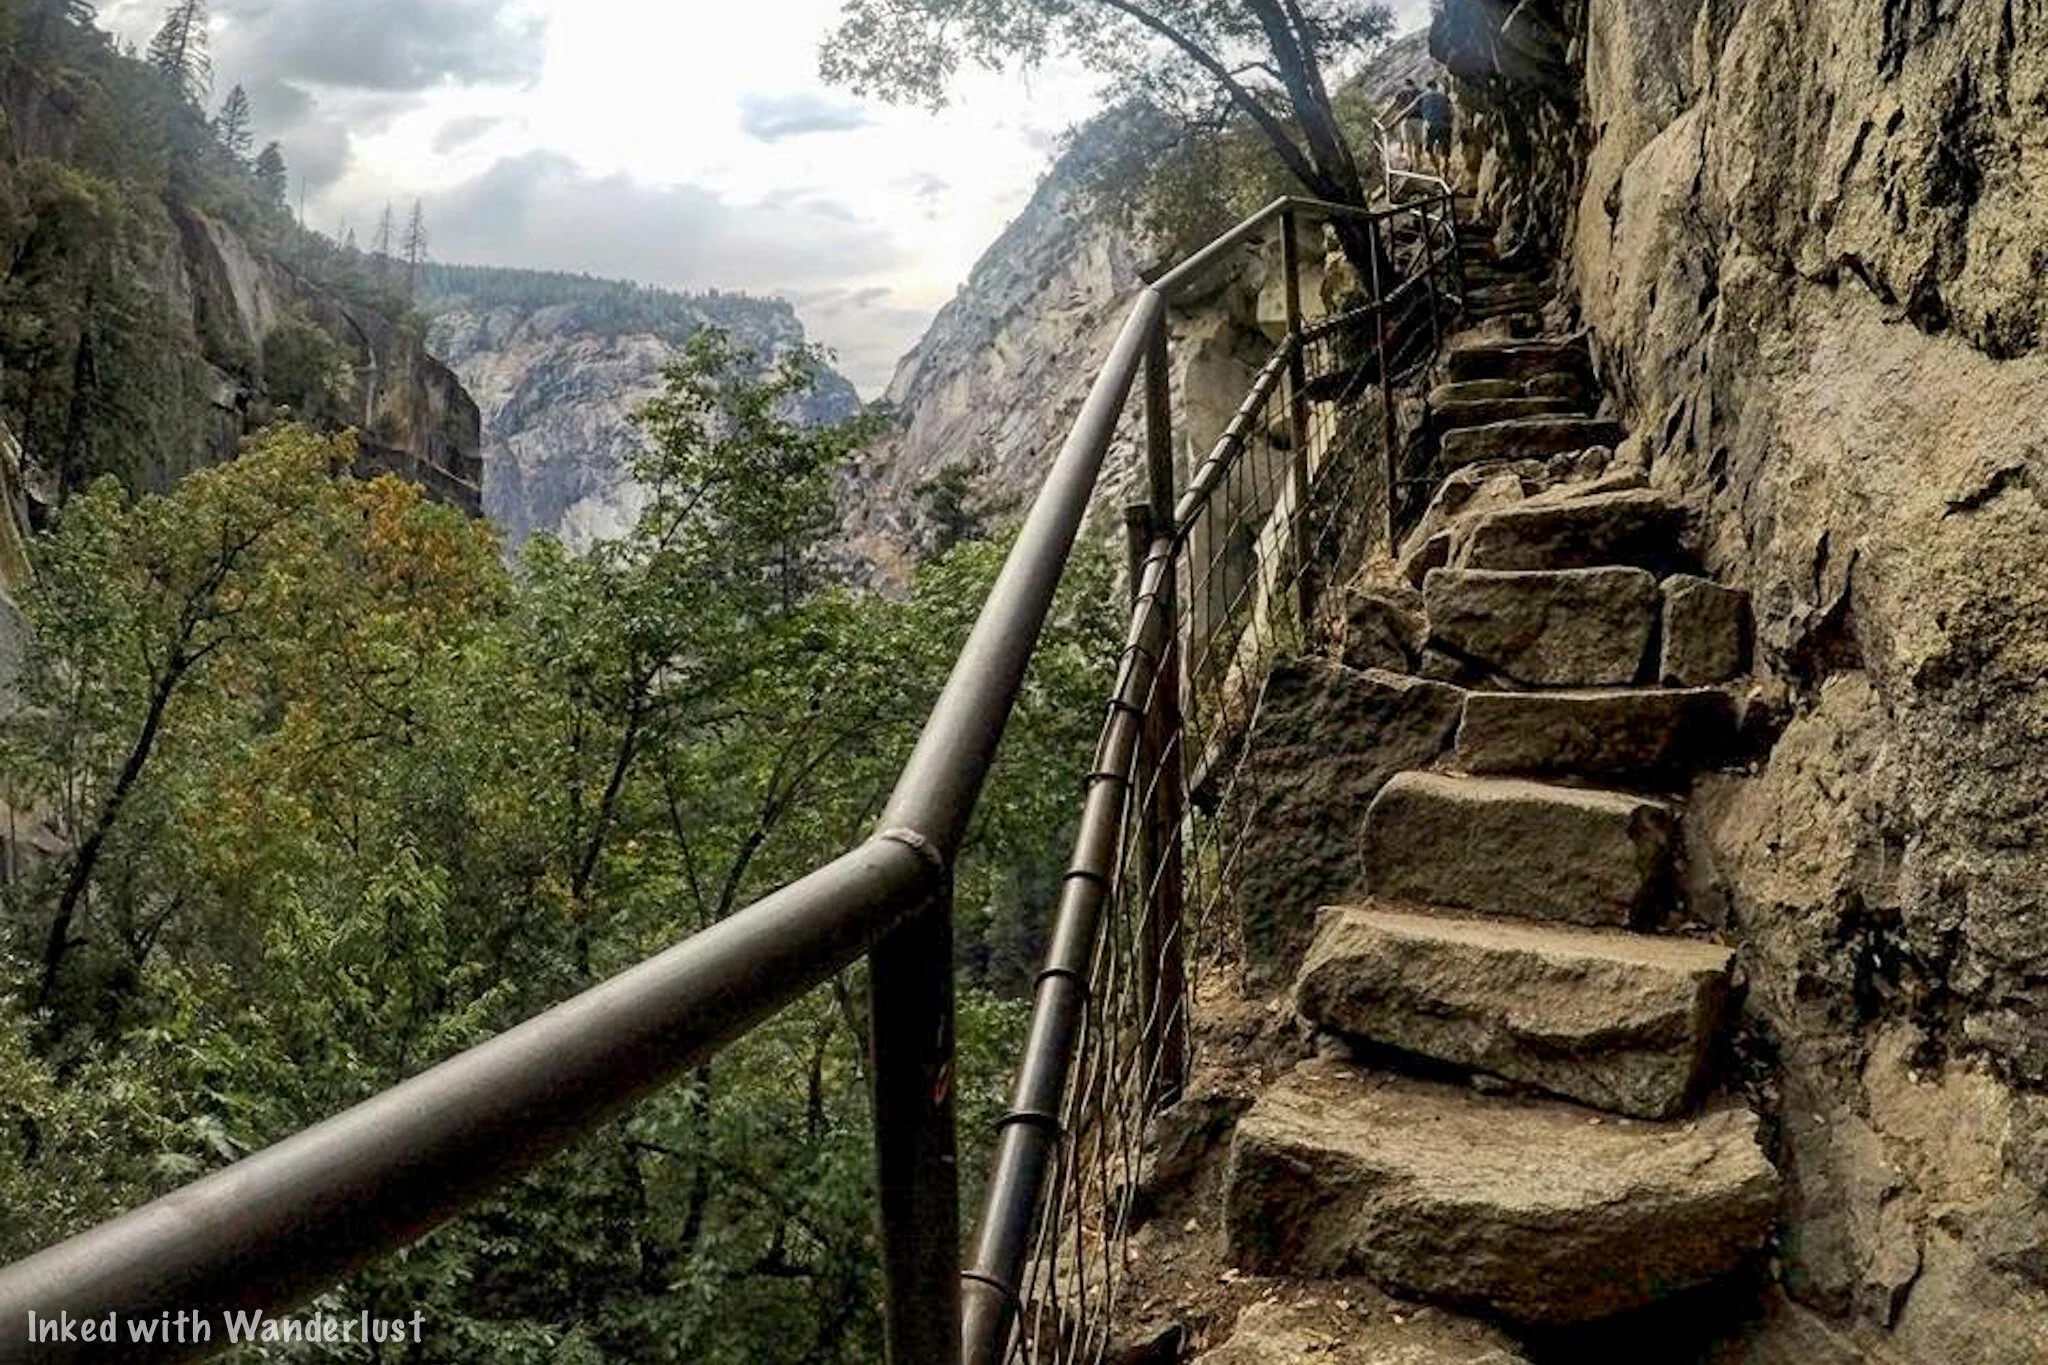
Pictured above, you’ll see the last of the steps you’ll need to tackle before reaching the top. Once up there, you’ll see much more of the gorge leading into the valley and get up close to Vernal’s edge.


The river you see feeding the falls is the Merced River. The waters leading to the edge usually appear calm, but strong currents are always present.
At the edge, the Merced dumps millions of gallons of water 317-feet into the gorge below. The view up here is simply remarkable.
From here, you'll again have a choice to make. You can head back to your car or you can continue on for another 1.5 miles to Nevada Fall.

Nevada Falls
About a mile from Vernal, you’ll come to the Nevada Fall footbridge. The view of the Merced cutting through the granite boulders is an amazing sight.
From the bridge, you’ll have a great view of Liberty Cap. Many visitors mistake this for Half Dome (wishful thinking). From here, you’re close to the end of the trail (and another restroom).

While Nevada doesn’t produce nearly the amount of mist that Vernal does, the steps will still be slick. The good news is you won’t have as many to deal with as in between the steps are moments of compact dirt.
Once at the top, there’s rocks and log furniture to take a break on. There’s also the second opportunity for restroom use. This one is surprisingly well maintained.

If you’re a Half Dome permit holder, you’ll want to continue onward from here. For you Mist Trail day hikers, it’s time to head back. You’ll have two options on how to do this:
You can take the John Muir Trail down. This will add another mile to the hike, but its much smoother as you won’t have to negotiate the stone steps. Plus, you’ll get a unique view of Nevada Fall.
You can head back down the same way you came up. Keep in mind, going down those steps is worse than going up (especially if they’re slick). Going down the JMT may add an hour, but it wouldn’t necessarily add more time as it would more than likely take longer to deal with the steps.
On our 2017 visit, we opted to go back down the Mist Trail versus the JMT. Almost immediately, I regretted that decision. Seriously, consider the JMT.
Things to Remember
This is NOT an easy going trail. It may be fairly short, but don’t underestimate the potential dangers. More people have been killed or hurt on this trail than any other in the park. That includes Half Dome. It is sun exposed, has thousands of slick stone steps, and a powerful river running through it. Keep to the trail, watch your step, bring plenty of water/snacks, and don’t overdue it.
Swimming or wading is NOT allowed. Years ago, people were able to swim in the emerald pools up river from Vernal Fall. Unfortunately, those days are over. Far too many deaths have occurred from people getting swept over the edge.
The trailhead parking lot fills up early. The closest parking lot to the trailhead fills up quickly. Even if you do snag a spot, you’ll still have to walk a quarter-mile to the trailhead. So keep this in mind when planning your day and prepare for the possibility of having to park further away and taking the shuttle in.
Have a great time. Despite the potential dangers, this trail is one of the most breathtakingly beautiful trails you’ll ever hike. Pace yourself, take pictures, and be sure to pause and allow the beauty of Yosemite to consume you. If you only have time for one day hike during your visit, this is the one.
A quick note…
We’re often asked about the equipment we use to capture the photos on our website. Below, we’ve added Amazon links to those products and others that we recommend.
If you decide to purchase, Amazon will pay us a small commission. This helps us keep Inked with Wanderlust running and doesn’t cost you anything extra.
“Understanding Exposure” by Bryan Peterson (this book is a great resource for anyone starting out in photography)
Conclusion
It is our hope that this article was helpful to you in planning your next adventure. If so, please share it with your family and friends on Facebook or Pinterest.
You can further show support by subscribing to our newsletter below. In it, you’ll receive a once weekly newsletter containing announcements, new post alerts, news, and more!
If you have any questions, comments, or suggestions, please engage with us in the comment section below.
Thanks for reading and safe travels!

Hike to North Dome and Indian Rock Arch in Yosemite National Park
While hiking Half Dome requires a permit and a great deal of planning, hiking neighboring North Dome requires nothing more than a drive up to the trailhead…
Disclosure: This post contains affiliate links. If you make a purchase through these links, I may earn a small commission at no additional cost to you. I only recommend products or services that I believe will add value to my readers.

While hiking Half Dome requires obtaining a permit and a great deal of planning and preparation, hiking neighboring North Dome requires nothing more than a drive up to the trailhead and strong legs.
Due to this, many see North Dome as an excellent alternative to Half Dome if you were unsuccessful in the permit lottery or if Half Dome is too daunting. There are no cables or climbing involved and best of all, you’ll be in a position to get one of the best views of Half Dome in the entire park.
So where is the trailhead for North Dome? What’s the parking situation like? Like to know what to expect on this trail? What’s Indian Rock Arch? I answer all of these questions and more in the post below. Let’s get into it.
North Dome Trailhead and Parking
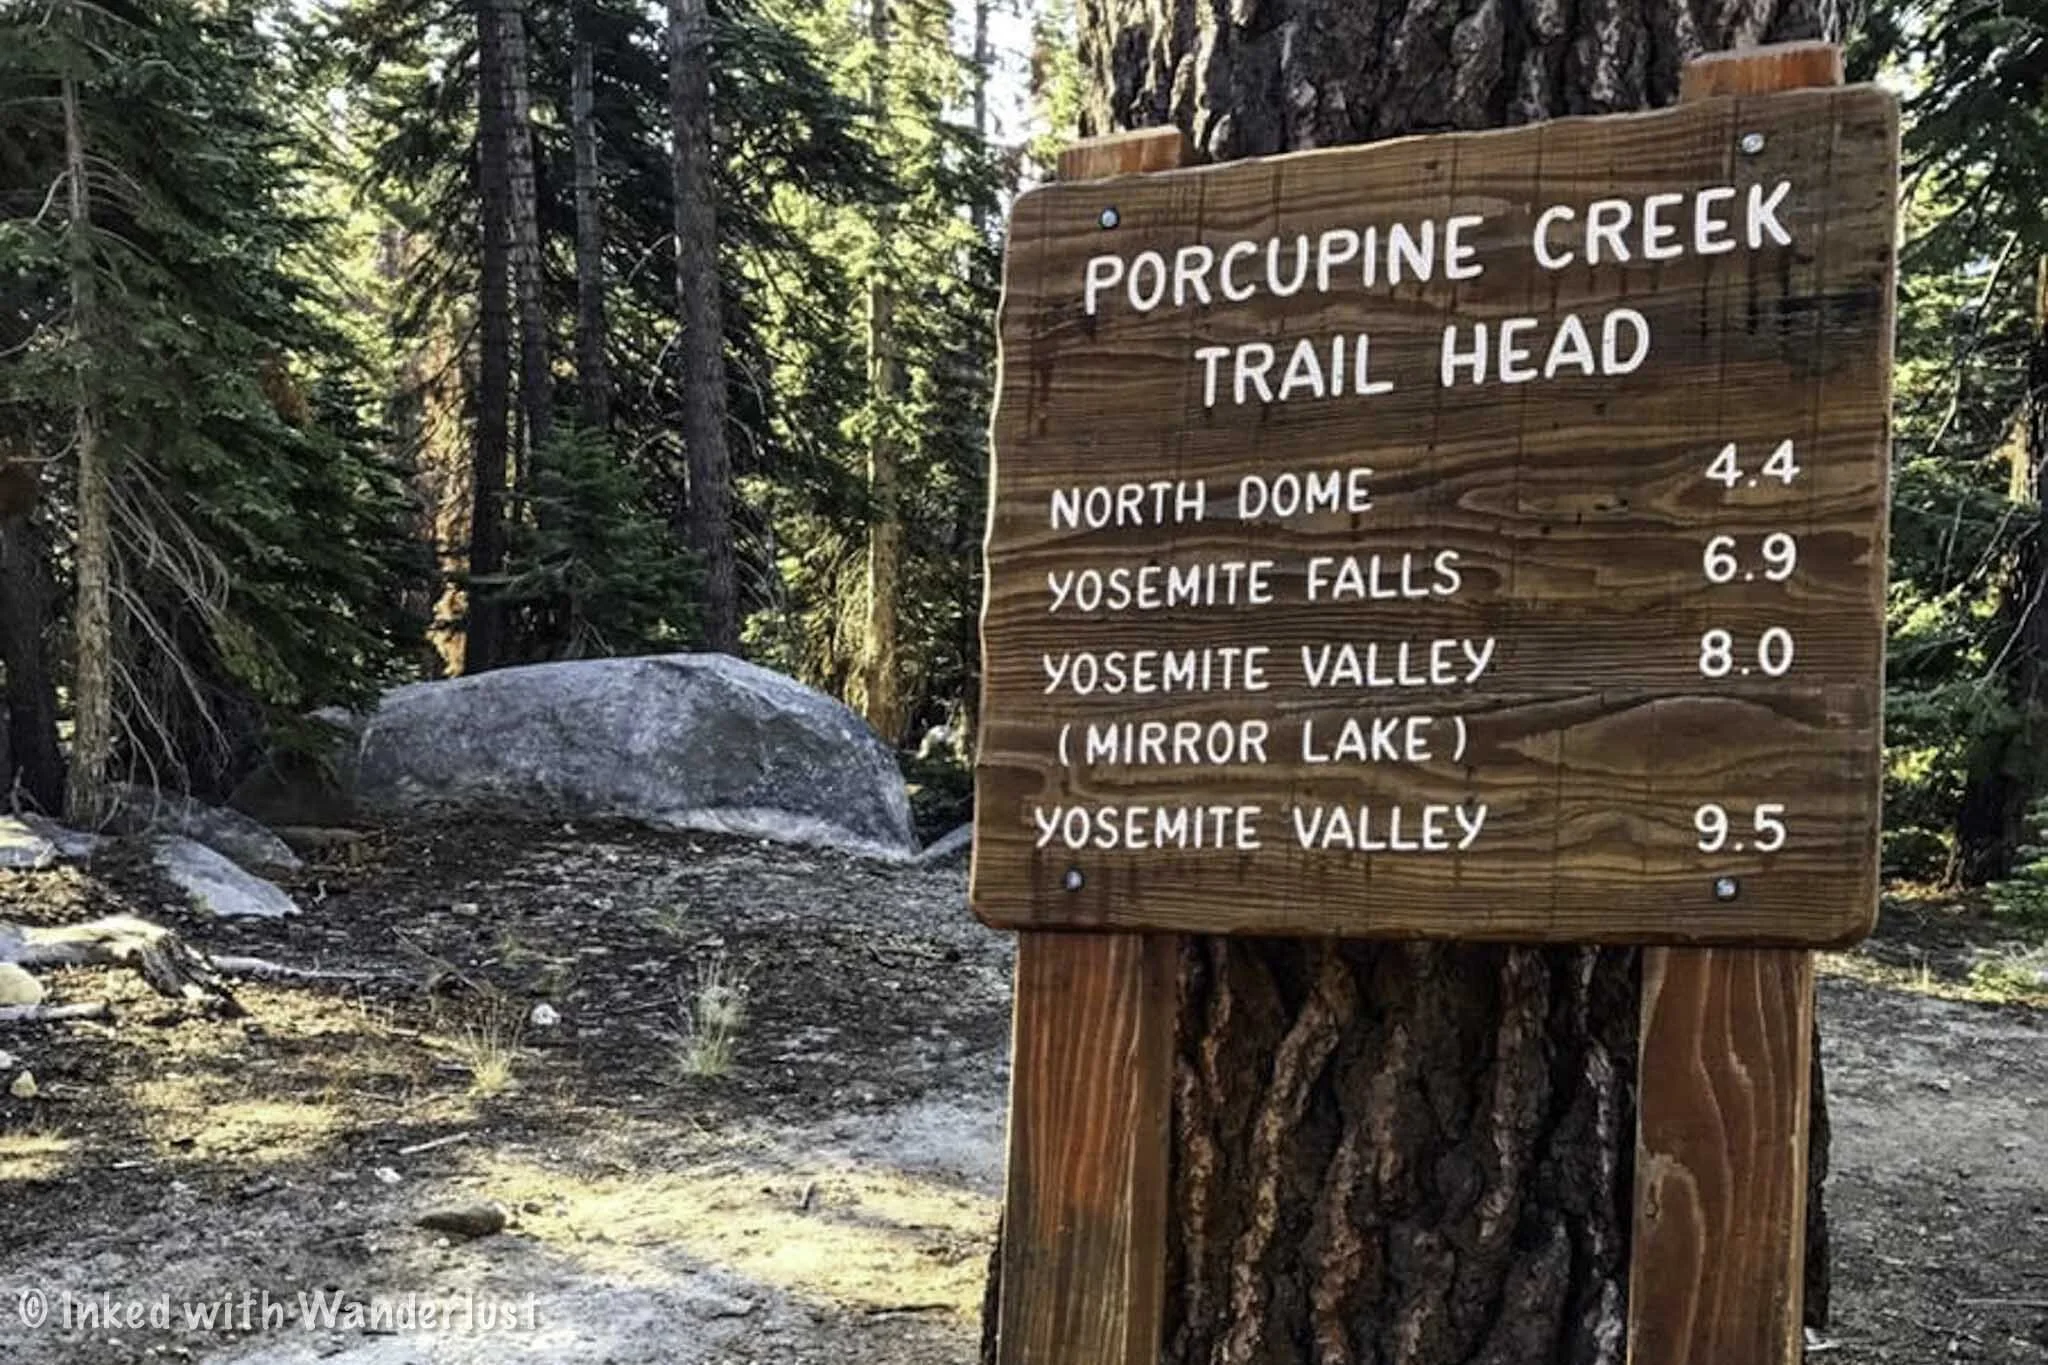
Although you’re technically able to reach North Dome from the valley, the official trailhead is just off Tioga Road on Yosemite’s east side and can be found in the Porcupine Creek parking lot (do not confuse this with Porcupine Flat).
From Yosemite Valley, follow the signs to Highway 120. Ten miles after leaving the valley you’ll come upon Crane Flat. Turn right there and after twenty-five miles or so, you’ll arrive to the parking lot on your right.
From Yosemite’s east entrance, simply drive for about twenty miles after driving through the gate and you’ll reach Porcupine Creek on your left. If needed, there are pit toilets located in the parking lot.
As is the case with most Yosemite trailheads, the earlier you arrive, the better off you’ll be. I arrived to the trailhead at around 7am and there was only one other car. When I got back to my car after the hike, around 2pm, every spot was occupied.
The North Dome Trail

Much of the route to North Dome is your standard, albeit beautiful, walk in the woods. The scenery is stunning as you’re surrounded by hundreds of moss-covered trees and granite boulders.
You’re starting at 8,100 feet at the parking lot and you’ll work your way down to 7,540 feet at North Dome. While there will be some slight incline on the trail, you are ultimately going downward the whole time.
This is great on the way in and will feel like a breeze, but you’ll definitely feel it on your way back to the car (especially in the final mile or so). Total mileage, without taking the detour to Indian Rock Arch is 8.8 miles, round-trip. With the detour (highly recommended), you’ll add another mile or so.
Indian Rock Arch Detour

About 2/3rds of the way to North Dome, you’ll come across the half mile (one way) detour to Indian Rock Arch on your left. It is the ONLY natural granite arch located within Yosemite. The arch is about 15 feet tall and sits atop a hill with commanding views at the top.
My recommendation would be to take the detour on the way in, rather than on the way back. This way, you can save your energy and endurance for the elevation gain you’ll still need to navigate.
North Dome

After checking out Indian Rock Arch, continue your way to North Dome. After another mile or so, you’ll come into a clearing and get your first glimpse of both North Dome and Half Dome in the distance. Don’t stop here, the views are just getting started.
Eventually, you’ll reach a point where it feels like you’ve lost the trail. You haven’t. Just keep Half Dome in your sights and stay to the left (down) and you’ll pick it back up again. If needed, there are typically cairns all over the place to help guide you.

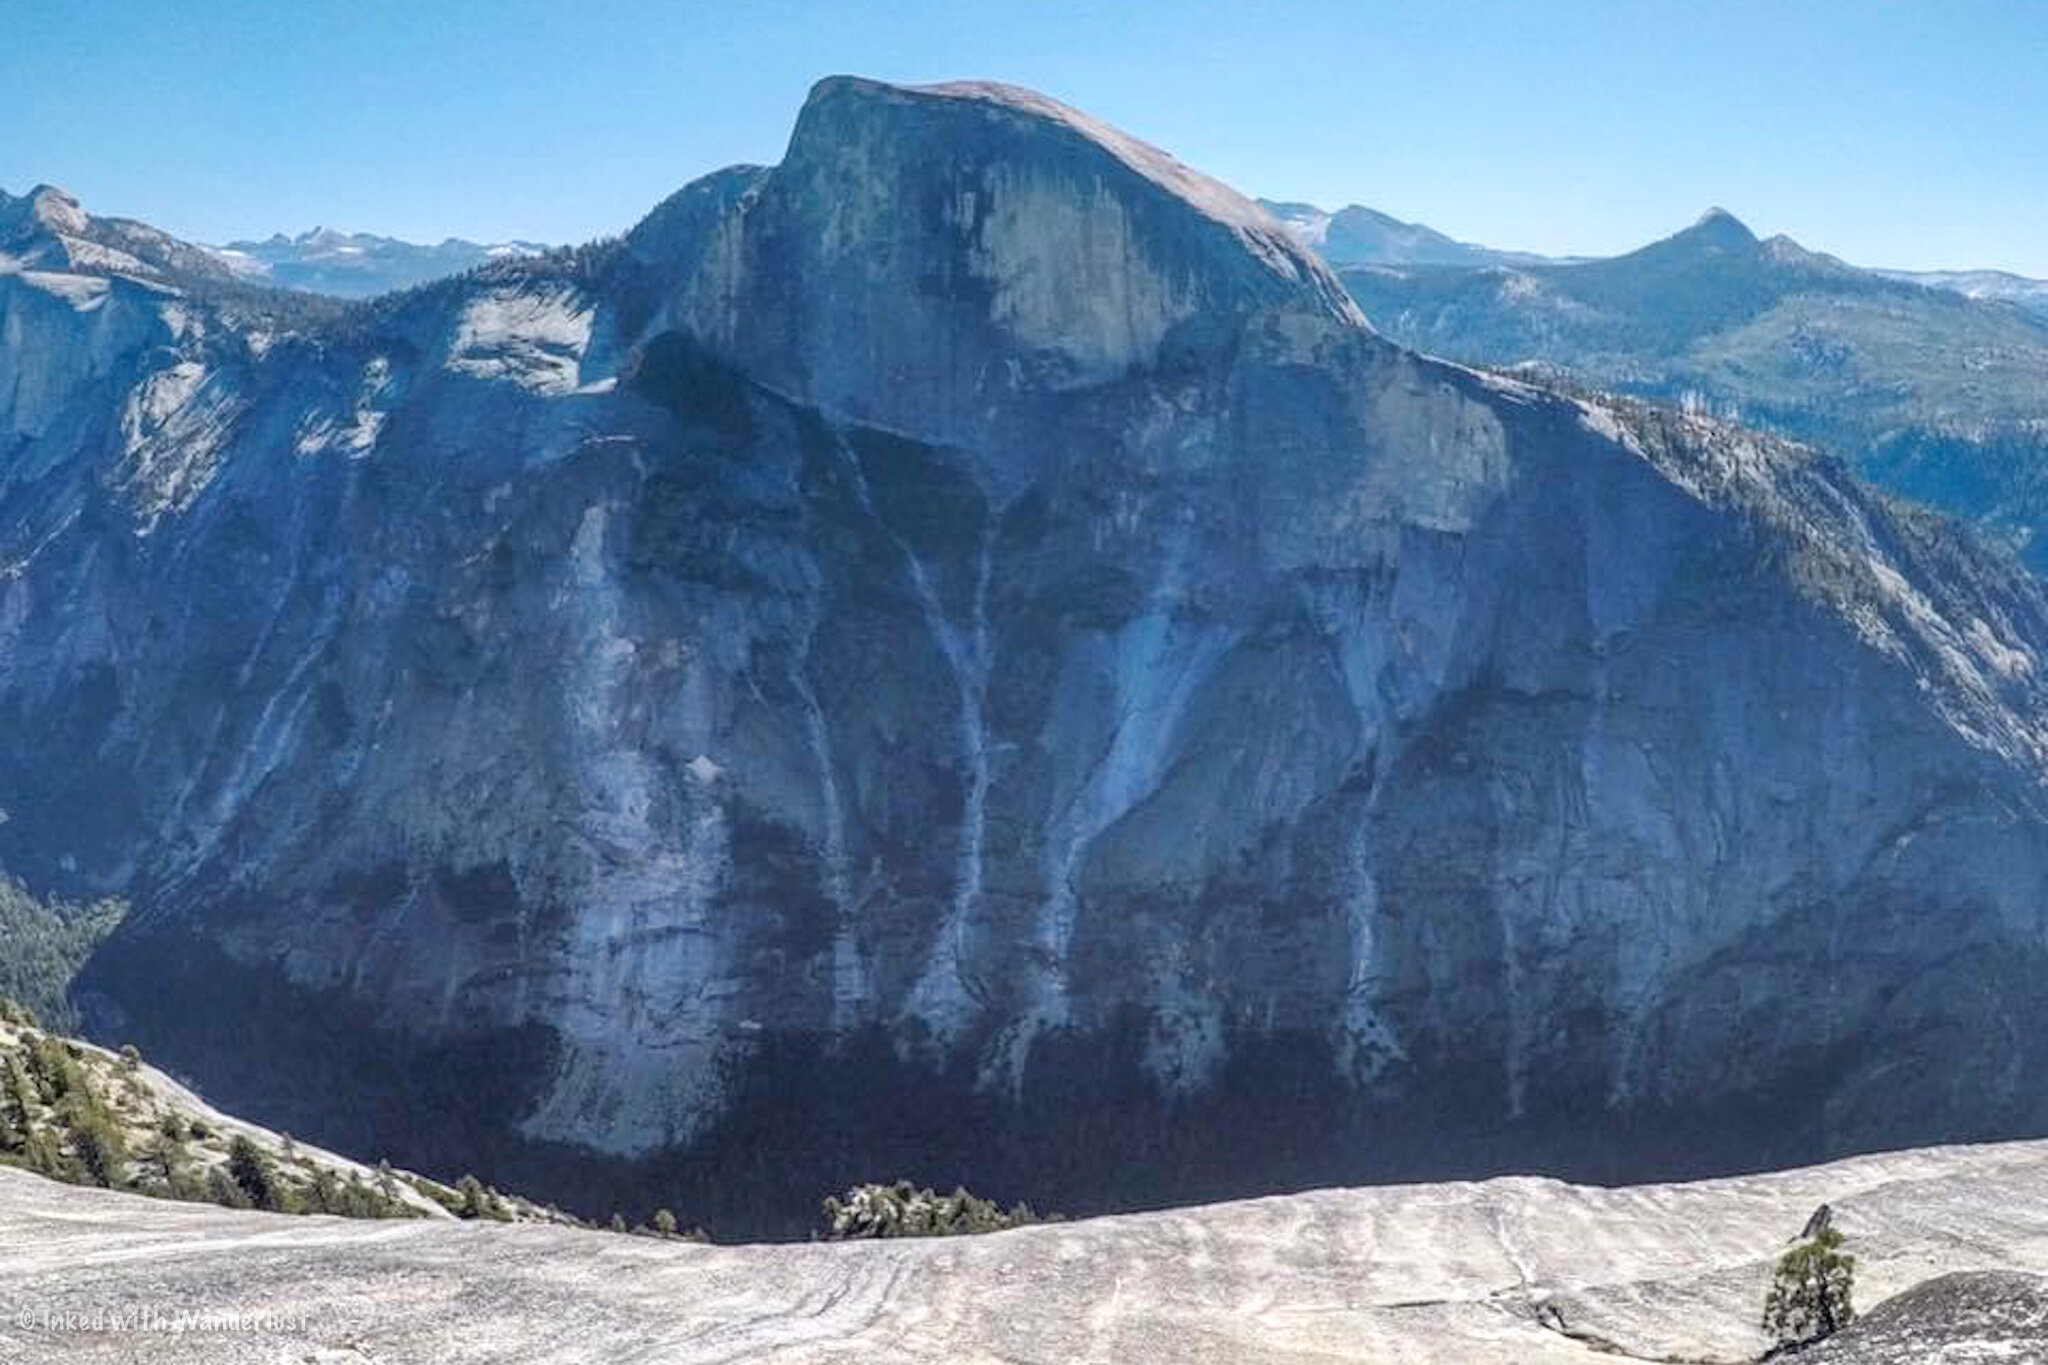
After dropping down from the granite you were just on, you’ll once again find yourself surrounded by trees and will have lost sight of Half Dome. Keep with the trail and after a short while you’ll come to another clearing. Here, you’ve officially made it to North Dome.
Half Dome will have a commanding presence as you continue to work yourself down to North Dome’s precipice and on arrival, you’ll have an amazing view of not only Half Dome, but Tenaya Canyon and the many highlights of Yosemite Valley as well.
Things to Know About the North Dome Hike in Yosemite
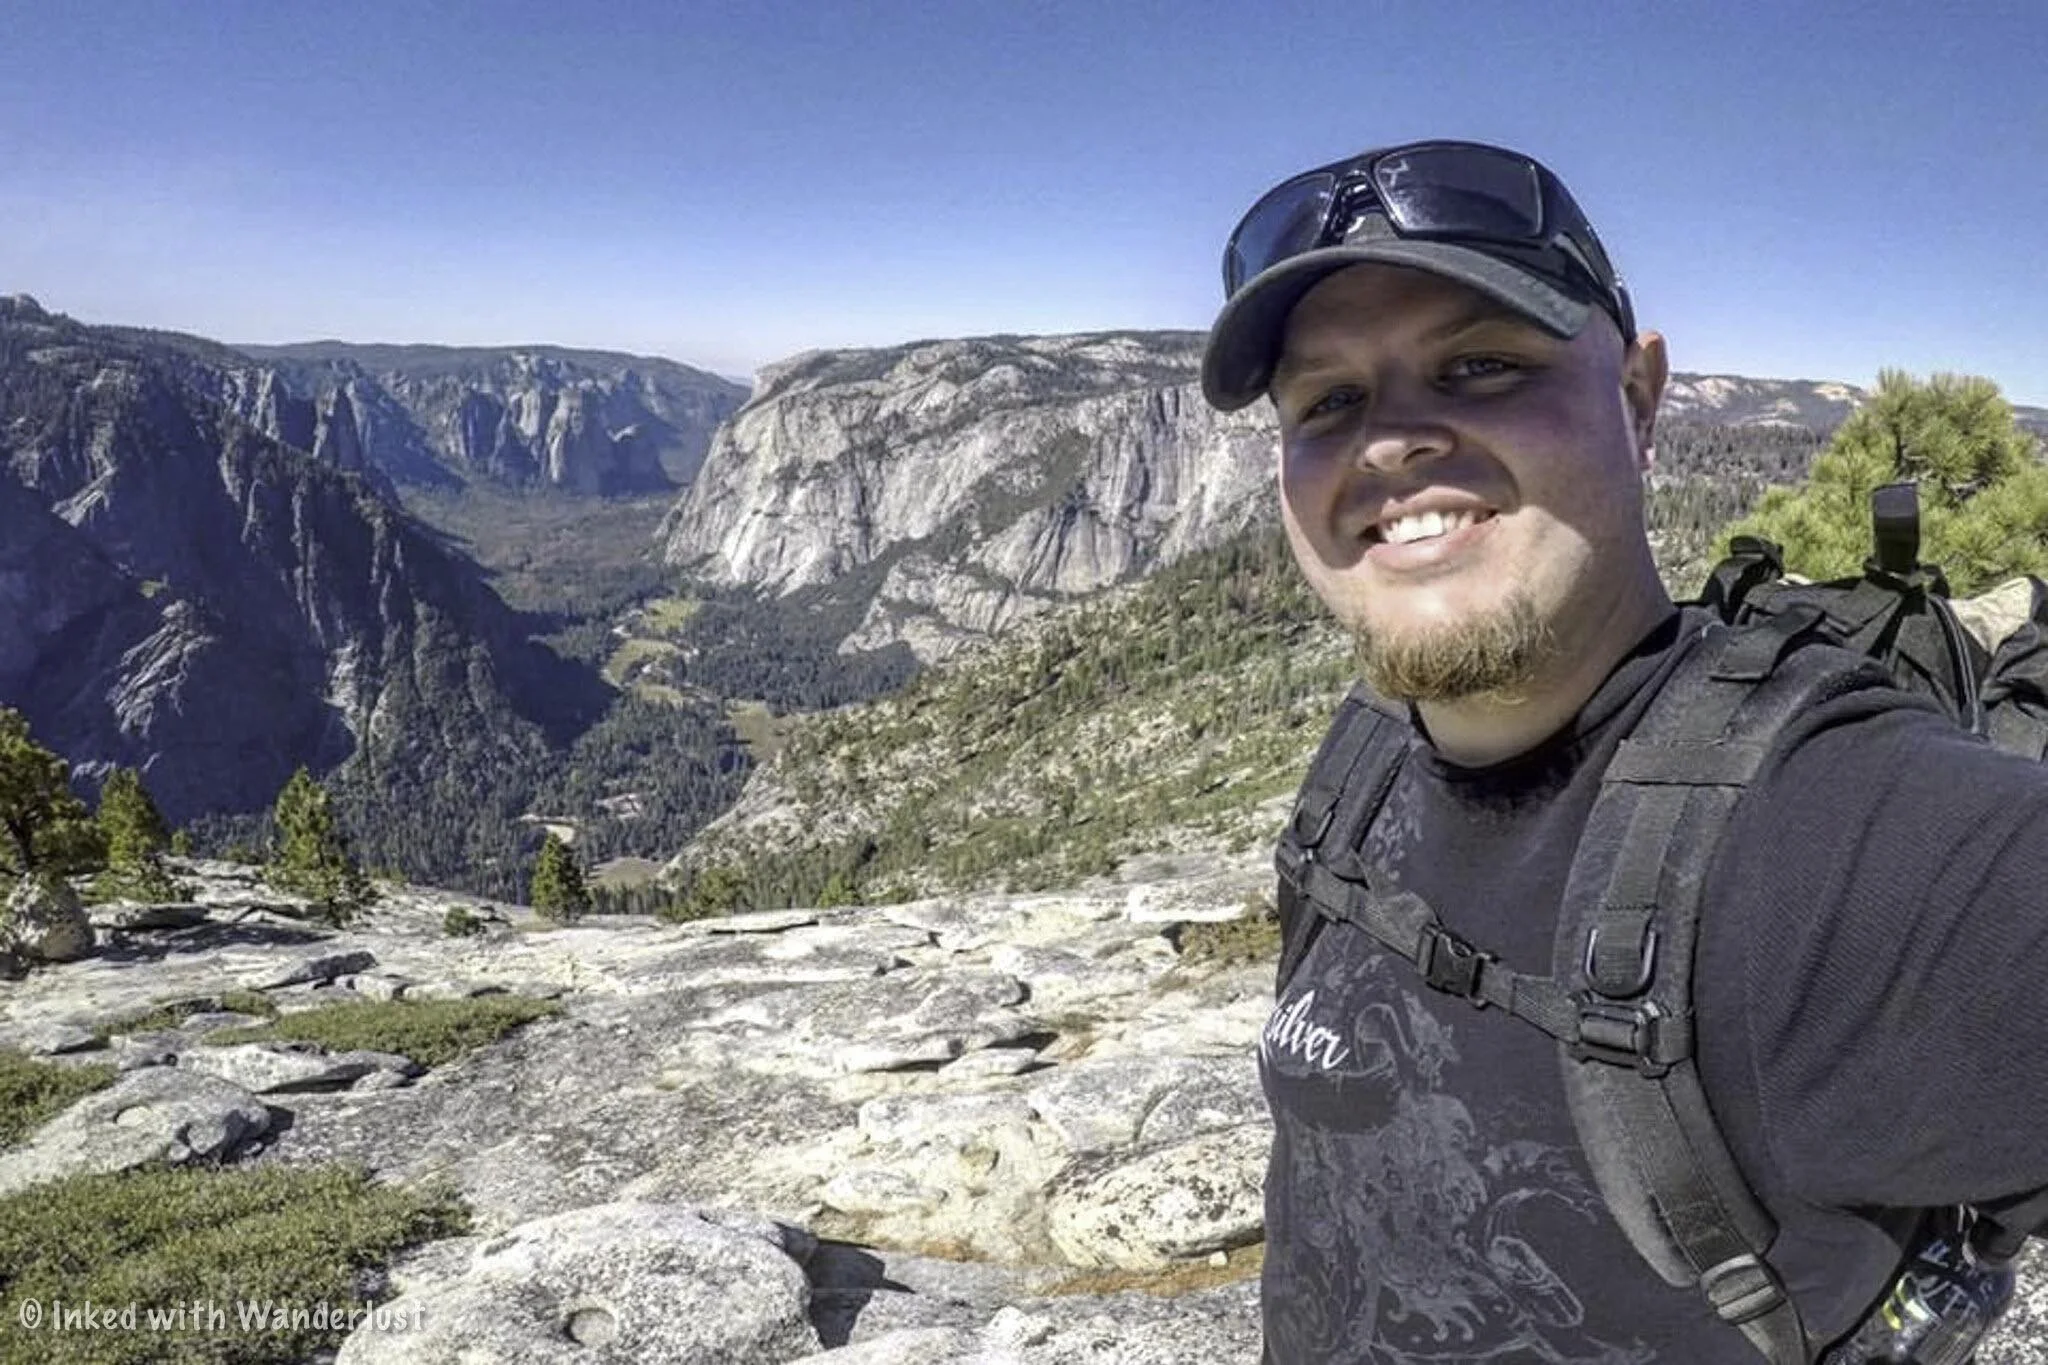
The trail is inaccessible in winter. The North Dome trail is on Yosemite’s east side on Tioga Road and due to heavy snowpack, this area of the park is closed in winter. Typically, it’ll open for the season at the end of May or beginning of June and closes with the first major snowfall of the year (typically late October/November).
North Dome isn’t easy, but it isn’t difficult either. You’ll be starting out at a higher elevation and work your way down, which is the easy part. Where it could get moderately challenging for some is on the way back out. As long as you’re prepared for this, you’ll do just fine.
North Dome itself is generally safe, but use common sense. North Dome doesn’t see the amount of hikers Half Dome does, so it isn’t overly slick. However, getting too close to the edge could result in a deadly slide into Tenaya Canyon or Yosemite Valley. Using footwear with good grip is advisable and of course, watch your footing.
It doesn’t get too crowded. It’s nowhere near as bad as the trails in the valley, such as the Mist Trail, or some of the neighboring trails on Tioga road (Cathedral Lakes, Tuolumne Meadows, etc). If you get an early start, you’ll likely have it mostly (or all) to yourself. Starting later will likely mean more people on the trail, though.
North Dome is NOT the same as Half Dome. There are no cables or climbing involved and it’s roughly half of the total milage as Half Dome. North Dome is a great alternative to those seeking similar views as Half Dome provides (albeit from a lower vantage point), but don’t want to bother with the red tape or the challenge of Half Dome.

Glen Aulin: A Glorious Hiking Trail in Yosemite
I’m often asked by Yosemite first timers (friends and friends of friends) about which hiking trails in Yosemite should they hike during their visit…
Disclosure: This post contains affiliate links. If you make a purchase through these links, I may earn a small commission at no additional cost to you. I only recommend products or services that I believe will add value to my readers.

I’m often asked by Yosemite first timers (friends and friends of friends) about which hiking trails in Yosemite should they hike during their visit. There are many beautiful hikes in Yosemite, but one of the few I recommend most often is the Glen Aulin trail, located in the Tuolumne Meadows area of the park.
Its not the easiest hike in Yosemite, nor is it the shortest, but it’s far from difficult and I’d say that as long as you and your family have hiked, a minimum, a few times, then you shouldn’t have any issue with Glen Aulin. It’s a straight shot and mostly level throughout, making it an ideal hike for families.
Before we get into it, you need to know that this trail is located in the high elevation area of Yosemite’s east side. This area of the park receives tons of snow in the winter, making it inaccessible during that time. If you want to hike the Glen Aulin trail, you’ll need to plan a summer or fall visit as the east gate typically opens in late May or early June.
However, even at those times, there could still be heavy snow pack along the trail. If you want to avoid snow and/or muddy conditions, I recommend visiting in late summer or in the fall when the weather is pleasant.
Now that that’s out of the way, let’s get into it!
Glen Aulin Trailhead Parking
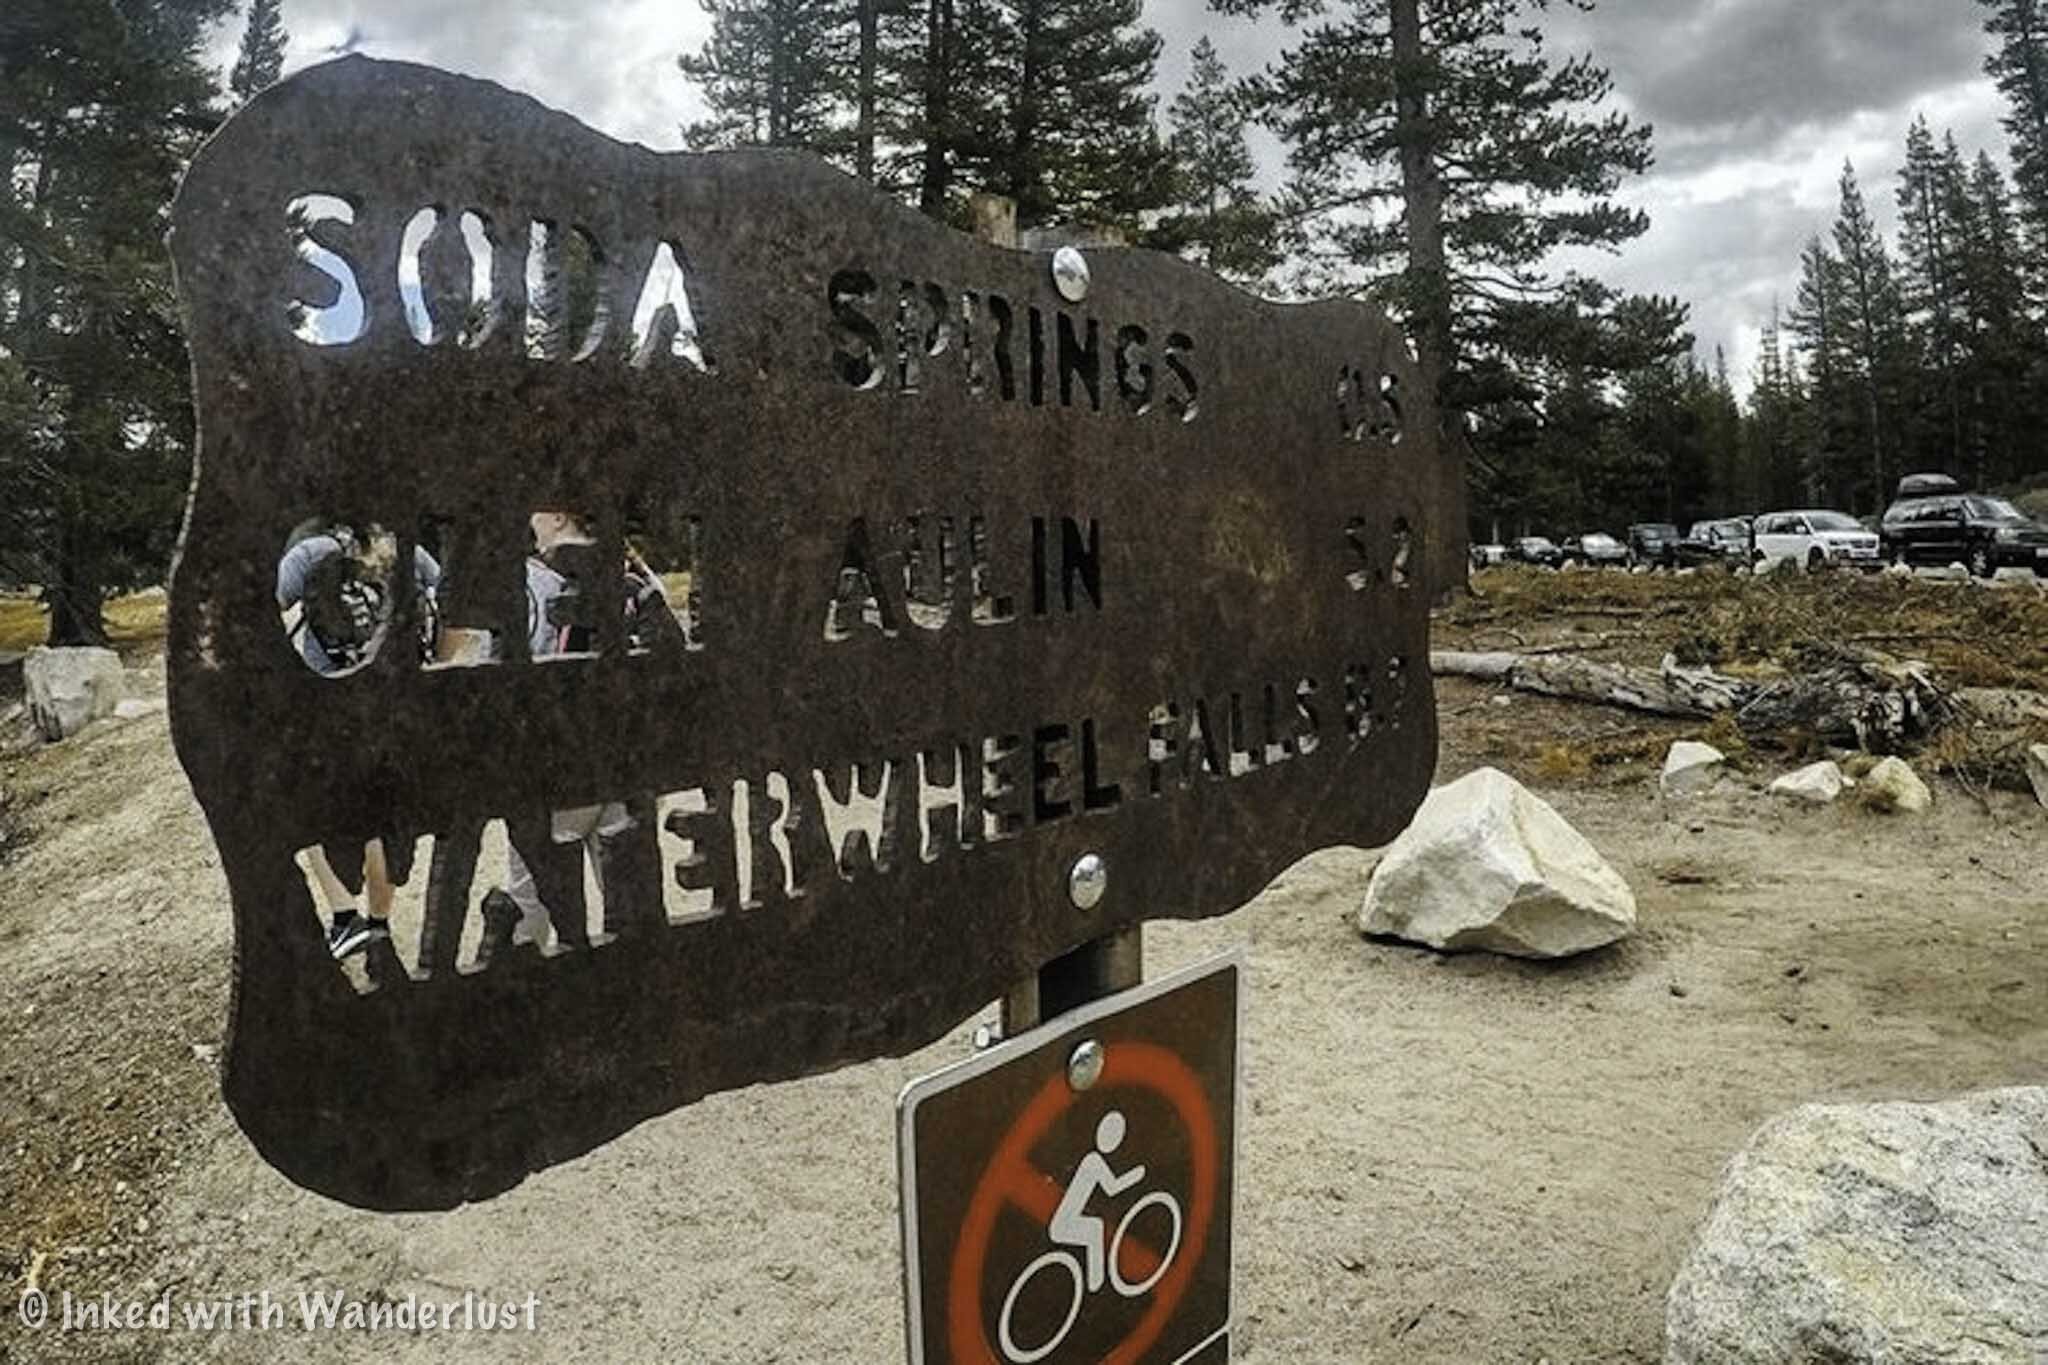
The official trailhead for Glen Aulin begins just to the right of Parson’s Lodge and Soda Springs in the back-end Tuolumne Meadows. However, you must begin on the opposition side of the meadow, which adds some milage to your hike, but not a lot.
Unless you’re starting from the Lembert Dome area, there is no official parking lot for this hike. Some attempt to park on the side of the road, but you’re risking being cited and towed. I would play it safe and park in the visitor center parking lot across the street.
Glen Aulin Hiking Trail

Once you’ve secured a spot, make sure there isn’t anything with a smell in your car or trunk, as this area sees a lot of bear activity. This includes food, drink, deodorant, etc. There are bear lockers everywhere in the area free to use.
To start your hike, cross the street and look out for the trailhead sign that lists Soda Springs, Glen Aulin and Waterwheel Falls (pictured above). You’ll want to follow the dirt path to the opposite end of Tuolumne Meadows.
The first notable feature you’ll encounter is the picturesque bridge spanning over the Tuolumne River. If you arrive early, do yourself a favor and get your pictures in now because on your way out it’ll likely be littered with tourists.

After the bridge you’ll come across Parsons Lodge (slight left) and Soda Springs (slight right). Parson’s Lodge was built by the Sierra Club in 1915 as a memorial to Edward Taylor Parsons (club member and Yosemite advocate). Soda Springs is a mineral spring with a half cabin built around it.
Don’t spend too much time here, because you haven’t officially started the actual trail yet and still have a ways to go. Keep going past Soda Springs and the lodge and you’ll see signs pointing you toward Glen Aulin trail, proper.
Glen Aulin shares its trail with both the PCT and the JMT. So if you see signs for either or both, you’re going in the right direction.

The first half-ish is fairly flat and straightforward. It’s clearly marked and well-maintained so there’s no real risk of going off-track. At around the three mile mark, you’ll come out into a beautiful meadow and lake that rivals Tuolumne Meadows (in my opinion).
Shortly after this point is where the trial starts to get a bit rocky and less maintained. However, the views continue to get better and better. For the next couple miles, you’re zig-zagging along beautiful cascades and have jaw dropping views of the granite mountains out in the distance.
The closer you get to Glen Aulin, the more spectacular the cascades get. I hiked this late in the season and the river was going strong. I could only imagine how it looks earlier in the season.
Tuolumne Falls
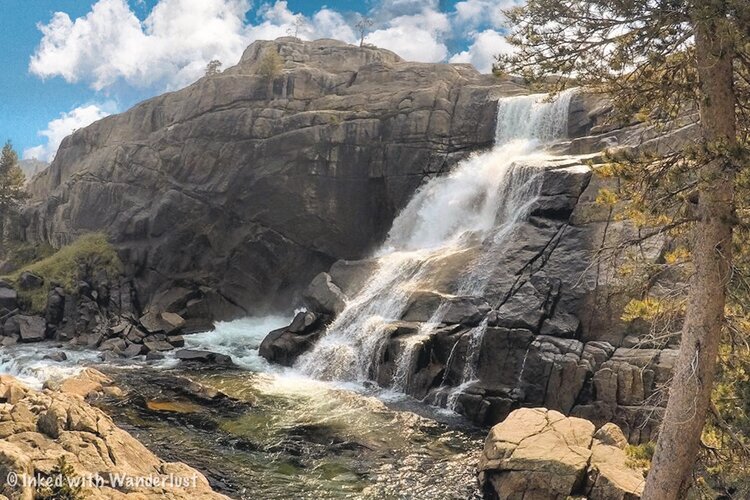
Before reaching Glen Aulin, you’ll first find yourself at the beautiful Tuolumne Falls. This waterfall is simply breathtaking and worth spending some time at. Although no one was down there on my hike, I have heard of overheated hikers using the pool around the falls as a swimming hole. I would exercise caution if you decide to do so.
After soaking in the views and getting your pictures, continue down the trail. From here, you’re still another mile or so from your destination. This is where the drop in elevation will become more noticeable and trail becomes rockier than it was before. Watch your step and pace yourself, if needed.
White Cascades and Glen Aulin

This is one of those destinations that just sneak up on you. You’re wondering how much further you have to go and bam, you come off a slight descent and there it is, the beautiful Glen Aulin and White Cascade. The views in this area are simply stunning.
While there’s nothing wrong with enjoying the view from the initial side, you’ll want to keep going as the view is much better across the swimming hole. Head forward towards the bridge and cross it to get there.
Glen Aulin High Sierra Camp

As you’re coming off the bridge, take a right and head over to the Glen Aulin High Sierra Camp. Everyone and anyone is free to hang out around the camp and the swimming hole, but access to the tents and restrooms are only for registered guests.
The Glen Aulin High Sierra Camp is one of five camps scattered throughout some of Yosemite’s most popular locations. You can attain one by entering the annual lottery and crossing your fingers that you win one. Rates for the Glen Aulin Camp in 2024 are as follows:
$175 per night (Adults)
$90 per night (Children)
Rates include a stay in one of the tents, along with dinner and breakfast, with lunch available as an option for an additional charge. Bookings are available for stays from July 4 - September 7, 2024. You can get more information here. Keep in mind that each tent can fit four people and they will fill it. Depending on your party size, you may be sharing it with others.
The best part of the Glen Aulin High Sierra Camp is you’re camping directly next to the gorgeous White Cascades and swimming hole. Imagine waking up to that sight every morning and enjoying a prepared breakfast next to a fire. That beats any hotel I can think of.
Glen Aulin Hiking Tips

This trail gets crowded. For starters, the trailhead begins in Tuolumne Meadows, one of the most tourist-heavy areas of Yosemite. Additionally, it shares its trail with the PCT and JMT. The earlier you can get started, the better.
It’s a moderate level of difficulty. It’s not a difficult hike by any means, but it is on the longer side and rocky in the latter half. That said, it’s mostly level, straight forward, clearly marked and well-maintained. Just be prepared for the length of it and you’ll be fine.
This trail is seasonal. The Glen Aulin trail is located in Yosemite’s high elevation area and thus, receives a heavy amount of snow in the winter, making it inaccessible. The entire east side closes during this time. So plan a summer or fall visit if you want to hike Glen Aulin.
Bears do frequent this area. Bears are all over Yosemite. However, they tend to hang around Tuolumne Meadows and this trail quit a bit. I didn’t see any during my hike, but you might. If you do encounter a bear, make lots of noise to alert it of your presence, give the bear plenty of space and you’ll be fine.
Watch out for the pack horses! Supplies get down to Glen Aulin High Sierra Camp via pack horses. I encountered them 3 times on my hike. Keep an eye out for them and give them the right of way. You also may want to watch your footing after they pass, for obvious reasons.
Planning a trip to Yosemite? If it’s your first visit, be sure to read 10 Awesome Things to Do in Yosemite Valley on Your First Visit. Additionally, read Tunnel View: How to See the Most Iconic View in Yosemite for an epic view you won’t want to miss. Finally, if you’re thinking of hiking Half Dome, read How to Hike Half Dome: The Complete First Timers Guide.
IF YOU WANT TO SEE ALL OF YOSEMITE’S HIGHLIGHTS IN A DONE-FOR-YOU, HASSLE-FREE TOUR WITH KNOWLEDGEABLE GUIDES, GO HERE.

4 Reasons Why You Should NOT Hike Half Dome
I hiked Half Dome with my brother back in 2017 and it was the most thrilling experience of my life at the time. Hiking 8 miles (mostly uphill), a 400-foot climb up the cables
I hiked Half Dome with my brother in 2017 and it was the most thrilling experience of my life at the time. Hiking 8 miles (mostly uphill), a 400-foot climb up the cables, standing at the top, and being able to look down on Yosemite Valley is an experience that’s hard to describe.
As incredible as it was, it came at a price. As my brother and I were making our way up Sub Dome, I realized how truly unprepared we were. Don’t get me wrong, I THOUGHT we were prepared but truth be told, we probably had no business being up there. That’s a tough pill to swallow, but it’s the truth.
All went well, though. We made it to the top without any major problems and managed to make it back to the car despite being low on energy and close to dehydration. I knew the experience of hiking Half Dome would make for an awesome addition to this blog (you can read that article here) but I started thinking, “what about the other part of it that no one talks about”?
The “part” I’m referring to is instead of encouraging everyone and anyone to hike Half Dome, what if I gave people reasons why they SHOULDN’T hike it? That’s the purpose of this article. We all know the reasons why you should, but there are plenty of reasons why you shouldn’t. So read on to find out the four reasons why you should NOT hike Half Dome.
1) It can be dangerous

Half Dome. Yosemite National Park.
I’m not going to sugarcoat it, there is potential, life-threatening danger on this hike. Truth be told, you’ll find danger in anything you do. Just driving to the trailhead is more dangerous (statistically speaking). That’s why I’m saying it CAN be dangerous. I believe most of the danger can be mitigated as long as you’re prepared for it.
That said, people have died on this hike. They’ve died both on the trail and on the cables. As of 2019 (2020 numbers have not be listed yet) there have been:
At least 13 deaths
291 accidents
& 140 search & rescue missions
This is just since 2005. Thankfully, there were no confirmed deaths on Half Dome in 2020. The most recent was in 2019 when a young women from Arizona slipped on the steepest part of the climb and slid 500 feet to her death.
Weather also plays a role in the level of danger. The granite is smooth and slick from all the hiking boots that’s traversed over it over the years and when it rains, it becomes incredibly dangerous to attempt an ascent or descent. You do NOT want to be up top (or even on the base) when lightning strikes.
2) You have a medical condition

Half Dome. Yosemite.
If you have vertigo, are prone to seizures, have heart or lung problems, bad knees, etc, you shouldn’t hike Half Dome. Vertigo, especially, can cause a fatal accident to occur. Most of the hike takes place on your standard hiking trail but towards the end, you’ll need to navigate your way up Sub Dome and a 400-foot climb up the cables.
Hiking Half Dome with heart issues also wouldn’t be wise. In 1995, a man from Huntington Beach collapsed from heart failure as he was making his way up the cables and fell. There have been others who have had heart attacks while hiking but thankfully survived their ordeal.
Half Dome isn’t worth your life or making your condition worse. There are many trails in Yosemite that are just as spectacular that wouldn’t put you in unnecessary risk. North Dome, for example, is an excellent alternative that ends with any epic view of Half Dome. You can read that article here.
3) You have a low level of fitness
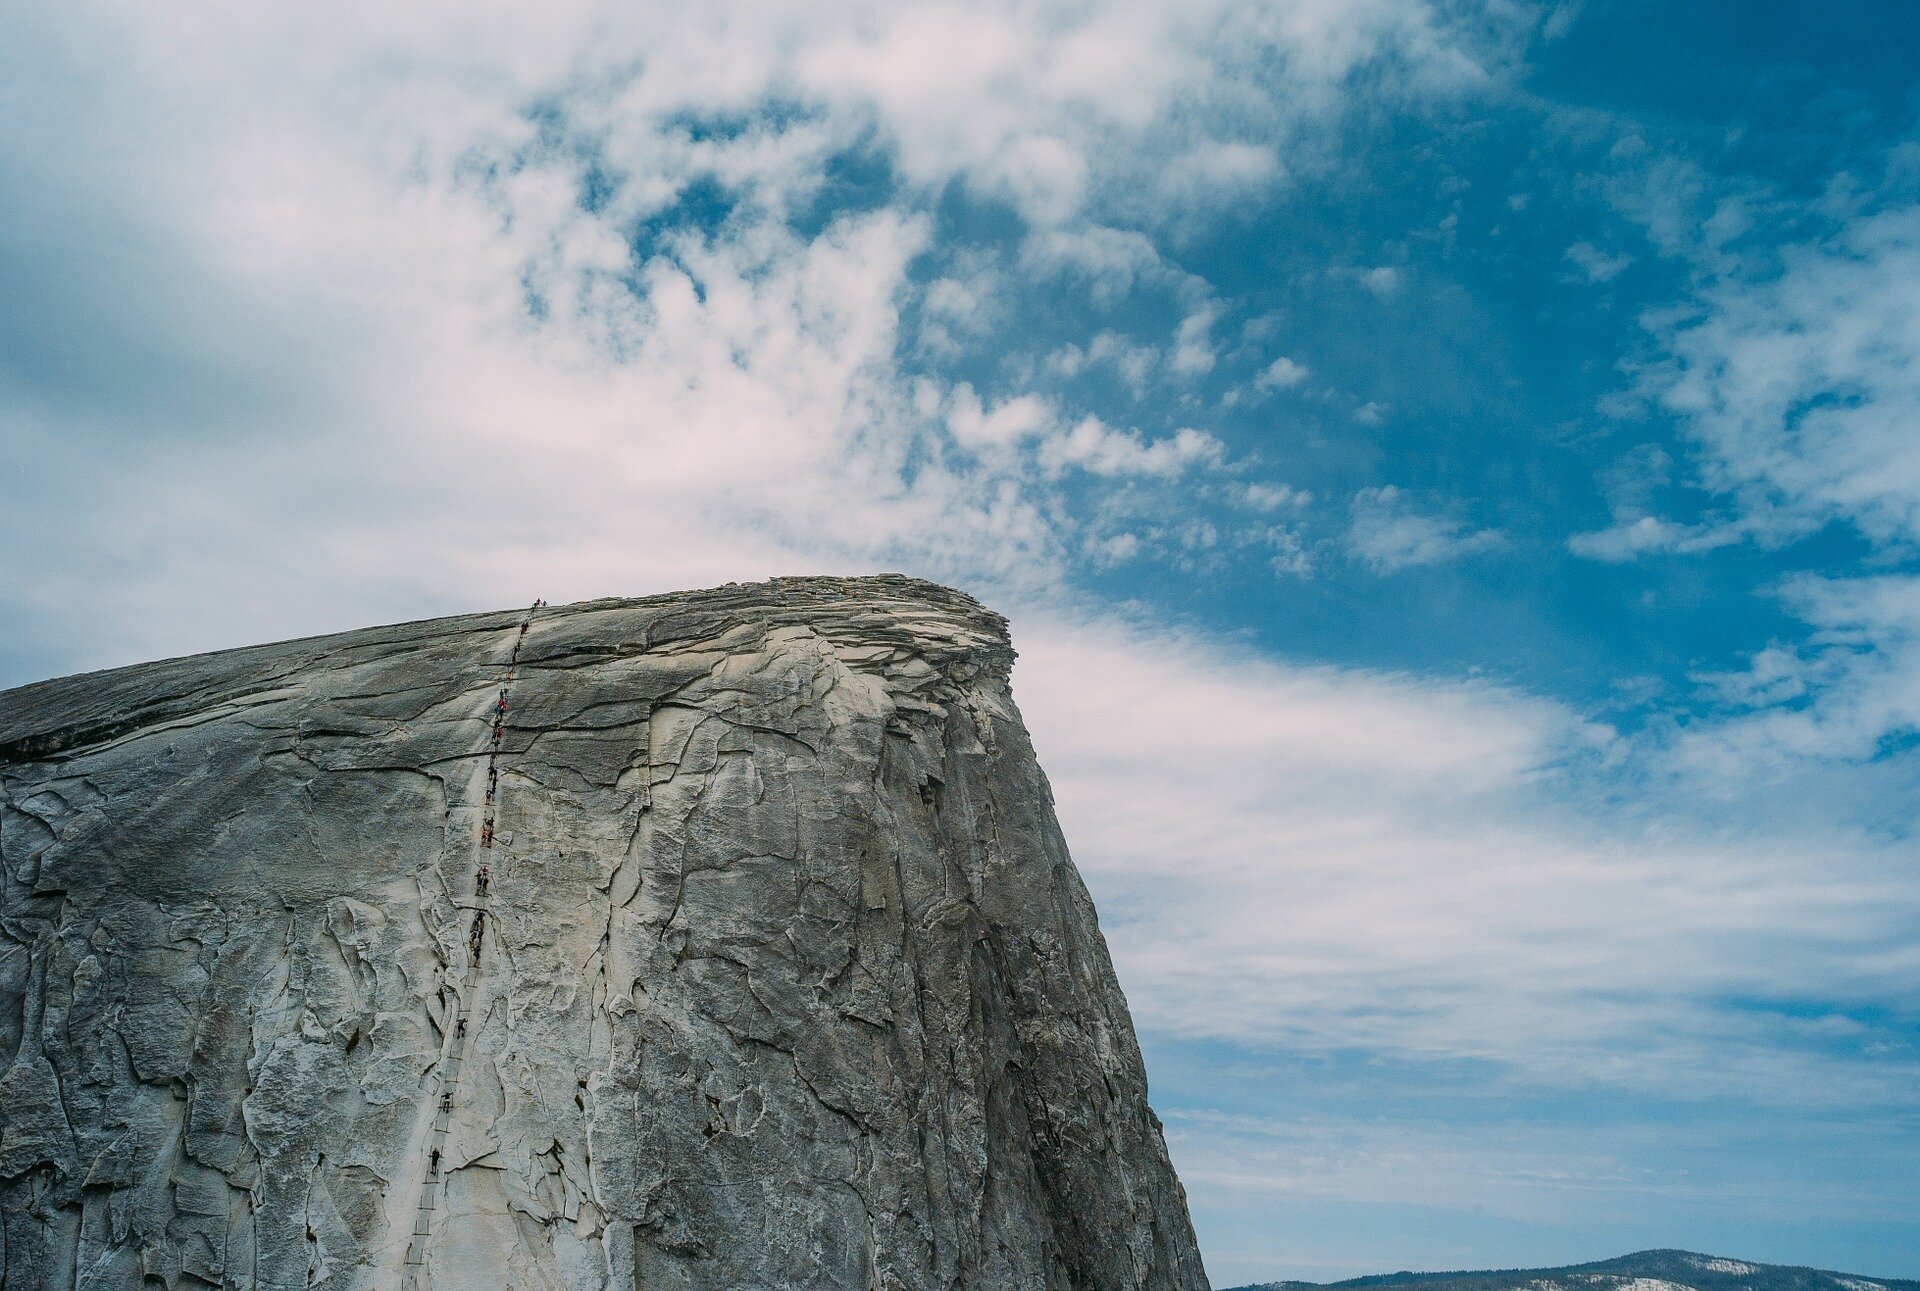
Half Dome cables. Yosemite.
While being a top level athlete isn’t required, being in at least decent shape is. One way you can find out how in “hiking” shape you are would be to go for a hike on an easier trail and pay attention to your breathing. If you’re huffing and puffing, then Half Dome is too dangerous.
Thankfully, this is something that can be overcome. If you’re serious about hiking Half Dome start training MONTHS before, even a year! The sooner the better. Join a gym and utilize a stair master and squat press. Go hiking regularly and keep upping the difficulty. The higher elevation you train at, the better prepared you’ll be.
4) You’re inexperienced

Half Dome. Yosemite National Park.
This one is pretty self explanatory and like the reason above, can also be overcome. If you’re new to hiking, starting with Half Dome wouldn’t be ideal. Your best bet would be to start out small. Like your local park, for example. If you’re coming to Yosemite, some good beginner trails would be:
The Mist Trail (Challenging, but still beginner friendly)
Cook’s Meadow
Elizabeth Lake
Lembert Dome
Cathedral Lakes
Once you’ve put a few of these (or others) under your belt, you can start hiking the more difficult ones that’ll challenge you to up your game and test your resolve. Some of those Yosemite trails include:
Upper Yosemite Falls
Four Mile Trail
Cloud’s Rest
If you can tackle one of these without feeling like you’re going to fall over at any moment, chances are good that you’re ready for Half Dome. If not, then I would definitely stick with the easier ones mentioned above (there’s no shame in it).
Remember, it isn’t just your safety at risk, but you could be putting the safety of other hikers and Park Rangers (if they have to come help you) at risk as well.
= Conclusion =
I hope you’ve found this article helpful in deciding whether Half Dome is a good fit for you. If none of these apply to you then great, get at it. If one does, then remember that NO hike is worth your life and there’s absolutely no shame in admitting when something’s out of your comfort zone. In fact, it’s a respectable trait.
Safe travels.
Please support this website by sharing this article with your friends & family on Pinterest, Facebook, or your favorite social media app.
You can also show your support by reading one or more of the related posts below. Thank you.

How to Make a Day Reservation for Yosemite National Park
Back in March of 2020 when the pandemic began to take hold in the United States, movie theatres, shops, theme parks, and the like…
3 minute read | contains affiliate links
*GREAT NEWS! Effective January 2023, day-use reservations to enter Yosemite National Park will no longer be required. Standard park entry fees still apply.
Check out our other Yosemite related posts below to start planning your trip!
Back in March 2020 when the pandemic began to take hold, movie theaters, restaurants, and more began closing in an effort to slow the spread. Yosemite was no different.
A couple months later when officials deemed it safe to reopen, they did so with the caveat that all visitors must have a confirmed reservation. This way, park officials could control crowd levels.
This continued throughout the summer season and ended in September 2020. Due to the program’s success, park officials decided to renew the policy for the 2021 season.
In 2022, as of May 20th and through September 30th, you will either need a day use reservation or one of the various alternatives if you’re arriving between the hours of 6am - 4pm.
This year, the reservation system is more about the multiple construction projects going on throughout the park and less to do with covid-19.
If you’re certain you’ll be arriving between that ten hour timeframe and will need a reservation, the information we curated below will benefit you.
How To Make A Reservation

Day use reservations are made via Recreation.gov. Make sure to set up an account and you’re signed in before attempting to get a reservation.
They go quickly, so saving yourself these steps now could make all the difference.
If you’re using a mobile device, download the app as it tends to work better than the website. Follow the steps below to secure your reservation.
In the search bar type in, “Yosemite National Park ticketed entry” and then click/tap, “day use entry”.
Click/tap, “select date”. If reservations are available on the day you want, the box will be highlighted blue. If not, it’ll be gray. Select your day and hit, “select tickets”.
Then, you’ll select your ticket type. If you have one of the various passes that grants free entry, select “vehicle”, as later on in the process you’ll have the chance to select your pass.
From this point, you’ll have 15 minutes to complete the reservation.
On the next page you’ll verify your information and add your annual pass (if you have one). You’ll see a box that says, “add a pass”. Tap that, select your pass, and proceed to the next page.
Then, you’ll see your total. If you have or will purchase one of the annual passes, you’ll see the vehicle fee removed from your total with only the reservation fee remaining.
On the final page, you’ll pay the fees and receive your confirmation.
Yosemite Reservation Fees
The only fee associated with the reservations is the $2 processing fee but keep in mind that this is in ADDITION to the $35 entry fee. If you’re a holder of one of the various annual or lifetime passes, then your only cost will be the $2 fee.

Other Types of Reservations
The above will apply to most people visiting the park. However, there are a few other ways one could secure a reservation without needing one. They are as follows:
An Upper Pines Campground reservation
A Yosemite Valley Lodge or Ahwahnee room reservation
Private lodging or rental in Wawona, Foresta, or Yosemite West
A Yosemite wilderness permit
A commercial-use authorization
A Half Dome permit

Whether you have one of the above reservations or a traditional day-use, you will need to provide proof of such by presenting your confirmation and photo ID at the gate.
You’ll pay your entrance fee (if applicable) and be given a permit that’s valid for three (3) consecutive days with unlimited re-entries. You will NOT need a reservation for each day, just the arrival date.
Visiting Without a Reservation

If you weren’t able to get a reservation, the only other way is to visit the park by arriving on a YARTS bus (Yosemite Area Regional Transportation System), on bicycle, on foot, or on horseback.
You can also make it a point to arrive before 6am or after 4pm. Just keep in mind that if you arrive between those hours, even by a few minutes, the reservation policy will be enforced.
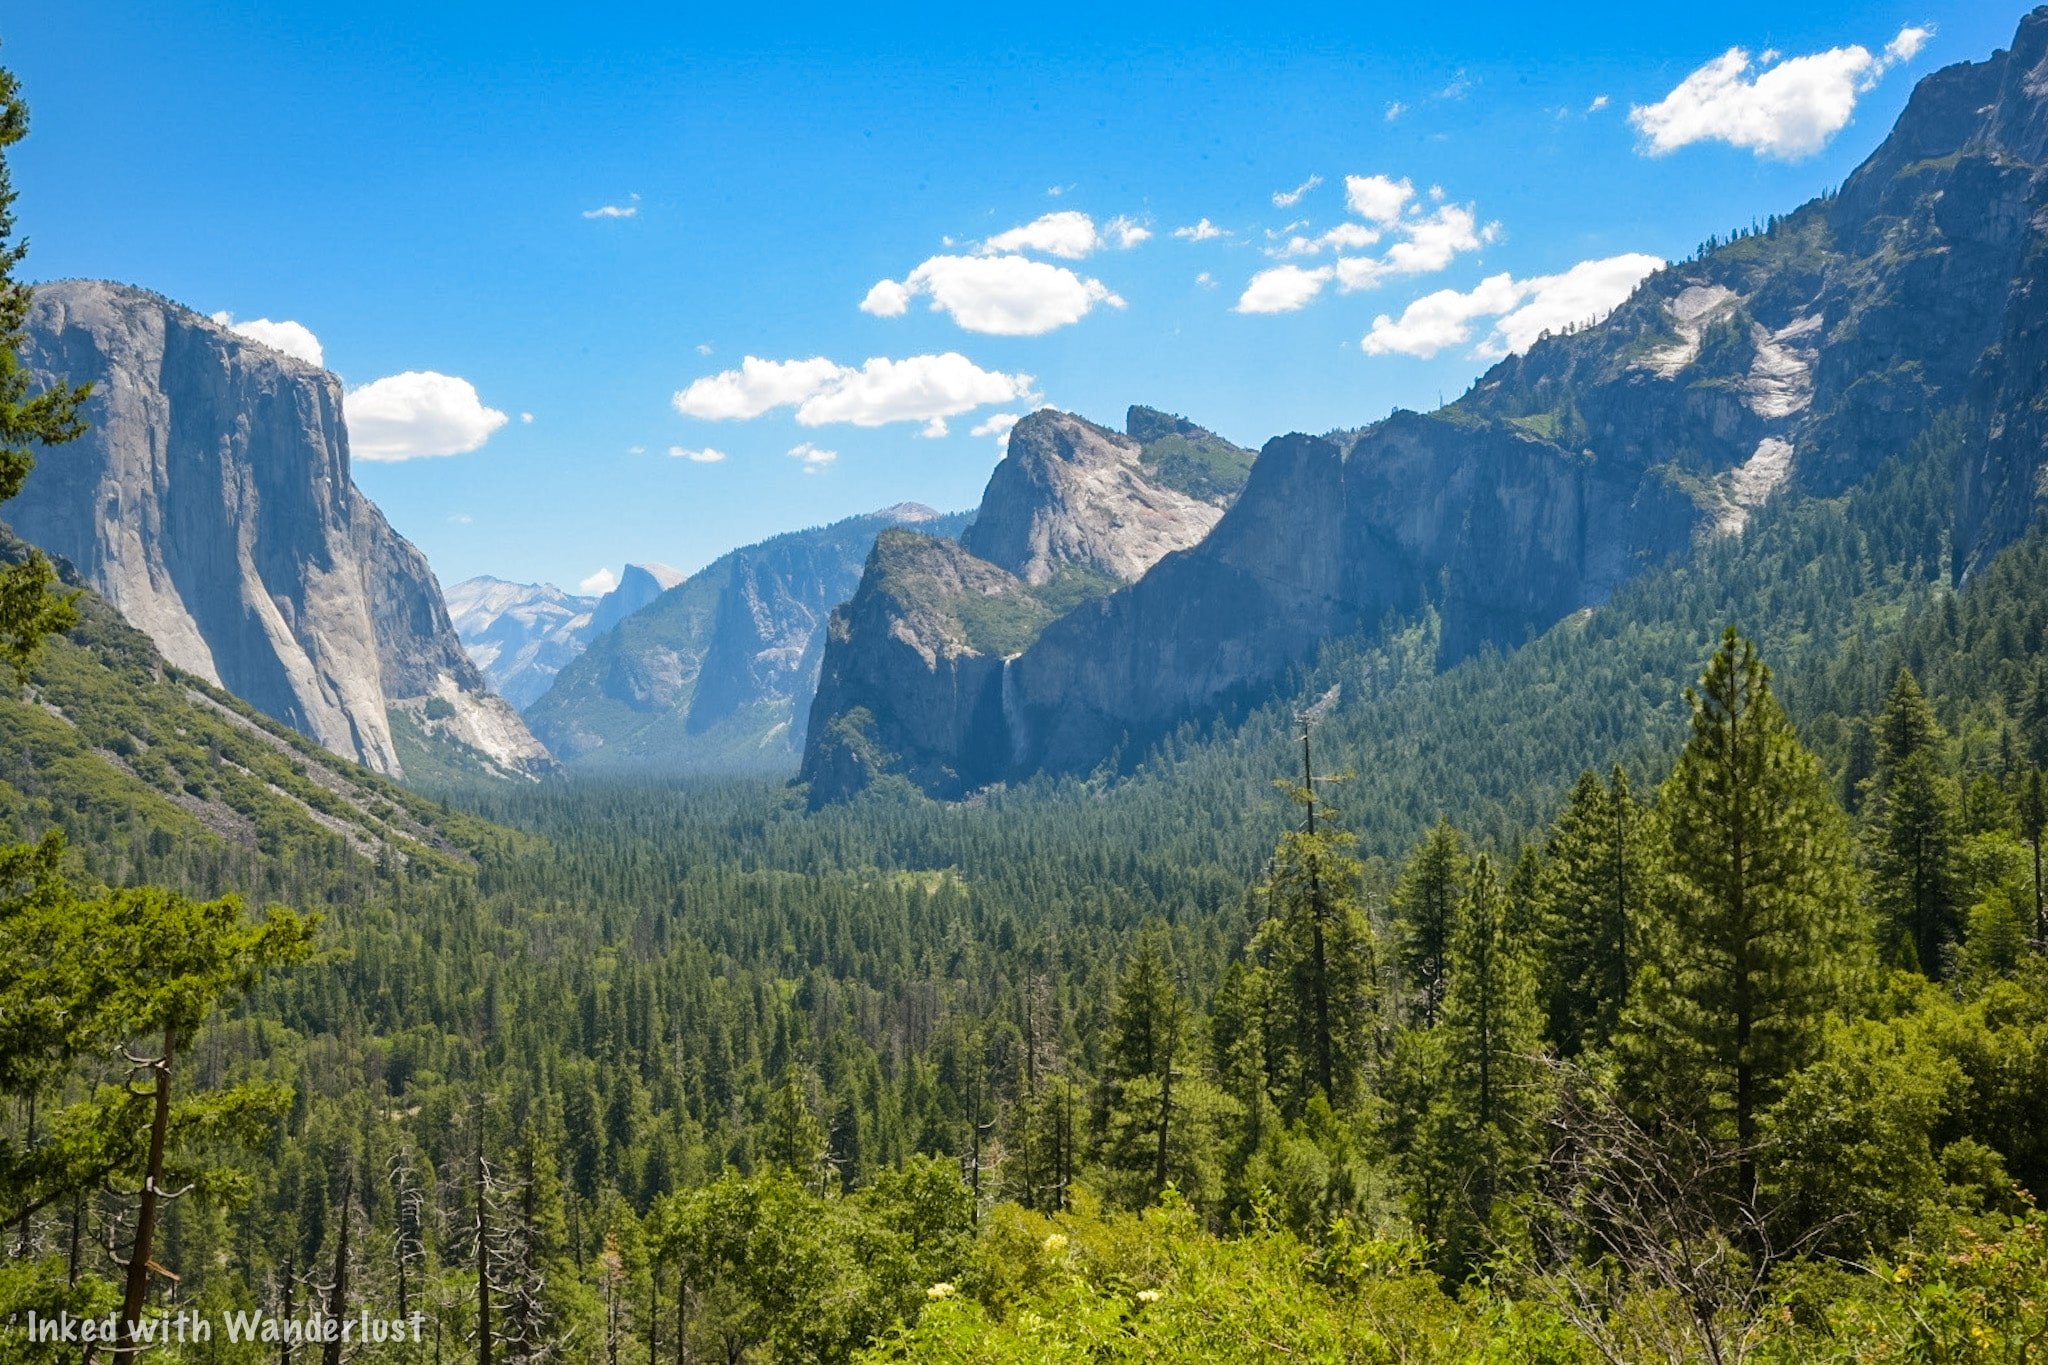
How Dates Are Released
As of March 23rd, 2022, 70% of reservations will become available for purchase. The remaining 30% will be released seven days prior.
So for example; if you wanted to visit the park on June 7th and you weren’t able to get one ahead of time, more reservations will be released on June 1st.
If you’re still not able to secure one, keep looking. Cancellations do happen. If there’s still slots open, you could get one (theoretically) the day before.

Additional Tips
Keep an eye out for cancellations! Canceled dates are released the same day they become available. So if you haven’t been able to get the day you want, keep checking. A cancellation may pop up.
You must arrive on the day on your reservation. You’ll get a permit that’s valid for three consecutive days at the gate. However, you MUST arrive on the FIRST day listed on your confirmation. If you don’t, you’ll be denied entry.
Each vehicle MUST have its own reservation. It won’t matter if you’re the same party. If you arrive in two or more separate vehicles, an occupant in each vehicle will require their own reservation.
You have a specific window of time to arrive. Day use reservation holders must arrive after 5am on their arrival date and leave the park by 11pm. Other things to keep in mind; there will be NO same-day reservation options and reservations cannot be sold or transferred to another person.
A Quick Note…
We’re often asked about the equipment we use to capture the photos on our website. Below, we’ve added Amazon links to those products and others that we recommend.
If you decide to purchase, Amazon will pay us a small commission. This helps us keep Inked with Wanderlust running and doesn’t cost you anything extra.
“Understanding Exposure” by Bryan Peterson (This book is a great resource to anyone getting into photography).
It is our hope that this article was helpful to you in planning your next adventure. If so, please share it with your family and friends on Facebook or Pinterest.
You can further show support by subscribing to our newsletter below. In it, you’ll receive a once weekly newsletter containing announcements, new post alerts, news, and more!
If you have any questions, comments, or suggestions, please engage with us in the comment section below.
Thanks for reading and safe travels!