
Northern California Waterfall Road Trip Itinerary (6 Waterfalls!!)
The northern half of California is literally teething with one gorgeous waterfall after another. Some, like Burney Falls, are easy to…
Disclosure: This post contains affiliate links. If you make a purchase through these links, I may earn a small commission at no additional cost to you. I only recommend products or services that I believe will add value to my readers.
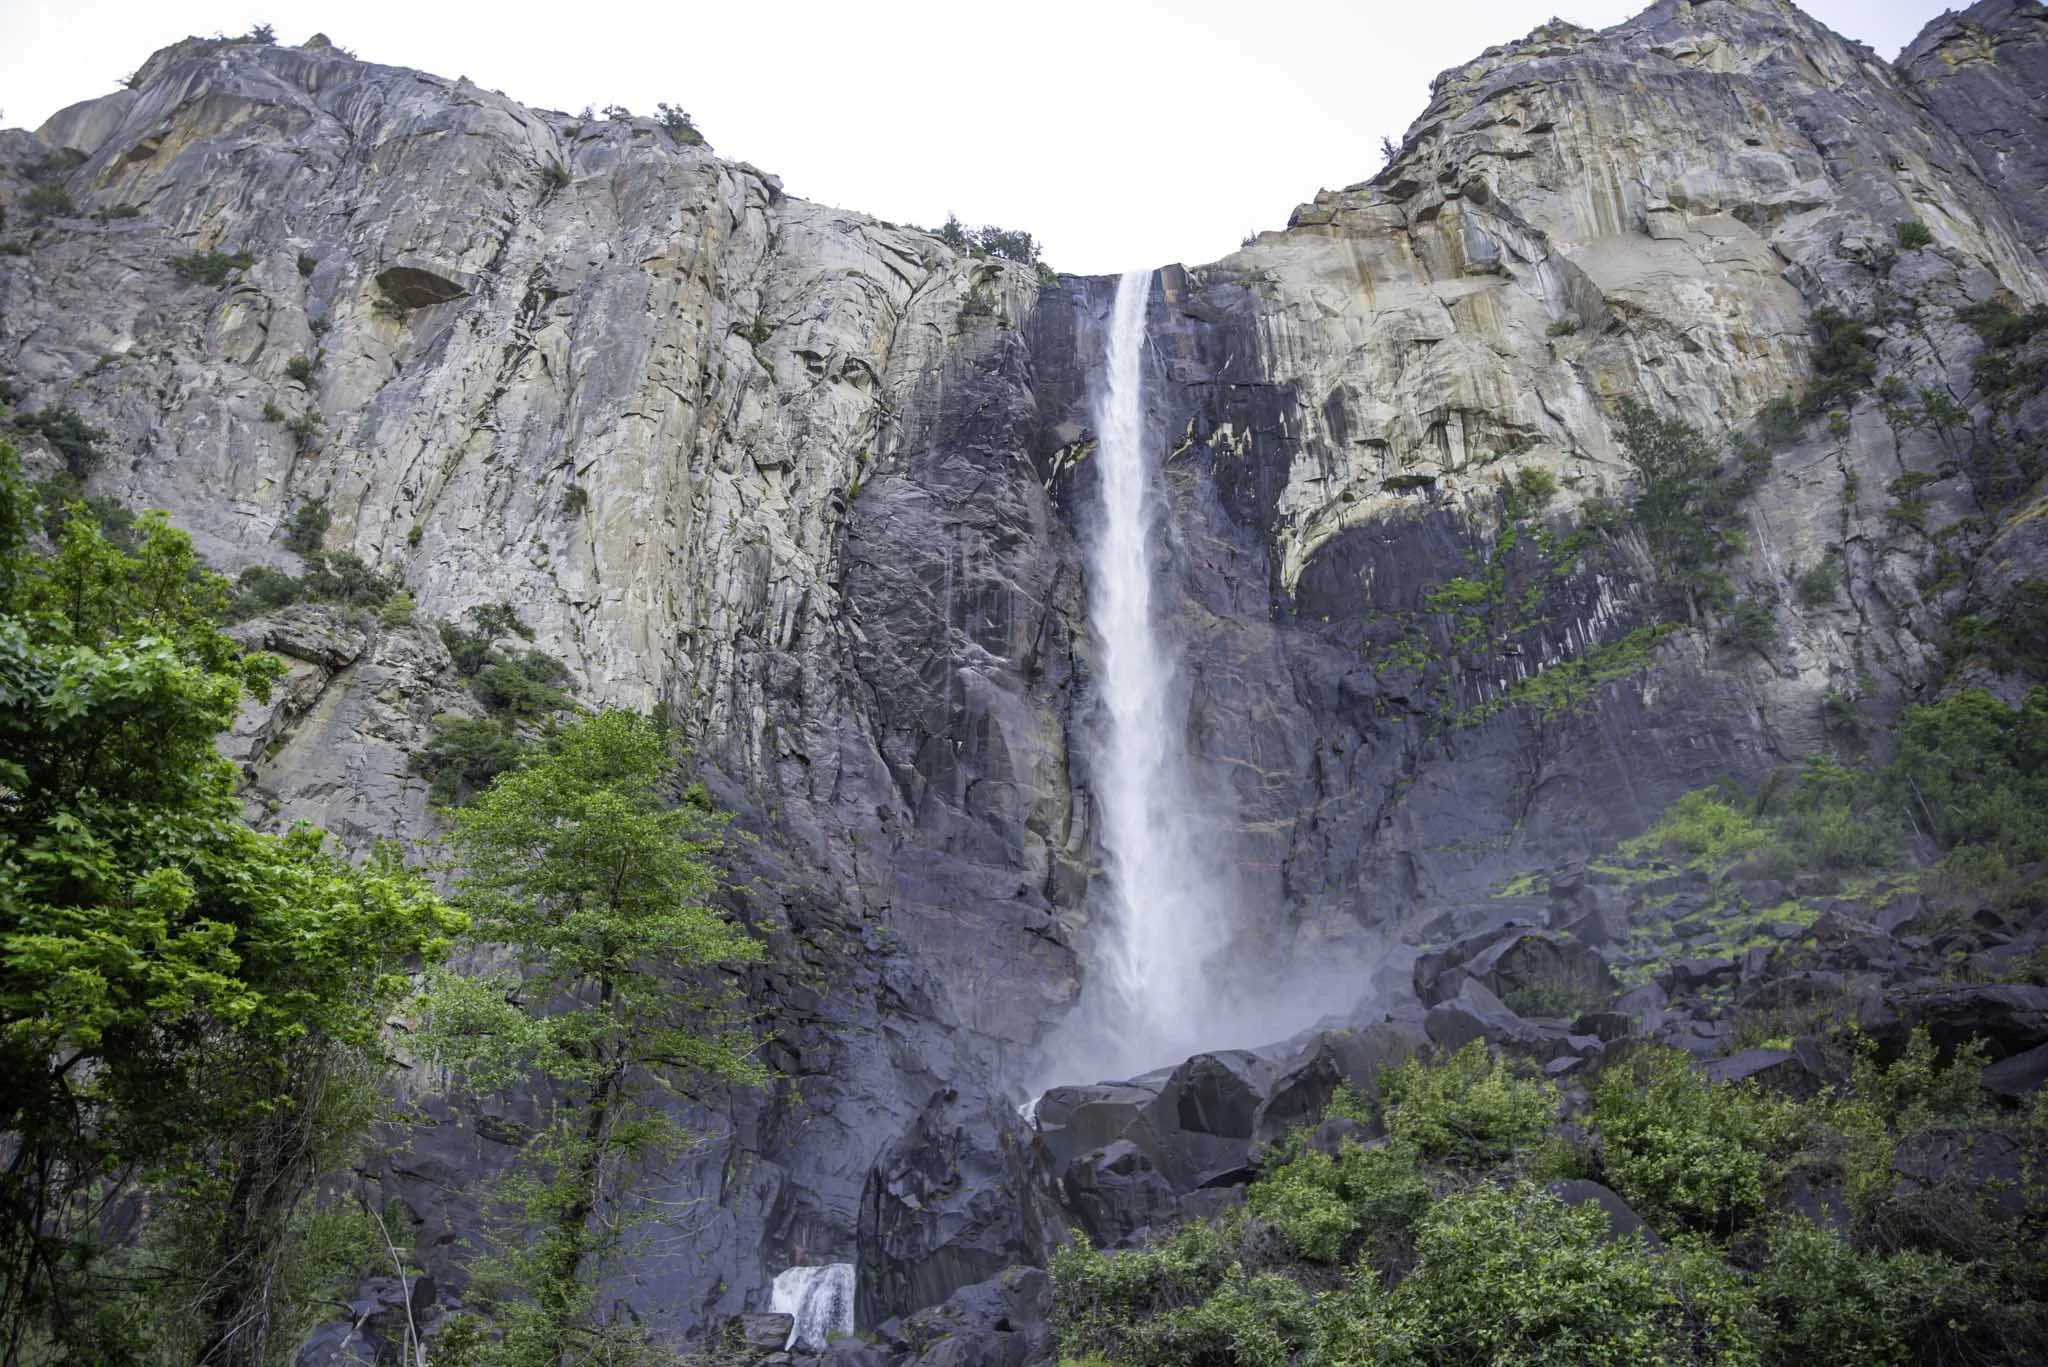
The northern half of California is literally teething with one gorgeous waterfall after another. Some, like Burney Falls, are easy to view as they require little to no effort beyond driving there. Others, such as the upper portion of Yosemite Falls, require extra effort and determination.
The Shasta region, located in the upper sector of California, has many of the former. In fact, between the small mountain towns of Burney and Dunsmuir along a 60-mile stretch of road are six such waterfalls, some of which require nothing more than getting out of your car to see.
If you plan correctly and don’t linger for too long, seeing all six of these waterfalls is entirely doable. I have been to all of these falls, numerous times, and will provide what I believe to be a solid Northern California waterfall road trip itinerary to see them.
Additionally, I’ll provide information about parking, some helpful (from experience) tips, area restaurants, hotel recommendations, and more. Let’s get into it!
Buy me a coffee?
If you found this blog helpful, consider leaving a tip through the Buy Me A Coffee button below! Whether it’s $1 or $5, every bit helps offset small travel costs like coffee, water, lunch, parking, or park entry fees. Your support means the world—thank you!
I Recommend Beginning in Dunsmuir
The town of Dunsmuir is located right off of Interstate-5 in the Shasta region of California. It is here where you’ll find the first two waterfalls on this list. One of which requires the most amount of effort of the six to see.
You could also begin in the town of Burney and save Dunsmuir for last if you wish. This itinerary, however, will focus on beginning in Dunsmuir. If you want to begin in Burney, simply hit these waterfalls in the reverse order.
There are numerous hotels and local eateries in Dunsmuir. To start your day, I recommend a breakfast burrito and coffee at Up and Running Espresso. Enjoy your breakfast, secure yourself a parking spot, and head off to your first waterfall of the day.
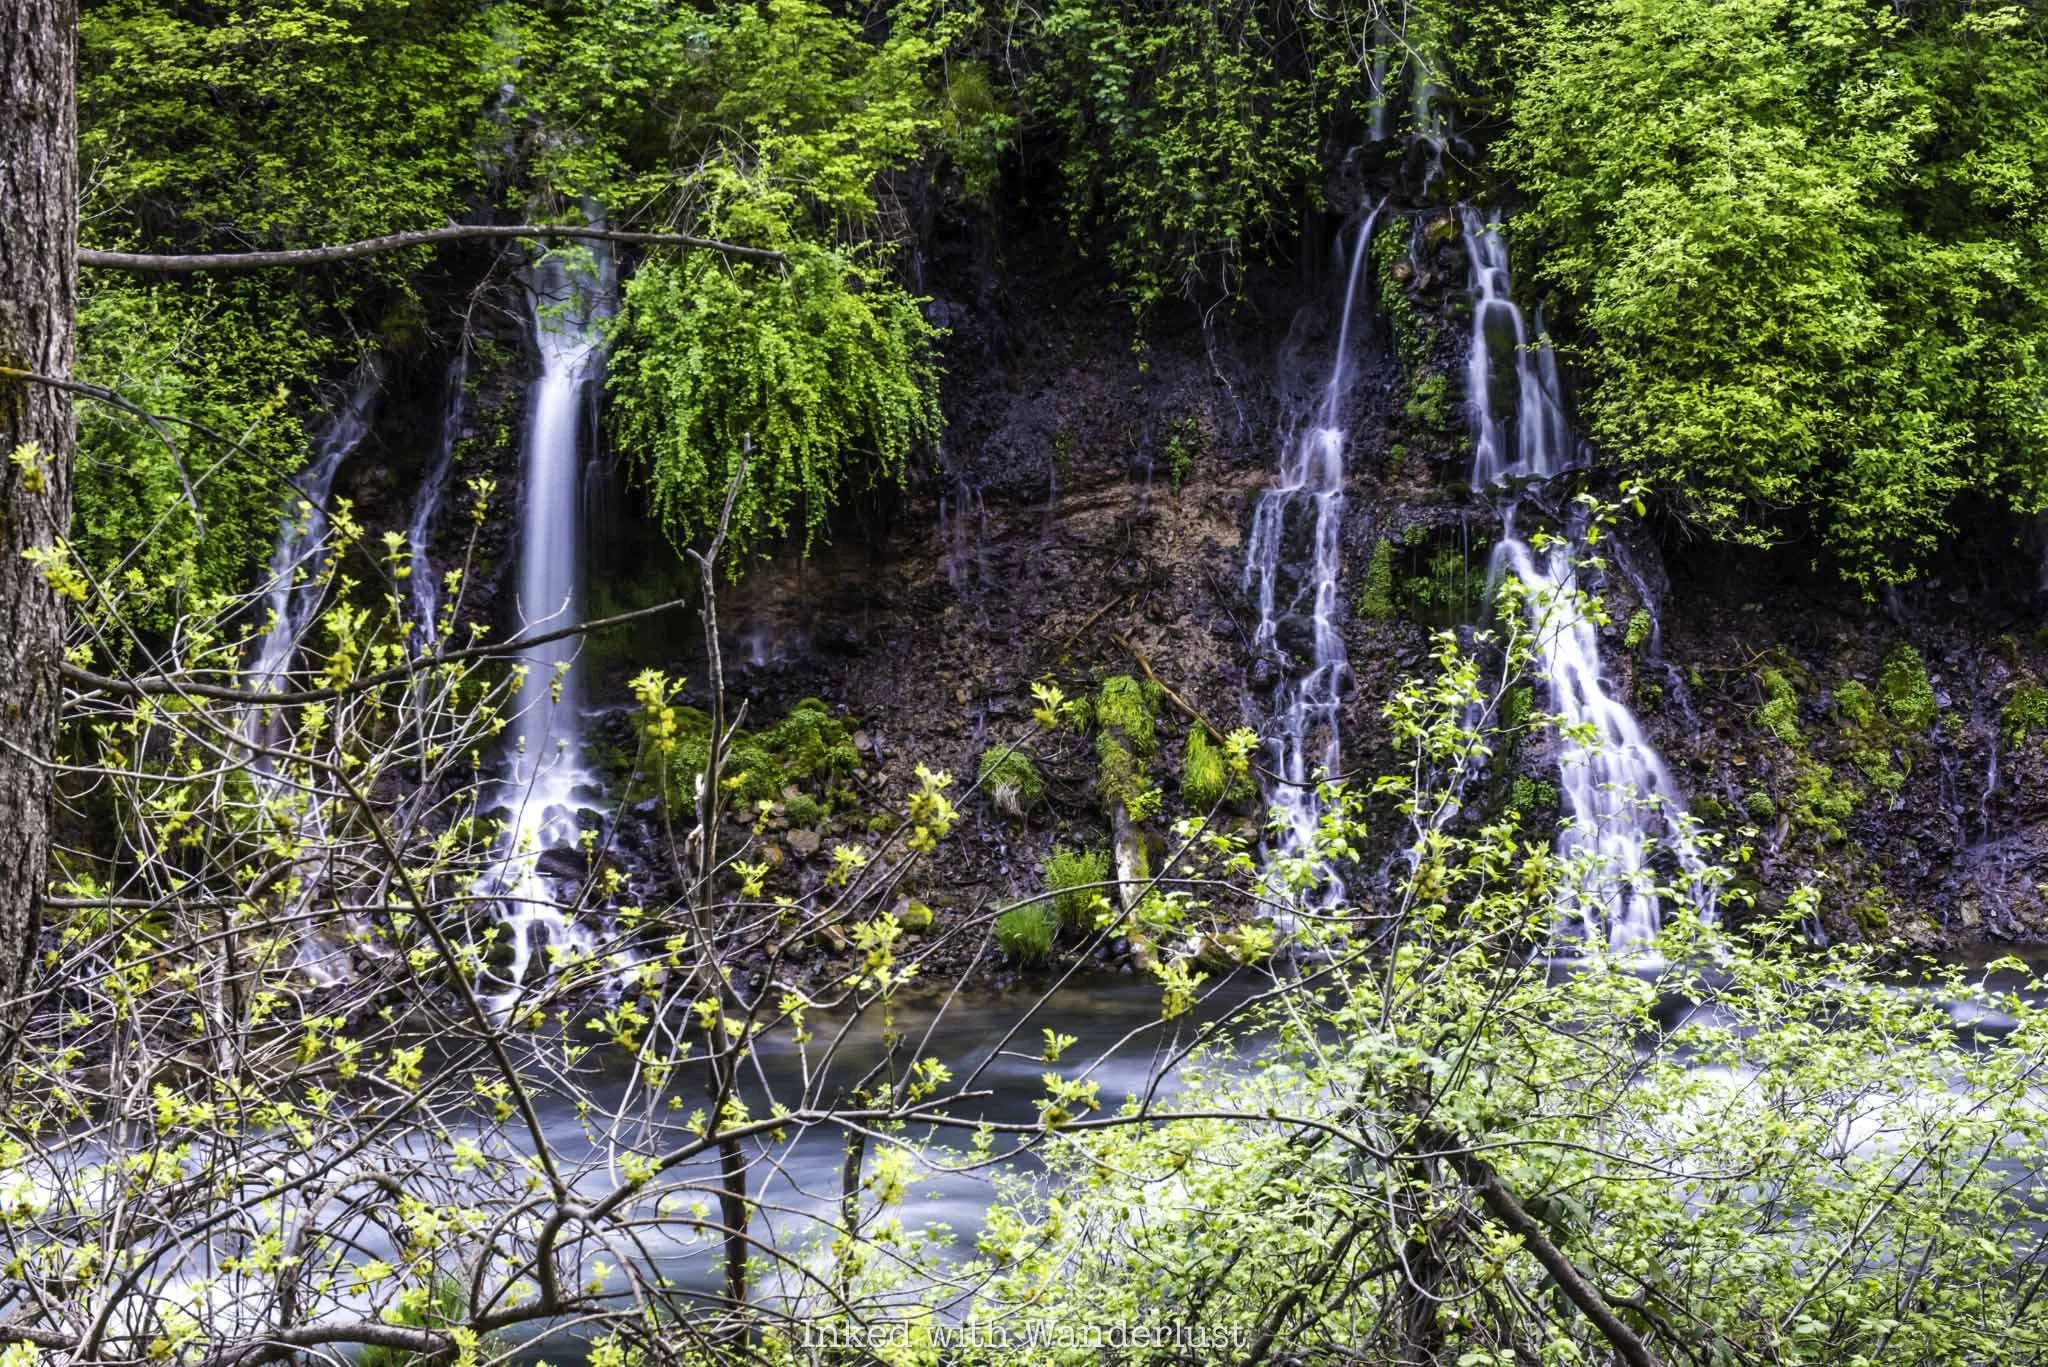
1) Mossbrea Falls

Admittedly, this one’s a bit tricky. It’s fairly easy to get to, but you’ll need to be ok with a little trespassing to see it. Mossbrea Falls itself isn’t the issue, it’s the route you’ll need to take that traverses across private property.
I wrote an extensive guide with step-by-step instructions on how to get to Mossbrea Falls. Additionally, it’s full of helpful tips, advice, and picture references to ensure a smooth experience.
You’ll need to walk through a private retreat and then along railroad tracks (Union Pacific property) for about a mile to reach the falls. Both property owners have relaxed their stance on hikers going through their property, as I had no issues at all when I went.
Mossbrea Falls is easily one of the most beautiful waterfalls I’ve ever seen. It’s almost like stepping into the pages of a fairytale novel. Trust me, it’s worth the effort. If you knock this one out first thing in the morning, you should be able to complete it in two hours or less.
When you’re done, and if it’s open, consider stopping for lunch at nearby Yaks on the 5 restaurant. It’s right down the street from Mossbrea and serves can’t-miss, delicious artisan burgers.
READ ALSO: “The Ultimate Guide to Mossbrea Falls in Dunsmuir”
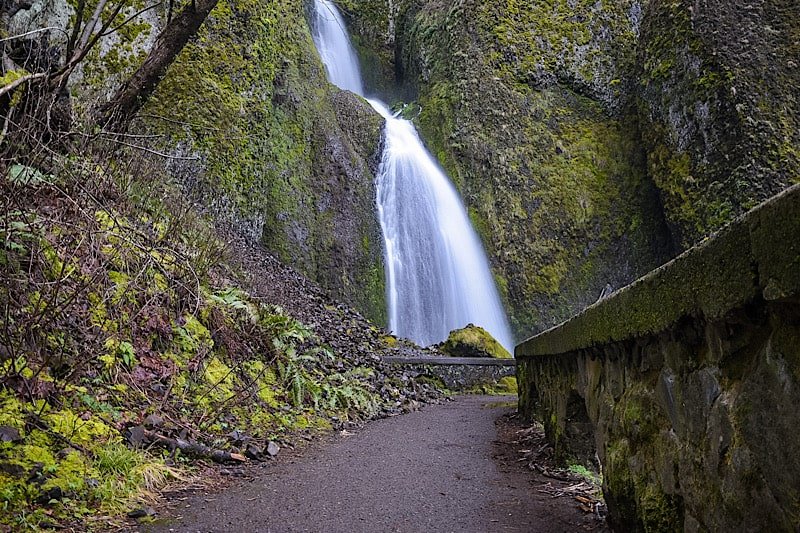
2) Hedge Creek Falls

From where you parked for Mossbrea Falls, head north on Dunsmuir Avenue or on Interstate 5 to Hedge Creek Falls. As you get closer, you’ll see signs indicating which exit to take and where to park.
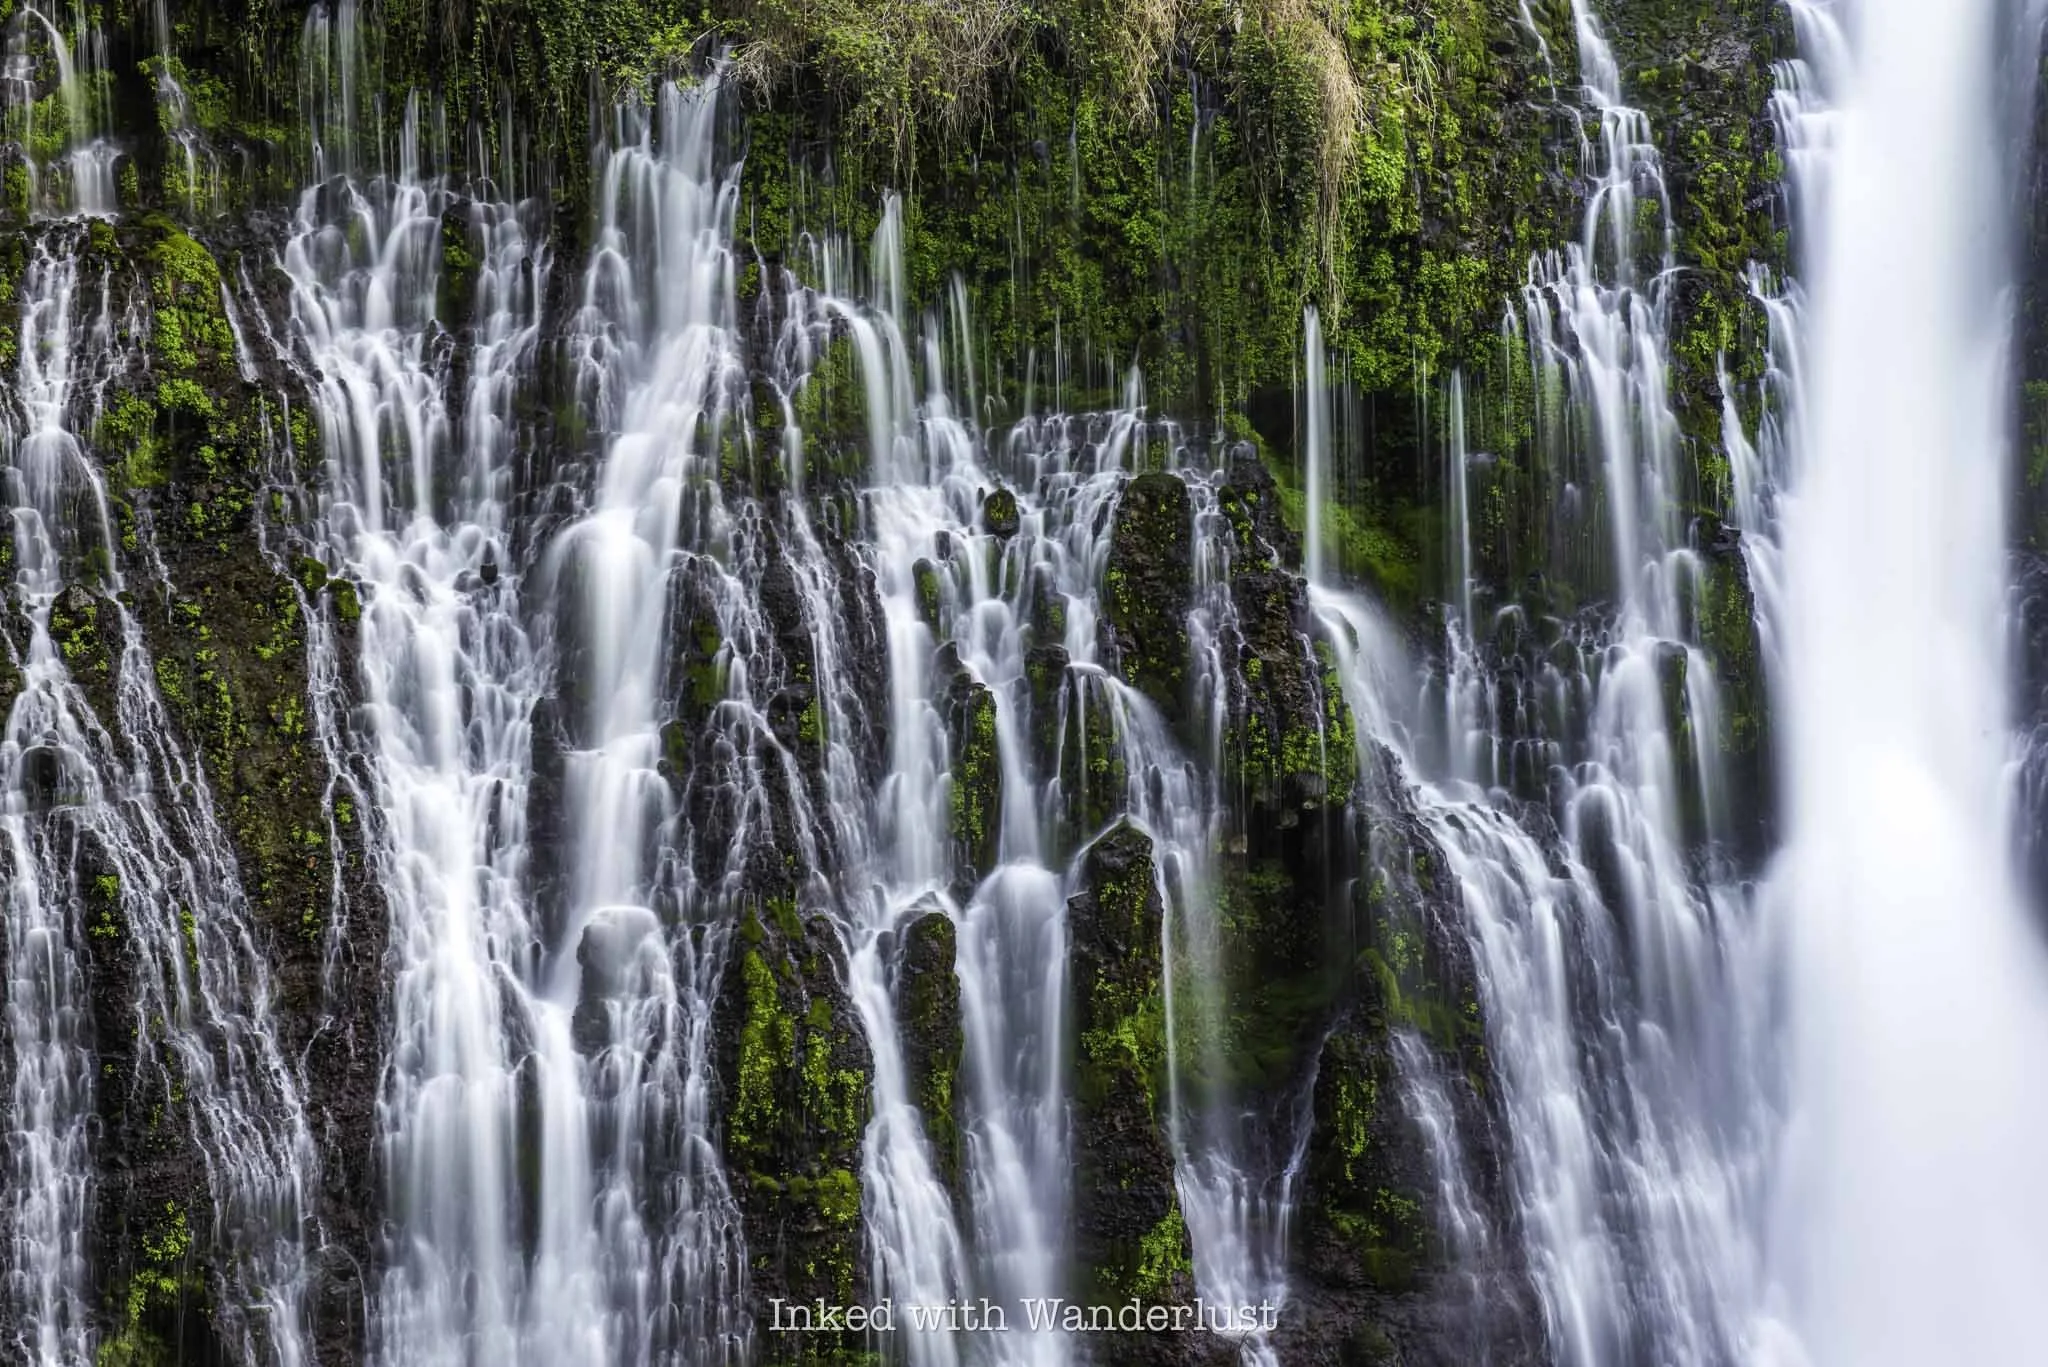
From the small pull out-style lot, it’s a short jaunt down to the relatively small, but nonetheless beautiful fall. This single flow fall flows 35-feet over a dramatic basalt shelf with towering pines and other greenery abound.
A unique aspect to Hedge Creek Falls is you’re able to walk behind it, offering a unique perspective. This is the only fall on this list where you can do that, which helps it to stand out.
READ ALSO: “Hedge Creek Falls: A Short Hike to an Incredible Waterfall”
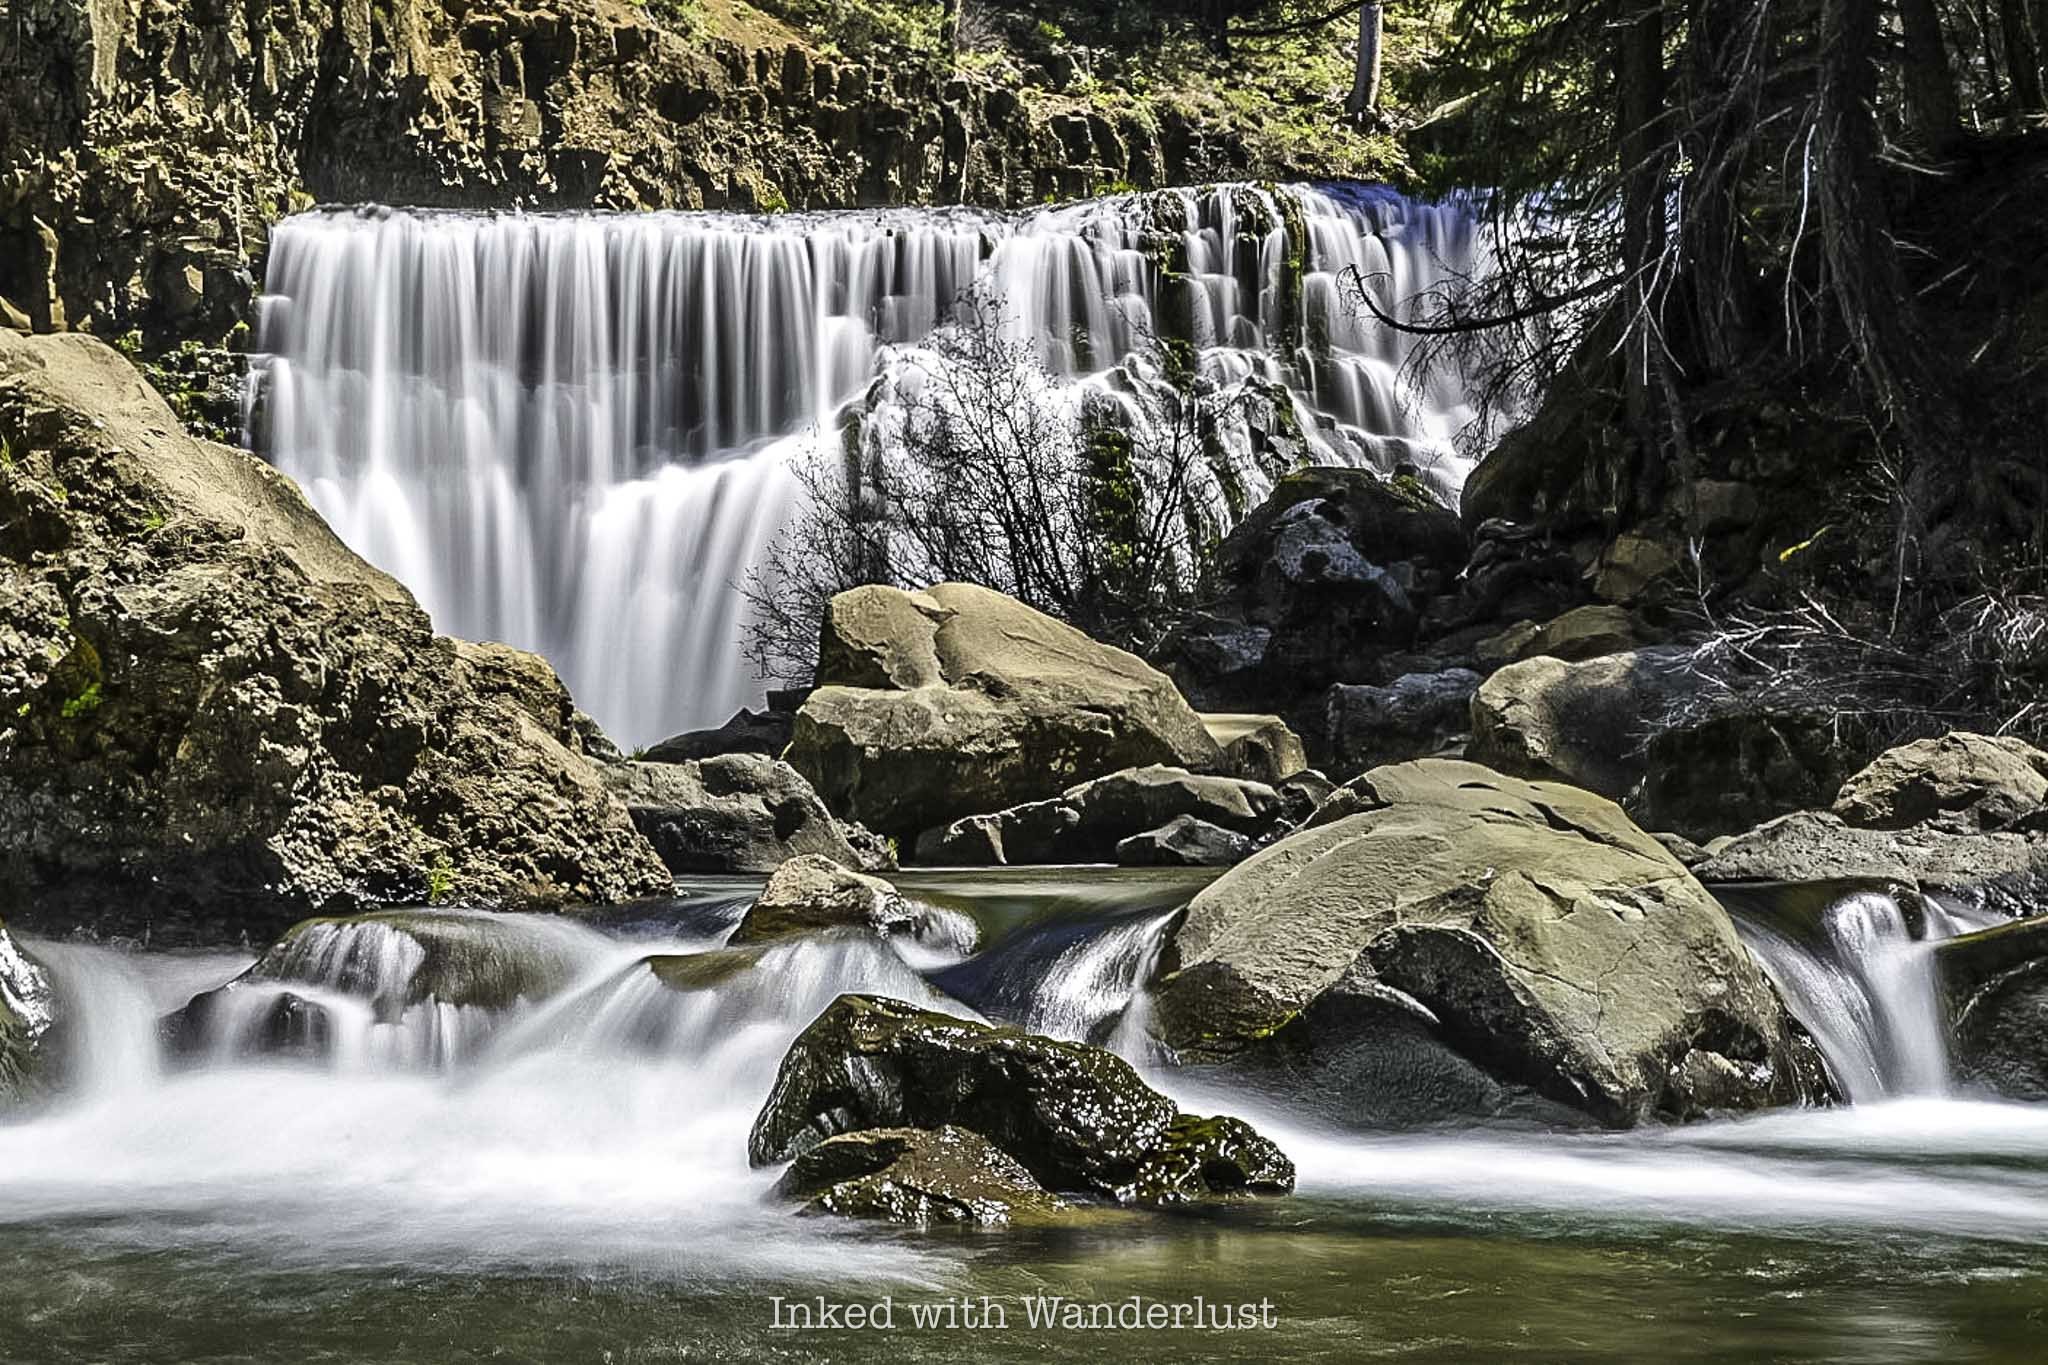
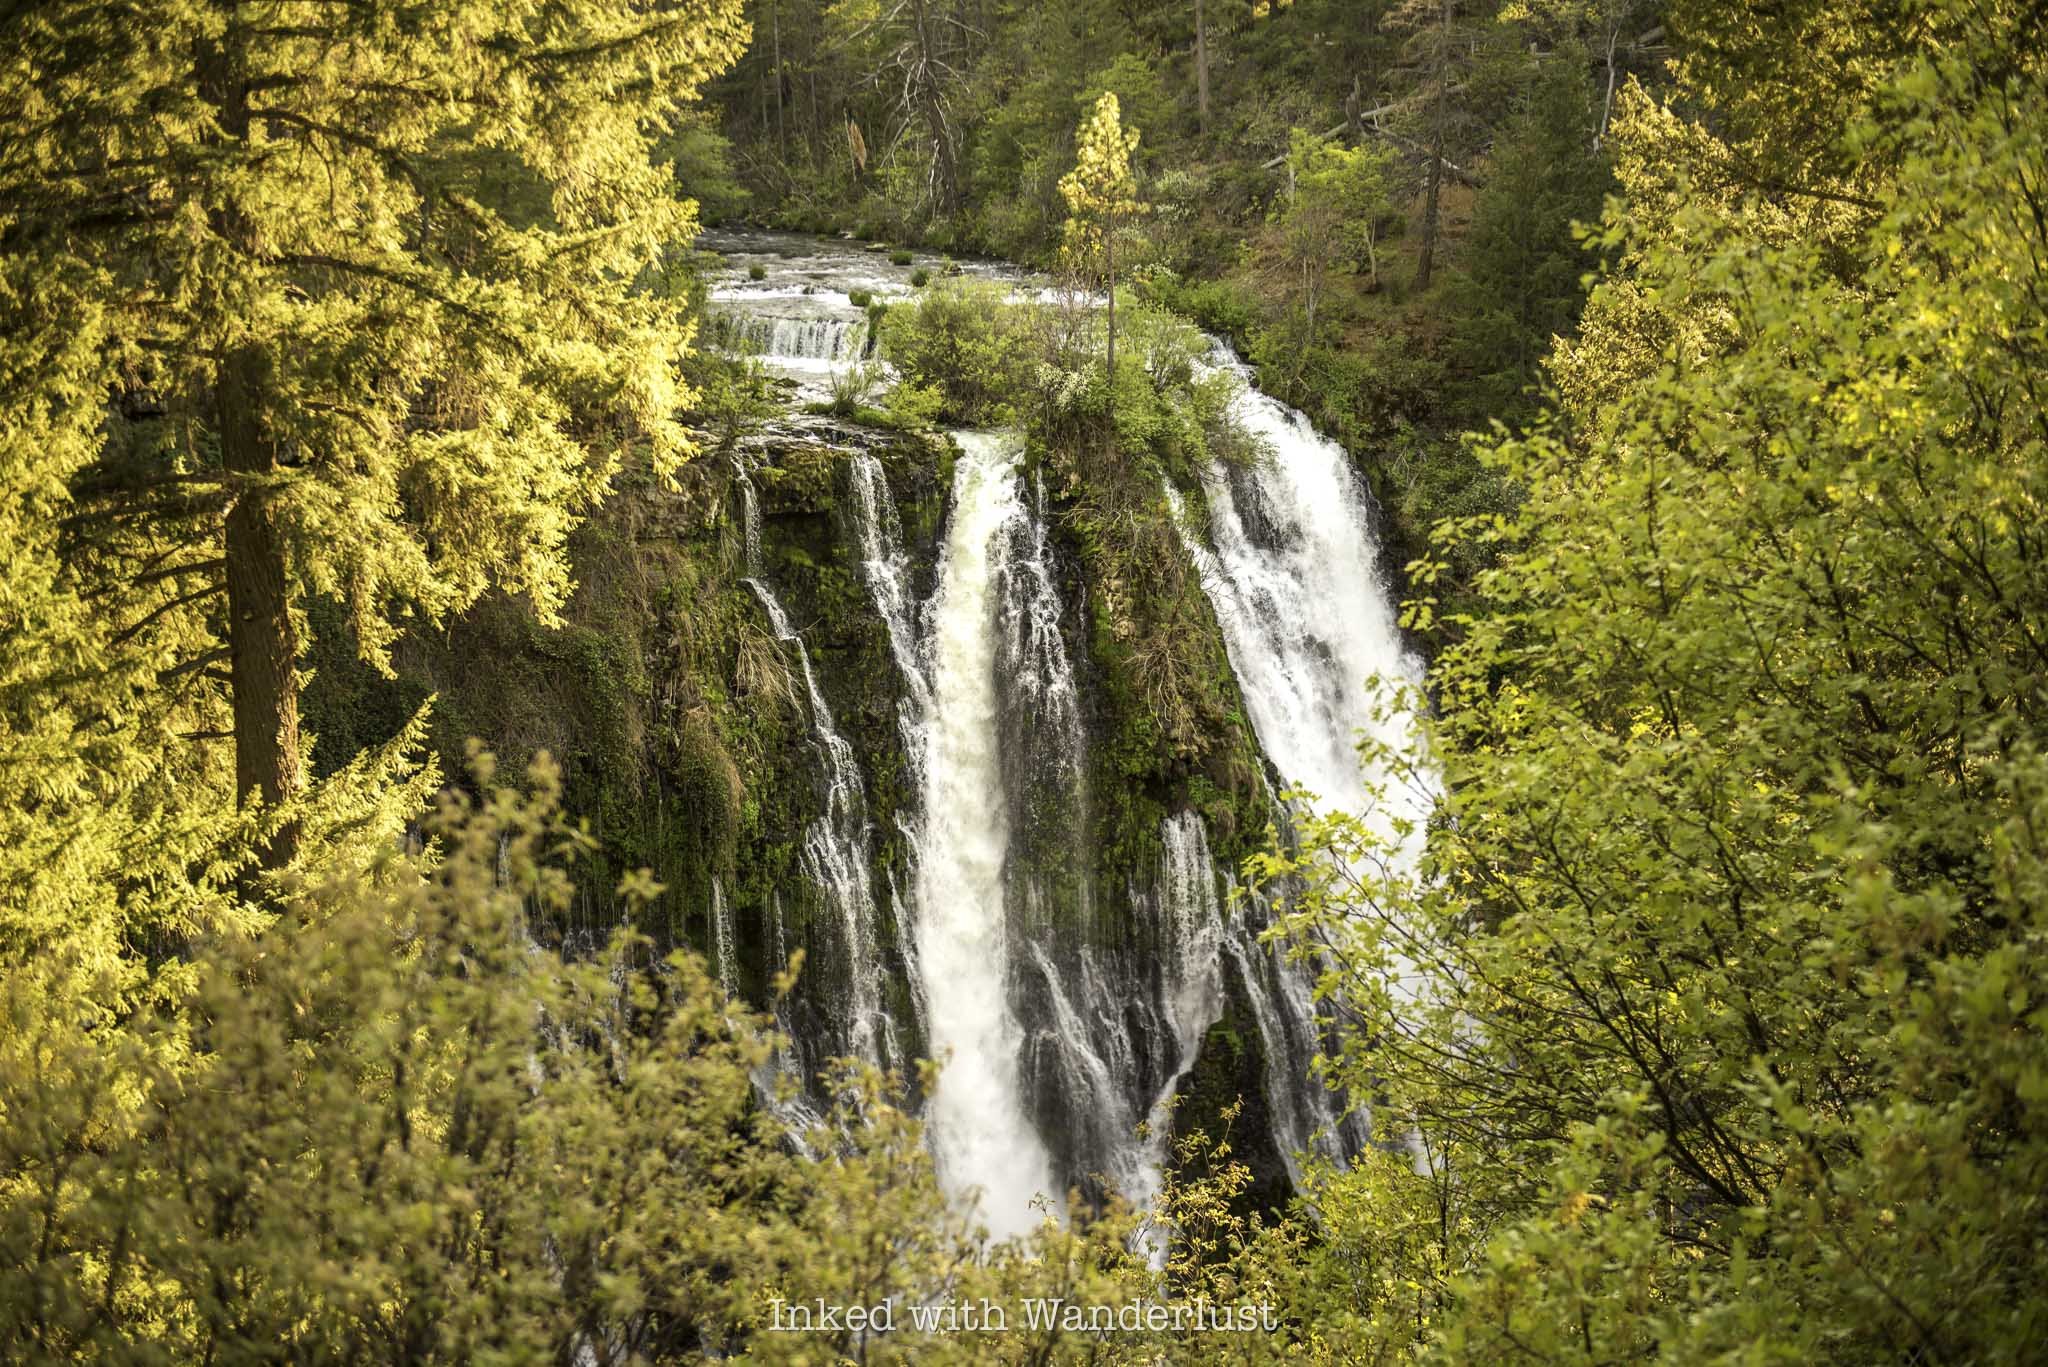
3) Upper McCloud Fall

To reach your next destination, you’ll head east on CA-89 towards to the historic town of McCloud. More specifically, McCloud River Falls. From Hedge Creek Falls, it’ll take roughly 25 minutes of drive time to reach the upper fall.
There, you’ll find three incredible waterfalls along a single 3.9-mile (out and back) trail. However, you likely won’t have time to hike it and still make it to the final waterfall. Instead, drive to each one as they all have their own lots and viewing areas.
I suggest beginning at Upper McCloud Falls. You can see it fairly well from the viewing decks but for a better view, head a bit further down the trail to an unmarked spur trail. Shortly after the concrete ends, you’ll see said unmarked spur trail on your left.
Take your time as it’s a bit sketchy. From the bottom, you’ll get an incredible “head-on” view of the fall and can access the pool if you want to swim. I do recommend saving that for the middle and/or lower falls, though.
4) Middle McCloud Fall
After checking out the upper fall, you’ll next head to Middle McCloud Fall. The middle fall is the largest and, in my opinion, most picturesque of the three. It also has a large and deep pool at the base.
However, it’s also the one that requires the most effort to see, provided you want to see it from its base. There are a couple of viewing platforms just steps from the parking lot if you’re ok with seeing it from afar.
To get to the base, you’ll hike the fourth of a mile (one-way) dirt trail to the bottom. Getting there is easy, but it’ll be an uphill slog on the way out. It’s not difficult at all, but be prepared for it.
I encourage you to take a dip in the pool down there. It’s a great way to cool off on a hot summer day and you won’t find a better view. Many folks cliff jump here as well, but I would check for underwater boulders before doing so.
READ ALSO: “How to Hike to the Base of Middle McCloud Falls”
5) Lower McCloud Fall

Next, head further down the road to Lower McCloud Fall. This 12 foot singular fall plunges into a bowl-shaped pool surrounded by basalt rock walls. It’s the most popular (for obvious reasons) for swimming out of the three.
There is no steep trail to take and you won’t need to go down a sketchy spur trail to reach it either, as it’s mere feet from the parking lot. If you skipped swimming at the middle fall, definitely don’t skip it here.
If you want to want to hike the entire trail, I recommend starting here as opposed to the upper fall. You’ll get the initial climb done on your way in, when you have the most energy. The way back will be a breeze as it’ll be all downhill.
READ MORE: “McCloud River Falls: Three Fantastic Waterfalls in One Hike”
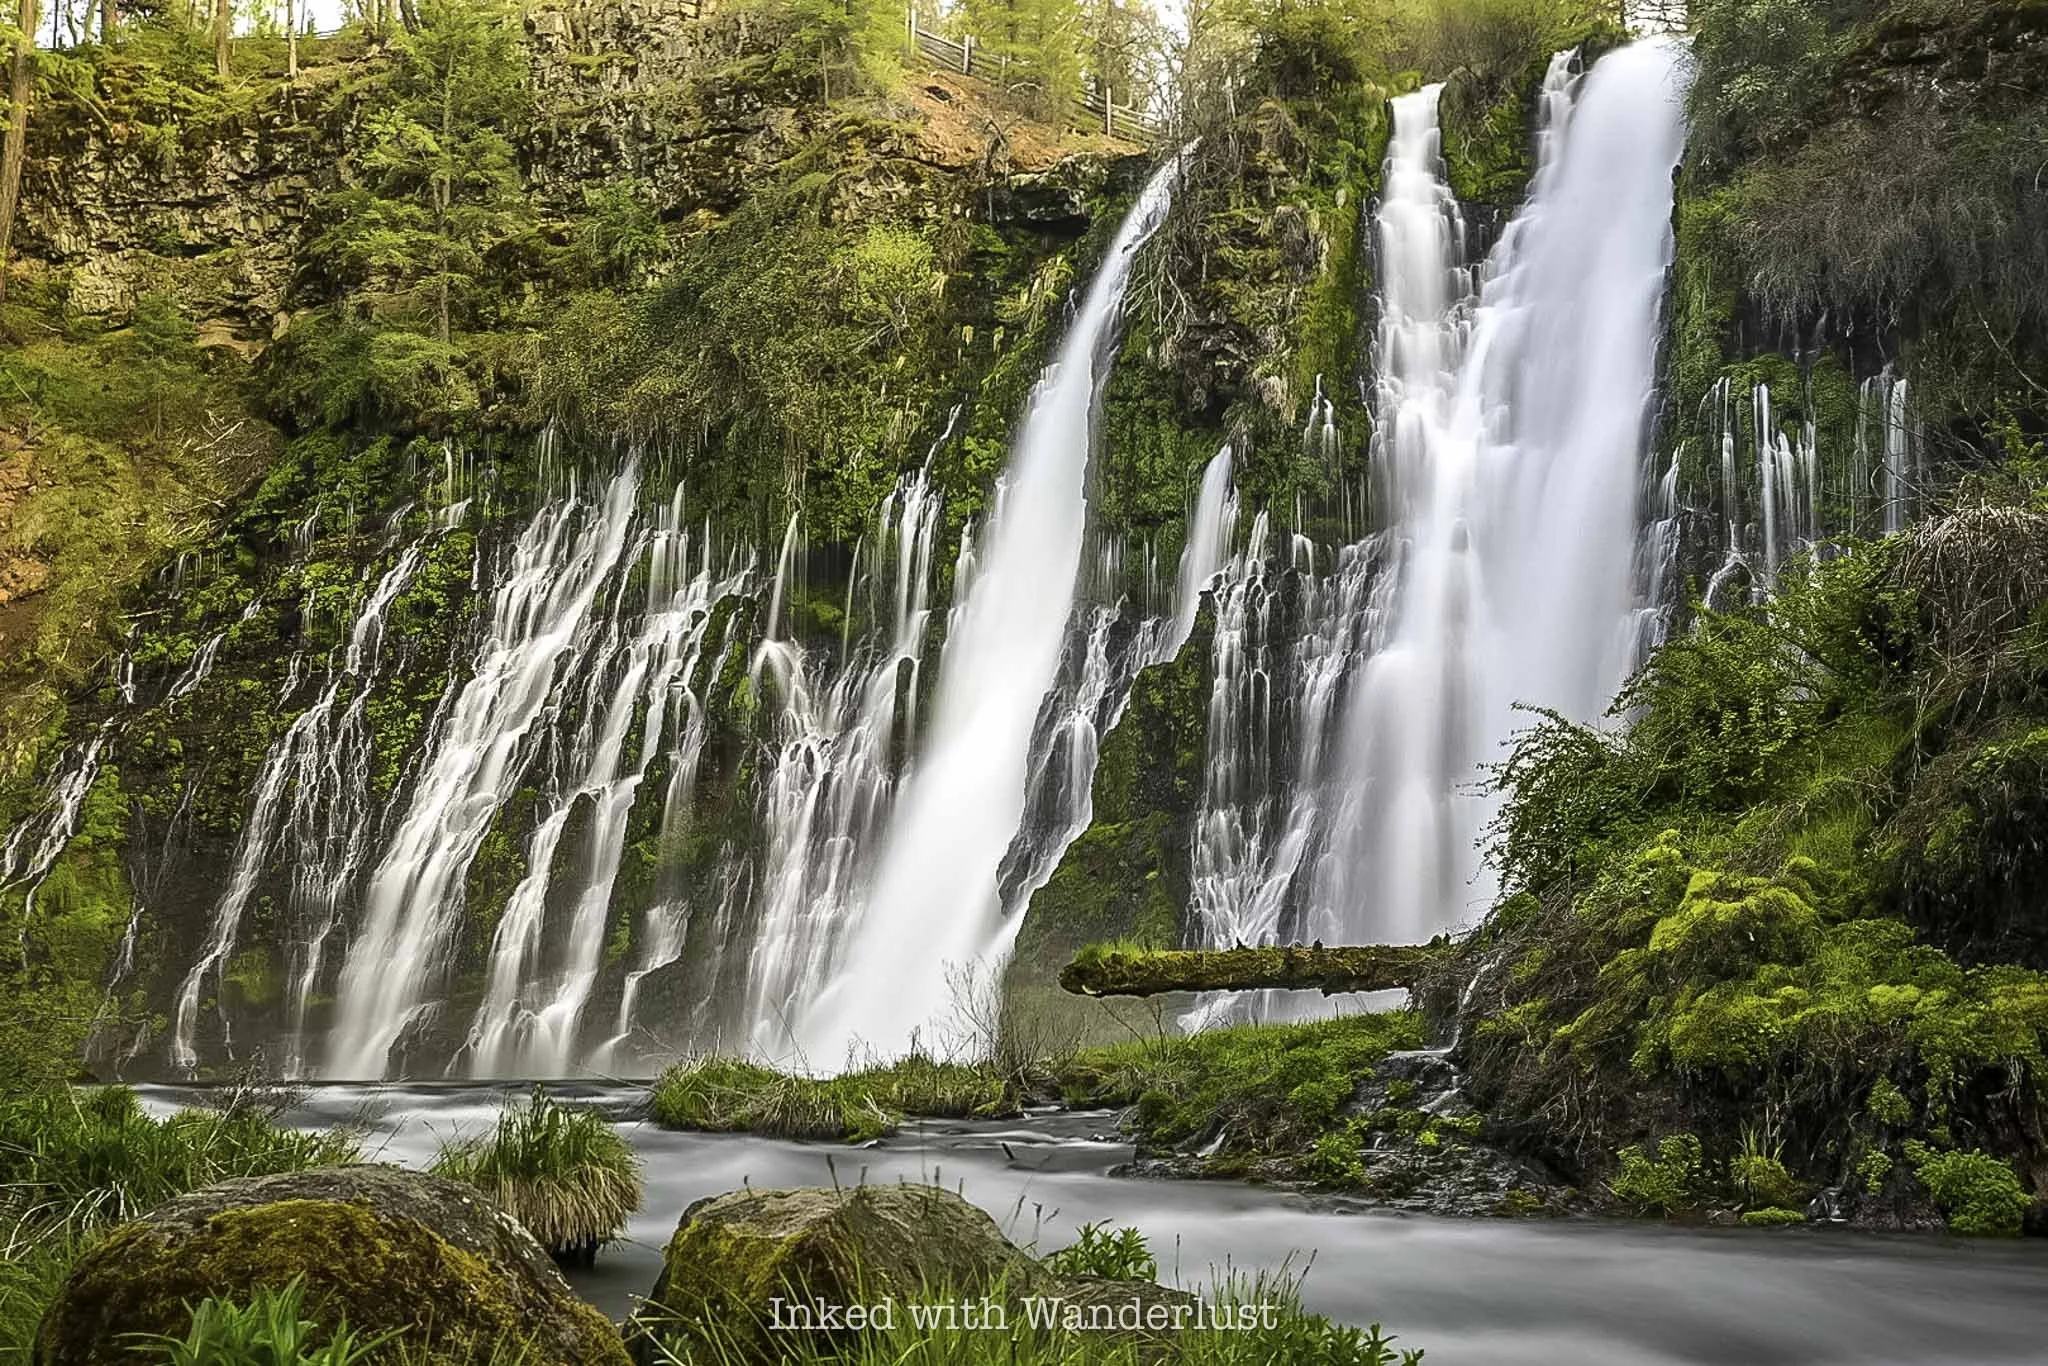
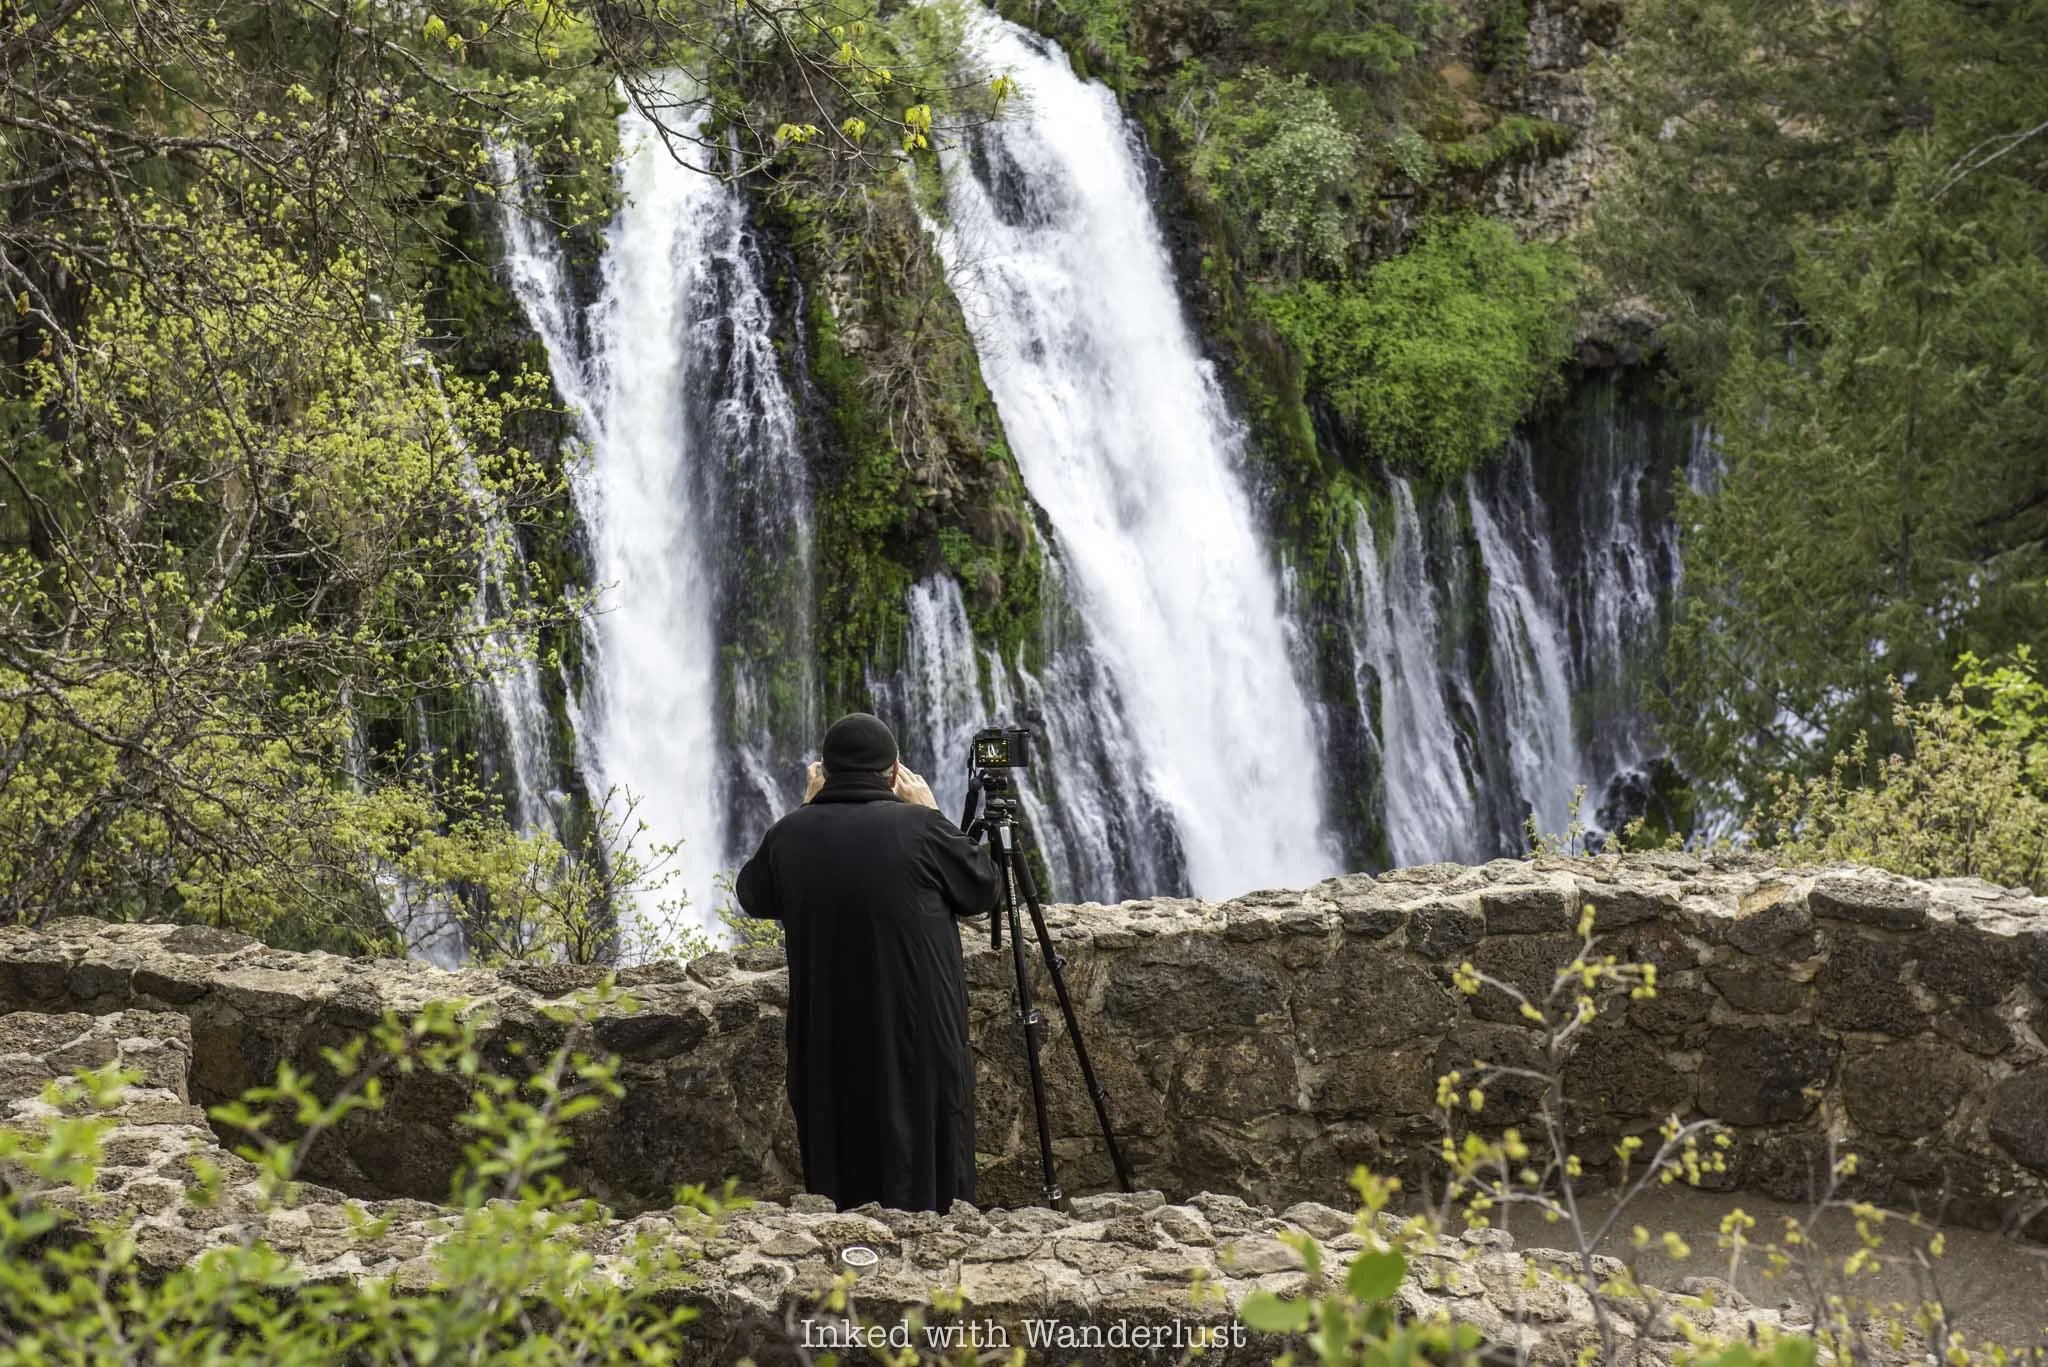
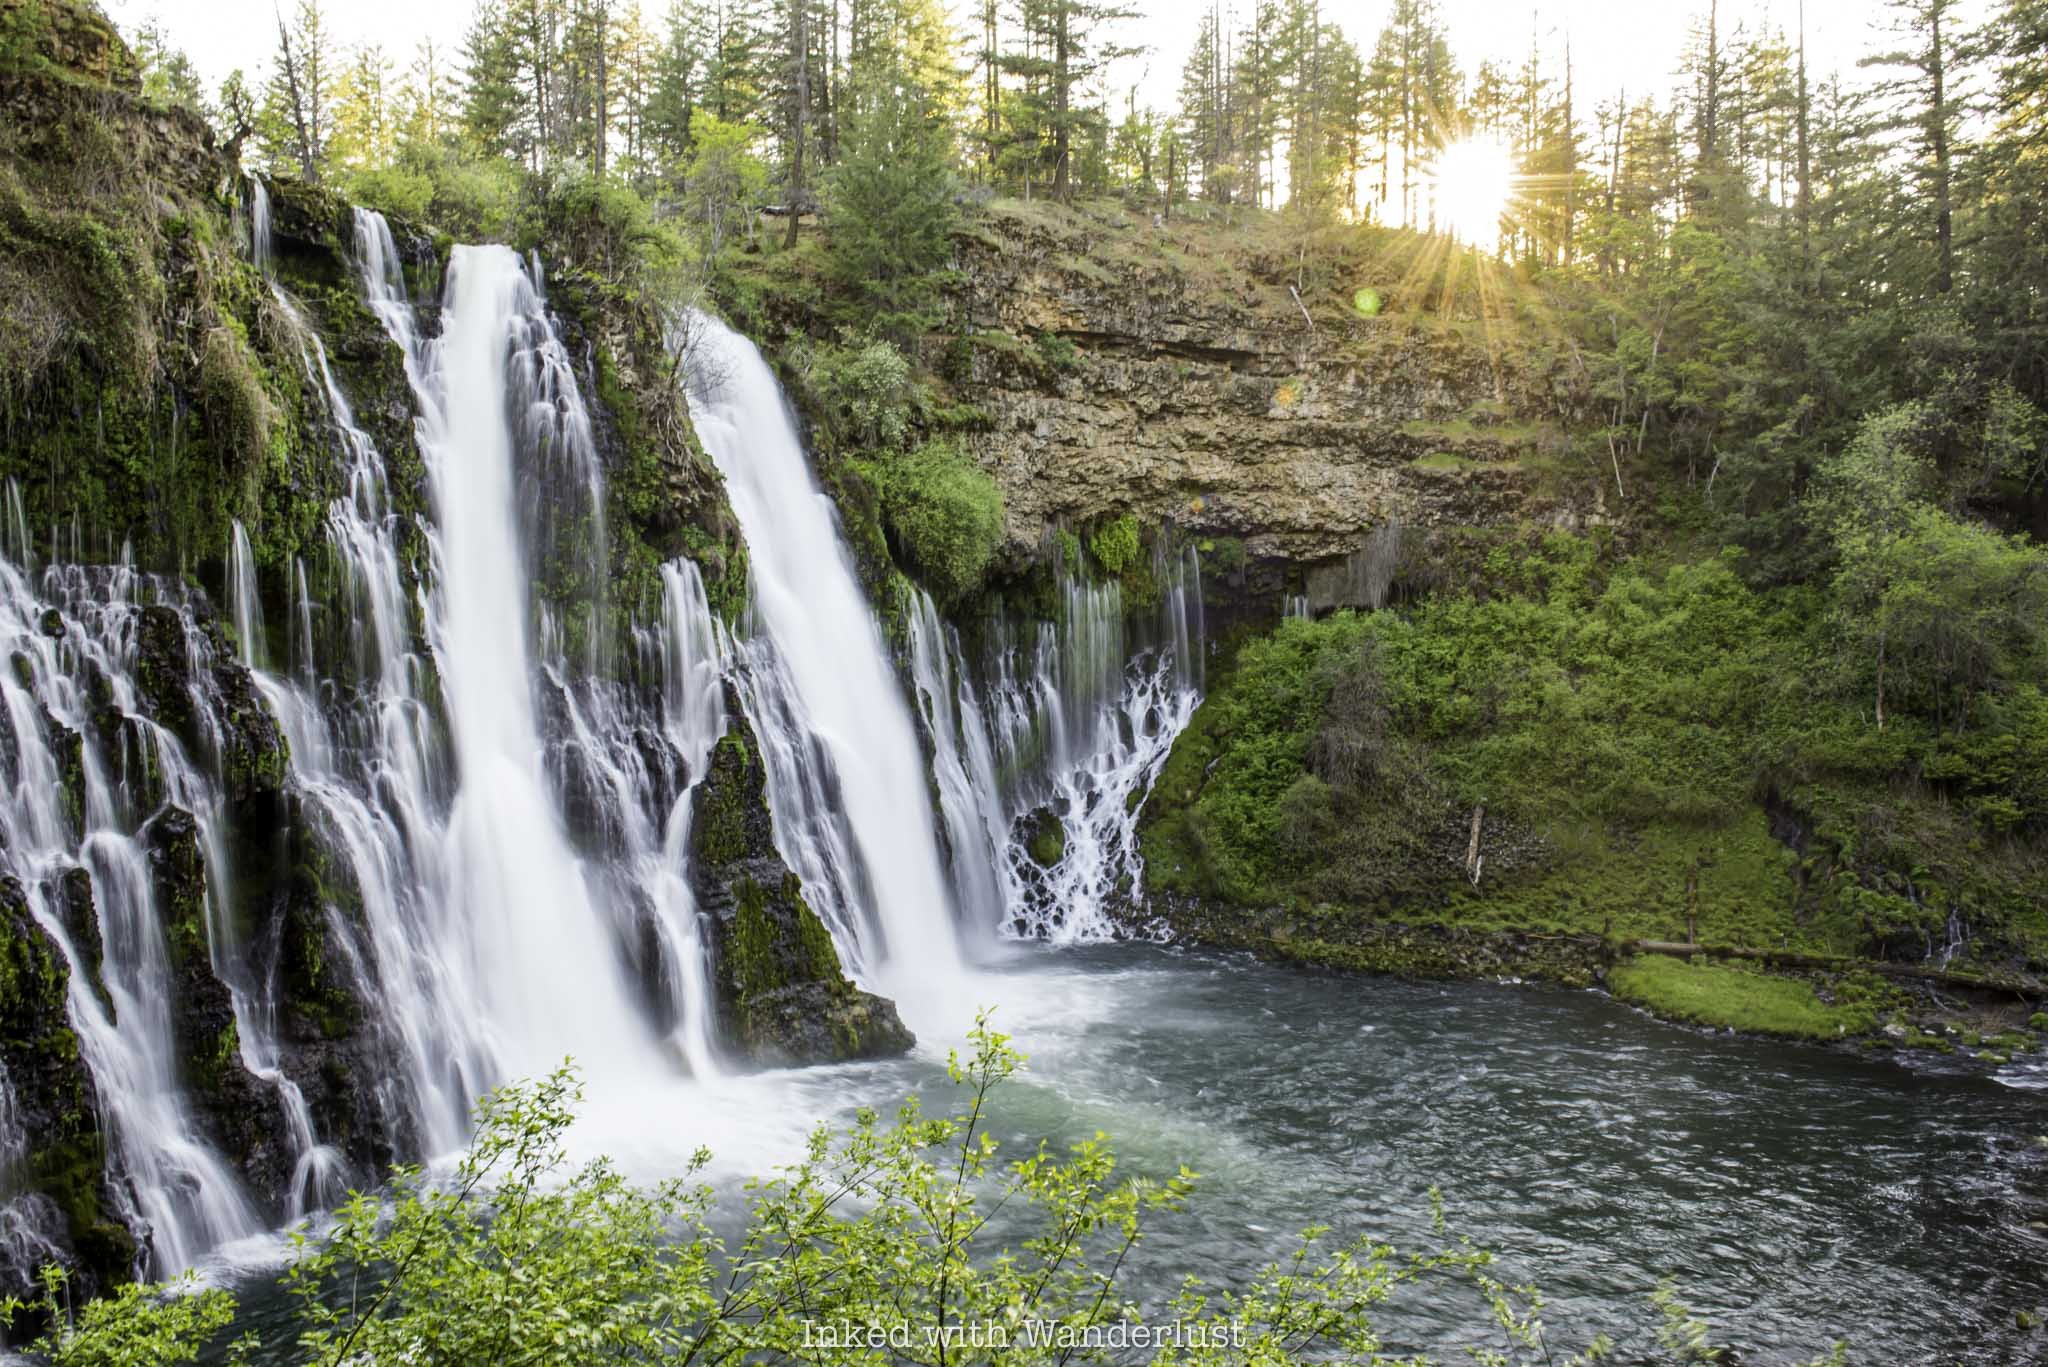
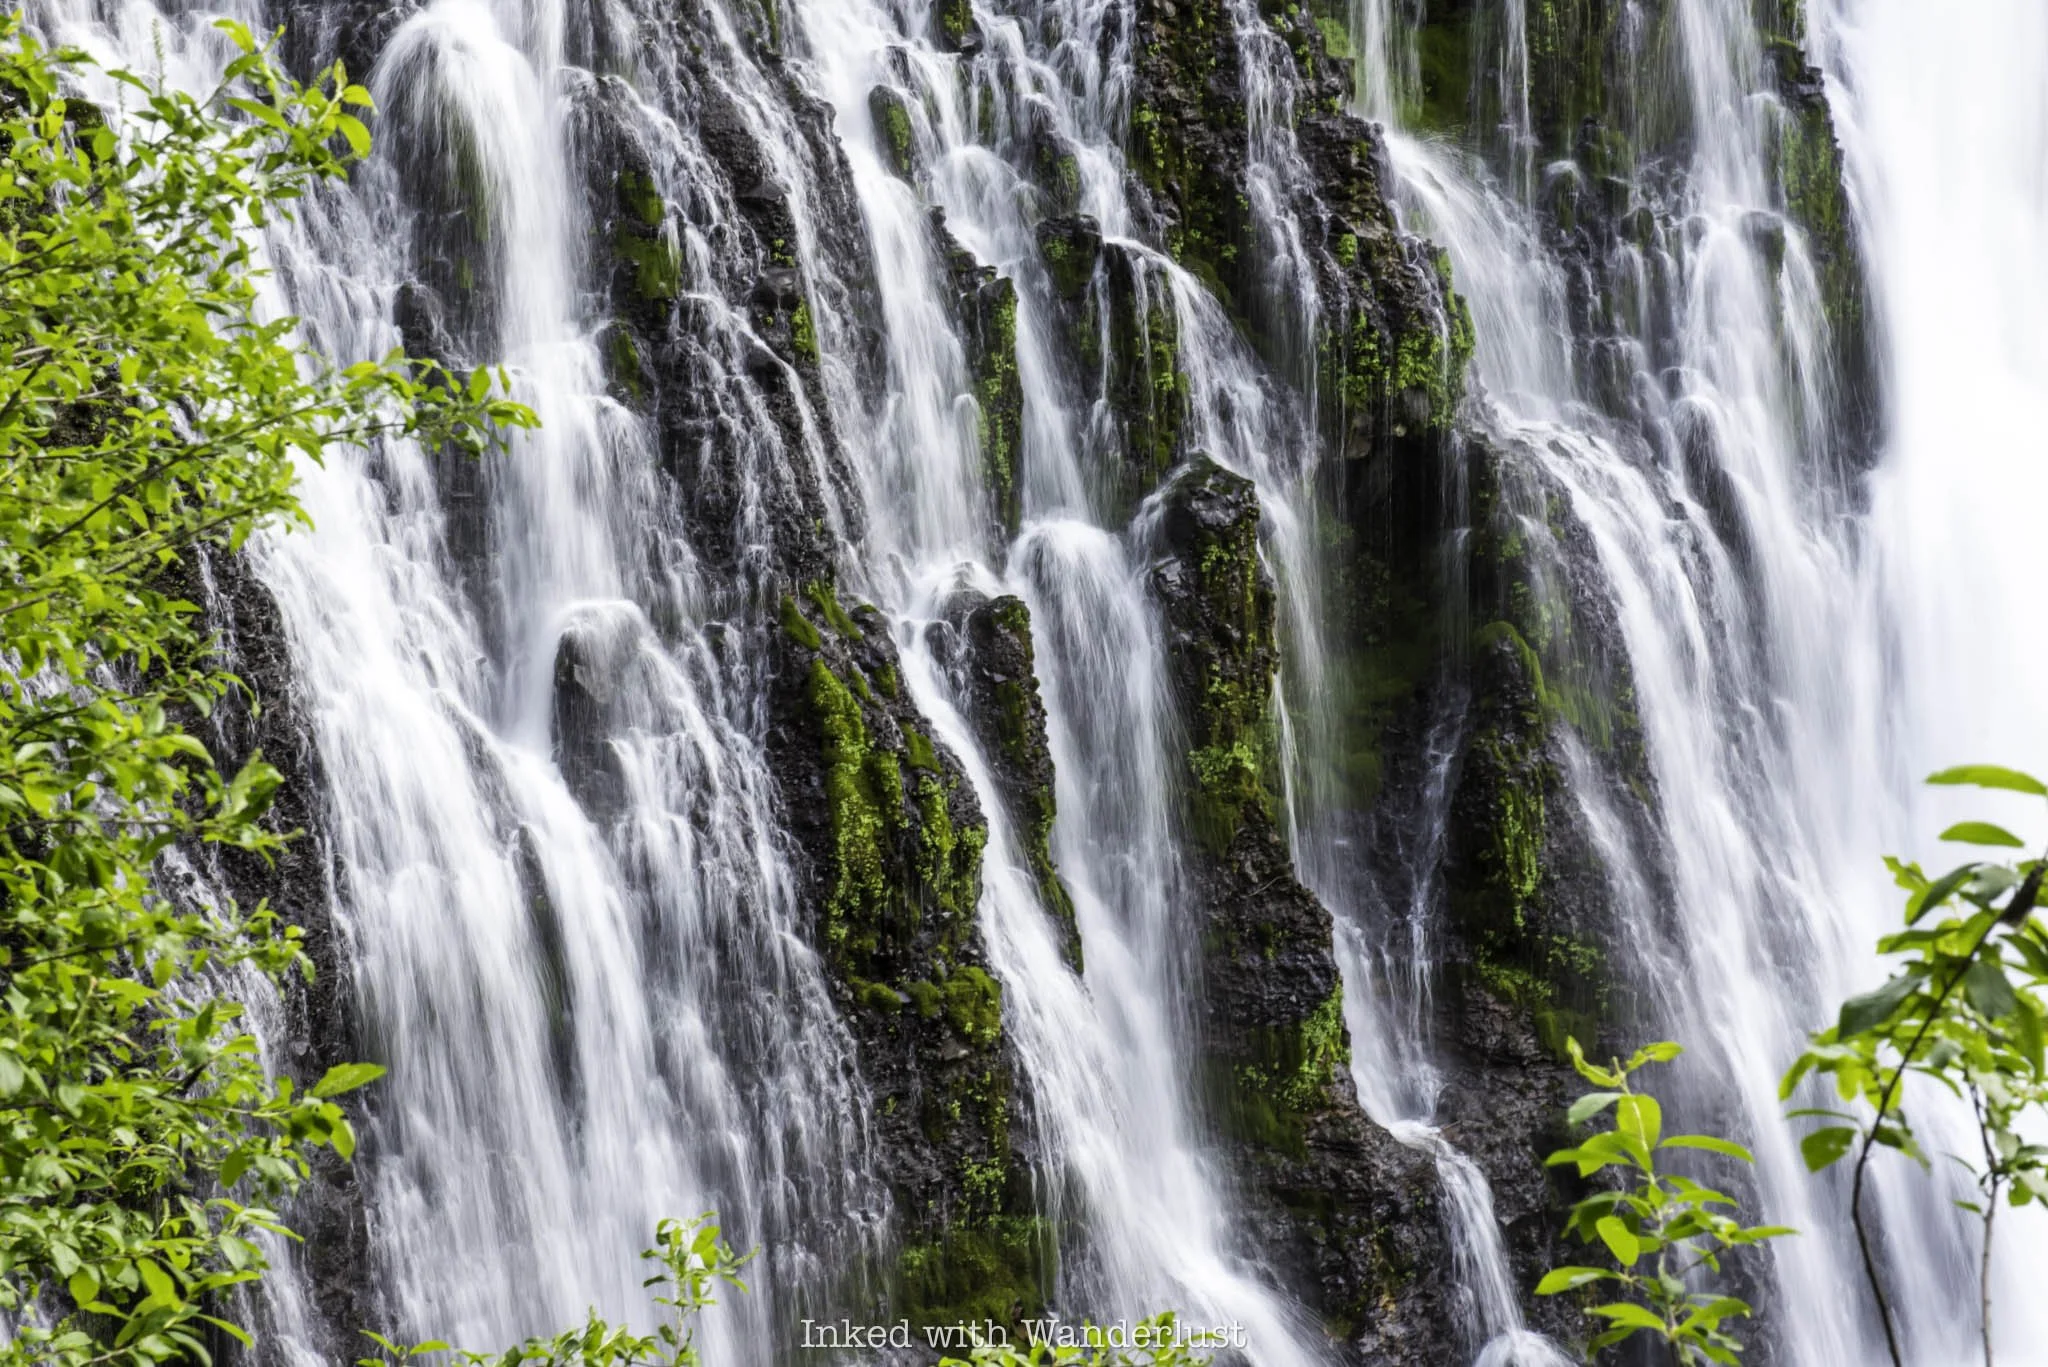
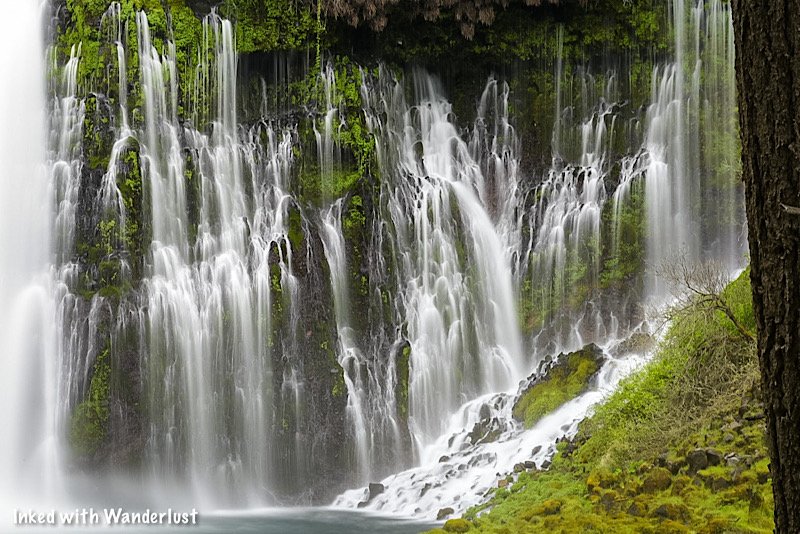
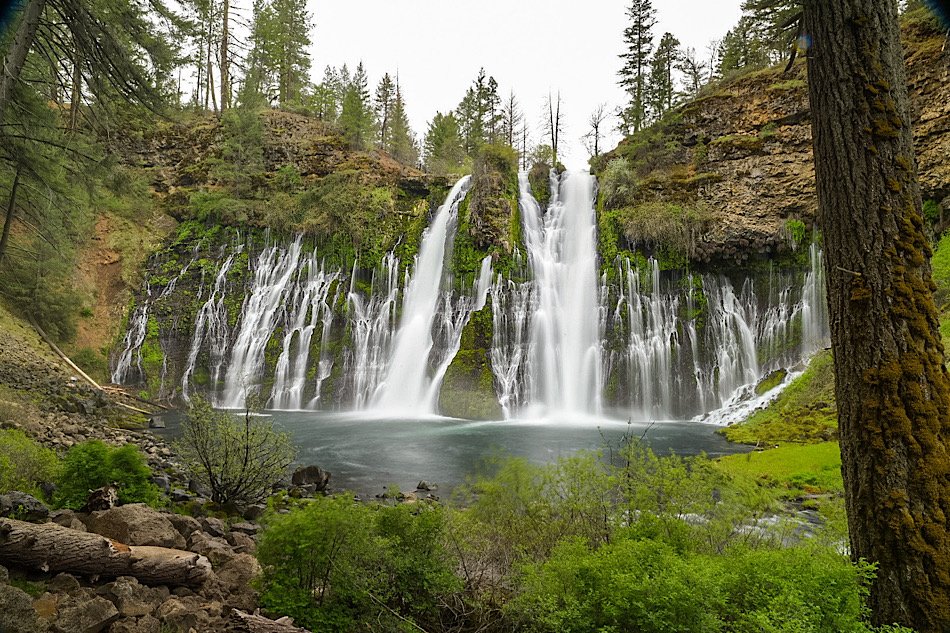
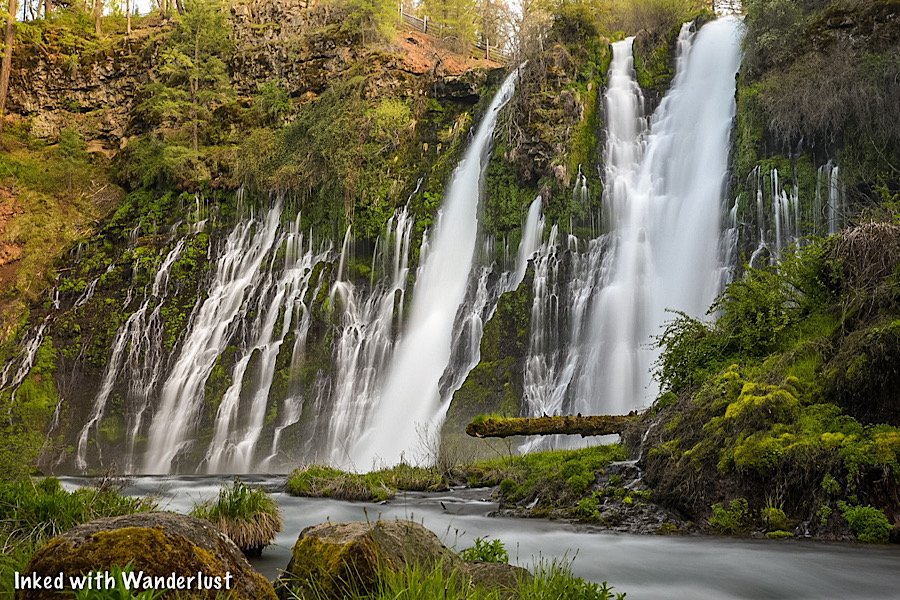
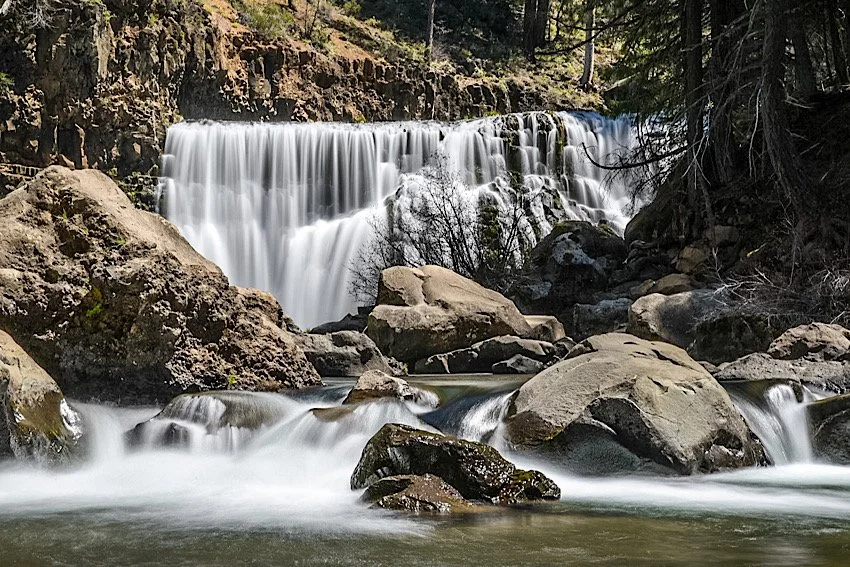
6) Burney Falls

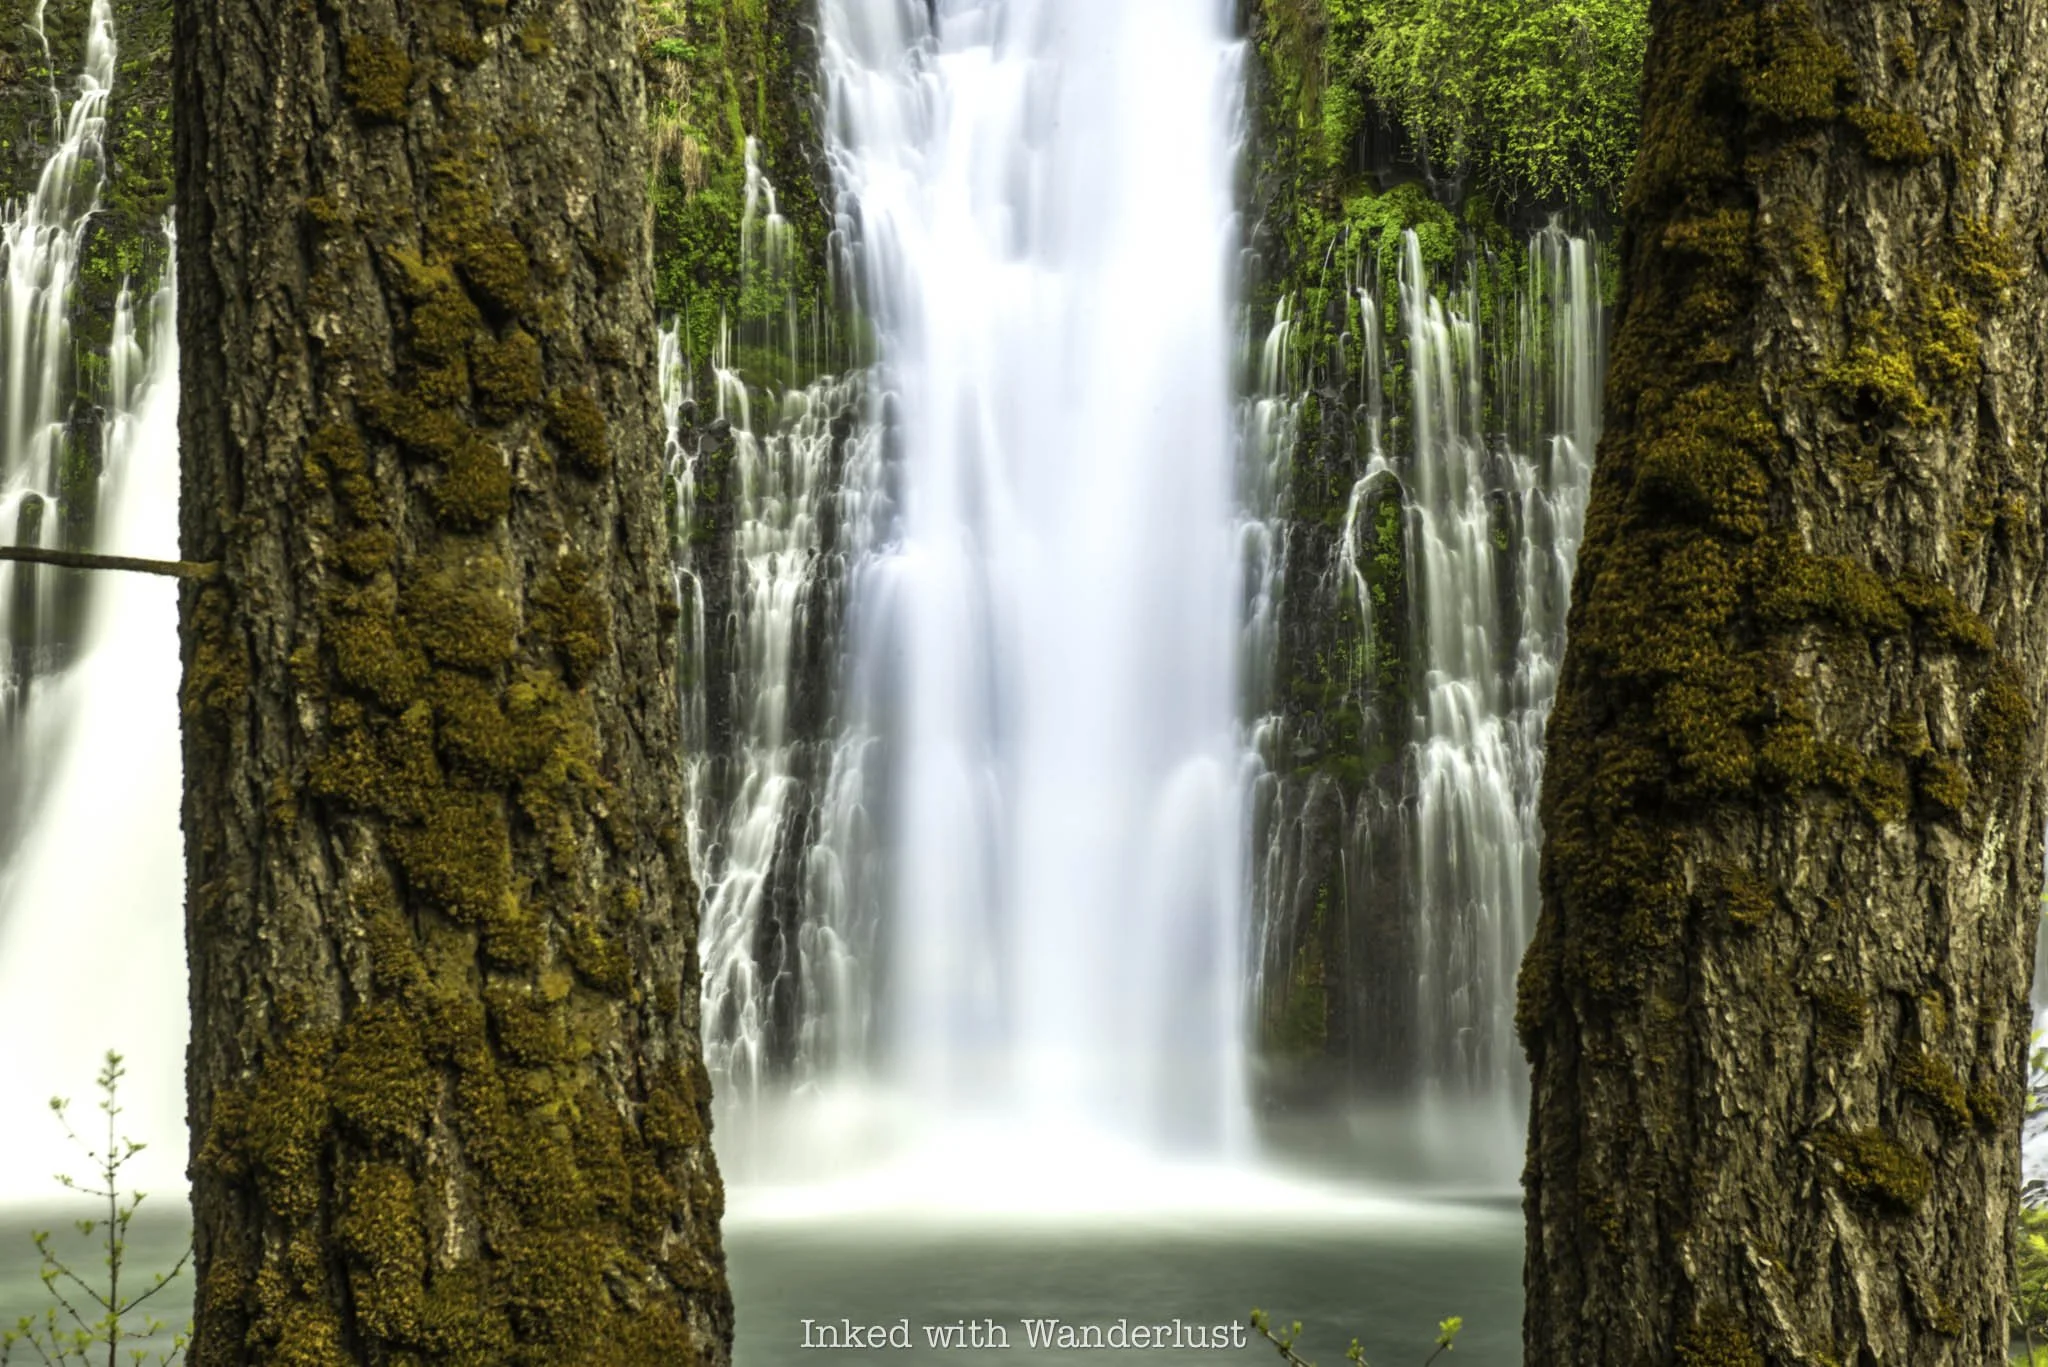
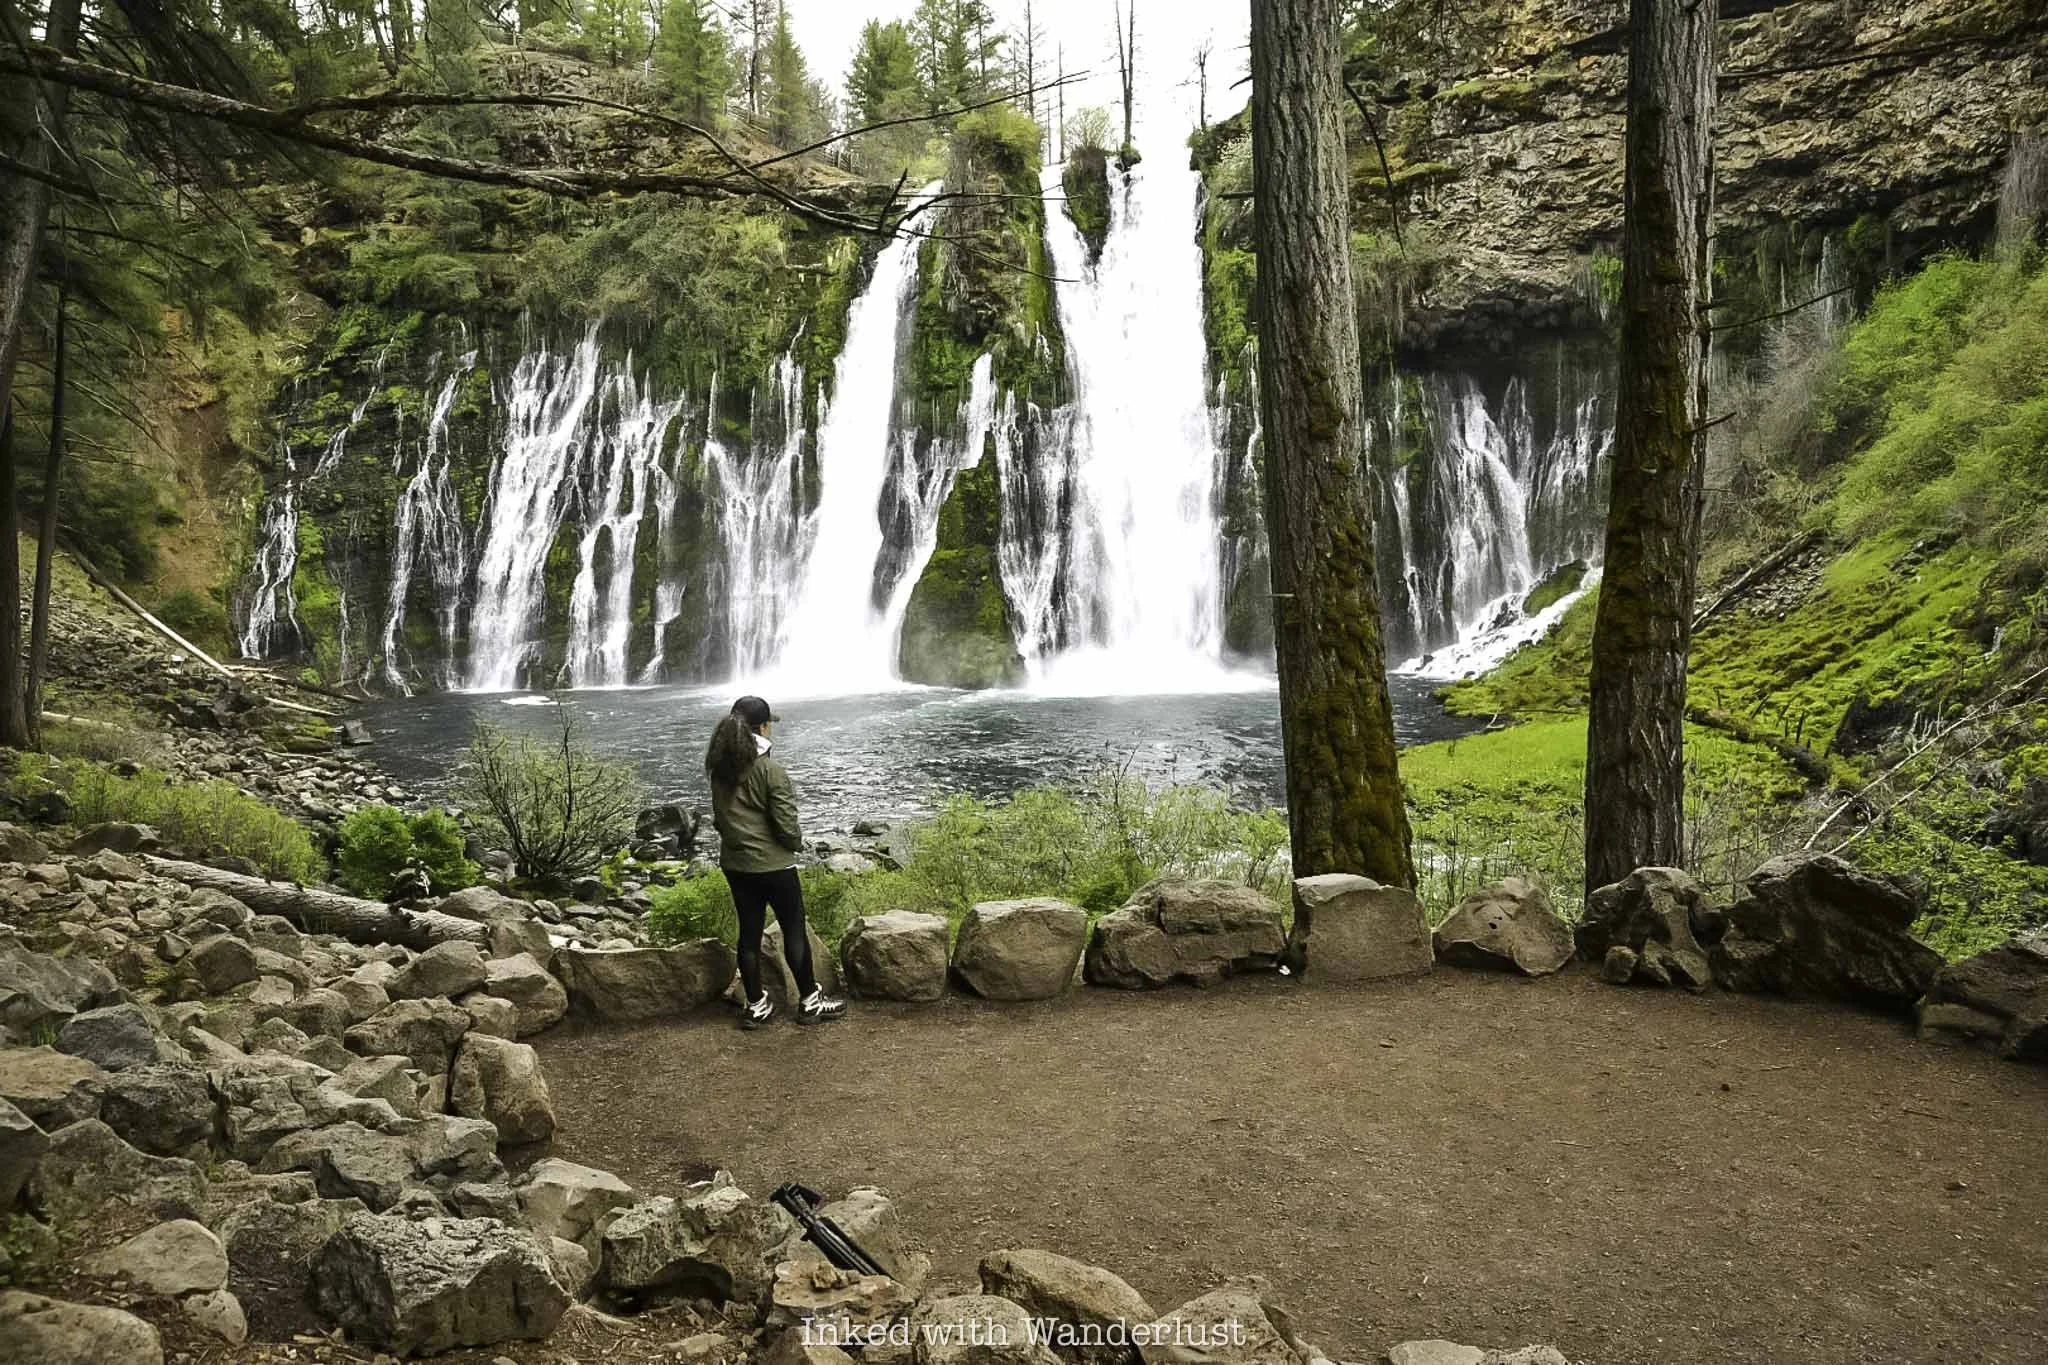
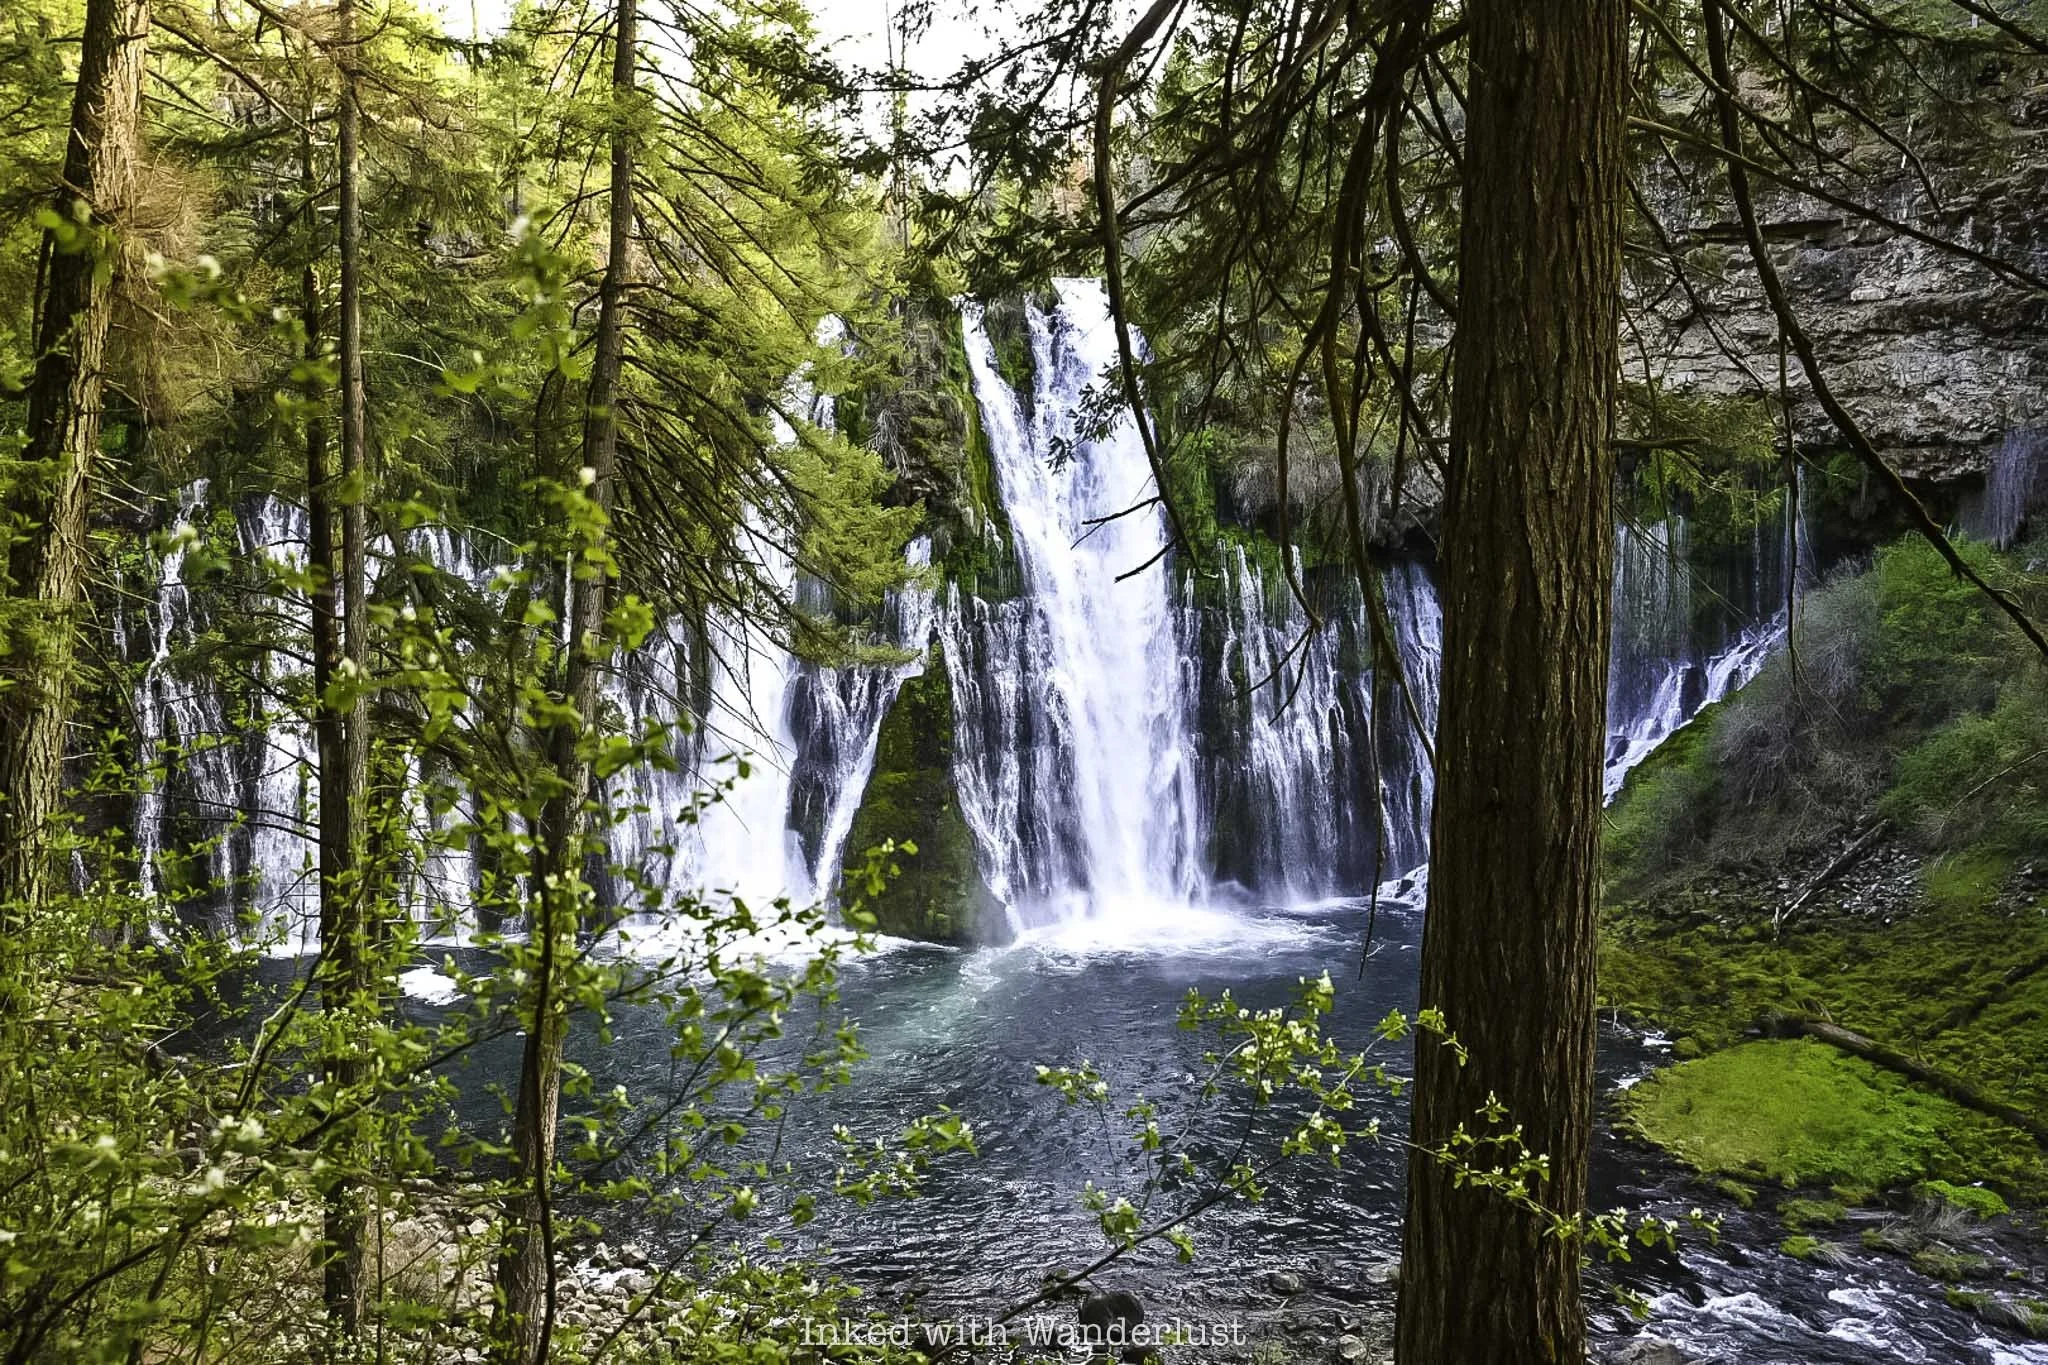
Your final waterfall on your Northern California waterfall road trip is the awe-inspiring Burney Falls. If you’ve never been to Burney Falls, you’re in for a treat. It’s largely fed by Burney Creek, but also by underground rivers that flow outward through the large basalt wall.
You can view Burney from above at the accessible (and paved) viewing deck but for the full experience, head down the short path to its base and pool. It’s a sight you can only truly appreciate in person.
Burney Falls does get crowded during the day, which is why I recommend saving it for last and getting there in the late afternoon or closer to sunset. That’s what I do whenever I visit and I almost always have it to myself or I’m sharing it with just a few others.
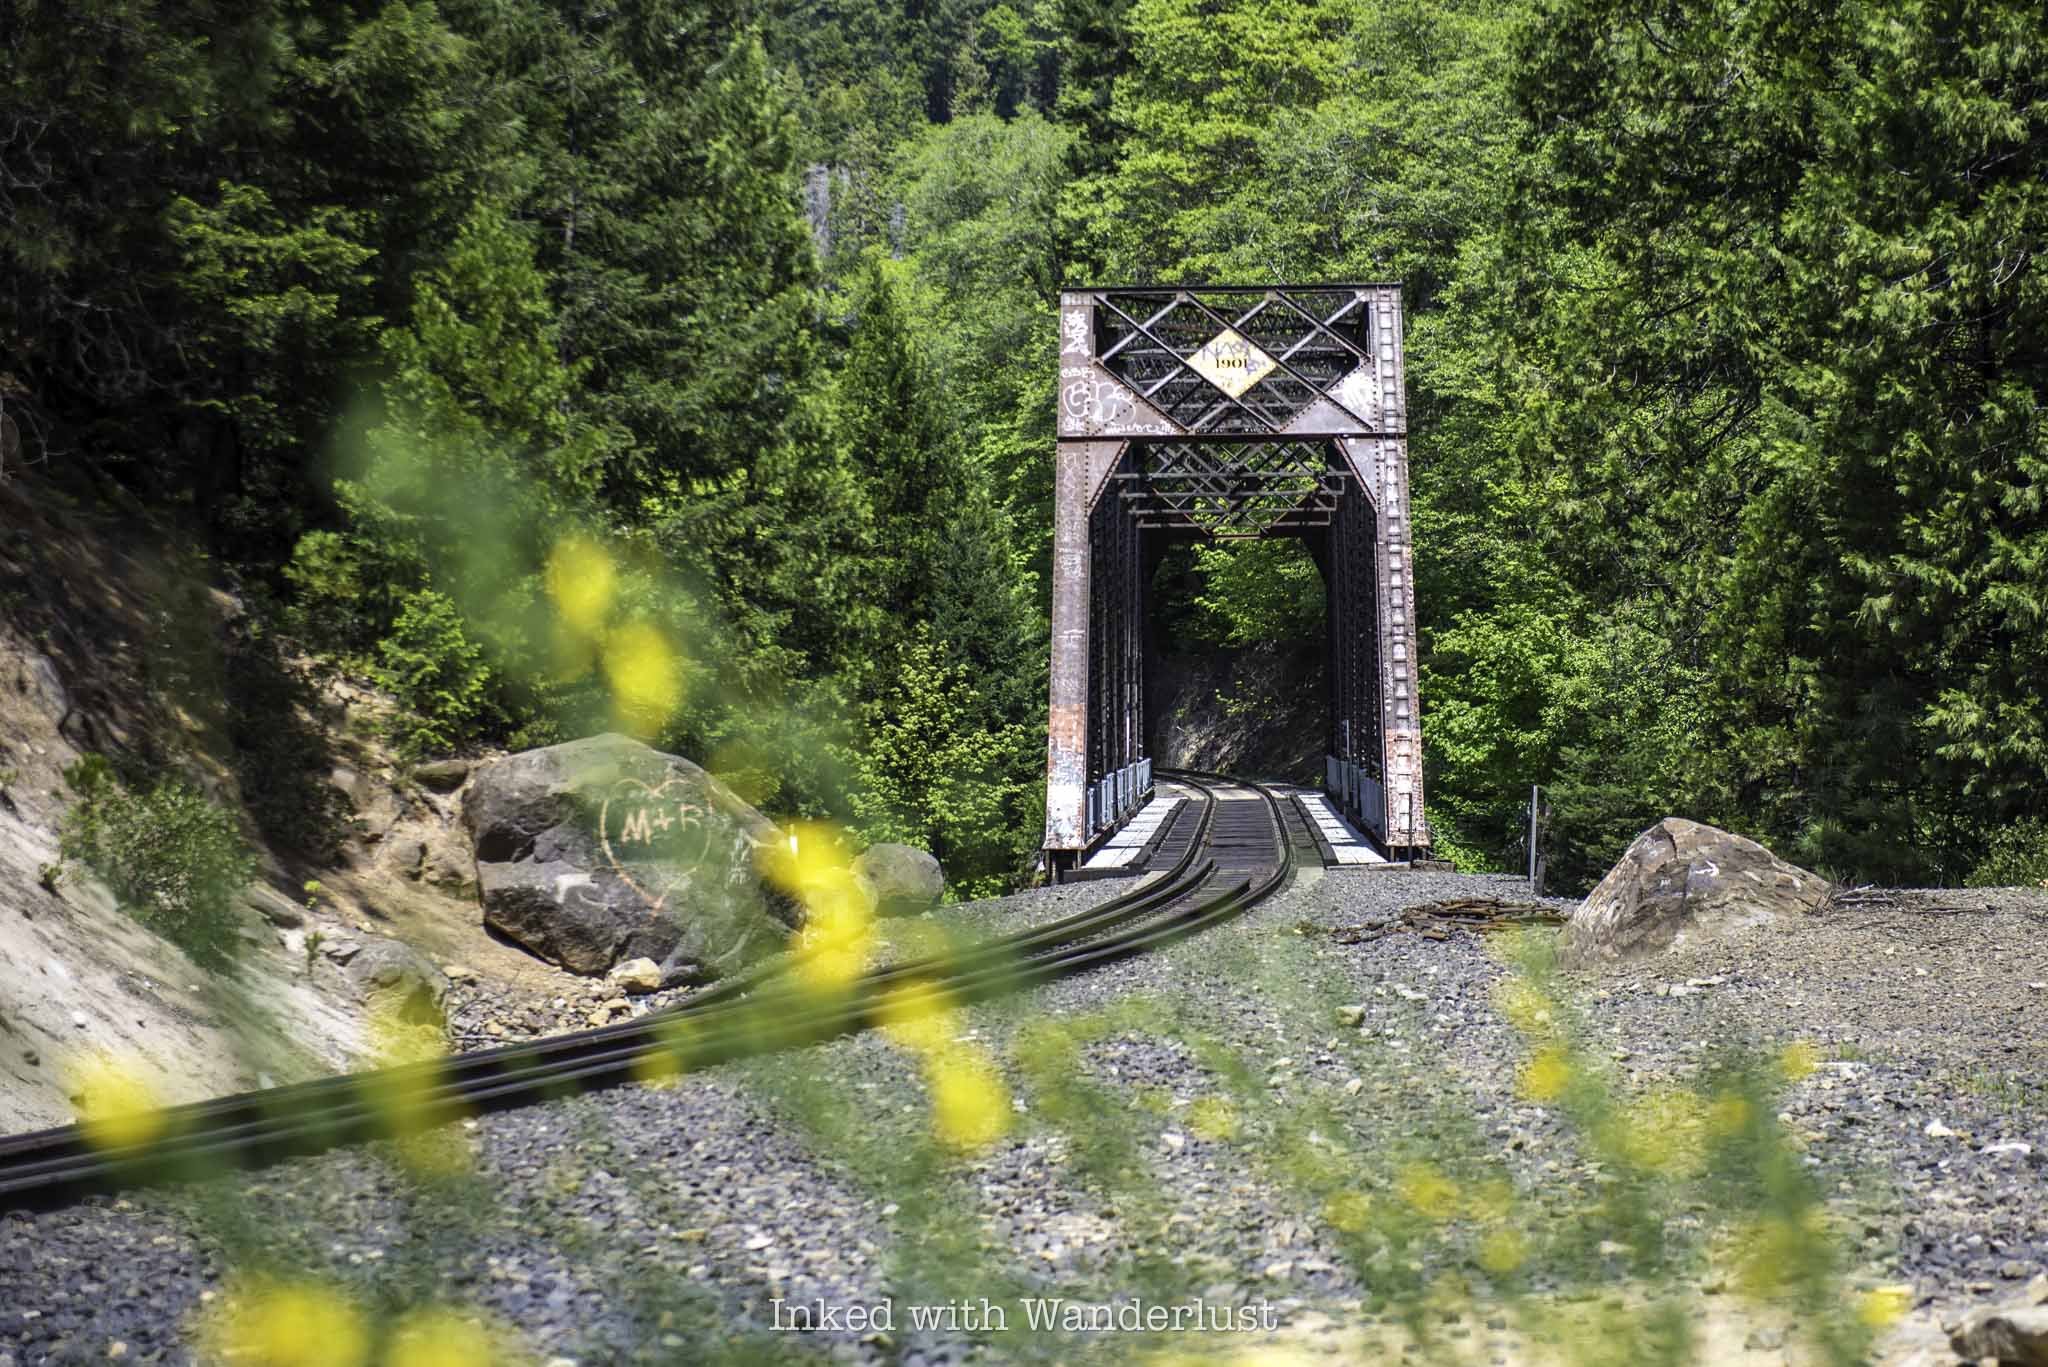
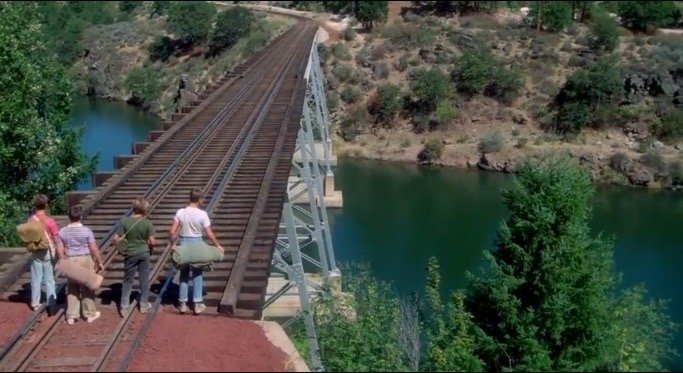
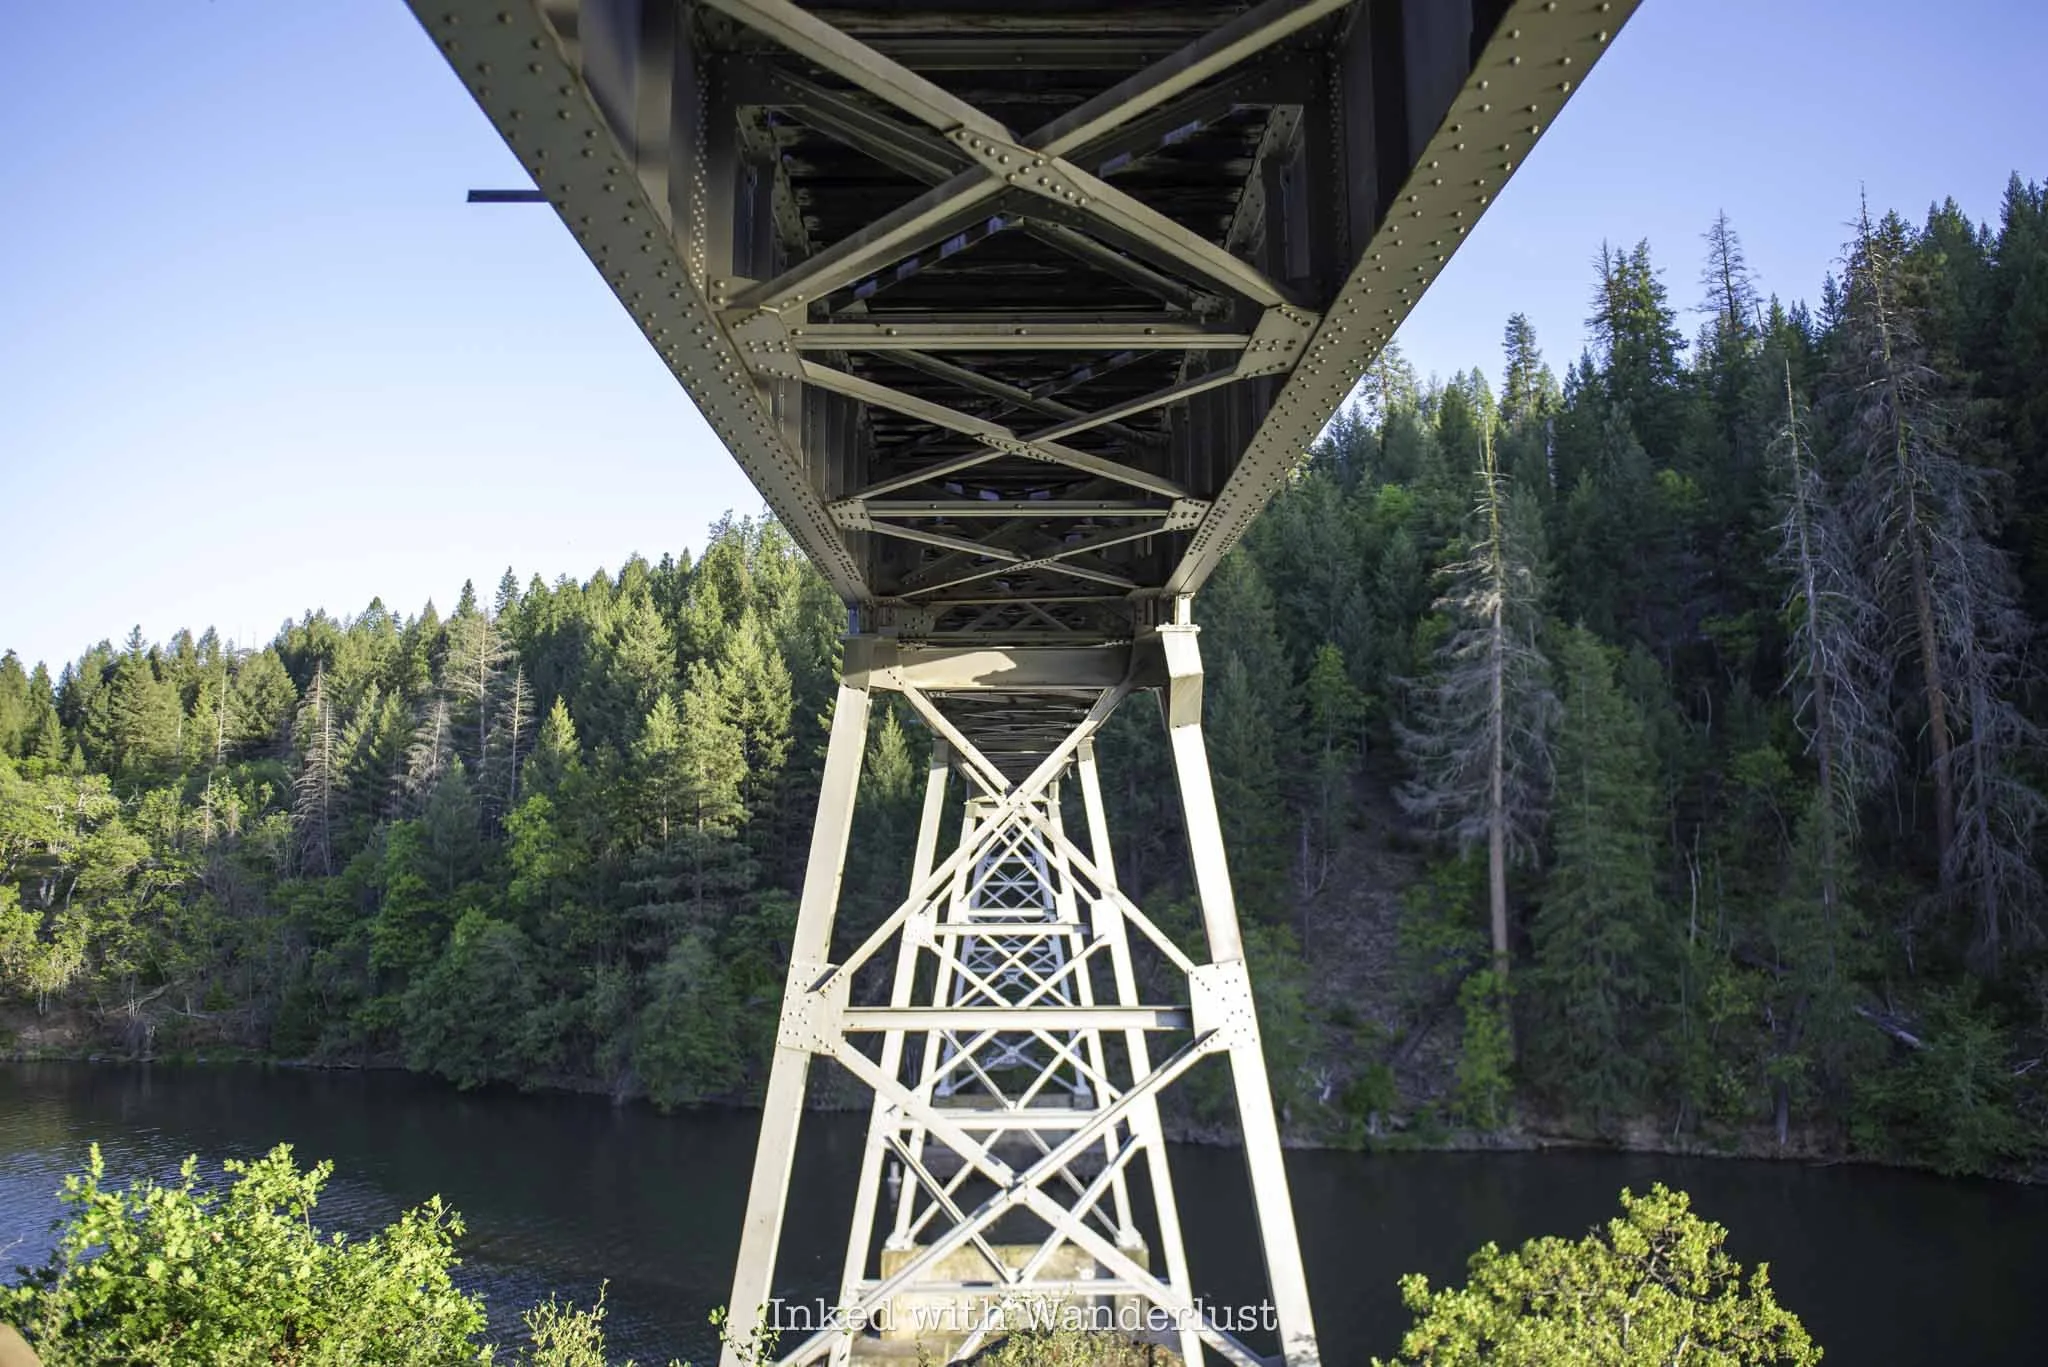
On the way to Burney Falls from McCloud Falls, you’ll pass the location of the infamous scene from the movie “Stand by Me” where the boys ran for their lives across a bridge from an oncoming train. It’s still there if you want to check it out this piece of Hollywood history.
As stated earlier, to do this in the reverse order, go to Burney Falls in the morning. From there, stop at the three McCloud Falls. Then, drive to Dunsmuir and knock out Hedge Creek Falls before concluding at Mossbrea Falls.
If you’re planning to stay near Burney Falls, I recommend Shasta Pines Motel in the town of Burney. It’s a no-frills motel with little in the way of amenities, but it’s clean and affordable with comfortable bedding. From Burney, you can check out Subway Cave, Lassen-Volcanic National Park, and more!
READ MORE: “McArthur-Burney Falls State Park Ultimate Guide”
Buy me a coffee?
If you found this blog helpful, consider leaving a tip through the Buy Me A Coffee button below! Whether it’s $1 or $5, every bit helps offset small travel costs like coffee, water, lunch, parking, or park entry fees. Your support means the world—thank you!


PROVERBS 16:9

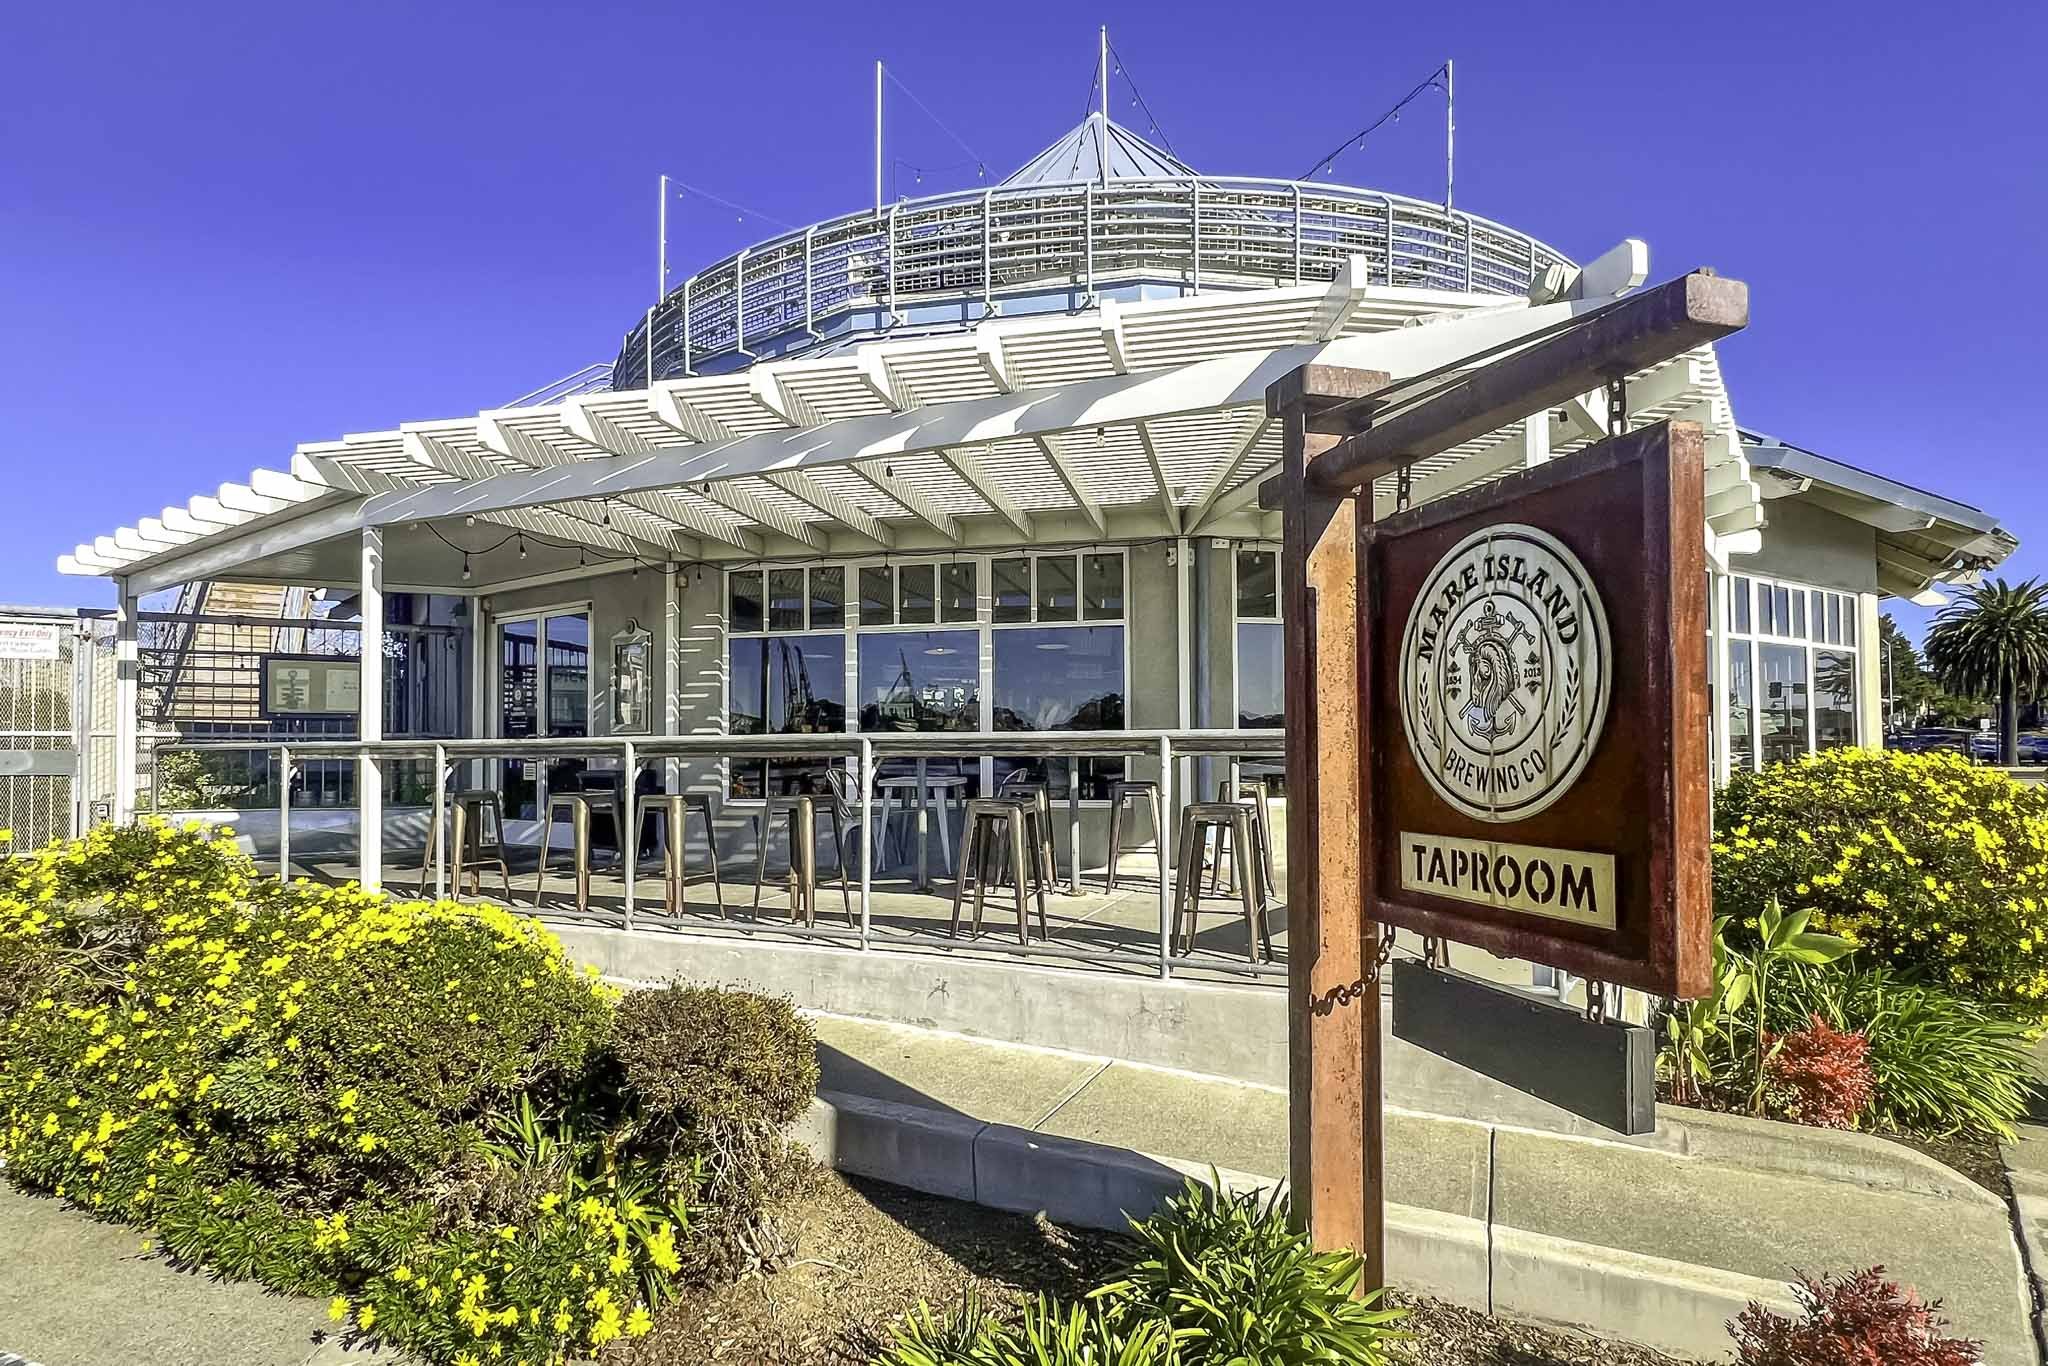
YAKS on the 5: Delicious Artisan Burgers in Dunsmuir
Since its opening in 2003, locals and visitors alike have flocked to Yaks on the 5 for their hearty varsity of artisan burgers, sweet sticky…
Disclosure: This post contains affiliate links. If you make a purchase through these links, I may earn a small commission at no additional cost to you. I only recommend products or services that I believe will add value to my readers.
Since its opening in 2003, locals and visitors alike have flocked to Yaks on the 5 for their variety of hearty artisan burgers stacked high with unique toppings, sweet sticky buns and an array of other American-fare dishes.
I finally had the opportunity to try it for myself and I have to say, I wasn’t let down. It lived up to hype and some. After-all, its been named one of the best restaurants in America on Yelp’s top 100 list.
Looking at it from the outside, you might think it doesn’t look like much. Once you’ve tried it for yourself, though, I have no doubt you’ll be singing its praises along with me. It’s pricy, which is the only negative at Yaks. However, you get your money’s worth for sure.
Quick Stats
Location: Dunsmuir, California
Type of Food: Artisan burgers, BBQ and other American fare
Alcohol: Yes
Cost: $13 - $26 pp
Seating: Inside and outside
My Visit(s): May 2025
Getting to Yaks and Parking
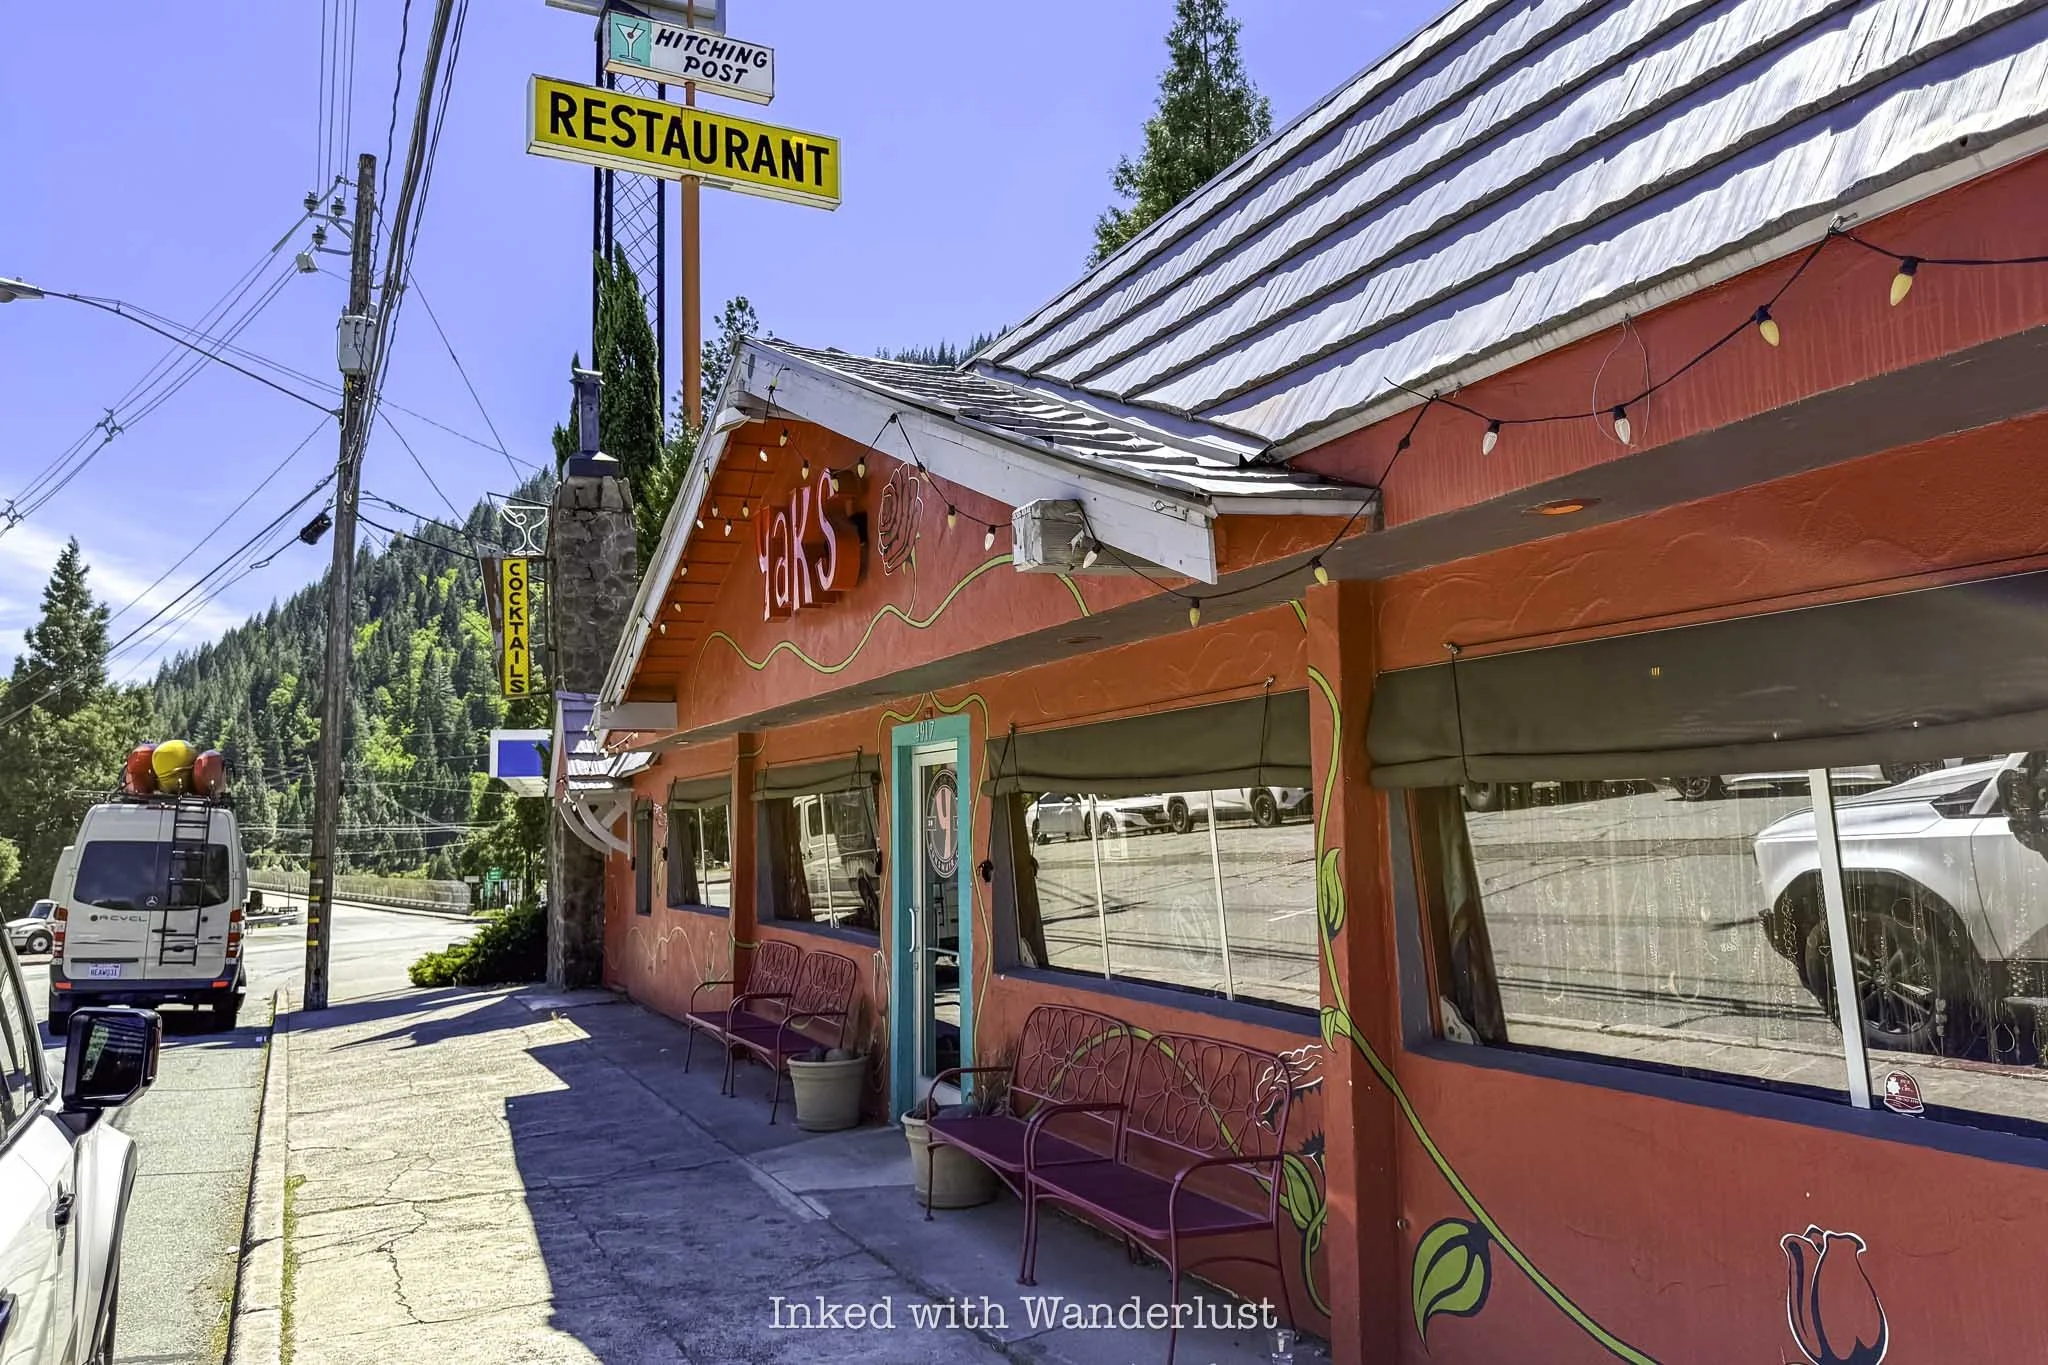
There are two Yaks locations - one in Shasta City and another in Dunsmuir. This post pertains to the Dunsmuir location, specifically. It’s located directly off of Intestate 5 (hence - Yaks on the 5).
You can see it from the freeway and the restaurant’s exterior is bright red, so there’s no getting lost. From either direction, you’ll exit onto Dunsmuir Avenue and go right. There’s limited street parking out front and additional parking in the back.
If you drive an EV, there are two ChargePoint stations behind the restaurant. There’s also additional seating back there, which is nice because the inside is fairly small and often fills up quickly.
The Restaurant and Food

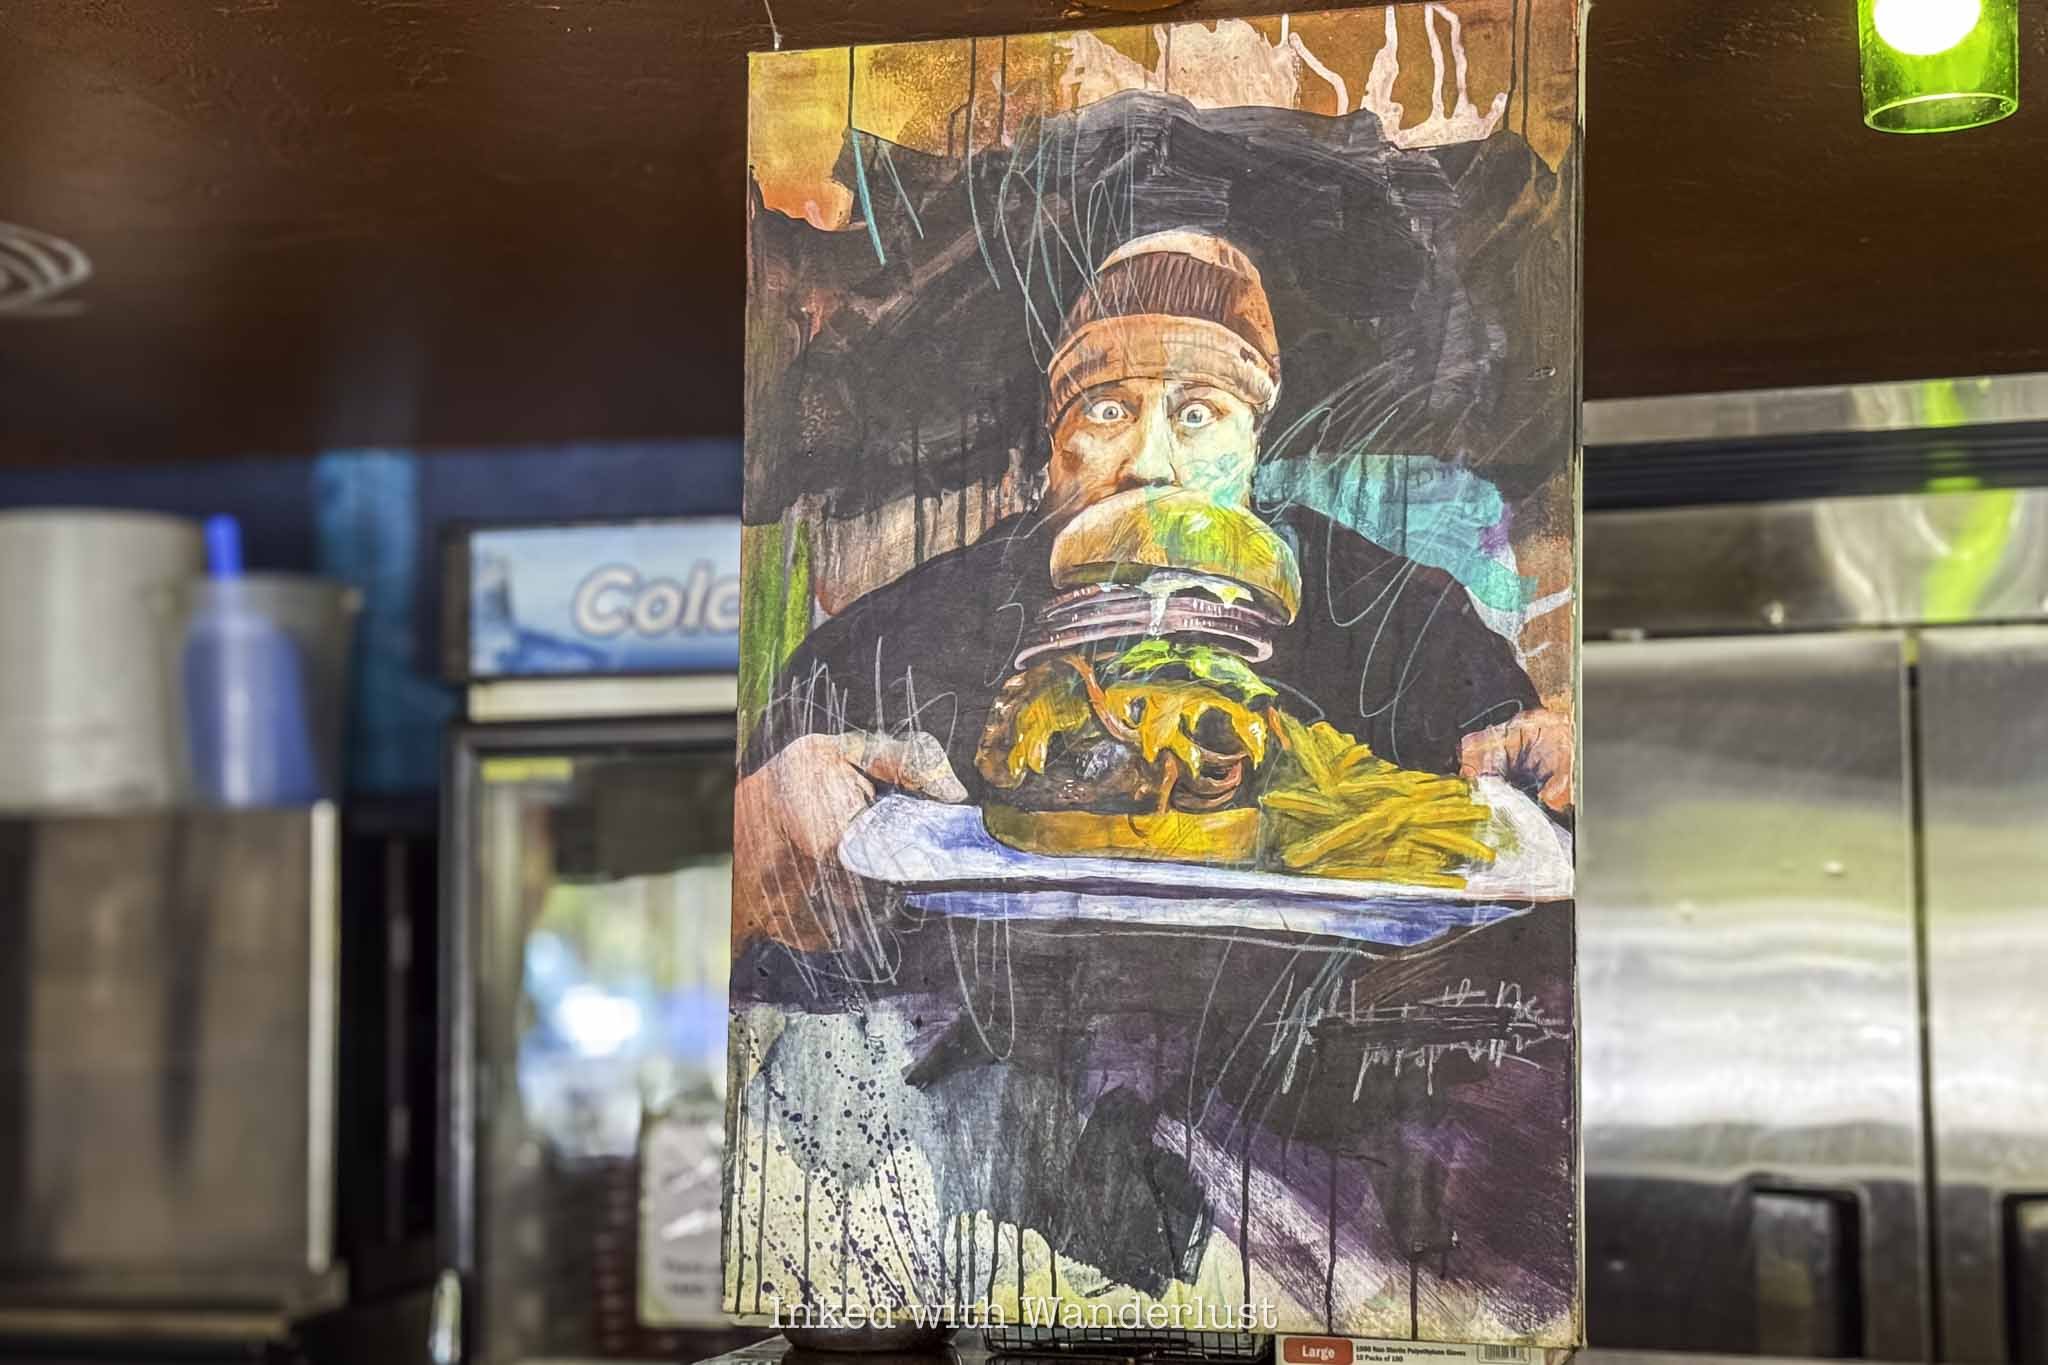
Yaks’ menu mostly consists of unique, artisan burgers. A couple examples include the OMG!, which is a burger topped with jack cheese, fried onion strings, beer battered jalapeños, lemon-ginger marmalade, cream cheese, garlic aioli and red leaf. This is one of their most ordered burgers.
By the way, if you don’t say anything, your burger will be cooked pink. Which typically means “medium” doneness. If you want REALLY pink, no pink or hockey puck (if you’re anything like my mom) be sure to request this when ordering.

There’s also the Bacon Overload, which is what I ordered. This burger is topped with jack cheese, bacon crumbles, house-made fried onion strings, house-made ranch drizzle, garlic aioli and red leaf.
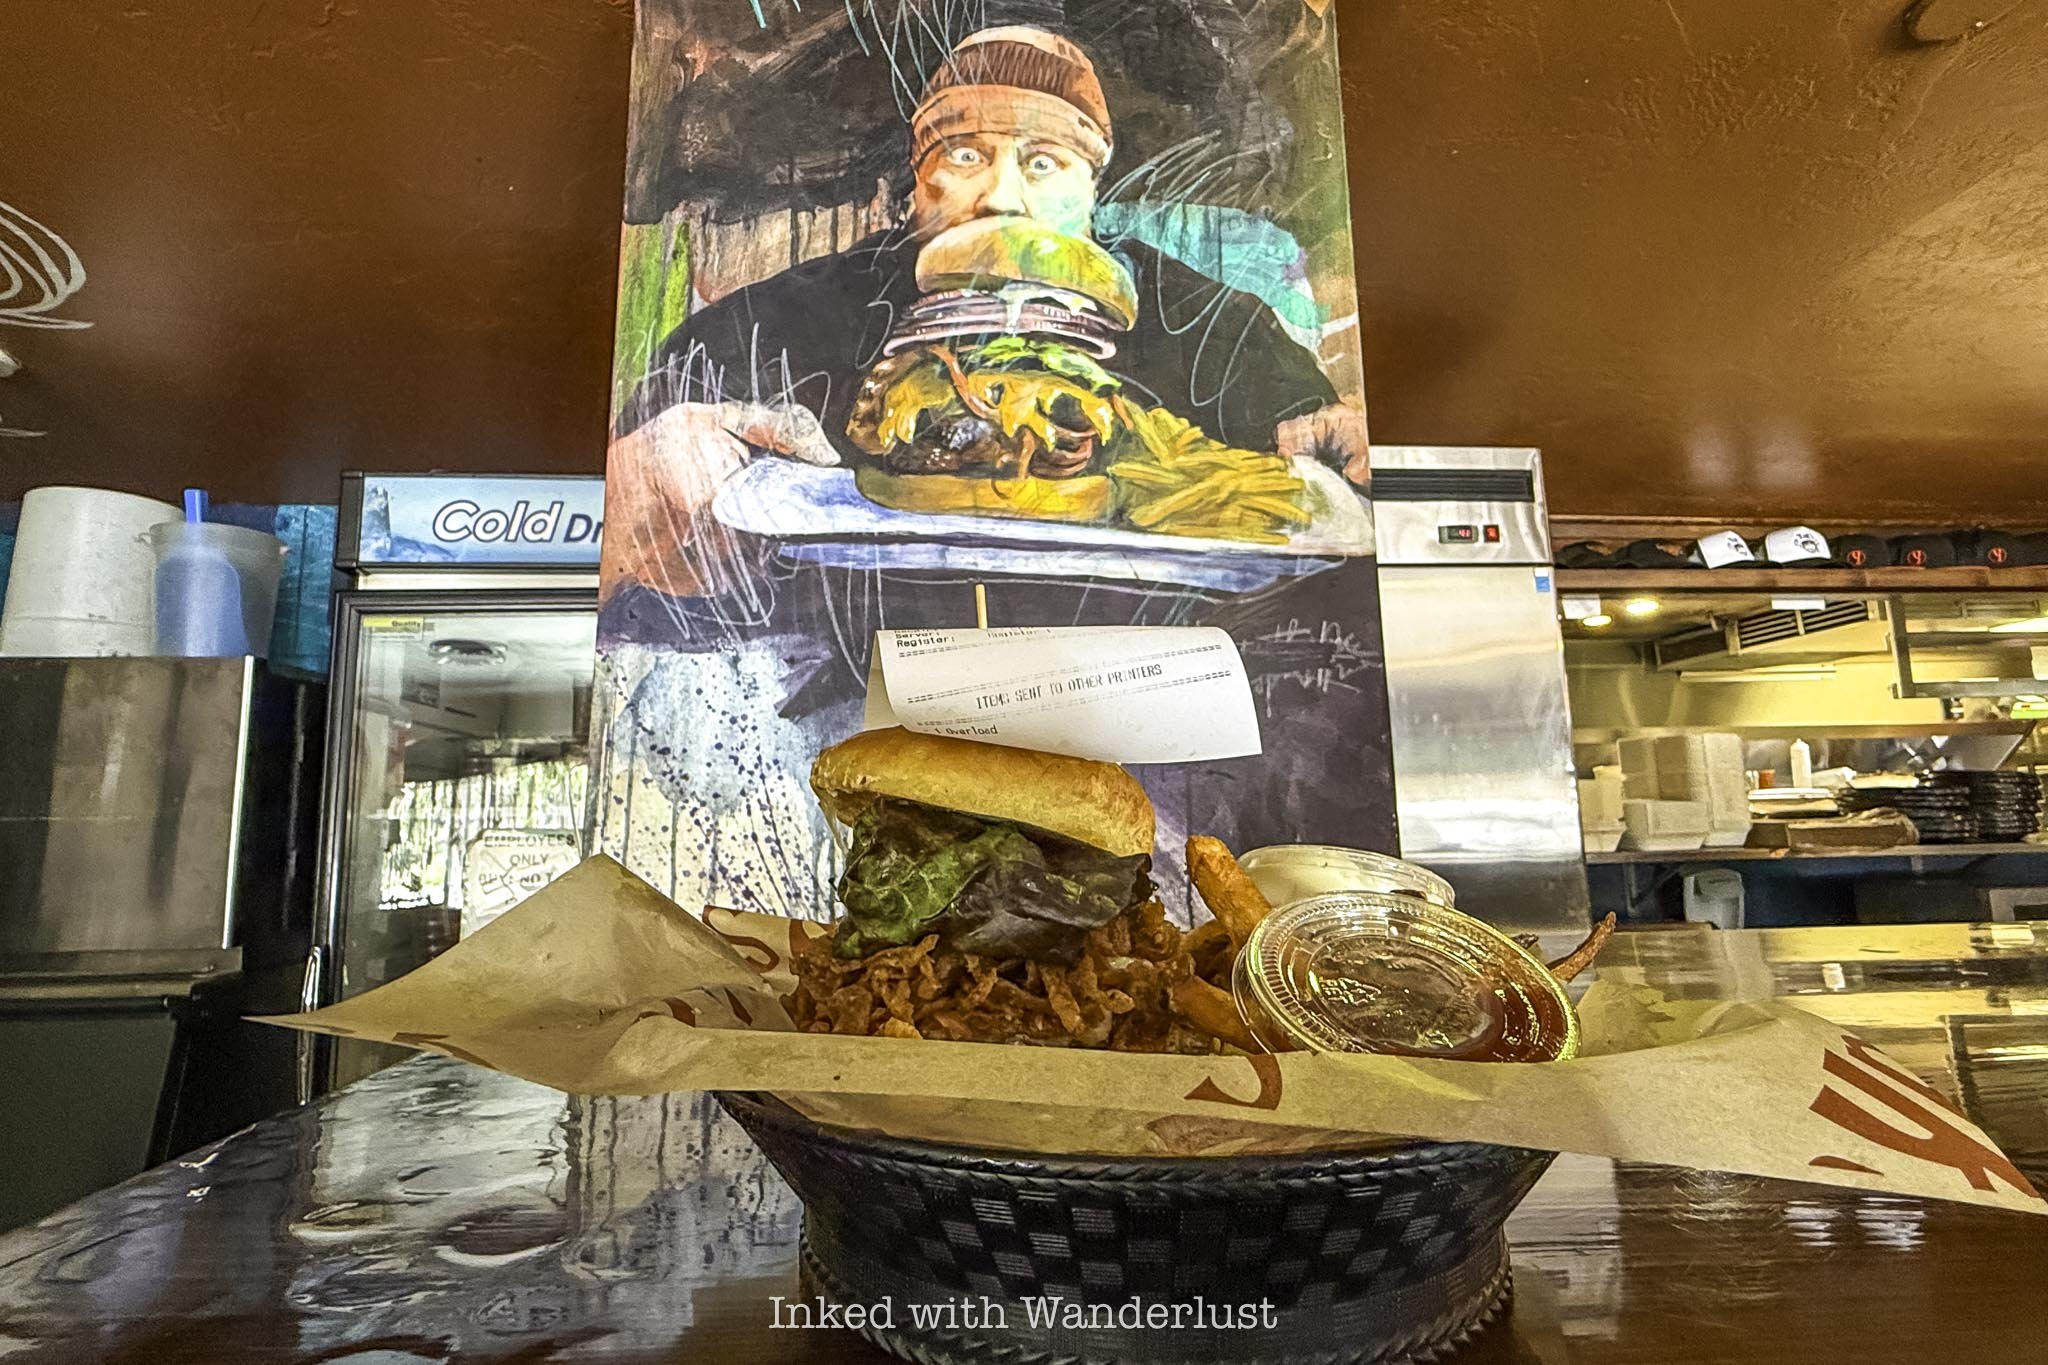
In short, it was delicious. The flavors of this burger blended well and exploded with every bite. I’m normally not a ranch guy, but their house-made ranch was amongst the best I’ve ever tried.
If you don’t upgrade, your burger will come with a side of chips. I decided to upgrade to their house-cut fries, though, and I’m glad I did. They’re salted and fried perfectly, and come with a side of their house-made lavender ketchup.


Two more popular menu items at Yaks include their famous sticky buns. The buns’ flavor of buttered bourbon and warm caramel sauce comes together as decadently as it sounds. If all you want are sticky buns, they let you skip the main ordering line.
Their most ordered appetizer is the Scott’s Tots. Their crispy-fried tater tots smothered in their sweet and spicy brown sugar-cajun rub and topped with bacon, jack cheese, gorgonzola, house-made chili-lime aioli, cilantro and a squeeze of lime.

To me, there’s nothing better than a burger and beer after hiking. I asked the cashier for her recommendation (since they have twenty beers on tap) and I ultimately went with the Blackberry Blonde by Fall River Brewing Company. It was perfectly refreshing.

All told, Yaks on the 5 is a great place to eat. Whether you’re hiking in the area or just passing through, it’s the perfect meal to keep you going. It is definitely pricy but do your best to look past that because the food really is top notch and worth it.
By the way, if you’re looking for outdoorsy things to do in Dunsmuir, I recommend checking out Hedge Creek Falls, Castle Crags State Park, and the enchanting Mossbrea Falls hike.
PSALM 121:7-8

The Ultimate Guide to Mossbrea Falls in Dunsmuir (Step-by-Step Directions)
Visiting Mossbrea Falls, located in the wonderful Northern California town of Dunsmuir, is like stepping straight into a fairytale novel. This unique waterfall is fed…
Disclosure: This post contains affiliate links. If you make a purchase through these links, I may earn a small commission at no additional cost to you. I only recommend products or services that I believe will add value to my readers.

Visiting Mossbrea Falls, located in the wonderful Northern California town of Dunsmuir, is like stepping straight into a fairytale novel. This unique waterfall is fed by multiple springs which flow through a moss-covered mountainside and into the Sacramento River.
Stretching roughly 175-feet across and 50-feet at its highest point, the falls create a lush, living tapestry of water and greenery. It’s an absolute dream for hikers, photographers, waterfall chasers and nature lovers alike.
There’s one caveat to hiking to Mossbrea Falls, though—it isn’t exactly legal. Being at the falls isn’t the problem, rather it’s the route you’ll need to take to get there. Technically, you’ll be trespassing not once, but twice on the way.
Normally, I wouldn’t include something like this on my website, as I like to promote responsible travel and hiking practices. However, all parties involved have seemingly relaxed their position on this. So I decided to promote the responsible way to enjoy this illegal hike (make sense?).
Buy me a coffee?
If you found this blog helpful, consider leaving a tip through the Buy Me A Coffee button below! Whether it’s $1 or $5, every bit helps offset small travel costs like coffee, water, lunch, parking, or park entry fees. Your support means the world—thank you!
Trail Stats
Location: Dunsmuir, California
Fee: None
Open: Year round, but difficult to access in winter
Family Friendly: No (potentially)
Cell Service: Limited
Restroom: Portable near the trailhead
Parking: Street
EV Stations: None, but there are two charging stations down the road at Yak’s
Difficulty: Easy
Popularity: Moderate to high
Mileage: 3 miles, out and back
Condition: No maintained trail, but simple to follow the worn path
Elevation: 2,529 feet
Features: Multiple waterfall streams into a flowing river down moss-covered cliffs
Best Viewed: Spring, for full flow
Pets: Allowed
Drones: No signs stating you can’t
Hazards: Potential wildlife interactions and walking along an active railway
My Visit(s): May 2025
Is Mossbrea Falls Illegal?

The short answer…yes. This is because of the route, though. NOT the waterfall itself. There are two points on the route where you’ll be trespassing—once when you walk through Shasta Retreat and again when you walk along the train tracks, which is owned by Union Pacific.
There are numerous signs stating such at both locations but as stated above, these two parties have seemingly relaxed their position. I won’t name names, but I have spoken with a county employee, two Union Pacific employees, and a local about Mossbrea Falls.
Based on what I have been told, the people at Shasta Retreat do not mind people WALKING through to access the falls. However, they VERY MUCH mind folks parking down there. If you do, your vehicle being towed is all but certain.
Secondly, Union Pacific also does not seem to care much about it either. The railroad section is the longest stretch of the “trail”, as you’ll walk along the tracks for just shy of a mile. On my visit, I passed multiple UP employees and passed a train as well.
The UP employees I spoke with stated that their main gripe is people walking ON the tracks as opposed to alongside them. They say people have been much better about it in recent years, so Union Pacific’s stance has cooled.
Evidence of this was when I passed a stopped train on my way to the falls. Instead of a lecture, I received a smile and a wave from the conductor. Additionally, I walked by a parked Sheriffs Deputy on Dunsmuir Avenue on my out and he just waved as well.
As long as you’re being respectful and not parking anywhere you’re not supposed to, you shouldn’t have any issues. That could always change, though, so don’t take my word as gospel. I’m simply relaying my experience and what I was told by key individuals.
Where to Park to See Mossbrea Falls

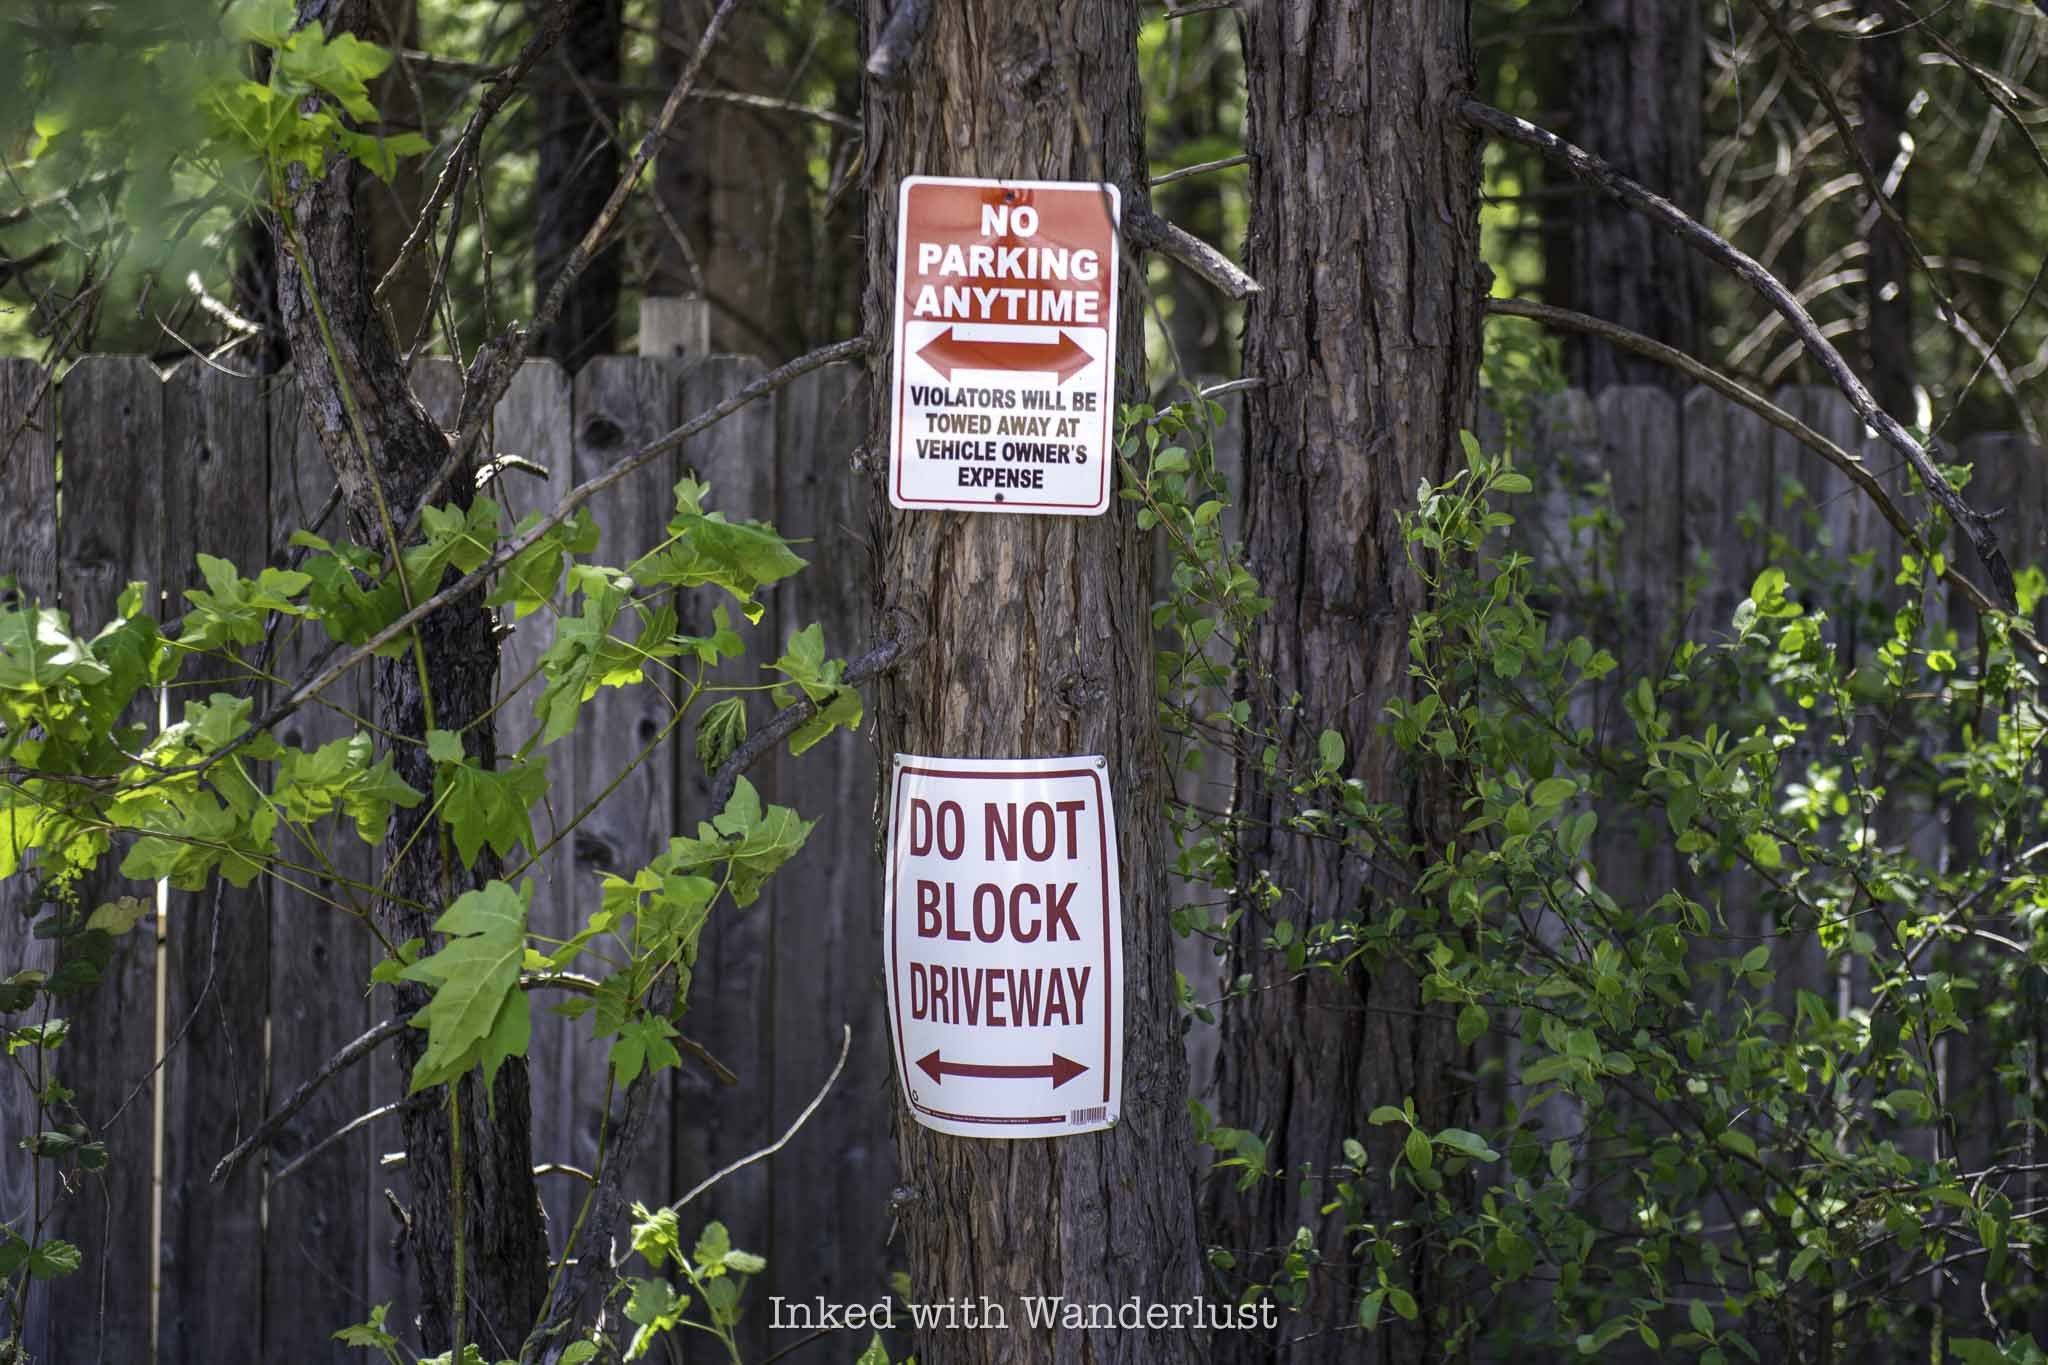
Parking, as opposed to the trespassing part, appears to be the biggest point of contention as it pertains to getting to Mossbrea Falls. There is free, limited parking available along the west side of Dunsmuir Avenue. However, most of the curbs are either red or white.
The east side of the street (the side closest to Interstate 5) is 100% no parking. Don’t do it. Additionally, there are a couple of tempting dirt pull-outs along the road, but most of them have posted “no parking” or “private property” signs.


Just up the road from Shasta Retreat there’s a large parking lot next to a community ball field. There’s an abandoned building there, as well as a coffee and food truck called Up-N-Running Espresso. This is where I parked.
When talking to a local while getting my morning coffee, I was advised that despite the posted “no parking” signs, nobody would care if I parked there. According to her, it’s rarely ever enforced, especially outside of the summer months.
Sure enough, my vehicle wasn’t towed, nor did I receive a ticket. If you’re visiting during the summer, I would arrive early and snag one of the street parking spots to play it safe. In early spring or fall, you’ll likely be ok in that lot.

Further down Dunsmuir Avenue and right after the I-5 off-ramp across from Chevron and Yak’s on the 5 restaurant is a dirt pullout long enough to accommodate multiple vehicles. Parking down here will add another half-mile or so to your hike.
I must stress again to NOT park at the entrance to or in Shasta Retreat. Please don’t give them any reason to take this access point away. Additionally, don’t put “Mossbrea Falls” into your GPS. This will take you into Shasta Retreat. Instead, use this address to drive there:
4727 Dunsmuir Avenue (this will take you to the parking lot I mentioned above)
How to Get to Mossbrea Falls

I’m going to give you the most clear and to-the-point directions to Mossbrea Falls you’ll find anywhere. There will also be many photo references. Be sure to bookmark this post to your device so you can refer back to it later on.
From where you parked, start walking north on Dunsmuir Avenue towards Shasta Retreat. When you get to the arch pictured above, the street going through it and into the retreat is Scarlet Way. Proceed (walking) down that street.
By the way, they have set up a port-o-potty, complete with handwashing station, near this arch for public use

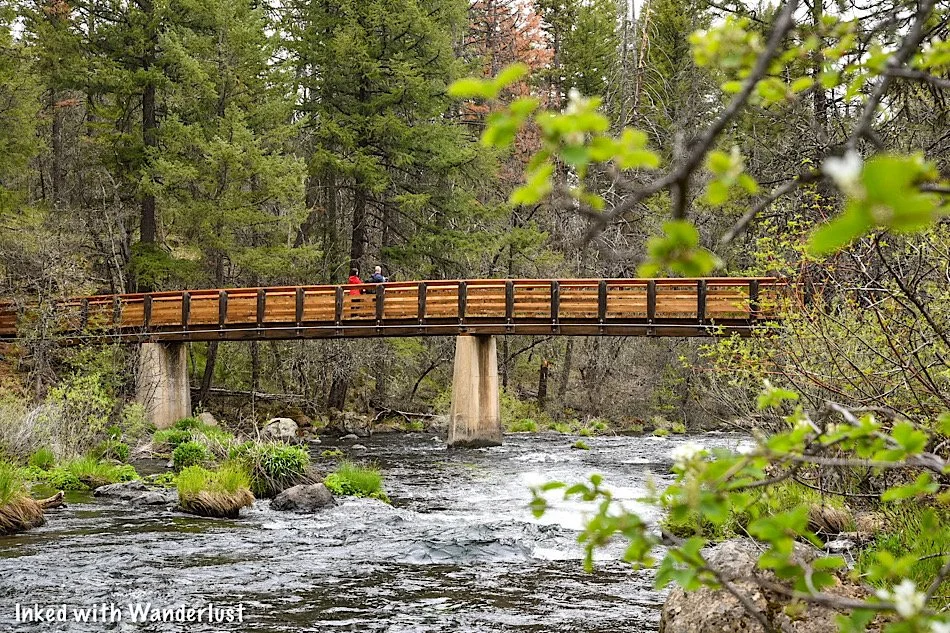
When you get to the bottom of the road, it’ll become Cave Avenue. Turn right. Soon after, you’ll come to the bridge pictured above. Cross it and check out the gorgeous views of the Sacramento River below.
When you get to the other side of the bridge, you’ll come to the railroad tracks you’ll be strolling alongside of for the next mile. Turn right at the tracks and remain on the east side of them (the side closest to the river).

Much has been said online about this stretch of the “trail” being too dangerous. In my opinion, there was nothing inherently dangerous about it, provided you’re staying off of the tracks and keeping your ears open for oncoming trains.
There is plenty of room to safely walk on the east side (nearest the river) even if a train is passing through. Conversely, the west side is a different story. If you walk on that side, you’re simply asking to get hit.

There’s a well-worn, noticeable path throughout much of this stretch that comes and goes. The rest of the time you’ll be traversing on what I call, “rail rocks”. These rocks, while not huge, are larger than basic gravel and are exceptionally loose.
More than once while walking on a slant, the rocks gave way, causing my foot to slide a bit and threw me off balance. I never fell or anything like that but if you have balance issues or sensitive ankles/knees, I would take it slowly.
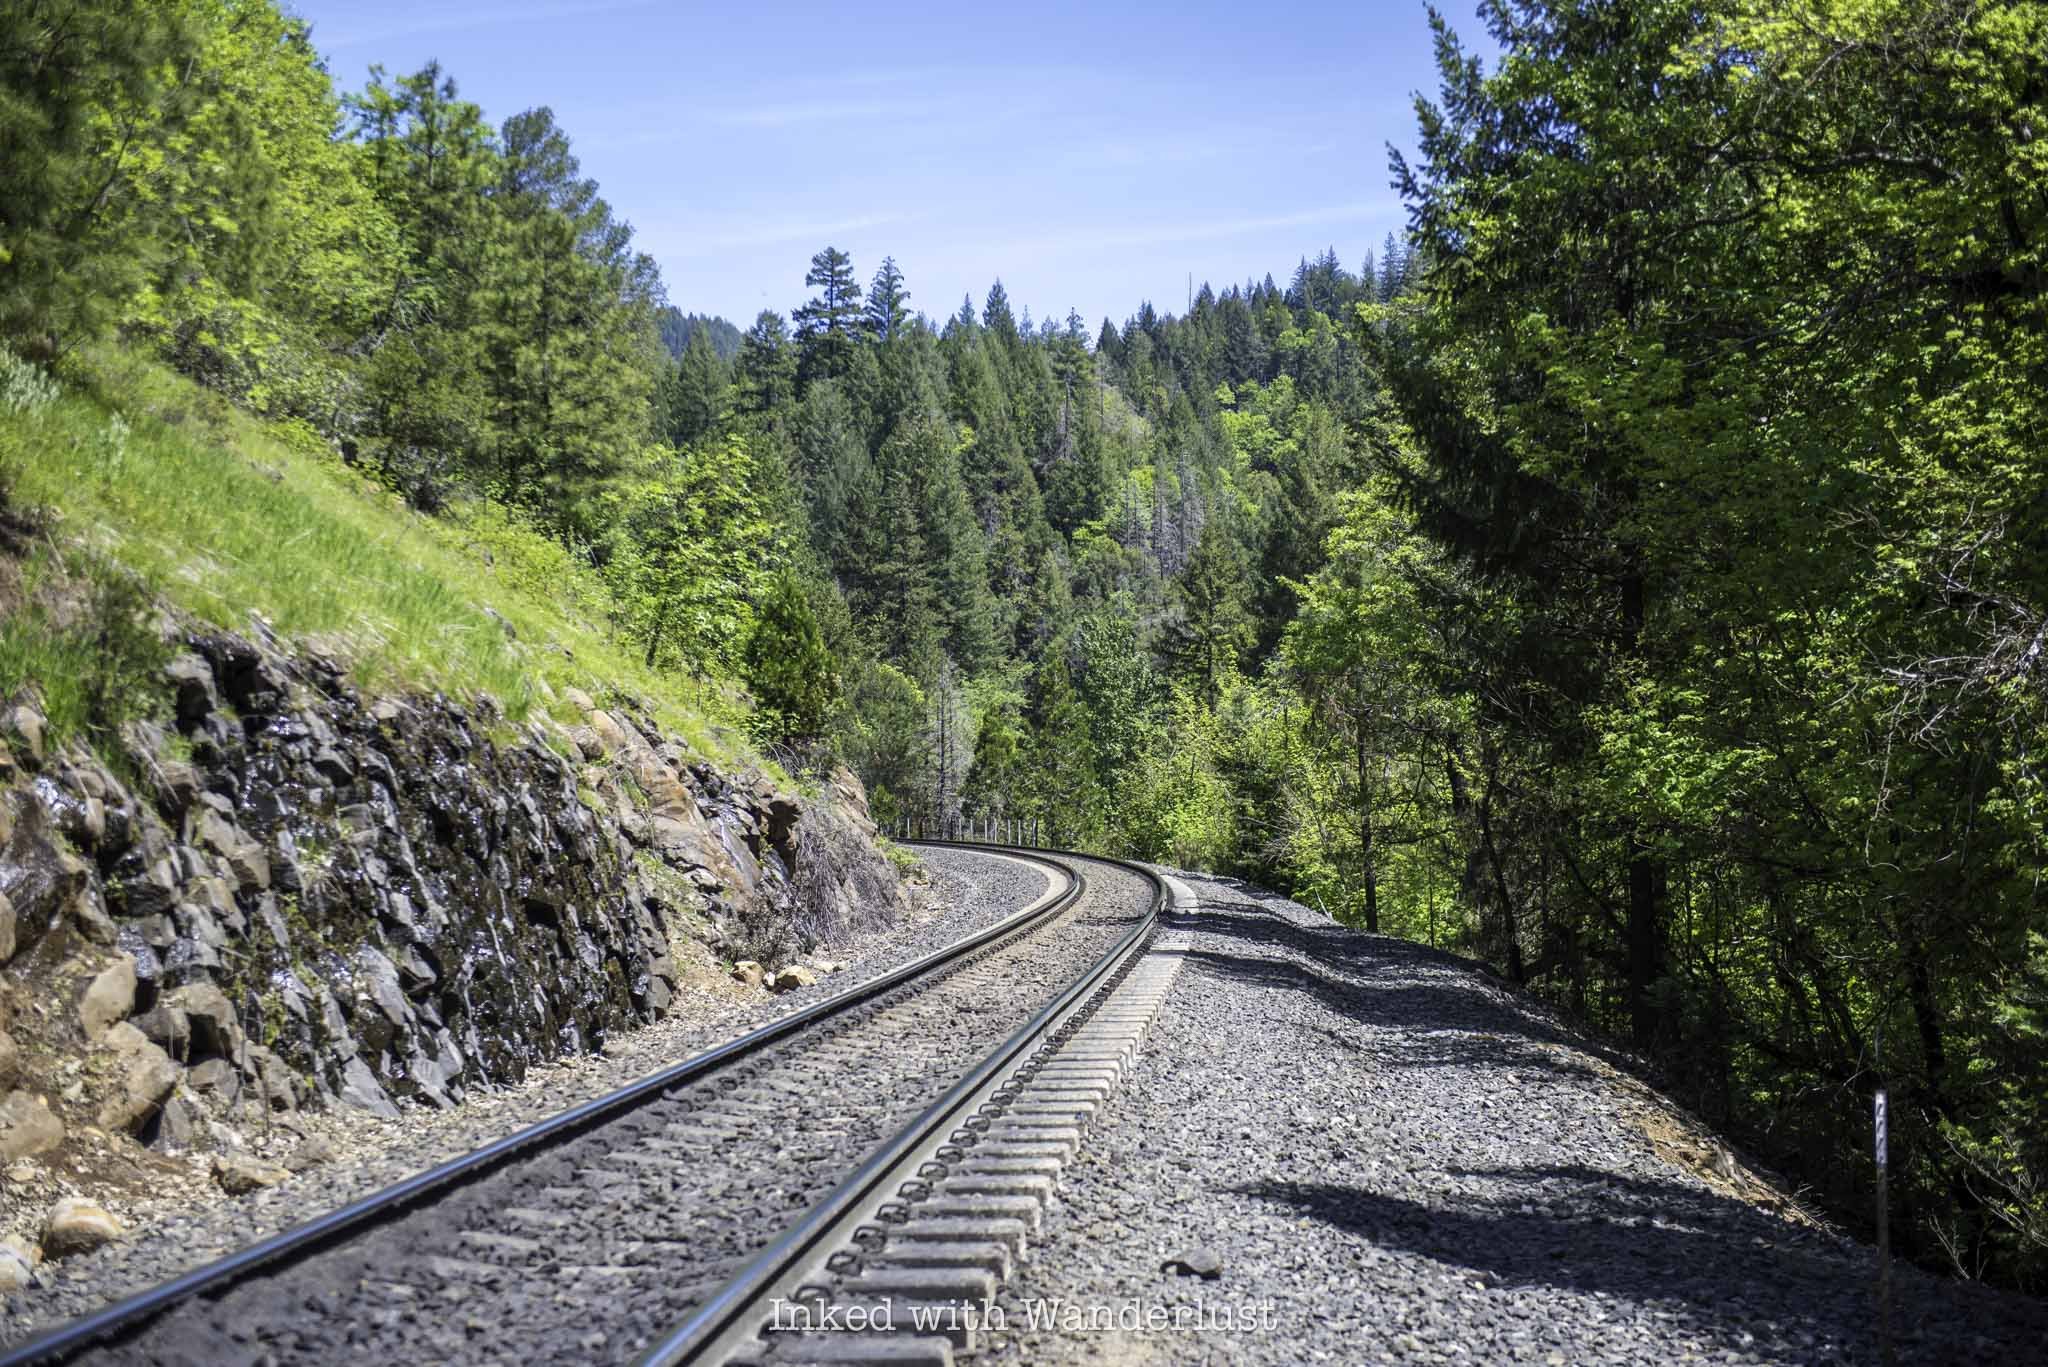
Admittedly, there are a few points along this one mile stretch of track where it gets a bit narrow. I didn’t run into any moving trains, but there was one parked and I walked alongside it for probably half the time.
If it were moving, those narrow portions would’ve been nail biters. If you happen to be at the narrow points and hear or see a train coming, simply step as far to the side as you can and wait for it to pass before proceeding.
There are no signs pointing the way to the falls, but thankfully there’s a big tell letting you know when you’re there. When you come to the trestle bridge in the photo above, stop. Don’t cross it. Instead, turn right and head into the trees.
Just on the other side of those trees is where you’ll find Mossbrea Falls. If you’re here in the spring like I was, you’ll likely hear the falls before you see them. There are multiple paths and each one will lead you to the same spot.
Mossbrea Falls

When you get into the trees, the multiple flowing streams which make up Mossbrea Falls quickly come into view. If you’re here in the spring, the Sacramento River will be flowing heavily and fully, leaving only a small-ish shoreline to view the falls from.

As summer progresses and especially into the fall, the river levels lower, exposing more shoreline and allowing you to get closer. Even with a depleted shoreline, though, you’ll still have a close view.

The best time of day to visit Mossbrea Falls, in my opinion, would be morning or closer to sunset. I had minor car trouble on the day of my visit, which delayed my arrival to around mid-day and I had to deal with the harsh sun hitting the river.

As far as best time of year goes, I would recommend either spring or fall. In the spring, both the river and falls are at their fullest. In the fall, Mossbrea Falls is still flowing, but you’ll have the added benefit of lower river levels and the beautiful fall foliage. Both scenarios are great for photography.
When you’re done viewing the falls, simply head back in the same direction you came. Remember to walk in the space between the tracks and river, keeping your ears open for oncoming trains.
Is Mossbrea Falls Family Friendly?

This is a question commonly asked online and honestly, it can only be answered by individual parents. Personally, I didn’t see any kids at the falls or along the trail during my visit. However, I have seen photos online of families at the falls.
If your kids are teenagers, they shouldn’t have a problem. Especially if they have experience with the outdoors. However, I can see smaller children struggling with the rail rocks. There’s also the potential for danger from the trains.
Only you know your children and their abilities. As amazing as Mossbrea Falls is, it isn’t worth it if you have doubts about them being able to get through the trail. There are solid alternatives in the area, such as Hedge Creek Falls, McCloud Falls and Burney Falls Scenic Loop.
Mossbrea Falls: An Uncertain Future

For years, the city of Dunsmuir has been actively campaigning to construct a safer (and…legal) path to Mossbrea Falls. There have been many hurdles, such as money and getting property owners to relinquish portions of land to make the trail possible.
Recently, Union Pacific agreed to sign over a portion of their land, but the city still needs to raise funding. The current proposal involves extending the Hedge Creek Falls trail. A bridge would be constructed, allowing hikers to safely cross the Sacramento River.
On the other side, fences would be built, keeping people away from the railroad tracks. To bridge the gap, a trail (likely a wooden boardwalk or something similar) would connect you to Mossbrea Falls.

The project is estimated to cost well into the millions. I’m not sure how close or far away they are, but the city is actively asking for donations. They’ve placed a sign with a QR code near the entrance to Shasta Retreat. You can view their website, donation page, and proposal here.
Until this idea becomes a reality, we’ll need to be comfortable with committing misdemeanors in order to see what I believe is one of the most beautiful waterfalls in the state. I truly hope the city can make this happen.
For now, please be respectful when on Shasta Retreat property. No pictures of people’s homes, loitering, parking, etc. Pass through as quickly and quietly as you can. Furthermore, keep off the tracks when on UP property.
The point of all of this is to not give either any reason to reverse their decisions to be relaxed on us trespassing. It’s a privilege that either could strip from us without warning. Let’s do our part to keep Mossbrea Falls as accessible as possible for everyone.
Buy me a coffee?
If you found this blog helpful, consider leaving a tip through the Buy Me A Coffee button below! Whether it’s $1 or $5, every bit helps offset small travel costs like coffee, water, lunch, parking, or park entry fees. Your support means the world—thank you!
EXODUS 13:21

2026 Ultimate Burney Falls Guide (New Reservations Update)
Located within the Cascade Range and just outside the small town of Burney, McArthur-Burney Falls State Park features…
Disclosure: This post contains affiliate links. If you make a purchase through these links, I may earn a small commission at no additional cost to you. I only recommend products or services that I believe will add value to my readers.
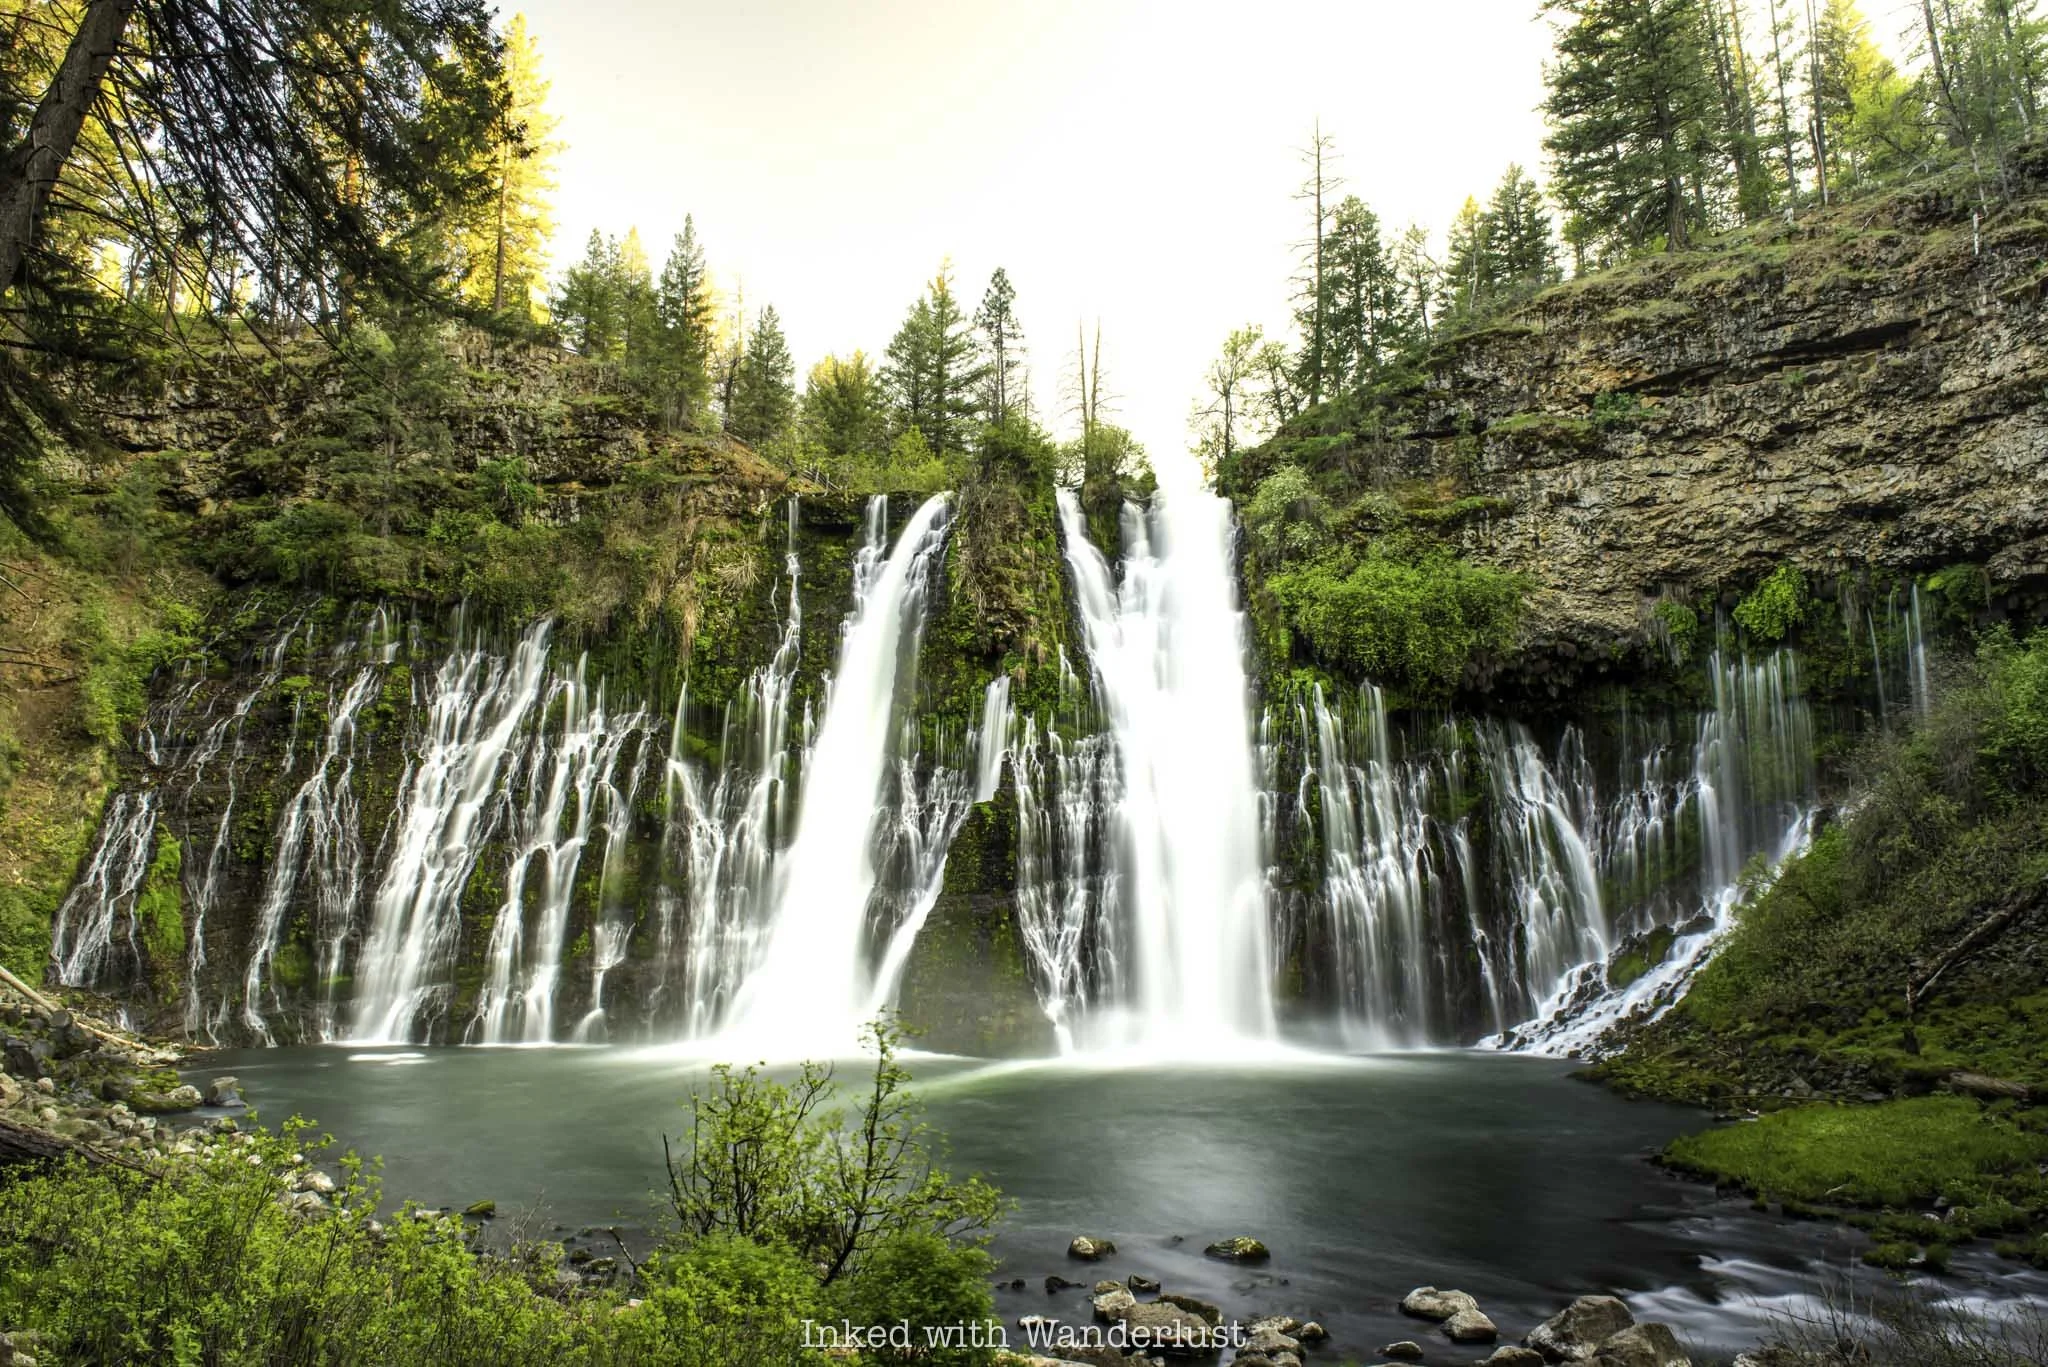
Located within the Cascade Range and outside the town of Burney, McArthur-Burney Falls State Park features quite possibly the most beautiful waterfall in the state; the eighth wonder of the world, Burney Falls.
Burney Falls is one of California’s many must-see natural attractions. It’s worth a trip all in itself as well as an easy add-on if you’re already in the Shasta region.
We have been to this park a few times and have amassed all the information we could find to put together a comprehensive guide to help you plan a successful visit.
Burney Falls Day-Use Reservations
New in 2026 is the Burney Falls day-use reservation requirement. Prior to 2026, reservations were never implemented. With Burney Fall’s rise in popularity in recent years, consequently, it’s become a necessity.
The good news is they’re only required on weekends in the summer months and major holidays. In 2027, that’ll likely change, as I predict the reservation system to be a success and the park service will look to expand it further.
For now, day use reservations for Burney Falls are required:
May 15 - September 27 (Fridays, Saturdays, and Sundays only)
Memorial Day
Fourth of July
Labor Day
Furthermore, when making a reservation, you’ll need to select a timeframe of arrival as there are three different types of day-use permits. They are morning (8am to noon), afternoon (1pm to 5pm), and an all day option. The number of each alloted per day are:
Morning - 103 passes
Afternoon - 103 passes
All Day - 35 passes
Day-use reservations can be made through the LAZ Parking service through this link. Cost is $10 plus a .55 cent processing fee per pass (note - you only need one reservation per vehicle). Also, this counts as your park entrance fee.
Senior, disability, and annual pass discounts apply, if eligible. If you have a campsite reservation, you won’t need to obtain a day-use reservation. Finally, same-day reservations cannot be made as they must be secured ahead of time (up to six months in advance).
Directions to the Park
Getting to Burney Falls is easy and straightforward. There’s no off-roading or miles of hiking involved. Simply park your car at the visitor center and either view the falls from the upper deck or take the trail down to the pool. To get there:
From Reno
Take US 395 North for 90 miles.
Turn right onto CA-44 West for 46 miles.
Turn right onto CA-89 North for 28 miles.
Turn left on Lake road.
Turn left into McArthur-Burney Falls State Park
Total drive time is around 3 hours.
From Sacramento
Take I-5 North for 161 miles towards Redding.
Merge onto CA-299 East for 59 miles.
Turn left onto CA-89 North for 6 miles.
Turn left onto Lake road.
Turn left into the park.
Total drive time is around 3.5 - 4 hours.
Burney Falls is close to many large cities. Keep in mind that if you decide to drive here during the winter months, road conditions can be rough. This region gets a healthy amount of snow annually.
Burney Falls Campground & Entry Fees
Camp Sites & Cabins
The Burney Falls Campground is open year round and features 102 campsites. Each holds a max of eight people and includes one vehicle. Each additional vehicle will incur a fee.
Fees for campsites begin at $35 per night and include a picnic table, fire ring, and food locker. Bathrooms and showers are located near the entrance of the campground with tap water spigots positioned throughout.
Seventeen of the sites are designated for tent camping only with the remaining accommodating tents, trailers, and RV’s (up to 32 feet in length).
Additionally, the Burney Falls campground features 24 cabins. There are two types of cabins, each with their own features and sizes:
18-foot: Can accommodate up to 4 people and comes with one bunk bed and two extra mattresses.
24-foot: Can accommodate up to 6 people and comes with two bunk beds and two extra mattresses.
Camp Reservations
As stated above, the Burney Falls campground is open throughout the year, but how you go about securing a site varies depending on time of year:
Labor Day to mid-May: Campsites are available on a first come, first serve basis and are payable by cash at the kiosk at the entrance. The park is near empty during this time with sites being easy to come by.
Mid-May to mid-September: You must make a reservation through ReserveAmerica.com or by calling 1-800-444-7275. You can reserve a site up to 6-months in advance. It’s during this time where crowd levels soar and the park regularly fills to capacity.
All cabins come with a covered porch and room outside for tents and/or a campfire. They do NOT come with electricity or plumbing. The cabin is heated by propane (included) and you’ll have a bathroom with showers located nearby.
To make a campsite or cabin reservation, head over to reserveamerica.com or call 800-444-7275. (Cabins are NOT available between Labor Day and mid-May).

Camping & Day-Use Fees
The following are fees you can expect to pay at the park:
Day Use Entry: $10 per vehicle (covered if you’ve made a day-use reservation)
Campsite: $35 per night, per site (one vehicle included)
Cabin: $85-$105 per night (depending on group size)
If you have a campsite or cabin reservation, then the day-use fee is included in your nightly rate. However, they do not allow early arrivals (before 2pm). If you arrive before then, you may be subject to the day-use fee.
If the booth at the entrance is unstaffed, use the electronic pay station near the picnic tables in the visitor center parking lot to pay your fees. If you’re paying cash, do so with exact change as it does not give back change.
Now, you’re able to pay day-use, camping, and boat launch fees via the pay station pictured above. It’s located outside, adjacent to the visitor center. Simply make your selection, pay the fees (cash or credit/debit card), enter your license plate, and place your receipt on your dashboard.
Lodging Options
Dusty Campground
Just thirteen miles away from the park, “Dusty Campground”, is located on the north shore of Lake Britton. The six available sites are available on a first come, first serve basis and include picnic tables. Bathrooms and coin operated showers are provided.
Hotels
Alternatively, the town of Burney is just ten miles away from the park and has multiple hotels, as well as a variety of restaurants and grocery options. My personal recommendation is Shasta Pines Motel & Suites.
I stayed there during my visits in 2022 and 2025. It’s an older property and there are little in the way of amenities but the rooms were clean, the bedding was comfortable, and the rate was reasonable at just over $100 per night.
Hiking Trails and Amenities
Inside the park, you’ll find a few trails to enjoy. All of them are on the shorter side, mostly flat, well maintained, and are perfect for families with little ones who don’t have a lot of hiking experience.
Burney Falls Scenic Loop

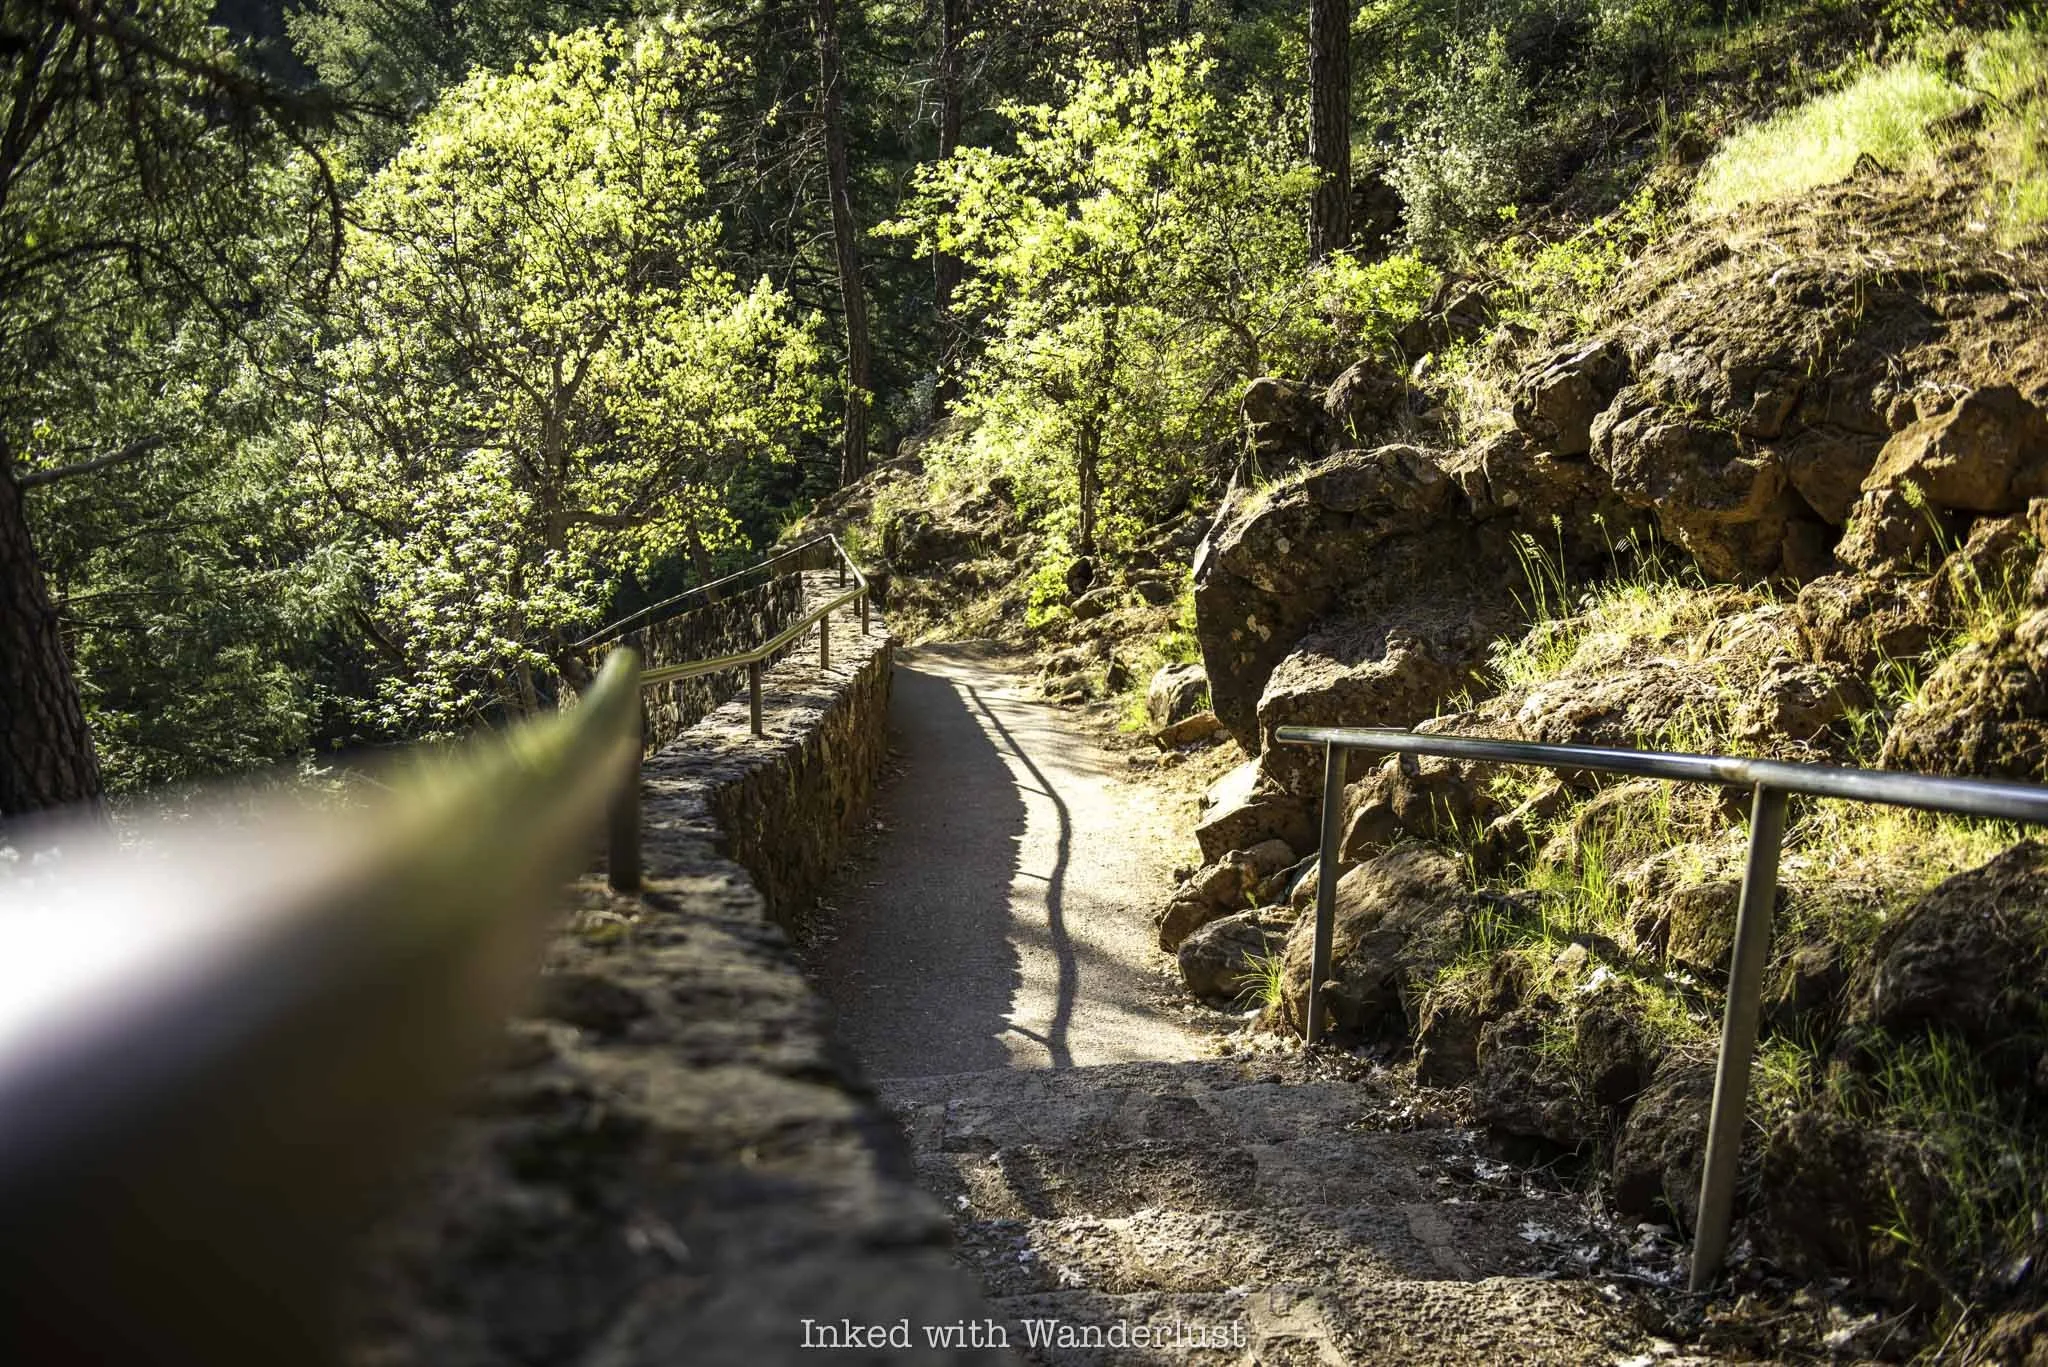
The Burney Falls Scenic Loop is a 1.2 mile loop that begins at the rim, loops around to a bridge that crosses Burney Creek upstream from the edge of the falls and concludes at the base of the falls.
It is a well-maintained trail but throughout much of it, you won’t have a view of the falls. You’ll see it at the beginning and end, but you’ll only see it sporadically through the rest of it.
Regardless of the lack of view, it’s a serene trail. Along the way you’ll find interpretive signs detailing the history and development of Burney Falls. You’ll also enjoy an abundance of shade and seating along the way.
To get more details, check out trail guide about it here.
Burney Creek Loop

This trail is around the two mile mark. We started from our campsite, worked our way down to Lake Britton, to the base of the falls, then back up to our campsite.
If you’re not staying at the campground, you’ll begin at the Rim. You’ll either go right and through the campground or go left on the Rim Trail, cross the bridge, and go left towards Lake Britton.
You’ll follow the creek the entire way, passing a beautiful wooden bridge and non-stop serene beauty before reaching the lake. You’ll also see evidence of Burney’s volcanic past.
The Pool of Burney Falls
This is the trail most people utilize. It’s a third of a mile, beginning at the rim and terminating at the base of the falls. It is paved, but you’ll need to navigate a series of stairs near the beginning. Due to this, the trail is not handicap accessible.
The trail consists of three switchbacks on a fairly even decline. It’s easy going down but due to elevation, you’ll definitely feel it going back up (though it isn’t hard). When you’re done, head back up to the rim or continue down the trail along Burney Creek.
Visitor Center and Pioneer Cemetery

The trail to the cemetery begins near the campground restrooms and is 2.5 miles, out and back. It’s well maintained, but the trail can be difficult to follow durning winter. The cemetery itself has a lot of overgrowth and isn’t overly impressive, but still worth checking out.
The visitor center is located to the right of the entrance as you drive in. It’s small, but it features a lot of informative displays explaining Burney Fall’s development and history.

It opens at 9am and closed at 5pm. It closes on major holidays and due to staffing issues, could close at random times. If it’s open during your visit, I highly recommend heading inside. The staff are knowledgable and can answer any questions about the falls you may have.
Across the small field adjacent to the visitor center is the park’s general store. This is where you can pick up some last minute camping essentials, limited hot food, and souvenirs (the visitor center also has souvenirs).
What is the Best Time to go to Burney Falls?

McArthur-Burney Falls State Park and its campground are open year round and thus, each time of year brings its own positives and negatives.
Spring (March - May): While snow is possible in March, it drops considerably from the month prior with April and May seeing virtually none. March is also the month with the most spring rainfall. Crowd levels begin to pick up in April, especially on weekends and holidays.
Summer (June - August): Hot and crowded sums it up. Rain is rare. Both the parking lot and campground fill quickly and crowds at the base of the falls have been known to be dense. If you must come during this time, mid-week and early morning is best.
Fall (September - November): It starts to cool down but not to the point where you’ll be freezing. Crowds have tapered off and you’ll be able to enjoy the falls without fighting for a spot. We camped here in October and it was fantastic! This is, in our opinion, is the best time to go.
Winter (December - February): Cold, icy, and no shortage of snow. However, there are virtually no crowds. You’ll probably have it to yourself, especially if you arrive on a weekday. If you can tolerate the cold and have the vehicle to navigate the snow and ice, this is the time for you.
My first visit was in October 2016. Crowds were low and while it was chilly at night, the weather during the day was mild. My second visit in August 2019 was far different. Unbearably hot and there were people shoulder-to-shoulder at the falls.
My subsequent visits in 2022, 2023 and 2025 were during the first week of May. Each time, I stopped by the park on a weekday and arrived a couple hours prior to sunset. Each time, I either had Burney Falls to myself or shared it with just a few others.
Therefore, I recommend going in the beginning of May and on a weekday if you can help it. You don’t necessarily have to go close to sunset, but you will be contending with more people in the middle of the day.
Additional Information
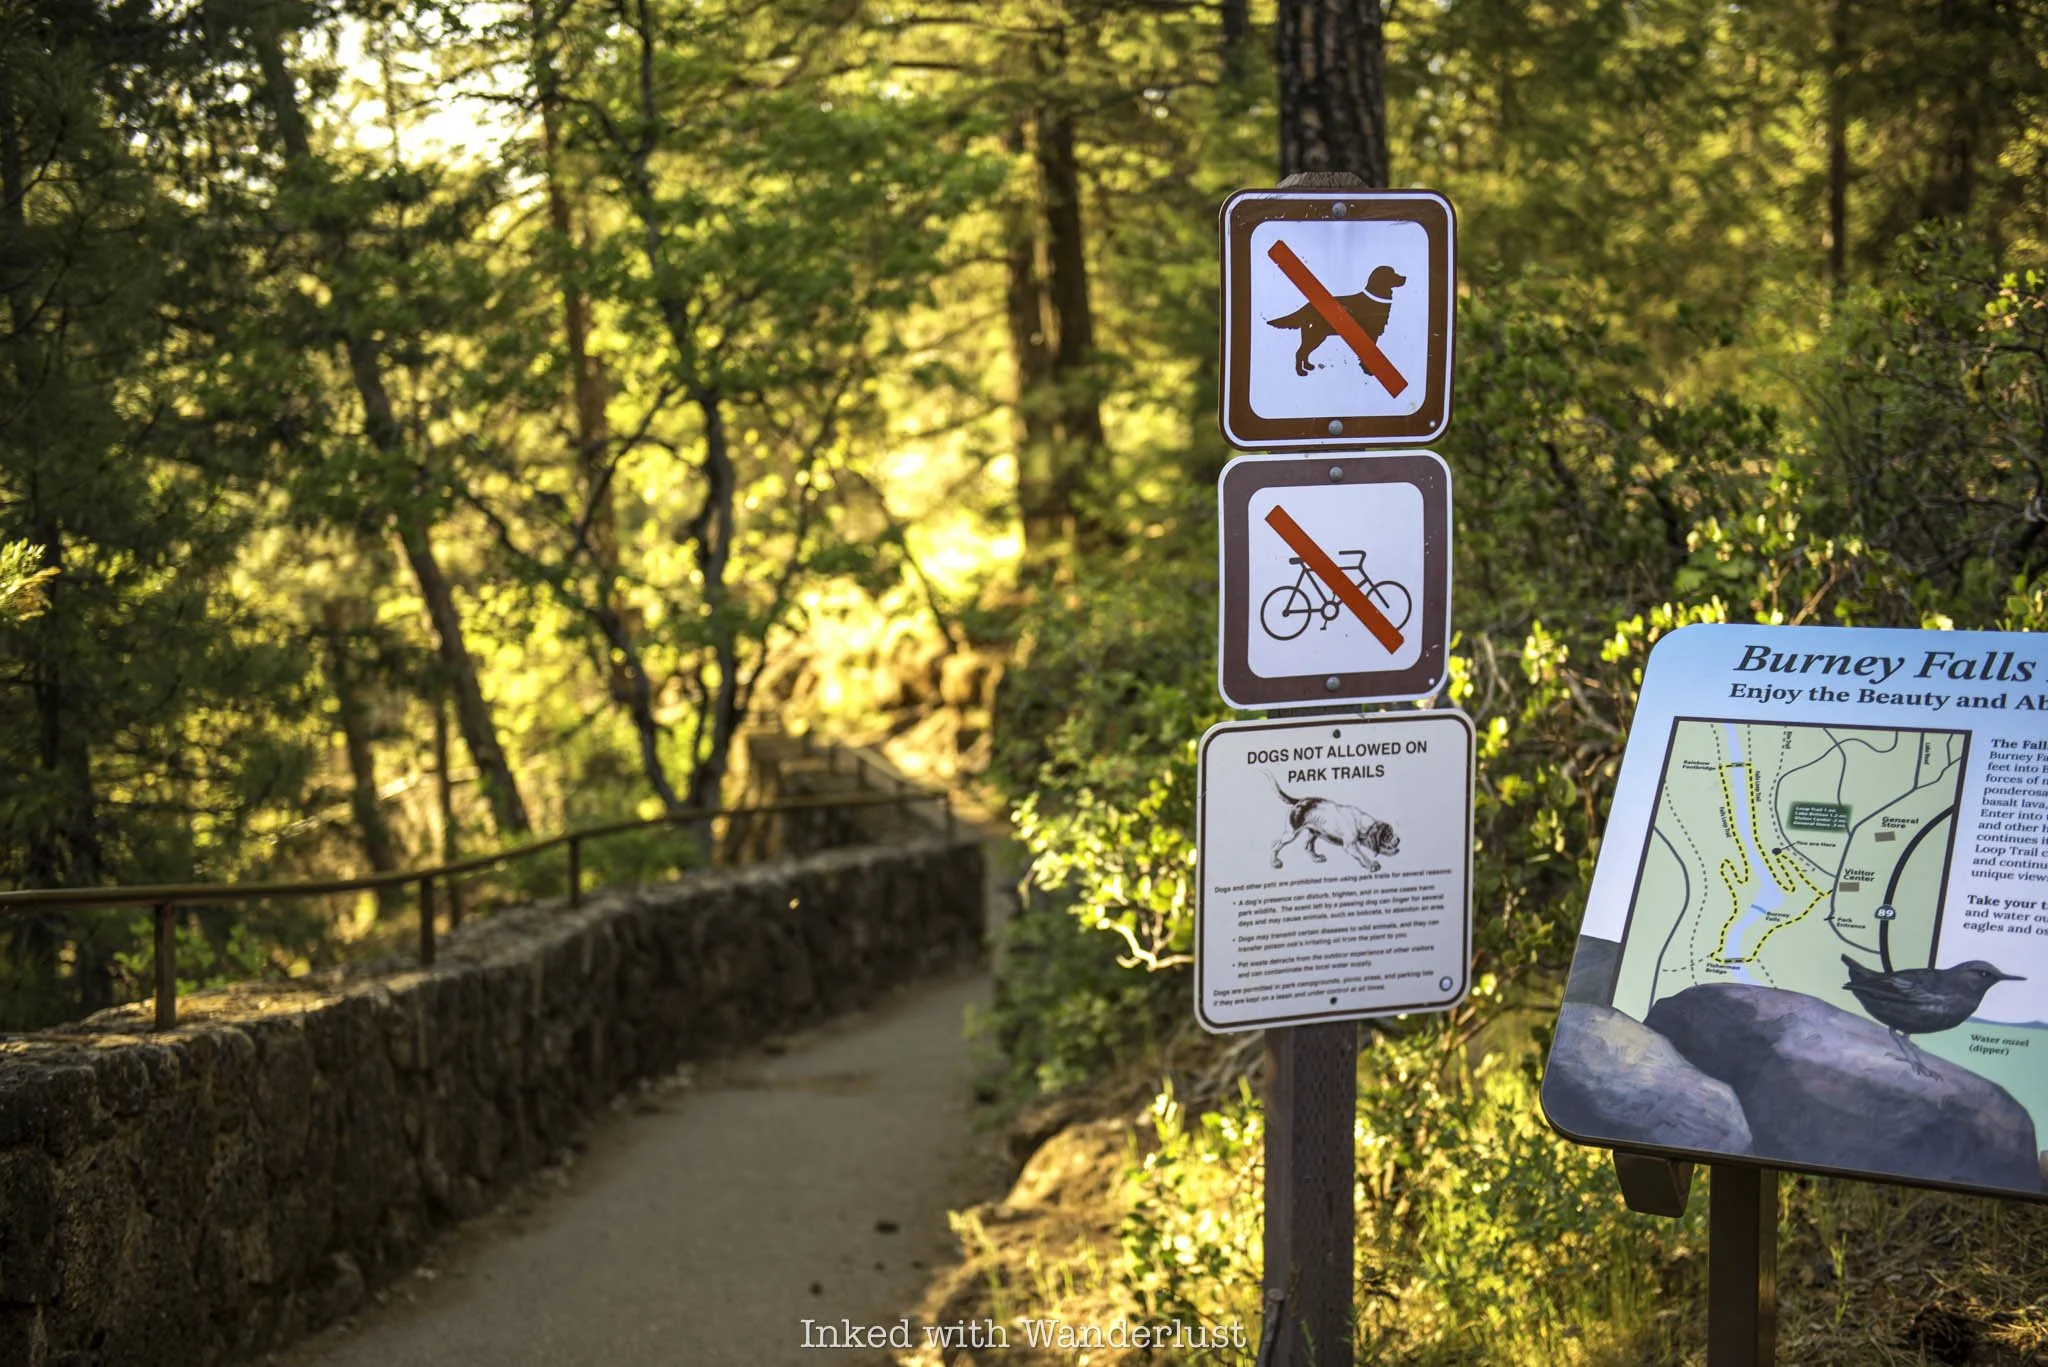
Dogs are permitted. You may bring your dog with you into the park and the campground. However, they are not allowed inside the visitor center or on any trails (except the cemetery trail).
Buy local wood. If you’re camping at Burney, the park sells wood bundles near the entrance (cash only). You can also buy wood in town. The reason for this is so people don’t unintentionally introduce diseases from outside the area.
Parking can be a pain. During the summer, it isn’t uncommon for the parking lot to fill quickly. Your best bet is to arrive early. If you try to park along the road outside the park you risk a fine and tow. If it fills, come back after 4pm and you should be fine.
No restaurants in the park. The nearest restaurants are located in the town of Burney 12 miles away. Each campsite features a grill, so your best bet is to bring your own food, charcoal, and lighter fluid.
You can swim in the pool. The pool below the falls is ok to swim in. In the fall and winter months, however, the water gets very cold.
There is wheelchair access. The main trail leading down to the falls is unfortunately NOT wheelchair accessible due to stairs and a steep decline in some places. However, the visitor center and observation decks are!
EV Charging is not available. This includes the park itself and the town of Burney. The closest charging stations are located in the towns of Dunsmuir (ChargePoint) and Shingletown (Tesla), respectively.
Drone use not permitted. As is the case in most parks of this nature, the use of Drones are not allowed.
Things To Do Nearby

While Burney Falls is the main attraction in the area, there are still plenty of other attractions to check out. You could easily spend a few days or more here. Below, I’ll cover a handful of my favorites. Some are within a few minutes drive while others are further out, but still in the same vicinity.
McCloud River Falls

McCloud Falls is a series of three beautiful waterfalls (lower, middle, and upper) located about 45-minutes north from Burney right off Highway 89. You can start at either the Lower Falls or Upper Falls and hike the 3.5-mile trail that connects all three. The trail is considered easy for most.
Alternatively, if you’re short on time, you can simply drive to each waterfall and take the short trails to view each one. To get more information of these beautiful waterfalls, go here.
The ‘Stand By Me’ Bridge

If you’ve seen the classic 80’s movie, ‘Stand By Me’, you'll no doubt remember the scene where the boys had to run for their lives across the bridge. Most don’t realize that you can visit the actual bridge where that scene was filmed. It’s is just a few short miles from Burney Falls.
Due to a death that occurred in 2021, the bridge is barricaded off and walking on it is no longer allowed. However, it’s still worth checking out. (you can read my post about it here.)
Subway Cave

You can put this one in the super cool, but a bit freaky column. Subway Cave is one of the largest, but easily accessible lava caves in the world. You’ll need to bring a flashlight with you as there are no natural or artificial light sources inside the cave. It’s literally pitch black.
You can explore the cave at your leisure or take part in one of the free, guided tours that take place during the summer months. To get further details on Subway Cave, check out our article here.
Junk Art Sculptures

Located about 15-minutes from Burney in Cassel, you’ll find one of the coolest roadside attractions you’ll ever see. There’s about a dozen or so giant sculptures made from old vehicle parts and other pieces of metal. There’s a couple tin mans, a dog, a spider, and more!
For some reason, Google has this listed as permanently closed but we decided to go anyway and found it to be 100% open. (you can read my post about this place here.)
Hedge Creek Falls

You’ll have to drive for about an hour to see this one as it’s located in Dunsmuir, but trust us when we say it’s worth it. The parking lot and trailhead can be found right off Interstate-5 and it’s an easy, third of a mile hike down to the falls.
The coolest feature to this one (aside from the waterfall itself), is that you’re able to walk behind it along the basalt rock walls. Read my comprehensive guide about Hedge Creek Falls here.
While you’re in Dunsmuir, be sure to take a hike the awe-inspiring Mossbrea Falls! It’s like stepping into the pages of a fairytale novel. Afterwards, head further down the street for delicious artisan burgers at Yaks on the 5.
If you’ll be traveling between Burney and Dunsmuir, give my Northern California waterfall road trip itinerary a read. In it, you’ll discover my recommendations to see SIX gorgeous waterfalls in one 60-mile drive!
This post was originally published in 2021 and was recently updated for accuracy.

How To Hike To The Base Of Middle McCloud Fall
Middle McCloud Fall is just one of three beautiful waterfalls, collectively known as McCloud Falls, along the McCloud…
3 minute read | contains affiliate links
Middle McCloud Fall is just one of three beautiful waterfalls, collectively known as McCloud Falls, along the McCloud River about 45 minutes from the town of Burney.
Being that there’s two more waterfalls, you may be wondering why i’m only writing about the middle fall in this post. There reason is simple…it’s my favorite.
I have a post dedicated to the three falls as a whole. If you’re interested in reading that one, you can do so here.
In that post, I state near the end of article that if you only have time to visit just one of these, make it the middle fall.
On top of that, of the three, the middle fall is the only one that requires any real effort to reach the base (you can drive to all three but the middle one requires a small hike to reach it).
So in this post, i’m going to cover where to find parking, what to expect along the trail and what it’s like at the base of the fall. Let’s get into it!

Quick Stats
Location: McCloud, CA (45 minutes from Burney Falls)
Fee: None
Permit: None
Open: Spring, summer & fall
For: Hikers, swimmers, sightseers
Restroom: At the trailhead
Parking: Large, paved lot
EV Stations: None
Difficulty: Easy
Popularity: Medium to high
Mileage: 0.8-mile, out-and-back
Time: 1-3 hours (depending how much you spend at the fall)
Elevation Gain: 157-feet
Condition: Maintained & easy to follow
Features: Waterfall and great swimming hole
Pets: Allowed on leash
Drones: No signage stating you can’t use them
Hazards: Boulder field near the base and submerged boulders in the swimming hole
Our Visit(s): September 2019 and May 2022
Getting There and Parking

Middle McCloud Fall is fairy easy to get to. If you’re coming from the town of Burney:
Drive north on highway 89 for about 40-miles
Turn left onto Fowler Public Camp road
Continue for about a half-mile
Then turn left onto an unnamed, paved service road (you’ll see signage indicating the way)
If you’re coming from the Dunsmuir:
Drive south on highway 89 for about 22-miles
Turn right onto Fowler Public Camp road for a half-mile
Turn left onto the same unnamed service road.
Each of the three falls have their own paved parking lots but the middle one is the largest. It could easily fit dozens of vehicles plus some RV’s and buses.
You’ll find the trailhead directly adjacent to the bathrooms.
Trail To The Vista

For those who don’t want to make the trek down to the bottom, the middle fall can be viewed from above at the vista.
The trail to the vista is paved and is able to accommodate wheelchairs and strollers. There are two of them to choose from.
For most people, this is as far as they’ll go. The view of the falls from up there is nice but to get the true experience, you’ll want to hike down to the base.
Trail To The Base

Finding the beginning of the trail to the base can be a bit tricky. Especially if you aren’t paying attention (like me during our first visit).
The dirt path to the base spurs off from the paved trail that leads to the second vista. Right as the paved path elbows, look to your right (pictured above).
The dead giveaway are the rocks lining the right side of the trial, forming a path. How I missed that the first time I’ll never know.
*Side Note: There is no sign pointing the way. So keep an eye out for those rocks you see in the photo above.

From there, it’s only 0.4-mile down to the bottom. Accounting for a few stops to take pictures, it shouldn’t take more than 10 minutes or so.
Shortly after finding the trail, you’ll encounter a set of wooden stairs. After this, the trail continues its descent via a series of switchbacks.

The trail, while a bit rocky in some spots, is well maintained and easy to follow. There are no steep points as the switchbacks are gradual.
When you reach the bottom, you'll come to a junction. Going right will take you down to Lower McCloud Falls (about a mile out).

To continue to the middle fall, head left (you should have the waterfall in your line of sight as this point).
At the end of the trail, you’ll see a large boulder field in front of you. If you want to swim near the waterfall, you’ll need to negotiate it.

Most of the boulders are positioned fairly close to one another, so getting through it isn’t too difficult. Young children may have a tough time, though.
Once on the other side, you’ll have unobstructed views of Middle McCloud Fall and its pool. I was fortunate enough to have it all too myself.

The scenery is amazing. Huge, towering alpines surround you while the water pours over the crest and down the large basalt rock wall into the pool below.
If you plan to swim, I do caution you to watch for the submerged boulders and to wear water shoes as there’s tons of debris in the water.

When you’re done, simply head back up the same way you came. While you’ll definitely notice the incline going out, it’s still an easy trek.
I stand firm that the middle fall is the best of the three and if you only have time for one, to make it this one. You won’t regret it.
If you want to make it a point to see all three waterfalls and hike the trail connecting them, check out our post, “McCloud River Falls: Three Fantastic Waterfalls In One Hike”
Your Thoughts…
What do you think of Middle McCloud Falls? Does this seem like a waterfall/hiking trail you and your family would enjoy?
Let us know in the comments below! We love to hear from our readers.
Please support our website by subscribing to our newsletter below.
Thank you for reading.
Check Out These Other Amazing Destinations!


7 Things You Will Love About Burney
Burney is an unincorporated town in Shasta County in Northern California and has long been a haven for outdoor enthusiasts…
3 minute read | contains affiliate links
Burney is an unincorporated town in Shasta County in Northern California and has long been a haven for outdoor enthusiasts.
The town is mostly known for its waterfall of the same name, Burney Falls, a 129-foot, nearly 300-foot wide behemoth.
While Burney Falls deserves its status as the town’s main offering, there are many other things to do in and around Burney that most may not be aware of.
In this post, we’re going to discuss seven of our favorite things about Burney that we think you would love most.

A Quick Note…
We have several more “7 Things” posts about other great towns that you might want to read about. Click/tap any of the links below (opens a new window) to read them.
1) McArthur-Burney Falls State Park
May as well get the main event out of the way at the start. You’ve undoubtedly heard of Burney Falls (or at the very least have seen pictures of it).
It’s more than deserving of its title as one of the best and most popular waterfalls in the entire state and you would agree once you’ve seen it.
Burney Falls has a commanding presence with a height of 129-feet and a width of nearly 300-feet. It’s an amazing sight to behold.
No trip to Burney would be complete without AT LEAST one visit to the falls and take in its beauty. If you’ve never been, be sure to check out our guide.
READ: “Burney Falls State Park: When To Go, Directions and More”
2) Junk Art Sculptures

Just down the road from Burney Falls in the tiny town of Cassel are a bunch of junk art sculptures that are open to the public.
They’re placed in front of a local construction company, the owners of said construction company being the artists behind them.
It is free to both park at and explore the sculptures and it’s open during daylight hours. It’s a great way to kill an hour or so.
READ: “Check Out Junk Art Sculptures Near Burney Falls”
3) Proximity to McCloud River Falls

While not in Burney itself (the falls are located near the town of McCloud), McCloud River Falls is a series of three scenic waterfalls.
It’s about an hour’s drive to these falls, but the trip is more than worth it, especially if it’s a hot day and you’re in search of a swimming hole.
The three falls can be accessed via a 3.9-mile, out-and-back hiking trail or by driving to each one. The lower and upper falls are right off their parking lots.
The middle fall (the most scenic of the three) can be viewed from above but for a closer look, you’ll need to take a series of switchbacks to the bottom.
READ: “McCloud River Falls: Three Fantastic Waterfalls In One”
4) Subway Cave

Just a short drive from Burney is the largest, most easily accessible lava tube cave in the world; Subway cave.
It isn’t open in winter but if you’re in the area any other time of year, you’re all set. Best part? It’s free to park and explore the cave.
You’ll definitely want to bring flashlights because there are no natural or artificial light sources anywhere in the cave.
READ: “Subway Cave: Explore An Awesome Lava Tube Near Burney Falls”
5) Proximity to MANY Waterfalls

Burney Falls is far from the only waterfall in the area. In fact, there are DOZENS scattered throughout the area.
A handle of examples of those include; Hedge Creek Falls (pictured above), Potem Falls, McCloud Falls, Mossbrea Falls and Faery Falls.
READ: “Hedge Creek Falls: A Short Hike To An Incredible Waterfall”
6) A Plethora of Hiking Trails

As is the case with the rest of California, there are hiking trails everywhere around Burney and the surrounding area.
In fact, a beautiful section of the infamous Pacific Crest Trail (PCT) goes through here.
Some other well known area trails include the Burney Falls Scenic Loop, the Spatter Cone Trail, the Great Shasta Rail Trail and more.
READ: “How To Hike The Burney Falls Scenic Loop”
7) The Bridge from ‘Stand by Me’

Finally, if you’ve ever seen the movie, ‘Stand by Me’, then you’ll undoubtedly remember the infamous bridge scene.
In it, the four boys attempt to cross the bridge but end up having to run for their lives from an oncoming train.
Many people don’t realize that the bridge used in the movie is still standing and is just down the road from Burney Falls.
Due to an unfortunate death in 2021, walking on the bridge is no longer permitted. You can, however, still visit it and take in the surrounding views.
READ: “How To Visit The Bridge From ‘Stand By Me’ In Burney”
Your Thoughts…
Does Burney sound like a place you and your family would enjoy? Have you been to any of the destinations listed above?
Let us know in the comments below! We love hearing from our readers.
Please support our website by subscribing to our newsletter below.
Thank you for reading.
Check Out These Amazing Oregon Destinations!

How To Visit the Stand by Me Bridge in Burney
The 1986 Hollywood film, ‘Stand By Me’, wasn’t exactly a box office hit but over the years it has since gained a strong cult fan…
Disclosure: This post contains affiliate links. If you make a purchase through these links, I may earn a small commission at no additional cost to you. I only recommend products or services that I believe will add value to my readers.

The 1986 Hollywood film, ‘Stand By Me’, wasn’t exactly a box office hit. Over the years, though, it has gained a strong cult following. If you’re a part of that following (and since you’re reading this i’m assuming you are), you undoubtedly remember that infamous bridge scene.
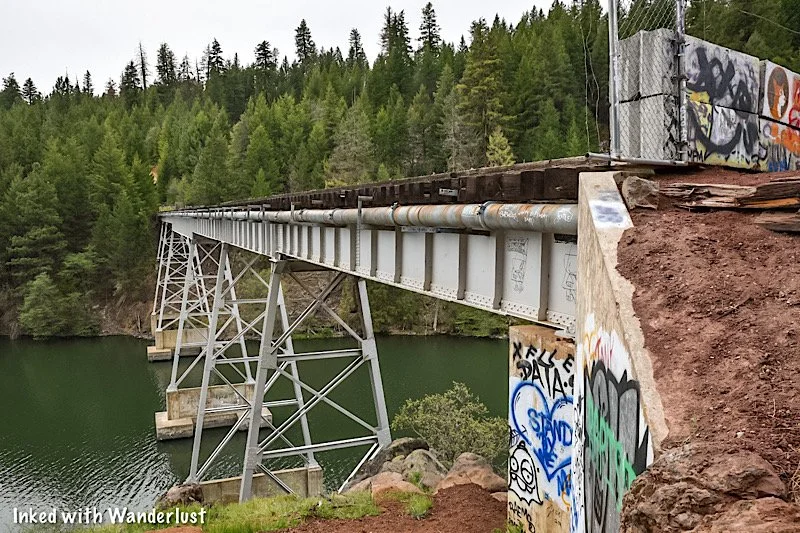
You may not realize this, but that scene wasn’t filmed in Oregon. It was filmed just down the road from Burney Falls in Burney, California. While it was taken out of service early into the new millennium, it still stands to this day and can be easily visited by anyone who wishes to.
So where is it? How do you get there? I’ll answer these questions and more in the post below. Let’s get into it.
Buy me a coffee?
If you found this blog helpful, consider leaving a tip through the Buy Me A Coffee button below! Whether it’s $1 or $5, every bit helps offset small travel costs like coffee, water, lunch, parking, or park entry fees. Your support means the world—thank you!
A Quick Word…
While you’re still permitted to visit the location of the bridge, the bridge itself has been blocked off. Walking on the bridge is prohibited due to the 2021 death of a Reno, NV man.
How to Get to Stand by Me Bridge

The Stand by Me bridge is located just a short drive away from the central part of Burney, California. From famed Burney Falls, it’s just a couple minutes away.
If you’re coming from Burney (whether the town or the waterfall):
Head north on highway 89 (if you’re at Burney Falls, take a left out of the park).
Shortly after crossing over Lake Britton, and driving through the overpass, take a (very) hard right onto Eagle Mountain lane.
You’ll continue on the dirt road for about a quarter mile before arriving at the bridge on your right.
If you’re coming from the opposite direction, such as McCloud or Dunsmuir, you’ll simply go south on highway 89 before taking a left onto Eagle Mountain lane.

Distance from additional cities and parks include:
Burney Falls: 2.5 miles
Lassen National Park: 43 miles
Redding, CA: 67 miles
Reno, NV: 168 miles
Medford, OR: 138 miles
Brownsville, OR: 338 miles
The dirt road going to the bridge is navigable for just about any vehicle. My compact made it just fine. Though there are some potholes to keep an eye out for. There is no official parking lot, but there’s an open area of dirt on the side of the road that serves that purpose. Just find a spot that makes sense.
2025 Update: I recently visited again and it looked like the road was improved. The potholes that were there during my previous visit were repaired.
The Stand By Me Bridge

The first thing you’ll likely notice is the blockade placed in front of the bridge. Prior to 2021, walking across the bridge was permitted. Since 2021, a Reno man was killed after jumping from the bridge and a barricade was placed at either end, prohibiting pedestrian access.
Thankfully, there are open slots between the cement blockade and barbwire where you can get a clear photo of the bridge and landscape behind it. Additionally, you can easily access the underside of the bridge as well.
2025 Update: Apparently, somebody took exception to these blockades, as one half of the fence and barbed wire was torn down. The cement blocks remain in place, though.
Despite the bridge being blocked off, it’s still worth a visit. Particularly if you’re a fan of the movie. Even if you’re not a fan, it’s a historic bridge with amazing views of the lake and surrounding hills. You can get those views on either side of the bridge.

I can’t say for sure, but it’s likely possible to access the bridge from the other side via the Burney section of the Pacific Crest Trail (PCT). Along the Burney Falls Scenic Loop there’s a point in which you can access the PCT. I’m not sure of the milage, though. I suggest hiking for a couple miles until you see what looks like old train tracks and follow those towards the water.
2025 Update: At some point between my first and second visits, another blockade was placed at the opposite of the bridge.
Once you’ve finished checking out Stand by Me bridge, I encourage you day trip out to Dunsmuir, roughly one hour from here. On the way, stop at McCloud River Falls to see three beautiful waterfalls in one trail. When you get to Dunsmuir, a hike to Mossbrea Falls and Hedge Creek Falls are a must. Follow up with dinner at Yaks on the 5!
Buy me a coffee?
If you found this blog helpful, consider leaving a tip through the Buy Me A Coffee button below! Whether it’s $1 or $5, every bit helps offset small travel costs like coffee, water, lunch, parking, or park entry fees. Your support means the world—thank you!
PSALM 91

Check Out Cool Junk Art Sculptures Near Burney Falls
The small town of Burney, California, is known as the home to the awe inspiring, Burney Falls, and central to many more amazing…
2 minute read | contains affiliate links
The small town of Burney, California, is known as the home to the awe inspiring, Burney Falls, and central to many more amazing destinations.
There is one attraction just ten minutes or so outside of Burney that isn’t well known, but is a fun (and free) way to spend an hour or more exploring - the Cassel Junk Art Sculptures.
So how do you get there? What kind of sculptures are there? Where are they located? We’ll answer these questions and many more. Let’s get into it.

Quick Stats
Location: Packway Materials - Cassel, CA
Fee: None
Open: Every day, during daylight hours
For: Everybody
Restroom: None
Parking: Medium sized dirt lot right off the road
EV Stations: None
Popularity: Low
Time: An hour or less
Features: Dozens of junk art sculptures
Pets: Not specified
Drones: Not specified, but this is private property so seek permission first
Our Visit(s): May 2022

About The Sculptures & Getting There
The Cassel Junk Art Sculptures are located in the tiny town of Cassel near the front entrance of Packway Materials, a local construction company.
The two brothers who own the company are also the artists behind these sculptures and use scraps from their business to create them.
The address for the sculptures is:
22244 Cassel road, Cassel, CA
If you’re coming from the town of Burney, head Northeast up highway 299 and go straight through the stoplight. Then, turn right onto Cassel road for two-miles.

If you’re coming from Dunsmuir/McCloud/Burney Falls, head south on CA-89 to the four-way stop. Turn left at the light and then turn right onto Cassel road for two-miles.
You’ll pass a huge, empty grassy field on your right just before arriving. On arrival, you’ll see a medium sized dirt lot near the sculptures. That’s where you’ll park.
There is no fee to park or to explore the sculptures, but keep in mind that this is private property. So please be respectful of that.
Junk Art Sculptures

There’s no specific order to view the sculptures. Simply go from one to the next. They’re fairly spread out, but not to the point where you’ll have to walk extensively.
There are a couple dozen sculptures of varying shapes, sizes and themes. A few examples of what you’ll find are:
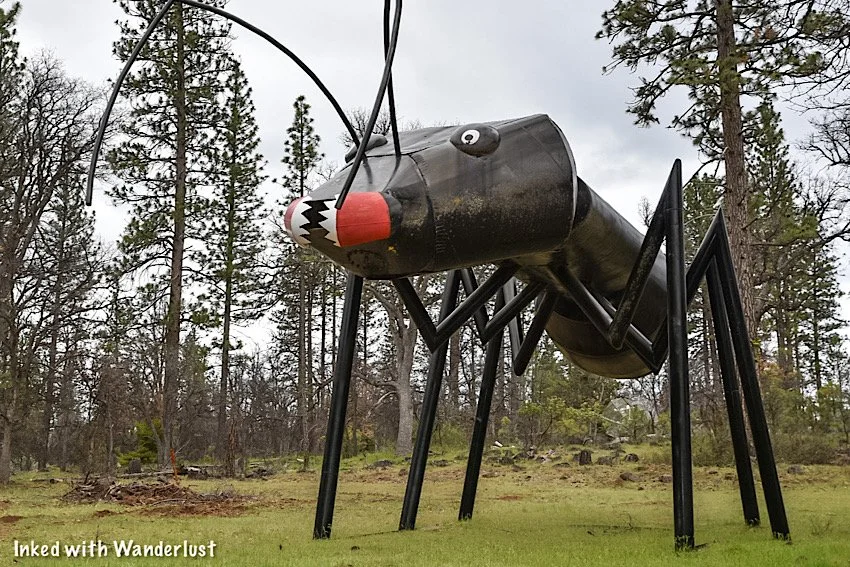
A 40-foot, 5-ton dinosaur
A rock man
An ant
Aliens and their UFO
A Dragonfly
A Miniture Dachshund
A Giant Grasshopper
And Much More


It won’t take long to explore. When we were here we spent about an hour looking around and taking pictures.
If you bring kids, I’d imagine you could spend a little more time than that here. Especially if they’re interested in them.
If you happen to be driving through or spending time at Burney Falls, the junk art sculptures are a worthy stop to get out and stretch your legs.
Your Thoughts…
Does this sound like something you and/or your kids would enjoy? Tell us in the comments below. We love hearing from our readers!
By the way, be sure to check out our posts below about the other amazing attractions in this area.
Please support our website by subscribing to our newsletter below.
Thank you for reading.
Check Out These Amazing Hiking Trails!


How To Hike The Burney Falls Scenic Loop Trail
Burney Falls is one of the most visit state parks in all of California. Prior to covid, the park would see an average of 4,000…
3 minute read | contains affiliate links
Burney Falls is one of the most visited state parks in all of California. Prior to covid, the park would see an average of 4,000 daily visitors. Since covid, that number has more than tripled to an average of 13,000.
It’s no wonder, either. Burney Falls is a spectacular waterfall. On top of that, it’s one of the most easily accessible waterfalls as it can viewed from an accessible viewing deck just steps away from the parking lot or by taking a short, paved trail to the base.
Many people are completely unaware of the hiking trails contained within the park. So we’ve decided to write a post about the most popular one, the Burney Falls Scenic Loop. It’s a beautiful trail that begins at the rim of the falls and concludes at the base.
If you’ve never been there, you should check out our comprehensive guide on Burney Falls. In it, we cover a lot of information such as directions, camping, hiking trails, best time to visit and more! So if you’re looking for that information, you should definitely read that one and come back here.
Let’s get into it.

Quick Stats
Location: McArthur-Burney Falls State Park
Fee/Permit: $10 per vehicle to enter the park
Open: Year round
For: All visitors/hikers
Parking: Semi-large, paved lot
Restroom: At the visitor center
EV Stations: None
Drone Use: Not allowed
Difficulty: Easy
Popularity: Highly trafficked
Time: 1 hour or more
Milage: 1.2-miles
Elevation Gain: 167-feet
Trail Condition: Well maintained
Main Feature(s): Burney Falls
Pets: Not allowed
Special Notes/Hazards: Though it’s a beautiful trail, Burney Falls will be out-of-view for the majority of the hike
Our Visit(s): October 2016, August 2019, & May 2022

Trailhead, Parking & Direction
The trailhead for the Burney Falls loop trail is directly across the road from the park’s visitor center and parking lot. You’ll see a sign up ahead indicating as such (pictured above).
The parking lot is fairly large, probably closer to medium sized, actually. As we covered in our guide to Burney Falls, this lot tends to fill quickly in the summer months. So if you go during that time, we highly advise that you plan for an early arrival.
Once you’ve parked and paid your entry fee ($10), cross the street and head towards the rim of the falls to begin your hike. There’s a viewing deck where you can get a from above view of the falls.

Burney Falls Loop Trail
If all you want to do is go to the base of falls and leave, bear right towards the stairwell. It’ll only take a few minutes to get down there as it’s only a third-of-a-mile along a well-maintained path.
If you’re dead-set on the loop trail (as you should be) you’ll want to bear left along the dirt path. This trail also takes you to the base, just not as quickly.

Unfortunately, Burney Falls won’t be visible for much of the trail. In fact, you’ll only get the full view once you’ve circled down to the base. Shortly after the beginning of the trail, you’ll get one final look at it through some trees.
After a short time, you’ll arrive at the serene, ‘Fisherman’s Bridge’, crossing Burney Creek just upstream from the top of the falls. If you’re an angler, there are great spots here along the creek to fish for Rainbow Trout.

Be sure to stop near the middle of the bridge to take in the views. You won’t be able to see the crest of Burney Falls from here, but you’ll get a great view looking upstream of the creek.

After the bridge, turn right and you’ll enter a heavily forested portion of the trail filled with Douglas Firs and Oaks. Also along this stretch are a number of benches. Feel free to rest your feet for a moment and take in the sights around you.
The trail will begin to descend slightly along a series of gentle switchbacks. Before hitting the descent, you’ll pass a junction to the Pacific Crest Trail and a series of rocky steps built into the trail. No need to worry as the steps are easily navigable.


Near the halfway mark down the switchbacks you’ll get your first glimpse of Burney Falls since the start of the trail. Again, it’s through a collection of trees but it’s a gorgeous view nonetheless.
Rainbow Bridge Junction

At the bottom of the switchbacks you’ll come to another footbridge crossing over Burney Creek. This one is named, “Rainbow Bridge”. Much like the first one, stopping here to take in the views of the creek would be worth your while.
From here, you have two directions in which you could go. Going left from Rainbow Bridge will take you on a detour to Lake Britton. This is a solid option as the picturesque lake provides many recreational activities.
*Note: The detour to Lake Britton from this junction is closed for the 2022 season due to heavy storm damage to the trail. No word on when it’ll open. To reach Lake Britton, you’ll need to utilize the trail leaving from the rim of the falls and through the campground.

To keep to the loop trail and continue on to the falls, however, you’ll want to bear right as you’re walking off of the bridge. Along this stretch, you’ll pass a huge boulder field on your left. Showcasing evidence of the area’s volcanic past.
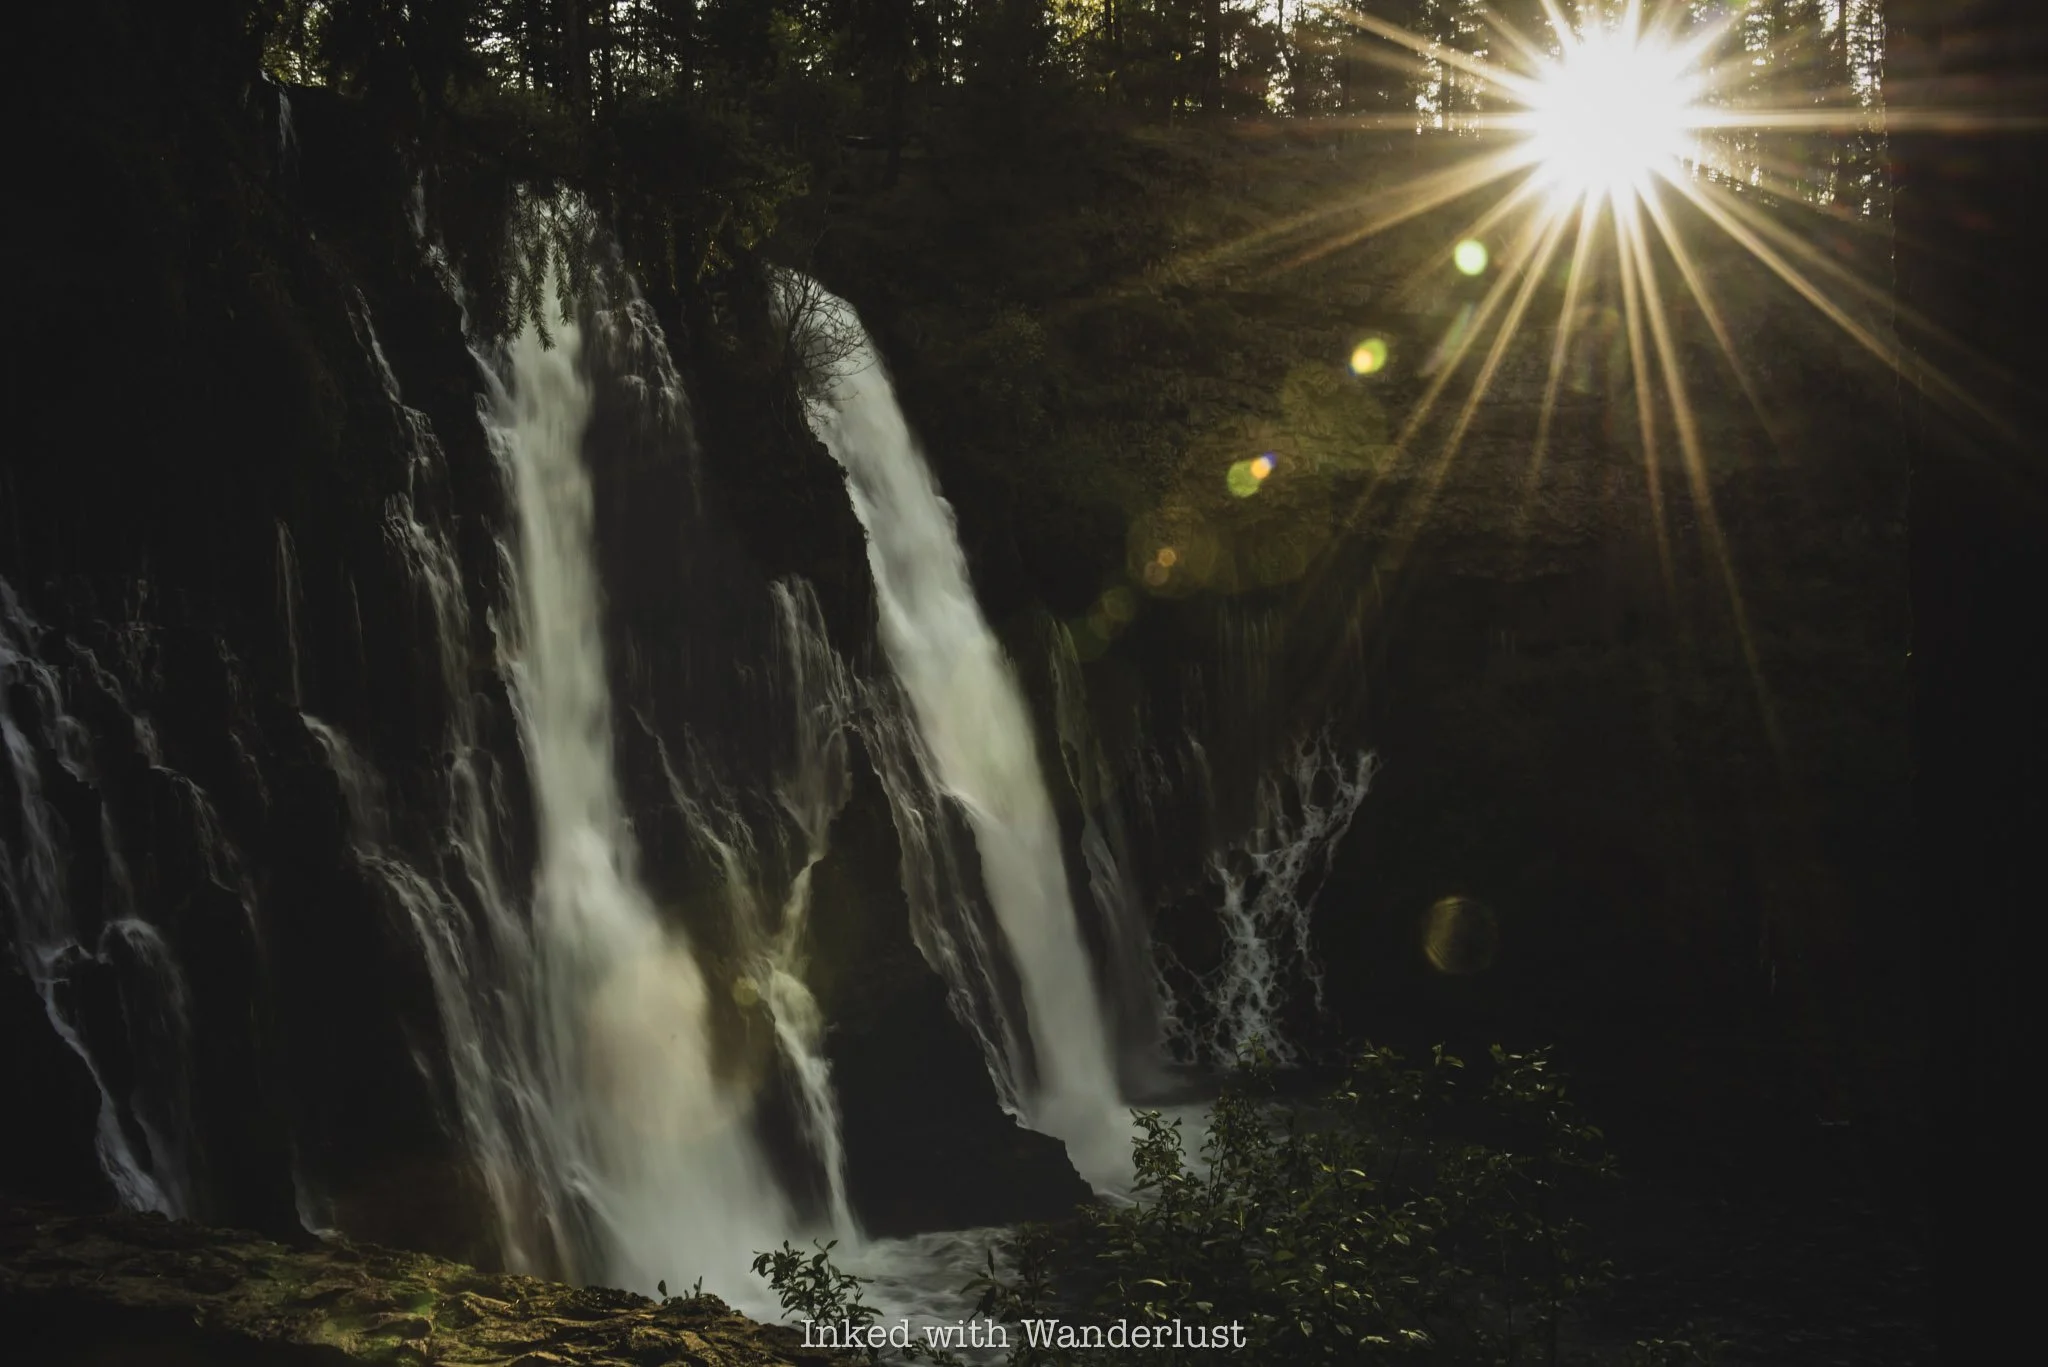
Soon, you’ll begin to hear the sounds of Burney Falls crashing into the pool below it and before long, it’ll come into view. There are many spots along this stretch of the creek to get an excellent side view of the falls. You’ll need to scramble a bit but trust us, it’s worth it.
The Base of Burney Falls

This is the main viewing area of Burney Falls and is where you would’ve ended up had you gone right at the trailhead instead of left. This area is defined by a perimeter made of rocks and is a somewhat small area (considering the crowds this park sees).
For a closer look - or to go for a swim in the pool below the falls - you’ll need to scramble down a rock field. The constant mist from the falls makes most of these rocks very slick. So be sure to watch your footing.

If you’re here on a particularly busy day (pretty much any day during the summer season) expect to find many, many people to be here. It doesn’t take long before that viewing area - and even the rock field - becomes a shoulder-to-shoulder situation.
We’ve never been here during winter, but we feel spring is the best time to go, crowds wise. Our most recent visit was the first week of May, 2022, and we practically had the falls all to ourselves. A few people came and went but that was it.

Once you’ve gotten your fill of the views, continue on the trail by heading up the paved switchbacks back to the rim (where you first began). Along the way, you’ll encounter several interpretive signs detailing the development and history of Burney Falls and the area.

It may be a persistent climb back to the rim but fret not, it isn’t that bad. The switchbacks are gentle and towards the end, there’s a couple sets of stairs to help with the final push.
Once you’re back at the rim and satisfied with your visit to the park, simply cross the road to get back to the parking lot. Or better yet, stop by the visitor center before leaving. They have many interesting/informative exhibits.

Which Direction Should You Go?
That’s entirely up to you, but we wrote this trail guide in the clockwise direction as that was the direction we went and feel it’s the way to go. The reason is because of the epic payoff at the end (Burney Falls).
However, there’s nothing that says you can’t go counter-clockwise. If you do, you’ll arrive at the falls after just a third-of-a-mile. To continue past that, head down the paved trail along the creek.
When you reach Rainbow Bridge, simply cross it and head up the dirt switchbacks and onward to Fisherman’s Bridge. There’s no right or wrong. Either direction will provide the same great views and experience.
*Tip: Be sure to read our comprehensive guide about Burney Falls State Park. It’ll help you plan your visit with information on weather, camping, amenities, directions and more!

Your Thoughts…
Does this sound a trail you and your family would enjoy hiking together? Have you been to Burney Falls or have you been dying to go? Tell us about it in the comments below. We love love hearing from our readers!
Please support our website by sharing it with your family and friends.
Thank you for reading.

Hedge Creek Falls: A Short Hike To An Incredible Waterfall
While not a grand sight or a long hike deep into the wilderness, Hedge Creek Falls still packs a punch as a highly scenic…
3 minute read | Contains affiliate links
While not a grand sight or a long, deep hike into the wilderness, Hedge Creek Falls still packs a punch as a highly scenic, simple trail terminating at the 35-foot waterfall spilling over a hanging wall of basalt.
The trail’s unique feature, aside from the waterfall itself, gives hikers the rare chance of going behind the waterfall via a large cleft in the rock.
Hedge Creek Falls is perfect for families with small children, pets, or anyone who happens to be driving by and wants to stretch their legs. Both the parking lot and trailhead are conveniently located right off Interstate-5.
In this guide, we’ll cover everything you’ll need or want to know about hiking to Hedge Creek Falls. Let’s get into it.

Quick Stats
Location: Dunsmuir, CA
Fee/Permit: None
Open: All year
For: Hikers
Parking: Small dirt lot across the street from the trailhead
Restroom: Port-O-Potty in the parking lot
EV Stations: None
Drone Use: No signs stating you can’t
Difficulty: Easy
Popularity: Moderate
Time: Less than an hour
Milage: 0.7-miles, out and back
Elevation Gain: 200 feet
Trail Condition: Well maintained
Main Feature(s): 35 foot waterfall, views of Mount Shasta, and views of the Sacramento River
Pets: Allowed on leash
Special Notes/Hazards: Vehicle break-ins are common in the trail’s parking lot
Our Visit(s): May 2022
*Please practice leave no trace principles and keep to the trail

Trailhead and Parking
The Hedge Creek Falls trail is probably one of the easiest trailheads on earth to find. Both it and the parking lot are located directly off Interstate-5 on Dunsmuir Ave.
Whether you’re traveling south or north on I-5S, you will see signs for Hedge Creek as you get close. From either direction, take exit #732 and go right on Dunsmuir Ave and it’ll be right there.

If you’re coming from Burney Falls, simply travel north on CA-89 for about 56-miles before jumping on Interstate-5 south for a short time. From there, follow the same directions above.
The parking lot is of the dirt variety and small. It fills rather quickly in the summer so the sooner you can arrive, the better. To find the trailhead, simply cross the street.

The Trail
The trail begins just past the water fountain on the left. It’s a well maintained, packed dirt trail with very little tripping hazards (rocks, branches, etc).
You’ll descend down to the falls under the cover of trees, providing plenty of shade even on the sunniest of days. After just a few minutes, you’ll take note of the sounds of Hedge Creek.

After just ten minutes or so, you’ll arrive at the waterfall. The time of year you’re visiting will determine how heavy the flow is. We were here in May and it wasn’t flowing very heavily.
As you approach the falls, the trail temporarily gets rockier (and slick during the winter) due to how close you’re able to get to both the falls and the creek.


Here, you’ll have the rare opportunity to walk directly behind a waterfall. There’s a large cleft cut into the columnar basalt wall for you to walk through.
You’ll also take notice of the dozens of handprints all over the walls of the hanging rock. These were left by visitors who used the mud in the cleft to leave those prints.


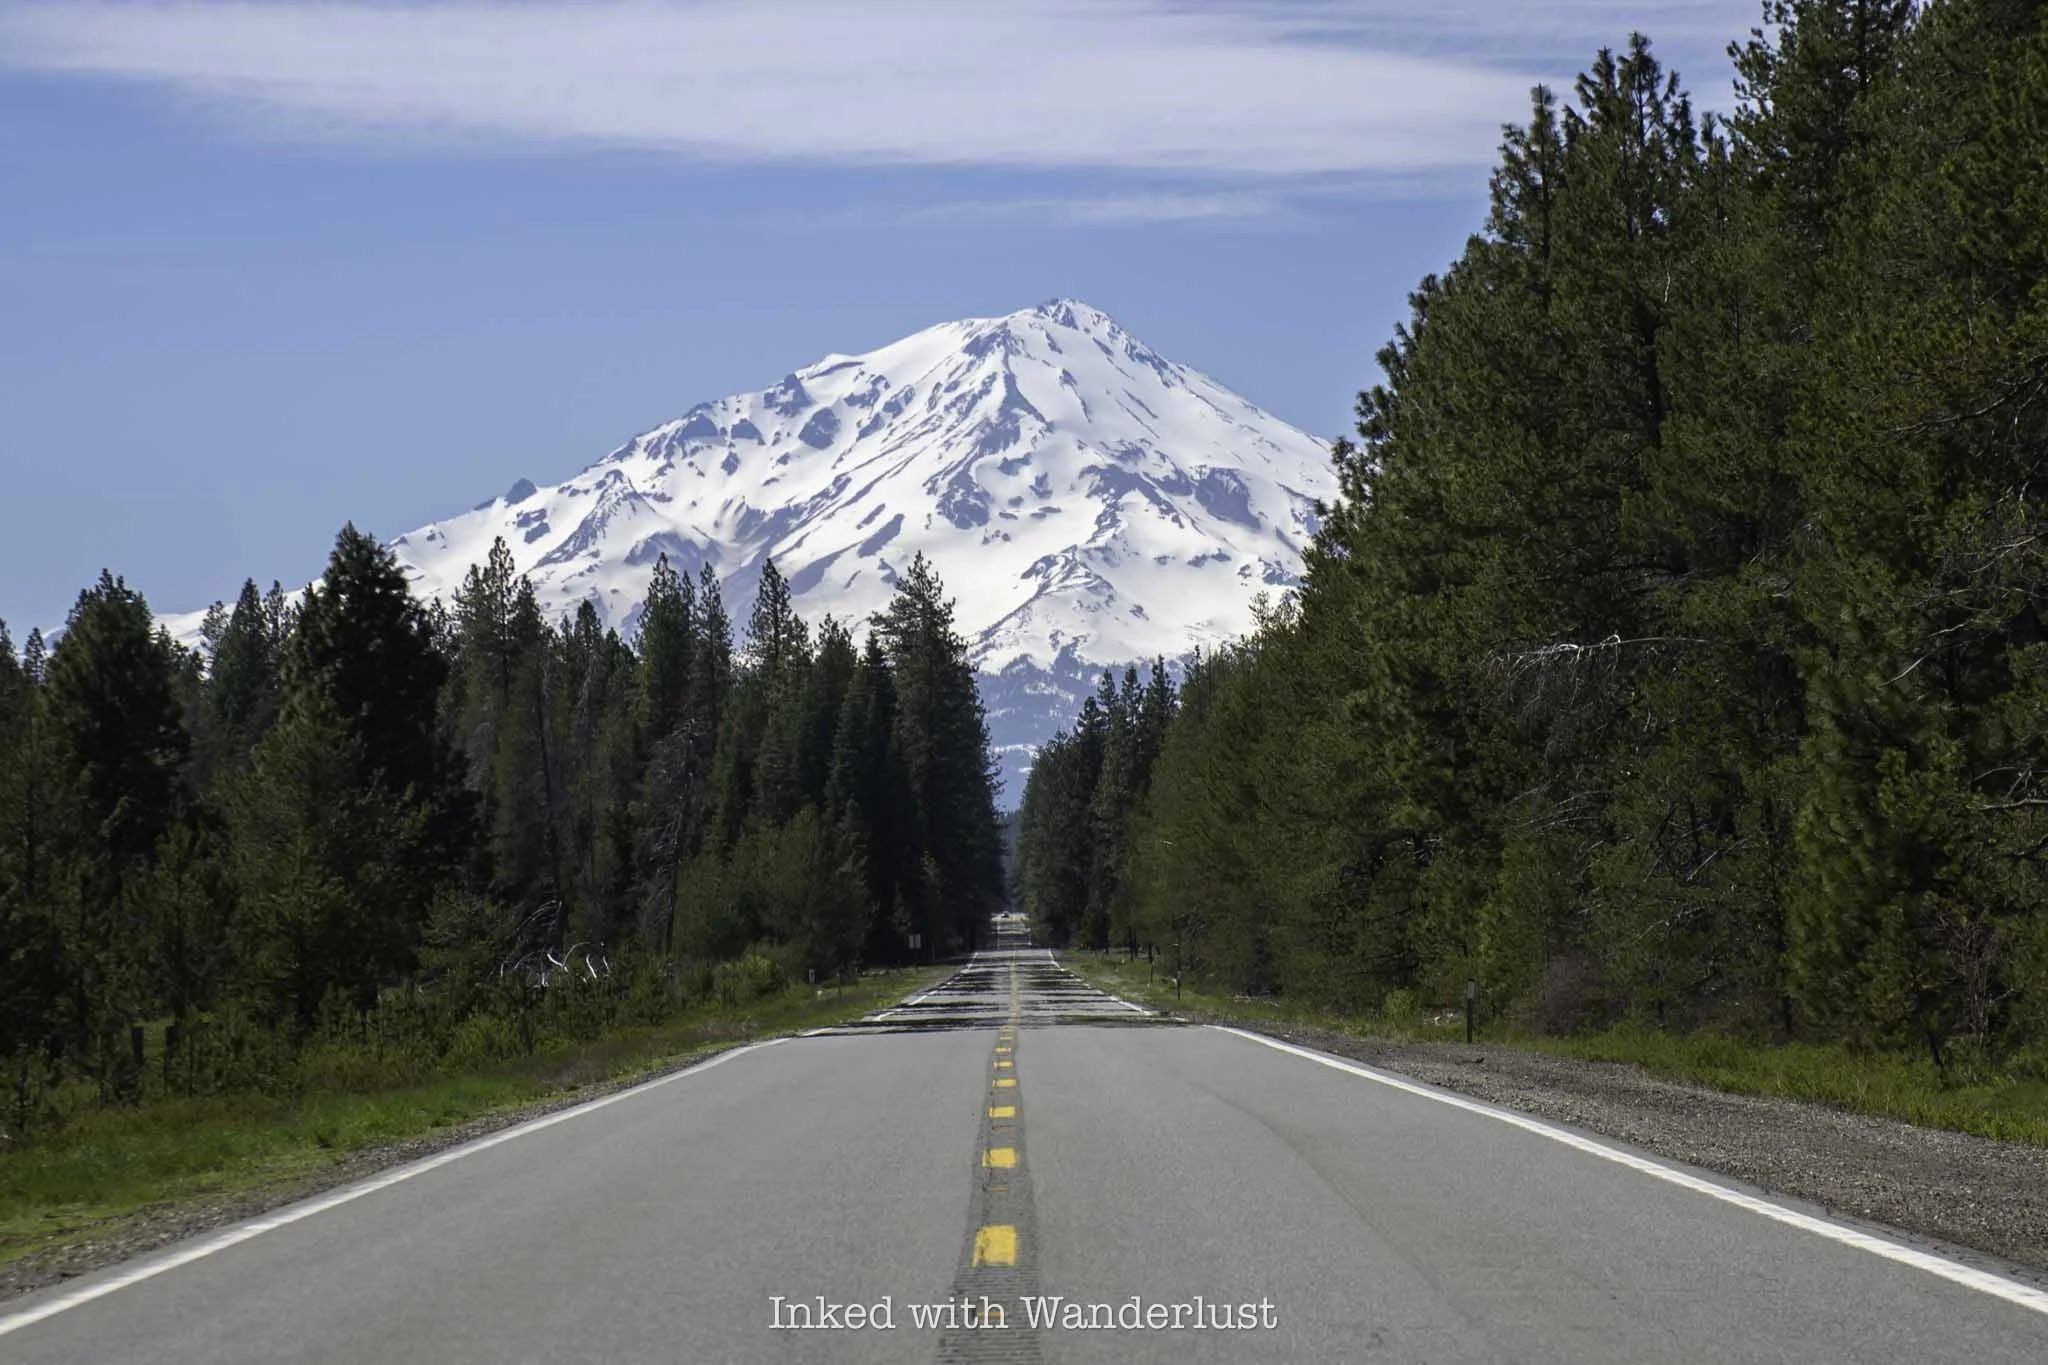
From here, the trail continues for another tenth of a mile to a spectacular view of the Sacramento River and an ‘ok’ view of the summit of Mount Shasta (the rest is obstructed by trees).

Onward to Mossbrea Falls
Now, there’s (almost) nowhere left to go. Most will simply turn around and go back their car. Others could cross the river (if it’s safe) and continue on to an even more beautiful waterfall, “Mossbrea Falls”.
Currently, there’s only an unofficial trail to Mossbrea that requires hikers to commit the crime of trespassing on more than one occasion. So the only other way is to cross the river.
The Mount Shasta Trail Association has been making efforts to finally construct an official trail. Essentially, the plan is to connect Mossbrea Falls to the Hedge Creek Falls trail via a bridge over the river.

Unfortunately, there hasn’t been much progress as the last update given by the MSTA was back in July of 2020. If you want to keep tabs on this project, go here.
Hopefully this project will pick up steam soon because Mossbrea Falls is amazing and it’s criminal that it can’t be accessed without risking a misdemeanor charge.
Have you been to Hedge Creek Falls? Or are you a local and have heard any rumors about the trail to Mossbrea or what the hold up’s about? Lets us know about it in the comments below!
Please support our website by sharing this article with your family and friends.
Thanks for reading.
McCloud River Falls: Three Fantastic Waterfalls in One Hike
Just a short distance between two popular Northern California towns; Burney and Dunsmuir, McCloud Falls is a series of three…
Disclosure: This post contains affiliate links. If you make a purchase through these links, I may earn a small commission at no additional cost to you. I only recommend products or services that I believe will add value to my readers.

Just a short distance between two popular Northern California towns; Burney and Dunsmuir, McCloud Falls is a series of three beautiful waterfalls along the McCloud River.
Lower, Middle, and Upper McCloud Falls are easily accessible by foot via a 3.9-mile (out-and-back) hiking trail or by driving to each one via the paved road connecting the three. Additionally, each fall has its own parking lot with picnic tables, signage, restrooms and a campground nearby.
In this guide, we’ll cover a few things you’ll need to know about each of the falls like where to find them, how to access them once you’re there, etc. Let’s get into it.
Quick Stats
Location: McCloud, CA (in between Burney and Dunsmuir)
Fee/Permit: None
Open: Year round, but can be difficult to access in winter
Parking: Large, paved lots at each waterfall
Restroom: Three (one at each waterfall)
EV Stations: None
Drone Use: Allowed (UAV must be registered and follow applicable laws)
Difficulty: Easy by vehicle / Easy to moderate by foot
Popularity: Popular
When: Weekdays and early is best for lower crowds
Time: 2-3 hours
Milage: 3.9 miles, out and back via the trail
Elevation Gain: 337-feet
Trail Condition: Well maintained and easy to follow
Main Feature(s): Three waterfalls of varying heights
Campground: Fowler’s Campground (located near the lower falls)
Pets: Allowed on leash
Special Notes/Hazards: Each waterfall can either be hiked or driven to. No specific dangers aside from usual wilderness hazards.
Our Visit(s): August 2019 & May 2022
Directions To McCloud Falls

If you already happen to be at Burney Falls (or will be), making McCloud Falls part of your itinerary is easy as it’s just under fifty miles away. Even better, if you’re coming from Interstate-5, it’s only thirty(ish) miles away.
McCloud Falls is a well known destination, so simply plugging that into your GPS of choice will get you there without issue. If you’re not a tech person, here’s the simple directions:
From Burney: Go north on Highway 89 for 35-40 miles, then take a left onto Fowler Public Camp road and follow the directions.
From Dunsmuir: Go north on Interstate-5 and take the exit for Highway 89 south. Follow this for about 20-25 miles and take a right onto Fowler Public Camp road.
The road leading to the falls is paved and well maintained. You just need to decide whether you’re going to hike to all three or simply drive.
The falls are handicap accessible and feature viewing decks straight off of the parking lots. For those who wish to, you have the option to walk down to the base of each one for a closer look.
Because we stopped here between our visits to Dunsmuir and Burney, we decided to drive to each waterfall and walk down to their bases to save time. While I recommend hiking the trail connecting the three, you can save a significant amount of time by doing what we did.
Lower McCloud Falls

The lower falls is a great place to begin your visit. The parking lot is paved and decently large. The viewing deck is just off the parking lot, past the restrooms.
If you’re able, I highly recommend going down the stone steps to get a closer view of this 15-foot waterfall. These stone steps is also where the official beginning (or end) of the hiking trail is. I have seen pictures of people swimming in the emerald green plunge pool, so I assume it’s allowed.
In fact, while you’re there, look for metal hooks embedded into the rock. According to a local I spoke with, those are the remains of what used to be a ladder swimmers used to climb out.
From here, you can either start hiking up the trail to the middle falls or head back to your car and drive up. If you drive, simply take a right up the road and look out of the waterfall sign.
Middle McCloud Falls

The middle falls was our favorite and arguably the most impressive of the three. If you only have time for one, I recommend this one. If you’re hiking here from the lower falls, the trail will take you straight to the base. If you drive, you’ll need to hike down or simply view it from above.
To get to the base, you’ll need to hike the short, quarter-mile(ish) trail to the bottom. It’s easy to miss and there isn’t any signage indicating where to go (at least none that we saw). What you’ll look out for is a dirt path, lined with rocks, spurring off to the right from the paved one going to the viewing deck.
The trail consists of packed dirt and while a bit rocky in some spots, overall it’s a well-maintained, easy to-follow trail. You’ll take a short series of graded switchbacks before reaching the bottom.

When the trail flattens out at the bottom, keep left to the falls and you’ll eventually reach a rest area. Between you and the falls is a boulder field that you’ll need to scramble over if you want a closer view. The pool in front of the falls is perfect for swimming and while we don’t how deep it is, we have seen videos of people cliff jumping into it, indicating it’s decently deep.
Out of the three, the middle fall is where we spent the majority of our time. I wrote an extensive post highlighting the middle falls and its trail if you’d like to read more about it.
Upper McCloud Falls

The upper falls is the one with second tallest plunge at 30-feet. Similar to the lower fall, it’s narrow and dumps into a small pool but unlike the lower fall, it’s carved out an opening between the basalt rock walls, rather than just spilling over it.
There’s a plethora of viewing space up top but unfortunately, none of them provided an impressive view of the waterfall (in my opinion, anyway). To get a better view, you’ll need to rough it a bit.
Just past the last viewing deck, where the dirt trail begins, you’ll see a spur trail on your left going straight down to the waterline. Watch your footing and take your time. It’s short, but steep with nothing but loose dirt and rocks. Taking a spill here wouldn’t feel good.
There isn’t a lot of space at the water’s edge. Most of it consists of awkwardly spaced boulders that you’ll need to sit or stand on to view the waterfall.
When you’re done, head back up and go a little further upstream to see the cascades feeding the waterfall or read about the development of these falls on the informational signs near the trailhead.
Hike or Drive?

That all depends on personal preference, physical limitations, how much time you have, etc. Both have their advantages and disadvantages.
Hiking the trail: You’ll need to ensure you have the proper equipment with you such as trekking poles (see my recommendation here), hiking boots/shoes, water, sun protection, etc. Each waterfall is less than one mile from the next and the only real “challenging” part is the uphill slog out of the middle fall. Aside from that, it’s a fairly simple trail.
Driving to each fall: For those short on time or with physical limitations, this would be the best option. Each fall has its own parking lot and all of the upper viewing decks are wheelchair accessible. If you’re able, you can still get a close view of each waterfall (which is really the main point, anyway).
As far as where to start, that’s also your personal preference. If you’re hiking with a group with multiple vehicles, our recommendation would be to leave a vehicle at the lower fall, take another up to the upper fall, and start the hike there.
This strategy is two-fold as:
You’re hiking down to the lower falls, bypassing having to work your way up and out of the middle falls.
Saves you time by cutting the hike in half.
If you’re driving, it doesn’t really matter where you start. If you only have time for one waterfall, we recommend the middle falls as it’s the largest, most scenic/photogenic, and has the best swimming hole.
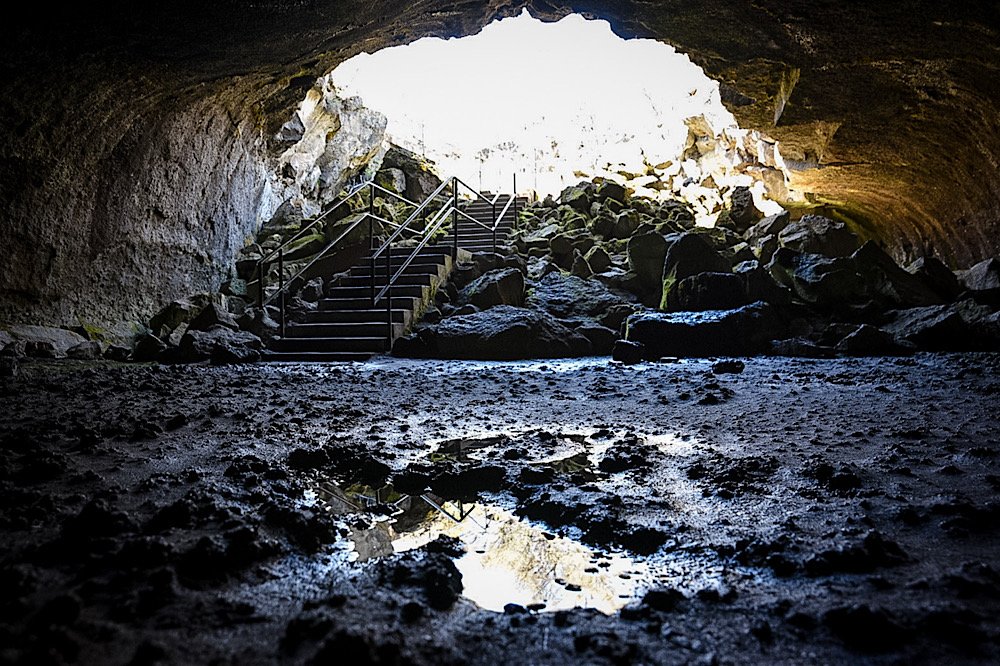
Subway Cave: Explore An Awesome Lava Tube Near Burney Falls
Subway Cave, located just a small distance from the town of Lassen Volcanic National Park, is the largest and most easily accessible lava…
5 minute read | Contains affiliate links
Subway Cave, located just a short distance from Lassen Volcanic National Park, is the largest and most easily accessible lava tube in the world.
The access road is right off of highway 44 and the cave itself is a short, five-minute walk from its decently sized parking lot.
If you’ve ever wanted to explore a cave but you don’t feel like crawling through tight spaces, Subway Cave is perfect for you as it’s large and wide open.
So how do you get there? What’s the inside of the cave like? We answer these questions and much more below!

Quick Stats
Location: Near Old Station, California
Red Tape: None
Open: Seasonal. May through October
For: Hikers/Explorers
Parking: Fairly large, paved lot
Restroom: Yes. At the trailhead
EV Stations: None
Drone Use: Not allowed
Difficulty: Easy
Time: One hour or more
Milage: 1/3 of a mile
Trail Condition: Well maintained outside the cave. Inside the cave is “as-is”. Rough floor, but no extreme hazards
Main Feature(s): Lava Tube
Pets: Not allowed
Special Notes/Hazards: You’ll need to bring a flashlight as its pitch black in the cave. You’ll also need a light jacket or sweater as the cave hovers at around 46 degrees.
Our Visit(s): May 2022

Getting To Subway Cave
Getting to Subway Cave is simple and straight forward. Especially if you happen to already be in the area or will be driving through.
Since it doesn’t take very long to explore, it makes for an excellent roadside stop to get out and stretch your legs for an hour or so.
From Reno
Take highway 395 north for about ninety miles
Go right on CA-44 west for forty-six miles
Turn right on CA-89 north
About a third of a mile after turning on CA-89, you’ll see a sign for Subway Cave. Turn right onto the road
Total drive time is about two hours and twenty minutes
From Redding
Take CA-44 east for fifty-seven miles
Continue onto CA-89 north for about a third of a mile
When you see the large sign for Subway Cave, turn right.
Total drive time is just over an hour
From Burney Falls State Park
Take a right out of the park onto CA-89 south for twenty-eight miles
Total drive time is about thirty minutes
Parking at Subway Cave

After turning onto the road from the highway, it’s a short drive to the parking lot. The lot itself is fairly large, bring able to accommodate at least a few dozen vehicles.
There’s no guesswork involved as the road eventually terminates at the lot. You won’t have to worry about money as both parking and entering the cave are free.
At the trailhead you’ll find a few interpretive signs detailing the formation and history of the cave, along with the area as whole.
Subway Cave Lava Tube

As stated above, it’s only a five-minute walk from the trailhead to the entrance of the cave. You’ll start down a paved path before hitting a set of stairwells.
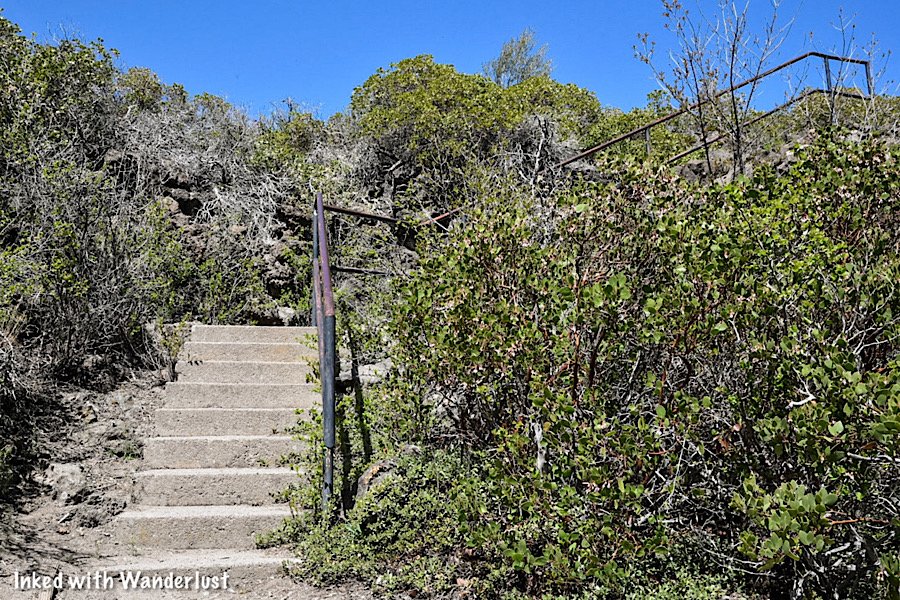
At the top of the stairwell, you’ll continue on a dirt path for a short distance before arriving at the mouth of the cave dubbed; Devil’s Doorway.
Devil’s Doorway

The entrance to Subway Cave will be on your right and down a couple sets of stairwells. Around you, you’ll notice debris from the cave collapse that formed the 25-30-foot across entrance.
As soon as you reach the cave floor, you’ll immediately notice the temperature change. It could be one hundred degrees at the surface, but the cave remains at a cool forty-six.

The other element of the cave you’ll immediately take notice of is how dark it is. It won’t take long before you’ll be unable to see your own hand in front of your face.
*There are NO natural or artificial light sources in Subway Cave!
Due to this, be sure to bring a flashlight or headlamp with a minimum of 500 lumens to safely navigate the cave. The light on your cell phone will not cut it.

The image above is deceitful as its isn’t representative of the actual lighting conditions in the cave. This was a camera trick to enable us to show you details of the cave walls and its shape.
The image below is a more accurate depiction of how dark the cave really is. The flashlight we had was one we just picked up at Target on the way in. It wasn’t great as you can see.

While easy to navigate, you should know that the cave floor can be slick in some spots, along with being jagged and uneven throughout its entirety.
So much so, that the first stretch of the tube you’ll walk through is dubbed, Stubtoe Hall. Just aim your light to the floor while walking and you’ll be fine.
Lucifer’s Cul-De-Sac

You’ll eventually reach what seems like a split. A choice to go either left or right. Keep in mind that there is only one entrance and exit.
We recommend going left first, as this will take you to a room called, Lucifer’s Cul-De-Sac. You’ll start out with six-foot ceilings before reaching the room with a fifteen-foot high ceiling.
The trail dead-ends here so once you’re finished exploring it, head back the same way to came and go right at the split to continue.
At this point, you’re at about the halfway mark of the cave. There are small signs dotted along the cave floor that help you determine where you are.
The Sanctum

You’ll come to an even larger room called, The Sanctum. It has a high ceiling before reaching a point where, depending on your height, you may need to duck to get through.
Take this opportunity to check out the ceiling and walls around you. They’re covered in these popcorn looking formations called, Speleothems, or “Lavacicles”.

These formations develop when water passes through the soil above the limestone, absorbing carbon dioxide. It then becomes acidic and cools.
You’ll eventually reach a rubble pile on your right and soon after this, you’ll see the exit up ahead (Rattlesnake Collapse). Much like the entrance, a stairwell leads you up to the surface.

That’s it. As stated, Subway Cave isn’t very big and doesn’t take long to explore. Many people discover that its over before they know it.
After reaching the top of the stairwell, turn around (facing the cave exit) and take the trail to the left of the cave. This will take you back to the parking lot.
If you want to spend more time in the cave, there isn’t anything that says you can’t go back through to the other side. It’s totally up to you.
A quick note…
We’re often asked about the equipment we use to capture the photos on our website. Below, we’ve added Amazon links to those products and others that we recommend.
If you decide to purchase, Amazon will pay us a small commission. This helps us keep Inked with Wanderlust running and doesn’t cost you anything extra.
“Understanding Exposure” by Bryan Peterson (this book is a great resource for anyone starting out in photography)
Conclusion
It is our hope that this article was helpful to you in planning your next adventure. If so, please share it with your family and friends on Facebook or Pinterest.
You can further show support by subscribing to our newsletter below. In it, you’ll receive a once weekly newsletter containing announcements, new post alerts, news, and more!
If you have any questions, comments, or suggestions, please engage with us in the comment section below.
Thanks for reading and safe travels!