
The Complete Guide to Muir Woods: Trails, Reservations, and More
Muir Woods National Monument is one of the most popular attractions in the Bay Area, bringing in hundreds of thousands of visitors annually…
Muir Woods National Monument is one of the most popular attractions in the Bay Area, bringing in hundreds of thousands of visitors annually. A trip to the area just wouldn’t be complete without a visit.
Enacted as a National Monument by Theodore Rosevelt in 1908, Muir Woods is 554 acres of tranquility. These giant coastal redwoods have an average age of 600-800 years old. The oldest clocking in at a whopping 1200 years!
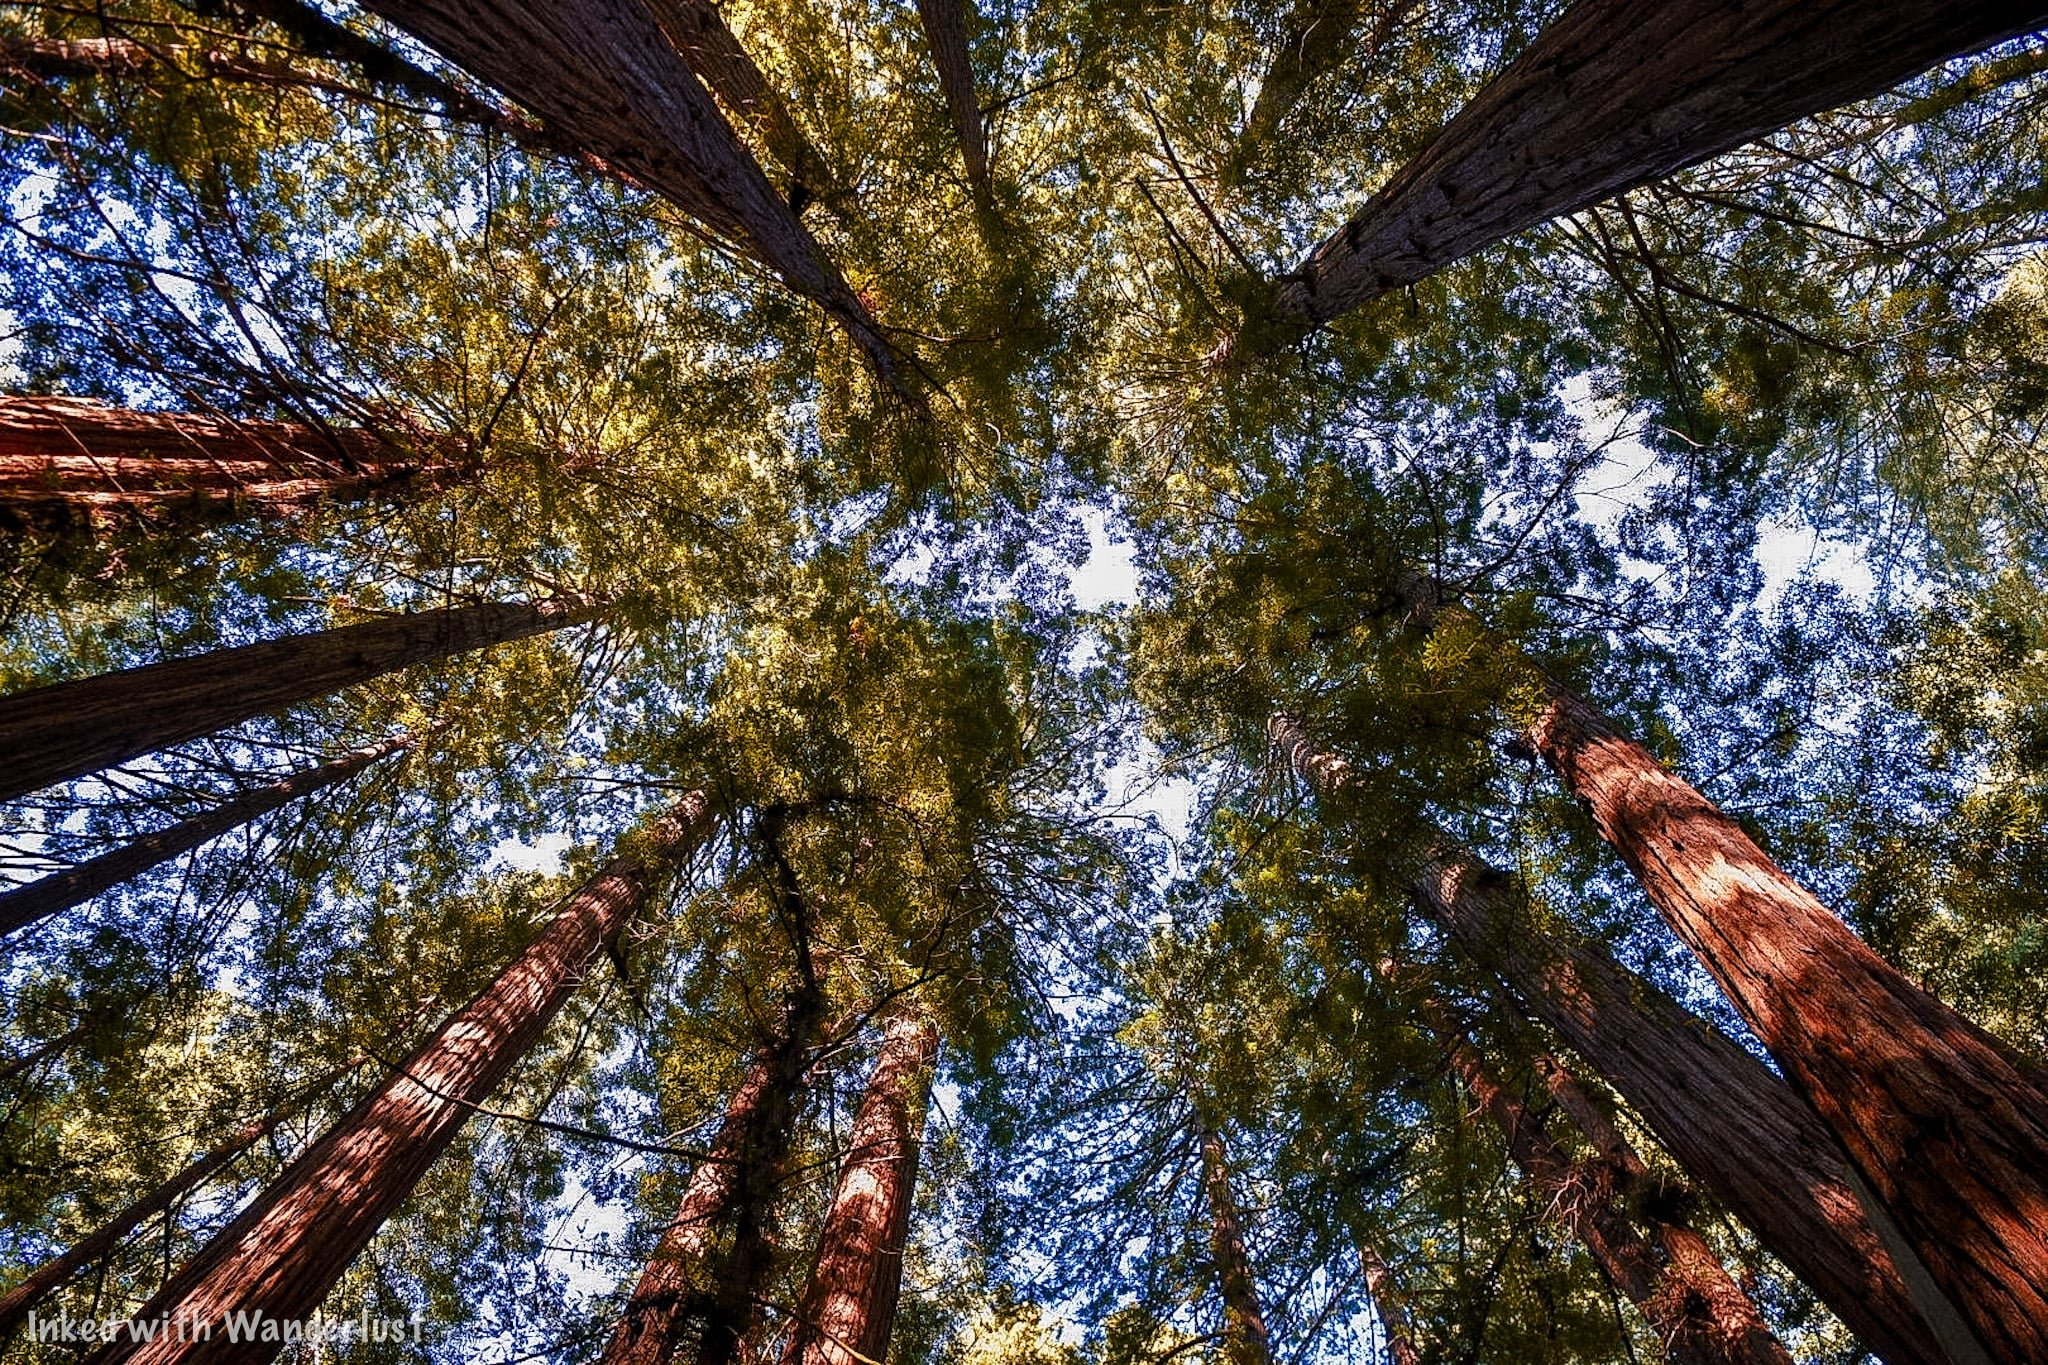
Your first time walking amongst these ancient giants is a magical experience. Many of the trees in the monument are north of 200-feet tall and will undoubtedly leave you in awe as you gaze upon them.
While we encourage anyone and everyone to visit this amazing place, there are certain things you need to know and do before going to ensure a successful visit. Let’s get into it!
Visitor Information
Parking Reservations
If you want to visit Muir Woods, before you do anything else, you need to check the park calendar and ensure there is an available parking reservation for the day(s) you want to go.
Reservations are required no matter the day or time of year. Parking lots at the monument are not large and parking isn’t allowed on the sides of the road. So this is needed in order to mitigate over-crowding.
How To Make a Reservation
To make a parking reservation, follow the steps below:
Go to this website
Click/Tap the reservation button and select the day you want.
You’ll then select your vehicle type.
Select your arrival time window (Arrival times are in 30-minute intervals).
You’ll then be given the option to pay for your park admission fees ahead of time (This fee is in addition to your reservation fee).
Now you’ll enter your information and payment method.
You’ll be emailed a QR code that will contain your reservation and admission fees (if you opted to pre-pay). Be sure to screen shot this and save it. When you arrive, pull it up on your phone and the parking attendant will scan it.
You should also print it out a hard copy in case your phone dies.
Parking Reservation Fees
The following is a list of parking fees for your type of vehicle. These fees are mandatory and are paid at the time you make your reservation:
Standard Vehicle - $9.00
Handicap Accessible - $9.00
Electric Vehicle - $13.00*
Vehicle 17-22 feet - $30
Vehicle 23-35 feet - $45
*The reason EV’s are more is because it includes charging. If you think you’ll be fine without it, just opt for the standard vehicle price. If you’re driving a Tesla, remember to bring your J1772 adaptor.

Shuttle
If you’re visiting on a weekend or holiday, the shuttle is another option. You’ll park at an offsite location at Pohono Park & Ride and take the 30-minute ride in.
If you go with this option, you will NOT need to make a parking reservation. Though you WILL need to select a 30-minute window of arrival at the Pohono lot.
The address for Pohono Park & Ride is as follows:
100 Shoreline Highway, Mill Valley, CA 94941
Fees for the shuttle are:
$3.50 (per person 16 years and up)
Free (persons under 15 years)
The shuttles are ADA accessible with each one able to accommodate two wheelchairs. When making your reservation, be sure to select this option to ensure a spot.

Is Ride-Sharing an Option?
The short answer? Yes and no. You could get an Uber to take you into the monument but once there, you won’t have cell reception. So getting one to pick you up wouldn’t be possible.
Taking a Taxi would be your best bet if you don’t have your own vehicle or you’re visiting on a weekday. We would advise you to arrange a pick-up time with the driver or you can call them on the payphone behind the restrooms near the entrance.
Speaking of restrooms, there are two at the park:
As mentioned above, there’s one just before the entrance near the parking lot.
The other is located near the gift shop and cafe.
Beyond the gift shop, there are no other bathrooms in the monument.
Park Entrance Fees
In addition to paying for either the shuttle or a parking reservation, you will need to pay park entrance fees as well (unless you’re a holder of one of the various annual passes).
Muir Woods entrance fees are as follows:
$15.00 (per person ages 16 and up)
Free for persons 15 years and younger.
*Pro Tip: If you’re a family of 3- 4 and everyone is 16 years or older, consider purchasing the Muir Woods Annual Pass. It costs $45 (the total cost of three adults), is good for 12-months, and covers up to four people per visit! Just keep in mind that it will NOT cover parking or shuttle fees.
The easiest and most convenient way to pay for your entrance fee is online while making your shuttle or parking reservation. When you arrive, the attendant will scan your QR code and you’re done.
If you prefer to pay on arrival, you can. Current accepted forms of payment are cash, credit/debit card, or Apple Pay. Just keep in mind that shuttle or parking fees MUST be paid online, in advance.
Directions to Muir Woods

From San Francisco
Most don’t realize just how close Muir Woods is to San Francisco. How close? Only a mere 11-miles from the Golden Gate Bridge! To get there:
Go north on Highway 101 and cross the Golden Gate Bridge
Take the Highway 1 exit to Stinson Beach
Turn left to stay on Highway 1
Turn right on Panoramic Highway
Turn left on Muir Woods road and continue until you reach the parking lot

From the East Bay
Make your way to and get on Highway 101 South
Take the Highway 1 exit to Stinson Beach
Follow steps 3, 4, and 5 above
For GPS purposes, here is the official address for the monument:
1 Muir Woods Road, Mill Valley, CA 94941
Park Hours
Normally (as in, when we don’t have pandemics going on), Muir Woods is open all year long, including on major holidays. However, it is NOT open 24/7. The monument is open to the public:
8:00am to 5:00pm, daily.
The park facility hours vary slightly from normal park hours. They are:
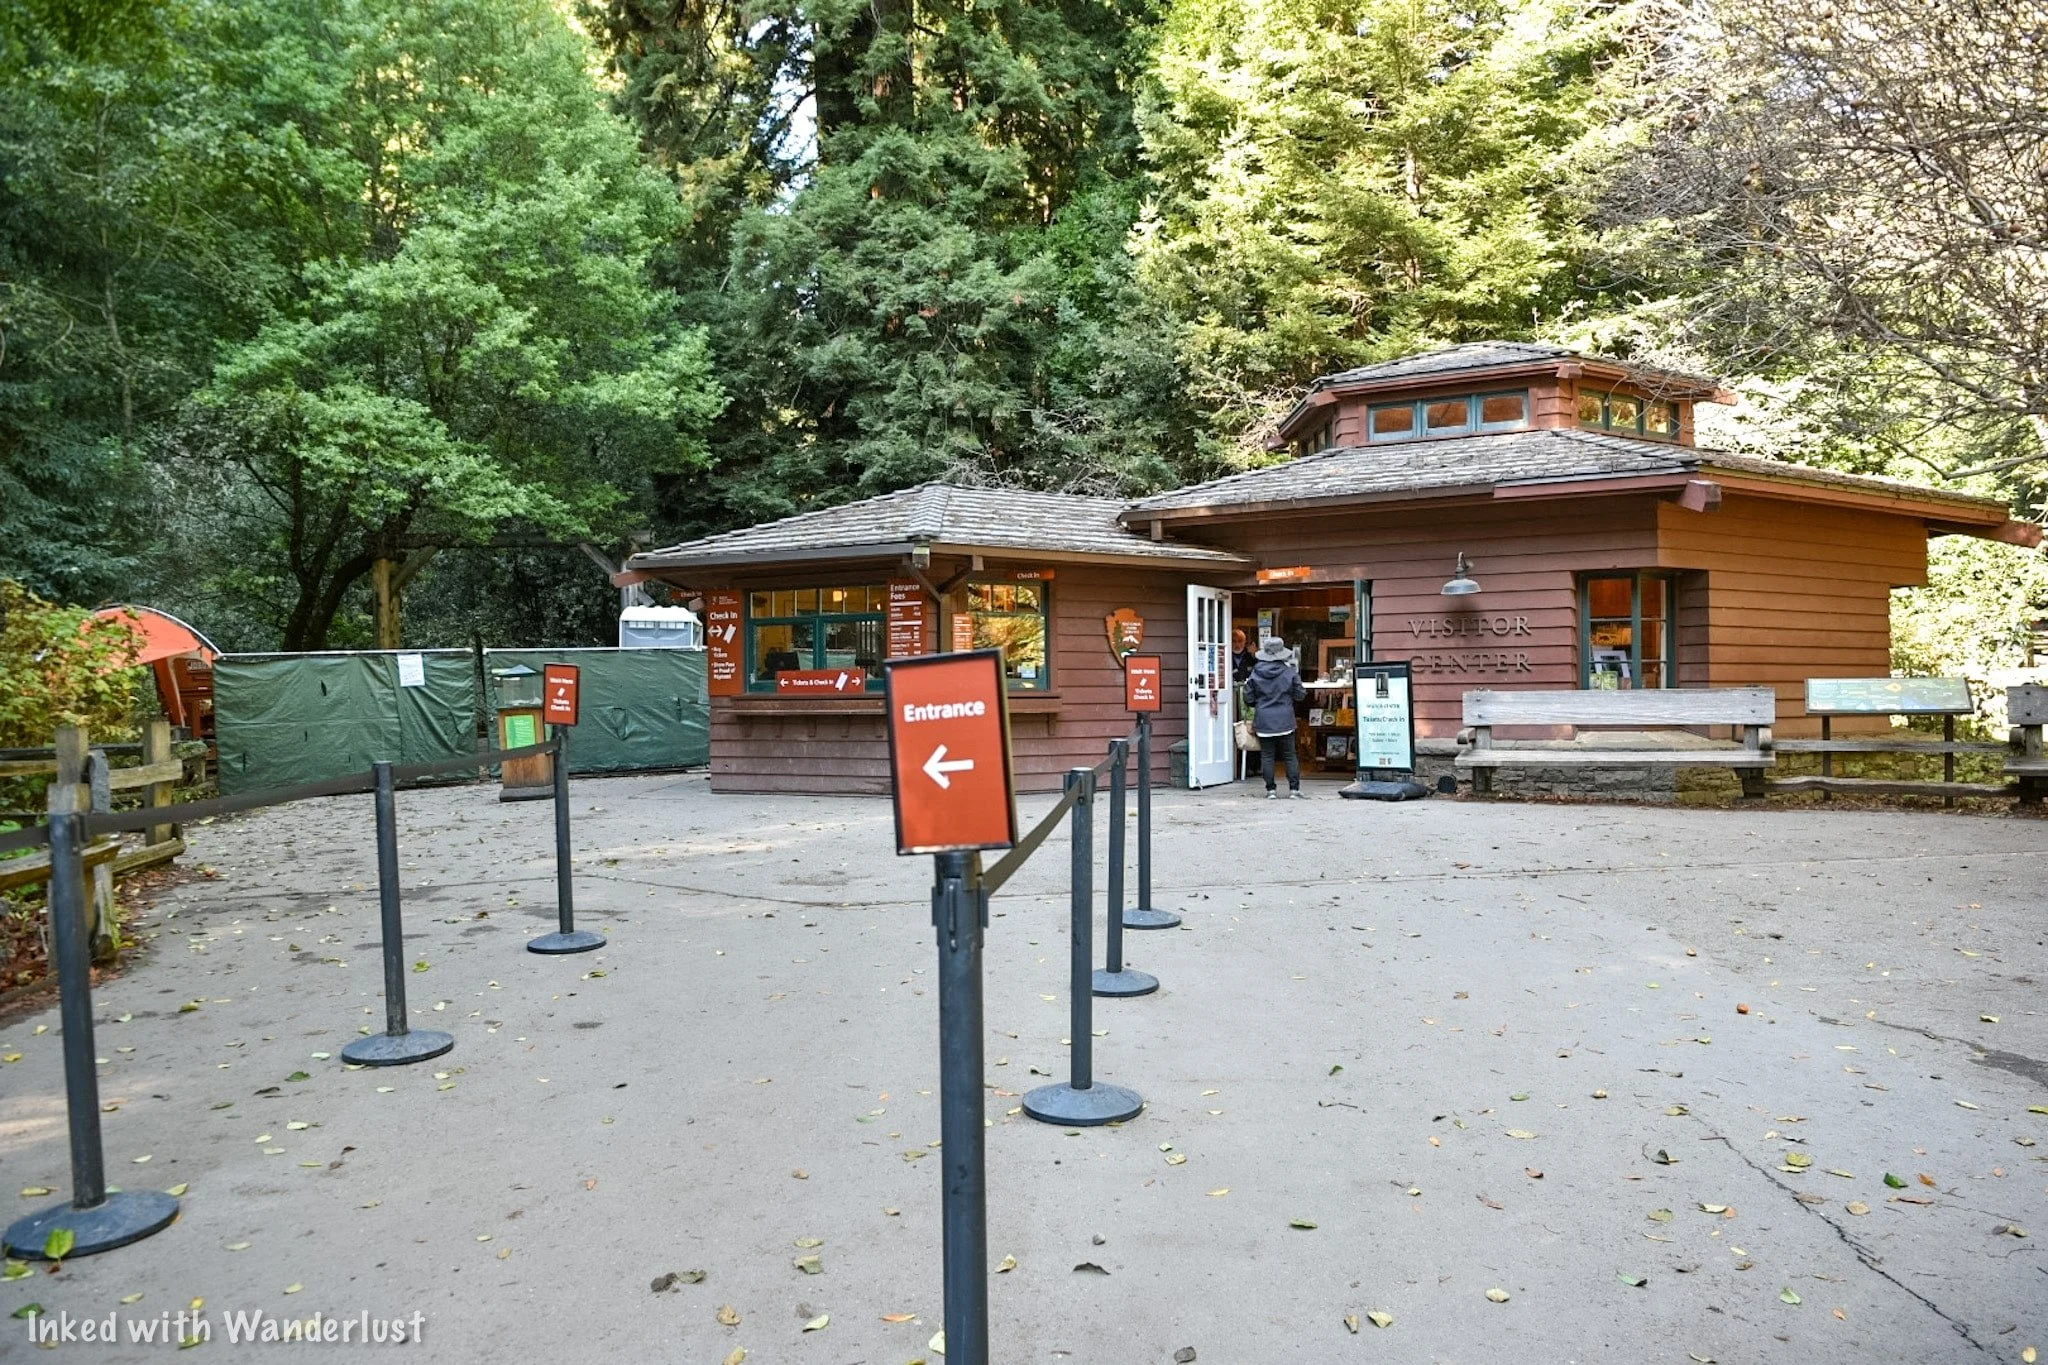
Visitor Center: 8:00am to 4:30pm. This is the building at the entrance to the monument.
Gift Shop: 9:00am - 5:00pm. This building is roughly 50-60 yards or so behind the visitor center.
Cafe: 10:00am - 4:00pm. The cafe is adjacent to the gift shop.
Best Time to Go

Busiest Time
Peak travel months for Muir Woods is May - October. Due to its proximity to San Francisco, it sees heavy visitation during these months. So much so, it can downright miserable.
If you must come during these months, we highly recommend a weekday and arrive as close to opening as possible. It’ll still be crowded, but it’ll at least be slightly easier than the weekend.
Off Season
In our opinion, the best time to visit is between the months of November and April. Yes, it does get cold and yes, it can be rainy, but the park also sees a major reduction in crowds.
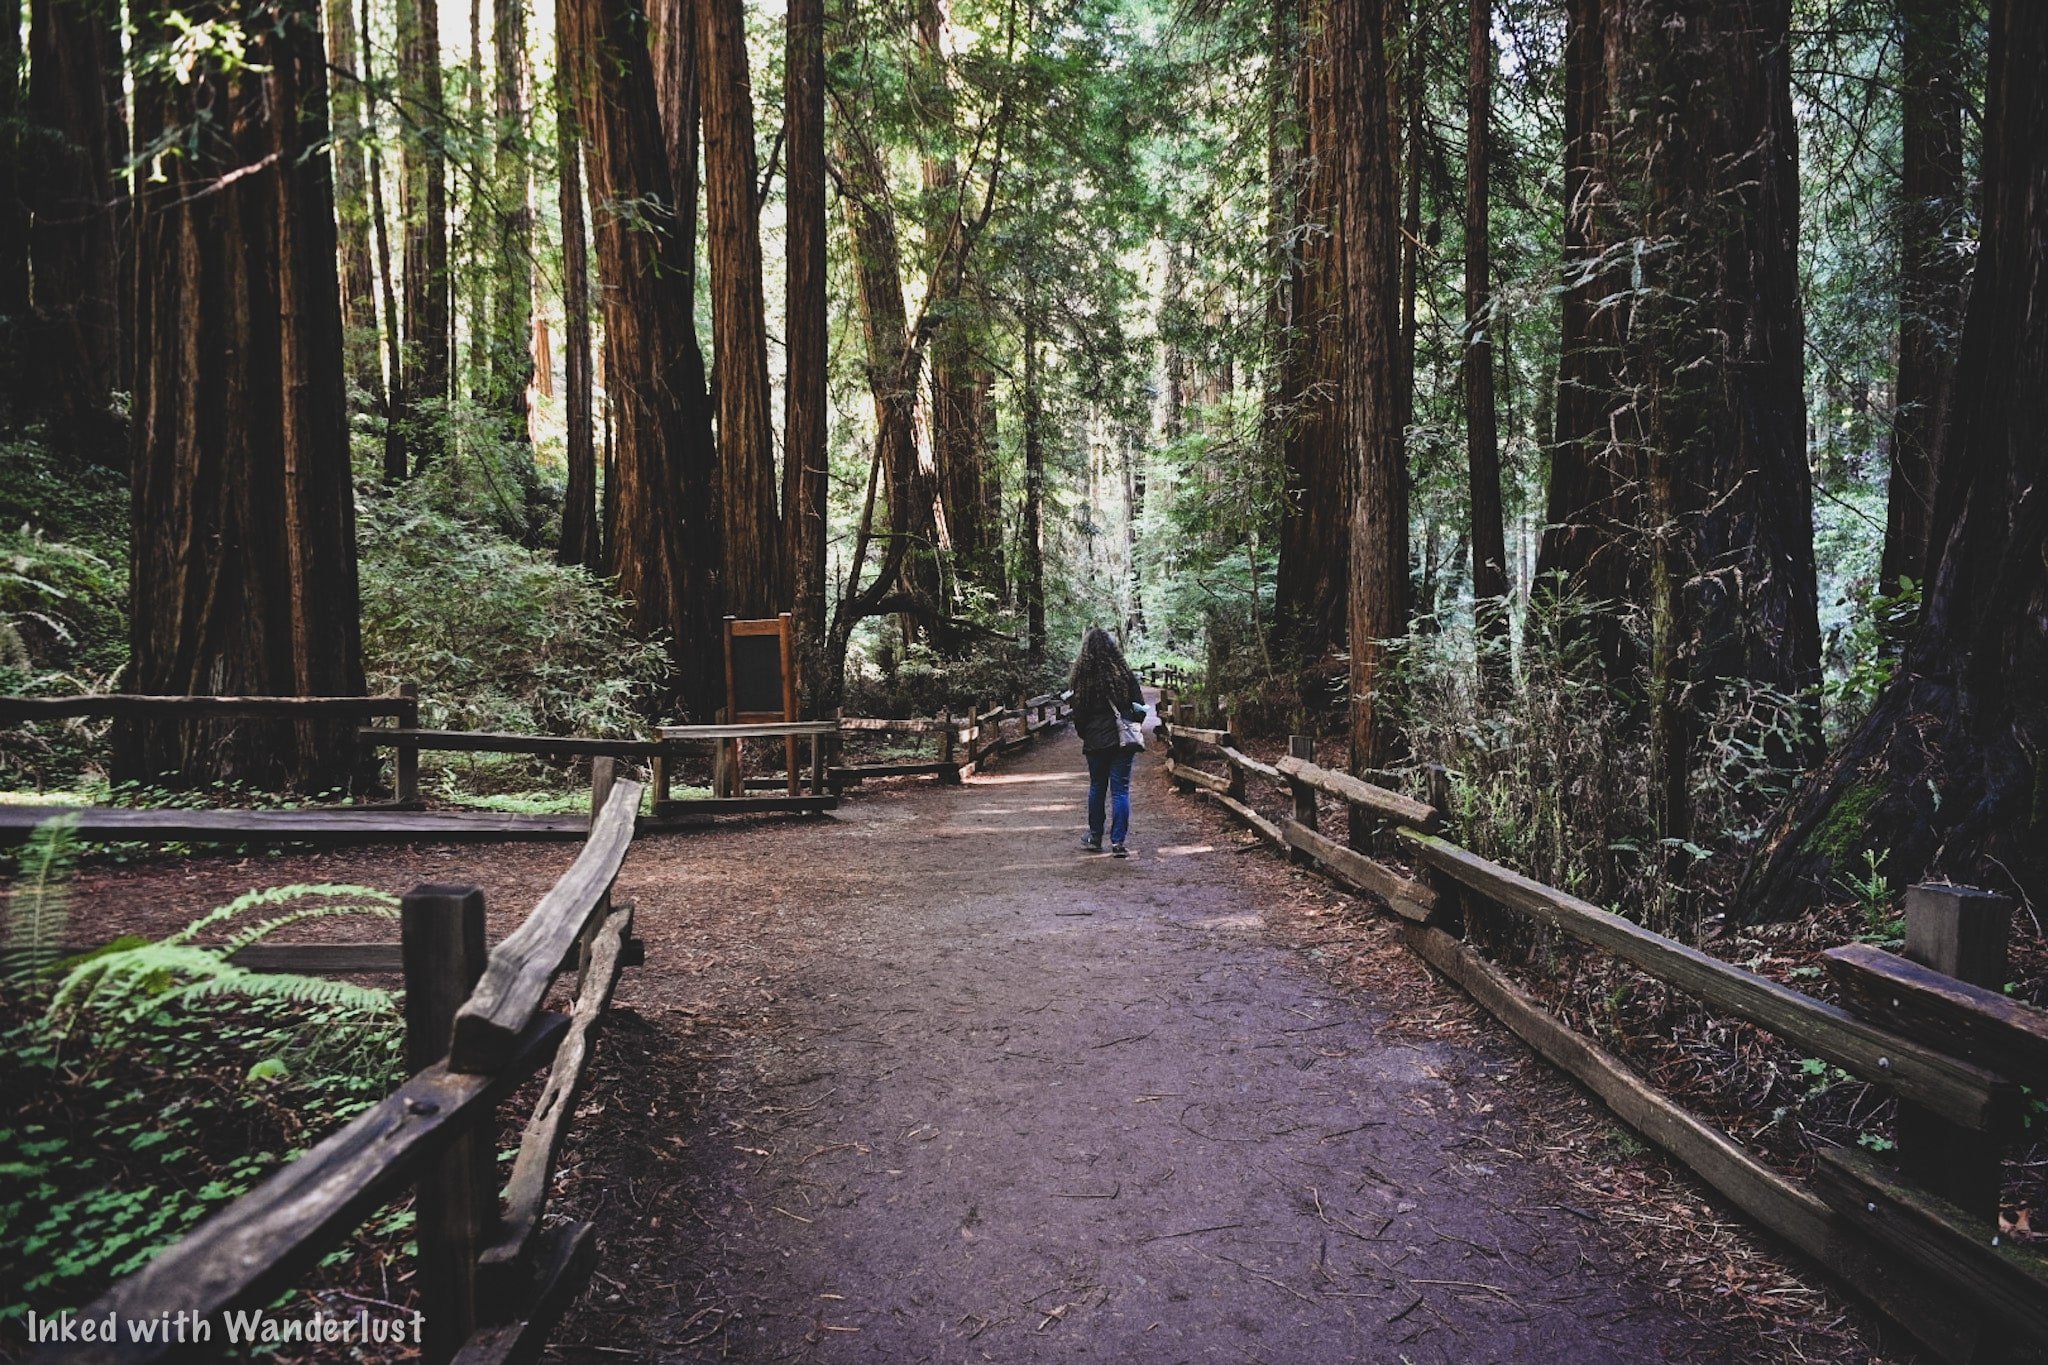
The photos in this post were from our trip in November 2021 and as you can see, the crowds were minimal. If you can help it, we highly advise that you plan your trip for the off season.

Hiking Trails
Within the monument itself, there are 6-miles of trails. There are others that begin in Muir Woods but spur off to other locations such as Muir Beach, Stinson Beach, and neighboring Mount Tamalpias State Park.
All of the park trails begin and end at the visitor center at the entrance of the park. These include:
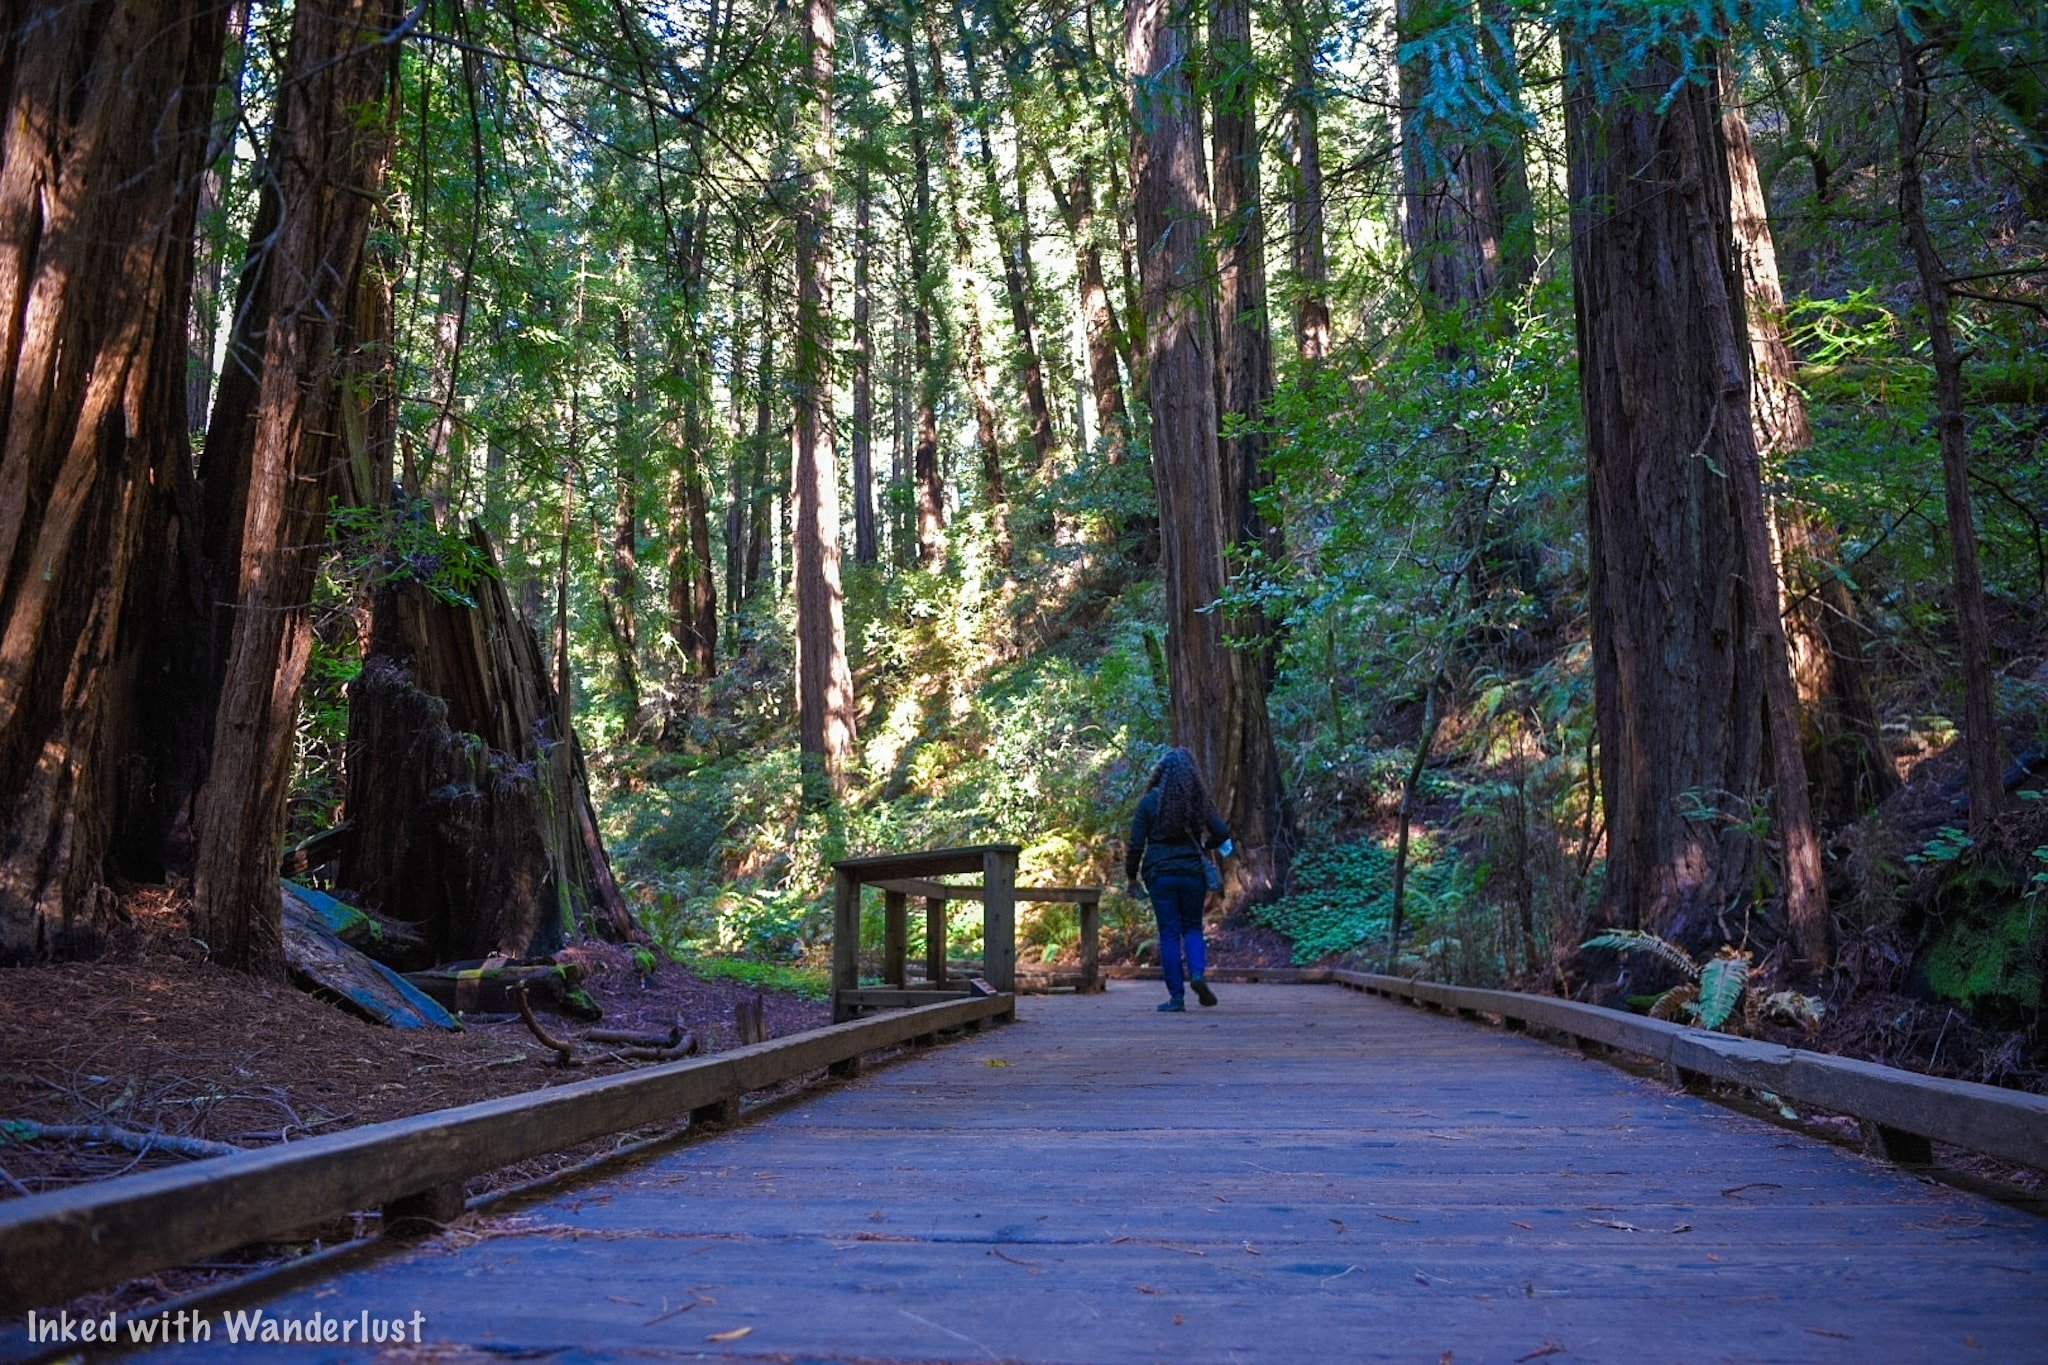
Bridge 2 and back ( .5 miles): This is a short, peaceful walk along Redwood Creek. The boardwalk following this trail is both wheelchair and stroller friendly.
Bridge 3 and back ( 1 mile): This also follows Redwood Creek (on both sides) but extends your excursion into old growth Redwoods.
Bridge 4 and back (1.5 miles): We highly recommend doing this. This trail takes you all the way to the end of the park (any further and you’ll enter Mount Tamalpias State Park). From here, you can turn around and head back or…..
Hillside Trail (2.0 miles): The first two miles includes the initial 1.5 miles to bridge 4. Instead of heading back the way you came, cross the bridge and head up the hill. This will loop you back and spit you back out at bridge 2. Going this way gives you a different perspective of the forest.

As mentioned above, there are other trails that spur off to other places outside park boundaries. A couple of these include:
Muir Woods to Muir Beach (6 miles): This trail takes you to Muir Beach and back. It isn’t a long or difficult trail but depending on your level of fitness, we would definitely recommend allocating at least a few hours.
Dipsea Trail (up to 10 miles): Dipsea is one of the most popular trails in the area. It begins at Muir Woods and ends at Stinson Beach. You can do the whole thing (about 10-miles, one-way) or you can shorten it to your desired milage.
To see more more trail options, go here.
Whether you intend to stay within the park or hike beyond it, we recommend picking up a park map at the visitor center. You’ll likely be handed one when you get there but if not, definitely ask.

What to Bring
Muir Woods is located almost directly off the coast of the Pacific Ocean. In the morning, that misty fog San Francisco is known for appears quite often. Temperatures rarely exceed 70 degrees and due to the height of the trees, there’s plenty of shade.
Due to this, there are certain things you’ll want to bring with you. Particularly if you’re visiting during the off season months. Here are a few of our suggestions:
Backpack: For us, this is essential. I never go anywhere without my backpack. I use it for camera gear, carrying water, snacks, spare clothing, and other personal items.
Camera: Nearly everyone has a camera on them these days. From DSLR’s to iPhones. Whichever you use, be sure to bring it to capture the memories you’re sure to make. Just don’t try to use a Drone here. They’re not allowed.
Water: Beyond the gift shop, there are no water fountains. Make you to bring plenty of water with you.
Dress in Layers: For the off season months, bring a waterproof jacket. As the day progresses, it’ll start warming up. So keep a long sleeve and short sleeve shirt with you.
Proper Footwear: While the main trail along Redwood Creek is well maintained, you’re still in a wild place. There’s tree stumps, rocks, dirt, etc. Hiking boots or sturdy shoes with good grip would suffice.
Snacks: You can pick some up at the Cafe or save some money/time by bringing them with you. Just be sure to pack out any empty wrappers, bags, etc.

Keep to the Trail
We don’t mean to be preachy, but it needs to be said. It’s important to remain on the trail and boardwalk in Muir Woods. As tempting as it may be to get closer, please don't.
Redwoods have shallow roots and stepping on the little ones can stunt growth. Trampling through the soil could also have devastating consequences for the insects and other wildlife that depend on it as their habitat.
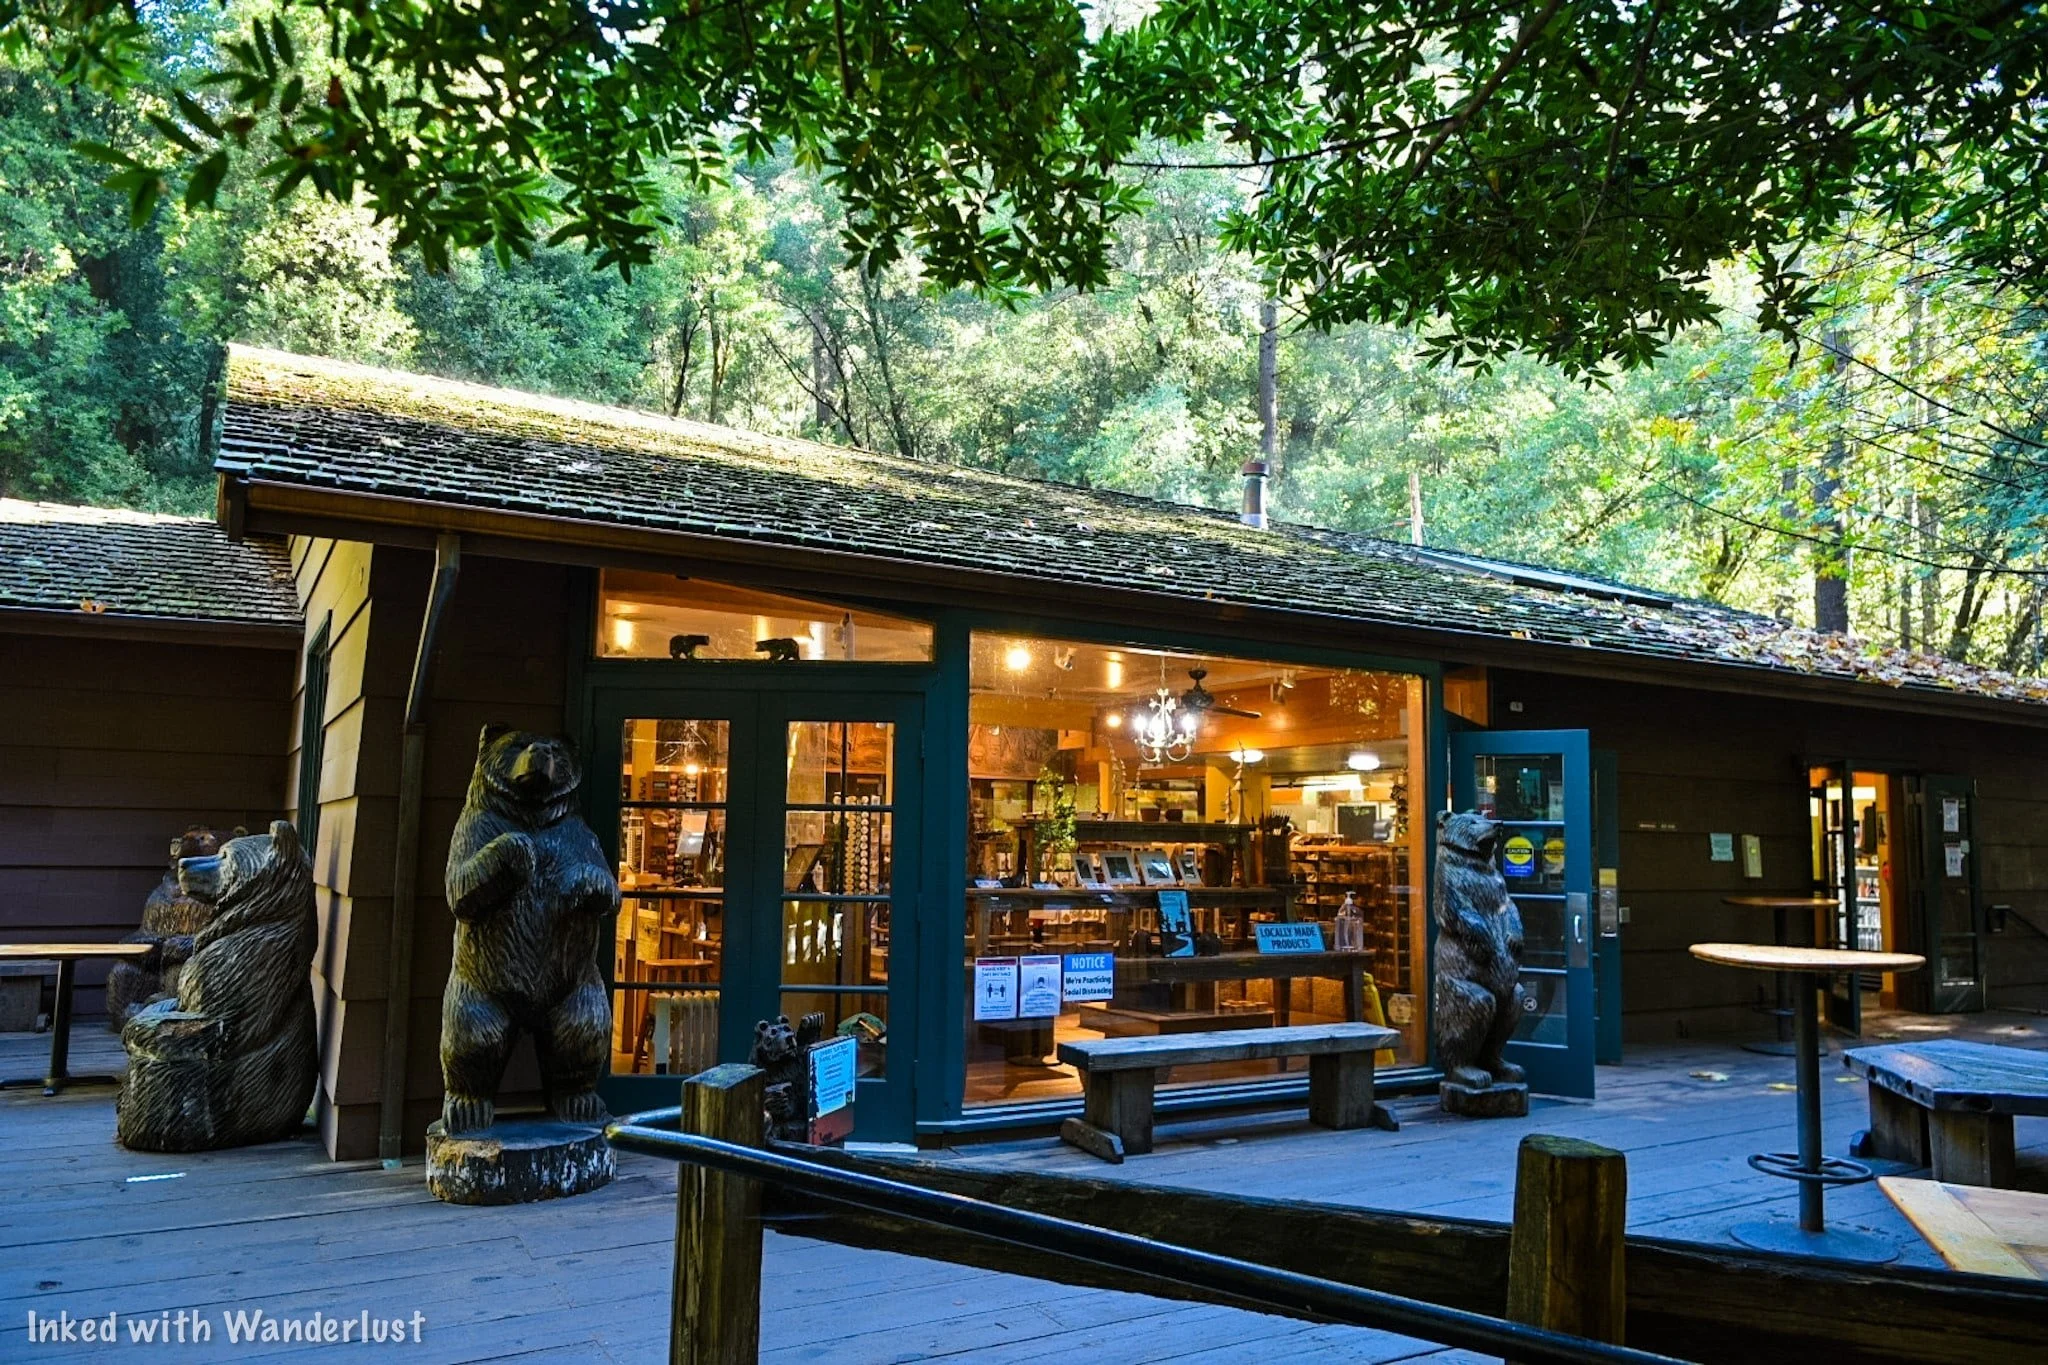
Muir Woods Gift Shop & Cafe
About 20 yards behind the visitor center, you’ll find the gift shop and cafe. Both are housed in one building. The gift shop has all the usuals; shirts, framed pictures, pins, patches, coffee mugs, etc.
The cafe mostly serves a variety of hot and cold sandwiches and some grab & go options. I’ve had the gilled cheese with tomato soup and found it to be fine. Nothing out-of-this-world, but it did the job. You can see their full menu here.
Things to Do Nearby
While you could easily spend an entire day at Muir Woods, if you’re up to it, there are a few places nearby that are worth a visit in their own right.
Muir Beach Overlook: This stunning overlook is located about 10-minutes from Muir Woods. From it, you have endless views of the Pacific Ocean, stunning views of the beach and coastline, and you’ll also learn some awesome military history on top of that. You can read all about it on our post here.
Stinson Beach: About 20-minutes is all it takes to drive to Stinson Beach from Muir Woods.
Kirby Cove Hiking Trail: About 13-miles from Muir Woods and on the Marin Headlands side of the Golden Gate Bridge, this short hiking trail takes you to a stunning cove with jaw an amazing view of the bridge and city. Read our guide on it here.
Mount Tamalpais State Park: What the locals refer to as, “Mount Tam”, this stunning State Park has a huge network of hiking trails through amazing forests, waterfalls, the mountain’s summit, and more!


Conclusion
We thoroughly enjoyed our visit to Muir Woods and we have no doubt you will too. We’re so excited to finally add it to our website and help you put together a trip for yourself. Let us know in the comments if you have any further questions!
We hope you enjoyed this article and it was helpful to you. If so, please support our website by sharing it with your friends and family on Facebook, Pinterest, or your favorite social media site. You can further show support by staying on and reading one or more of the related articles above.
Thanks for reading and safe travels!

Manzanar National Historic Site: Directions, Things to See, and More (2022)
My first visit to Manzanar came in 2017 while on my way home from Southern California. I did some research about attractions along 395 and was surprised to find Manzanar…
Our first visit to Manzanar came in 2017 while on our way home from Southern California. We researched attractions along 395 and we were surprised to find Manzanar as neither of us have ever heard of it.
We only had a few hours to spend but that was all it took for Manzanar to take hold of us. When I was younger, I visited the Museum of Tolerance in L.A and it had a huge impact on me. Manzanar had the same affect.
If you’ve been wanting to visit Manzanar or have never heard of it, keep reading to find out how you can visit this highly historical and important place. Let’s get into it!
Visitor Information

Getting to Manzanar
Manzanar is located in the small California town of Independence nestled between the equally small towns of Lone Pine and Big Pine. The mighty Sierra Nevada mountains provide a beautiful backdrop to what was once an active relocation camp.
Northbound
For simplicity sake, we’ll use Los Angeles as the example.
From Los Angeles, you are roughly 220-miles, or 3.5-hours, away from Manzanar.
Work your way from L.A to Highway 395 North.
You’ll know you’re close once you reach the town of Lone Pine.
From Lone Pine, you’re about 10-minutes away from the turn-out.
Southbound
For southbound, we’ll use Reno.
From there, you’re about 252-miles, or 4.5-hours, from Manzanar.
Find your way from Reno to Highway 395 South and keep to it.
When you reach the town of Big Pine, you’re around 30-minutes away from the turn-out.
Things to See at Manzanar

Manzanar Visitor Center
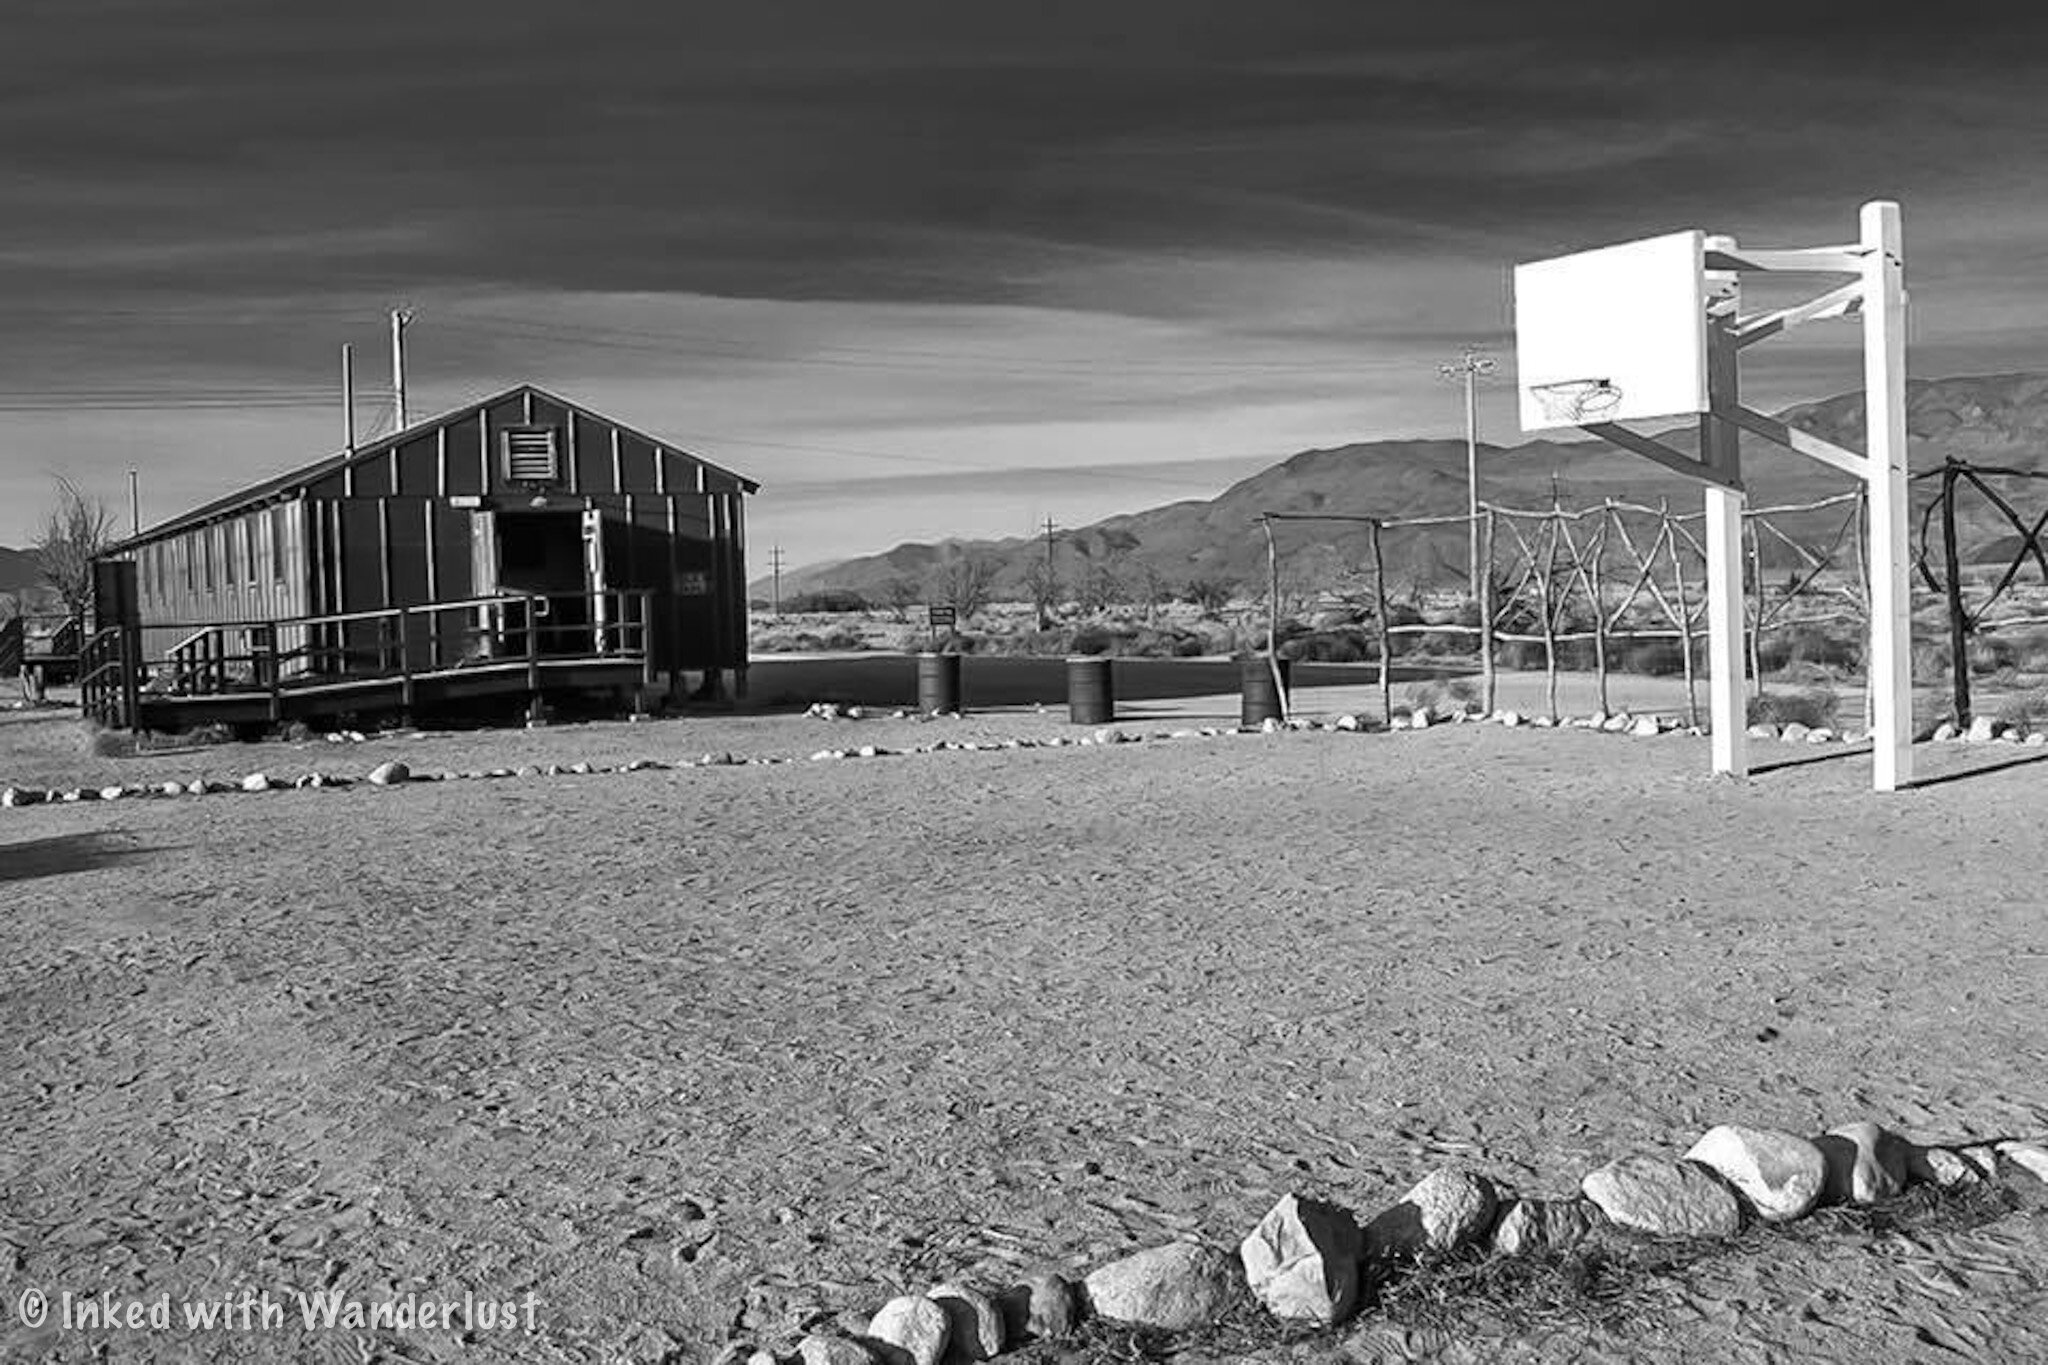
The first thing you’ll see upon driving in is the same as the thousands of Japanese Americans that were once held here; the Sentry Post. Here, Military Police once stood guard checking vehicles coming in and out.
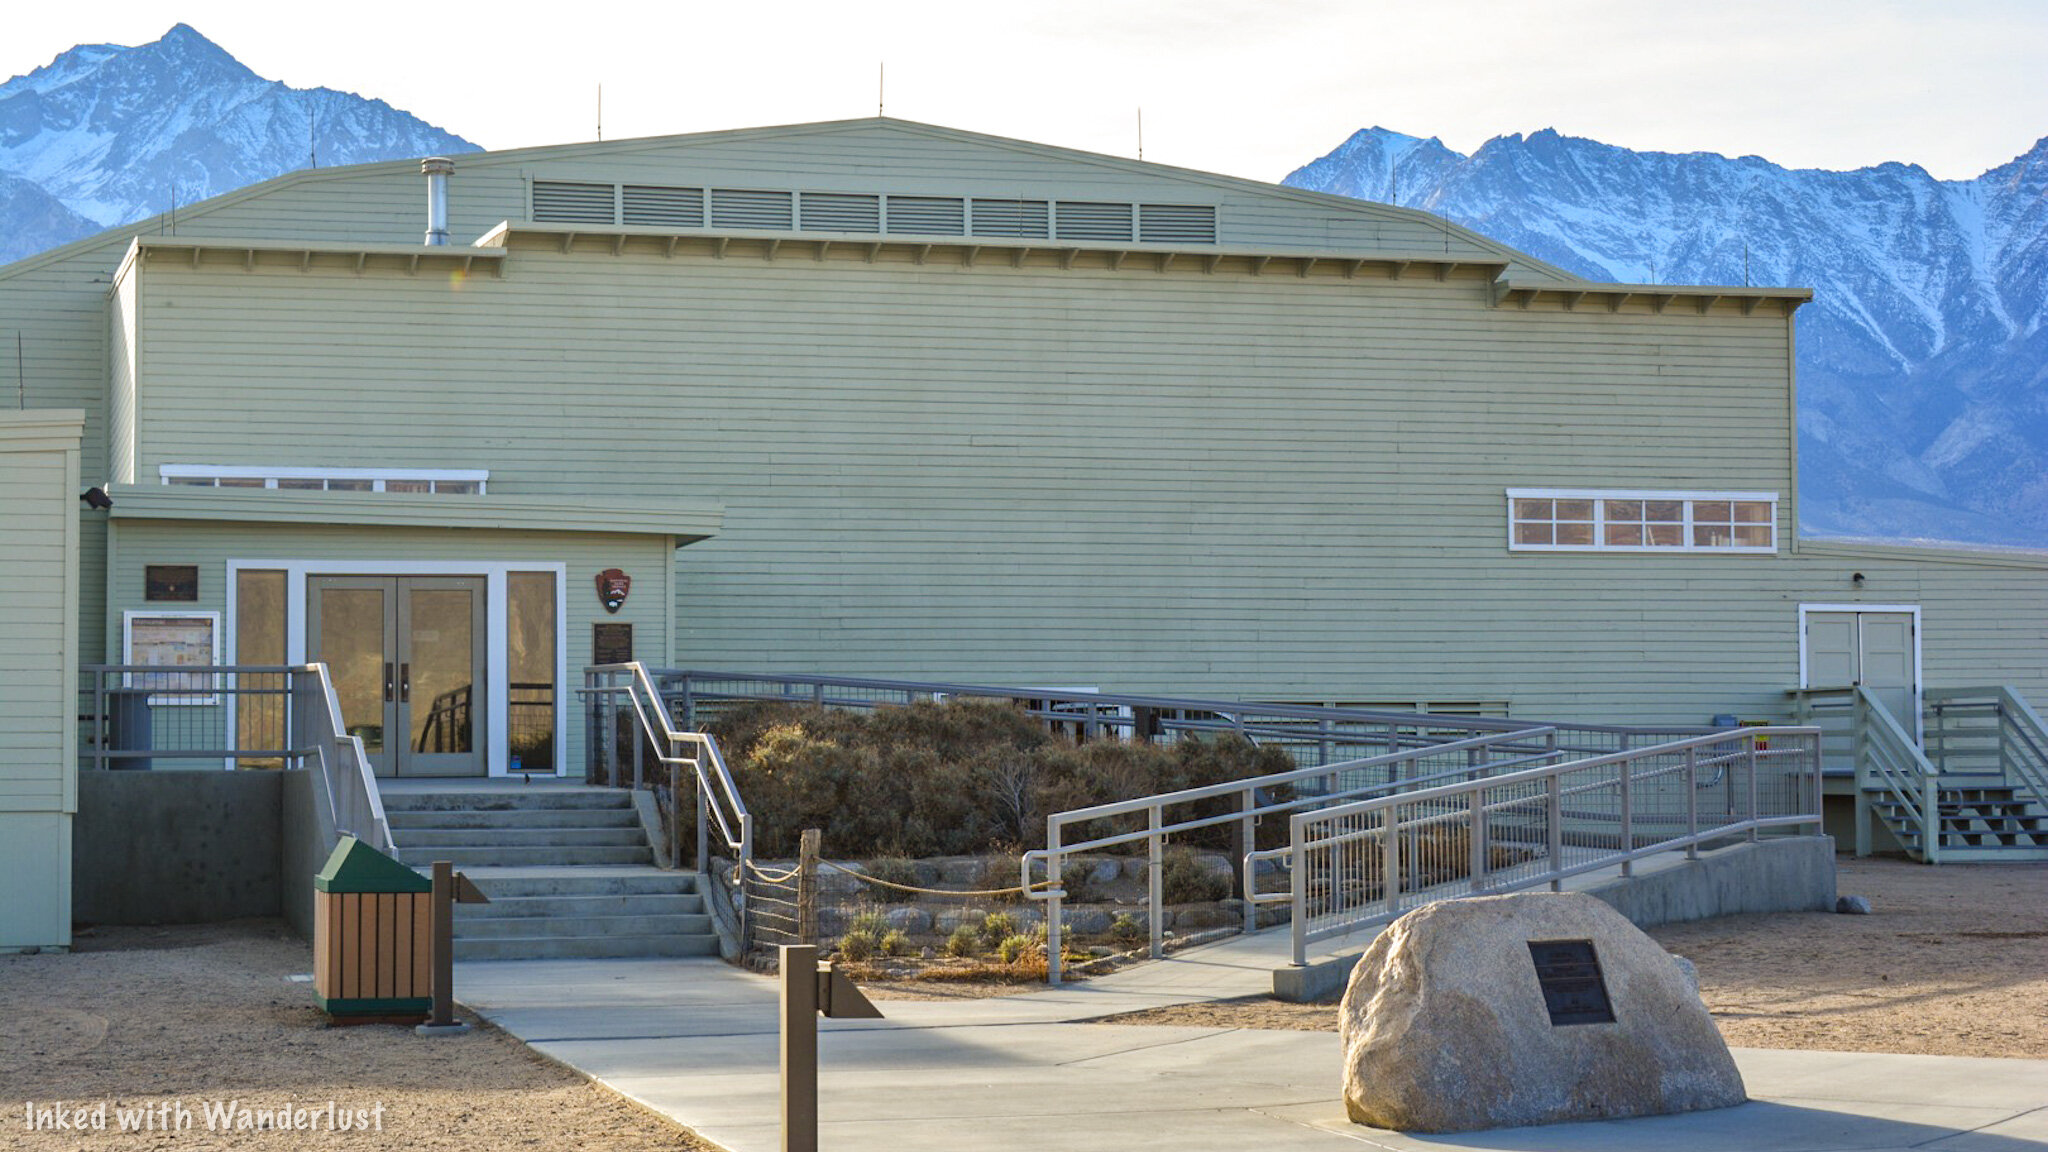
After securing your parking spot, your first stop should be the Visitor Center. We reccomend this because it’s packed with informative exhibits, a 22-minute park film, information desk, and a bookstore.
Hours for the visitor center are as follows:
Monday: 11am - 4pm
Tuesday: Closed
Wednesday: Closed
Thursday: Closed
Friday: 11am - 4pm
Saturday: 11am - 4pm
Sunday: 11am - 4pm
If you arrive on a day or time that the Visitor Center is closed, you can still access the remainder of the park.

Fair warning, you may find some of the exhibits offensive. The one below in particular. However, it does give you a sense of how badly Japanese Americans were treated after the bombing of Pearl Harbor and during the war.

Honestly, we were ignorant to it. We didn’t understand the extent of it all and until we discovered Manzanar, we had no idea our country utilized camps like this. It was difficult for us to grasp.


Manzanar was the first of 10 of these camps and at its peak held more than 10,000 Japanese Americans, mostly from the Los Angeles area. The photo above gives you an idea of its original size.
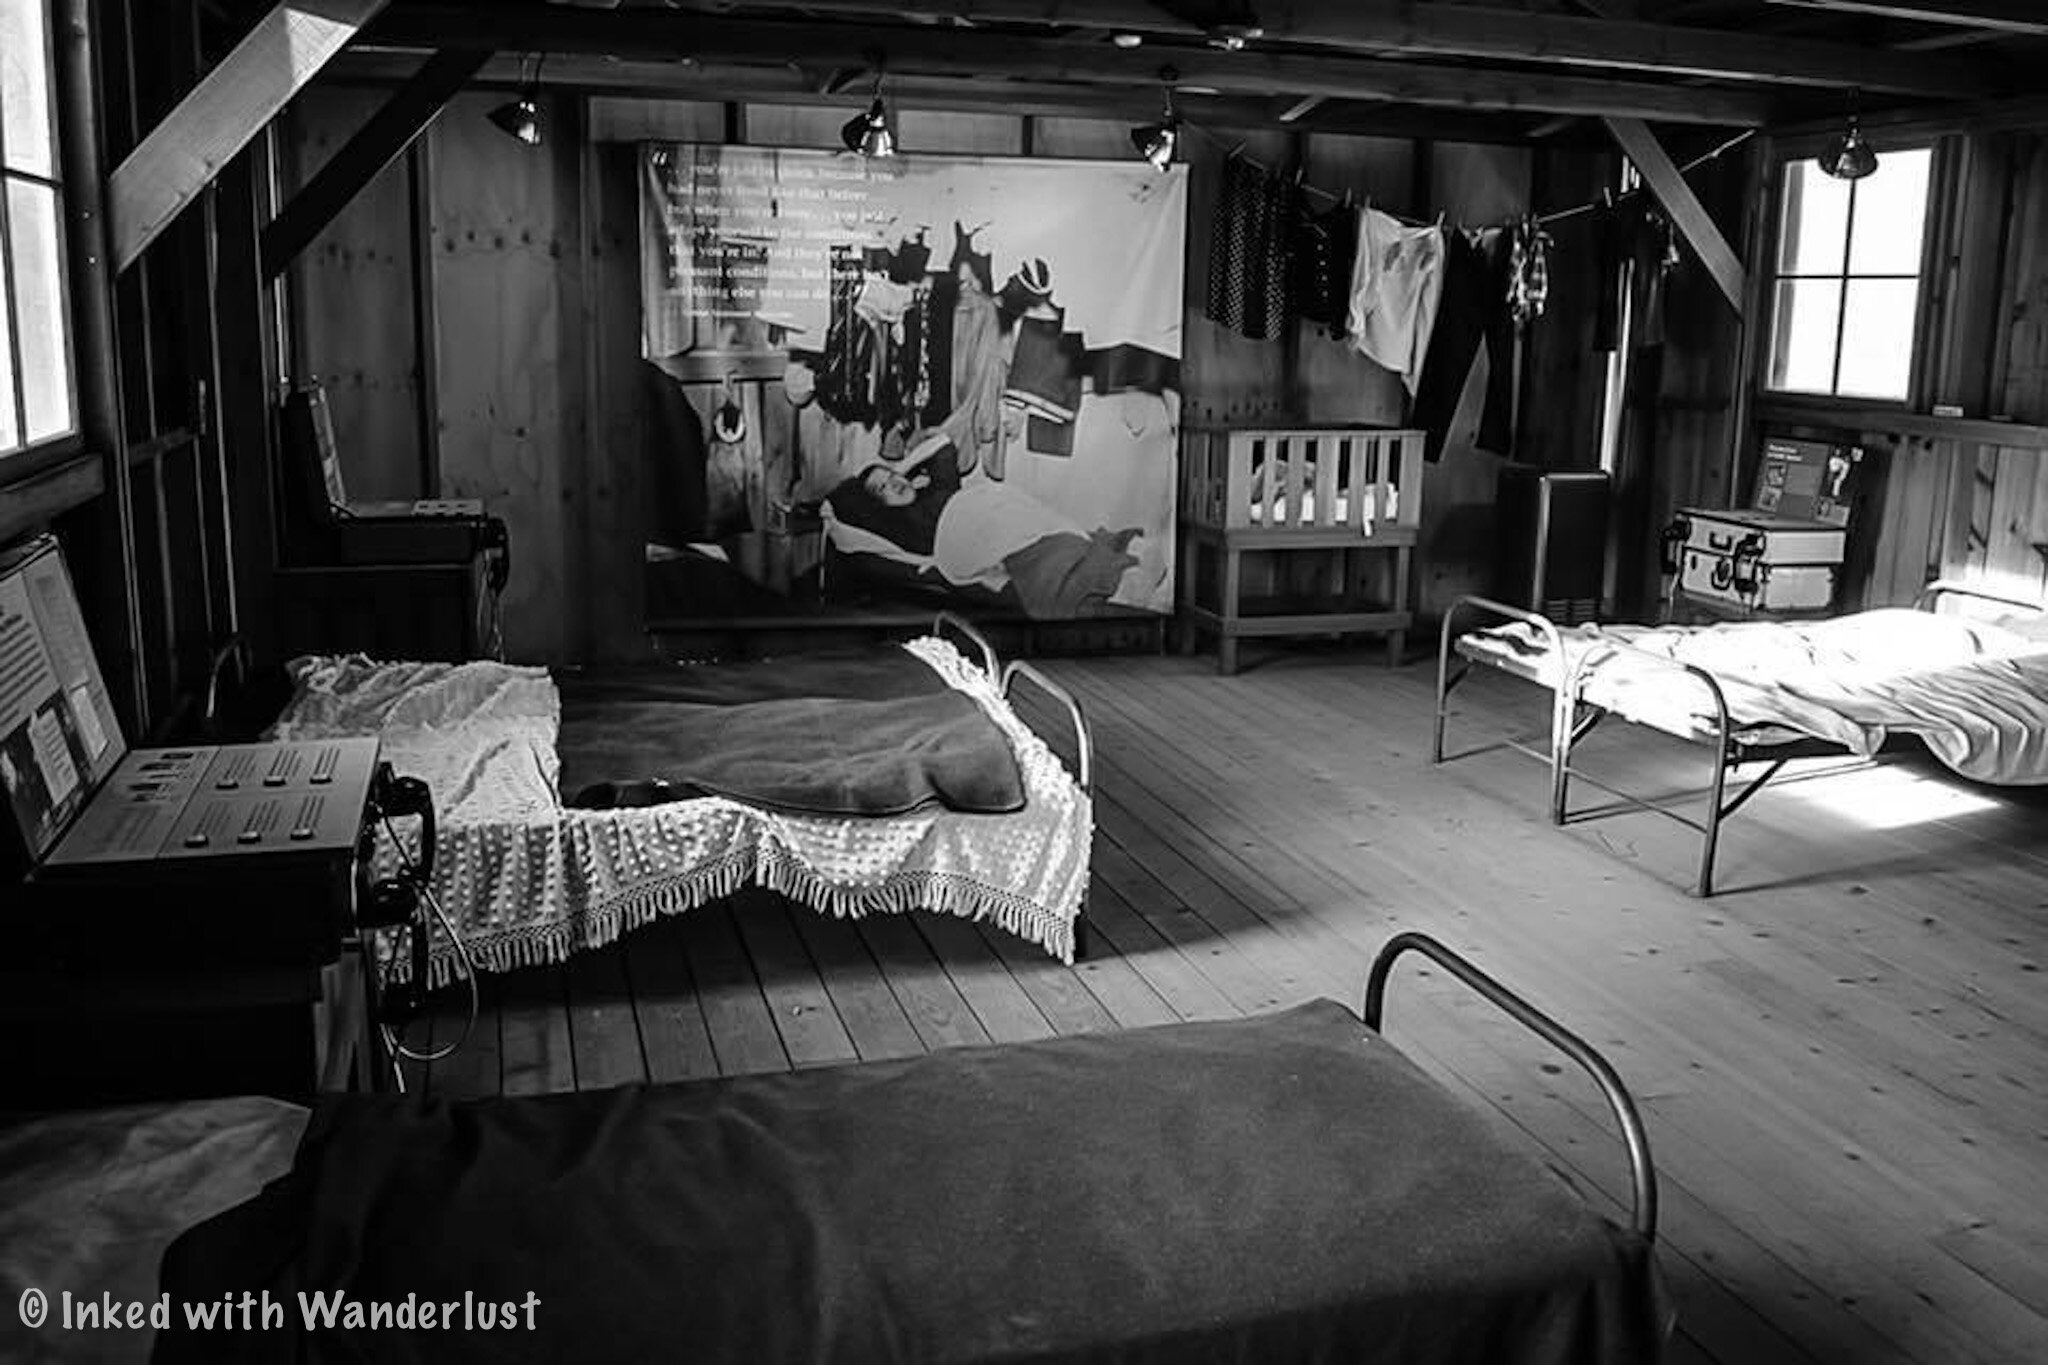
The entire property was 6200 acres with the developed portion covering 540 acres. The residential area alone was around one square mile and was made up of 36 blocks of 20-foot by 100-foot apartment style barracks, housing up to 8 people each.


The barracks had partitions with no ceiling, providing little privacy. To make matters worse, both the latrines and showers were communal, providing no partitions or stalls. Many who were interned here have said the lack of privacy was one of the worst parts about it.
Block 14 & Barracks
In the back of the exhibit hall you’ll find a giant mural with the names of each person interned. Behind that, there’s an exit leading you to the next feature of the site; Block 14.
Block 14 consists of a mess hall, latrine, four barrack buildings (reconstructed in 2015), and a recreation area. The barrack exhibits describe the arrival process, loyalty questionnaire, the Block Manager’s Office, and the School.

The latrine is where you can see the rows of toilets and communal showers, giving you a sense of the camp’s harsh realities.
The mess hall was originally built in 1942 and was moved to Manzanar from Bishop Air Base in 2002. It’s nearly identical to the 36 mess halls that, between 1942 and 1945, served over 28 million meals.
The exhibits in Block 14 are open daily from 7:30am - 3pm (closed Thanksgiving and Christmas). The remainder of the site is open from dusk until dawn.
Cemetery Monument

After exploring the visitor center and block 14, we were running low on time. Neither of us expected to have this much to do. However, there was one more thing we wanted to check out before we left; the Cemetery Monument.
The monument was erected in 1943 by the people of Manzanar to honor the dead. The cemetery and monument were built just outside of the camp’s boundary and the three letters on the front of the monument translate to, “soul consoling tower”.
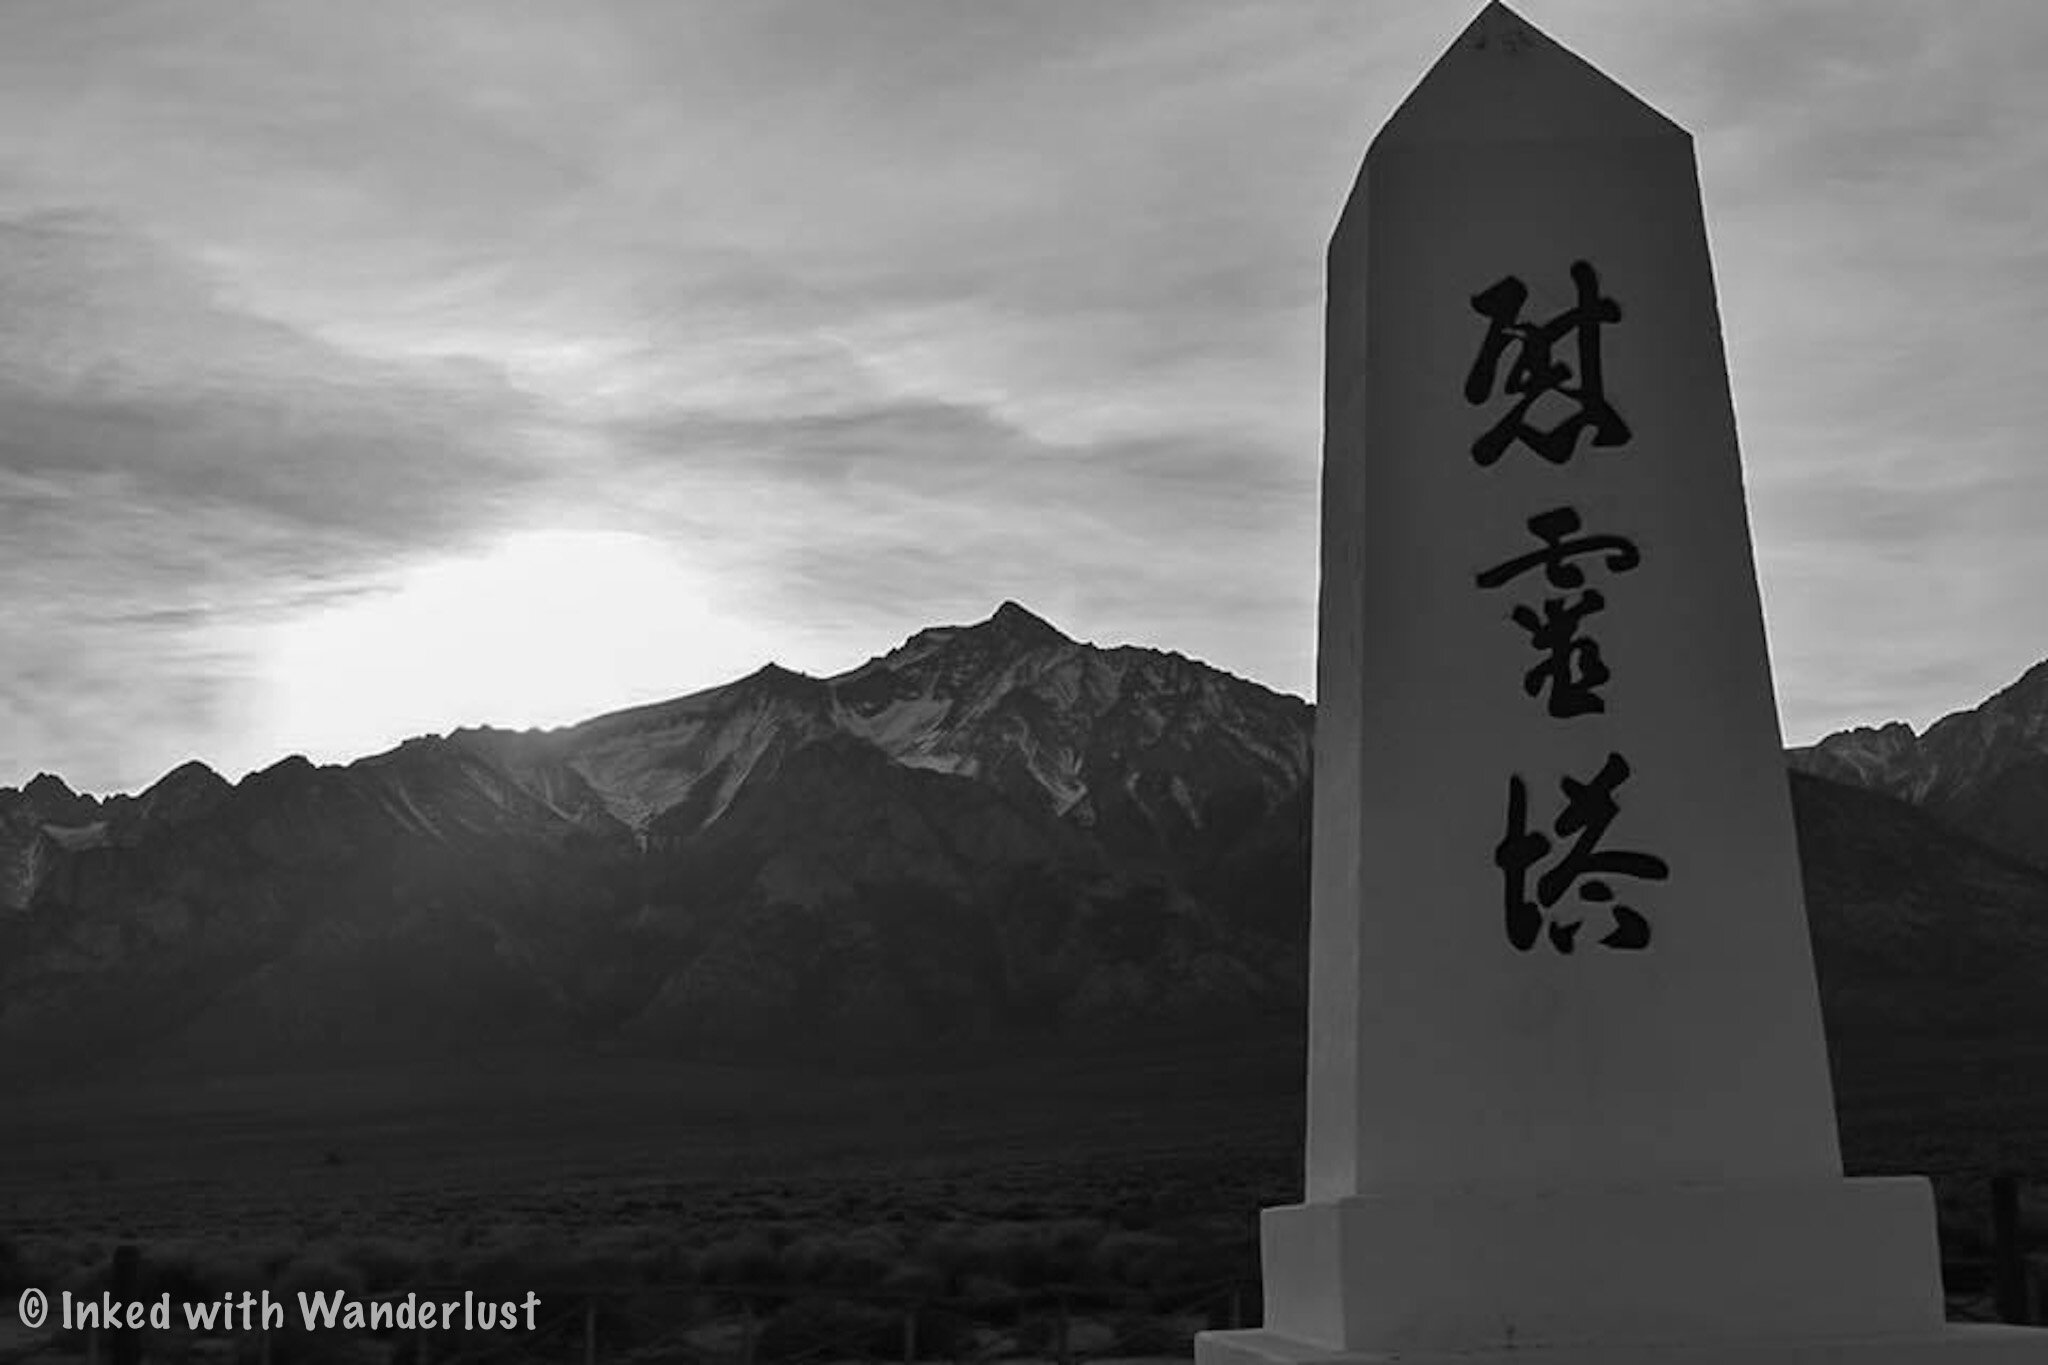
You’re more than welcome to enter the cemetery and photograph the monument, but keep in mind that this is an active cemetery with burials on site.
More than 145 Japanese Americans died while incarcerated here. Many were cremated and sent home for burial elsewhere, but 15 were ultimately buried here.
After the camp’s closure in 1945, some families would have the bodies removed and brought home. In 1999 National Park Service Archeologists confirmed the remains of five people still entombed here.
Manzanar Annual Pilgrimage

Every year on the last Saturday of April, an event called, “The Manzanar Pilgrimage”, is held. It began in 1969 when a small group of people wanted to bring awareness to the injustices that took place here and has now morphed into an event that welcomes people by the thousands.

It is held at the cemetery and features speeches by local tribe members, the NPS, politicians, and community activists. Dance and music performances are also featured throughout the event. Buddhist Priests and Christian Ministers attend to honor the bodies that remain.
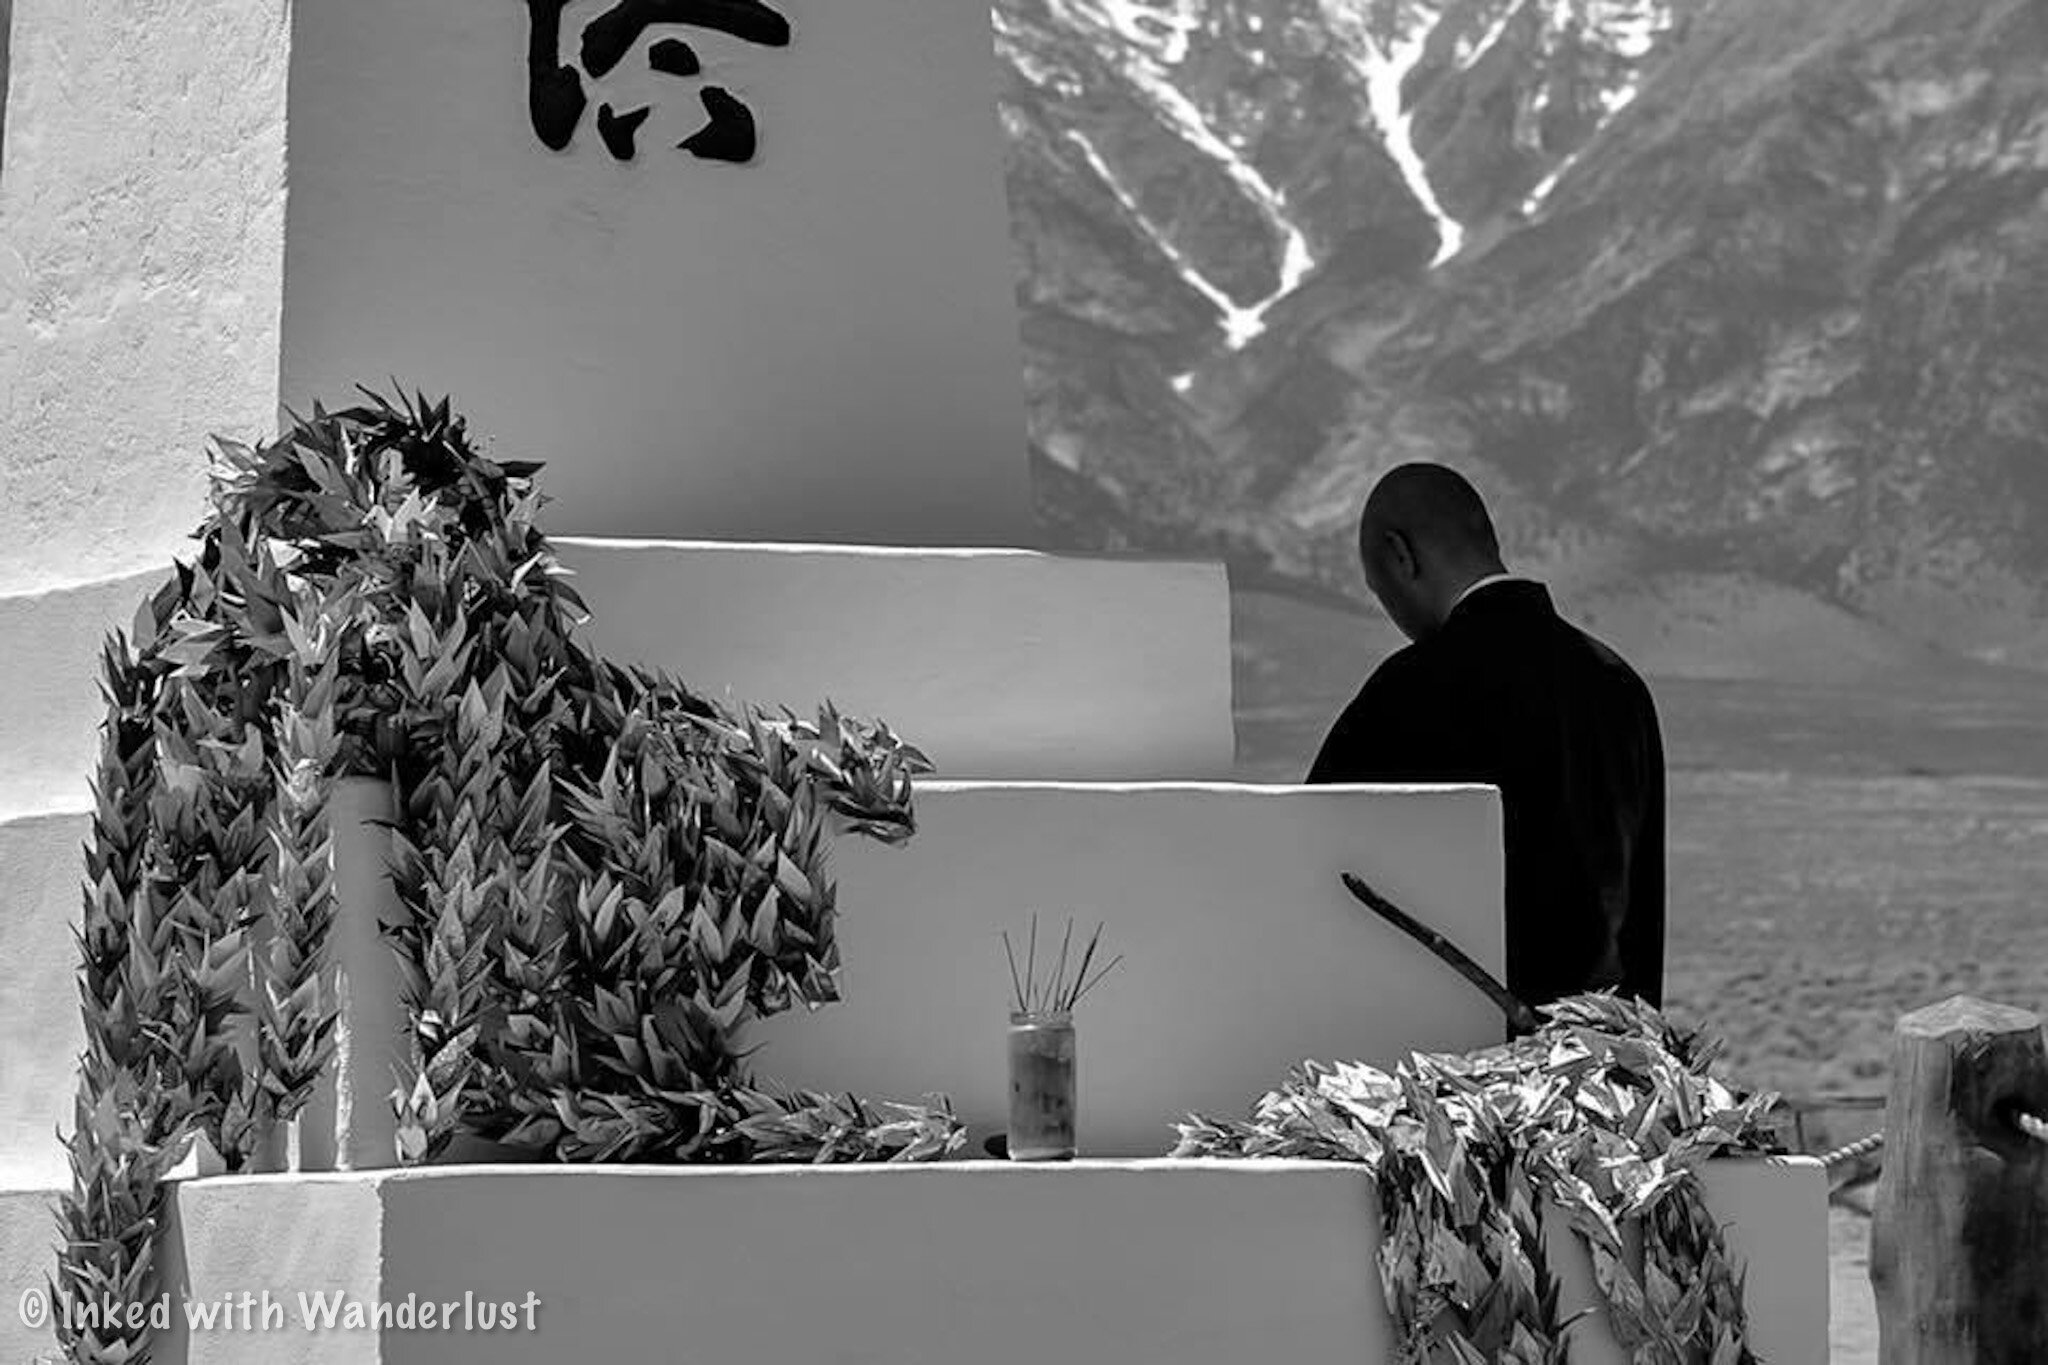
We had the honor of attending the 49th annual event in 2018 and were moved by it. Being able to hear from the Daughter of someone incarcerated here gave me chills as she described her Mother’s struggle and plight. If you ever get a chance, we highly recommend attending.

Additional Information
Manzanar is FREE to visit! Again, free. No entry fee, parking fee, etc. As always, you could stop by the bookstore to make a purchase, donation, or both!
Be mindful of visitor center hours. The site itself is open from sunrise to sunset but the visitor center is only open from 11am-4pm and closed completely on Tuesdays, Wednesdays, Thursdays, and most holidays.
Limited resources available. There are bathrooms in the visitor center but other things such as food and gas are limited to the surrounding towns of Lone Pine and Independence. Be sure to fill your tank before visiting.
Be respectful of the site. This site is highly historical and as such, is fully protected. Please don’t destroy or remove anything from the site. Also, you may come across families visiting their deceased loved ones at the cemetery. Be sure to give them space.
No EV charging stations. There are no charging stations at the site itself. However, there is a Tesla Supercharger 10-minutes away in Lone Pine.
No Drone use. As is the case with most NPS properties, Drone use is strictly prohibited.


Conclusion
Our visits to Manzanar were fantastic and we have no doubt you would love it as well, especially if you’re into history. Be sure to drop us a comment and let us know if you plan to visit Manzanar for yourself!
We hope you found this article to be helpful in planning your next trip. If so, please support our site by sharing it with your friends and family on Facebook or Pinterest. You can further show support by staying on and reading one or more of the related articles above.
Thank you for reading and safe travels!
Editor’s Note: This post was originally published in October 2020 has recently been updated for comprehensiveness and accuracy.

Hike to North Dome and Indian Rock Arch in Yosemite National Park
While hiking Half Dome requires a permit and a great deal of planning, hiking neighboring North Dome requires nothing more than a drive up to the trailhead…
Disclosure: This post contains affiliate links. If you make a purchase through these links, I may earn a small commission at no additional cost to you. I only recommend products or services that I believe will add value to my readers.

While hiking Half Dome requires obtaining a permit and a great deal of planning and preparation, hiking neighboring North Dome requires nothing more than a drive up to the trailhead and strong legs.
Due to this, many see North Dome as an excellent alternative to Half Dome if you were unsuccessful in the permit lottery or if Half Dome is too daunting. There are no cables or climbing involved and best of all, you’ll be in a position to get one of the best views of Half Dome in the entire park.
So where is the trailhead for North Dome? What’s the parking situation like? Like to know what to expect on this trail? What’s Indian Rock Arch? I answer all of these questions and more in the post below. Let’s get into it.
North Dome Trailhead and Parking
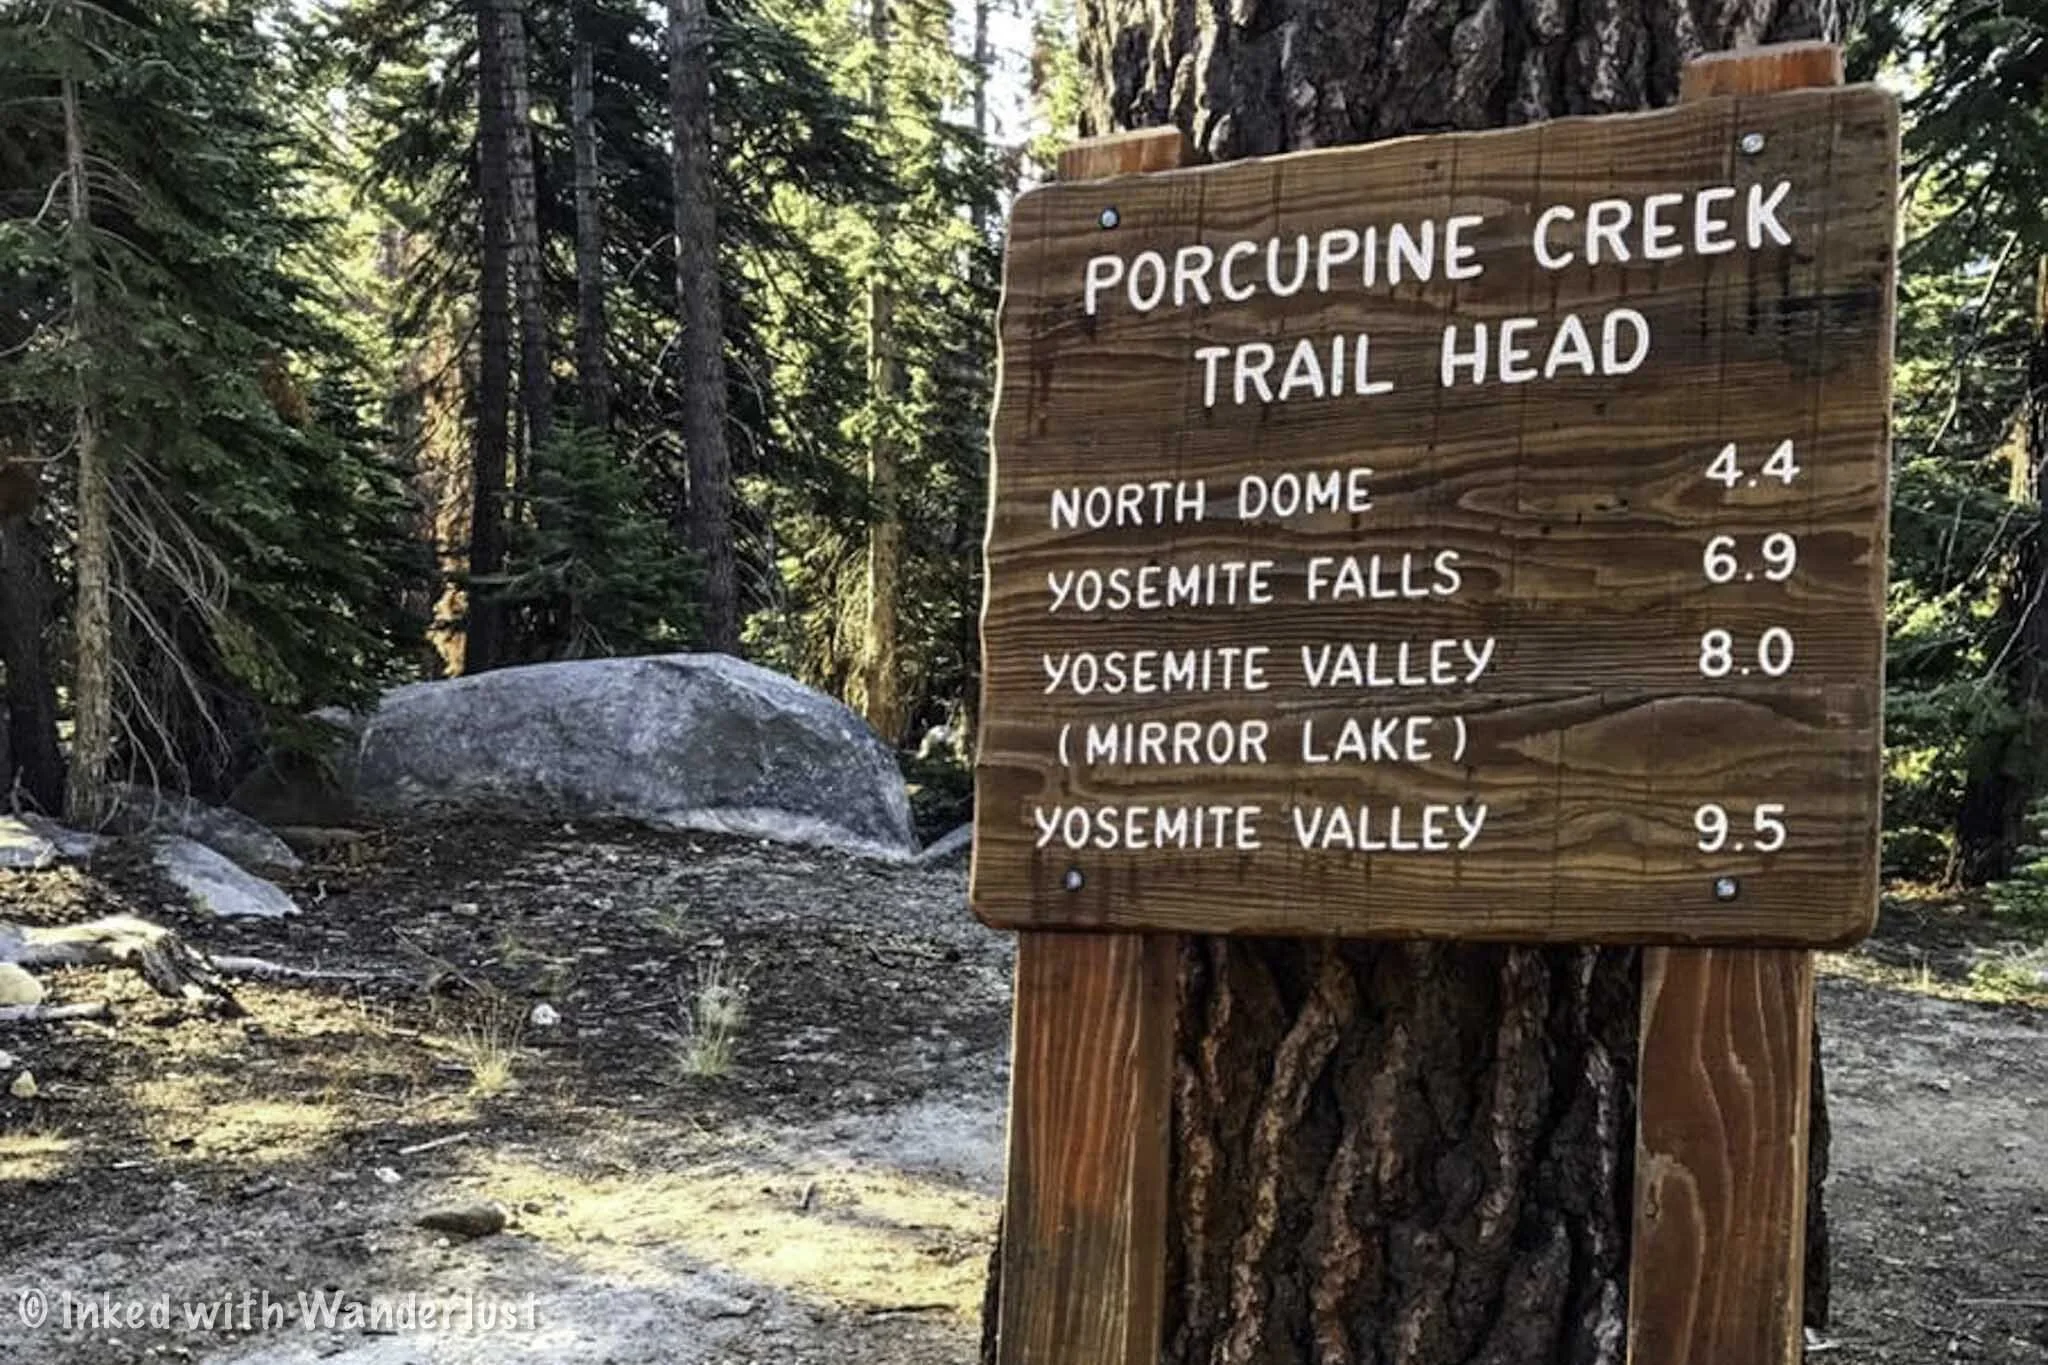
Although you’re technically able to reach North Dome from the valley, the official trailhead is just off Tioga Road on Yosemite’s east side and can be found in the Porcupine Creek parking lot (do not confuse this with Porcupine Flat).
From Yosemite Valley, follow the signs to Highway 120. Ten miles after leaving the valley you’ll come upon Crane Flat. Turn right there and after twenty-five miles or so, you’ll arrive to the parking lot on your right.
From Yosemite’s east entrance, simply drive for about twenty miles after driving through the gate and you’ll reach Porcupine Creek on your left. If needed, there are pit toilets located in the parking lot.
As is the case with most Yosemite trailheads, the earlier you arrive, the better off you’ll be. I arrived to the trailhead at around 7am and there was only one other car. When I got back to my car after the hike, around 2pm, every spot was occupied.
The North Dome Trail

Much of the route to North Dome is your standard, albeit beautiful, walk in the woods. The scenery is stunning as you’re surrounded by hundreds of moss-covered trees and granite boulders.
You’re starting at 8,100 feet at the parking lot and you’ll work your way down to 7,540 feet at North Dome. While there will be some slight incline on the trail, you are ultimately going downward the whole time.
This is great on the way in and will feel like a breeze, but you’ll definitely feel it on your way back to the car (especially in the final mile or so). Total mileage, without taking the detour to Indian Rock Arch is 8.8 miles, round-trip. With the detour (highly recommended), you’ll add another mile or so.
Indian Rock Arch Detour

About 2/3rds of the way to North Dome, you’ll come across the half mile (one way) detour to Indian Rock Arch on your left. It is the ONLY natural granite arch located within Yosemite. The arch is about 15 feet tall and sits atop a hill with commanding views at the top.
My recommendation would be to take the detour on the way in, rather than on the way back. This way, you can save your energy and endurance for the elevation gain you’ll still need to navigate.
North Dome

After checking out Indian Rock Arch, continue your way to North Dome. After another mile or so, you’ll come into a clearing and get your first glimpse of both North Dome and Half Dome in the distance. Don’t stop here, the views are just getting started.
Eventually, you’ll reach a point where it feels like you’ve lost the trail. You haven’t. Just keep Half Dome in your sights and stay to the left (down) and you’ll pick it back up again. If needed, there are typically cairns all over the place to help guide you.

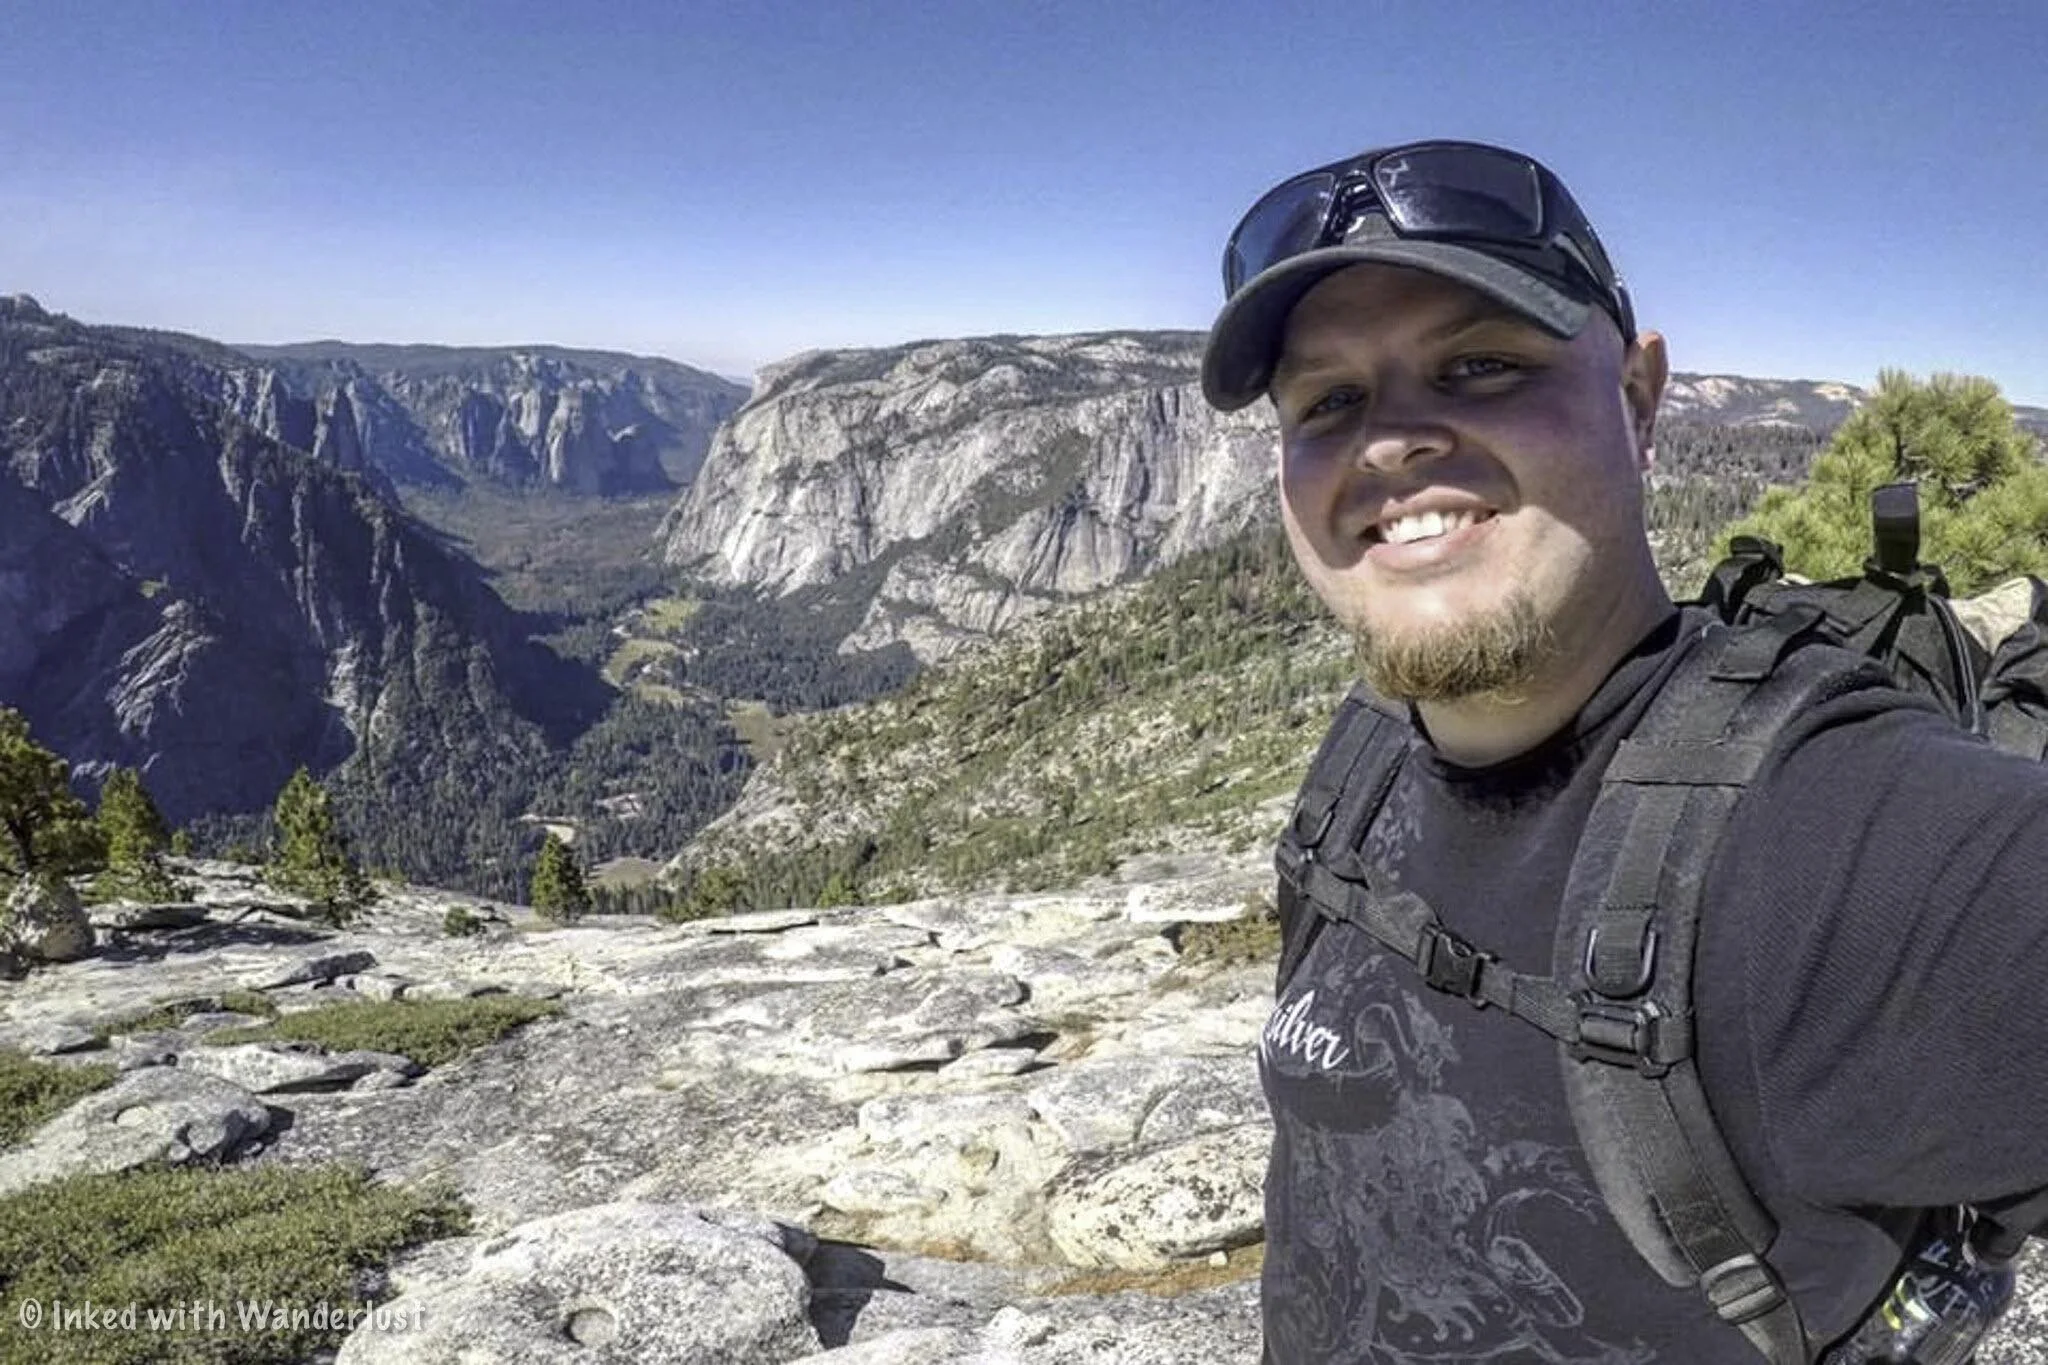
After dropping down from the granite you were just on, you’ll once again find yourself surrounded by trees and will have lost sight of Half Dome. Keep with the trail and after a short while you’ll come to another clearing. Here, you’ve officially made it to North Dome.
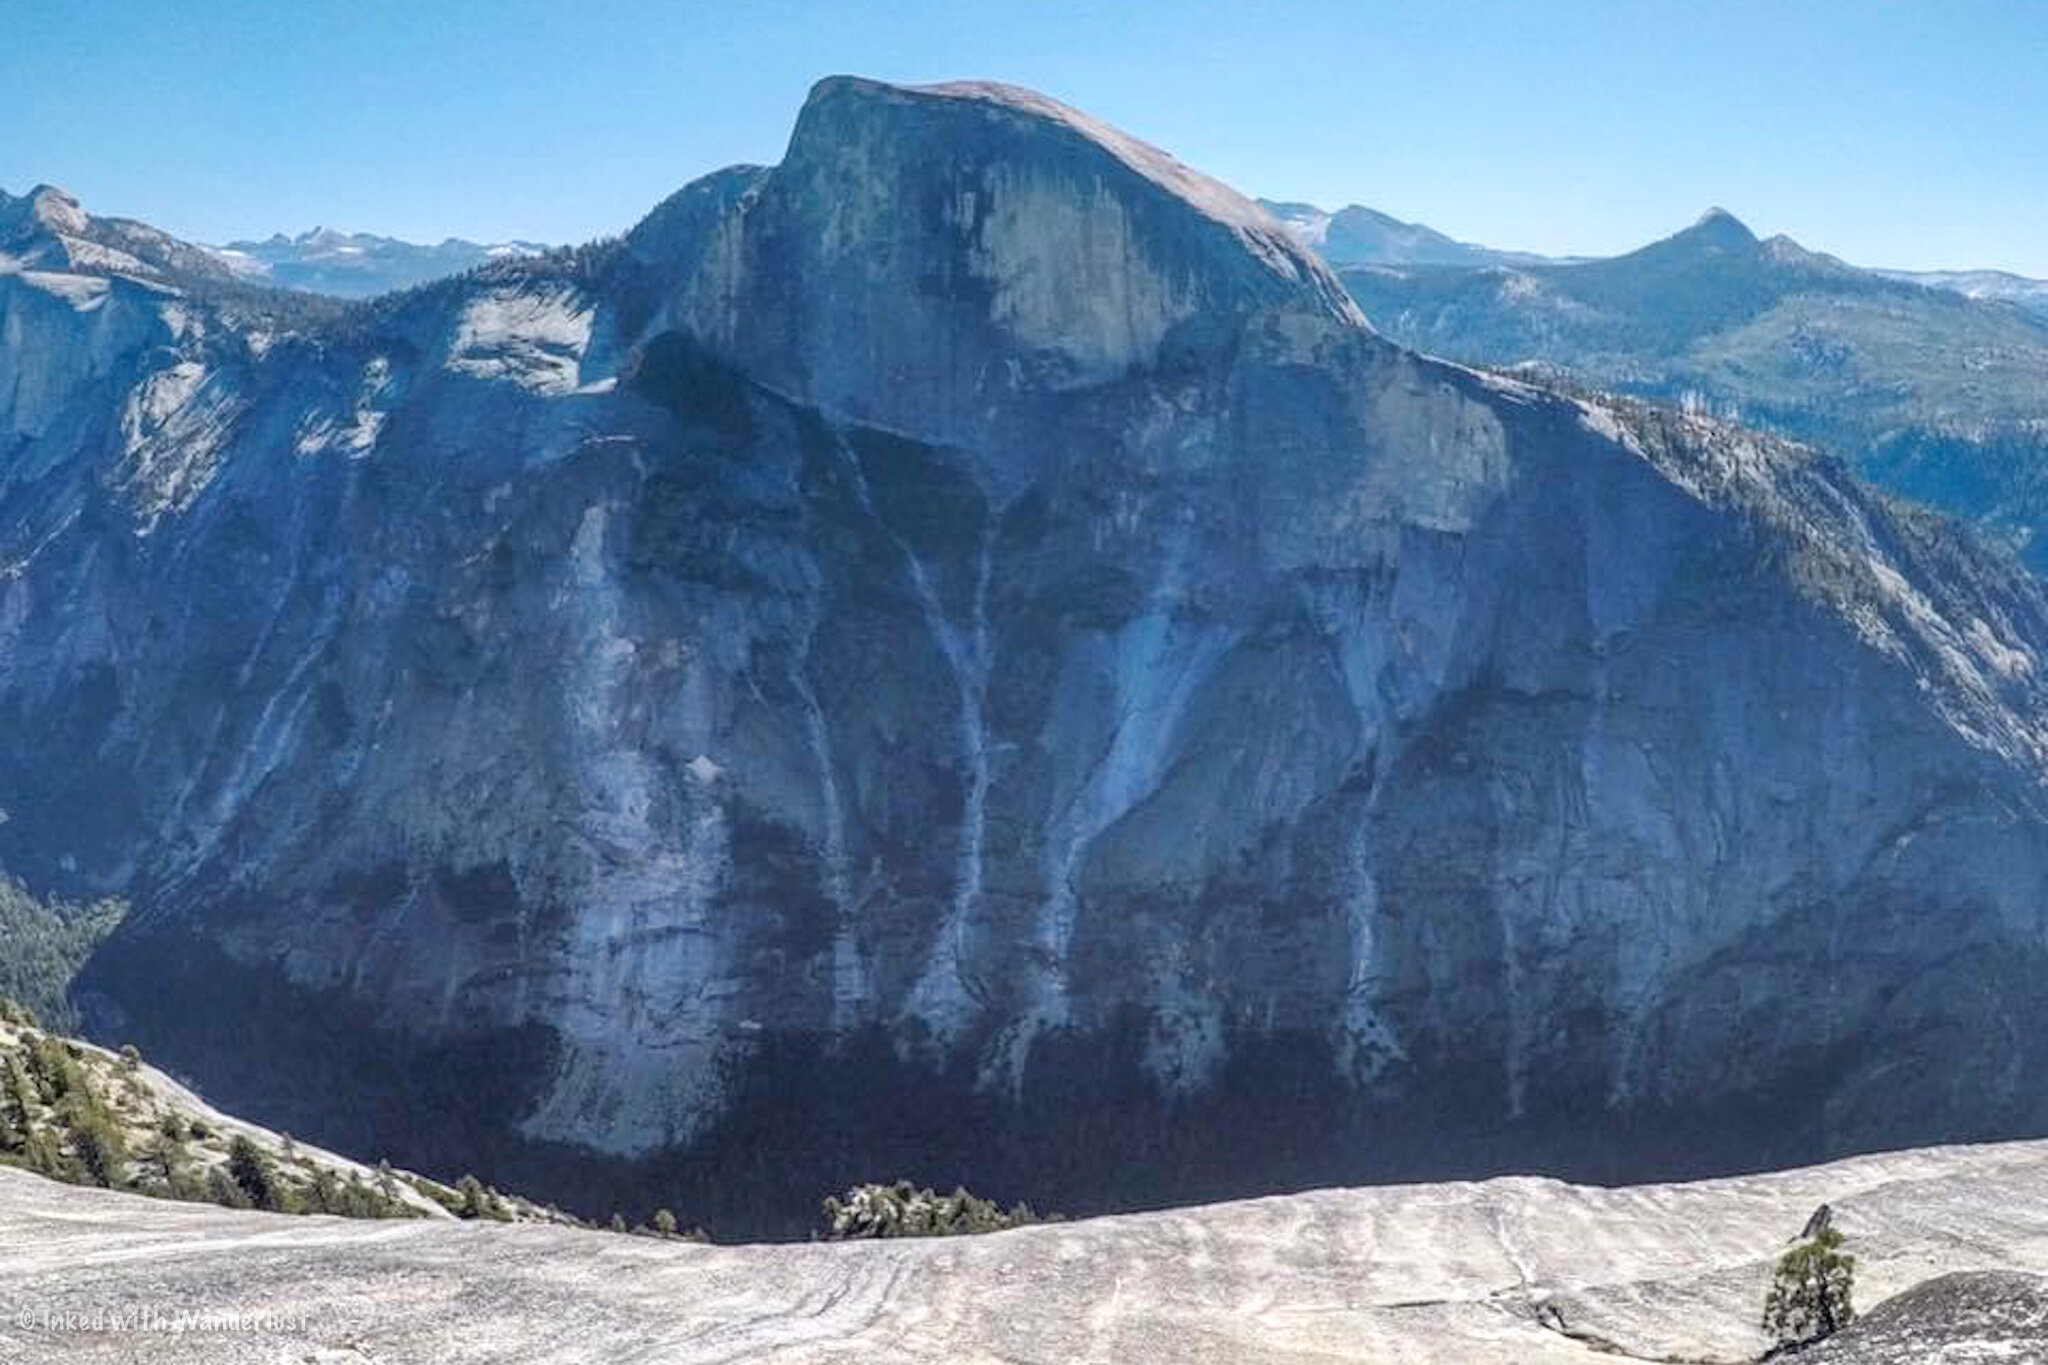
Half Dome will have a commanding presence as you continue to work yourself down to North Dome’s precipice and on arrival, you’ll have an amazing view of not only Half Dome, but Tenaya Canyon and the many highlights of Yosemite Valley as well.
Things to Know About the North Dome Hike in Yosemite
The trail is inaccessible in winter. The North Dome trail is on Yosemite’s east side on Tioga Road and due to heavy snowpack, this area of the park is closed in winter. Typically, it’ll open for the season at the end of May or beginning of June and closes with the first major snowfall of the year (typically late October/November).
North Dome isn’t easy, but it isn’t difficult either. You’ll be starting out at a higher elevation and work your way down, which is the easy part. Where it could get moderately challenging for some is on the way back out. As long as you’re prepared for this, you’ll do just fine.
North Dome itself is generally safe, but use common sense. North Dome doesn’t see the amount of hikers Half Dome does, so it isn’t overly slick. However, getting too close to the edge could result in a deadly slide into Tenaya Canyon or Yosemite Valley. Using footwear with good grip is advisable and of course, watch your footing.
It doesn’t get too crowded. It’s nowhere near as bad as the trails in the valley, such as the Mist Trail, or some of the neighboring trails on Tioga road (Cathedral Lakes, Tuolumne Meadows, etc). If you get an early start, you’ll likely have it mostly (or all) to yourself. Starting later will likely mean more people on the trail, though.
North Dome is NOT the same as Half Dome. There are no cables or climbing involved and it’s roughly half of the total milage as Half Dome. North Dome is a great alternative to those seeking similar views as Half Dome provides (albeit from a lower vantage point), but don’t want to bother with the red tape or the challenge of Half Dome.


